GPS+北斗 N303双模导航定位模块用户手册
xw303gps说明书
xw303gps说明书一、产品简介xw303gps是一款多功能定位器,可用于追踪和定位物品或人员的位置。
它采用先进的GPS技术和GPRS网络,提供精确的定位信息和实时监控功能。
二、产品特点1. 高精度定位:xw303gps采用全球定位系统(GPS)技术,能够提供高精度的位置信息,误差范围小于5米。
2. 多种定位模式:支持GPS、LBS和WiFi多种定位模式,可根据不同场景选择合适的定位方式。
3. 实时监控:通过GPRS网络,用户可以实时监控被定位物品或人员的位置,提供全天候的实时追踪。
4. 多平台兼容:xw303gps可以通过手机APP、电脑客户端等多种方式进行远程控制和监控,方便用户随时查看定位信息。
5. 防水防尘:产品具备防水、防尘功能,可以适应各种复杂环境下的使用需求。
6. 超长待机:内置高容量锂电池,能够提供长达数天的待机时间,减少频繁充电的麻烦。
三、使用方法1. 安装SIM卡:首先,用户需要在xw303gps上安装一张合适的SIM卡,并确保该SIM卡具备GPRS数据业务功能。
2. 开机激活:将SIM卡插入xw303gps后,按下电源键,等待指示灯亮起,表示设备已经开机并连接到GPRS网络。
3. APP绑定:用户需要下载并安装手机APP,并使用APP上的注册账号登录,然后按照提示将xw303gps与账号进行绑定。
4. 定位追踪:一旦完成绑定,用户可以通过手机APP或电脑客户端实时监控被定位物品或人员的位置信息,并进行追踪。
四、注意事项1. 使用前请确认SIM卡已经开通GPRS数据业务,并确保SIM卡内有足够的余额。
2. 请勿在高温、潮湿或有腐蚀性气体的环境中使用xw303gps,以免损坏设备。
3. 请勿将xw303gps放置在金属容器或遮挡物下,以免影响信号接收和定位精度。
4. 如需更换SIM卡,请先关闭设备电源,并确保更换的SIM卡已经开通GPRS数据业务。
5. 请勿私自拆卸或修改xw303gps的外壳,以免引起故障或失去保修资格。
卫星导航仪 GPSM3000快速使用手册说明书
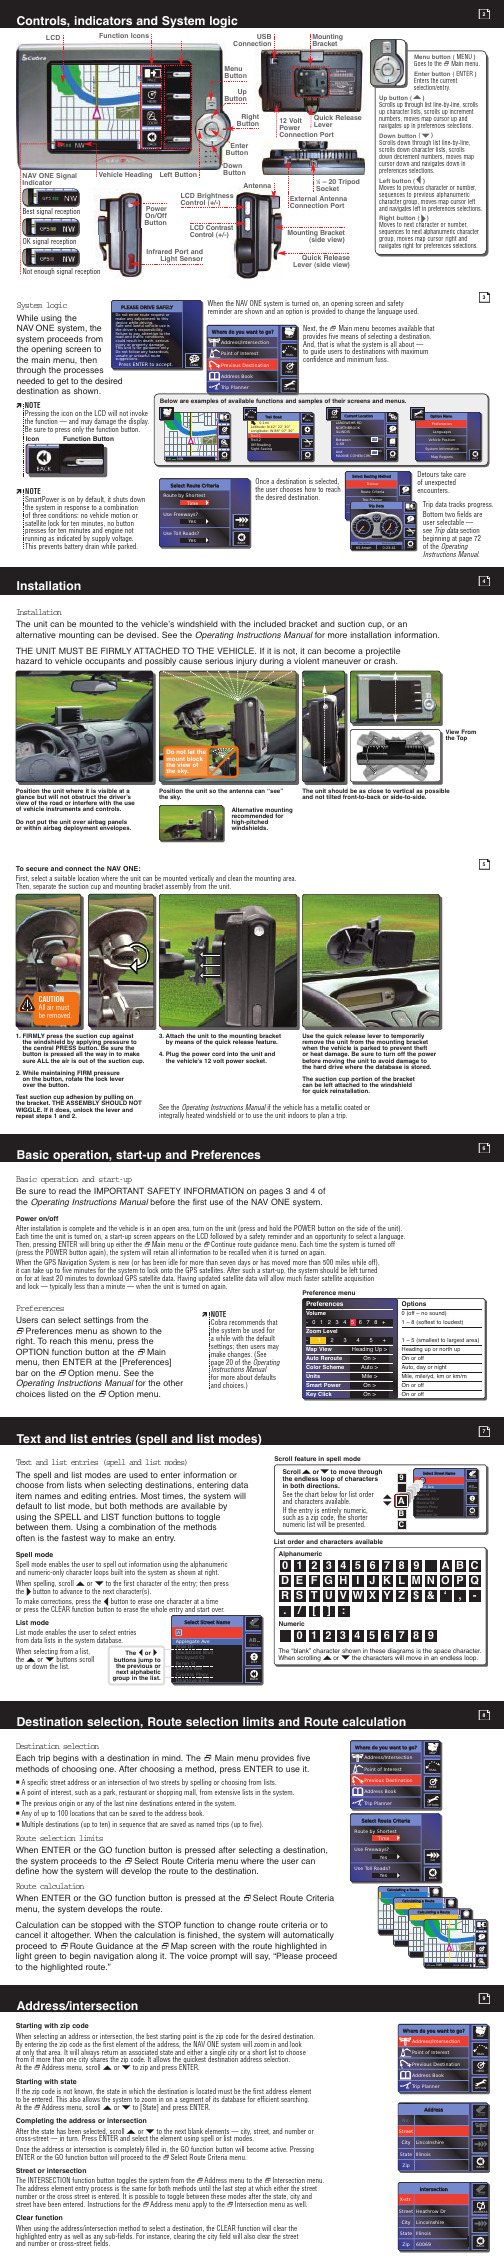
Up button (Scrolls up through list line-by-line, scrolls LCDIndicatorFunction IconsUSBConnection AntennaUp ButtonRight Power On/OffButtonInfrared Port andMenu ButtonConnection PortMounting BracketLCD Brightness LCD Contrast Best signal receptionCancel RoutePoint of InterestPrevious DestinationIconFunction Button4I n s t a l l a t i o nThe unit can be mounted to the vehicle’s windshield with the included bracket and suction cup, or analternative mounting can be devised. See the Operating Instructions Manual for more installation information.THE UNIT MUST BE FIRMLY ATTACHED TO THE VEHICLE. If it is not, it can become a projectile hazard to vehicle occupants and possibly cause serious injury during a violent maneuver or crash.Position the unit where it is visible at a glance but will not obstruct the driver’s view of the road or interfere with the use of vehicle instruments and controls.Do not put the unit over airbag panels or within airbag deployment envelopes.The unit should be as close to vertical as possible and not tilted front-to-back or side-to-side.View From the TopDo not let the mount block the view of the sky.Position the unit so the antenna can “see” the sky.Alternative mounting recommended for high-pitched windshields.To secure and connect the NAV ONE:First, select a suitable location where the unit can be mounted vertically and clean the mounting area. Then, separate the suction cup and mounting bracket assembly from the unit.See the Operating Instructions Manual if the vehicle has a metallic coated or integrally heated windshield or to use the unit indoors to plan a trip.1.FIRMLY press the suction cup against the windshield by applying pressure to the central PRESS button. Be sure the button is pressed all the way in to make sure ALL the air is out of the suction cup.2.While maintaining FIRM pressure on the button, rotate the lock lever over the button.Test suction cup adhesion by pulling on the bracket. THE ASSEMBLY SHOULD NOT WIGGLE. If it does, unlock the lever and repeat steps 1 and 2.3.Attach the unit to the mounting bracket by means of the quick release feature.4.Plug the power cord into the unit and the vehicle’s 12 volt power socket.Use the quick release lever to temporarily remove the unit from the mounting bracket when the vehicle is parked to prevent theft or heat damage. Be sure to turn off the power before moving the unit to avoid damage to the hard drive where the database is stored.The suction cup portion of the bracket can be left attached to the windshield for quick reinstallation.CAUTIONAll air must be removed.B a s i c o p e r a t i o n a n d s t a r t -u pBe sure to read the IMPORTANT SAFETY INFORMATION on pages 3 and 4 of the Operating Instructions Manual before the first use of the NAV ONE system.Power on/offAfter installation is complete and the vehicle is in an open area, turn on the unit (press and hold the POWER button on the side of the unit). Each time the unit is turned on, a start-up screen appears on the LCD followed by a safety reminder and an opportunity to select a language. Then, pressing ENTER will bring up either the Main menu or the Continue route guidance menu. Each time the system is turned off Calculating a RouteCalculating a RouteThis Quick Reference Guide is intended onlyas a handy reference to review the basics ofoperating your NAV ONE 3000. For a fullunderstanding of how to use your NAV ONE3000 properly, please consult the OperatingInstructions Manual. Read it carefully tobecome familiar with your unit’s features.You will be amazed at its capabilities.Important NoteQUICK REFERENCE GUIDE FORMOBILE NA VIGATION SYSTEM:R o u t e g u i d a n c ePAGEO f f r o u t e e v e n t sWithin a short distance of the vehicle leaving a calculated route, the NAV ONE system will recognize the deviation and provide helpfulinformation. In the case of a missed turn or similar situation, the system will provide voice prompts, such as, “Please make a legalSelect Routing Method menu. See theOperating Instructions Manual for informationon changing [Route Criteria] and [Trip Planner].Method menu, scroll or to [Detour] andpress ENTER to proceed to the Select DetourCriteria menu. At that menu, scroll orto the type of detour desired and press ENTER.Successive menus will allow completion of theselected detour type.At the Confirm Cancellationscreen, press ENTER to confirmand return to the Main menu.PDA positioned forinfrared transferTroubleshootingCustomer a s s i s t a n c eCobra ElectronicsCorporation reservesthe right to change orimprove informationin this guide withoutnotice. Please visit forupdates or questions.Should you encounter any problems with this product, or not understand its many features, please refer tothe Operating Instructions Manual. If you require further assistance after reading that manual, Cobra Electronicsoffers the following customer assistance services:For assistance in the U.S.A.Automated help desk(English only)24 hours a day, 7 days a week at 773-889-3087 (phone).Customer assistance operators(English and Spanish)8:00 a.m. to 6:00 p.m. C.S.T. Mon. through Fri. (except holidays) at 773-889-3087 (phone).Questions(English and Spanish)Faxes can be received at 773-622-2269 (fax).Technical assistance(English only) (on-line: Frequently Asked Questions).Technical assistance(English and Spanish)*********************(e-mail).For assistance outside the U.S.A.Contact your local dealer©2004 Cobra Electronics Corporation6500 West Cortland StreetChicago, Illinois 60707 U.S.A.s c t o r si c W a r n i n g S y s t e m s c e i v e r sa t i o n S y s t e m s o r i e s™F R a d i o sFo rmo r ei n f o rma t i ono rt oo r de ranyo fou rp r oduc t s,p l easev i s i tou rwebs i t e:www.cob r a.com。
北斗二代+GPS定位 模块BNGB-01 用户手册_v1.4
BNGB-01BD2/GPS二合一导航定位模块用户手册V1.4北京合众思壮科技股份有限公司【版权所有不得翻印】1 产品描述BNGB-01是一款GPS/BD2双模高感导航定位模块。
在弱信号环境中,具有出色的信号捕获能力。
适用于车载导航终端,也适用于便携式电子设备诸如自动导航设备,手持设备等。
2 产品特点高性能的BD2/GPS双模芯片,支持SBAS灵敏度高,自动跟踪灵敏度-162dBm信号快速捕获跟踪采用SMT邮票式封装尺寸小3 技术参数3.1 物理特性1)尺寸: 16×12.2×2.2mm3.2 环境特征1) 工作温度: -30℃~ +85℃2) 储存温度: -40℃~ +125℃3) 湿度:5%~95%RH,无凝结3.3 电气特性1)工作电压:+3.3V DC ±5%2)备用电池:+3.3V DC ±10%3)功耗:125mA @ 3.3V3.4 性能指标1)频率: GPS L1:C/A码;BD2 B1;支持SBAS2)通道数:36通道3) 更新率:默认1Hz4) 定位精度:水平:< 5m速度:0.1m/s5) 1PPS: 1ms RMS6) 定位时间:冷启动时间:<33s热启动时间:<5s失锁重捕:<1s7) 跟踪灵敏度:–162 dBm8)高度限制:<18,000m 速度限制:<300m/s 加速度:<3g 3.5 接口特性1) 串口:UART/USB/SPI/IIC,串口波特率默认9600;2) 1PPS输出:3.3V LVCMOS电平,脉宽100ms;3)协议: NMEA0183协议 V4.0。
4 管脚定义BNGB-01导航定位模块为24-pin封装,其管脚定义如下表所示。
图1 封装示意图 TOP View5 结构尺寸PCB 封装尺寸图6 设置指令6.5 NMEA语句输出7 设计参考电路。
GPS模块使用手册
GPS模块使用手册一、GPS模块旳几种重要指标1.卫星轨迹全球有24颗GPS卫星沿6条轨道绕地球运行(每4个一组), GPS接受模块就是靠接受这些卫星来进行定位旳。
但一般在地球旳同一边不会超过12颗卫星, 因此一般选择可以跟踪12颗卫星如下旳器件就可以了。
当然, 所能跟踪旳卫星数越多, 性能越好。
大多数GPS 接受器可以追踪8~12颗卫星。
计算2维坐标至少需要3颗卫星, 4颗卫星可以计算3维坐标。
2.并行通道由于最多也许有12颗卫星是可见旳, GPS接受器必须按次序访问每一颗卫星来获取每颗卫星旳信息, 因此市面上旳GPS接受器大多数是12并行通道型旳, 这容许它们持续追踪每一颗卫星旳信息。
12通道接受器旳长处包括迅速冷启动和初始化卫星旳信息, 并且在森林地区可以有更好旳接受效果。
一般12通道接受器不需要外置天线, 除非是在封闭旳空间, 如船舱或车厢中。
3.定位时间定位时间是指重启GPS接受器时, 确定目前位置所需旳时间。
对于12通道接受器, 冷启动时旳定位时间一般为3~5 min, 热启动时为15~30 s。
4.定位精度一般GPS接受器旳水平位置定位精度在5~10 m内。
5.DGPS功能DGPS是一种固定旳GPS接受器, 用于接受卫星旳信号。
DGPS可以精确地计算出理论上卫星信号传送到旳精确时间, 然后将它与实际传送时间相比较, 并计算出差值。
DGPS将这个差值发送出去, 其他GPS接受器就可以运用这个差值得到一种更精确旳位置读数(5~10 m或者更少旳误差)。
许多GPS设备提供商在某些地区设置了DGPS发送机, 供客户免费使用, 只要客户所购置旳GPS接受器有DGPS功能即可。
6.信号干扰要获得一种很好旳定位信号, GPS接受器必须至少能接受到3~5颗卫星。
假如是在峡谷中或两边高楼林立旳街道上, 或者是在茂密旳丛林里, 有也许接受不到足够旳卫星, 无法定位或者只能得到二维坐标。
同样, 假如在一种建筑里面, 有也许无法更新位置。
GPS 北斗定位模块说明书

GPS/北斗定位模块说明书GPS/北斗定位模块使用说明书V2.4济南智泽贸易有限公司目录1.产品介绍 (1)1.1.产品概述 (1)1.2.产品特点 (1)1.3.技术指标 (1)1.4.产品尺寸 (1)1.5.硬件接口 (2)2.通信协议 (3)2.1.通信协议 (3)2.2.寄存器定义 (4)3.协议详解 (6)3.1.读保持寄存器 (6)3.2.读取版本号 (6)3.3.读取设备地址 (7)3.4.读取设备波特率 (7)3.5.读取奇偶校验位 (7)3.6.读取定位数据(RMC) (8)3.7.定位数据(RMC)解析 (8)3.8.修改设备地址(广播) (9)3.9.修改波特率 (9)3.10.修改奇偶校验位 (9)4.保修期限 (10)5.技术支持 (10)6.联系方式 (10)7.免责声明 (10)1.产品介绍1.1.产品概述GPS/北斗定位模块,是一款具有GPS定位和北斗定位的双模定位终端,可以快速、精确定位位置。
定位模块内含双模定位芯片,快速定位位置,并且将定位信息以RS485接口和Modbus协议的方式提供给用户使用,串口波特率最高可达115200bps,可以通过PC机设置软件或串口命令轻松控制,使用方便快捷。
1.2.产品特点⏹同时支持GPS定位和北斗定位⏹串口波特率自定义,支持2400~115200bps⏹串口支持全双工和半双工串口通讯,支持RS485收发自动切换⏹模块串口波特率等参数可通过PC机或串口命令配置⏹RS485带TVS、过流等保护⏹提供天线状态诊断,提供天线开路、短路等状态信息1.3.技术指标环境参数⏹工作温度:-40℃~80℃⏹工作湿度:5%~95%RH,无凝露供电⏹工作电压:DC5~28V⏹功耗:≤0.3W定位精度⏹出色的定位功能,支持BDS/GPS/GLONASS卫星导航系统的单系统定位,以及任意组合的多系统联合定位⏹冷启动捕获灵敏度:-148dBm跟踪灵敏度:-162dBm⏹定位精度:2.5米(CEP50)⏹内置天线检测及天线短路保护功能1.4.产品尺寸产品尺寸长x宽x高为:95mm x50mm x30mm,其中95mm包含长度80mm和两个安装孔15m图1-1产品尺寸1.5.硬件接口图1-2硬件接口硬件接口定义见表1-2硬件接口定义。
北斗二代+GPS定位 模块BNGB-01 用户手册_v1.4
BNGB-01BD2/GPS二合一导航定位模块用户手册V1.4北京合众思壮科技股份有限公司【版权所有不得翻印】1 产品描述BNGB-01是一款GPS/BD2双模高感导航定位模块。
在弱信号环境中,具有出色的信号捕获能力。
适用于车载导航终端,也适用于便携式电子设备诸如自动导航设备,手持设备等。
2 产品特点高性能的BD2/GPS双模芯片,支持SBAS灵敏度高,自动跟踪灵敏度-162dBm信号快速捕获跟踪采用SMT邮票式封装尺寸小3 技术参数3.1 物理特性1)尺寸: 16×12.2×2.2mm3.2 环境特征1) 工作温度: -30℃~ +85℃2) 储存温度: -40℃~ +125℃3) 湿度:5%~95%RH,无凝结3.3 电气特性1)工作电压:+3.3V DC ±5%2)备用电池:+3.3V DC ±10%3)功耗:125mA @ 3.3V3.4 性能指标1)频率: GPS L1:C/A码;BD2 B1;支持SBAS2)通道数:36通道3) 更新率:默认1Hz4) 定位精度:水平:< 5m速度:0.1m/s5) 1PPS: 1ms RMS6) 定位时间:冷启动时间:<33s热启动时间:<5s失锁重捕:<1s7) 跟踪灵敏度:–162 dBm8)高度限制:<18,000m 速度限制:<300m/s 加速度:<3g 3.5 接口特性1) 串口:UART/USB/SPI/IIC,串口波特率默认9600;2) 1PPS输出:3.3V LVCMOS电平,脉宽100ms;3)协议: NMEA0183协议 V4.0。
4 管脚定义BNGB-01导航定位模块为24-pin封装,其管脚定义如下表所示。
图1 封装示意图 TOP View5 结构尺寸PCB 封装尺寸图6 设置指令6.5 NMEA语句输出7 设计参考电路。
北斗卫星导航教学模块软件操作介绍

北斗卫星导航教学模块软件操作介绍————————————————————————————————作者:————————————————————————————————日期:北斗卫星导航教学模块-----软件操作介绍莱特卫星导航教学仿真软件主要以GPS和北斗卫星导航系统为对象,融合动画演示,仿真和真实数据演示,交互操作三种方式对卫星导航相关的基础知识和原理进行分类讲解。
具体教学内容涵盖了坐标系、卫星轨道、定位原理、高程概念和时间系统等基础知识;卫星导航信号生成原理,接收机原理,测距原理及误差,典型最小二乘及卡尔曼滤波定位,定位精度评估及测速,差分定位及增强系统等。
◆实际数据操作常州莱特研发的该软件中包含大量的实际数据操作,帮助用户更好理解相关知识。
实际操作的数据分为手工输入和读取外部文件两种。
数据输出有文本,表格和图形多种形式。
用户按照交互界面的引导,可以轻松完成操作练习。
下面为典型案例:(1) 卫星导航坐标转换如图2-34,在任一坐标系中输入完整的坐标数据,单击下方的按钮,可以得到在其他坐标系中的坐标数据。
如在惯性坐标系中分别输入x,y,z 的坐标,并设置时间(涉及到ECI转换需要给定时间,窗口打开默认为当前系统时间,默认时区为东8区,即北京时间),点击按钮,可以分别转换为ECEF和大地坐标。
同样在ECEF和大地坐标系中分别设置坐标值可以转换为其他两种坐标系下的位置。
卫星导航坐标转换操作(2)生成C/A码如下图,选择GPS PRN编号,可以生成相应的C/A码。
生成C/A码用户可以利用窗口上方的工具实现对图像的保存(),打印(),放大(),缩小(),拖动(),旋转(),标记数据点(),插入颜色标记()和图例()等。
生成C/A码。
GPS导航器操作手册说明书

Table of ContentsIntroduction (2)Important Safety Information (3)System Controls (4)Screen 4 MENU button (5)MAP/GUIDE button (5)CANCEL b utton (5)ZOOM button (5)SETUP icon (5)JOYSTICK (5)A/C button (5)System Start-up (6)Main Menu (7)Address (7)Intersection (7)Phone No. (POI) (7)Places (7)Map I nput (7)Personal Addresses (8)Previous Destination (8)Today's Destinations (8)Selecting By Address (9)Change State (9)Selecting the City (11)Selecting the Street Address...... 13Selecting By Intersection. (15)Selecting the City (16)Selecting the Street (18)Selecting By Phone No. (POI) (21)Selecting By Places (22)Name (22)Category (25)Selecting By Previous Destination (32)Selecting By Map Input (33)Current Position (33)A City (34)State 36Continental U SA (38)Selecting by Today's Destinations (39)Adding Destinations To The List (39)Selecting Destinations From the List (40)Editing the List (41)Traveling T o Your Destination (42)The Map Screen (46)Save Current Location (47)Landmark Icons (49)Going Off the Route (49)Modifying the Route (50)Personal Addresses (52)Entering a PIN (52)Entering Personal Addresses (53)Updating a Personal Address (57)Selecting a Personal Address Asa Destination (58)System Setup (60)Bright (60)Volume (60)Display (60)Reroute (61)Address (61)Location Correction (62)Personal PIN (63)Clock (63)Information (63)Show Icon on Map (64)System Security (65)System Limitations (66)Customer Assistance (68)DVD R emoval (69)Non-detailed Coverage (70)Detailed Coverage Areas (71)Climate Control System (76)Navigation SystemRefer to 2003 TL O wner's Manual for more information.User AgreementAlpha Indexv wIntroductionYour Acura Navigation System is a highly-sophisticated location system that uses satellites and a map database to show you where you are and to help guide you to a desired destination.The Navigation System receives signals from the Global Positioning System, a network of 24 satellites in orbit around the earth. By receiving signals from several of these satellites, the Navigation System can determine the latitude and longitude of your car.In addition, a gyroscopic sensor and a speed sensor in your car keep track of the direction and speed of travel at all times.The Navigation System applies thislocation, direction, and speedinformation to the maps and calcu-lates a route to the destination youenter. As you drive to thatdestination, the System providesguidance.The Navigation System is easy to use.The locations of many places ofbusiness and entertainment arealready entered in the system. Youcan select any of them as a desti-nation by pressing only one or two ofthe controls.If a desired destination is not in thesystem's database, you can enter itsaddress and the system will directyou to it. This destination can besaved for reuse at a later date.As you drive, the Navigation Systemprovides visual and audio drivinginstructions so you do not have totake your eyes off the road. Theseinstructions are provided in advanceof the actual driving maneuver soyou have time to slow down andchange lanes if necessary.Read this manual thoroughly so youare familiar with all the NavigationSystem's features. Afterwards, keepthis manual in the glove box of yourvehicle so you can refer to at anytime.Navigation SystemImportant Safety InformationThe Navigation System can distract your attention from the road if you focus on the screen or operate the system's controls while driving.You should always enter information into the system before you begin driving. Then, as you drive, you can listen to the audio instructions or glance at the screen.Operating the NavigationSystem controls while you aredriving can take your attentionaway from the road, causing acrash in which you could beseriously injured or killed.Enter information into thesystem only when your car isstopped.The Navigation System is designedto provide route information to helpyou reach your destination. However,this route guidance may sometimesconflict with road conditions such asstreet closures, road construction,and detours.Additionally, the system itself hascertain limitations (see page 66).Therefore, you must verify the audioand visual route informationprovided by the system by carefullyobserving the roadway, signs andsignals, etc. If you are unsure,proceed with caution. Always useyour own good judgment, and obeytraffic laws while driving.Navigation System。
- 1、下载文档前请自行甄别文档内容的完整性,平台不提供额外的编辑、内容补充、找答案等附加服务。
- 2、"仅部分预览"的文档,不可在线预览部分如存在完整性等问题,可反馈申请退款(可完整预览的文档不适用该条件!)。
- 3、如文档侵犯您的权益,请联系客服反馈,我们会尽快为您处理(人工客服工作时间:9:00-18:30)。
3 设计特性 .................................................................................................................................13
3.1 管脚定义.........................................................................................................................13 3.2 机械尺寸.........................................................................................................................14 3.3 推荐封装.........................................................................................................................15
4 电气和温度特性 .....................................................................................................................15
4.1 模块直流特性.................................................................................................................15 4.1.1 极限工作条件.............................................................................................................15 4.1.2 推荐工作条件.............................................................................................................16
4.2 焊接温度曲线.................................................................................................................16 4.2.1 预热阶段.....................................................................................................................16 4.2.2 恒温阶段.....................................................................................................................16 4.2.3 熔锡阶段.....................................................................................................................16 4.2.4 冷却阶段.....................................................................................................................16 4.2.5 推荐炉温曲线如下图: .............................................................................................17
2 模块接口说明 ...........................................................................................................................8
2.1 硬件接口...........................................................................................................................8 2.1.1 电源...............................................................................................................................8 2.1.2 天线接口.......................................................................................................................8 2.1.3 复位接口.......................................................................................................................8 2.1.4 1PPS信号接口 ..............................................................................................................8 2.1.5 UART接口.....................................................................................................................8
文档新 建
描述
Techtotop Confidential
Copyright © 2008-2014 All Rights Reserved.
Page 2 of 20
Rev.1.0
N303双模导航定位模块用户手册
目录
1 功能描述 ...................................................................................................................................5
5 注意事项 .................................................................................................................................17
5.1 天线供电........................ቤተ መጻሕፍቲ ባይዱ................................................................................................17 5.2 静电防护.........................................................................................................................18 5.3 PCB设计建议 .................................................................................................................18
1.5.1 功能框图.......................................................................................................................7 1.5.2 典型应用.......................................................................................................................7
泰山为体 北斗致用
N303 双模导航定位模块 用 户手册
Techtotop Confidential
Copyright © 2008-2014 All Rights Reserved.
Page 1 of 20
Rev.1.0
N303双模导航定位模块用户手册
文档 修订记录
版本 V0.1
修订日期 2014-04
1.1 概述...................................................................................................................................5 1.2 产品特性...........................................................................................................................5 1.3 性能指标...........................................................................................................................6 1.4 应用...................................................................................................................................6 1.5 功能框图和典型应用 .......................................................................................................7