博朗剃须刀 S3 说明书
博朗5140s中文说明书

博朗5140s中文说明书一、博朗剃须刀的使用方法1、充电充电时间在3-6小时左右。
一次充电后,剃须刀可使用时间,根据您的胡须浓密有所不同。
请注意,只有经过数次充放电循环后,才能达到充电容量。
2、剃须方法剃须刀浮动式网膜自贴合您的皮肤表面提供更为贴面、顺畅的剃须。
启动长须修剪器,可以修剪鬓发和络鳃胡。
剃须刀与皮肤垂直呈90度,拉紧您的皮肤并逆着胡须生长方向剃须,同时更换网膜和刀头,可获得较少皮肤刺激的贴面剃须效果。
3、剃须时间普通剃须需要温水洗脸后。
加剃须育使用效果理想。
而电动剃须刀应该在洗脸前剃须效果,由于皮肤在水洗后会略微膨胀,我们建议您在洗脸之前剃须。
二、博朗剃须刀清洗保养1、普通清洗清洁前先拔掉电源插头。
关闭剃须刀,拆卸网膜架,然后用刷子刷净刀头和网膜架内部区域的。
注意切勿用刷子清洁剃须刀网膜,否则会导致网膜破损。
2、流水清洗防水剃须刀,每次剃须后,启动剃须刀,将它放在流动的热水进行剃须刀头部清洗。
有时可以使用肥皂(不含颗粒和磨损性物质的天然液体皂)清洗,洗净后可以继续运转剃须刀一段时间。
或拆下剃须刀网膜、刀头、风干所有部件。
3、自动清洗自动型剃须刀。
只要将剃须刀放入清洗器,通电选择清洗程序就可以自动完成清洗和充电工作,使清洁更加便捷。
4、常规保养每4个星期左右使用博朗喷雾清洁剂清洁刀头起到杀菌保养作用,在长须修剪器、造型器和网膜上滴加少量轻机油。
5、电池保养为了保持电池充电的效果,剃须刀必须约每6个月完全放电一次(通过正常使用的*放电),然后再完全充电,不宜长时间将剃须刀暴露于温度高于50摄氏度的环境中。
注意环保,请勿将报废电池与家庭垃圾一起丢弃。
将其送至适当的收集点进行处理。
说明书范例-(XX剃须刀)使用说明书

说明书范例-(XX剃须刀)使用说明书(XX剃须刀)使用说明书本说明适用于各类充电式剃须刀。
充电:将电源插头插入AC220V电源之中,视充电指示灯亮、充电12-16小时。
注意:充电时间不要过长,以免影响电池寿命。
剃须:将开关键上推至(on)开启位置,即可剃须。
为求最佳之刮须效果,请将皮肤拉紧,使胡子成直立状,然后以逆胡子生长的方向缓慢移动。
修剪刀:如有修剪刀功能的剃须刀,请在剃须前,先将修剪刀推出,修短胡须后再用网刀剃净。
清洁:剃须刀要经常清洁。
清洁前应先关上开关。
旋下网刀,用毛刷将胡须屑刷净。
清洁后轻轻放回刀头架、且到位。
清洁时应轻拿轻放,避免损坏任何部件。
保修条例:保修服务只限于一般正常使用下有效。
一切人为损坏例如接入不适当电源,使用不适当配件,不依说明书使用;因运输及其它意外而造成之损坏;非经本公司认可的维修和改造,错误使用或疏忽而造成损坏;不适当之安装等,保修服务立即失效。
此保修服务并不包括运输费及维修人员上门服务费。
保修期外享受终身维修,维修仅收元器件成本费。
剃须刀中内、外刃属消耗品不在保修范围内。
保修期:正常使用六个月。
注意事项:充电时间12~16小时。
换刀网刀头时一定要选用原厂配件。
评析:这是一篇剃须刀的使用说明书。
该使用说明书还附上了“保修条例”部分,严格来讲,“保修条例”不属于使用范围内的东西,可以略去。
就其使用说明来讲,该文谈到三个主要的步骤,一是充电,二是剃须,三是清洁。
这类剃须刀属于充电式的,由于刚打开的产品尚未充电,故要求先充电。
该部分介绍了所接用的充电电压,充电时间及注意事项等。
剃须部分将剃须的具体方法,剃刀走动的方向等都介绍的很清楚。
除此而外,还指出有“修剪刀”的剃刀可在剃须前先将长须修短,再用剃须刀剃净。
清洁是剃须后必做的工作,这里详细地介绍了剃须刀的保养清洁工作。
为延长剃须刀的寿命这都是很有必要的。
多功能智能剃须刀的使用说明书

多功能智能剃须刀的使用说明书使用说明书:多功能智能剃须刀一、产品简介多功能智能剃须刀是一款为每位绅士独家设计的高端剃须工具。
它集剃须、修剪、清洁于一体,采用先进的智能技术与高品质材料制成。
本说明书旨在为您提供详细的产品使用方法和注意事项,确保您能充分发挥其功能并获得最佳剃须体验。
二、外观及配件1.剃须刀主体:采用优质金属材料,外观精致典雅。
2.剃须刀刀头:采用高效锋利的刀片,可有效剃除须发。
3.修剪头:用于修剪胡须、鬓角等细节部位。
4.清洁刷:用于清洁剃须刀刀头和剃须刀主体。
三、使用方法1.准备工作在使用剃须刀前,请确保电源充足,并将剃须刀进行充电。
同时,将剃须刀清洁彻底以确保卫生。
2.剃须a.洗净脸部后,取适量剃须泡涂抹在脸部,使须发变软。
b.按下电源开关,将剃须刀刀头顺着脸部轻轻移动,不需用力压迫。
c.若您需要剃除颈部须发,将剃须刀从下往上逆向移动以获得更加彻底的剃须效果。
d.剃须过程中,您可利用剃须刀背面的修剪器修整蓄须、胡须等细节部位。
3.修剪将修剪头装到剃须刀主体上,开启修剪模式进行修整。
a.根据个人需要和要求选择合适的修剪头,将其固定到剃须刀上。
b.将修剪头靠近要修整的部位,轻柔地移动剃须刀,修整出理想效果。
c.修剪完毕后,将修剪头取下并重新安装剃须刀刀头。
4.清洁a.剃须刀使用完毕后,断开电源,拆下剃须刀刀头。
b.利用清洁刷将剃须刀刀头上残留的须发、清洁剂等物质清理干净。
c.将清洁刷洗净并晾干后,放入原处。
四、注意事项1.请确保剃须刀处于关机状态下进行清洁和更换配件操作。
2.使用剃须刀前请确认刀头安装牢固,防止因松动导致安全事故。
3.避免将剃须刀浸入水中或长时间接触水分,以免损坏剃须刀。
4.为了保持产品的性能和寿命,请定期清洁和润滑剃须刀。
5.请保持剃须刀干燥,避免阳光直射和高温环境下存放。
6.儿童请在成人监护下正确使用剃须刀,并避免将其用于其他用途。
五、维护保养1.请根据使用频率,定期更换剃须刀刀头,以保证剃须效果和舒适体验。
剃须刀设备说明书

显示屏上的图标是什么意思? (图 B) - 主菜单
您可以按菜单按钮来切换菜单项。 长按即可启用或禁用某些功能。 图标 含义 此菜单以百分数的形式显示电池状态。
可以通过此菜单启用或禁用旅行锁。
可以通过此菜单禁用或重新启用光环反馈。
- 打开剃须刀电源
20 简体中文
按下开/关按钮启动剃须刀。
从此菜单项中,您可以取消配对剃须刀和 智能手机。 注意: 请确保您的智能手机配备了 Bluetooth® 4.2 或更高版本。
本剃须刀配备了 Bluetooth® 4.2 及更高版 本,可与该应用程序连接。 将剃须刀和智 能手机配对后,即使剃须刀已关闭,剃须 刀上的蓝牙也会自动打开。 这样方便在随 后同步剃须数据,因此您在剃须时无需随 身携带智能手机。 有关将剃须刀和智能手
主菜单(图 A) 关闭剃须刀时,您可通过按菜单按钮在四 个菜单功能之间进行切换。
电池剩余电量 该菜单项显示电池剩余电量。
22 简体中文压力网罩传感源自 该菜单项显示上次剃须的压力反馈。
动作控制传感器 该菜单项显示上次剃须的动作反馈。
旅行锁 蓝牙
从此菜单项中,您可以通过按住菜单按钮 3 秒钟来锁定和解锁剃须刀。 您在旅行 时,可以锁住剃须刀,以防止电源意外开 启。
简体中文 23
机配对的好处的信息,请参阅“将剃须刀 连接到应用程序的好处”。 注意: 您可以通过激活旅行锁来关闭剃须 刀上的蓝牙。
主菜单(图 B) 您可以按菜单按钮来切换菜单功能。
电池剩余电量 该菜单项显示电池剩余电量。
剃须后反馈 旅行锁
注意: 只有通过应用程序设置启用此功能 后,才会显示此菜单。
- 蓝牙 图标 含义
此图标显示剃须刀已与您的智能手机配对。
博朗190s-1, 170s-1剃须刀说明书中文版
Series1Series 1190s-1612 English 16Braun GmbH Frankfurter Straße 145 61476 Kronberg/Germany Our products are designed to meet the highest standards of quality, functionality and design. We hope you entirely enjoy your new Braun shaver.WarningYour shaver is provided with a special cord set with integrated Safety Extra Low Voltage power supply. Do not exchange or manipulate any part of it. Otherwise there is a risk of electric shock.Never use the appliance with a damaged foil or cord.This appliance is not intended for use by children or persons with reduced physical or mental capabilities, unless they are given supervision by a person responsible for their safety. In general, we recommend that you keep the appliance out of reach of children. Children should be supervised to ensure that they do not play with the appliance.Oil bottleKeep out of reach of children. Do not swallow. Dispose of properly when empty.Description1 Foil protection cap2 Shaver foil3 Cutter block4 Long hair trimmer5 Charging light (190s only)6 On/off switch7 Special cord setCharging (190s only)The best environmental temperature for charging is between 15 °Cand 35 °C.• Using the special cord set, connect the shaver to an electrical outlet with the motor switched off.• When charging for the first time, leave the shaver to charge continuously for 4 hours. The charging light (5) shows that the shaver is being charged. When the battery is fully charged, the charging light intermit-tently blinks on and off. This indicates that the battery maintains its full English• Once the shaver is completely charged, discharge the shaver through normal use. Then recharge to full capacity. Subsequent charges will take about 1 hour.• Maximum battery capacity will only be reached after several charging/ discharging cycles.• If the rechargeable batteries are discharged, you may also shave by connecting the shaver to an electrical outlet via the special cord set.ShavingRemove the foil protection cap (1). Activate the on/off switch (6). The floating foil frame automatically adapts to your skin surface for a close, smooth shave.For pre-shaving after a few days of not having shaved, use the long hair trimmer (4) to pre-cut long hairs. For a close, smooth shave, finish with the foil.TrimmingPush out the long hair trimmer (a). It allows controlled trimming of moustache and sideburns. It evenly cuts and trims larger areas: ideal for shaping sideburns, moustaches and partial short beards.Frequent use of the long hair trimmer may reduce the battery capacity (190s only).Tips for the perfect shave• We recommend that you shave before washing, as the skin tends to be slightly swollen after washing.• Hold the shaver at right angles (90°) to the skin. Stretch the skin andshave against the direction of beard growth.• To maintain 100% shaving performance, replace your foil and cutterblock at least every 18 months or when worn.CleaningThe shaver head is suitable for cleaning under running tap water.Warning: Detach the shaver from the power supply before cleaningthe shaver head in water.• Model 190s only: Switch the shaver on and rinse the shaver head under hot running water.• You may use liquid soap without abrasive substances. Rinse off all foam and let the shaver run for a few more seconds.• Next, (model 190s: switch off the shaver) remove the shaver foil (2) and cutter block (3). Then leave the disassembled shaving parts to dry. Alternatively, you may clean the shaver using the brush provided (c):• Switch off the shaver. Remove the shaver foil.• Using the brush, clean the cutter block and the inner area of the shaver head. However, do not clean the shaver foil with the brush as this may damage the foil.Keeping your shaver in top shapeAbout every four weeks, clean the cutter block with Braun cleaning agents. Put a drop of light machine oil onto the long hair trimmer and the shaverfoil (d).Replacing the shaving partsTo maintain 100% shaving performance, replace your foil and cutter blockat least every 18 months or when worn. Change both parts at the same time for a closer shave with less skin irritation.(Shaver foil and cutter block: 10B)Preserving the batteries (190s only)In order to maintain the optimum capacity of the rechargeable batteries, the shaver has to be fully discharged (by shaving) every 6 months approximately. Then recharge the shaver to full capacity. Do not expose the shaver to temperatures higher than 50 °C for extended periods of time.Environmental noticeThis product contains rechargeable batteries. In the interest ofprotecting the environment, please do not dispose of the product inthe household waste at the end of its useful life. Disposal can takeplace at a Braun Service Centre or at appropriate collection points provided in your country.。
博朗 330S-4中文说明书
360s-4+–360s -4S e r i e s 3360 1011330 320S e r i e s3EnglishOur products are designed to meet the highest standards of quality, functionality and design. We hope you enjoy your new Braun Shaver. WarningPlease read the use instruction carefully and thoroughly before using the appliance.Your shaving system is provided with a special cord set, which has an integrated Safety Extra Low Voltage power supply. Do not exchange or tamper with any part of it, otherwise there is risk of an electric shock.Do not shave with a damaged foil or cord.This appliance is not intended for use by children or persons with reduced physical, sensory or mental capabilities, unless they are given supervision by a person responsible for their safety. In general, we recommend that you keep the appliance out of reach of children. Children should be supervised to ensure that they do not play with the appliance.Oil bottleKeep out of reach of children. Do not swallow. Do not apply to eyes. Dispose of properly when empty.Description1 Foil & Cutter cassette2 Long hair trimmer34 On/off switch5 Charging lights (green)6 Low-charge light (red)7 Replacement light for shaving parts8 Shaver power socket9 Special cord set10 Etui (360s only)11 Protection cap (330s/320s only)ChargingThe best environmental temperature for charging is between 15 °C to 35 °C. Do not expose the shaver to temperatures higher than 50 °C for extendedis not used for a few months, leave the shaver to charge continuously for 4 hours.• Once the shaver is completely charged, discharge the shaver through normal use. Then recharge to full capacity. Subsequent charges will take about 1 hour.• A full charge provides up to 45 minutes of cordless shaving time depending on your beard growth. However, the maximum battery capacity will only be reached after several charging/discharging cycles.• If the rechargeable batteries are discharged, you may also shave by con-necting the shaver to an electrical outlet via the special cord set.• 5-minute quick charge is sufficient for a shave.Charging lights (5)The green charging lights show the charge status of the batteries(330s/320s: 1 charging light). The green charging light blinks when the shaver is being charged or switched on. When the battery is fully charged, all green charging lights (330s/320s: 1 charging light) shine permanently, provided the shaver is connected to an electrical outlet.Low-charge light (6)The red low-charge light flashes when the battery is running low.You should be able to finish your shave.ShavingPress the on/off switch (4) to operate the shaver (picture).The flexible shaving foils automatically adjust to every contour of your face (picture).Long hair trimmer (2)To trim sideburns, moustache or beard, slide the long hair trimmer upwards. Precision setting switch () (360s only)lowered.CleaningThe shaver head is suitable for cleaning under running tap water.Warning: Detach the shaver from the power supply before cleaningthe shaver head in water.Regular cleaning ensures better shaving performance. Rinsing the shaver head under running water after each shave is an easy and fast way to keep it clean:• Switch the shaver on (cordless) and rinse the shaver head under hot running water. You may use liquid soap without abrasive substances. Rinse off all foam and let the shaver run for a few more seconds.• Next, switch off the shaver, remove the shaver Foil & Cutter cassette (1) and let it dry.• If you regularly clean the shaver under water, then once a week apply a drop of light machine oil onto the long hair trimmer (2) and shaverFoil & Cutter cassette (1) (picture).Alternatively, you may clean the shaver using a brush:• Switch off the shaver. Remove the shaver Foil & Cutter cassette and tap it out on a flat surface (picture).• Using a brush, clean the inner area of the shaver head. However, do not clean the shaver Foil & Cutter cassette with a brush as this may damage it (picture).Keeping your shaver in top shapeReplacement light for shaving parts / ResetTo maintain 100% shaving performance, replace the shaver Foil & Cutter cassette (1), when the replacement light for shaving parts (7) comes on (after about 18 months) or when worn.Foil & Cutter cassette: 32S/32BThe replacement light will remind you during the next 7 shaves to replace the Foil & Cutter cassette. Then the shaver will automatically reset the display. After you have replaced the Foil & Cutter cassette (1), press the on/off switchPreserving the batteriesIn order to maintain the optimum capacity of the rechargeable batteries, the shaver has to be fully discharged (by shaving) every six months approxima-tely. Then recharge the shaver to full capacity.Environmental noticeThis product contains rechargeable batteries. In the interest ofprotecting the environment, please do not dispose of the product inthe household waste at the end of its useful life. Disposal can takeplace at a Braun Service Centre or at appropriate collection sitesprovided in your country.Subject to change without notice.For electric specifications, see printing on the special cord set.Braun GmbH Frankfurter Straße 145 61476 Kronberg/Germany 。
Philips 剃须刀商品说明书
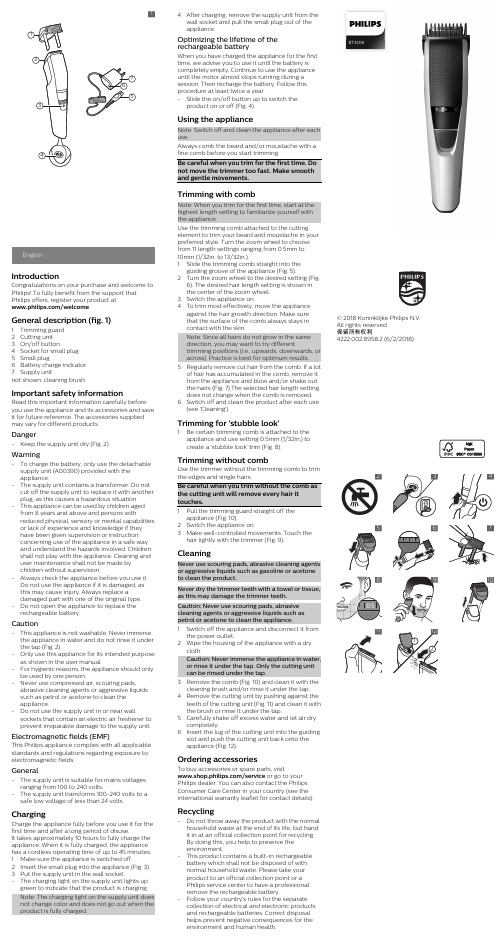
EnglishIntroductionCongratulations on your purchase and welcome to Philips! To fully benefit from the support that Philips offers, register your product at/welcome.General description (fig. 1)1Trimming guard2Cutting unit3On/off button4Socket for small plug5Small plug6Battery charge indcator7Supply unitnot shown: cleaning brushImportant safety informationRead this important information carefully before you use the appliance and its accessories and save it for future reference. The accessories supplied may vary for different products.Danger-Keep the supply unit dry (Fig. 2).Warning-To charge the battery, only use the detachable supply unit (A00390) provided with theappliance.-The supply unit contains a transformer. Do not cut off the supply unit to replace it with another plug, as this causes a hazardous situation.-This appliance can be used by children aged from 8 years and above and persons withreduced physical, sensory or mental capabilities or lack of experience and knowledge if theyhave been given supervision or instructionconcerning use of the appliance in a safe wayand understand the hazards involved. Children shall not play with the appliance. Cleaning and user maintenance shall not be made bychildren without supervision.-Always check the appliance before you use it.Do not use the appliance if it is damaged, asthis may cause injury. Always replace adamaged part with one of the original type.-Do not open the appliance to replace the rechargeable battery.Caution-This appliance is not washable. Never immerse the appliance in water and do not rinse it under the tap (Fig. 2).-Only use this appliance for its intended purpose as shown in the user manual.-For hygienic reasons, the appliance should only be used by one person.-Never use compressed air, scouring pads, abrasive cleaning agents or aggressive liquidssuch as petrol or acetone to clean theappliance.-Do not use the supply unit in or near wall sockets that contain an electric air freshener to prevent irreparable damage to the supply unit. Electromagnetic fields (EMF)This Philips appliance complies with all applicable standards and regulations regarding exposure to electromagnetic fields.General-The supply unit is suitable for mains voltages ranging from 100 to 240 volts.-The supply unit transforms 100-240 volts to a safe low voltage of less than 24 volts. ChargingCharge the appliance fully before you use it for the first time and after a long period of disuse.It takes approximately 10 hours to fully charge the appliance. When it is fully charged, the appliance has a cordless operating time of up to 45 minutes. 1Make sure the appliance is switched off.2Insert the small plug into the appliance (Fig. 3). 3Put the supply unit in the wall socket.-The charging light on the supply unit lights up green to indicate that the product is charging.Note: The charging light on the supply unit does not change color and does not go out when the product is fully charged.from 11 length settings ranging from 0.5mm to10mm (1/32in. to 13/32in.).1Slide the trimming comb straight into theguiding groove of the appliance (Fig. 5).2Turn the zoom wheel to the desired setting (Fig.6). The desired hair length setting is shown inthe center of the zoom wheel.3Switch the appliance on.4To trim most effectively, move the applianceagainst the hair growth direction. Make surethat the surface of the comb always stays inthe brush or rinse it under the tap.5Carefully shake off excess water and let air drycompletely.6Insert the lug of the cutting unit into the guidingslot and push the cutting unit back onto theappliance (Fig. 12).Ordering accessoriesTo buy accessories or spare parts, visit/service or go to yourPhilips dealer. You can also contact the PhilipsConsumer Care Center in your country (see theinternational warranty leaflet for contact details).Recycling-Do not throw away the product with the normalhousehold waste at the end of its life, but handit in at an official collection point for recycling.By doing this, you help to preserve theenvironment.-This product contains a built-in rechargeablebattery which shall not be disposed of withnormal household waste. Please take yourproduct to an official collection point or aPhilips service center to have a professionalremove the rechargeable battery.-Follow your country’s rules for the separatecollection of electrical and electronic productsand rechargeable batteries. Correct disposalhelps prevent negative consequences for theenvironment and human health.BT3206© 2018 Koninklijke Philips N.V.All rights reserved选择,长度范围在 0.5 毫米到 10 毫米(1/32 英寸到13/32 英寸)之间。
博朗6系 说明书

博朗6系说明书A:充电1、将开关钮向下推【能看见“OFF”标记】。
2、用滑动板使充电头从剃须刀推出来。
然后插入墙壁上的电源插头。
绿色指示灯会亮。
3、剃须刀可以在100V-240V之间的电压连接充电。
4、剃须刀在充电8小时后会充满自停。
5、剃须刀充满电后连续工作时间约30分钟。
6、充电后用滑动板将充电头移回剃须刀里。
7、为了保证蓄电池的长寿,请注意:a在环境温度5-35度之间进行充电以及储存剃须刀,b不要将剃须刀长久的与电源连接。
、3B:进行剃须1、确保剃须刀充分的充电。
2、切勿让水或者其他液体进入剃须刀。
3、皮肤干燥时剃须效果最佳。
因此最好在洗脸前或洗脸后过一段时间再使用剃须刀。
4、使用时将剃须刀刀头放在皮肤上快速移动,既进行圆周运动又进行无循环运动。
另外可用另外的空手绷紧皮肤。
5、胡须出现的更多能剃的更短,颈部的毛发同样的可以剃掉。
6、请注意:您的皮肤可能需要2-4个星期的时间不能完全适应此独特飞利浦剃须刀系统。
7、剃须结束后将保护盖盖好。
、3C:清洁1、清洁时请确保电源开关未打开。
2、使用飞利浦剃须刀专用毛刷进行清洁。
3、每周清洁一次胡须储藏室,每两个月清洁一次刀头。
4、可以使用能除掉油脂的液体(例如酒精)清洁剃须刀刀头。
清洁完毕之后请加上一滴专用润滑油,这样可以使刀头得到润滑,同时可以保证剃须的舒适性,并保证刀头更长的使用寿命。
5、为了避免混淆,每次清洁都要分开剃须刀刀头(网罩和刀片),既每个网罩和刀片不能混淆。
这点是很重要的,因为每组网罩和刀片是相互磨合的。
若将网罩和刀片调换的话,可能需要几个星期以后剃须刀才会达到最佳剃须效果。