飞利浦PT725剃须刀,中文、英文说明书
家用电动剃须刀的使用说明书

家用电动剃须刀的使用说明书感谢您购买我们的家用电动剃须刀。
本说明书将为您提供有关剃须刀的正确使用方法和维护技巧。
在使用前,请仔细阅读以下内容,并按照说明进行操作,以确保安全和最佳使用效果。
第一章:产品简介1.1 产品概述家用电动剃须刀是一款高品质的剃须工具,旨在提供舒适、快捷而干净的剃须体验。
采用先进的刀片和电动技术,能够轻松应对不同的胡须类型和皮肤敏感程度。
1.2 主要特点- 精密的刀片设计,确保快速而有效地切剃每一根胡须。
- 强大的电动驱动,提供稳定而持久的动力。
- 人体工学手柄设计,使手感舒适,操作方便。
- 具备防水功能,便于清洁和维护。
第二章:安全使用须知在使用家用电动剃须刀之前,请务必阅读并遵守以下安全使用须知:2.1 适用用户本剃须刀适用于年满18岁以上的成年男性。
对于未成年人或无剃须经验的用户,请在成年人的监护下使用。
2.2 电源与充电- 仅使用本剃须刀附带的充电器进行充电,确保充电器完好无损并与电源连接牢固。
- 在充电过程中,剃须刀和充电器不可浸入水中或触碰潮湿的环境。
- 充电时,确保电源稳定,避免使用过大功率的充电器。
2.3 使用环境- 本剃须刀仅适用于干燥的剃须环境。
禁止在水中或潮湿环境下使用。
- 请勿在高温或受潮的环境下存放剃须刀,以免影响性能和寿命。
2.4 剃须时的注意事项- 请选择适合的剃须头部件,根据胡须密度和个人需求进行调整。
- 使用前请确保剃须刀头干净整洁,无异物或堵塞。
- 剃须时,请保持剃须刀与皮肤的角度适中,避免剃须刀头夹紧皮肤,以免造成刮伤或刺激。
第三章:使用方法3.1 充电与电池- 开启剃须刀尾部的充电接口盖,将充电器插头连接至剃须刀的充电口上。
- 将充电器插头连接至稳定的电源上,开始充电。
充电指示灯将亮起,表明剃须刀正在充电。
- 充电完成后,将充电器插头拔出,合上充电接口盖。
3.2 剃须操作- 在剃须前,确保剃须刀头整洁并安装牢固。
- 将剃须刀头轻轻贴近脸部皮肤,以适当的角度开始剃须。
Philips 清洁刷和剃须刀附件说明书

- Always check the appliance before you use it. Do not use the appliance if it is damaged, as this may cause injury. Always replace a damaged part with one of the original type.
Important safety information
Read this important information carefully before you use the appliance and its accessories and save it for future reference. The accessories supplied may vary for different products.
Battery fully charged
Note: When the battery is full, the display switches off automatically after 30 minutes.
Note: This appliance can only be used without cord.
While the appliance continues to charge, first the bottom light of the battery charge indicator flashes and then lights up continuously. Then the second light flashes and then lights up continuously, and so on until the appliance is fully charged.
Philips W725手机说明书

W725BlackCTW725BLKDouble your reach and freedomBrace yourself for new levels of speed, performance and freedom with the Philips W725 phone. With seamless access to both GSM and WCDMA networks, plus super-speedy HSDPA connectivity, go forth and blaze your own trail.Enjoy fast and easy 3G connectionDual mode (WCDMA and GSM), dual coverageEnjoy fast downloads with HSDPAGo online anywhere with plug and play USB modemSpeak face-to-face via video callMaximize your Multimedia Experience8.1 cm (3.2") WQVGA TFT touch screenCustomize home screen with default widgets5 megapixel autofocus camera with flashHighlightsDual mode (WCDMA and GSM)Your Philips mobile phone incorporates two SIM cards to allow you access to WCDMA and GSM network connections at the same time.Now you can enjoy wider mobile coverage on two networks with just one phone.HSDPA fast downloadDownload files and access emails and the web on your mobile phone with HSDPA,broadband-like speed. All you need is a valid service subscription from your network operator and the correct phone settings.Plug and play USB modemWith plug and play USB modem, accessing the web and your emails on your laptop is a breeze, even when you're on the go. Simply connect your Philips mobile phone to your laptop with the included data cable.Video callSave travel time while enjoying face-to-face communication with the people who matter via video call. Your phone camera captures and relays images to video call recipients with compatible mobile phones.8.1 cm/3.2" WQVGA touch screenEnjoy brilliant colors and vibrant images like never before with your phone's large 8.1 cm (3.2") WQVGA TFT display. Revel in intuitive navigation and discover a world of mobile possibilities - with just a touch.Preset widgets for home screenWith widgets, you can customize your mobile phone's home screen and instantly access features, information and media content that's most important to you. With just a click, you can conveniently access your calendar,messages, photos and music - and more!Simply drag and drop to organize your widgets... and your life.5 MPixel AF camera with flashCapturing memorable moments is as simple as point-and-shoot. A built-in flash allows you to capture clear, sharp images - even in dim lighting conditions.SpecificationsDimensionsForm Factor: Candy barAntenna: IntegratedHandset color: BLACKHandset dimensions: 108.8x56.3x15mm Network Features3G: WCDMAWCDMA band: 2100MHzGSM band: 850, 900, 1800, 1900 MHz GPRS (Rx+Tx): Class 10 (4+2), Class BEDGEMessaging: SMS (Short Message Service), Concatenated SMS (Long SMS), SMS multi-target, Predefined SMS, MMS,Multimedia Message Service, E-mailServices: SIM Toolkit / Release 99, WAP 2.0 Voice Codec: FR/EFR/AMR/HROSBrew MP: Brew MP 1.03Picture/DisplayDiagonal screen size (inch): 3.2 inchMain Display Colors: 262KMain Display Resolution: 240X400 pixel Main Display Technology: TFTStill Picture CapturingCamera: IntegratedImage sensor type: CMOSPreview frame rate: 15 frames/second Picture file format: JPEGPicture resolution: VGA (640x480), 1M (1280x960), 2M (1600x1200), 3M (2048x1536), 5M (2592x1944)White balance: Automatic, Incandescent,Fluorescent, Daylight, Cloudy, TungstenPicture quality: Normal, Fine, GoodStill Picture PlaybackPicture Compression Format: BMP, JPEG, GIF,PNG, WBMPVideo PlaybackCompression formats: 3GP, MPEG4, H.263Frame rate (fps): 15, 30Resolution (pxl): 128x96, 128x160, 176x144,220x176, 320x240Video RecordingCompression formats: 3GPFrame rate: 15 fpsResolution (pxl): 176x144, 320x240Audio PlaybackAudio supported formats: Midi, AMR, WAV,MP3, WMA, AAC, AAC+Audio RecordingRecord your own voiceSoundRingers: MP3 ringer, Voice memo ringer, AMRringerStorage MediaMemory Card Types: Micro SDMemory management: Memory statusUser memory: 80 MBMaximum memory card capacity: 32 GBConvenienceButtons and controls: Camera key, Side keys,Soft keys, Power On/OffCall Management: Call Forwarding, Call onHold, Call Time, Call Waiting*, Caller ID*,Conference Call, Emergency Call, Microphonemute, Missed Calls, Received Calls, FirewallClock/Version: Digital, International clockEase of Use: Hands free mode, In-flightmode, Keypad Lock, Vibra Alert, Dual SIMcards, Graphical User Interface, Screen SaverDigital Clock, SoftkeysGames and applications: Agenda, AlarmClock, Calculator, Java MIDP 2.0, Stopwatch,ENG-CHN and CHN-ENG dictionary,Dashboard applications, Currency converter,Chinese festival reminder, Countdown timer,Handwriting recognition, Motion sensor, MSN,WidgetLanguage available: UI: English, ChineseSimplified, Chinese TraditionalMultimedia: FM RadioPersonal Info Management: Time Zone,Smart Phonebook, Quick Note, SD card back-upPersonalisation/Customization:Downloadable Picture, DownloadableAnimated GIF, Downloadable Ringtones,Downloadable Java Applications, Wallpaper,Fotocall, RingtonesText input: T9VibratorConnectivityAV streaming format: H263/MPEG4BluetoothHeadset: Via 3.5mm jack connectorModem Capabilities: GPRS, HSDPA DL3.6Mbps, UL 384KbpsPC Link: USB 2.0Bluetooth profiles: A2DP, Handsfree,Headset, Object push profile, File transferprofileBluetooth version: 2.1+EDRGPSBuilt-in GPSAccessoriesStandard Package Includes: Battery, Charger,Handset, Stereo Headset, USB data cable,User ManualPowerBattery Capacity: 2100mAhBattery Type: Lithium-ionElectrical Enhancements: Back-up batteryStandby time: WCDMA: up to 950 hrs; W+G:up to 600 hrsTalk time: WCDMA: up to 14 hrs; GSM: up to26 hrs© 2019 Koninklijke Philips N.V.All Rights reserved.Specifications are subject to change without notice. Trademarks are the property of Koninklijke Philips N.V. or their respective owners.Issue date 2019‑10‑23 Version: 3.1.112 NC: 8670 000 85191 EAN: 69 31555 21052 8。
电动刮胡刀使用说明书

电动刮胡刀使用说明书尊敬的用户:感谢您选择使用我们的电动刮胡刀。
为了确保您正确、安全地使用该产品,我们特别为您提供了以下的使用说明书。
请您仔细阅读并按照说明进行操作。
第一部分:产品概述1. 产品外观及配置我们的电动刮胡刀外观精美,手柄采用人体工学设计,舒适握持。
刀头采用高强度不锈钢材质,具有很好的耐磨性和切割性能。
产品包含主机、充电器、刀头保护罩和清洁刷等配件。
2. 产品特点(在这里列举产品的主要特点,如刀头高速旋转、双刀网设计、潮湿或干湿两种刮胡方式等)第二部分:使用前须知1. 充电(说明充电前的注意事项,如首次充电时间、充电指示灯的显示等)2. 刀头安装(描述刀头如何正确安装,包括拆卸刀头保护罩、安装刀头时的角度和注意事项等)3. 清洁与维护(介绍清洁刀头的方法和频率,以及如何清洁机身、保养电池等)第三部分:使用步骤1. 准备工作(如洗净脸部、涂抹剃须膏等)2. 开机与刮胡(说明如何打开电源开关、掌握正确的刮胡技巧、不易发生伤害的刮胡姿势等)3. 收尾与清洁(介绍使用完毕后的清洁步骤,包括刀头、机身的清洁等)第四部分:常见问题解答1. 使用过程中刺痛或不适怎么办?(列举可能的原因,如刀头损坏、刮胡姿势不正确等,并给出解决方法)2. 充电指示灯不亮或闪烁怎么办?(指导用户检查充电器、充电接口是否正常,或联系售后服务)3. 刀头寿命如何判断?何时更换?(介绍刀头的使用寿命、如何判断刀头是否需要更换等)第五部分:安全警示1. 使用时的安全事项(提醒用户不可将产品浸入水中、不可与火源接触等)2. 孩童禁用(警示用户,刮胡刀不适用于儿童使用)3. 电源注意事项(说明使用正确的充电器,避免电源故障或电池短路等)最后,请您在使用电动刮胡刀之前仔细阅读本使用说明书,并按照说明进行正确操作。
如有任何疑问或问题,请您联系我们的客服热线,我们将竭诚为您提供解答与帮助。
感谢您对我们产品的信任与支持!祝您使用愉快!此致,[公司名称]。
电动剃须刀说明书

电动剃须刀说明书标题:电动剃须刀说明书正文:尊敬的顾客,感谢您选择我们的电动剃须刀。
为了让您更好地了解和使用我们的产品,请仔细阅读以下说明。
一、产品概述我们的电动剃须刀是一款采用先进刀片技术和高性能电机的理想剃须工具。
它既适用于干剃,也适用于湿剃,能够有效地剃去胡须,为您带来舒适的剃须体验。
二、主要特点1. 超薄设计:刀头和剃须网采用超薄结构,提供更贴近皮肤的剃须效果,减少不适感。
2. 高性能电机:采用高转速电机,提供强劲的动力输出,确保顺畅的剃须效果。
3. 多功能显示屏:显示屏上可以清晰地看到当前剃须状态、剩余电量和儿童锁定状态等信息,方便您掌握使用情况。
4. 快速充电:支持快速充电功能,只需短时间充电即可继续使用。
5. 防水设计:具备良好的防水性能,方便清洗和湿剃使用。
三、产品使用1. 开机与关机:长按电源键2秒开机,再次长按2秒即可关机。
2. 剃须模式选择:按下剃须模式调节键,可切换干剃和湿剃模式。
3. 剃须步骤:(1) 使用前请确保刀头和剃须网的完好性和清洁度。
(2) 将刀头轻轻贴近皮肤,不需过度用力。
(3) 轻轻移动刀头,顺着脸部轮廓进行剃须。
(4) 剃须完毕后,关闭电源,清洗刀头和剃须网。
四、注意事项1. 请勿将电动剃须刀置于儿童易触及的地方,避免意外伤害。
2. 如发现皮肤出现过敏或刀头不适,请立即停止使用并咨询专业人士。
3. 请勿将电动剃须刀浸入水中清洗,仅需将刀头和剃须网取下后用清水冲洗即可。
4. 如长时间不使用,请将电动剃须刀存放在干燥通风的地方,并定期清洗刀头和剃须网。
五、服务与售后我们提供一年的免费质保服务,如在使用过程中遇到任何问题,请联系我们的客服中心或到当地授权维修点进行维修。
六、环保提示请注意正确处理剃须刀的电池和包装物,避免对环境造成污染。
本说明书仅供参考,如有任何疑问,请联系我们的客服中心或查阅我们的官方网站。
再次感谢您选择我们的电动剃须刀,祝您使用愉快!厂家名称。
飞利浦剃须刀中文说明书
AT890/AT811) 11 电池符号和剃须刀头符号(仅限于 AT941/AT940/AT897) 12 剃须刀开/关按钮(仅限于 AT941/AT940/AT897) 13 修剪器释放滑块(仅限于 AT941/AT940/AT897/AT896/AT894/
提示: 为获得最佳修剪性能,请每隔六个月用一滴缝纫机油润滑修 剪器齿。
存储 -- 盖上剃须刀保护盖,以防受损。 -- 仅限于 AT941/AT940/AT897/AT894/AT892/AT891/AT890:
将剃须刀存放在随附的软袋中。
112 简体中文
更换
为获得最佳剃须效果,建议您每年更换一次剃须刀头。
1 小时
AT941、AT940、AT897 AT894、AT892、AT891 AT890、AT811
8 小时
AT899、AT896、AT790 AT756、AT753、AT751 AT750
剃须时间可能会因剃须行为、清洁习惯或胡须类型的差异而少于下 表标示的时间。
60 分钟 AT941
AT940
50 分钟
106 简体中文
使用剃须刀
注意: 本款剃须刀可在沐浴或淋浴过程中使用。 因此,出于安全原因,其不能直接连在电源上使用。
剃须提示和诀窍
-- 这款剃须刀适合干湿两用。可使用剃须啫喱或泡沫湿剃, 令皮肤倍感舒爽;或采用干式剃须,更为方便。
注意: 建议在湿剃时使用剃须啫喱或泡沫。请勿使用浓稠的剃毛乳 液或剃毛油。 -- 为获得最佳的剃须效果,请在使用时作迂回运动。 -- 该剃须刀采用防水设计,可在沐浴或淋浴时时使用。 -- 您的皮肤可能需要 2 到 3 周才能适应飞利浦剃须系统。 湿剃
电动剃须刀商品说明书轻松剃须呵护男士肌肤

电动剃须刀商品说明书轻松剃须呵护男士肌肤电动剃须刀商品说明书轻松剃须呵护男士肌肤一、产品简介电动剃须刀是一种现代化的剃须工具,旨在提供便捷、舒适的剃须体验,同时保护和呵护男士的肌肤。
本说明书将为您介绍如何正确使用电动剃须刀,并给出一些建议,以便您能够充分利用该产品的功能。
二、产品特点1. 高效剃须:电动剃须刀采用先进的刀片技术,能够迅速而顺畅地剃除须发,不仅节省时间,还能确保剃须效果。
2. 皮肤保护:本产品配备的剃须刀头设计独特,能够有效减少对皮肤的刺激和摩擦,保护肌肤免受剃须刀的伤害。
3. 智能适应性:电动剃须刀针对不同的须发类型和肌肤敏感度,具备智能适应功能,能够动态调整刀片速度和力度,以提供最佳的剃须效果。
4. 便捷清洁:该产品具备易于清洁的特性,剃须刀头可拆卸并可水洗,方便用户进行日常清洁和维护。
三、使用指南1. 准备和准备工具在使用电动剃须刀之前,请确保肌肤清洁和干燥。
为了获得更好的剃须效果,您可以使用热毛巾或剃须泡沫软化须发。
2. 使用步骤(1)打开电动剃须刀电源开关,确保刀头安全锁定。
(2)将电动剃须刀刀头轻轻靠近面部,以顺时针或逆时针方向进行剃须。
(3)剃须时,请确保不要过度施加压力,以免引起不适或刮伤皮肤。
(4)每次剃须后,请清洁剃须刀头,以确保下次使用时的卫生和剃须效果。
3. 注意事项(1)在使用电动剃须刀之前,请确保阅读完整的产品说明书,并按照说明正确操作。
(2)如有皮肤过敏或刺激等不适症状出现,请立即停止使用电动剃须刀,并咨询医生的建议。
(3)请避免水浸入电动剃须刀的内部,以免损坏产品。
(4)请将电动剃须刀放置在儿童无法接触的地方。
四、产品维护为了保持电动剃须刀的良好性能和使用寿命,请遵循以下维护建议:1. 清洁剃须刀头:每次使用后,请拆卸剃须刀头并清洗。
将刀头浸泡在温水中,然后用刷子轻轻清洁刀网和刀片。
2. 定期更换刀片:建议根据个人使用频率,定期更换电动剃须刀的刀片。
Philips 牙刷机产品说明书

FlexCare Platinum ConnectedEnglish 6简体中文 17繁體中文 26IntroductionCongratulations on your purchase and welcome to Philips! To fully benefit from the support that Philips offers, register your product at /welcome .Important safety informationRead this important information carefully before you use the appliance and save it for future reference.Danger-Keep the charger away from water. Do not place or store it over or near water contained in a bathtub, washbasin, sink etc. Do not immerse the charger in water or any other liquid. After cleaning,make sure the charger is completely dry before you connect it to the wall socket.Warning-The mains cord cannot be replaced. If the mains cord is damaged,discard the charger.-Always have the charger replaced with one of the original type in order to avoid a hazard.-Do not use the charger outdoors or near heated surfaces.-If the appliance is damaged in any way (brush head, toothbrush handle or charger), stop using it. This appliance contains no serviceable parts. If the appliance is damaged, contact theConsumer Care Center in your country (see chapter 'Warranty and support').Caution-Do not clean the brush head, the handle and/or the charger in the dishwasher.-If you have had oral or gum surgery in the previous 2 months,consult your dentist before you use the toothbrush.-Consult your dentist if excessive bleeding occurs after using this toothbrush or if bleeding continues to occur after 1 week ofuse.Also consult your dentist if you experience discomfort or pain when you use the Philips Sonicare.6English-The Philips Sonicare toothbrush complies with the safetystandards for electromagnetic devices. If you have a pacemaker or other implanted device, contact your physician or the device manufacturer of the implanted device prior to use.-If you have medical concerns, consult your doctor before you use the Philips Sonicare.-This product has only been designed for cleaning teeth, gums and tongue. Do not use it for any other purpose. Stop using theproduct and contact your doctor if you experience any discomfort or pain.-The Philips Sonicare toothbrush is a personal care device and is not intended for use on multiple patients in a dental practice or institution.-Stop using a brush head with crushed or bent bristles. Replace the brush head every 3 months or sooner if signs of wear appear.-Do not use other brush heads than the ones recommended by the manufacturer.-If your toothpaste contains peroxide, baking soda or bicarbonate (common in whitening toothpastes), thoroughly clean the brush head with soap and water after each use.This prevents possible cracking of the plastic.Electromagnetic fields (EMF)This Philips appliance complies with all applicable standards and regulations regarding exposure to electromagnetic fields.Your Philips Sonicare (Fig. 1)1Hygienic travel cap2Brush head with unique identifier3Handle4Sensors5Power on/off button6Bluetooth7Intensity level indicator8Intensity level button (+ and -)9Brushing modes7English10Mode button11Battery level indicator12Travel charger-Not shown: Travel caseNote: The content of the box may vary based on the model purchased.Preparing for useAttaching the brush head1Align the brush head so the bristles point in the same direction as the front of the handle (Fig. 2).2Firmly press the brush head down onto the metal shaft until it stops.Note: Philips Sonicare brush heads are imprinted with icons to easily identify your brush head (Fig. 4).Charging your Philips Sonicare1Put the plug of the charger in a wall socket.2Place the handle on the charger.The flashing light of the battery level indicator indicates that the toothbrush is charging (Fig. 5).Note: It takes at least 24 hours to fully charge the battery.Using the applianceBluetooth connectivityBefore you start the connectivity procedure, make sure your mobile device runs on Bluetooth 4.0 or higher.Note: For the latest information on device compatibility, please visit the App Store or Google Play.8EnglishConnecting your toothbrush1When used in connected mode, the Philips Sonicare app gives you the opportunity to receive real-time feedback on brushing, store and share brushing data with your dentist (if you so choose), and receive personalized coaching. If you wish to use the toothbrush in unconnected mode, the toothbrush will still function. To use the toothbrush in connected mode, please follow the instructions below.2Download the Philips Sonicare app from the Apple App Store or Google Play Store.3Confirm Bluetooth is switched on on your mobile device before you open the app. Check the settings on your mobile device to switch on Bluetooth.4To connect the toothbrush to the app, switch onthe toothbrush by pressing either the power on/off button or the brushing mode button. Make sure the toothbrush is not on the charger when you switch it on.5Open the Sonicare app.6Follow the Sonicare app instructions displayed on your mobile device. The app automatically connects with the toothbrush. If the toothbrush does not connect, follow the troubleshooting steps provided in the app.Note: For optimal data capture, keep your mobile device close during brushing.Brushing instructions1Wet the bristles and apply a small amount of toothpaste.2Place the toothbrush bristles against the teeth at a slight angle (45degrees), pressing firmly to make the bristles reach the gumline or slightly beneath the gumline (Fig. 6).Note: Keep the center of the brush in contact with the teeth at all times.3Press the power on/off button to turn on the Philips Sonicare.9English4Apply light pressure to maximize Philips Sonicare’s effectiveness and let the Philips Sonicare toothbrush do the brushing for you.Do not scrub.5Gently move the brush head slowly across the teeth in a small back and forth motion so the longer bristles reach between your teeth. Continue this motion throughout the brushing cycle.6To clean the inside surfaces of the front teeth, tilt the brush handle semi-upright and make several vertical overlapping brushing strokes on each tooth (Fig. 7).Note: To make sure you brush evenly throughout the mouth,divide your mouth into 6 sections using the BrushPacer feature (see chapter ‘Features’).7Follow the Sonicare app's brushing guidance combined with the BrushPacer and begin brushing in section 1 (upper right teeth) and brush for 20 seconds before you move to section 2 (upper front teeth). Continue doing this for section 3 till 6 to ensure even brushing in all 6 segments of the mouth (Fig. 8).Note: When using the White mode, two additional 20 second intervals can be used for polishing your front teeth.8The Philips Sonicare app helps to address any missed spots by guiding you to spend 20 seconds in the areas you missed during brushing.Your Philips Sonicare toothbrush is safe to use on:-Braces (brush heads wear out sooner when used on braces)-Dental restorations (fillings, crowns, veneers)Note: Ensure that braces or dental restorations are properly adhered and not compromised. If not, braces or dental restorations may be damaged when they come into contact with the brush head.Note: When the Philips Sonicare toothbrush is used in clinical studies,the handle should be fully charged and the Easy-start feature deactivated.Brushing modesNote: When the toothbrush is switched on, you cannot toggle between modes.10English1Prior to turning on the Sonicare, press the mode button to toggle between modes.-The selected brushing mode illuminates.-Once a brushing mode has been selected, it remains active until another brushing mode is selected.Clean modeStandard mode for superior teeth cleaning.White mode2 minutes of alternating between White and Massage, with an additional 40 seconds to polish your visible front teeth.Deep CleanProvides an invigorating of deep massage to deliver an exceptionally clean experience.Intensity levels per mode-Low: 1 LED indicator light.-Medium: 2 LED indicator lights.-High: 3 LED indicator lights.Note: to adjust the intensity level to the next higher or lower level, you can press the + button to increase intensity or the - button to decrease intensity at any time during the brushing cycle.Pressure SensorA change in vibration (and a slight change in sound) alerts you when you apply too much pressure while brushing. See chapter ‘Features’.Battery status (when handle is not on charger)- 1 yellow LED indicates a low charge.- 3 green LEDs indicate a full charge.Note: If you hear two sets of five beeps and the yellow LED of the battery level indicator flashes, your Sonicare will turn off until placed on the charger, where it will start to recharge.Note: Your Sonicare will not be able to run a brushing routine until it is fully recharged.Note:To keep the battery fully charged at all times, you may keep your Sonicare on the charger when not in use.11EnglishFeaturesPressure SensorThis Philips Sonicare model comes with the Pressure Sensor feature activated. The Pressure Sensor works in all 3 modes and at all 3intensity levels.Activating or deactivating the Pressure Sensor feature 1Attach the brush head to the handle.2Place the handle in the plugged-in charger.-To deactivate Pressure Sensor:Press and hold the power on/off and mode button for 2 seconds.You hear 1 beep to indicate that the Pressure Sensor feature has been deactivated.-To activate Pressure Sensor:Press and hold the power on/off and mode button for 2 seconds.You hear 2 beeps to indicate that the Pressure Sensor feature has been activated.BrushPacer-The BrushPacer is an interval timer that has a short beep and pause to remind you to brush the 6 sections of your mouth.Depending on the brushing mode or brushing routine you have selected, the BrushPacer beeps at different intervals during the brushing cycle. See the ‘Brushing instructions’ sections (Fig. 8).To deactivate or reactivate the BrushPacer feature:1Place the handle with a brush head attached in the plugged-in charger.2Press and hold the mode button until:a You hear 1 beep to indicate the BrushPacer has beendeactivated.b You hear 2 beeps to indicate the BrushPacer has beenactivated.12EnglishSmartimerThe Smartimer indicates that your brushing cycle is complete by automatically turning off the toothbrush at the end of the brushing cycle.Dental professionals recommend brushing no less than 2 minutes twice a day.Easy-startThis Philips Sonicare comes with the Easy-start deactivated.The Easy-start feature gently increases the power over the first 14brushings to help you get used to the brushing with the Philips Sonicare.Note: Each of the first 14 brushings must be at least 1 minute in length to properly advance through the Easy-start ramp-up cycle.Activating or deactivating the Easy-start feature1Attach the brush head to the handle.2Place the handle in the plugged-in charger.-To activate Easy-start:Press and hold the power on/off and mode button for 2 seconds.You hear 2 beeps to indicate that the Easy-start feature has been activated.-To deactivate Easy-start:Press and hold the power on/off and mode button for 2 seconds.You hear 1 beep to indicate that the Easy-start feature has been deactivated.Note: Using the Easy-start feature beyond the initial ramp-up period is not recommended and reduces Philips Sonicare effectiveness in removing plaque.Note: Each of the first 14 brushings must be at least 1 minute in length to properly move through the Easy-start ramp-up cycle.Cleaning13EnglishToothbrush handle1Remove the brush head and rinse the metal shaft area with warmBrush head1Rinse the brush head and bristles after each use (Fig. 10).2Remove the brush head from the handle and rinse the brush head connection with warm water at least once a week. Rinse the travel cap as often as needed.Charger1Unplug the charger before you clean it.2Wipe the surface of the charger with a damp cloth. Make sure you remove any toothpaste or other residue from the charger surfaces.StorageIf you are not going to use the product for a long time, unplug it, clean it (see chapter 'Cleaning') and store it in a cool and dry place away from direct sunlight.Replacement Brush head-Replace Philips Sonicare brush heads every 3 months to achieve optimal results.Note: The Sonicare App will tell you when it is time to replace your brush head. (See in-app Help section)-Use only Philips Sonicare replacement brush heads.Recycling-Do not throw away the product with the normal household waste at the end of its life, but hand it in at an official collection point for recycling. By doing this, you help to preserve the environment.14English-This product contains a built-in rechargeable battery which shall not be disposed of with normal household waste. Please take your product to an official collection point or a Philips service center to have a professional remove the rechargeable battery.-Follow your country’s rules for the separate collection of electrical and electronic products and rechargeable batteries. Correct disposal helps prevent negative consequences for theenvironment and human health.Removing the rechargeable battery(standard) screwdriver. Observe basic safety precautions when you follow the procedure outlined below. Be sure to protect your eyes,hands, fingers, and the surface on which you work.1To deplete the rechargeable battery of any charge, remove the handle from the charger, turn on the Philips Sonicare and let it run until it stops. Repeat this step until you can no longer switch on the Philips Sonicare.2Insert a screwdriver into the slot located at the bottom of thehandle and turn counterclockwise to release the bottom cap (Fig.11).3Hold the handle upside down and push down on the shaft to release the internal components of the handle (Fig. 12).4Insert the screwdriver under the circuit board, next to the battery connections, and twist to break the connections. Remove the circuit board and pry the battery from the plastic carrier (Fig. 13).The rechargeable battery can now be recycled and the rest of the product discarded appropriately.Warranty and supportIf you need information or support, please visit/support or read the international warranty leaflet.15EnglishWarranty restrictionsThe terms of the international warranty do not cover the following:-Brush heads.-Damage caused by use of unauthorized replacement parts.-Damage caused by misuse, abuse, neglect, alterations or unauthorized repair.-Normal wear and tear, including chips, scratches, abrasions,discoloration or fading.Hereby, Philips Consumer Lifestyle BV declares that the radio equipment type Bluetooth LE is in compliance with Directive 2014/53/EU.The full text of the EU declaration of conformity is available at the following internet address: /support16English简介感谢您的惠顾,欢迎光临飞利浦! 为了让您能充分享受飞利浦提供的支持,请在 /welcome 上注册您的产品。
- 1、下载文档前请自行甄别文档内容的完整性,平台不提供额外的编辑、内容补充、找答案等附加服务。
- 2、"仅部分预览"的文档,不可在线预览部分如存在完整性等问题,可反馈申请退款(可完整预览的文档不适用该条件!)。
- 3、如文档侵犯您的权益,请联系客服反馈,我们会尽快为您处理(人工客服工作时间:9:00-18:30)。
A Protection cap B Shaving unit C Shaving unit release button D Shaver on/off button E Charging light F Trimmer (PT880, PT860 only) G Trimmer release slide (PT880, PT860 only) H Cleaning brush I Adapter
Charging
PT880, PT860: It takes approx. 1 hour to fully charge the shaver.
English 9
PT735/PT730/PT725/PT720: It takes approx. 8 hours to fully charge the shaver. When you charge the shaver for the first time or after a long period of disuse, let it charge until the charging light lights up continuously. A fully charged shaver provides up to 17 (PT880, PT860) or 14 (PT735/PT730/PT725/PT720) cordless shaves. The shaving time may be less than 17 (PT880, PT860) or 14 (PT735/PT730/PT725/PT720) cordless shaves as a result of your shaving behaviour, your cleaning habits or your beard type.
off the adapter to replace it with another plug, as this causes a hazardous situation. -- The appliance is not intended for use by persons (including children) with reduced physical, sensory or mental capabilities, or lack of experience and knowledge, unless they have been given supervision or instruction concerning use of the appliance by a person responsible for their safety. -- Children should be supervised to ensure that they do not play with the appliance. -- Always unplug the shaver before you clean it under the tap. -- This symbol means: Forbidden to use in the shower. -- Warning: Do not use this appliance close to a bathtub, shower or other containers filled with water.
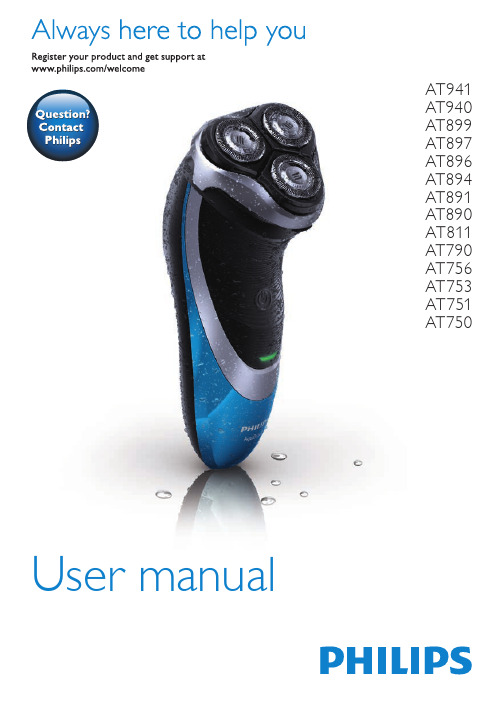
Register your product and get support at
/welcome
PT880, PT860, PT735, PT730, PT725, PT720
1
PT880, PT860, PT735, PT730, PT725, PT720
English 6 简体中文 20
General -- This shaver can be safely cleaned under the tap. -- This symbol means: Suitable to be cleaned under a
running tap. -- The adapter is equipped with an automatic
6 English
Introduction
Congratulations on your purchase and welcome to Philips! To fully benefit from the support that Philips offers, register your product at /welcome. Please read this user manual, as it contains information about the wonderful features of this shaver as well as some tips to make shaving easier and more enjoyable.
Compliance with standards -- This shaver complies with all standards regarding
electromagnetic fields (EMF). If handled properly and according to the instructions in this user manual, this shaver is safe to use based on scientific evidence available today. -- This shaver complies with the applicable IEC safety standards.
Charge indications
Battery low -- When the battery is almost empty (when there
are only 5 or fewer shaving minutes left), the charging light starts to flash orange. -- When you switch off the shaver, the charging light continues to flash orange for a few seconds.
Charging -- When the shaver is charging, the charging light
flashes green.
Battery fully charged -- When the battery is fully charged, the charging
light lights up green continuously.
8 English
-- Do not use the shaver, adapter or any other part if it is damaged, as this may cause injury. Always replace a damaged adapter, charger or part with one of the original type.
Note:After approx. 30 minutes, the charging light goes out to save energy.
10 English
Charging with the adapter
1 Put theห้องสมุดไป่ตู้small plug in the shaver.
2 Put the adapter in the wall socket. ,, The charging light shows the charging status of
-- Only use the adapter, charger and accessories supplied.
-- Always put the protection cap on the shaver to protect the shaving heads when you are travelling.
Caution -- Do not immerse the shaver in water or any
other liquid. -- Do not use water hotter than 80°C to rinse
the shaver. -- Be careful with hot water. Always check if the
water is not too hot, to prevent your hands from getting burnt. -- The shaver is not dishwasher-proof. -- Warning: Remove the detachable cord from the handheld part before cleaning this part in water. -- Water may leak from the socket at the bottom of the shaver when you rinse it.This is normal and not dangerous because all electronics are enclosed in a sealed power unit inside the shaver.
Note:You can find the type number on the back of the shaver.
Important
Read this user manual carefully before you use the appliance and save it for future reference.