(完整word版)Cobasc501分析仪用户操作手册
COBAS生化仪操作指南

输入最后样本编号
Start 将样本放到定义 好的急诊位
Start
4 关机
1C8000 需做关机前保养;请按以下程序执行;在Wash Rack绿架子上加入
Pos W1: Multiclean Pos W2: ISE Cleaning Solution SysClean Pos W3: ISE Activator
Start
单个标本
Save
项目相同
Repeat
输入起始号;回车
急诊样本
Stat
选择样本类型 输入样
本位置样本号
手工重测
如果仪器处在Standby或S stop 模式
选择需要重测的样本;编辑需重测的项目;检查样本位置
输入起始号;回车位
Start
选择项目
2 结果浏览
SaveΒιβλιοθήκη WorkplaceData Review
Calibration
Calibrator
Rack Assign
选定标液及空 位置
Add
OK
3 应用设置 Utility
3 质控设置
1 质控品装载
Application
Others
在1 2 3… 中填入定标液的编 码;下面填入样本量
Save
2 安排质控品架号
QC
Chemistry
Install
原装 手工
DailyMaintenance设置状态自动运行 C 查看Reagent preparing状态;是否添加试剂
或其他液体一般前一天关机前加好;以备第二 天顺利使用 D 查看Calibration情况;准备定标液和定标架
COBAS8000生化仪操作指南
3 COBAS8000生化仪Standby状态操作 A 进行Sample Data Clear清除以往数据 B 进行Calib and QC Select操作;按设置规定
P01.91.420016-02 CA51简易操作指南(中文)
CA51凝血分析仪简易操作指南1 开机打开电源开关,系统自检,恒温器对测试通道加热,约10分钟TEMP(温度)指示灯亮,然后仪器可进行正常测量。
2 常用项目的基本操作规范实例选定菜单“1—测量样品”,进入测量界面选择进行样品测量还是质控测量(下面以样品测量为例说明)。
2.1PT测试2.2病人编号设置测试项目,病人编号(ID):2.3输入号按“2”键出现光标,按键盘上的“”“”可搜索检测项目或直接输入项号按“确认”键确认,取消请按“菜单”键;按“1”键出现光标,输入“0001”1号病人;确认请按“确认”键,取消请按“菜单”键。
2.4PT试剂预热将PT试剂根据测试样本多少取适量试剂预温位预热至37度。
2.5血浆预温加血浆20ul于测试通道或预温位的空比色杯内,预温2分钟(样本加入杯子底部,不能有气泡)。
2.6加样器吸取试剂将已预温的比色杯放入测试通道内,用联机加样器吸取40ul PT试剂。
2.7检测按“OPTIC”键,屏幕提示“请添加试剂”时加入PT试剂,当加样器按到底后松开时,迅速关闭遮光盖,仪器自动开始计时检测,最后显示和打印测量结果。
2.8多个样品操作重复2.5、2.6、2.7过程可连续测定多个病样的PT,测完一个PT后病人编号会自动加1,(按“菜单”键返回主菜单)。
2.9APTT测试在测量界面按“2”键出现光标,按照提示,在相应测试通道用“”“”光标键或直接输入项目号:02选定APTT;取20ul待测血浆放入比色杯,再取20ulAPTT试剂加入比色杯,放入测试位预温3分钟;用联动加样器吸取已预温好的Cacl220ul,按“OPTIC”键,屏幕提示“请添加试剂”时加入Cacl2试剂,迅速关闭遮光盖,仪器自动开始计时检测,最后显示测量结果。
2.10TT测试在测量界面按“2”键出现光标,按照提示,用“”“”光标键或直接输入项目号:03选定TT。
取30ul待测血浆放入比色杯,预温2分钟;联动加样器吸取已预温好的TT试剂30ul,按“OPTIC”键,提示“请添加试剂”时加入试剂,迅速关闭遮光盖,仪器自动计时检测,最后显示测量结果。
罗氏公司COBAS C501全自动生化分析仪检测系统性能验证

血 液 筛 查 ; c MI A 检 测 梅 毒 抗 体 是 近 年 来 应 用 的 一 项 新 方
法, 其原 理是将重组 T P抗 原 包 被 于 微 粒 子 , 通 过 该 微 粒 子 与 检验标本稀 释液混合 , 检 测标本 中存在 的梅毒 抗体 , 从 而 大 大 提 高 了检 测 的灵 敏 度 和 特 异 度 [ 4 - 6 ] ; TP P A 是 目前 公 认 的 梅 毒 确认试验 之一 , 所 检 测 的抗 体 属 于 特 异 性 抗 体 , 具 有 高灵 敏 度 ,
率为 5 3 ; 1 4 , 另 还 有 4例 可 疑 标 本 。 初 筛 实 验 灵 敏 度 高 , 但
[ 5 ] 袁 明生. 化 学 发 光 微 粒 子 免 疫 分 析 法 检 测 梅 毒 螺 旋 体 抗
的应 用 评 价 [ J ] . 检验医学 , 2 0 1 0 , 2 5 ( 7 ) . 5 7 1 — 5 7 2 .
( 收稿 日期 : 2 0 1 6 - 0 5 1 6 修 回 日期 : 2 0 1 6 - 0 7 — 2 8 )
[ 1 ] 尹静 , 徐贵江 , 刘 艳. 4种 梅 毒 血 清 学 检 测 方 法 的 临 床 应 用
[ 6 ] 张 东梅 , 徐韫健 , 张婷. 化 学 发 光 微 粒 子 免 疫 法 和 梅 毒 螺 旋 体颗粒凝集试验检测梅毒抗 体 的比较[ J ] . 中 国微 生 态
学杂志 , 2 O 1 3 , 2 5 ( 1 0 ) : 1 2 1 2 — 1 2 1 4 . TP P A结合 , 避 免 误 诊 的 发 生 。梅
( 40): 1 39 2 — 1 3 94 .
分布 , 而 且还 有 低 龄 化 感 染 的 趋 势 , 此 结 果 和 已报 道 的梅 毒 传 播 有 低 龄 化 和 在 大 学 生 人 群 中 传 播 趋 势 相 吻 合 ] 。 梅毒发病 率有不断上升趋势 , 并 且 已从 高 危 人 群 向普 通 人 群扩散 , 全社会应该加强宣传教育 , 提 高 民众 对 梅 毒 的认 识 , 减 少 梅 毒 的感 染 率及 传 播 率 。 梅 毒 血 清 学 检 查 是 诊 断 梅 毒 的重
cobas c501开放通道试剂说明书

•Indicates cobas c systems on which reagents can be used Order information Roche/Hitachi cobas c systemscobas c311cobas c501cobas c pack MULTI Cat.No.0459*******System-ID0777773••Open/close tool On requestEnglishSystem informationDevelopment channel applications:ACN311-315Development channel diluents:ACN958-960Intended useEmpty reagent carrier for use on Roche/Hitachi cobas c systems.SummaryDevelopment channel applications are based on the open channel concept.Before using a development channel application,it must be installed on theanalyzer via cobas link and all parameters entered manually.For development channel applications,cassette kits from Roche Diagnosticsare available(see the order information section).These kits consist of acobas c pack MULTI with bottles in different sizes,which is prelabeled witha development channel barcode.Since the same development channelbarcode label is used for all of the development channel applications,the cobas c pack MULTI has to be assigned to a development channelapplication before loading it onto the analyzer.Tests not originating from Roche Diagnostics with a maximum ofthree reagents can be assigned to a given development channel.Ifa diluent for automatic sample predilution is required,this has to beprovided in a separate cobas c pack MULTI.Tests originating from Roche Diagnostics are described in thecorresponding method sheets.cobas c pack MULTI bottle informationBottlepositions:Position A(large bottle):Maximum fill volume:25.65mLMaximum variable dead volume:1.8mLMinimum bottle dead volume:3.85mLMaximum use volume:20.0mLPosition B(small bottle):Maximum fill volume:18.3mLMaximum variable dead volume:0.9mLMinimum bottle dead volume:2.4mLMaximum use volume:15.0mLPosition C(small bottle):Maximum fill volume:18.3mLMaximum variable dead volume:0.9mLMinimum bottle dead volume:2.4mLMaximum use volume:15.0mLNote:The variable dead volume is dependent on the total fill volume.It is necessary for correct cobas c pack MULTI handling on the instrument.Reagent and diluent preparationUse only accessories as listed in the order information section.Always use a new cobas c pack MULTI when preparing fresh reagent.Never reuse accessories designed for single use as this may cause reagent contamination and affect test results.Filling the cobas c pack MULTI bottles incorrectly may result in a reduced number of tests or refusal of the cobas c pack MULTI by the instrument. Please follow the described procedure step by step.Reagent:Prepare the reagent according to the manufacturer’s instructions. Calculation of use volume:To calculate the use volume(V useRX)for each reagent,first determinethe following parameters for a given test:•N=No.of tests per cobas c pack MULTI to be performed•V pipRX=Reagent pipetting volume per test inµL for each reagent R1,R2and/or R3Note:The no.of tests per cobas c pack MULTI must not exceed500.The names R1,R2and R3refer to the reagent parameters in the application parameter screen.Please use these descriptors for all of the following steps,even if only one or two reagents are used in the test.•V useR1(mL)=N*V pipR1(µL)/1000•V useR2(mL)=N*V pipR2(µL)/1000•V useR3(mL)=N*V pipR3(µL)/1000Example:N=150tests per cobas c pack MULTI•V pipR1=100µL per test•V pipR2=40µL per test•V pipR3=20µL per testCalculation of use volume:•V useR1=150*100/1000=15.0mL•V useR2=150*40/1000=6.0mL•V useR3=150*20/1000=3.0mLCalculation of bottle fill volume:To calculate the fill volume(V fillRx)for each reagent,use the following equations.The first factor defines the variable dead volume.•V fillR1(mL)=1.09*N*V pipR1(µL)/1000+3.85•V fillR2(mL)=1.06*N*V pipR2(µL)/1000+2.4•V fillR3(mL)=1.06*N*V pipR3(µL)/1000+2.4Example:N=150tests per cobas c pack MULTI•V pipR1=100µL per test•V pipR2=40µL per test•V pipR3=20µL per testCalculation of fill volume:•V fillR1=1.09*150*100/1000+3.85=20.2mL•V fillR2=1.06*150*40/1000+2.4=8.8mL•V fillR3=1.06*150*20/1000+2.4=5.6mLImportant:The fill volume for R1must not exceed25.65mL.For R2and R3thefill volume must not exceed18.3mL.If this is the case for one of the reagents the number of tests per cobas c pack MULTI must be reduced and the use and fill volumes for all reagents recalculated.Filling the cobas c pack MULTI:Bottle positions:Filling rules:•Always fill position A with R1.•Always fill position B with R2.•Always fill position C with R3.1.Turn the cobas c pack MULTI towards you as shown above.2.Position A of the cobas c pack MULTI is now in the center,position B onthe left side and position C on the right side of the cobas c pack MULTI.3.Unscrew the screw cap of the bottle in position A in the center ofthe cobas c pack MULTI using the open/close tool.4.Pour the appropriate volume of R1as calculated above into theopen bottle of the cobas c pack MULTI(position A).5.Close the bottle tightly using the open/close tool.6.Unscrew the screw cap of the bottle in position B on the left sideof the cobas c pack MULTI using the open/close tool.7.Pour the appropriate volume of R2as calculated above into theopen bottle of the cobas c pack MULTI(position B).8.Close the bottle tightly using the open/close tool.9.Unscrew the screw cap of the bottle in position C on the right sideof the cobas c pack MULTI using the open/close tool.10.Pour the appropriate volume of R3as calculated above into theopen bottle of the cobas c pack MULTI(position C).11.Close the bottle tightly using the open/close tool.Example(using the above calculations):•Pour20.2mL of R1into the large bottle in the center of the cobas c pack MULTI(position A).•Pour8.8mL of R2into the small bottle on the left side of the cobas c pack MULTI(position B).•Pour5.6mL of R3into the small bottle on the right side of the cobas c pack MULTI(position C).Diluent:Prepare the diluent according to the manufacturer’s instructions.The defined diluent bottle(B,A and/or C)of the cobas c pack MULTI has to be filled with the maximum fill volume and closed tightly using the open/close tool.If more than one diluent bottle is used the instrument automatically switches to the next bottle until all bottles are empty.In the Dilution and Cleaner Cassette Setting screen(Utility>System>Page3/4>button[Dil.+Cln.]),select Bottle Setting to enter the use volume for the diluent bottles to be defined. Position A(large bottle):Use volume:19.0mLPosition B(small bottle):Use volume:12.0mLPosition C(small bottle):Use volume:12.0mLThe cobas c pack MULTI is now ready for use.Note:Before loading the cobas c pack MULTI onto the instrument,it has tobe reserved for a development channel application.Once a cobas c pack MULTI is removed from the instrument,it cannot be reloaded.When loaded onto the instrument,each cobas c pack MULTI is registered as full in the reagent inventory.Therefore,if a used and/or only partially filled cobas c pack MULTI is loaded onto the instrument,the number of tests may be reduced or it may be refused by the instrument.Development Channel Application ParametersInstalling development channel applications1.Select Utility >Application to display the application screen.2.Select Download to open the download screen.3.Select Application Code in the area Search Using and select anapplication code between 311and 315from the drop-down list.4.Choose Search to start searching for the selected criteria.The search results will be displayed.5.Mark the check box in the column Selection to download thecorresponding application and choose Download .6.The file transfer window will then open.Choose OK to transfer the file.7.The Confirmation window will then open.The short test name assignedto the application will be automatically displayed in the Test Name text box (DC311-315).However,the user can enter a different short test name (up to five characters),if desired.The measurement unit and the registration number (channel)of the application can be selected here.Please be aware that these definitions cannot be changed later.Choose OK to download the application.8.Select Close to close the download screen.9.If multiple c modules are configured,assign the test application to theappropriate module (Utility >Module Set >Test Assignment ).10.Define a Print Order for the test application (Utility >Report Format).11.Define all parameters for the development channel as follows.Defining application parameters -Analyze tabTo display the analyze screen select Utility >Application >Analyze.Select the development channel from the Test list on the left side of the screen.Assay/Time/Point:Choose the settings for the parameters assay type,assay time and measuring points.•1st entry field:Select the assay type from the drop-down menu.•2nd entry field:Select the assay time from the drop-down menu.•3rd -6th entry fields:Enter the appropriate measuringpoints in the given fields.Wavelength:Choose the wavelength to be used with the application.•1st entry field:2nd or sub wavelength.•2nd entry field:1st or main wavelength.If the application is intended for monochromatic measurements,choose Cancel in the first entry field.Sample Volume:On cobas c systems it is possible to perform automatic predilution for patient samples and controls.•1st entry field:Sample volume (µL)of the undiluted sample for thenormal,decreased and increased volume settings.•2nd entry field:Sample volume (µL)of the prediluted sample for thenormal,decreased and increased volume settings.•3rd entry field:Diluent volume (µL)for the normal,decreasedand increased volume ually the first run is performed with the normal sample volume settings.A rerun is performed with decreased or increased volume settings,if necessary.In case the decreased sample volume setting is used,the diluted sample volume is used for the rerun.Note:When programming dilutions for development channel applications,the total (undiluted)sample volume and diluent volume must be at least 100µL (due to mixing).Dilution:In the Dilution area,the diluent for the development channel application can be defined.•Water•Diluent :Enter the appropriate diluent ACN:951(NaCl 9%),958,959or 960.In addition,enter the dilution factor for a concentrated diluent.For more information refer to the Dilution and Cleaner Cassette Setting (Utility >System >Page 3/4>button [Dil.+Cln.]).Cassette Configuration:•Code :0777773(fixed for development channels)•Expiration Days:Enter the on board stability of the reagent in days.Reagent Volume:Up to three different reagents (R1,R2,R3)for one test can be used,but usually only two reagents are used (R1and R2or R3).R1is added directly after the sample is pipetted.•1st entry field:Reagent pipetting volume (µL)for R1,R2and R3in µL,respectively.•2nd entry field:Water volume (µL)that should be added by thesystem after pipetting R1,R2and R3,respectively.•3rd entry field:Always select Inactive .Bottle Setting:The bottle settings can be entered after opening the Bottle Setting screen in the Cassette Configurationarea.•a,b and c denote the bottle position in the cobas c pack MULTI.•1st entry field:Select the reagent type from the drop-down menu.For a always select R1,for b always select R2and for c always select R3.•2nd entry field:Enter the number of tests per bottle,which is identical to the number of tests per cobas c pack MULTI for all three reagents.•3rd entry field:Enter the calculated use volume (mL).Checks and other settings (for more information,refer to the COBICD):Linearity Limit:When performing rate assays,the relationship between the absorbance change and time must be linear.If the linearity is beyond the limit value,an alarm flag >Lin.is displayed with the result.•1st entry field Linearity limit for rate assays with 4-16points[0-100](0:No Check)•2nd entry field Linearity limit for rate assays with ≥17points[0-100](0:No Check)•3rd entry field Minimal total rate in the measuring window to perform the check[0-32000]•4th entry fieldMinimal rate difference between the first 5(11)points and the last 5(11)points in the measuring window to perform the check[0-32000]Prozone Limit:The prozone check is used to detect the effect of excess antigen on turbidimetric immunoassays,which can lead to deagglutination and detection of concentrations on the right side of the signal dose response curve (Heidelberger Curve).Due to this,abnormally high samples may give incorrect or even false normal results.The prozone limit check can also be used to detect unexpected reaction kinetics when measuring gammopathic samples.•1st entry field Prozone Limit (lower limit value)[-32000-32000]•2nd entry field Prozone Limit (upper limit value)[-32000-32000]•3rd entry field MP1:Measuring point of 1st slope [1-70](0:Cancel)•4th entry field MP2:Measuring point of 1st slope [1-70](0:Cancel)•5th entry field MP3:Measuring point of 2nd slope [1-70](0:Cancel)•6th entry field MP4:Measuring point of 2nd slope [1-70](0:Cancel)•List box Defines the range where the flag occurs[Inside,Outside]•7th entry field Minimal signal difference of 1st slope to perform the check[-32000-32000]•8th entry fieldMinimal signal difference of 2nd slope to perform the check[-32000-32000]Abs.Limit (for rate assays only):In rate assays,correct data cannot be obtained if the concentration or activity value is beyond the quantitative range.For this reason,a check is performed with reference to a set upper or lower absorbance limit.For rate assays with ascending absorbances,the limit is an upper limit;for assays with descending absorbances,the limit is a lower limit.A data alarm (>React )is issued if only 2or less measure points remain within the set absorbance limit.The alarm is not issued if there are 3or more measure points within the absorbance limit.•1st entry field:Enter absorbance limit [0-32000(Abs x 104)].•2nd entry field:Choose the appropriate assay directionfrom the drop-down menu.Cell Detergent:In general,detergents are used for washing the reaction cell after measurements are taken.•Detergent 1:Cell Wash Solution I /NaOH-D •Detergent 2:Cell Wash Solution II /AcidWash •Detergent 1&2Stirring Level:The stirring level of the test application can be defined in this field.Range:[1-15]Stirring Setting:Defines complex ultrasonic mixing patterns.Please do not change predefined settings.Defining application parameters -Calib.tabTo display the calibration screen select Utility >Application >Calib.Calibration Type area:•Calibration Type:Choose the appropriate calibration typefrom the drop-down menu.•Point :Up to 6calibrators (points)can be defined to calibrate a test.•Span :The calibrator that corresponds to the span point is measuredand the previously measured calibration curve is adjusted to this setpoint for each applicable calibration type.Checks and other settings (for further information refer to the COBICD):SD Limit:Defineable for nonlinear or multipoint linear tests.For each calibrator,an absorbance value is calculated from the given concentration and the current calibration curve.This calculated absorbance is compared to the measured absorbance.If the difference between the two exceeds the SD limit value,an SD.E alarm is issued.The SD limit value is defined in the SD Limit box (in Abs ×104).An SD limit value of 999.9denotes omission of the check.Duplicate Limit:All photometric calibrators are run in duplicate.The duplicate check calculates the %error and the absolute absorbance error (difference)between these duplicate measurements.The obtained check values are compared to the %error limit and the absorbance error limit.Duplicate Limit entries of 99and 32000denote omission of the check.•1st entry field:Enter the %error limit.•2nd entry field:Enter the absorbance error limit.Sensitivity Limit:Sensitivity refers to the ratio of an absorbance difference to a concentration difference.It is calculated from the measured absorbances and given concentration values of the blank calibrator (S1)and the span calibrator (SN).The sensitivity obtained in a calibration must lie within certain limits.If the obtained sensitivity is not within these limits,a Sens.E alarm is issued,indicating calibration failure.The calibration curve of the affected test will not be updated.A Sensitivity Limit range of -99999to 999999denotes omission of the check.•1st entry field:Enter the lower sensitivity limit.•2nd entry field:Enter the upper sensitivity limit.S1Abs.Limit:This check sets an upper and lower absorbance limit for the blank calibrator,Std (1).If the absorbance for Std (1)falls outside these limits,the system issues a S1A.E alarm indicating erroneous calibration.The calibration curve of the affected test will not be updated.An S1Abs.Limit minimum of -32000and maximum of 32000denotes omission of the check.•1st entry field:Enter the lower absorbance limit.•2nd entry field:Enter the upper absorbance limit.Auto Masking:If Auto Masking is selected,the particular test requiring calibration due to calibration failure will be automatically masked.To activate the auto masking function for the system,check the Auto Masking check box on Utility >System >Calib.Mask Setting .Auto Calibration:In the Auto Calibration area the trigger for automatic calibration is defined for eachapplication.Calibration can be requested automatically in the following cases:•Timeout :If the calibration time period for a cobas c pack has expired.•Changeover :If a new cobas c pack is loaded onto the analyzer.•QC Violation :If a QC measurement has violated a defined rule.For QC-triggered calibration,you must configure the QC violation parameters and activate QC-triggered calibration.Defining application parameters -Range tabTo display this screen select Utility >Application >Range.Report Name:User definable test name to be printed on result reports.Data Mode:Temporary inactivation of an installed method without deinstallation.Automatic Rerun:Select this check box to activate the automatic rerun function for the selected test.If the check box is selected,the test is automatically requested for rerun each time a result is flagged with a data alarm.If Automatic Rerun is selected,the sample remains on the rack rotor until the results of the test are available.To activate the automatic rerun function for the system,select Start (global button)and in the Automatic Rerun area,select Change .In the following screen,check the Routine and /or Stat check boxes.Technical Limit:The technical limit reflects the analyte concentration range within which the relation between measured signal (absorbance or rate of change in absorbance)and concentration is well defined.Any result below the lower technical limit (<Test data alarm)is repeated with increased volume.Any result over the upper technical limit (>Test data alarm)is repeated with decreased volume.•1st entry field:Enter the lower technical limit.•2nd entry field:Enter the upper technical limit.Repeat Limit:For each test a clinically relevant range can be entered.If the test result lies outside this limit but inside the concentration range defined as the technical limit of the application,the test is repeated using the same sample volume and dilution as in the first run.The concentration range entered in Repeat Limit must lie within that entered in Technical Limit .•1st entry field:Enter the lower repeat limit.•2nd entry field:Enter the upper repeat limit.Control Interval Time:A timer-based control interval can be activated and defined.After the time (hours)is specified,a QC measurement is automatically requested (Cause:Timeout)or an auto QC measurement is triggered.Auto QC On Board Stability:Activates and defines the on board stability of the analyte in control material in hours to execute the Auto QC concept.Qualitative area:In the fields of the first column (1-5)the upper limit concentration can be entered.Any result less than or equal to the value defined here will be printed with the text entered in the second field.If a result is higher than range (5),the entry from field (6)is used.L,H,I (serum index)Defines the check values for sample serum index results.If the measured results exceed the entered values,a flag is issued.If 0is entered,the corresponding check is not performed.Expected Values areaThe Expected values area is used to define the normal range for men and women in three different age groups.If the results from a test fall outside the ranges entered here,the system issues an alarm (H,L ).The last row of each category (male,female)does not allow an age limit to be entered.These expected values correspond to those for patients older than the upper limit of the second age group.Default area:•Sex :Select either male or female values to be used as the defaultexpected values if sex is not defined for a sample.•Range :Select the range of values to use as the default expectedvalues if age is not defined for a sample.Changing application parameters -Others tabTo display this screen select Utility >Application >Others.Calibrator Code:Enter the appropriate calibrator code numbers (911-930)in the entry fields for calibrators (1)to (6).Do not use calibrator codes from Roche Diagnostics products.Concentration:After entering the calibrator setpoint values (in the Calibration >Install screen),the concentrations are displayed here.Rack No.-Pos.:After rack assignment,the corresponding rack number and position is displayed.Sample Volume:The calibrator sample volume which is used for calibration is displayed.In case a predilution is required this sample volume is taken to prepare the predilution.Diluted sample volume:In case the calibrator material is diluted [with diluent (water)]the amount of diluted calibrator material which is taken for calibration is displayed in this field.Diluent volume:The amount of diluent dispersed for predilution is displayed.Assigning reagents and diluents to development channel applications 1.Select Open Channel on the Reagent >Setting screen.2.Select the appropriate test.3.Select Reserve and OK to close the window.4.Load a filled cobas c pack MULTI onto the instrument toassign it to the selected test.5.Assign a cobas c pack MULTI containing a special diluent analogously.FOR US CUSTOMERS ONLY:LIMITED WARRANTYRoche Diagnostics warrants that this product will meet the specifications stated in the labeling when used in accordance with such labeling and will be free from defects in material and workmanship until the expiration date printed on the label.THIS LIMITED WARRANTY IS IN LIEU OF ANY OTHER WARRANTY,EXPRESS OR IMPLIED,INCLUDING ANY IMPLIED WARRANTY OF MERCHANTABILITY OR FITNESS FOR PARTICULAR PURPOSE.IN NO EVENT SHALL ROCHE DIAGNOSTICS BE LIABLE FOR INCIDENTAL,INDIRECT,SPECIAL OR CONSEQUENTIAL DAMAGES.COBAS and COBAS C are trademarks of Roche.Other brand or product names are trademarks of their respective holders.Significant additions or changes are indicated by a change bar in the margin.©2007Roche DiagnosticsRoche Diagnostics GmbH,D-68298Mannheim USA:US Distributor:Roche Diagnostics,Indianapolis,INUS Customer Technical Support 1-800-428-2336。
Cobas c 501分析仪用户操作手册解读
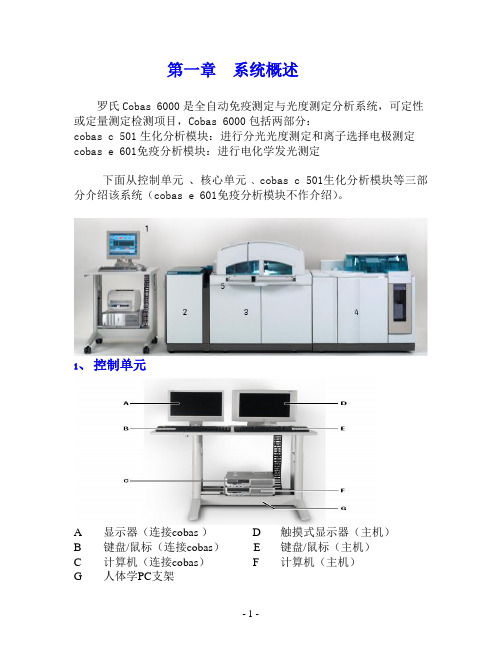
第一章系统概述罗氏Cobas 6000是全自动免疫测定与光度测定分析系统,可定性或定量测定检测项目,Cobas 6000包括两部分:cobas c 501生化分析模块:进行分光光度测定和离子选择电极测定cobas e 601免疫分析模块:进行电化学发光测定下面从控制单元、核心单元、cobas c 501生化分析模块等三部分介绍该系统(cobas e 601免疫分析模块不作介绍)。
1、控制单元A 显示器(连接cobas ) D 触摸式显示器(主机)B 键盘/鼠标(连接cobas) E 键盘/鼠标(主机)C 计算机(连接cobas) F 计算机(主机)G 人体学PC支架2、核心单元1)核心单元轨道A 核心单元 E 模块轨道B 急诊标本位 F 常规标本上机位C 条形码阅读器G 标本退出位D 标本架转盘急诊标本位A 标本架托盘B 标本架C 标本杯、微量杯2)标本架及标本容器标本架不同类型、颜色和相应编号如下:标本容器有三种类型:标本试管、标本杯、定标及质控小瓶标本试管直径为13mm或16mm,长度为75mm或100mm;标本杯可插入16 mm标本试管中用。
A 标本架上的标本杯 D 16mm×100mm试管B 16mm×75mm试管 E 16mm×100mm试管上的标本杯C 16mm×75mm试管上标本杯3、cobas c 501生化分析模块A、B 标本吸样区 E、F 试剂吸样区C 反应盘区 G 试剂盒装载区D ISE模块A、B 标本吸样区A 、B 标本针 D 标本针抽干区C 屏蔽管(防静电) E 标品针冲洗站C 反应盘区A SMS (位置2)、 Multiclean (位置1)B 水位感受器C 超声混合单元D 光度计单元 F 反应盘 G 杯冲洗装置 HHitergent从左往右依次为:Internal standard solution Internal standard solution Diluent solution Diluent solutionReference electrode solution更换以上系统试剂后,进入reagent—status,选择reagent volumn reset 后按ok,仪器即自动更新系统试剂可用量。
罗氏Cobas C501生化仪的保养操作流程

四、C501每月保养
(四)清洗Detergent 1&2 过滤器
四、C501每月保养
(五) 清洁滤网
【过滤网脏,可能会引起仪器散热效率低和仪器故障】 ➢ 1、关机或待机状态下 ➢ 2、用吸尘器清洁机器前部滤网除尘
五、C501每两月保养
更换测试电极
【定期更换(Na K Cl)测试电极, 以预防结果问题的发生】 ➢ 1、关机或待机状态下。 ➢ 2 、拔除电极信号线。 ➢ 3 、取出旧的电极。 ➢ 4 、清洁电极腔体。 ➢ 5 、安装新的电极。
三、C501每周保养
(四) 清洁内标液缓冲池
四、C501每月保养
(一)清洁ISE参比液过滤器
【过滤器堵,可能会引起仪器故障】 每月执行一次,根据仪器使用情况按需执行。 ➢ 1、关机或待机状态下。 ➢ 2 、盖上专用盖。 ➢ 3 、从参比液瓶中取出过滤器,用去离子水冲洗。 ➢ 4 、旋紧管端的过滤器并将其放回瓶内。 ➢ 5 、执行试剂灌注。
三、C501每周保养
(三)清洁各针冲洗站
【冲洗池脏,可能会引起携带污染】 ➢ 1、关机或待机状态。 ➢ 2、使用棉签擦拭所有冲洗池。 ➢ 3、每个冲洗站注入100ml去离子水清洗。
三、C501每周保养
(四) 清洁内标液缓冲池
【内标液缓冲池脏,可能会引起ISE结果问题】 ➢ 1、关机或待机状态。 ➢ 2、拧松螺丝取出内标液缓冲池。 ➢ 3、用去离子水冲洗内标液缓冲池内的结晶。 ➢ 4、排出池内的水,将内标液缓冲池装回仪器。
和孵育盘。 ➢ 4、用棉签擦拭超声混匀器附近。冲洗孵育盘过滤器。
四、C501每月保养
(三)清洁孵育池
四、C501每月保养
(四)清洗Detergent 1&2 过滤器
Roche cobas c501操作程序-英文版
操作程序执行日期:5.3.2在操作中一定要穿戴防护设备。
戴着防护手套工作时应格外当心,因为防护手套易被刺穿或割破,从而导致感染。
5.4废物的处理5.4.1废水的处理.需添加消毒剂,严格按照生物废物处理办法处理。
5.4.2接触人源性样本会造成感染。
所有与人源性样本关联的物质和机械组件均具有潜在的生物危险。
如果样本溶液接触到您的皮肤,应立即用水清洗并使用消毒剂,咨询医生。
6 开机程序6.1开机检查检查供水、排水系统是否正常,供电是否正常,仪器标本是否存在阻碍物。
6.2关机状态6.2.1接通仪器左侧电源开关,后打开控制电脑。
电源开关6.2.2仪器开始初始化,输入用户名及密码,登陆仪器操作界面,仪器可以自动关联保养,做完保养后仪器回到后待机状态。
6.3 仪器处于Sleep状态6.3.1仪器在进入睡眠时指定的时间自动唤醒,或单击[Wake Up]唤醒仪器。
6.3.2系统结束睡眠状态至登录界面,输入用户名及密码,仪器初始化(Initializing)后,进入保养程序,完成后进入Stand by状态。
7 开机后确认操作程序执行日期:7.1进入系统Over View,点击Daily Maintenance按键,检查保养工作是否完成(仪器自动完成,但如果保养液不够量,自动保养会中断),如保养未完成,确认保养液够量后,进入Utility—Maintenance,用光标选中需做的保养项目,点Select,再Execute,手工要求仪器完成保养工作.(本机已设为开机自动保养)7.2清除标本数据库进入系统Over View,点Sample Data Clear,选择CLEAR后点OK,即可清除以往所有的病人结果数据.7.3检查试剂盘内试剂是否足够:进入Reagent界面,点击Setting 按键,从该画面下检查试剂量,按需要更换试剂7.3.1 c501罗氏原装试剂将罗氏原装试剂外包装拆除后,生化试剂盒直接放到试剂装载口,仪器会自动将试剂放入试剂仓。
cobas Link 简易操作指南(customer)_V201201
cobas Link 简易操作指南
用户名和密码
用户管理员:HRDAdmin 密码HRDAdmin1
普通用户:HRDUser 密码HRDUser1
如不能正常登录,请拨打罗氏诊断免费热线电话800-820-8864
cobas link操作使用
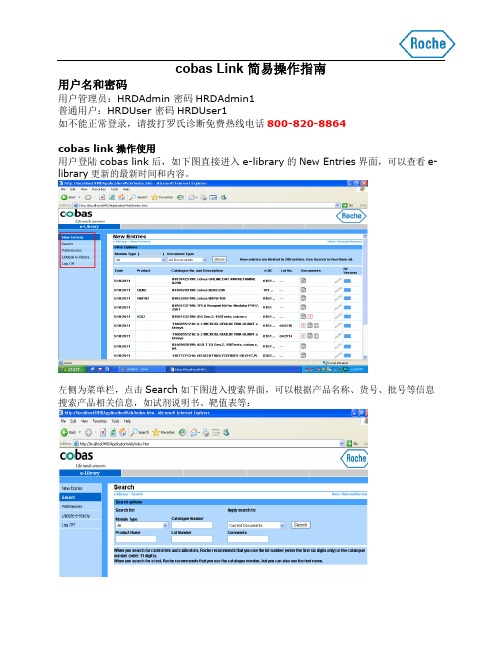
用户登陆cobas link后,如下图直接进入e-library的New Entries界面,可以查看e-library更新的最新时间和内容。
左侧为菜单栏,点击Search如下图进入搜索界面,可以根据产品名称、货号、批号等信息搜索产品相关信息,如试剂说明书、靶值表等:
点击Update e-library,如下图进入e-library手动更新界面,插入相应e-library光盘,点击Start the CD import,即开始更新。
更新过程时长不一,页面会显示两进度条分别表示读取CD及处理数据的进程。
更新完毕,会如下图显示:
如更新出错,会如下图有红色报警显示:。
- 1、下载文档前请自行甄别文档内容的完整性,平台不提供额外的编辑、内容补充、找答案等附加服务。
- 2、"仅部分预览"的文档,不可在线预览部分如存在完整性等问题,可反馈申请退款(可完整预览的文档不适用该条件!)。
- 3、如文档侵犯您的权益,请联系客服反馈,我们会尽快为您处理(人工客服工作时间:9:00-18:30)。
第一章系统概述罗氏Cobas 6000是全自动免疫测定与光度测定分析系统,可定性或定量测定检测项目,Cobas 6000包括两部分:cobas c 501生化分析模块:进行分光光度测定和离子选择电极测定cobas e 601免疫分析模块:进行电化学发光测定下面从控制单元、核心单元、cobas c 501生化分析模块等三部分介绍该系统(cobas e 601免疫分析模块不作介绍)。
A 显示器(连接cobas)B 键盘/鼠标(连接coba9C 计算机(连接cobas)D 触摸式显示器(主机)E 键盘/鼠标(主机)F 计算机(主机)G 人体学PC支架1、控制单元2、核心单元1)核心单元轨道A 核心单元B 急诊标本位C 条形码阅读器E 模块轨道F 常规标本上机位G 标本退出位D 标本架转盘BA ----------■■札■泗■ ■■B -C B BIN急诊标本位A A标本架托盘B标本架C标本杯、微量杯2)标本架及标本容器标本架类型标本架颜色标本架ID号软件中显示标本架上标签常规标本架灰色5001-8999001-3999001-3999 STAT标本架红色4001-4999E001-E999S001-S999定标标本架黑色2001-2999S001-S999C001-C999QC标本架白色3001-3999C001-C999Q001-Q999保养标本架绿色B999B999W999标本试管直径为13mm或16mm,长度为75mm或100mm ;标本杯可插入16 mm标本试管中用。
A 标本架上的标本杯B 16mm x 75mm试管C 16mm x 75mm试管上标本杯D 16mm x 100mm试管E 16mm x 100mm试管上的标本杯3、cobas c 501 生化分析模块A B标本吸样区E、F 试剂吸样区C反应盘区G试剂盒装载区D ISE模块A B标本吸样区A B 标本针D 标本针抽干区C 屏蔽管(防静电)E 标品针冲洗站从左往右依次为:Internal standard solution Internal standard solution Dilue nt soluti on Dilue nt soluti onRefere nee electrode soluti onH Hiterge nt更换以上系统试剂后,进入reage nt — status,选择 ok,仪器即自动更新系统试剂可用量。
Dilue nt soluti onRefere nee electrode soluti onC 反应盘区D ISE 模块K 、Na 、Cl 、参比电极仓A SMS (位置 2 )、B 水位感受器C 超声混合单元D 光度计单元F 反应盘G 杯冲洗装置Multiclea n (位置1) 从左往右依次为:Dilue nt soluti onE 试剂盘开盖处(关闭状态)F 试剂盘开盖处(打开状态)E 、F 试剂吸样区ACD R1 试剂吸样口 A 试剂针G 试剂盒装载区B 试剂盘C R2 试剂吸样口A试剂盒抓手B试剂盒装载口C 试剂盒装载区平台D废试剂盒出口第二章软件系统简介1、系统状态概览日常保养数据清除试剂准备定标质控选择参数下载标本运行状态仪器各部件温度打印预览oj/oi/oa I7-S3Dally 、Saatpta \Roa 护“y r <CdktMati^ft ^ndtPW4MFClear /'ta___________ fPnmarani QC Iwlecrt OoWTlIcMlli rrKftihK /Toiieh tlie efick <Enler>R^cJk, 單.Cwi\&iUnit^l^uiSW^it 弋1J口wrv«*w报警试剂查看取消保养Shut(kjwihAhi ™2、日常工作菜单工作区 试剂 定标 质控 应用设定Hva^onlTWP®:r.'l-1!:.;. ;!.< : I ii ' l ;;iEflE/f^LB2 GfTE"Pi■' p --------------------------------------------------- -- ^―IncpwiEe D WFWM 1 Diulks-n R A I O Pmlii ・Cslit —idM dkh^ir.kSwFruwtoLjBaZU_』Galibrati anUtility停止b DtiiKal s |由_山Order关机 D OMI停止吸样停止吸样报警打印i专L>MI 塔味开始系统状态概览仪器状态 操作者日期时间实用标准文档第三章基本操作1、开机a 、 检查供水、排水系统是否正常,打开供水系统电源b 、 接通仪器左侧电源开关c 、登陆:输入用户名及密码,仪器初始化后进入 Stand by 状态ITU*) 13:14注意:仪器分不同级别及权限使用,可根据实际情况设定;添加用户名后,第一次 输入的密码即为以后的密码。
A 标本架上机/退出区 C 电源开关B急诊标本位 D 主开关电路断路器Ty** iD WE it .2、开机后确认a、进入系统OVERVIEW点击Daily Maintenance 按键,检查保养工作是否完成(仪器自动完成,但如果保养液不够量,自动保养会中断);如保养未完成,确认保养液够量后,进入Utility —Maintenance,用光标选中需做的保养项目,点Select,再点Execute,手工要求仪器完成保养工作。
b、清除标本数据库:进入系统OVERVIEW点Sample Data Clear,选择CLEAR后点OK即可清除以往所有的病人结果数据。
C、检查试剂盘内试剂是否足够:进入REAGEN界面,点击SETTINGS键,从该画面下检查试剂量,按需要更换试剂。
3、申请新项目(确认已打开E-LIBRARY电脑)a、下载新项目参数进入Utility —Application —Download,进行如上界面,在Application name 一栏选定所要申请的项目(如果开放项目,则在Application Code栏选定开放通道代码311-320),按Search行参数查找,找到后按Download则出现以下界面brf I M i-h m I MIB M!:■«« mh<ai—F-如果罗氏原装试剂,直接按 0K ;如果是开放项目,则输入开放项目的名称及单 位,然后按0K 。
b 、项目参数修改(罗氏原装生化试剂)进入Utility — Application — range ,填入项目报告名称及单位,并设定是否启用 自动重测功能,如启用,输入重测的范围。
c 、项目参数修改(生化开放项目)由上图可见每个项目包含四个参数界面: Analyse 、Calib 、Range 、Others ,以下分别进行详细介绍进入 Utility -—Applicatio n ,选定项目AdainW/OI/Ofl 10;5Vp lird ®WorkplaceReasflnlGalibfationQCUtilitySyste*”治址站十祸Tefti |Specnil lftfei di Rfffjort FcrffiisfModuli 1AnflfyteRangeOVwSAtupk 如 Nwm t 9 I JI 0 r« [TTFI HJ -[Fb"Inc 4.« I JI 0AM 10Limit L -itHe 血t ihe froi* Hit hdxCoda 07tn31ExoirdttQn SSR1 150 n R2 10Iwctwe Ki 49「I Im 加伽・ Daw*胪m停mt 1St«rw^ L«val 2Slrrnt ScuintMlMEMlUP StMr4nLOW Gtlrrvifi打啊 SitrrlnjiShutJ '*'1340Afi«a v ;n n «/Pointi Point Tfd ID III 粘 0<2nd/PrO 100Mo 00-031)AnalyseAssay/Time/Point :分析方法 / 出报告时间 / 反应点数 Wavelength (2nd/Primary ) :次波长 / 主波长Sample Volume :标本量 Normal :正常标本量 标本体积/ Decrease :减量 标本体积/ Increase :增量 标本体积 /Diluent :稀释液 Water 用水作稀释液Diluent 用NaCI (生理盐水)作稀释液 Cassette configuration: 试剂盒配置 Code 代码Expiration Days 有效期 Reagent Volume 试剂量R1 试剂用量/ 稀释液体积/ 激活状态 R2 试剂用量/ 稀释液体积/ 激活状态 R3 试剂用量/ 稀释液体积/ 激活状态 Bottle setting 试剂盒设定Cassette type 试剂盒类型Bottle 试剂盒内有小瓶a 试剂类型 / 可测试数 / 根据可测试数计算出的试剂用量b 试剂类型 / 可测试数 / 根据可测试数计算出的试剂用量c 试剂类型 / 可测试数 / 根据可测试数计算出的试剂用量 Linearity Limit:线性限制4-16点/ > 17/最小限制值/最大限制值Prozone Limit :前带限制 前带限制最小值 /前带限制最大值 /反应点/反应点/ 反应点 / 反应点 / 低于还是高于输入的吸光度值存 在前带限制 /吸光度差异 /吸光度差异 Abs Limit : 吸光度限制(对速率法) 吸光度 / 反应是上升还是下降 Cell Detergent : 选择碱液( Detergent 1 ) /酸液( Detergent 2 )清洗比色杯 Stirringlevel:超声混匀器水平稀释后标本体积 / 稀释后标本体积 / 稀释后标本体积 /稀释液体积 稀释液体积 稀释液体积!!■ 11Gali brationQCLAilNlyStirri ng sett in g: 超声混匀器设定修改好该界面参数后点SAVE 呆存(2) CalibCalibration Type :选择定标类型 Point :定标点数Span :跨距点为第几点(当定标状态界面下选择 Span 时,即只做该单点定标)Weight :定标曲线的权重(无意义,选 0) Update Type :升级类型(无意义,选 Non® SD limit :标准差限制 Duplicate limit :重复性限制 Sen sitivith limit :灵敏度限制 Auto masking :是否自动屏蔽Auto Calibrati on :自动定标 S1 Abs. limit:S1吸光度限制Timeout : 定标过期 Lot :同批号试剂过期时选择做何种定标方式/时间间隔cassette :同一盒试剂过期时选择做何种定标方式/时间间隔 Chan geover :改变Lot :变换批号时选择做何种定标方式 cassette :换盒时选择做何种定标方式113 ■ FP0;• 1 BE3 Sni-yiM l>rZPi UplineT Di KHr-Z^ni日D- BterZHLkliivC*>K1PA日.r_^IM111d11LUH12 •JarZMIt 0IJJtM1郃 ki 住1 IG 函U**n-1 19SmrX'PlLMrw■ &T1 Wailki -1 ■: riBIIBV *■f *WoffllBliMMWwirmBif % I Km |iEl■! iFfa H I-I Fta r»Qrt-7tahi环■*!> Eni|34fl~>KD3! HllEhilaQ h* r^paanrar!!■ 11Gali brationQCLAilNlyQC violation :定标后是否自动进行质控 Method :定标类型(空白、两点、多点)Rule :质控规则Control 1/2/3 :自动进行的质控水平修改好该界面参数后点SAVE 呆存(3) RangeApplication Code :项目申请代码Unit :单位(只能修改一次,如要再次修改,将整个项目删除后重新申请) Report Name : 报告名称 Data Mode : 数据模式(选择ACTIVE Automatic Rerun : 如需自动重做则打勾Technical Limit :线性范围(超出范围则按 Analyse 中减量或增量重做)Repeat Limit : 重做范围(超出该范围不稀释重做)Co ntrol In terval Time : 输入质控间隔时间 AutoQC on board stability:质控在机稳定时间Qualitative :定性测试 L :血清指数数值(血脂) H:血清指数数值(溶血) I :血清指数数值(黄疸)Expected Value :按性别输入期望值 Male : 女性 Femal : 男性 DefaultSex : :默认设置 性别选男性或女性WorkplKeCalibrationQCUtility^pwiai WashReportT ・*t3 TMM 1「m 1. k Bar/Ft上W.W 0 Ser/R1自」 心4QGT 蛙 b Ser/PlCREAJ kSdr/H□IMFBKHRUrf"BWOb U.MFI日c *Sar/PIUFtM »c 吕中丹01DASTLb Sor/Pl11 i r :HHar/IFIU I +HH2SIkS»r/plH1Q!UNruR ■” PfiU^kw-勺■P Aw!4>»bR!k :廉Tflchnieal Lhiit|0AaiMuaii Llmli |lIsRno*WinS]™»nciSAmd^z* Dn-ta^rnUbinVAvplksfwi C4e£1:U^ih I” I厂 £34iaEl.ainieB A VTO OC On Bov rd SlsbilityL 1^5~ H [Tnoi~ 1 |科Range :选择哪个参考范围修改好该界面参数后点SAVE 呆存(4) Others定标物代码(手工输入)定标物浓度(无需输入,定标In stall 过定标物代码链接过来) 定标物放置的架号、位置号 定标物使用量 :被稀释后的定标液用量Diluent Volume : 稀释液量 修改好该界面参数后点SAV 保存d 、项目选择键设置(在中文电脑中则添加通道号)进入Utility — system ,在界面下方有4页菜单栏,选择Page ,进行Key SettingAnpiis! ismb-iHcn I MashHet Fcr*i:卜IrflCalibrator Code Concentration :Rack No Pos :Sample Volume : Diluted S. Volume界面下的值自动通C^jiUrationIMilityOtherrM^(n/iwt ii■■■ EX h■. twiTBfr^nitimid>l j|*d :- WiWixnH-"gh Mu 产码»w单个项目点某空白按键,选出新项目置于该按键上;如选错,可再点该按键,重选其它项目或选择Undefine (不定义该按键)。