家具安装说明书指引
家具定制企业售后安装手册

家具定制企业售后安装手册第1章企业简介与售后服务承诺 (5)1.1 企业简介 (5)1.2 售后服务承诺 (5)1.3 服务流程概述 (5)第2章产品安装前准备 (5)2.1 收货检查 (5)2.2 安装工具与材料准备 (5)2.3 环境要求与安全措施 (5)第3章家具安装基本技能 (5)3.1 安装工具的使用方法 (5)3.2 常用连接件的认识与安装 (5)3.3 电动工具的安全操作 (5)第4章客厅家具安装 (5)4.1 沙发安装 (5)4.2 电视柜安装 (5)4.3 茶几安装 (5)4.4 鞋柜安装 (5)第5章卧室家具安装 (5)5.1 床安装 (5)5.2 衣柜安装 (5)5.3 床头柜安装 (5)5.4梳妆台安装 (5)第6章餐厅家具安装 (6)6.1 餐桌安装 (6)6.2 餐椅安装 (6)6.3 酒柜安装 (6)第7章书房家具安装 (6)7.1 书桌安装 (6)7.2 书柜安装 (6)7.3 电脑桌安装 (6)7.4 转角书桌安装 (6)第8章厨房家具安装 (6)8.1 橱柜安装 (6)8.2 洗手池安装 (6)8.3 抽油烟机安装 (6)第9章卫生间家具安装 (6)9.1 浴室柜安装 (6)9.2 马桶安装 (6)9.3 淋浴房安装 (6)第10章储物家具安装 (6)10.1 墙柜安装 (6)10.3 鞋架安装 (6)第11章儿童家具安装 (6)11.1 儿童床安装 (6)11.2 儿童书桌安装 (6)11.3 儿童衣柜安装 (6)第12章售后服务与客户满意度调查 (6)12.1 售后服务流程 (6)12.2 售后服务范围 (6)12.3 客户满意度调查 (6)12.4 投诉与建议处理流程 (7)第1章企业简介与售后服务承诺 (7)1.1 企业简介 (7)1.2 售后服务承诺 (7)1.3 服务流程概述 (7)第2章产品安装前准备 (8)2.1 收货检查 (8)2.1.1 检查包装:确认产品包装是否完好无损,无变形、破损、潮湿等情况。
家具组装说明书提供家具组装步骤和工具要求

家具组装说明书提供家具组装步骤和工具要求家具组装说明书一、简介感谢您选择我们的家具产品。
为了帮助您顺利组装家具,我们特别提供了本说明书,其中包含了详细的组装步骤和所需工具清单。
请您仔细阅读本说明书,并按照步骤进行操作,以确保组装过程顺利进行。
二、组装步骤1. 检查配件在开始组装之前,请仔细检查包装盒内所有配件是否完好。
如有配件缺失或损坏,请及时联系客服人员寻求解决方案。
2. 准备工作确保组装家具的区域宽敞且干净整洁,避免在地毯、沙发或其他易损坏物品上进行组装。
建议在平整的地板上进行操作。
3. 工具准备请准备以下工具:- 扳手- 电动螺丝刀- 橡皮锤- 尺子- 螺丝批4. 组装步骤4.1 拆封家具将家具包装打开,将零件和配件整理出来,检查是否齐全。
根据包装内附的清单对照核对。
4.2 按照图纸进行组装根据配套提供的图纸或说明书,按照步骤进行家具的组装。
请确保按照指示正确拧紧螺丝和连接器。
4.3 加入固定配件在组装过程中,可能需要使用一些固定配件,如螺丝、螺母等。
请根据所提供的图纸,按照需要进行固定。
4.4 调整家具平衡完成家具的基础组装后,请确保其平衡稳固。
如有需要,可以使用橡皮锤轻轻调整家具的平衡。
4.5 清理工作组装完成后,请将组装过程中产生的垃圾和杂物清理干净,并将包装盒妥善处理。
三、注意事项1. 安全第一在组装过程中,请确保自身安全。
使用电动工具时,要小心操作,避免伤害。
2. 细心操作在拆封、组装过程中,请细心操作,避免过度用力或过度拧紧导致零件损坏。
3. 阅读说明书在组装之前,仔细阅读本说明书和提供的图纸,确保理解每一步骤。
4. 寻求帮助如果在组装过程中遇到困难或问题,请及时寻求帮助,联系我们的售后服务,我们将竭诚为您服务。
四、总结希望通过本说明书的指导,您能够顺利组装家具,享受到我们提供的舒适和美观。
如果您对本说明书有任何疑问或建议,请随时与我们联系。
祝您愉快的家具组装之旅!以上为本家具组装说明书的内容及要求,希望能够对您有所帮助。
沃尔玛家具产品说明书:沃尔玛浴室洗手间安装指南
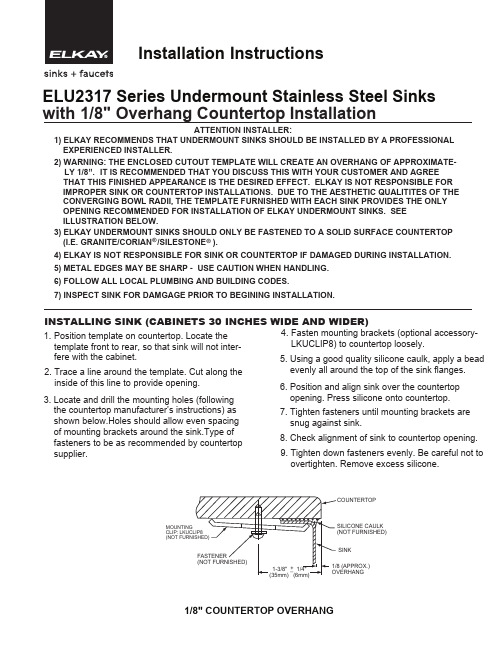
INSTALLING SINK (CABINETS 30 INCHES WIDE AND WIDER)ATTENTION INSTALLER:1. Position template on countertop. Locate thetemplate front to rear, so that sink will not inter- fere with the cabinet.2. Trace a line around the template. Cut along the inside of this line to provide opening.3. Locate and drill the mounting holes (following the countertop manufacturer’s instructions) as shown below.Holes should allow even spacing of mounting brackets around the sink.Type of fasteners to be as recommended by countertop supplier.4. Fasten mounting brackets (optional accessory- LKUCLIP8) to countertop loosely.5. Using a good quality silicone caulk, apply a bead evenly all around the top of the sink flanges.6. Position and align sink over the countertop opening. Press silicone onto countertop.7. Tighten fasteners until mounting brackets are snug against sink.8. Check alignment of sink to countertop opening.9. Tighten down fasteners evenly. Be careful not to overtighten. Remove excess silicone.1) ELKAY RECOMMENDS THAT UNDERMOUNT SINKS SHOULD BE INSTALLED BY A PROFESSIONAL EXPERIENCED INSTALLER.2) WARNING: THE ENCLOSED CUTOUT TEMPLATE WILL CREATE AN OVERHANG OF APPROXIMATE- LY 1/8”.IT IS RECOMMENDED THAT YOU DISCUSS THIS WITH YOUR CUSTOMER AND AGREE THAT THIS FINISHED APPEARANCE IS THE DESIRED EFFECT. ELKAY IS NOT RESPONSIBLE FOR IMPROPER SINK OR COUNTERTOP INSTALLATIONS. DUE TO THE AESTHETIC QUALITITES OF THE CONVERGING BOWL RADII, THE TEMPLATE FURNISHED WITH EACH SINK PROVIDES THE ONLY OPENING RECOMMENDED FOR INSTALLATION OF ELKAY UNDERMOUNT SINKS. SEE ILLUSTRATION BELOW.3) ELKAY UNDERMOUNT SINKS SHOULD ONLY BE FASTENED TO A SOLID SURFACE COUNTERTOP(I.E. GRANITE/CORIAN /SILESTONE ).®®4) ELKAY IS NOT RESPONSIBLE FOR SINK OR COUNTERTOP IF DAMAGED DURING INSTALLATION. 5) METAL EDGES MAY BE SHARP - USE CAUTION WHEN HANDLING. 6) FOLLOW ALL LOCAL PLUMBING AND BUILDING CODES.7) INSPECT SINK FOR DAMGAGE PRIOR TO BEGINING INSTALLATION.ELU2317 Series Undermount Stainless Steel Sinks with 1/8" Overhang Countertop Installation1/8" COUNTERTOP OVERHANGCAULK FURNISHED)SINK(APPROX.)MOUNTINGINSTALLING SINK (CABINETS 27 INCHES WIDE)5. Insert fasteners loosely, all around the sink.6. Using a good quality silicone caulk, apply a bead evenly all around the top of the sink flanges.7. Position and align sink under the countertop opening. Press silicone onto countertop.8. Tighten fasteners until the sink is snug against the countertop.9. Check alignment of sink to countertop opening.10. Tighten down fasteners evenly. Be careful not to overtighten. Remove excess silicone.1. Position template on countertop. Locate thetemplate front to rear and left to right, so that sink will not interfere with the cabinet.2. Trace a line around the template. Cut along the inside of this line to provide opening.3. Cut an opening in a sheet of plywood orunderlayment. The size of the opening should be the same as the one in the countertop.(Optional: Create a recess in the sheet in which the sink rim can sit. See graphics below.)4. Place the sink and plywood (or underlayment) under the countertop.PLYWOOD/UNDERLAYMENT OPTIONAL RECESS DIMENSIONS1/32 (.031”) MAXSuggestions for the Care and Cleaning of your Elkay Stainless Steel SinkELKAY SATIN FINISHElkay's original highlighted satin finish is produced by an abrasive grinding operation which lends a uniform pattern of satin finish lines to the metal surface. All exposed areas then undergo a series of progressive machine and hand polishing operations. It is this careful polishing that makes an Elkay satin luster finish so beautiful…and so easy to clean and maintain. RECOMMENDED CLEANSERSElkay has tested general household cleansers to mea-sure their effectiveness in cleaning stainless steel sinks. The most aggressive cleansers consist of Bar Keeper’s Friend, Zud and Lawrence Right Work. Other cleansers, which are still effective, but less aggressive include Ajax, Comet, Shiny Sinks Plus, Luneta, Soft Scrub, Mr. Clean, Maas and Flitz. So to help maintain the beautiful finish of your stainless steel sink, use one of the cleansers that Elkay recommends.RECOMMENDATIONSFOR PROPER MAINTENANCE•Do…Rinse thoroughly after each use. “Thorough”rinsing can be done by running water for a few min-utes and rubbing the cleaned area with a clean sponge.•Do…Towel dry after each use to prevent mineral deposits from building up on the surface of the sink.•Do…Clean the sink once a week, being sure to rub in the direction of the satin finish grain lines, using an Elkay recommended cleanser.•Do…Use an Elkay bottom grid or rinsing basket to “protect” the finish. Bottom grids and rinsing baskets can remain in the sink and will not cause rusting or pitting.•Do Not…Rub the sink across the satin finish lines. Scouring across the satin finish lines can damage the original sink finish.•Do Not…Allow soap or other household cleansers to dry on the surface of the sink. Most brands contain chemical additives which will affect the original finish.•Do Not…Use solutions of chlorine bleach and water in the sink. Chlorides, which are found in most soaps, detergents, bleaches, and cleansers, are very aggres-sive to stainless steel. If left on the sink too long they can cause surface pitting.•Do Not…Use a steel wool pad to clean your sink. If a more abrasive product is needed, use a green Scotch Brite pad being sure to rub in the direction of the satin finish grain lines. Steel wool pads have a tendency to break apart and small particles of steel can becomeembedded in the surface of the sink. The steel par-ticles will rust and will give the appearance that the sink itself is rusting.•Do Not…Use rubber mats or dishpans in the sink. Leaving rubber mats or dishpans in the sink can lead to surface rust or possible pitting. However, if you insist on using mats or dishpans, please remove them after each use and rinse thoroughly.•Do Not…Leave wet sponges, cloths, or cleaning pads on the sink. This can lead to surface rust.Following these recommendations for the care and cleaning of your stainless steel sink will insure that it will provide you with many years of service. CHLORIDESToday, chlorides are found in most all soap, detergents, bleaches and cleansers; chlorides can be aggressive to stainless steel. However, chlorides are very water solu-ble. Therefore, THOROUGH RINSING of your sink after each use to remove any chloride residue and a weekly cleaning is all that is required to keep your sink looking bright and shiny.SCRATCHESLike many metallic surfaces, your stainless steel sink will scratch. These are merely usage scratches and over time will blend into the overall finish of your sink with proper cleaning.KNIVESYour sink is designed to serve as many things but not as a cutting board or chopping block. This type of use will lead to deep scratches in the sink finish and will dull your knives. Elkay does offer various cutting boards which will provide an additional work area.WATER QUALITYThe quality of your water can affect your sink’s appear-ance. If your water has a high iron content, a brown sur-face stain can form on the sink giving the appearance of rust. Additionally, in areas with a high concentration of minerals, or with over-softened water, a white film may develop on the sink. To combat these problems, we suggest that the sink be towel dried after use, and again, on a weekly basis, the sink should be cleaned using a recommended cleanser.FOODSHeavy salt concentration or foods containing high levels of salt should not be allowed to dry on the sink surface. Rinse your sink thoroughly after use.Elkay2222 Camden Court Oak Brook, IL 60523©2010 ElkayPrinted in U.S.A.(Rev. RL 5/10) PART NO. 74180688 ELKAY LIMITED LIFETIME SINK WARRANTYElkay warrants to the original purchaser of an Elkay stainless steel sink that Elkay will,at its option,replace or repair,without charge,such product if it fails due to a manufacturing defect for a lifetime of normal residential use. Product replacement does not include transportation cost or labor installa-tion cost.This warranty covers only stainless steel self-rimming drop-in sinks installed in a conventional countertop surface and stainless steel under-mount sinks installed in a conventional solid surface countertop and applies to residential installations only.Elkay reserves the right to examine product in question and its installation prior to replacement.WASTE FITTINGS AND ACCESSORIES ARE NOT WARRANTED OTHER WARRANTY CONDITIONS ON SINKSThis warranty applies to sinks purchased after March1st2001as shown on the purchaser’s dated receipt.For sinks purchased prior to March1st2001, the applicable warranty at that time will be in effect.Our warranty does not cover product failure or damage caused by the use of optional Elkay acces-sories,abusive treatment,misuse,environmental factors,normal wear including dents and scratches,improper care and cleaning,use of aggres-sive and abrasive cleaners,damage due to handling or failure to follow the recommended procedures for installation,care and maintenance as detailed in the installation and care guide provided with every sink.This warranty is extended only to the original consumer purchaser of the product.This war-ranty does not cover shipping costs,labor costs,or any other charges for such items as installation or replacement of the sink,diagnosis or replace-ment of any faucet or component part,or any other expense or loss.All incidental or consequential damages are specifically excluded.No additional warranties,express or implied are given,including but not limited to,any implied warranty of merchantability or fitness for a par-ticular purpose.Some states do not allow the exclusion or limitation of incidental or conse-quential damages or limitations on how long an implied warranty lasts,so the above limitations or exclusions may not apply to you.This warranty gives you specific legal rights,and you may also have other rights which vary from state to state.TO OBTAIN SERVICE UNDER WARRANTY1.Write to:Elkay Manufacturing CompanyAttention:Consumer Services2222Camden CourtOak Brook,IL605232.Include a letter containing the following information:a.Date of purchase and installationb.Proof of Purchase(copy of original dated invoice)c.Description of nature of defectd.Model number or description of model and/or component part ifpossible.。
家具组装说明书

家具组装说明书一、准备工作在开始组装家具之前,请确保您已经准备好以下工具和材料:1.套装家具的所有零件:包括桌腿、椅背、抽屉、螺丝等。
2.螺丝刀:用于拧紧螺丝。
3.扳手:用于拧紧螺母。
4.橡皮锤:用于轻敲家具连接部件。
5.胶带:用于固定某些零件。
二、组装步骤1.打开包装箱,取出所有零件,并将它们分门别类地放在工作区域。
2.首先,请按照家具图纸上的指示,将家具框架的各个部件正确地连接在一起。
确保螺丝已经完全拧紧。
3.接下来,将椅背与桌腿连接。
通过确保连接紧密,来保证椅子的稳定性。
4.如果组装的家具有抽屉,那么请根据图纸中的指示将抽屉轨道安装在家具框架内。
确保抽屉能够顺利滑出,并且固定牢固。
5.最后,请检查所有连接是否牢固,家具的结构是否稳定。
如果有任何疑虑,请重新拧紧螺丝和螺母。
三、注意事项为确保您正确地组装家具并保证使用安全,请注意以下事项:1.在组装过程中,确保操作平稳。
不要急躁,避免受伤。
2.按照步骤进行,不要跳过任何一个环节。
3.若组装时发现任何零件损坏或缺失,请及时联系售后服务,切勿强行使用。
4.切勿将家具放置在易受潮湿或日晒的地方,以免影响其使用寿命。
5. 定期检查并拧紧螺丝、螺母,以确保家具的稳定性。
结束语:感谢您阅读本家具组装说明书,希望以上内容能帮助您顺利地组装家具,并享受到舒适的使用体验。
如果对组装过程有任何疑问,请随时与我们联系,我们将竭诚为您提供帮助。
祝您使用愉快!注意:组装家具时请注意安全,避免受伤。
家居行业家具安装操作规程

家居行业家具安装操作规程一、前言家具作为家居装饰的重要组成部分,具有美观、舒适等特点,广受人们喜爱。
然而,合理的安装是确保家具使用寿命和质量的关键。
本文将针对家具安装,提出一套规范的操作规程,以保证安装过程的顺利进行。
二、准备工作1. 勘测与测量:在家具安装前,需对安装场所进行勘测与测量,确保家具尺寸与场所尺寸相符。
如有需要,可以采用绘制平面图或利用计算机软件进行模拟。
2. 所需工具:根据家具的种类确定所需工具,如螺丝刀、扳手、电钻等,并确保工具完好无损,以免影响安装质量。
3. 环境准备:确保安装场所宽敞、通风,并清理干净,以避免安装过程中的障碍物或污染物影响正常操作。
三、家具安装步骤1. 拆包与检查:打开包装,将家具零部件逐一取出,进行清点并检查是否有缺损或破损的零件。
如有问题,及时与供应商联系并妥善处理。
2. 研读说明书:根据家具的种类和型号,详细阅读安装说明书,了解各个零部件的用途、组装方式以及注意事项。
确保在操作前,掌握清楚整个家具的结构和安装方式。
3. 组装底座或骨架:根据安装说明书,先组装好底座或骨架。
注意各个连接部位是否牢固,并进行必要的调整,确保家具整体稳定。
4. 安装重要零部件:根据安装说明书,按照顺序安装各个重要零部件,如抽屉、门板等。
在安装过程中,要注意各个零部件的位置和配合,确保连接紧密。
5. 固定家具:将家具与地面、墙面或其他家具进行固定,以增加稳定性。
使用合适的螺丝、膨胀螺丝等固定装置,并根据使用环境的不同,选择适当的安装方法。
6. 检查与调整:在家具安装完成后,进行全面检查。
确认家具所有零部件的安装牢固,各功能部件的正常运行。
若发现问题,及时调整或更换零部件。
7. 清洁与保养:安装完成后,及时清理家具表面和周围的杂物,并进行适当的养护与保养。
根据材质不同,采用相应的清洁剂和方法,保持家具的外观整洁。
四、安全注意事项1. 安全装备:进行家具安装时,应佩戴好安全手套和护目镜,以免因意外事故造成伤害。
办公家具安装作业指导书

办公家具安装作业指导书第1章准备工作 (4)1.1 安装工具与材料检查 (4)1.1.1 工具清单确认 (4)1.1.2 工具状态检查 (5)1.1.3 材料清点 (5)1.1.4 材料质量检查 (5)1.2 安装场地与环境评估 (5)1.2.1 场地尺寸测量 (5)1.2.2 场地清洁与整理 (5)1.2.3 环境安全评估 (5)1.2.4 现场设施检查 (5)1.3 安装团队组织与职责划分 (5)1.3.1 团队成员组成 (5)1.3.2 职责划分 (5)1.3.3 团队协作 (6)1.3.4 安全培训 (6)第2章安全知识 (6)2.1 安装安全规范 (6)2.1.1 作业前准备 (6)2.1.2 现场作业规范 (6)2.1.3 电气安全 (6)2.2 个人防护装备使用 (6)2.2.1 头部防护 (6)2.2.2 手部防护 (6)2.2.3 眼部防护 (6)2.2.4 呼吸道防护 (7)2.2.5 足部防护 (7)2.3 突发事件应急处理 (7)2.3.1 触电 (7)2.3.2 火灾 (7)2.3.3 机械伤害 (7)2.3.4 高处坠落 (7)第3章办公桌安装 (7)3.1 办公桌结构解析 (7)3.1.1 桌面 (7)3.1.2 支撑架 (7)3.1.3 抽屉 (8)3.1.4 柜体 (8)3.2 办公桌组装流程 (8)3.2.1 准备工具 (8)3.2.2 检查零部件 (8)3.2.4 安装桌面 (8)3.2.5 安装抽屉和柜体 (8)3.2.6 固定螺丝 (8)3.2.7 检查调整 (8)3.3 关键部位安装技巧 (9)3.3.1 支架安装 (9)3.3.2 桌面安装 (9)3.3.3 抽屉安装 (9)3.3.4 柜体安装 (9)3.3.5 螺丝固定 (9)第4章办公椅安装 (9)4.1 办公椅结构解析 (9)4.1.1 椅座:采用高密度泡沫材料,具有良好的弹性和舒适度。
椅座底部通常有安装孔,用于与底座连接。
家具组装说明书

家具组装说明书说明书编号:2021-xxxx适用产品:家具组装一、产品介绍感谢您选择我们的家具产品。
为了确保您能顺利完成家具的组装,我们特别提供本说明书,希望能够为您提供明确的指导和帮助。
二、工具准备在组装家具之前,请确保您准备了以下工具:1. 扳手2. 螺丝刀3. 手电筒4. 尺子5. 橡胶锤6. 维修工具包(如有)三、组装步骤请按照以下步骤逐一完成家具的组装:1. 验收零件在开始组装家具之前,请先仔细检查包装盒内的零件是否齐全,如有零件缺失或损坏,请及时与我们联系。
2. 清理工作区域在组装之前,请确保工作区域清洁整齐,并清除任何可能造成困扰的器具或杂物,以免影响组装效果。
3. 组装顺序及步骤请按照以下顺序进行组装,确保每一步都按照要求完成:a) 拆开包装盒并摆放零件,确保易于寻找和使用;b) 根据组装图纸,将各个零部件按照指定的次序组装,确保正确的安装位置和方向;c) 逐一固定螺丝和螺母,使用扳手和螺丝刀进行紧固,但请注意不要过紧或过松;d) 在组装过程中,如果遇到任何问题,请立即停止操作并与我们联系以获取帮助。
四、使用和保养1. 使用方法组装完成后,请按照以下要求正确使用家具:a) 请避免超负荷使用,确保使用时的稳定性和安全性;b) 需要特别注意的是,使用橡皮锤轻轻敲打家具的表面,以避免使用尖锐工具。
2. 保养方法为延长家具的使用寿命,请按照以下要求进行保养:a) 定期清洁家具表面,可以使用柔软的湿布,避免使用酸性或有腐蚀性的清洁剂;b) 防潮:请避免长时间暴露在潮湿或高温的环境中,以防损坏家具;c) 避免碰撞:请不要用力撞击或刮蹭家具表面以免划伤或损坏;d) 随时检查紧固件:定期检查螺丝和螺母的紧固情况,如有松动,请及时紧固。
五、注意事项请注意以下事项,以确保组装过程的安全性和顺利进行:1. 请勿将家具暴露在潮湿、高温或阳光直射的环境中;2. 在组装过程中,请小心使用工具,以免划伤自身或损坏家具;3. 如在组装或使用过程中有任何问题,请及时与我们联系,切勿私自拆卸、修理或改动产品;4. 请妥善保管好说明书和发票等购买凭证,以方便后续的售后服务。
家具组装使用说明书
家具组装使用说明书尊敬的顾客:欢迎购买我们的家具产品!为了帮助您更好地使用和组装家具,请您仔细阅读以下使用说明书。
本说明书包含了家具的组装步骤、注意事项以及维护方法。
希望通过本书的指导,您能轻松完成家具的组装,并享受到优质的使用体验。
一、前言在开始组装家具之前,请确保您拿到了完整的家具包装,并检查包装盒上是否有损坏或者缺失的情况。
若有破损,请与我们的客服联系并提供相关信息。
在组装家具过程中,请保证工作区域的安全和整洁,防止意外伤害。
二、家具组装步骤1. 准备工作a) 将家具包装打开,并检查里面是否有配件清单。
b) 仔细阅读配件清单,并确认是否所有配件都齐全。
c) 根据家具的种类和型号,找到对应的组装工具(如螺丝刀、扳手等)。
2. 组装准备a) 仔细阅读家具组装图纸,了解整体结构和部件名称。
b) 提前准备支撑物(如凳子或垫子),以便在组装过程中方便操作。
3. 组装步骤a) 根据家具组装图纸的指引,逐步组装每个家具部件。
b) 使用配套工具正确拧紧螺丝和螺母,确保家具结构稳固。
c) 注意每个部件的安装方向和位置,以免出现错误组装或配件破损。
d) 在组装过程中,避免使用过大的力量,以免损坏家具的外观或结构。
e) 若遇到困难或不明确的地方,请再次仔细阅读家具组装图纸或咨询客服。
4. 组装完成a) 检查家具各个部位是否牢固连接,无松动或摇晃现象。
b) 检查家具表面是否有划痕或瑕疵,如有问题请及时与客服联系解决。
c) 清理组装过程中留下的垃圾和封装材料,保持房间整洁。
三、家具使用注意事项1. 安全使用a) 在使用家具时,请遵循产品设计的用途和承重标准,不要超负荷使用。
b) 避免在家具上爬梯或站立,以免发生意外摔倒的事故。
c) 避免让儿童独自使用家具,以免导致受伤。
2. 放置环境a) 将家具放置在平整的地面上,以确保稳固性。
b) 避免家具长时间暴露在阳光下,以免导致颜色褪色或材质老化。
c) 避免让家具接触到水或湿度过高的环境,以防发生变形或腐蚀。