东芝硬盘固件更新程序升级指南
PNY SSD 固件更新指南说明书

PNY SSD Firmware Update ProcedureSystem Preparation:∙ Prior to launching the PNY Field Firmware Update tool, it is recommend to perform a backup of all your data to ensure nodata is lost during the firmware update process∙For the update to work properly you must be running Windows 8,Windows 7, Vista SP2, or XP SP3 in AHCI (Advanced HostController Interface) mode.∙Do not unplug power at any time during the firmware update.Power needs to be constant during the update, either from ACpower or battery power.∙AMD users must use the Microsoft AHCI driver for the update procedure to complete successfully.∙Use only native SATA ports to perform the upgrade; do NOT use third party controllers.∙Notebook users, it is recommended to use AC power to prevent any power loss during firmware upgrade. The update shouldtake several minutes.Step 1: Launching the PNY SSD Firmware Update ToolFirst, locate the location of your downloaded utility. Double-click on the zip file, if you prefer to change the location of the utility you can do this now by extracting the .zip file to your preferred location. [The .zip file will consist of the update utility, the instructions in .pdf form and the firmware file.]If you are using Windows 7 or Vista SP2, right-click the PNY SSD Firmware Update Tool and select “Run as administer” to launch the PNY update utility. By doing this the Firmware Update Tool will start.If you are using XP SP3, double-click on the PNY SSD Firmware Update Tool and proceed.Step 2: Confirming model number(s) and firmware revisionConfirm that your drive(s) are present, showing in the SSD Firmware Update Tool, and select the one you wish to update by checking the box to the left of the “Model” column(Note: If you wish to update multiple drives, you must update each one, one at a time)Step 3: Selecting the correct “Update Firmware” optionDepending on your Drive you will need to select the appropriate file. In the signature section of Update tool, if the middle section of numbers starts with 1181, select the file labeled client 1181. If the signature states the middle numbers as 253 please use the file labeled client 253. Once You have identified the correct version you will use click on the update firmware button to Select the update file.Step 4: Locating the update fileBy pressing the “Update Firmware” button a window will open that will be prompted to select the appropriate firmware file you wish to update with. To do this, navigate to where you Extracted the update and select the FFP for the update.Step 5: Alert messageIf you have not already backed up your data as indicated in the “System Preparation” section, you should cancel the update, back up your data and then proceed back through steps 1-5. If you have successfully backed up your data, select “Proceed” to continue the Firmware update process.Step 6: Successful updateThe update process will take a few minutes to complete, after the update process is complete successfully you will receive a green check next to your drive model that was updated.Step 7: Confirming successful updateTo confirm the update was successful, please select the “Rescan for Drives” button in the lower left corner of the PNY SSD Firmware Update Tool. This will refresh the drive so that you can verify the drive was successfully updated with the new firmware.Your updated Firmware Revision will be displayed under “FW Rev.” and should read “5XX XXXXX”If the update was unsuccessful please try again, if the update continues to be unsuccessful please call PNY’s Free Technical Support Center at 1-800-234-4597 (USA Only)Step 8: Repeating the Update Process (if applicable)If you would like to update additional drives of different capacities, you will need to update them one at a time. To do this, begin the process again starting at “Step 1” and repeat this process until you have completed the Firmware updates on all drives.Step 9: Closing the Firmware UpdaterYou have now completed the firmware update. Close the Firmware Update Tool by clicking the “X” in the top right corner of the application.Step 10: Safely restarting your systemAfter completing the Firmware update, PNY recommends to restart your system, by safely powering down your system, then waiting at least 10 seconds and then powering back on.。
CT-X5100固化软件升级指南说明书
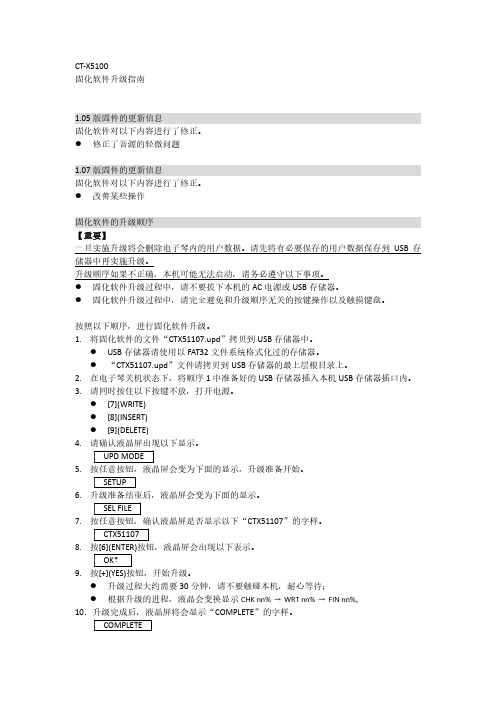
CT-X5100固化软件升级指南1.05版固件的更新信息固化软件对以下内容进行了修正。
修正了音源的轻微问题1.07版固件的更新信息固化软件对以下内容进行了修正。
改善某些操作固化软件的升级顺序【重要】一旦实施升级将会删除电子琴内的用户数据。
请先将有必要保存的用户数据保存到USB存储器中再实施升级。
升级顺序如果不正确,本机可能无法启动,请务必遵守以下事项。
固化软件升级过程中,请不要拔下本机的AC电源或USB存储器。
固化软件升级过程中,请完全避免和升级顺序无关的按键操作以及触摸键盘。
按照以下顺序,进行固化软件升级。
1.将固化软件的文件“CTX51107.upd”拷贝到USB存储器中。
USB存储器请使用以FAT32文件系统格式化过的存储器。
“CTX51107.upd”文件请拷贝到USB存储器的最上层根目录上。
2.在电子琴关机状态下,将顺序1中准备好的USB存储器插入本机USB存储器插口内。
3.请同时按住以下按键不放,打开电源。
[7](WRITE)[8](INSERT)[9](DELETE)4.5.6.7.CTX51107”的字样。
8.按钮,液晶屏会出现以下表示。
9.升级过程大约需要30分钟,请不要触碰本机,耐心等待;根据升级的进程,液晶会变换显示CHK nn% → WRT nn% → FIN nn%。
10COMPLETE”的字样。
11.按任意按钮电源将会关闭。
以上固化软件升级过程结束。
【重要】如果出现升级无法正常结束,出现错误显示的场合,请尝试以下面的顺序再次升级。
1.从本机上拔出AC电源。
2.再次向USB存储器中拷贝正确的“CTX51107.upd”文件。
3.将USB存储器确实安装在本机上。
4.将本机连接AC电源。
5.按电源按钮打开电源液晶出现“BROKEN”显示的场合,请按[4](EXIT)。
回到顺序4,再次从顺序4开始实施升级。
如果显示错误信息,中断升级的场合、可能是“CTX51107.upd”的文件错误,或USB存储器损坏,请进行确认。
UpdataTool程序升级软件使用说明书

UpdataTool程序升级软件使用说明书前言:目前本司UpdataTool 程序升级软件仅适用于我司YX TW 08-1 、YX TW 10-1和YX TW 10-2这三款系统,我司这三款控制系统可提供在线远程升级远程升级程序的作用有以下几方面:(1)修复控制系统底层程序死机(由于用户操作不当,或者升级程序错误等)(2)当控制系统性能提升时,可以通过远程升级程序达到原有的系统性能提升(3)可修复原来旧程序可能存在的BUG一、远程升级方法1(用于能正常使用、通讯的情况下性能提升或修改BUG):(1)首先打开软件,即可看到以下界面:(2)点击右上角按钮,在弹出的对话框中,找到程序所在路径(注意看清楚文件名,每款系统的程序文件名不一样),选中然后打开,如下图(3)控制卡上电,然后波特率固定默认19200,选好串口COM(一般的电脑默认为COM1)(4)然后单击,若能升级,在软件的下方空白处会提示:XXX OK等字样,程序下载过程大概需要一分钟左右,等最后提示一句比较长的XXXX OK字样,证明程序就已经升级成功!若提示为:Data Sent Start Error ,Retrying!,则用发布软件检查是否能正常通讯上,或是串口,波特率是否选择好!若以上问题均排除还是无法升级,请采用方法2二、远程升级方法2(用于不能正常使通讯的情况,硬升程序,修复控制卡死机):(1)第一步与方法1相同(2)第二步与方法1相同(3)当操作了前两个步骤后,第三步波特率固定默认19200,选好串口COM(一般的电脑默认为COM1),然后单击(4)关闭控制卡电源,10秒钟后打开控制卡电源,当上电过程中,程序会自动下载到控制卡上,若能升级,在软件的下方空白处会提示:XXX OK等字样,程序下载过程大概需要一分钟左右,等最后提示一句比较长的XXXX OK字样,证明程序就已经升级成功!若提示为:Data Sent Start Error ,Retrying!请检查通讯线,反复试验几次都不成功,请返厂处理。
BDP2200 F7 BDP2205 F7 BDP2285 F7 固件升级指南说明书
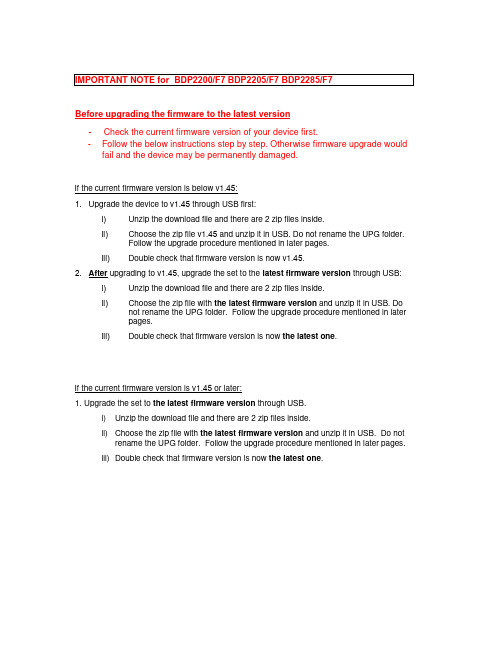
IMPORTANT NOTE for BDP2200/F7 BDP2205/F7 BDP2285/F7Before upgrading the firmware to the latest version‐Check the current firmware version of your device first.‐Follow the below instructions step by step. Otherwise firmware upgrade would fail and the device may be permanently damaged.If the current firmware version is below v1.45:1.Upgrade the device to v1.45 through USB first:i)Unzip the download file and there are 2 zip files inside.ii)Choose the zip file v1.45 and unzip it in USB. Do not rename the UPG folder.Follow the upgrade procedure mentioned in later pages.iii)Double check that firmware version is now v1.45.2.After upgrading to v1.45, upgrade the set to the latest firmware version through USB:i)Unzip the download file and there are 2 zip files inside.ii)Choose the zip file with the latest firmware version and unzip it in USB. Do not rename the UPG folder. Follow the upgrade procedure mentioned in laterpages.iii)Double check that firmware version is now the latest one.If the current firmware version is v1.45 or later:1.Upgrade the set to the latest firmware version through USB.i)Unzip the download file and there are 2 zip files inside.ii)Choose the zip file with the latest firmware version and unzip it in USB. Do not rename the UPG folder. Follow the upgrade procedure mentioned in later pages.iii)Double check that firmware version is now the latest one.3Update software Before you update the software of this player, check the current software version: • Press , and then select [Setup] > [Advanced] > [Version information], and press OK .Update software via the Internet1Connect the player to the Internet (see "Set up a network").2Press , and select [Setup].3Select [Advanced] > [Software update]> [Network] .» If an upgrade media is detected, you are prompted to start the update.4Follow the instructions on the TV screen to update the software.» When the update is complete, thisplayer automatically turns off and onagain.Update software via USB1Check the latest software version on /support.•Search for your model and click on"Software and drivers".2Download the software into a USB storage device.a Unzip the download, and make surethat the unzipped folder is named"UPG".b Put the "UPG" folder in the rootdirectory.3Connect the USB storage device to the (USB) connector on this player.4Press , and select [Setup].5Select [Advanced] > [Software update]> [USB].» If an upgrade media is detected, you are prompted to start the update.6Follow the instructions on the TV screen to update the software.» When the update is complete, thisplayer automatically turns off and onagain.Caution•Do not turn off the power or remove the USB storage device when the software update is in progress because you might damage this player.。
东芝刷固件教程

东芝MP3 P5-P10刷机前保证机器有足够的电量,如果是空电的话是刷机不能够完成的!
【1】:机器关机后,手按着关机键,快速的将数据线连入电脑!
【2】:电脑打开安装好的固件,如下图的图
标的这个!,双击打开!【3】:打开后程序中的(格式化数据区一定要)打勾!
【4】:确定电脑已经连接上MP3的,电脑会自己安装驱动,只要手不要放开关机键,稍等片刻,程序就会出现准备好的页面!
【5】:直接点击开始就可以了!等到完全刷好!程序会提示关闭!这时候,直接拔掉数据线!放开关机键!再直接开机就可以了!【6】:最重要的是,记得给好评!全5星!
腾阳音频:。
固件更新步骤(摘自维修手册)
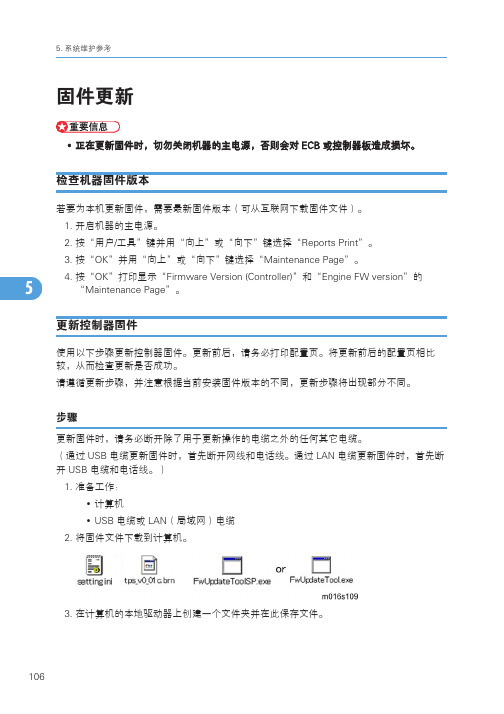
固件更新•正在更新固件时,切勿关闭机器的主电源,否则会对ECB 或控制器板造成损坏。
检查机器固件版本若要为本机更新固件,需要最新固件版本(可从互联网下载固件文件)。
1.开启机器的主电源。
2.按“用户/工具”键并用“向上”或“向下”键选择“Reports Print”。
3.按“OK”并用“向上”或“向下”键选择“Maintenance Page”。
4.按“OK”打印显示“Firmware Version (Controller)”和“Engine FW version”的“Maintenance Page”。
更新控制器固件使用以下步骤更新控制器固件。
更新前后,请务必打印配置页。
将更新前后的配置页相比较,从而检查更新是否成功。
请遵循更新步骤,并注意根据当前安装固件版本的不同,更新步骤将出现部分不同。
步骤更新固件时,请务必断开除了用于更新操作的电缆之外的任何其它电缆。
(通过USB 电缆更新固件时,首先断开网线和电话线。
通过LAN 电缆更新固件时,首先断开USB 电缆和电话线。
)1.准备工作:•计算机•USB 电缆或LAN(局域网)电缆2.将固件文件下载到计算机。
3.在计算机的本地驱动器上创建一个文件夹并在此保存文件。
1065•“FWUpdate ToolSP.exe”:用于控制器固件或引擎固件•“FWUpdate Tool.exe”:用于控制器固件4.在计算机与机器之间连接USB电缆。
单击“FWUpdateToolSP.exe”或“FWUpdateTool.exe”文件以执行更新程序。
5.6.对于USB连接,单击“F/W Update (USB)”[A]。
对于网络连接,在“MFP IPAddress”[B]中输入机器的IP地址,然后单击“F/W Update (NET)”[C]。
7.将出现“Download complete”信息。
•此时不得关闭主电源,直至更新程序完成。
8.屏幕上将出现以下信息:“Firmware is Updating ...”等待直至更新完成。
Fujitsu Security Solution CLEARSURE PC 固件升级指南说明书
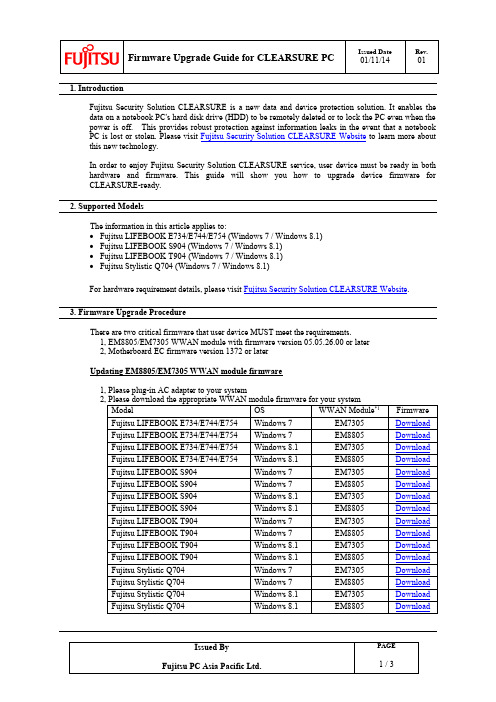
1. IntroductionFujitsu Security Solution CLEARSURE is a new data and device protection solution. It enables the data on a notebook PC's hard disk drive (HDD) to be remotely deleted or to lock the PC even when the power is off. This provides robust protection against information leaks in the event that a notebook PC is lost or stolen. Please visit Fujitsu Security Solution CLEARSURE Website to learn more about this new technology.In order to enjoy Fujitsu Security Solution CLEARSURE service, user device must be ready in both hardware and firmware. This guide will show you how to upgrade device firmware for CLEARSURE-ready.2. Supported ModelsThe information in this article applies to:∙Fujitsu LIFEBOOK E734/E744/E754 (Windows 7 / Windows 8.1)∙Fujitsu LIFEBOOK S904 (Windows 7 / Windows 8.1)∙Fujitsu LIFEBOOK T904 (Windows 7 / Windows 8.1)∙Fujitsu Stylistic Q704 (Windows 7 / Windows 8.1)For hardware requirement details, please visit Fujitsu Security Solution CLEARSURE Website.3. Firmware Upgrade ProcedureThere are two critical firmware that user device MUST meet the requirements.1, EM8805/EM7305 WWAN module with firmware version 05.05.26.00 or later2, Motherboard EC firmware version 1372 or laterUpdating EM8805/EM7305 WWAN module firmware1, Please plug-in AC adapter to your system3, Please decompress the downloaded ZIP file 4, Please close the AirCard Watcher 5, Please execute setup.exe6, Please follow the on-screen instructions to complete the upgrade - It may take about 10 minutes to complete the upgrade.- Please don't power-off the system until the upgrade is completed.- Please don't make any RF ON/OFF or any WWAN connection until the upgrade is completed.Note: 1, How to identify the WWAN moduleClick “Menu ”Select “About …”Select “Device - Hardware ”WWAN ModuleUpdating Motherboard EC firmware1, Please plug-in AC adapter to your system4, Please decompress the downloaded ZIP file5, Based on your device, please open either “vPro_System” or “non-vPro_System” folder.(if applicable)6, Based on your Operating System, please open either “For_32bit_OS” or “For_64bit_OS” folder 7, Please execute FjFirmUpdU.exe8, Please follow the on-screen instructions to complete the upgrade4. Fujitsu Security Solution CLEARSURE Service CenterIf you have any enquiry, please contact Fujitsu Service Center for assistance.。
东芝硬盘固件更新程序升级指南

东芝硬盘固件更新程序升级指南东芝硬盘固件更新程序为了提⾼东芝硬盘的读写能⼒,针对部分型号的硬盘,提供此硬盘固件升级程序。
请根据您电脑的具体型号,在以下链接选择对应的机型进⾏下载:/doc/51fd2da5284ac850ad02423b.html /service/download.jsp适⽤机型:⽀持的系统:Windows 7 32bit/64Bit注:执⾏完成后,电脑将⾃动重启。
⽀持硬盘型号和现有固件版本⽀持硬盘的SN号:起始SN号为40G******,终⽌SN号为709******只需要核实SN号的前三位。
更新后每个型号的硬盘对应的新固件版本刷新⽅法:在刷新该软件前,请确认以下⼏点:在刷新固件时,不要关机。
在刷新固件时,请使⽤电源适配器进⾏供电。
机器必须必须在驱动模式,不要进⼊休眠模式。
请先暂时关闭或卸载所有杀毒软件,以免误报病毒。
1.开机将电脑进⼊Windows。
2.将硬盘固件更新程序(TOSHIBA_HDD_***_Update_VXXX.zip)拷贝到任意⼀个盘符下。
然后解压硬盘固件更新程序,得到TOSHIBA_HDD_***_Update_VXXX.EXE⽂件。
3.右键选择TOSHIBA_HDD_***_Update_VXXX.EXE⽂件,选择“创建快捷⽅式”。
4.右键选择创建出的快捷⽅式,选择“属性”。
5.在弹出的对话框的“快捷⽅式”选项卡下,的“⽬标”值后⾯加⼊“/chk hdd“(引号除外)。
6.然后点击“确认”。
7.双击刚刚创建的快捷⽅式“TOSHIBA_HDD_***_Update_VXXX.EXE-快捷⽅式”。
8.点击“下⼀步”。
9.当提⽰重启电脑时,点击“确定”,进⾏重启电脑。
10.电脑重启后,会进⾏加载⽂件。
11.加载完成后,在如下界⾯点击“EXECUTE"。
12.执⾏完成后,会显⽰您电脑硬盘现在的固件信息。
13.点击“Reboot“。
电脑⾃动重启后,进⼊系统,会提⽰硬盘驱动重新安装。
- 1、下载文档前请自行甄别文档内容的完整性,平台不提供额外的编辑、内容补充、找答案等附加服务。
- 2、"仅部分预览"的文档,不可在线预览部分如存在完整性等问题,可反馈申请退款(可完整预览的文档不适用该条件!)。
- 3、如文档侵犯您的权益,请联系客服反馈,我们会尽快为您处理(人工客服工作时间:9:00-18:30)。
东芝硬盘固件更新程序
为了提高东芝硬盘的读写能力,针对部分型号的硬盘,提供此硬盘固件升级程序。
请根据您电脑的具体型号,在以下链接选择对应的机型进行下载:
/service/download.jsp
适用机型:
支持的系统:
Windows 7 32bit/64Bit
注:执行完成后,电脑将自动重启。
支持硬盘型号和现有固件版本
支持硬盘的SN号:
起始SN号为40G******,终止SN号为709******
只需要核实SN号的前三位。
更新后每个型号的硬盘对应的新固件版本
刷新方法:
在刷新该软件前,请确认以下几点:
在刷新固件时,不要关机。
在刷新固件时,请使用电源适配器进行供电。
机器必须必须在驱动模式,不要进入休眠模式。
请先暂时关闭或卸载所有杀毒软件,以免误报病毒。
1.开机将电脑进入Windows。
2.将硬盘固件更新程序(TOSHIBA_HDD_***_Update_VXXX.zip)拷贝到任意一个盘符下。
然后解压硬盘固件更新程
序,得到TOSHIBA_HDD_***_Update_VXXX.EXE文件。
3.右键选择TOSHIBA_HDD_***_Update_VXXX.EXE文件,选择“创建快捷方式”。
4.右键选择创建出的快捷方式,选择“属性”。
5.在弹出的对话框的“快捷方式”选项卡下,的“目标”值后面加入“/chk hdd“(引号除外)。
6.然后点击“确认”。
7.双击刚刚创建的快捷方式“TOSHIBA_HDD_***_Update_VXXX.EXE-快捷方式”。
8.点击“下一步”。
9.当提示重启电脑时,点击“确定”,进行重启电脑。
10.电脑重启后,会进行加载文件。
11.加载完成后,在如下界面点击“EXECUTE"。
12.执行完成后,会显示您电脑硬盘现在的固件信息。
13.点击“Reboot“。
电脑自动重启后,进入系统,会提示硬盘驱动重新安装。
14.当提示重启时,请点击“立即重新启动“。
15.重启进入系统后,则升级完成。
怎样确认电脑已经更新完成?
再次双击TOSHIBA_HDD_***_Update_VXXX.EXE文件(不是快捷方式),更新后的版本将被显示。
点击“Exit“退出即可。