戴森暖风机hp2使用说明书
PHILIPS HP8183 HP8182 HP8181 HP8180 电吹风 ZH-CN 说明书

1 将插头连接至电源插座。
•• 要更精确地吹干头发,请将集风嘴 ( ) 安装到电吹风 ( ) 上。 •• 仅限于 HP8182/83:要增加量感,制作卷发和弹性发型,请将
扩散型风嘴 ( ) 安装到电吹风 ( ) 上。
•ቤተ መጻሕፍቲ ባይዱ 要卸下附件,将其从产品拉出即可。
2 将风速开关 ( ) 调至 可获得暖风用于造型,调至 可获得 强风用于快速吹干。按下强风按钮 ( ) 可获得强风。
3 将温度开关 ( ) 调至 可获得热风,调至 可获得暖风,调至 可获得冷风。按冷风喷出钮 ( ) 可获得冷风用于定型。
•• 仅限于 HP8181/82/83:本产品具有负离子功能,可令秀发更加
顺滑、亮泽。 » 当此功能处于打开状态时,可能会发出一种特殊气味。这是
正常情况,是由所产生的负离子导致的。 » 仅限于 HP8181:产品启动后,负离子功能将自动激活。
» 仅限于 HP8182/83:要打开或关闭负离子功能,请将负离子 滑动开关调至 或 ( )。 » 如果此功能已打开,则负离子指示灯 ( ) 将亮起。
•• 对于具有扩散型风嘴的 HP8182/83:
» 要增加头发根部的丰盈度,可将扩散型风嘴的梳齿插入头 发,作旋转运动。
» 对于较长的头发,可在扩散型风嘴的顶端展开发绺,或用梳 齿向下梳头发。
•• 如果产品过热,它将自动关闭电源。拔掉产品插头,让其冷却
几分钟。再次启动产品之前,请检查出风口,确保其未被绒 毛、头发等杂物堵塞。
电磁场 (EMF)
本产品符合与电磁场 (EMF) 相关的所有标准。目前的科学依据证 明,如果正确使用并根据本用户手册中的说明进行操作,则本产 品是安全的。
环境
弃置产品时,请不要将其与一般生活垃圾堆放在一起, 应将其交给政府指定的回收中心。这样做有利于环保。
暖风炉用户手册说明书
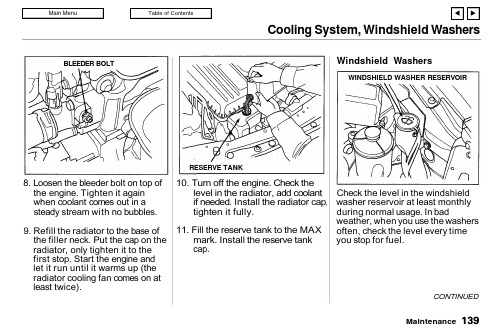
Cooling System, Windshield Washers8. Loosen the bleeder bolt on top of the engine. Tighten it again when coolant comes out in a steady stream with no bubbles.9. Refill the radiator to the base of the filler neck. Put the cap on the radiator, only tighten it to the first stop. Start the engine and let it run until it warms up (the radiator cooling fan comes on at least twice).10. Turn off the engine. Check thelevel in the radiator, add coolant if needed. Install the radiator cap,tighten it fully.11. Fill the reserve tank to the MAX mark. Install the reserve tank cap.Windshield WashersCheck the level in the windshield washer reservoir at least monthly during normal usage. In badweather, when you use the washersoften, check the level every timeyou stop for fuel.CONTINUEDMaintenanceRESERVE TANKBLEEDER BOLTWINDSHIELD WASHER RESERVOIRWindshield Washers, Transmission OilThe windshield washer reservoir is located behind the left headlight.Check the reservoir's fluid level by removing the cap and looking inside.Fill the reservoir with a good-quality windshield washer fluid.This increases the cleaningcapability and prevents freezing in cold weather.Do not use engine antifreeze or a vinegar/water solution in the windshield washer reservoir.Antifreeze can damage your car's paint, while a vinegar/watersolution can damage the windshield washer pump.Use only commercially-available windshield washer fluid.Transmission OilAutomatic TransmissionCheck the fluid level with theengine at normal operating tempe-rature.1. Park the car on level ground.Shut off the engine.2. Remove the dipstick (yellow loop) from the transmission and wipe it with a clean cloth.MaintenanceNOTICEDIPSTICKTransmission Oil3. Insert the dipstick all the way into the transmission.4. Remove the dipstick and check the fluid level. It should be between the upper and lower marks.5. If the level is below the lower mark, add fluid into the tube to bring it to the upper mark. Use Honda Premium Formula Auto-matic Transmission Fluid or an equivalent DEXRON ® II Auto-matic Transmission Fluid (ATF)only.6. Insert the dipstick all the way back in the transmission.The transmission should be drained and refilled with new fluid every 24months or 48,000 km (30,000 miles),whichever comes first. Shorten this to every 12 months or 24,000 km (15,000 miles) under severe driving conditions (see page 126).5-speed Manual TransmissionCheck the oil level a couple of mi-nutes after shutting off the engine.Make sure the car is on levelground. Remove the transmission filler bolt. The oil level should be up to the edge of the bolt hole. Feel inside the bolt hole with your finger.If you do not feel any oil, slowly add oil until it starts to run out of the hole. Reinstall the filler bolt and tighten it securely.MaintenanceCONTINUEDUPPER MARK LOWER MARKCorrect levelFILLERBOLTTransmission Oil, Brake and Clutch FluidOnly use an API Service SF or SG grade motor oil with a viscosity of SAE10W-30 or 10W-40.The transmission should be drained and refilled with new oil every 24months or 48,000 km (30,000 miles),whichever comes first. Shorten the service interval to every 12 months or 24,000 km (15,000 miles) under severe driving conditions (see page 126).Brake and Clutch FluidCheck the fluid level in the reser-voirs monthly. There are up to three reservoirs, depending onmodel. They are:Brake fluid reservoir (all models)Clutch fluid reservoir(Manual transmission only)ABS reservoir (LS, GS-R)The brake fluid in the brake and Anti-lock brake systems should be replaced every 2 years or 48,000 km (30,000 miles), whichever comes first.Brake SystemThe fluid should be between the MIN and MAX marks on the side of the reservoir. If the level is at or below the MIN mark, it is anindication that your brake system needs attention. Have the brake system inspected for leaks or worn brake pads.MaintenanceMAXMINBrake and Clutch FluidIf you add brake fluid to bring it up to the MAX mark, use Genuine Honda Brake Fluid or an equiva-lent from a sealed container that is marked DOT3 or DOT4 only.Brake fluid marked DOT5 is not compatible with your car's braking system.Anti-lock Brake SystemThe fluid should be between the MIN and MAX marks on the side of the reservoir. If it is at or below the MIN mark, it indicates apossible problem in the ABS. Have the dealer inspect the system and add fluid.Clutch SystemThe fluid should be between the MIN and MAX marks on the side of the reservoir. If it is not, add brake fluid to bring it up to that level. Use the same DOT3 or DOT4brake fluid from a sealed container specified for the brake system.Low fluid level can indicate a leak in the clutch system. Have this system inspected as soon as possible.MaintenanceMINMAX MINMAXPower SteeringYou should check the fluid level in the power steering reservoirmonthly. Check the level when the engine is cold. Look at the side of the reservoir. The fluid should be between the UPPER LEVEL and LOWER LEVEL. If it is below the LOWER LEVEL, add power steering fluid to the UPPER LEVEL.Using automatic transmission fluid or another brand of power steering fluid will damage the system. Use only GENUINE HONDA Power Steering Fluid-V.A low power steering fluid level can indicate a leak in the system.Check the fluid level frequently and have the system inspected as soon as possible.Turning the steering wheel to full left or right lock and holding it there can damage the power steering pump.MaintenanceNOTICEUPPER LEVEL LOWER LEVELNOTICEAir CleanerThe air cleaner element should be replaced every 2 years or 48,000 km (30,000 miles), whichever comes first. Under severe driving condi-tions, it should also be cleaned every 12 months or 24,000 km (15,000 miles), whichever comes first.Cleaning (Severe Conditions)Clean the air cleaner element by blowing compressed air through it in the opposite direction to normal air flow. If you do not have access to compressed air (such as a gas station), ask your Acura dealer to do this service.Follow the replacement procedure for removal and reinstallation.The air cleaner element is inside the box on the passenger's side of the engine compartment.To replace it:1. Loosen the three bolts andremove the air cleaner housing cover.2. Lift up the old air cleaner element and pull it out of the duct.Clean the inside of the air cleaner housing with a damp rag.3. Attach the new air cleanerelement to the duct. Make sure the tab on the duct fits in the notch on the air cleaner element.Install the new air cleaner element in the air cleaner housing correctly placing the square part of the flange on the element in the mating recess on the housing.4. Reinstall the air cleaner housing cover, tighten the three bolts.MaintenanceBOLTSAIR CLEANER ELEMENT。
戴森吸尘器说明书
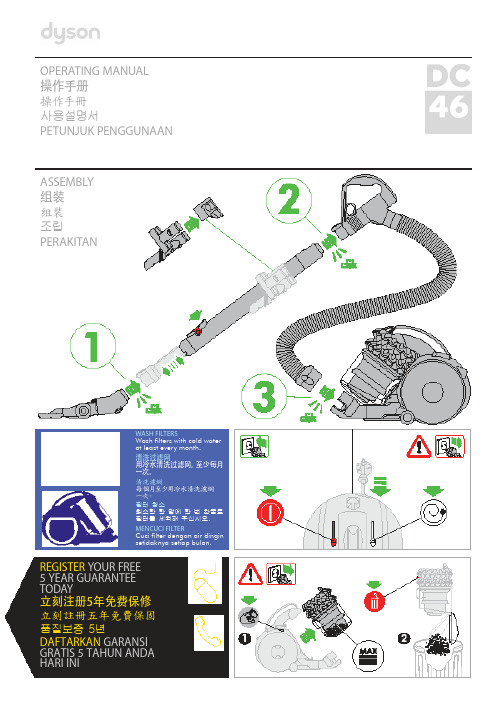
OPERATING MANUAL操作手册操作手冊사용설명서PETUNJUK PENGGUNAANASSEMBLY组装組裝조립PERAKITANWASH FILTERS清洗过滤网清洗濾網필터 청소MENCUCI FILTERREGISTER YOUR FREE5 YEAR GUARANTEE TODAY立刻注册5年免费保修立刻註冊五年免費保固품질보증 5년DAFTARKAN GARANSI GRATIS 5 TAHUN ANDA HARI INIDYSON CUSTOMER CARETHANK YOU FOR CHOOSING TO BUY A DYSON APPLIANCEAfter registering your free 5 year guarantee, your Dyson appliance will be covered for parts and labour for5 years from the date of purchase, subject to the terms of the guarantee.If you have any questions about your Dyson appliance, call the Dyson Helpline with your serial number and details of where/when you bought the appliance.Most questions can be solved over the phone by one of our trained Dyson Helpline staff.Alternatively visit for online help, general tips and useful information about Dyson.戴森客户服务感谢您选择购买戴森产品登记获取 5 年免费保修后,您的戴森产品自购买之日起,将享受 5 年的零件和人工保修服务,但须符合保修条款的规定。
Dyson Corrale 直发器使用说明书
Target temp
210 185 165
Current temp
Adjusting the temperature Press the Temperature (+/-) control buttons to select the temperature that suits your hair type and styling preference.
Reactivating your straightener Insert the Flight-ready tag back into your straightener.
Assembling the charging dock
Your dock can be used as a charging dock or a stand to store your Dyson Corrale™ straightener.
To achieve enhanced styling with less reliance on heat, Dyson engineers developed flexing plates. Made from materials selected for their flexibility, strength and thermal conduction, they shape to gather and control hair.
Charging when travelling Just check if you need a travel adaptor. The Magnetic 360° charging cable is suitable for use with all mains electricity supplies.
Dyson V15 Detect Cordless Vacuum, Black说明书
SpeedPro Max AquaCepillo de aspiración de 360 grados18 V, hasta 55 minutos de autonomía3 en 1: aspirador, mopa, de manoAccesorios integradosFC6901/01El aspirador sin cable más rápido* con limpieza 3 en 1Termina antes con nuestro aspirador sin cable 3 en 1. Nuestro potente cepillo con succión 360° captura el polvo y la suciedad más rápido de todas partes. En suelos duros o alfombras, cada movimiento es útil. Exclusivo sistema de aspirador y mopa que limpia distintos tipos suciedad de una pasada.Limpieza 3 en 1 ininterrumpida3 en 1: cepillo de aspiración de 360 grados, sistema de aspirador, mopa y aspiradorde manoPara varios tipos del polvo, incluye Aquaboost para la suciedad más resistenteUnidad de mano integrada, boquilla estrecha y cepilloAlcance rápido a todas partes, incluso debajo de los muebles bajosVelocidad inigualableEl cepillo de aspiración 360° captura el polvo y la suciedad más rápidoCepillo con luz LED permite ver el polvo y la suciedad ocultosHasta 55 minutos* de limpieza con batería de iones de litio de 18 VFlujo de aire sin precedentesPowerCyclone 8: nuestra tecnología sin bolsa más potenteEl motor digital PowerBlade crea un alto flujo de aire (>1000 L/min)El sistema de filtrado triple garantiza un elevado flujo de aire durante más tiempoDestacadosCepillo de aspiración de 360 gradosEl cepillo de aspiración 360° captura el polvo y la suciedad más rápidoHasta 55 minutos de funcionamientoLas baterías de iones de litio de 18 V de alto rendimiento proporcionan hasta 55 minutos de autonomía en el modo ECO, 23 minutos en el modo normal y 17 minutos en el modo Turbo antes de tener que recargarlas.Motor digital PowerBladePowerBlade es un motor digital diseñado para crear un alto flujo de aire sin precedentes (>1000 l/min) que produce una succión de360° en el cepillo. Regístrate en en los 3 meses posteriores a la compra paradisfrutar de una garantía de motor gratuita de 5años.Sistema de aspiración y limpieza en húmedoEl exclusivo sistema de aspiración y limpieza en húmedo controla la liberación de agua para mantener la humedad óptima para todo tipode suelos duros durante la limpieza. Lasalmohadillas de microfibra se pueden lavar a mano o en la lavadora.Alcance rápido a todas partesSpeedPro Max es flexible y fácil de cubeta para el polvo está en la parte superior, lo que ofrece un ángulo más bajo e incluso se queda completamente plana en el suelo para limpiar debajo de los muebles bajos.Tecnología PowerCyclone 8Tecnología PowerCyclone 8: nuestra mejortecnología de aspiración sin bolsa ahora en un aspirador vertical inalámbrico, para mantener una succión más potente durante más tiempo.Accesorios integradosLos accesorios son fáciles de usar con un solo clic. Su unidad extraíble de mano hace que SpeedPro Max sea como dos aspiradores en uno. El cepillo se encuentra incorporado al tubo para estar siempre a mano.Cepillo con luz LEDEl polvo, las pelusas, los pelos y las migas son más fáciles de detectar y eliminar con los indicadores LED de la boquilla de SpeedPro Max. El cepillo con luz LED permite ver incluso la suciedad oculta.Sistema de filtrado tripleEl sistema de filtrado triple devuelve solo el aire limpio al motor, lo que garantiza unelevado flujo de aire durante más tiempoDistintivo verde de PhilipsLos productos de bajo consumo de Philips pueden reducir los costes, el consumoenergético y las emisiones de CO2. ¿Cómo?Ofrecen una mejora medioambiental significativa en una o varias de las áreas ecológicas centrales de Philips: consumo eficiente, embalaje, sustancias peligrosas,peso, reciclaje y deshecho y durabilidad.EspecificacionesRendimientoTipo de pila: Iones de litioVoltaje de la pila: 18 VTiempo de carga: 5 hora(s)Tiempo de funcionamiento: 55 minuto(s) Tiempo de funcionamiento (turbo):17 minuto(s)Nivel de potencia acústica: 84 dB Cobertura de superficie por depósito: 60 m²Flujo de aire (máx.): 1000 l/min UsoCapacidad del depósito de agua limpia (máx.):0,28 LDetergentes que se pueden utilizar:detergente diluido o solo aguaDiseñoColor: Azul gasolinaFiltradoCapacidad de polvo: 0,6 LFiltro del motor: Filtro lavableCepillos y accesoriosAccesorios incluidos: Adaptador de CA,Almohadilla de microfibra, Cepillo integradoCepillo adicional: Cepillo de aspiración de 360gradosCepillo estándar: Aspirador y mopaDesarrollo sostenibleEmbalaje: > 90 % de materiales recicladosManual del usuario: Papel 100 % recicladoPeso y dimensionesPeso del producto: 2,654 kg* Comparado con los 10 aspiradores verticales sin cablelíderes en ventas de más de 300 euros en Alemania en2017, usando la prueba de limpieza de suelos duros consuciedad gruesa desarrollada por Philips y basado enla norma internacional IEC60312-1. Enero de 2018.* Con sistema de aspiración y limpieza en húmedo© 2021 Koninklijke Philips N.V. Todos los derechos reservados.Las especificaciones están sujetas a cambios sin previo aviso. Las marcas registradas son propiedad de Koninklijke Philips N.V. o de sus propietarios respectivos.Fecha de emisión2021‑04‑21Versión: 6.0.1EAN: 08 71010 38438 94 。
氧气燃烧型住宅多位置多速变频暖气机说明书

TECHNICAL GUIDEDue to continuous product improvement,specifications are subject to change without notice.Visit us on the web at for the most ISO 9001Certified Quality Management System444556-CTG-A-0209FOR DISTRIBUTION USE ONLY - NOT TO BE USED AT POINT OF RETAIL SALEWARRANTYLifetime limited warranty on both heat exchangers to the origi-nal purchaser; a 20-year limited warranty from original installa-tion date to subsequent purchaser.10-year warranty on the heat exchanger in commercial applica-tions.5-year limited parts warranty.DESCRIPTIONThese compact units employ induced combustion, reliable hot surface ignition and high heat transfer aluminized tubular heat exchangers. The units are factory shipped for installation in upflow or horizontal applications and may be converted for downflow applications.These furnaces are designed for residential installation in a basement, closet, alcove, attic, recreation room or garage and are also ideal for commercial applications. All units are factory assembled, wired and tested to assure safe dependable and economical installation and operation.These units are Category IV listed and may be vented either through side wall or roof applications using approved plastic combustion air and venr piping.FEATURES•Two stage heating operation includes two stage gas valve,two stage inducer operation and variable speed ECM blower operation. Adjustable delay timer allows two stage operation with a single stage thermostat.•Easily applied in upflow, horizontal left or right, or downflow installation with minimal conversion necessary.•Compact, easy to install, ideal height 33" tall cabinet.•ECM variable speed drive for cooling SEER enhancement,improved comfort with optional airflow delay profiles, and continuous fan options for IAQ performance.•Easy access to controls to connect power/control wiring.•Built-in, high level self diagnostics with fault code display.•Low unit amp requirement for easy replacement application.•All models are convertable to use propane (LP) gas.•Electronic Hot Surface Ignition saves fuel cost with increased dependability and reliability.•100% shut off main gas valve for extra safety.•24V, 40 VA control transformer and blower relay supplied for add-on cooling.•Hi-tech tubular aluminized steel primary heat exchanger with stainless steel tube/aluminum fin secondary heat exchanger for outstanding efficiency.•Solid removable bottom panel allows easy conversion.•Airflow leakage less than 1% of nominal airflow for ductblaster conditions.•No knockouts to deal with, making installation easier.•Movable duct connector flanges for application flexibility.•Quiet inducer operation, burner, and blower operation.•Inducer rotates for easy conversion of venting options.•Fully supported blower assembly for easy access and removal of blower.•External air filters used for maximum flexibility in meeting customers IAQ needs.•Insulated blower compartment for thermal and acoustic performance.•1/4 turn knobs provided for easy independent door removal.•Internal condensate trap design (patent pending) provides condensate management options, easy visual operation check, and is self priming to prevent nuisance problems.•Protection included from air intake, exhaust vent or condensate blockage.•Venting applications maybe installed as either 2 pipe sealed combustion or single pipe vent using indoor combustion air.444556-CTG-A-02092Johnson Controls Unitary ProductsAnnual Fuel Utilization Efficiency (AFUE) numbers are determined in accordance with DOE Test procedures.Wire size and over current protection must comply with the National Electrical Code (NFPA-70-latest edition) and all local codes.The furnace shall be installed so that the electrical components are protected from water.Cabinet & Duct DimensionsModel Nominal CFM (m 3/min)Cabinet Size Cabinet Dimensions (Inches)Approximate Operating WeightsA B C Lbs TM9V060B12MP111200B 17 1/216 3/813 1/4122TM9V080B12MP111200B 17 1/216 3/813 1/4126TM9V080C16MP111600C 2119 7/816 1/2136TM9V100C16MP111600C 2119 7/818 1/4142TM9V100C20MP112000C 2119 7/818 1/4145TM9V120D20MP112000D24 1/223 3/821 3/4156Ratings & Physical / Electrical DataModel Input High/Low Output High/Low Total Unit AFUEHigh Fire Air Temp. RiseLow Fire Air Temp. RiseMBH MBH Amps %°F°F TM9V060B12MP1160/3958/37 996 35 - 65 35 - 65 TM9V080B12MP1180/5277/50 996 35 - 65 30 - 60 TM9V080C16MP1180/5277/50 1296 35 - 65 35 - 65 TM9V100C16MP11100/6596/62 1296 35 - 65 30 - 65 TM9V100C20MP11100/6596/62 1496 35 - 65 35 - 65 TM9V120D20MP11120/78115/75149635 - 6535 - 65 Model Max. Outlet Air Temp.Blower Blower Size Max.Over-current Protect Min. Wire Size (awg) @ 75 ft. One Way°F HP Amps In.TM9V060B12MP11170 1/2 711 x 8 1514 TM9V080B12MP11175 1/2 711 x 8 15 14 TM9V080C16MP11175 3/4 10.211 x 10 15 14 TM9V100C16MP11175 3/4 10.211 x 10 15 14 TM9V100C20MP11175 1 12.711 x 11 20 12 TM9V120D20MP11170112.711 x 112012444556-CTG-A-0209Johnson Controls Unitary Products 3FILTER PERFORMANCEThe airflow capacity data published in the “Blower Perfor-mance” table listed above represents blower performance WITHOUT filters.All applications of these furnaces require the use of field installed air filters. All filter media and mounting hardware or provisions must be field installed external to the furnace cabi-net. DO NOT attempt to install any filters inside the furnace.NOTE: Single side return above 1800 CFM is approved as long as the filter velocity does not exceed filter manufacturer’s rec-ommendation and a transition is used to allow use on a 20x25filter.NOTES:1.Air velocity through throwaway type filters may not exceed 300 feetper minute (91.4 m/min). All velocities over this require the use of high velocity filters.2.Do not exceed 1800 CFM using a single side return and a 16x25 fil-ter. For CFM greater than 1800, you may use two side returns or one side and the bottom or one return with a transition to allow use of a 20x25 filter.*- 24" clearance in front and 18" on side recommended for service access.All furnaces approved for alcove and attic installation.ACCESSORIESPROPANE (LP) CONVERSION KIT - S1-1NP0347 - All ModelsThis accessory conversion kit may be used to convert natural gas (N) units for propane (LP) operation.CONCENTRIC VENT TERMINATION - S1-1CT0302 (2") & S1-1CT0302-636 (2")S1-1CT0303 (3") & S1-1CT0303-636 (3")For use through rooftop, sidewall. Allows combustion air to enter and exhaust to exit through single common hole. Elimi-nates unslightly elbows for a cleaner installation.SIDEWALL VENT TERMINATION KIT - S1-1HT0901 (3")S1-1HT0902 (2")For use on sidewall, two-pipe installations only. Provide a more attractive termination for locations where the terminal is visable on the side of the home.CONDENSATE NEUTRALIZER KIT - 1NK0301Neutralizer cartridge has a 1/2" plastic tube fittings for installa-tion in the drain line. Calcium carbonate refill media is also available from the Source 1 Parts (p/n 026-30228-000).SIDE RETURN FILTER RACKS - S1-1SR0200 - All Models S1-1SR0402 - All ModelsBOTTOM RETURN FILTER RACKS -S1-1BR0517 or 1BR0617 - For 17-1/2” cabinets S1-1BR0521 or 1BR0621 - For 21” cabinets S1-1BR0524 or 1BR0624 - For 24-1/2” cabinets1BR05xx series are galvanized steel filter racks. 1BR06xx are pre-painted steel filter racks to match the appearance of the fur-nace cabinet.COMBUSTIBLE FLOOR BASE KIT -For installation of these furnaces in downflow applications directly onto combustible flooring material, These kits are required to prevent potential overheating situations.tible floor base kit provides access for combustible airflow.S1-1CB0517 - For 17-1/2” cabinets S1-1CB0521 - For 21” cabinets S1-1CB0524 - For 24-1/2” cabinetsEAC TRANSITION KITS - For installation of EAC accessories with these furnaces to pro-vide easy transition of return airflow through the EAC to get the proper sealing and reduced airflow leakage.S1-1TK1001 - For all models using side return S1-1TK1017 - For 17-1/2” cabinets using bottom returnS1-1TK1021 - For 21” cabinets using bottom returnS1-1TK1024 - For 24-1/2” cabinets using bottom returnHIGH ALTITUDE PRESSURE SWITCHES -For installation where the altitude is less than 5,000 feet it is not required that the pressure switch be changed. For altitudes above 5,000 feet, see kits below.S1-1PS3306 - 080S1-1PS3307 - 060S1-1PS3302 - 100, 120ROOM THERMOSTATS - A wide selection of compatible ther-mosets are available to provide optimum performance and fea-tures for any installation.1H/1C, manual change-over electronic non-programmable ther-mostat.1H/1C, auto/manual changeover, electronic programmable,deluxe 7-day, thermostat.1H/1C, auto/manual changeover, electronic programmable.* For the most current accessory information, refer to the price book or consult factory.Recommended Filter Sizes (High velocity 600 FPM)CFM Cabinet SizeSide (in)Bottom (in)1200B 16 x 2516 x 251600C 16 x 2520 x 252000C (2) 16 x 2520 x 252000D(2) 16 x 2522 x 25Unit Clearances to CombustiblesApplicationUpflowDownflowHorizontalTop 1" 0" 0"Vent 0" 0" 0"Rear 0" 0" 0"Side 0" 0" 1"Front*0" 0" 0"Floor Combustible Combustible 11.For combustible floors only when used with special sub-base.Combustible Closet Yes Yes Yes Line ContactNoNoYesSubject to change without notice. Printed in U.S.A.444556-CTG-A-0209Copyright © 2008 by Johnson Controls, Inc. All rights reserved.Supersedes: NothingJohnson Controls Unitary Products5005 York Drive Norman, OK 73069AIR FLOW DATAHIGH / LOW SPEED COOLING AND HEAT PUMP CFM060B12080B12Jumper SettingsHigh Low High Low COOL Tap ADJ Tap*13438651320882A B 11167271093755B B 12357911203810A A 10266611001693B A 10797091080730A C 889590880641C B 900599910642B C 787531803585D B 814542836597C A 712490738557D A 725499749561C C 641456682529D C080C16100C16Jumper SettingsHigh Low High Low COOL Tap ADJ Tap*1787117118181192A B 150398715451030B B 1620105316611083A A 14059141427936B A 14629641497991A C 12177851234819C B 12458181265832B C 940608977648D B 10917021116728C A 852*********D A 9836261019666C C 764544791519D C100C20120D20Jumper SettingsHigh Low High Low COOL Tap ADJ Tap*2019129020061397A B 1790117416871131B B 1818119518451282A A 1630106815521050B A 1649108216941157A C 126984815021011C B 14329561400944B C 10787041365922D B 11697701364931C A 9866381232808D A 10626851225808C C 8665761117718D C HIGH / LOW HEAT CFM060B1280B12Jumper Settings High Low High Low HEAT Tap ADJ Tap*13648431433945A Any 12537451320887B Any 11026601223840C Any 10146071134768D Any80C16100C16Jumper SettingsHigh Low High Low HEAT Tap ADJ Tap*1684109517951171A Any 1542101115851047B Any 14269271420929C Any 12898321201785D Any100C20120D20Jumper SettingsHigh Low High Low HEAT Tap ADJ Tap*2194141719371323A Any 1999129017571199B Any 1799118215941062C Any 161410621429957D AnyAll CFM’s are shown at 0.5” w.c. external static pressure.These units have variable speed motors that automatically adjust to provide constant CFM from 0.0” to 0.6” w.c.static pressure. From 0.6” to 1.0” static pressure, CFM is reduced by 2% per 0.1” increase in static. Operation on duct systems with greater than 1.0” w.c. external static pressure is not recommended.NOTE: At some settings, LOW COOL and/or LOW HEAT airflow may be lower that what is required to operate an airflow switch on certain models of electronic air clean-ers. Consult the instructions for the electronic air cleaner for further details.* The ADJ “D” tap should not be used.。
dyson pure hot+cool 说明书

dyson pure hot+cool 说明书一、外观展示:延续经典,科技感十足戴森的产品一直有着自己的设计风格,当然这款戴森HP05也不例外,它在外观设计方面依然十分出色,可以说是颜值很高的一款产品。
首先就是外包装设计的十分简约,大大的外包装上面有一个本款产品的渲染图和一排Pure Hot+Cool字样,从这里就可以很清晰的了解到它的外观和主要功能。
戴森HP05的外观设计采用了戴森经典的无叶风扇的设计,上半部分是椭圆形的环状出风口,而下部分则是滤芯的所在,这种设计我感觉除了可以提高颜值颜值之外,更重要的是可以避免发生触碰扇叶的危险情况,在安全方面更有保障。
机身上半部分的出风口是一个细小的环状开槽,日常使用时冷暖风正是从此处喷射而出,单从外观来看倒像是一个环形的装饰条,其实这也是戴森产品的优点所在,既保证了产品的良好性能又兼顾了颜值,做的真的挺不错的。
因为这款机器具备了两种气流模式,所以除了在机身前方有一个环状出风口之外,在机身的侧面同样的预留了一个出风口,不过这个出风口主要是在无需凉风时才会使用到。
机身上惟一的一个实体按钮,通过它可以实现机器的开关机操作,而调节风速、温度、净化模式等操作则需要使用遥控器来实现。
动图封面在开机按钮的下方是一个液晶显示屏,通过这里可以实时的了解到房间内的空气质量指数、PM2.5、PM10、室内温度、室内湿度等各项数据,用户可以随时的掌握家中的空气质量,非常实用。
因为戴森HP05这款机器具备了空气净化器的功能,机身的底部其实可以看做是空气净化器的主体部分,它的滤芯就放置在这一部分机体内,所以外部的金属护罩外壳采用了密集的波点设计,相当于净化器的进风口。
值得一提的是这款机器的机身支持左右倾斜控制,所以在运行时就可以使送风的范围更加的宽广,能够更快的将凉风、暖风送达至房间的各个角落,这也是它的一个优势所在。
机身的护罩外壳是通过卡扣式的方式与机身组装到一起的,在更换滤芯或者进行清洁时只需用手按住这个卡扣并向下滑动就可以将它打开,操作非常的简单。
戴森 吸尘器 用户手册说明书

User manualIn the boxGetting startedCharging your machine Caring for your floors Emptying your bin Cleaning your bin Washing your filterWashing your brush barS V 12 J N .00000 P N .000000-00-00 00.00.00 V E R S I O N N O .01Cleaning your tools Clearing blockagesLooking after your machineThe Dyson cordless vacuum cleaner in an upright position with the wand and cleaner head attached.Dyson micro one point five kilogramsIn the boxWand clipClips to your vacuum's wand to hold tools.A plastic clip that attaches to the wandGetting startedCharging your machineFor the best experience, we recommend fully charging your machine, and any additional batteries, as soon as you open the box and after every clean.The LED light on the end of the handle will flash when the power is running low and you need to put your battery on to charge.Connect the charger directly to the charging point on the base of the handle of your machine. You can also connect to your dock as shown in the installation instructions supplied with your dock.The LED light on the end of the handle will pulse with a blue LED light when charging, and the light will go out when fully charged.It can take up to four hours to fully charge your battery. Your battery has been designed to be left on charge.Your machine won’t operate or charge if the ambient temperature is below 5°C (41°F). This is designed to protect both the motor and battery.You can help prolong the battery life by leaving your machine to cool downbefore recharging.Caring for your floorsCheck that the underside of the cleaner head or tool is clean and free from any objects that may cause damage.Before vacuuming your flooring, rugs, and carpets, check the manufacturer’s recommended cleaning instructions.This machine is designed for use on hard floors. The brush bar on your machine can damage certain flooring. Some rug materials may fuzz if a rotating brush bar is used when vacuuming. If this happens, we recommend vacuuming without the motorised floor tool and consulting with your flooring manufacturer.Washing your filterWash your filter at least once a month to maintain the best performance. Make sure the filter is completely dry before refitting.Twist off your filterDon’t put any part of your machine in a dishwasher or use detergents, polishes or air fresheners.Turn your filter anti-clockwise and pull it away from your machine.Before washing your filter, tap it gently over a bin to remove any loose dust and debris.Wash your filterWash the outside of the filter, rubbing with your fingers to remove the dirt. Carefully rinse the inside filter, without allowing water to fill the filter. Repeat these steps until the water runs clear.Shake and dryEmpty the filter and shake firmly to remove excess water.Keep shaking until there’s no water coming from the filter.Place your filter end up, as shown.Leave your filter to dry for at least 24 hours in a well-ventilated, warm place. Don’t dry your filter in a tumble dryer, microwave or near a naked flame. Important: your filter must be completely dry before you put it back into the machine. Your machine could be damaged if used with a damp filter.Refit your filterTo refit your filter, slide it onto the handle and turn it clockwise until it clicks into place.Your filter may need more frequent washing if you vacuum fine dust,use Max mode frequently or use with the bin full.A hand holding the filter with thenarrow end pointing downwards withdroplets of water being shaken from thefilter and again, with the end pointingdownwards shaking water out.The filter is left to drywith the pleated filterend facing upwards.Filter with hand overthe open end witharrows showing ashaking motion.Filter held in uprightposition, with the widerend in the palm of ahand. Water runningfrom a tap into thenarrower end.The filter is located at therear of your machine.Holding the filterby the hard, plasticend, tap the otherend over the bin.Washing your brush barRemove brush barDon’t put any part of your machine in a dishwasher or use detergents, polishes or air fresheners.Press the cleaner head release button to remove it from the wand.Pull the brush bar off the end cap and put the end cap to one side, don’t wash it.Wash and dry brush baror dirt. Keep washing until the water runs clear.Stand the brush bar upright and leave for at least 24 hours to dry.Replace your brush barsMake sure your brush bar is completely dry before refitting.Rotate the end cap until it clips securely back into position.The cleaner head housing is not washable and should only be wiped over with a damp lint-free cloth.Cleaning your toolspolishes or air fresheners.Light pipe crevice tool Mini motorised toolClearing blockagesIf your machine detects a blockage, the motor will pulse six times. You won’t be able to use your machine until the blockage has been cleared.If you try to use your machine when the motor is pulsing, it will automatically cut out.Leave your machine to cool down before looking for blockages and, for yoursafety, take care not to touch the power button.Disconnect your machine from the charger before looking for blockages. Be careful not to touch the trigger and be aware of sharp objects.Leave your machine to cool down before looking for blockages.Don't use your machine when looking for blockages as this could cause injury.With the wand removed from the machine, check for blockages at both ends of the wand.With the bin removed, check for blockages, paying particular attention to the air inlet, located at on the right–hand side of the machine just below the point where the bin joins the main body of the machine.Turn the cleaner head over to check for obstructions on the brush bar and air inlet.runner.Remove any obstructions from the brush bar.Looking after your machineTo always get the best performance from your machine, it’s important to clean it regularly and check for blockages.Look after your machineIf your machine is dusty, wipe with a damp lint-free cloth.Check for blockages in the cleaner head, tools and main body of your machine. Wash your filter regularly and leave to dry completely.Don’t use detergents or polishes to clean your machine.Look after your batteryTo get the best performance and life from your battery, use Eco mode.Your machine won’t operate or charge if the ambient temperature is below 5°C(41°F). This is designed to protect both the motor and battery.Your serial numbersYou can register your machine using the serial number found on the bottomof your machine.You can find your serial numbers on your machine, battery and charger.Use your serial number to register.。
- 1、下载文档前请自行甄别文档内容的完整性,平台不提供额外的编辑、内容补充、找答案等附加服务。
- 2、"仅部分预览"的文档,不可在线预览部分如存在完整性等问题,可反馈申请退款(可完整预览的文档不适用该条件!)。
- 3、如文档侵犯您的权益,请联系客服反馈,我们会尽快为您处理(人工客服工作时间:9:00-18:30)。
戴森暖风机hp2使用说明书
使用方法
1、首先连接到插座(5-22KW暖风机需要3相380-400V电压)
2、将暖风机竖直放置在表面坚固的地方,要远离潮湿的环境和易燃物品。
3、接通电源
4、将温控调节器旋至MAX(最大),让暖风机满功率运行。
5、将档位功率开关调至所需档位后,暖风机会按所设定功率运行。
6、一旦房间温度达到所要求的,加热元件将停止工作,但风扇会继续工作,一旦气温下降,加热元件会继续加热。
7、暖风机会自动启动,停止,从而保持室内温度的恒定。
8、在关闭加热器之前,将温控调节器调至MIN关闭,将档位开关调至风扇或者O关闭,暖风机会在2分钟内冷却下来。
9、风扇延时温控功能:如果关闭暖风机之前忘记将温控调节器旋至OFF位置,当出风口网罩将近50℃时,延时温控将继续运行直到温度降至40℃,此功能将加快冷却,延长使用寿命。
10、使用过后,首先关闭暖风机开关,然后拔出插头电源线。
11、当暖风机过热或宜昌操作和温控失灵时,非自动复位温控将启动,会关闭暖风机。
拔下插头等暖风机冷却后,用探针对准RESET 复位孔往里按,当听到滴答声响后表示电路复位,然后插上插头,打开暖风机开关,机器将恢复正常运行。
使用注意
1、不要将暖风机直接放置在电源插座旁边,不要用手去触摸暖风机内部加热元件,避免发生危险!
2、在暖风机加热的时候不要将它盖住,如果盖住会使暖风机过热。
不允许在任何有水或比较潮湿的地方使用暖风机。
3、暖风机应该保存在远离易燃物的安全的地方,最小距离不应小于0.5米。
4、不要在满是灰尘和有汽油,油漆稀释剂和其他易燃易爆危险品的地方使用,防止发生危险。
5、不要将暖风机在接近窗帘,门帘和纺织品使用,避免火灾。