STM32_uClinux应用文档
ARM设计的uClinux及其应用.
ARM设计的uClinux及其应用摘要:本文讨论了基于ARM的嵌入式操作系统uClinux及其应用开发设计及实现。
在32位ARM核的微处理器S3C4510B的硬件平台上结合嵌入式实时操作uClinux.完成了系统的硬件设计uClinux的编译、移植,最后实现了应用程序的添加。
关键词:ARM;实时操作系统uClinux;S3C4510B;ARM7TDMI1嵌入式操作系统uClinux及其应用开发嵌入式软件平台由以下部分组成:系统引导程序、嵌入式操作系统内核、文件系统。
系统引导程序通常也称为BootLoad&mdas摘要:本文讨论了基于ARM的嵌入式操作系统uClinux及其应用开发设计及实现。
在32位ARM核的微处理器S3C4510B的硬件平台上结合嵌入式实时操作uClinux.完成了系统的硬件设计uClinux的编译、移植,最后实现了应用程序的添加。
关键词:ARM;实时操作系统uClinux;S3C4510B;ARM7TDMI1 嵌入式操作系统uClinux及其应用开发嵌入式软件平台由以下部分组成:系统引导程序、嵌入式操作系统内核、文件系统。
系统引导程序通常也称为BootLoad—er ,代码量虽少,但是作用非常大,相当于PC上的BOIS,负责将操作系统内核固化到Flash中和系统初始化工作.然后将系统控制权交给操作系统。
文件系统是嵌入式软件平台占用存储量最大的一部分,也是与用户开发最相关的一部分,它存储了系统配置文件、系统程序、用户应用程序和必需的驱动程序。
1.1 BootLoader程序系统引导程序BootLoader是嵌入式系统加电后执行的第一个程序,一般应写入Flash存储器中并从起始物理地址0x0开始。
在应用实际中BootLoader的功能主要有:① 将uCLinux内核和文件系统烧写到目标板中;②系统初始化;③系统的内存映射;④加载uClinux内核1.2 嵌入式操作系统uCiinuxuClinux就是Micro—Control—Linux,是针对控制领域的嵌入式linux操作系统,它是从Linux 2.0/2.4内核派生而来,沿袭了主流Linux 的绝大部分特性,适合不具备内存管理单元(MMU)的微处理器/微控制器(例如ARM7TDMI),它也是一个完全符合GNU/GPL公约的操作系统,完全开放代码。
5.4 uClinux应用程序设计
makefile分析(续)
all: $(EXEC) $(EXEC): $(OBJS) $(CC) $(CFLAGS) -o $@ $@.c -elf2flt clean: -rm -f $(EXEC) *.gdb *.elf *.o
install: $(EXEC) mkdir -p /home/app cp $(EXEC) /home/app
二,TFTP下载工具的使用
TFTP:简单文件传输协议
产生于1980年 占用内存小,适合于小型文件传输 采用UDP传输,69端口,不提供密码验证 只支持文件传输,不支持交互
RFC 1350
TFTP使用
在宿主机:
配置主目录 配置IP
在目标机:
通过超级终端配置目标机IP 切换到可写的目录,从宿主机读取文件
tftp –g 宿主机IP –r ./程序名
TFTP使用详解(1)
硬件链接:
用串口线连接宿主机和目标机 通过jtag接口连接宿主机和目标机 用网线链接宿主机和目标机的网络端口 连接目标机电源,并打开
TFTP使用详解(2)
在windows中运行tftp服务器端程序 tftpd32.exe
点击"browse"按钮配置服务器主目录 点击"show dir"按钮检查主目录是否设置成 功
arm-elf-gcc hello.c –o hello -elf2flt –I... -L… -l…
3. 拷贝编译好的文件到某个目录,例如 "/home/app",下载到实验板.
makefile分析
# # # # 使用uClibc库编译连接uClinux应用程序样本 make DEBUG=1 构造调试版本 make 构造优化版本 make clean 清除构造生成的文件
uCLinux 操作系统开发文档

组名U5G参赛编号A358文档编号DOC-2日期2007-1-26作者王志勇uCLinux操作系统开发文档一.uClinux操作系统简介在本设计中采用的STR 710处理器不带有MMU,故操作系统选用uClinux.uClinux, Micro-Control-Linux,即"针对微控制领域而设计的Linux系统"。
1.uClinux的内存管理对于uClinux来说,其设计针对没有MMU的处理器,即uClinux不能使用处理器的虚拟内存管理技术。
uClinux仍然采用存储器的分页管理,系统在启动时把实际存储器进行分页。
在加载应用程序时程序分页加载。
但是由于没有MMU管理,所以实际上uClinux采用实存储器管理策略(real memeory management)。
这一点影响了系统工作的很多方面。
uClinux系统对于内存的访问是直接的,(它对地址的访问不需要经过MMU,而是直接送到地址线上输出),所有程序中访问的地址都是实际的物理地址。
操作系统对内存空间没有保护(这实际上是很多嵌入式系统的特点),各个进程实际上共享一个运行空间(没有独立的地址转换表)。
2.uClinux的内核加载方式uClinux的内核有两种可选的运行方式:可以在flash上直接运行,也可以加载到内存中运行。
这种做法可以减少内存需要。
Flash运行方式:把内核的可执行映象烧写到flash上,系统启动时从flash的某个地址开始逐句执行。
这种方法实际上是很多嵌入式系统采用的方法。
内核加载方式:把内核的压缩文件存放在flash上,系统启动时读取压缩文件在内存里解压,然后开始执行,这种方式相对复杂一些,但是运行速度可能更快(ram的存取速率要比flash高)。
3.uClinux的根(root)文件系统uClinux系统采用romfs文件系统,这种文件系统相对于一般的ext2文件系统要求更少的空间。
空间的节约来自于两个方面,首先内核支持romfs文件系统比支持ext2文件系统需要更少的代码,其次romfs文件系统相对简单,在建立文件系统超级块(superblock)需要更少的存储空间。
分享自己平时在网上收集的一些STM32源码,大家顶起哈!

分享⾃⼰平时在⽹上收集的⼀些STM32源码,⼤家顶起哈!本帖部分附件需要少量⾦币,此⽬的是为了⿎励⼤家积极发帖,请⼤家见谅!3.2⼨真彩TFT液晶触摸屏,320*240像素,26万⾊,i8080 16位并⾏接⼝,带转接板及触控芯⽚,可以直接⽤AVR、51、PIC、dsPIC、ARM7、STM32等单⽚机驱动。
3.2TFT.rar (6.69 MB, 下载次数: 180, 售价: 2 ⾦币)⾮常不错的⼀款STM32开发板资料。
含原理图、⽤户⼿册、各类例程:USB虚拟串⼝、TFT显⽰例程、U盘例程、TCP通信、uCOS例程、MP3解码、步进电机例程等。
有KEIL和IAR两套例程。
Armfly-STM32-SCH-SoftDemo.rar (16.05 MB, 下载次数: 431, 售价: 2 ⾦币)uC/OS-II官⽅的stm32的移植,基于arm的Cortex M3-uC/OS-II。
Micrium-ST-uCOS-II-LCD-STM32.rar (2.43 MB, 下载次数: 379)花了近3个⽉的毕业设计的时间,直到前⼏天完成的基本运营。
论⽂繁忙过去⼏天中,第⼀次在地图上从现在使⽤的软件代码的⽅式。
STM32 RVMDK 。
某些功能,这个MP3播放: MP3播放功能,⽀持MP3/WAV/WMA/MIDI播放,⽀持快进,快退,歌词显⽰⽀持[第⼆⼗条:第⼆⼗条:⼆⼗] / [第XX : XX.XX ] / [第XX号:第XX号] ,以⽀持多话歌词共享标记收⾳机功能,并⽀持⾃动发现服务台, FM76 ? 1.08 ,⾃动存⼊台湾图⽚播放功能,⽀持16位, 24位, 32位,任何⼤⼩的BMP图⽚浏览,以及符合JPEG / JPG格式图⽚浏览(只要它是正确的格式,⼤⼩限制)。
1,温度计功能。
,传感器DS18B20的。
2,彩⾊灯功能。
3,功率放⼤器功能。
4,职能亿多年来在⽀持太阳,⽉球和节⽓周查看。
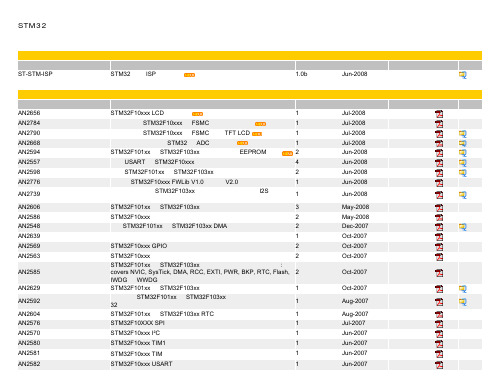
STM32系列的文档和文件
日期 May-2008 May-2008 Feb-2008
长度
文档
文档
中文描述 STM32 Class B的VDE证书
版本
日期 Nov-2007
长度 1342 KB
文档
文档
数据手册 参考 STM32F101x6/8/B Product Catalog P/N's : STM32F101VB STM32F101V8 STM32F101T8 STM32F101T6 STM32F101RB STM32F101R8 STM32F101R6 STM32F101CB STM32F101C8 STM32F101C6 STM32F103xC/D/E Product Catalog P/N's : STM32F103ZE STM32F103ZD STM32F103ZC STM32F103VE STM32F103VD STM32F103VC STM32F103RE STM32F103RD STM32F103RC STM32F101xC/D/E Product Catalog P/N's : STM32F101ZE STM32F101ZD STM32F101ZC STM32F101VE STM32F101VD STM32F101VC STM32F101RE STM32F101RD STM32F101RC 中文描述 版本 日期 长度 文档 英文 具有32至128 KB Flash,6个定时器,ADC,7个通信接口, 基于ARM 9 的中等容量,基本型32位MCU Jul-2008 中文 文档
2 STM32F10xxx 调试应用实例 STM32F101xx 和 STM32F103xx 核,及系统外围设备应用实例: covers NVIC, SysTick, DMA, RCC, EXTI, PWR, BKP, RTC, Flash, 2 IWDG 和 WWDG。 1 STM32F101xx 和 STM32F103xx 低功率模式 如何使用 STM32F101xx 和 STM32F103xx 微控制器的链路系统实现 1 32位定时器的分辨率 1 STM32F101xx 和 STM32F103xx RTC 校准 STM32F10XXX SPI 应用实例 STM32F10xxx I²C 应用实例 STM32F10xxx TIM1 应用实例 STM32F10xxx TIM 应用实例 STM32F10xxx USART 应用实例 1 1 1 1 1
OLIMEXINO-STM32开发板用户指南说明书

OLIMEXINO-STM32 development boardUser's manualAll boards produced by Olimex are ROHS compliantDocument revision E, November 2014Designed by OLIMEX Ltd, 2012SCHEMATIC:OLIMEXINO-STM32, board revision E https://LED2_E D23_ECAN_TPin #Signal Name Pin #Signal Name 1D23_EXT2D24(CANTX) 3D25(MMC_CS)4D265D276D287D29(SCL2)8D30(SDA2)9D31(#SS2)10D32(SCK2)DISCLAIMER© 2014 Olimex Ltd. Olimex®, logo and combinations thereof, are registered trademarks of Olimex Ltd. Other product names may be trademarks of others and the rights belong to their respective owners.The information in this document is provided in connection with Olimex products. No license, express or implied or otherwise, to any intellectual property right is granted by this document or in connection with the sale of Olimex products.The Hardware project is released under the Creative Commons Attribution-Share Alike 3.0 United States License. You may reproduce it for both your own personal use, and for commercial use. You will have to provide a link to the original creator of the project https:// on any documentation or website.You may also modify the files, but you must then release them as well under the same terms. Credit can be attributed through a link to the creator website: https://The software is released under GPL.It is possible that the pictures in this manual differ from the latest revision of the board.The product described in this document is subject to continuous development and improvements.All particulars of the product and its use contained in this document are given by OLIMEX in good faith. However all warranties implied or expressed including but not limited to implied warranties of merchantability or fitness for purpose are excluded. This document is intended only to assist the reader in the use of the product. OLIMEX Ltd. shall not be liable for any loss or damage arising from the use of any information in this document or any error or omission in such information or any incorrect use of the product.This evaluation board/kit is intended for use for engineering development, demonstration, or evaluation purposes only and is not considered by OLIMEX to be a finished end-product fit for general consumer use. Persons handling the product must have electronics training and observe good engineering practice standards. As such, the goods being provided are not intended to be complete in terms of required design-, marketing-,and/or manufacturing-related protective considerations,including product safety and environmental measures typically found in end products that incorporate such semiconductor components or circuit boards.Olimex currently deals with a variety of customers for products, and therefore our arrangement with the user is not exclusive. Olimex assumes no liability for applications assistance, customer product design, software performance, or infringement of patents or services described herein.THERE IS NO WARRANTY FOR THE DESIGN MATERIALS AND THE COMPONENTS USED TO CREATE OLIMEXINO-STM32. THEY ARE CONSIDERED SUITABLE ONLY FOR OLIMEXINO-STM32.For product support, hardware information and error reports mail to: ******************. Note that we are primarily a hardware company and our software support is limited.Please consider reading the paragraph below about the warranty of Olimex products.。
stm32嵌入式技术应用开发全案例实践pdf资料

stm32嵌入式技术应用开发全案例实践pdf资料随着科技的不断发展,嵌入式技术在各个领域得到了广泛的应用。
而STM32作为一款性能强大、功能丰富的嵌入式微控制器,受到了众多开发者的青睐。
为了帮助开发者更好地掌握STM32的应用开发技术,一份全案例实践PDF资料应运而生。
这份资料以实际案例为基础,详细介绍了STM32嵌入式技术的应用开发过程。
首先,资料从STM32的基本概念和特点入手,让读者对STM32有一个全面的了解。
接着,资料介绍了STM32的开发环境搭建,包括软件和硬件的准备工作。
通过这一部分的学习,读者可以快速上手STM32的开发工作。
接下来,资料通过一系列的案例实践,详细介绍了STM32在各个领域的应用。
比如,资料介绍了如何使用STM32进行智能家居系统的开发,包括温度控制、灯光控制等功能。
此外,资料还介绍了如何使用STM32进行智能交通系统的开发,包括红绿灯控制、车辆识别等功能。
通过这些案例实践,读者可以深入了解STM32在实际应用中的使用方法和技巧。
除了案例实践,资料还提供了大量的实验和实例代码。
这些实验和实例代码可以帮助读者更好地理解和掌握STM32的开发技术。
同时,资料还提供了详细的步骤和说明,让读者可以轻松地进行实验和代码的编写。
通过这些实验和实例代码的学习,读者可以提高自己的实际操作能力,为将来的项目开发打下坚实的基础。
此外,资料还介绍了一些常见问题和解决方法。
在实际开发过程中,开发者常常会遇到各种各样的问题,比如硬件连接问题、软件调试问题等。
资料通过列举一些常见问题和解决方法,帮助读者更好地解决实际开发中的困难和疑惑。
总之,这份STM32嵌入式技术应用开发全案例实践PDF资料是一份非常实用的学习资料。
通过学习这份资料,读者可以全面了解STM32的应用开发技术,掌握STM32的开发环境搭建和实际应用开发方法。
同时,通过实验和实例代码的学习,读者可以提高自己的实际操作能力。
希望这份资料能够帮助更多的开发者更好地应用STM32嵌入式技术,推动嵌入式技术的发展。
linux下搭建stm32运行环境

linux下搭建stm32运⾏环境操作系统:deepin 20stm32cubemx 和STM32CubeProgrammer需要java环境,需要下载安装jreoracle官⽹下载jre 账号可以百度⼿动安装:终端切换到jre下载⽬录,将其解压到 /usr/lib/java ⽬录。
sudo tar zxvf jdk-8u172-linux-x64.tar.gz -C /usr/lib/java将此jre注册到系统中:sudo update-alternatives --install /usr/bin/java java /usr/lib/java/jre1.8.0_172/bin/java 300切换jre:sudo update-alternatives --config javadeepin ⼀般会默认只有这⼀个可以忽略这⼀步配置环境变量:sudo vim /etc/profile添加如下代码:export JAVA_HOME=/usr/lib/java/jre1.8.0_261export JRE_HOME=${JAVA_HOME}/jreexport CLASSPATH=.:${JAVA_HOME}/lib:${JRE_HOME}/libexport PATH=${JAVA_HOME}/bin:$PATH使⽤ Java -version 验证安装是否成功oracle 官⽹下载 stm32cubemx 和stm32programer 这两个Linux版下载后解压解压后的⽂件夹⾥包含三个平台版本,先不要删除其他不⽤的不然安装不成功等安装成功后再⼀块删除直接双击运⾏即可给与运⾏权限或者终端通过 chmod 777 ⽂件名给与权限变成可执⾏⽂件stm32cubemx 和stm32programer 安装过程⼀样stm32cubemx 安装完进⼊后要先安装stm32HAL库stlink 驱动安装:1、安装依赖包sudo apt-get install libusb-1.0sudo apt-get install cmakesudo apt-get install libgtk-3-dev2、下载源码3、编译$ cd stlink$ git branch -a (以下版本根据这个命令下的选择版本对应更改)$ git checkout v1.4.0-patch$ make release$ make debug$ cd build$ cmake -DCMAKE_BUILD_TYPE=Debug ..$ make$ cd Release; sudo make install;sudo ldconfig$ cd ../.. (回到stlink⽬录下)$ sudo cp etc/udev/rules.d/* /etc/udev/rules.d/$ udevadm control --reload-rules$ udevadm trigger测试:st-info –version会看到类似如下提⽰:v1.4.0或者deepin商店进⾏安装直接搜stlink 应该可以没试跑⼀个例⼦吧:打开stm32cubemx进⾏新建⼯程,然后最后选择输出为Makefile代码,然后vs code打开代码⽂件,在 core ⽂件夹下有.h 和.c⽂件可以编程执⾏想要的单⽚机功能。
- 1、下载文档前请自行甄别文档内容的完整性,平台不提供额外的编辑、内容补充、找答案等附加服务。
- 2、"仅部分预览"的文档,不可在线预览部分如存在完整性等问题,可反馈申请退款(可完整预览的文档不适用该条件!)。
- 3、如文档侵犯您的权益,请联系客服反馈,我们会尽快为您处理(人工客服工作时间:9:00-18:30)。
AN3012Application noteGetting started with uClinux™for STM32F10x high-density devicesIntroductionuClinux, pronounced “you-see-Linux”, literally means “microcontroller (µC) Linux®”.uClinux is a Linux kernel fork for microcontrollers (MCUs, embedded systems). It does nothave a memory management unit (MMU). Originally derived from version 2.0 (1996) of theLinux kernel, it now has ports based on Linux 2.6. Since version 2.6, the major parts ofuC linux have been integrated with the mainline kernel for a number of processorarchitectures. The project continues to develop patches and supporting tools to use Linuxon microcontrollers. uClinux supports many architectures, and this new version supports theSTM3210E-EVAL evaluation board.The purpose of this application note is to explain you how to:1.Install the uClinux operating system, the toolchain, and configure the kernel for theSTM3210E-EVAL board2. Build a uClinux image and download it to the STM3210E-EVAL board3. Add applications to the kernelSeptember 2009Doc ID 16051 Rev 11/36Contents AN3012Contents1Package description . . . . . . . . . . . . . . . . . . . . . . . . . . . . . . . . . . . . . . . . . 6 2Hardware description . . . . . . . . . . . . . . . . . . . . . . . . . . . . . . . . . . . . . . . . 73Getting the tools . . . . . . . . . . . . . . . . . . . . . . . . . . . . . . . . . . . . . . . . . . . . 93.1uClinux package . . . . . . . . . . . . . . . . . . . . . . . . . . . . . . . . . . . . . . . . . . . . . 93.1.1Standard distribution . . . . . . . . . . . . . . . . . . . . . . . . . . . . . . . . . . . . . . . . 93.1.2STM3210E-EVAL uClinux software kit . . . . . . . . . . . . . . . . . . . . . . . . . . . 93.2GNU toolchain . . . . . . . . . . . . . . . . . . . . . . . . . . . . . . . . . . . . . . . . . . . . . . 93.3DFuSe & Flash loader demonstrator . . . . . . . . . . . . . . . . . . . . . . . . . . . . . 93.3.1DFuSe applet . . . . . . . . . . . . . . . . . . . . . . . . . . . . . . . . . . . . . . . . . . . . . 103.3.2Flash loader demonstrator . . . . . . . . . . . . . . . . . . . . . . . . . . . . . . . . . . . 104Building the uClinux image . . . . . . . . . . . . . . . . . . . . . . . . . . . . . . . . . . 114.1Installing the toolchain . . . . . . . . . . . . . . . . . . . . . . . . . . . . . . . . . . . . . . . 114.2Preparing the source code tree . . . . . . . . . . . . . . . . . . . . . . . . . . . . . . . . 124.3Configure uClinux for STM3210E-EVAL . . . . . . . . . . . . . . . . . . . . . . . . . . 134.3.1Configuring the kernel . . . . . . . . . . . . . . . . . . . . . . . . . . . . . . . . . . . . . . 154.3.2Application/library settings . . . . . . . . . . . . . . . . . . . . . . . . . . . . . . . . . . . 174.4Running the build process . . . . . . . . . . . . . . . . . . . . . . . . . . . . . . . . . . . . 185Loading the images to the board . . . . . . . . . . . . . . . . . . . . . . . . . . . . . . 195.1Loading the “kernel loader / software updater” . . . . . . . . . . . . . . . . . . . . . 195.1.1Software installation . . . . . . . . . . . . . . . . . . . . . . . . . . . . . . . . . . . . . . . . 195.1.2Hardware installation . . . . . . . . . . . . . . . . . . . . . . . . . . . . . . . . . . . . . . . 195.1.3Load the hex file to the Flash memory . . . . . . . . . . . . . . . . . . . . . . . . . . 205.2Loading the kernel/root file system images . . . . . . . . . . . . . . . . . . . . . . . 215.2.1DfuSe demonstration installation . . . . . . . . . . . . . . . . . . . . . . . . . . . . . . 215.2.2Generating the .dfu image and upgrading the board . . . . . . . . . . . . . . . 22 6First run . . . . . . . . . . . . . . . . . . . . . . . . . . . . . . . . . . . . . . . . . . . . . . . . . . 25 7Command examples/tutorials . . . . . . . . . . . . . . . . . . . . . . . . . . . . . . . . 272/36Doc ID 16051 Rev 1AN3012Contents8How to add new features . . . . . . . . . . . . . . . . . . . . . . . . . . . . . . . . . . . . 298.1How to add a new hardware driver . . . . . . . . . . . . . . . . . . . . . . . . . . . . . . 298.1.1References . . . . . . . . . . . . . . . . . . . . . . . . . . . . . . . . . . . . . . . . . . . . . . . 298.1.2Example of a kernel driver . . . . . . . . . . . . . . . . . . . . . . . . . . . . . . . . . . . 298.2How to add a new application . . . . . . . . . . . . . . . . . . . . . . . . . . . . . . . . . 34 9Revision history . . . . . . . . . . . . . . . . . . . . . . . . . . . . . . . . . . . . . . . . . . . 35Doc ID 16051 Rev 13/36List of tables AN3012 List of tablesTable 1.Document revision history . . . . . . . . . . . . . . . . . . . . . . . . . . . . . . . . . . . . . . . . . . . . . . . . . 35 4/36Doc ID 16051 Rev 1AN3012List of figures List of figuresFigure 1.STM3210E-EVAL board. . . . . . . . . . . . . . . . . . . . . . . . . . . . . . . . . . . . . . . . . . . . . . . . . . . . 8 Figure 2.Configuring the installation parameters . . . . . . . . . . . . . . . . . . . . . . . . . . . . . . . . . . . . . . . 11 Figure 3.uClinux-dist directory.. . . . . . . . . . . . . . . . . . . . . . . . . . . . . . . . . . . . . . . . . . . . . . . . . . . . . 12 Figure 4.uClinux kernel directory.. . . . . . . . . . . . . . . . . . . . . . . . . . . . . . . . . . . . . . . . . . . . . . . . . . . 13 Figure 5.uClinux configuration main menu. . . . . . . . . . . . . . . . . . . . . . . . . . . . . . . . . . . . . . . . . . . . 14 Figure 6.Vendor & Product selection . . . . . . . . . . . . . . . . . . . . . . . . . . . . . . . . . . . . . . . . . . . . . . . . 14 Figure 7.Kernel / Library / Defaults selection . . . . . . . . . . . . . . . . . . . . . . . . . . . . . . . . . . . . . . . . . . 15 Figure 8.System Type configuration. . . . . . . . . . . . . . . . . . . . . . . . . . . . . . . . . . . . . . . . . . . . . . . . . 16 Figure 9.STM3210-EVAL demonstration menu . . . . . . . . . . . . . . . . . . . . . . . . . . . . . . . . . . . . . . . . 17 Figure 10.Device Manager window. . . . . . . . . . . . . . . . . . . . . . . . . . . . . . . . . . . . . . . . . . . . . . . . . . . 19 Figure 11.Flash loader demonstrator download configuration . . . . . . . . . . . . . . . . . . . . . . . . . . . . . . 21 Figure 12.Multi Bin injection window (STM3210E-EVAL-jffs configuration) . . . . . . . . . . . . . . . . . . . . 22 Figure 13.Multi Bin injection window (STM3210E-EVAL-MCU_Flash configuration). . . . . . . . . . . . . 23 Figure 14.DfuSe demonstration window. . . . . . . . . . . . . . . . . . . . . . . . . . . . . . . . . . . . . . . . . . . . . . . 24 Figure 15.Example of MS HyperTherminal. . . . . . . . . . . . . . . . . . . . . . . . . . . . . . . . . . . . . . . . . . . . . 25 Figure 16.uClinux boot log . . . . . . . . . . . . . . . . . . . . . . . . . . . . . . . . . . . . . . . . . . . . . . . . . . . . . . . . . 26 Figure 17.Linux device driver architecture . . . . . . . . . . . . . . . . . . . . . . . . . . . . . . . . . . . . . . . . . . . . . 29 Figure 18.STM3210E-EVAL uart_driver struct. . . . . . . . . . . . . . . . . . . . . . . . . . . . . . . . . . . . . . . . . . 30 Figure 19.STM3210E-EVAL uart_port struct . . . . . . . . . . . . . . . . . . . . . . . . . . . . . . . . . . . . . . . . . . . 30 Figure 20.STM3210E-EVAL uart_ops struct. . . . . . . . . . . . . . . . . . . . . . . . . . . . . . . . . . . . . . . . . . . . 30 Figure 21.STM3210E-EVAL console struct . . . . . . . . . . . . . . . . . . . . . . . . . . . . . . . . . . . . . . . . . . . . 31 Figure 22.STM3210E-EVAL console Init function. . . . . . . . . . . . . . . . . . . . . . . . . . . . . . . . . . . . . . . . 31 Figure 23.Simple GPIO file_operations struct. . . . . . . . . . . . . . . . . . . . . . . . . . . . . . . . . . . . . . . . . . . 32 Figure 24.Simple GPIO write operation . . . . . . . . . . . . . . . . . . . . . . . . . . . . . . . . . . . . . . . . . . . . . . . 33Doc ID 16051 Rev 15/36Package description AN30126/36Doc ID 16051 Rev 11 Package descriptionThis section presents all the files in the package, that are needed to get started with uClinuxon STM32F101xC/D/E and STM32F103xC/D/E devices.●uClinux_on_stm32.patch.gz : the uClinux patch, using which the ARM Cortex-M3 CPU and STM3210E-EVAL board are supported.●AN3012.pdf : the purpose of this guide is to show all the steps necessary to successfully configure, build and run uClinux on the board. It also presents theprocedure to add new hardware driver and applications to the kernel.●Tiny_kernel_boot_loader.hex / kernel_boot_loader.hex : these are the boot loaders required to boot up the board and load uClinux (kernel loader / firmware updater).●uClinux_on_stm32-jffs.dfu / uClinux_on_stm32-MCU_Flash.dfu : these are the binary image files that can immediately be downloaded to the board to get uClinux running.AN3012Hardware description Doc ID 16051 Rev 17/362 Hardware descriptionThe STM3210E-EVAL evaluation board is designed as a complete development platform forSTMicroelectronics's ARM™ Cortex ®-M3 core-based STM32F103xx microcontrollersdelivered in 144-pin packages. This device features: full speed USB2.0, CAN2.0A/Bcompliant interface, two I 2S channels, two I 2C channels, five USART channels withSmartcard support, three SPI channels, two DAC channels, FSMC interface, SDIO, 64Kbyte of internal SRAM and 512 Kbyte of Flash memory, JTAG and SWD debug support.The STM3210E-EVAL has the following onboard hardware features:●Three 5 V power supply options: power jack, USB connector or daughterboard ●Boot from user Flash memory, system memory or SRAM ●I2S audio DAC, stereo audio jack ●128 Mbyte MicroSD card ●A- and B-type Smartcard support ●64 or 128 Mbit serial Flash memory, 512 Kbit × 16 SRAM, 512 Mbit or 1 Gbit NAND Flash and 128 Mbit NOR Flash memory ●I2C/SMBus compatible serial interface temperature sensor ●Two RS-232 channels with RTS/CTS handshake support on one channel ●IrDA transceiver ●USB2.0 full speed connection ●CAN2.0A/B compliant connection ●Inductor motor control connector ●JTAG and trace debug support ●240 × 320 TFT color LCD ●Joystick with 4-direction control and selector ●Reset, wakeup, tamper and user buttons ●4 color LEDs ● RTC with backup batteryHardware description AN3012 Figure 1.STM3210E-EVAL board8/36Doc ID 16051 Rev 1AN3012Getting the tools Doc ID 16051 Rev 19/363 Getting the toolsThis section explains how to get the software tools that are required to build and run uClinuxon the STM3210E-EVAL evaluation board.3.1 uClinux package3.1.1 Standard distributionY ou should first download the original uClinux source files from the uClinux project page(/), or simply follow the following direct link:/pub/uClinux/dist/uClinux-dist-20080808.tar.bz2To get the uClinux-dist-20080808.tar.bz2 file (281Mbytes), which is compatible with theSTM3210E-EVAL uClinux kit.Porting is based on the latest stable version of uClinux which implements the Linux kernel2.6.26-uc0.Y ou also need the uClinux distribution update patch file: uClinux-dist-20080808-20090112.patch.gz (47.1Mbytes) available from:/pub/uClinux/dist/patches/uClinux-dist-20080808-20090112.patch.gz3.1.2 STM3210E-EVAL uClinux software kitThis package contains the kernel patch (update of 399 files) and the kernel boot loader (seeSection 1: Package description ). The package is available from /stm32.3.2 GNU toolchainA toolchain known to successfully build the kernel for ARM Cortex-M3 targets can bedownloaded from the CodeSourcery web site /, or using thefollowing link: /sgpp/lite/arm/portal/release827The G++ Lite 2009q1 toolchain is a free version of the CodeSourcery G++ toolchain, whichis an improvement of the GNU toolchain for ARM processors. It supports ARM, thumb andthumb-2 compilation for all architectures, including Version 7 of the ARM Architecture.Note:1This application note only shows how to Install the “easy-to-install recommended packages”.2Y ou need a PC running on the Linux operating system to be able to install and compileuClinux. The Linux distribution (Fedora, Mandriva, Ubuntu, etc.) should have the kerneldevelopment kit.3.3 DFuSe & Flash loader demonstratorThese two tools are needed to load the final binary images to the board.Getting the tools AN301210/36Doc ID 16051 Rev 13.3.1 DFuSe appletDFuSe stands for Device firmware upgrade application. This applet, coupled to the kernelboot loader firmware, allows the upgrade of the final .dfu file to the external NOR Flashmemory.It can be downloaded from the STMicroelectronics website or directly, using the followinglink: /stonline/products/support/micro/files/um0412.zip .3.3.2 Flash loader demonstratorThis applet, together with the System memory boot loader capabilities, is used to upgradekernel_boot_loader.hex to the STM32F101/103xC/D/E’s 512-Kbyte internal Flash memory.The Flash loader demonstrator is available from at:/stonline/products/support/micro/files/um0462.zipNote:Y ou need a PC running on the Microsoft ® Windows ® operating system to be able to run anduse these two applets.4 Building the uClinux imageThis section shows the kernel building process from scratch; to successfully build theuClinux image, you have to Install GNU toolchain, extract the uClinux source files, apply thepath to the source, configure uClinux for the STM3210E-EVAL board and finally run thebuild process.4.1 InstallingtoolchaintheOn a host PC running with the Linux OS:1.Move to the directory containing the previously downloaded arm-2009q1-163-arm-uclinuxeabi.bin file.2. Execute the installer by double clicking on the bin file or from the command line bytyping:#./arm-2009q1-163-arm-uclinuxeabi.bin3. Follow the installer Wizard to install the typical toolchain settings.Figure 2.Configuring the installation parametersNote:When no windowing server is running you can use the console installation mode, which is enabled with the “-i console” parameter:# ./arm-2009q1-163-arm-uclinuxeabi.bin -i consoleDoc ID 16051 Rev 111/364.2 Preparing the source code treeLet us assume that all the downloaded files are present under the ~/sources directory.Make a new workspace directory, where the build process will take place.# mkdir ~/workspace1.Extract the original uClinux distribution files: make sure you have enough free space(more than 2 Gbytes).# cd ~/workspace# tar -xjvf ~/sources/uClinux-dist-20080808.tar.bz2Figure3 shows what is under the uClinux-dist directory.Figure 3.uClinux-dist directory.2. Update the uClinux distribution with the uClinux-dist-20080808-20090112.patch.gzpatch:# cd ~/workspace/uClinux-dist/# zcat ~/sources/uClinux-dist-20080808-20090112.patch.gz | patch -p13. To enable support of STM32 MCUs, patch the uClinux distribution withuClinux_on_stm32.patch.gz from the STM3210E-EVAL uClinux kit:# zcat ~/sources/uClinux_on_stm32.patch.gz | patch -p112/36Doc ID 16051 Rev 1Figure 4.uClinux kernel directory.4.3 Configure uClinux for STM3210E-EVALNow that you have enabled support of the STM3210E-EVAL evaluation board by uClinux,you need to set up the configuration for the kernel and the final application. Many types ofkernel binary images can be built depending on how you configure uClinux.In this section you will see how to configure the uClinux kernel to run from the STM32’sinternal Flash memory or the external NOR Flash memory.# make menuconfigFrom the main menu, select the vendor / product as shown in Figure5.Doc ID 16051 Rev 113/36Figure 5.uClinux configuration main menuSelect “STMicroelectronics” for “Vendor” and, depending on the type of kernel image youwant to build, select “STM3210E-EVAL-jffs” or “STM3210E-EVAL-MCU_Flash” for“Product”.By selecting “STM3210E-EVAL-jffs” you apply the default configuration that enables supportof an external Flash memory, and boot from it.If you choose the “STM3210E-EVAL-MCU_Flash” configuration, the compilation script willbuild a mini image that runs from the microcontroller’s internal Flash memory.Figure 6.Vendor & Product selectionReturn to the main menu (with the “Exit” button or the “ESC“ key).14/36Doc ID 16051 Rev 1Under the Kernel / Library / Defaults Selection menu, choose Linux-2.6.x for the “kernelversion” and “none” for the “libc version” and toggle the next three menus as shown inFigure7:●“Default all settings” will apply the default vendor/product configuration to the kerneland application.●“Customize Kernel Settings” is used to edit the kernel configuration.●“Customize Application/Library Settings” is used to choose the application that willbe add to the root file system.●Finally “Update Default Vendor Settings” is used to save the new configuration as thevendor default configuration for future use.Figure 7.Kernel / Library / Defaults selectionY ou can now exit the configuration menu. When prompted to save, choose “yes”.kernel4.3.1 ConfiguringtheThe Linux kernel has many configuration items. If you have followed the above describedsteps, the kernel should be configured to meet the STM3210E-EVAL evaluation boardspecifications. Let us now look into some of the main configuration menus.●The System Type menu (see Figure8) shows the MMU setting, ARM System type,processor type, Flash and SRAM settings. All these options should coincide with theboard specifications.Doc ID 16051 Rev 115/36Figure 8.System Type configuration●The boot options menu is used to enable the XIP (execute in place) mode and set thephysical location of the kernel xipImage. Y ou can also specify the default kernelcommand line. The “XIP Kernel Physical Location” parameter points to the Flashmemory address where the kernel image is located.For example, if “STM3210E-EVAL-jffs” was selected, the kernel binary will be written tothe external Flash memory address 0x64000000 set in the configuration menu (asdescribed in Section5.2.2: Generating the .dfu image and upgrading the board).If “STM3210E-EVAL-MCU_Flash” was chosen, the XIP setting will point to0x08003000.[ * ] Kernel Execute-In-Place from ROM(0x64000000) XIP Kernel Physical Locationor(0x08003000) XIP Kernel Physical Location●For console input/output, enter “Device Drivers” ->“Character Device”-> “SerialDrivers”. Set the two following options:[ * ] STM3210E-EVAL USART Port[ * ] Support for console on STM3210E-EVAL USART Port●Many file systems are supported by the uClinux kernel and can be enabled from the“File systems” menu. Y ou can determine which file system will be supported accordingto your product memory size. For example if you need the jffs2 file system you have toenable it.In the case of the STM3210E-EVAL-jffs configuration, this file system is mandatorybecause it is used as the root file system.Under the “File systems” -> “Miscellaneous File system” submenu, toggle JFFS2 fs(with fs standing for file system).[ * ] Journalling Flash File System v2 (JFFS2) support16/36Doc ID 16051 Rev 14.3.2 Application/library settingsIn this menu, leave the vendor default settings. In “Miscellaneous Applications” ->“STM3210E-EVAL Demo(s)”, you will find a few applications examples exploiting theSTM32 hardware and the uClinux features and drivers.Applications under development will also appear there.Figure 9.STM3210-EVAL demonstration menu1.If you use the STM3210E-EVAL-MCU_Flash configuration, the Show Logo application will not be selectedbecause the LCD is not initialized during the boot process hardware initialization.When exiting the configuration menu, save the settings.Doc ID 16051 Rev 117/364.4 Running the build processY ou are now ready to start building the uClinux system. Depending on the previouslyselected configuration (“STM3210E-EVAL-jffs” or “STM3210E-EVAL-MCU_Flash”), you willuse one of the two following processes to build the kernel image:●If you chose the STM3210E-EVAL-jffs configuration:Simply type the “make” command and wait the end of the build process. At this step,the kernel and the selected application are built.After this operation, the xipImage.bin, rootfs.img.bin and logo.bin files are generatedand copied to the “uClinux-dist/images/” folder.●If you chose the STM3210E-EVAL-MCU_Flash configuration:To build the minimal image, proceed as follows:a) Run the “make ucfront” command to prepare tools to build user applications.b) Run the “make user_only” command to prepare user applications.c) Run the “make romfs” command to build the initramfs folder tree.d) Run the “make image” command to copy the kernel image to the “uClinux-dist/images/” folder.At the end of this step a single xipImage.bin file is generated.Whatever the configuration you used (“STM3210E-EVAL-jffs” or “STM3210E-EVAL-MCU_Flash”), now all you need to do is copy the generated image(s) and jump to the nextstep: Loading the images to the board.18/36Doc ID 16051 Rev 15 Loading the images to the board5.1 Loading the “kernel loader / software updater”On a host PC running with a recent version of Microsoft Windows, you need to verify thatyou have an available COM port to communicate with the board.To check that you have an available communication port, right-click on the “My Computer”icon on the desktop and select “Properties” from the pop-up menu. The “System Properties”dialog box appears. Click on the “Hardware” tab, and then on the “Device manager” buttonto display the system hardware configuration. Available COM ports are grouped under the“Ports (COM & LPT)” node in the hardware tree as shown in Figure10.Figure 10.Device Manager window5.1.1 SoftwareinstallationRun the Flash_Loader_Demonstrator_VX.Y_Setup.exe file: the InstallShield Wizard willguide you through the installation of the Flash loader demonstrator application on yourcomputer. Once the software has been successfully installed, click on the “Finish” button. 5.1.2 HardwareinstallationConnect the device to a spare COM port on your PC.Doc ID 16051 Rev 119/365.1.3 Load the hex file to the Flash memoryBefore loading the file, move the boot jumpers to “System Memory Mode” then power up theboard. Run the Flash loader demonstrator application from the “Programs” menu.1.The first step consists in selecting the connection settings: UART port, baud rate andtimeout.2. In the second step, the connection is established and communication has started. Thisstep consists in displaying the Flash memory status. If this status is read-protected, the“Next” button is disabled until the read protection is removed by clicking on the“Remove protection” button. Removing the read protection causes all the Flashmemory pages to be erased.3. At this step the Wizard displays the available device information such as the target ID,the firmware version, the supported device, the memory map and the memoryprotection status. Select the target from the target combobox and click on “Next”.4. At this step, select the Download operation and set the related parameters as shown inFigure11. “Download from file” should point to the Kernel boot loader file from theSTM3210E-EVAL uClinux kit.Depending on the board configuration selected in Section4.3: Configure uClinux forSTM3210E-EVAL when booting from the STM32’s internal Flash memory, you requirea tiny boot loader to preserve some Flash pages for the kernel. In the case when thekernel is placed in an external Flash memory you can use a standard boot loader.–Use Tiny_kernel_boot_loader.hex (< 12 Kbytes) when booting from the STM32’s Flash memory (with the “STM3210E-EVAL-MCU_Flash” configuration).–Use Kernel_boot_loader.hex when booting from the NOR Flash memory (with the STM3210E-EVAL-jffs configuration).20/36Doc ID 16051 Rev 1Figure 11.Flash loader demonstrator download configuration5. The last Wizard page shows the operation page. It gives the size of the data to bedownloaded, the percent completed and the duration of the operation.Note:If an error message appears, you can consult the Flash Loader demonstrator user manual available from the “Programs” menu.5.2 Loading the kernel/root file system imagesMove the boot jumpers to select the “User Flash” boot mode, set the JP14 board jumper toconnected mode and reset the board.5.2.1 DfuSedemonstration installationSoftware InstallationRun the DfuSe_Demo_VX.Y.Z_Setup.exe file: the InstallShield Wizard will guide you toinstall DfuSe applications and source code on your computer. When the software issuccessfully installed, click on the “Finish” button. Y ou can then explore the driver directory.The driver files are in the “Driver” folder located at your install path (C:\Programfiles\STMicroelectronics\DfuSe).Doc ID 16051 Rev 121/36Hardware installation●Connect the device to a spare USB port on your PC.●The “Found New Hardware Wizard” then starts. Follow the wizard to install the newhardware driver available in the “Driver” folder at your install path.5.2.2 Generating the .dfu image and upgrading the boardLet us assume that the files generated from Running the build process have been copied toa local folder on the MS Windows host (e.g. C:\Workspace\Images).DFU file managerStart the DFU file manager application (Start -> All Programs -> STMicroelectronics ->DfuSe-> DFU File Manager), select “i want to GENERATE a DFU file from S19, HEX orBIN files” then click on “OK”.1.Set an unused Target ID number.2. Fill the VID, PID, Version and target name fields3. Click on the “Multi Bin” button to show the “Multi Bin Injection” dialog box.If you chose the “STM3210E-EVAL-jffs” configuration in Section4.3: Configure uClinuxfor STM3210E-EVAL you have to:–Set the start address in the Address field to “6400 0000”.–Click the Browse button to select the xipImage.bin file atC:\Workspace\Images\xipImage.bin.–Click on the Add to list button to add the selected binary file at the given address.–Redo the same sequence to add C:\Workspace\Images\rootfs.img.bin at address “64100 0000”, and C:\Workspace\Images\logo.bin at address “64160 0000”.–Click on “OK” to validate.Figure 12.Multi Bin injection window (STM3210E-EVAL-jffs configuration)22/36Doc ID 16051 Rev 1Doc ID 16051 Rev 123/36If you chose the “STM3210E-EVAL-MCU_Flash” configuration in Section 4.3:Configure uClinux for STM3210E-EVAL you have to:–Set the start address in the Address field to “08003000”.–Click the Browse button to select the xipImage.bin file at C:\Workspace\Images\xipImage.bin .–Click on the Add to list button to add the selected binary file at the given address.–Click on “OK ” to validate.Figure 13.Multi Bin injection window (STM3210E-EVAL-MCU_Flash configuration)4. To create the DFU file, click on “Generate ”.How to download a DFU fileRun the “DfuSe demonstration” application (Start -> All Programs ->STMicroelectronics ->DfuSe -> DfuSe Demonstration).1.Click on the “Choose ” button to select the previously generated DFU file. The displayed Information such as VID, PID, Version and target number is read from the DFU file.2.Choose “NOR Flash” or “internal Flash” in the “Select target(s)” area.3. Check the “Verify after download ” checkbox if you want to launch the verificationprocess after downloading data (this step is optional ).4. Click on the “Upgrade ” button to start upgrading the file content to the memory.5.Wait until the end of the upgrade process.。