FUJIFILM 富士 GW690(GSW690)iii 相机说明书
Finepix S7000富士相机说明书

本手册将指导您正确使用富士数码相机FinePix S7000。
请严格按照指导说明进行操作。
BL00304-600(1)富士数码相机准备工作相机使用方法高级功能设置软件安装查看图像23准备工作相机使用方法高级功能设置软件安装查看图像目录安上镜头盖和相机手带.......................................................................................................................................................8安装电池...........................................................................................................................................................................10安装存储介质...................................................................................................................................................................12检查电池的剩余电量.........................................................................................................................................................13开机和关机/设置日期和时间.............................................................................................................................................14设置日期时间/变更日期显示格式......................................................................................................................................15选择语言 (16)前言.................................................................................4配件.................................................................................5各部分名称. (6)LCD 显示屏文字显示举例............................................7I 静止图像模式......................................................7I 回放模式. (7)系统扩展选项..............................................................103配件指南.....................................................................104正确使用相机的注意事项............................................105电源的注意事项..........................................................105可使用的电池..........................................................105电池使用的注意事项...............................................105关于正确使用5号镍氢(Ni-MH )电池的注意事项.......106AC 电源适配器.. (106)给镍氢(Ni-MH )电池放电的操作步骤.......................107关于存储介质(xD-Picture Card™卡和Microdrives 卡)的注意事项...108警告显示.....................................................................109故障排除.....................................................................111技术规格.....................................................................113术语解释.....................................................................115安全使用须知..............................................................116重要信息 (118)1 准备工作4 设置5.1 软件组件.....................................................................................................................................................................875.2 在Windows 计算机中的安装........................................................................................................................................885.3 在Mac OS 9.0至9.2中的安装.....................................................................................................................................905.4 在Mac OS X 中的安装. (93)6.1 相机连接.....................................................................................................................................................................966.2 FinePixViewer 的使用方法........................................................................................................................................1016 查看图像2 相机使用方法h 长时间连拍...........................................................................................................................................................50D曝光补偿...........................................................................................................................................................................52使用AE 锁定.....................................................................................................................................................................53e 微距(特写) (54)............................................................................................................................................................................55q 静止图像菜单操作(重要,请阅读)....................................................................................................................................56静止图像菜单. (57)*自拍...................................................................................................................................................................................57A 设置白平衡.......................................................................................................................................................................58+自动对焦模式. (59)´多重.....................................................................................................................................................................59;中心.....................................................................................................................................................................60˜区域 (60)‘测光...................................................................................................................................................................................61j 包围式曝光.......................................................................................................................................................................61G 锐度...................................................................................................................................................................................62T 多重曝光...........................................................................................................................................................................62z 闪光灯亮度调整................................................................................................................................................................63∞使用外接闪光灯. (63)...........................................................................................................................................................................65 (67)B 回放 (68)o /所有画面...........................................................................................................................................................69i 保护图像:画面设定/解除/保护所有/取消所有保护.........................................................................................................71g 自动播放(自动回放)..........................................................................................................................................................73t 录制语音注释...................................................................................................................................................................74t回放语音注释 (76)u 如何指定打印选项(DPOF )................................................................................................................................................77u DPOF 设置画面................................................................................................................................................................78U 重新设定DPOF . (80)E45h 16 MB, xD-Picture Card™卡(1张)包括:抗静电盒(1个)h 5号碱性电池(4节)h 手带(1根)h 保护套(2个)h 手带金属环(2个)h 金属环安装工具(1个)h 镜头盖(1个)h 镜头盖固定搭扣(1个)h A/V (音频-视频)电缆(1根)(包括一端为插头(直径2.5mm ),另一端为针式插头电缆×2)h USB 电缆(微型-B 型)(1根)h CD-ROM (1套)FinePix SX 专用软件h 用户手册(本手册)(1册)前言I 拍摄前的试拍对于特别重要的拍摄(如婚礼或出国旅行),请务必进行试拍以确认相机的功能是否正常。
富士胶片AX-l:最简单的开关优先AE相机说明书

This convenience feature tells at a glance whether or not the camera is loaded with film. Film type and number of exposures are shown when Fuji films are used.
o Battery Compartment Cover
f) Preview Button
., Aperture Control Lever
o Fujica X-Mount o Lens Lock
(3 Quick-return Mirror
G Fractional Exposure Control
o(;) Film Speed Selector Film Rewind Crank / Knob
Electronic Self-timer 8
Another convenient feature is the built-in electronic self-timer. Count-down is a precise 12 seconds. And an audible electronic signal tells when the timer is operating.
Push-button Multiple Exposure Multiple exposures are no problem with the AX-I. Just take the first photograph, operate the film advance lever while pressing "R" rewind button and take another shot. This can be repeated any number of times with the film held in perfect register. Skillful use of this function will open the doors to new creativity.
相机使用说明书_操作

盈科视控文档中心文档编号产品版本密级20140826001 1.00文档名称:相机使用说明书_操作共 31 页相机使用说明书_操作Prepared by拟制Date 日期Reviewed by 评审人Date 日期Approved by批准Date 日期Authorized by签发Date日期盈科视控(北京)科技有限公司All rights reserved版权所有侵权必究Revision Record 修订记录Date 日期 RevisionVersion修订版本CR ID /Defect IDCR号Sec No.修改章节Change Description修改描述 Author作者2014-8-26 V1.00 初稿完成张宇目录1 Windows 系统 ‐‐‐‐‐‐‐‐‐‐‐‐‐‐‐‐‐‐‐‐‐‐‐‐‐‐‐‐‐‐‐‐‐‐‐‐‐‐‐‐‐‐‐‐‐‐‐‐‐‐‐‐‐‐‐‐‐‐‐‐‐‐‐‐‐‐‐‐‐‐‐‐‐‐‐‐‐‐‐‐‐‐‐‐‐‐‐‐‐‐‐‐‐‐‐‐‐‐‐‐‐‐‐‐‐‐‐‐‐‐‐‐‐‐‐‐‐‐ 5 1.1 注意事项 ‐‐‐‐‐‐‐‐‐‐‐‐‐‐‐‐‐‐‐‐‐‐‐‐‐‐‐‐‐‐‐‐‐‐‐‐‐‐‐‐‐‐‐‐‐‐‐‐‐‐‐‐‐‐‐‐‐‐‐‐‐‐‐‐‐‐‐‐‐‐‐‐‐‐‐‐‐‐‐‐‐‐‐‐‐‐‐‐‐‐‐‐‐‐‐‐‐‐‐‐‐‐‐‐‐‐‐‐‐‐‐‐‐‐‐‐‐‐ 5 1.2 支持版本 ‐‐‐‐‐‐‐‐‐‐‐‐‐‐‐‐‐‐‐‐‐‐‐‐‐‐‐‐‐‐‐‐‐‐‐‐‐‐‐‐‐‐‐‐‐‐‐‐‐‐‐‐‐‐‐‐‐‐‐‐‐‐‐‐‐‐‐‐‐‐‐‐‐‐‐‐‐‐‐‐‐‐‐‐‐‐‐‐‐‐‐‐‐‐‐‐‐‐‐‐‐‐‐‐‐‐‐‐‐‐‐‐‐‐‐‐‐‐ 6 1.3 软件下载 ‐‐‐‐‐‐‐‐‐‐‐‐‐‐‐‐‐‐‐‐‐‐‐‐‐‐‐‐‐‐‐‐‐‐‐‐‐‐‐‐‐‐‐‐‐‐‐‐‐‐‐‐‐‐‐‐‐‐‐‐‐‐‐‐‐‐‐‐‐‐‐‐‐‐‐‐‐‐‐‐‐‐‐‐‐‐‐‐‐‐‐‐‐‐‐‐‐‐‐‐‐‐‐‐‐‐‐‐‐‐‐‐‐‐‐‐‐‐ 61.4 使用说明 ‐‐‐‐‐‐‐‐‐‐‐‐‐‐‐‐‐‐‐‐‐‐‐‐‐‐‐‐‐‐‐‐‐‐‐‐‐‐‐‐‐‐‐‐‐‐‐‐‐‐‐‐‐‐‐‐‐‐‐‐‐‐‐‐‐‐‐‐‐‐‐‐‐‐‐‐‐‐‐‐‐‐‐‐‐‐‐‐‐‐‐‐‐‐‐‐‐‐‐‐‐‐‐‐‐‐‐‐‐‐‐‐‐‐‐‐‐‐ 82 Linux 系统 ‐‐‐‐‐‐‐‐‐‐‐‐‐‐‐‐‐‐‐‐‐‐‐‐‐‐‐‐‐‐‐‐‐‐‐‐‐‐‐‐‐‐‐‐‐‐‐‐‐‐‐‐‐‐‐‐‐‐‐‐‐‐‐‐‐‐‐‐‐‐‐‐‐‐‐‐‐‐‐‐‐‐‐‐‐‐‐‐‐‐‐‐‐‐‐‐‐‐‐‐‐‐‐‐‐‐‐‐‐‐‐‐‐‐‐‐‐‐‐‐‐‐ 15 2.1 注意事项 ‐‐‐‐‐‐‐‐‐‐‐‐‐‐‐‐‐‐‐‐‐‐‐‐‐‐‐‐‐‐‐‐‐‐‐‐‐‐‐‐‐‐‐‐‐‐‐‐‐‐‐‐‐‐‐‐‐‐‐‐‐‐‐‐‐‐‐‐‐‐‐‐‐‐‐‐‐‐‐‐‐‐‐‐‐‐‐‐‐‐‐‐‐‐‐‐‐‐‐‐‐‐‐‐‐‐‐‐‐‐‐‐‐‐‐‐ 15 2.2 支持版本 ‐‐‐‐‐‐‐‐‐‐‐‐‐‐‐‐‐‐‐‐‐‐‐‐‐‐‐‐‐‐‐‐‐‐‐‐‐‐‐‐‐‐‐‐‐‐‐‐‐‐‐‐‐‐‐‐‐‐‐‐‐‐‐‐‐‐‐‐‐‐‐‐‐‐‐‐‐‐‐‐‐‐‐‐‐‐‐‐‐‐‐‐‐‐‐‐‐‐‐‐‐‐‐‐‐‐‐‐‐‐‐‐‐‐‐‐ 15 2.3 软件下载 ‐‐‐‐‐‐‐‐‐‐‐‐‐‐‐‐‐‐‐‐‐‐‐‐‐‐‐‐‐‐‐‐‐‐‐‐‐‐‐‐‐‐‐‐‐‐‐‐‐‐‐‐‐‐‐‐‐‐‐‐‐‐‐‐‐‐‐‐‐‐‐‐‐‐‐‐‐‐‐‐‐‐‐‐‐‐‐‐‐‐‐‐‐‐‐‐‐‐‐‐‐‐‐‐‐‐‐‐‐‐‐‐‐‐‐‐ 152.4 使用说明 ‐‐‐‐‐‐‐‐‐‐‐‐‐‐‐‐‐‐‐‐‐‐‐‐‐‐‐‐‐‐‐‐‐‐‐‐‐‐‐‐‐‐‐‐‐‐‐‐‐‐‐‐‐‐‐‐‐‐‐‐‐‐‐‐‐‐‐‐‐‐‐‐‐‐‐‐‐‐‐‐‐‐‐‐‐‐‐‐‐‐‐‐‐‐‐‐‐‐‐‐‐‐‐‐‐‐‐‐‐‐‐‐‐‐‐‐ 153 参数调节 ‐‐‐‐‐‐‐‐‐‐‐‐‐‐‐‐‐‐‐‐‐‐‐‐‐‐‐‐‐‐‐‐‐‐‐‐‐‐‐‐‐‐‐‐‐‐‐‐‐‐‐‐‐‐‐‐‐‐‐‐‐‐‐‐‐‐‐‐‐‐‐‐‐‐‐‐‐‐‐‐‐‐‐‐‐‐‐‐‐‐‐‐‐‐‐‐‐‐‐‐‐‐‐‐‐‐‐‐‐‐‐‐‐‐‐‐‐‐‐‐‐‐‐ 20 3.1 相机参数配置 ‐‐‐‐‐‐‐‐‐‐‐‐‐‐‐‐‐‐‐‐‐‐‐‐‐‐‐‐‐‐‐‐‐‐‐‐‐‐‐‐‐‐‐‐‐‐‐‐‐‐‐‐‐‐‐‐‐‐‐‐‐‐‐‐‐‐‐‐‐‐‐‐‐‐‐‐‐‐‐‐‐‐‐‐‐‐‐‐‐‐‐‐‐‐‐‐‐‐‐‐‐‐‐‐‐‐‐‐‐‐ 203.1.1 参数配置界面 ‐‐‐‐‐‐‐‐‐‐‐‐‐‐‐‐‐‐‐‐‐‐‐‐‐‐‐‐‐‐‐‐‐‐‐‐‐‐‐‐‐‐‐‐‐‐‐‐‐‐‐‐‐‐‐‐‐‐‐‐‐‐‐‐‐‐‐‐‐‐‐‐‐‐‐‐‐‐‐‐‐‐‐‐‐‐‐‐‐‐‐‐‐‐‐‐‐‐‐‐‐‐‐‐‐‐ 203.1.2 OffsetX和OffsetY ‐‐‐‐‐‐‐‐‐‐‐‐‐‐‐‐‐‐‐‐‐‐‐‐‐‐‐‐‐‐‐‐‐‐‐‐‐‐‐‐‐‐‐‐‐‐‐‐‐‐‐‐‐‐‐‐‐‐‐‐‐‐‐‐‐‐‐‐‐‐‐‐‐‐‐‐‐‐‐‐‐‐‐‐‐‐‐‐‐‐‐‐‐‐‐‐‐‐‐‐‐‐‐ 213.1.3 Width和Height ‐‐‐‐‐‐‐‐‐‐‐‐‐‐‐‐‐‐‐‐‐‐‐‐‐‐‐‐‐‐‐‐‐‐‐‐‐‐‐‐‐‐‐‐‐‐‐‐‐‐‐‐‐‐‐‐‐‐‐‐‐‐‐‐‐‐‐‐‐‐‐‐‐‐‐‐‐‐‐‐‐‐‐‐‐‐‐‐‐‐‐‐‐‐‐‐‐‐‐‐‐‐‐‐‐‐ 213.1.4 ReverseX和ReverseY ‐‐‐‐‐‐‐‐‐‐‐‐‐‐‐‐‐‐‐‐‐‐‐‐‐‐‐‐‐‐‐‐‐‐‐‐‐‐‐‐‐‐‐‐‐‐‐‐‐‐‐‐‐‐‐‐‐‐‐‐‐‐‐‐‐‐‐‐‐‐‐‐‐‐‐‐‐‐‐‐‐‐‐‐‐‐‐‐‐‐‐‐‐‐‐‐‐‐ 213.1.5 PixelFormat ‐‐‐‐‐‐‐‐‐‐‐‐‐‐‐‐‐‐‐‐‐‐‐‐‐‐‐‐‐‐‐‐‐‐‐‐‐‐‐‐‐‐‐‐‐‐‐‐‐‐‐‐‐‐‐‐‐‐‐‐‐‐‐‐‐‐‐‐‐‐‐‐‐‐‐‐‐‐‐‐‐‐‐‐‐‐‐‐‐‐‐‐‐‐‐‐‐‐‐‐‐‐‐‐‐‐‐‐‐‐ 213.1.6 AcquisitionMode ‐‐‐‐‐‐‐‐‐‐‐‐‐‐‐‐‐‐‐‐‐‐‐‐‐‐‐‐‐‐‐‐‐‐‐‐‐‐‐‐‐‐‐‐‐‐‐‐‐‐‐‐‐‐‐‐‐‐‐‐‐‐‐‐‐‐‐‐‐‐‐‐‐‐‐‐‐‐‐‐‐‐‐‐‐‐‐‐‐‐‐‐‐‐‐‐‐‐‐‐‐‐‐ 223.1.7 AcquisitionStart和AcquisitionStop ‐‐‐‐‐‐‐‐‐‐‐‐‐‐‐‐‐‐‐‐‐‐‐‐‐‐‐‐‐‐‐‐‐‐‐‐‐‐‐‐‐‐‐‐‐‐‐‐‐‐‐‐‐‐‐‐‐‐‐‐‐‐‐‐‐‐‐‐‐‐‐‐‐‐‐‐‐‐‐‐‐ 223.1.8 ExposureTimeRaw ‐‐‐‐‐‐‐‐‐‐‐‐‐‐‐‐‐‐‐‐‐‐‐‐‐‐‐‐‐‐‐‐‐‐‐‐‐‐‐‐‐‐‐‐‐‐‐‐‐‐‐‐‐‐‐‐‐‐‐‐‐‐‐‐‐‐‐‐‐‐‐‐‐‐‐‐‐‐‐‐‐‐‐‐‐‐‐‐‐‐‐‐‐‐‐‐‐‐‐‐‐ 223.1.9 GainRaw ‐‐‐‐‐‐‐‐‐‐‐‐‐‐‐‐‐‐‐‐‐‐‐‐‐‐‐‐‐‐‐‐‐‐‐‐‐‐‐‐‐‐‐‐‐‐‐‐‐‐‐‐‐‐‐‐‐‐‐‐‐‐‐‐‐‐‐‐‐‐‐‐‐‐‐‐‐‐‐‐‐‐‐‐‐‐‐‐‐‐‐‐‐‐‐‐‐‐‐‐‐‐‐‐‐‐‐‐‐‐‐‐‐‐ 223.1.10 PayloadSize ‐‐‐‐‐‐‐‐‐‐‐‐‐‐‐‐‐‐‐‐‐‐‐‐‐‐‐‐‐‐‐‐‐‐‐‐‐‐‐‐‐‐‐‐‐‐‐‐‐‐‐‐‐‐‐‐‐‐‐‐‐‐‐‐‐‐‐‐‐‐‐‐‐‐‐‐‐‐‐‐‐‐‐‐‐‐‐‐‐‐‐‐‐‐‐‐‐‐‐‐‐‐‐‐‐‐‐ 233.1.11 PacketSize ‐‐‐‐‐‐‐‐‐‐‐‐‐‐‐‐‐‐‐‐‐‐‐‐‐‐‐‐‐‐‐‐‐‐‐‐‐‐‐‐‐‐‐‐‐‐‐‐‐‐‐‐‐‐‐‐‐‐‐‐‐‐‐‐‐‐‐‐‐‐‐‐‐‐‐‐‐‐‐‐‐‐‐‐‐‐‐‐‐‐‐‐‐‐‐‐‐‐‐‐‐‐‐‐‐‐‐‐ 233.1.12 AcquisitionFrameRateEnable与AcquisitionFrameRateAbs ‐‐‐‐‐‐‐‐‐‐‐‐‐‐‐‐‐‐‐‐‐‐‐‐‐‐‐‐‐‐‐‐‐‐‐‐‐‐‐‐‐‐‐‐‐‐‐ 233.1.13 TriggerMode ‐‐‐‐‐‐‐‐‐‐‐‐‐‐‐‐‐‐‐‐‐‐‐‐‐‐‐‐‐‐‐‐‐‐‐‐‐‐‐‐‐‐‐‐‐‐‐‐‐‐‐‐‐‐‐‐‐‐‐‐‐‐‐‐‐‐‐‐‐‐‐‐‐‐‐‐‐‐‐‐‐‐‐‐‐‐‐‐‐‐‐‐‐‐‐‐‐‐‐‐‐‐‐‐‐ 243.1.14 TriggerSoftware ‐‐‐‐‐‐‐‐‐‐‐‐‐‐‐‐‐‐‐‐‐‐‐‐‐‐‐‐‐‐‐‐‐‐‐‐‐‐‐‐‐‐‐‐‐‐‐‐‐‐‐‐‐‐‐‐‐‐‐‐‐‐‐‐‐‐‐‐‐‐‐‐‐‐‐‐‐‐‐‐‐‐‐‐‐‐‐‐‐‐‐‐‐‐‐‐‐‐‐‐‐ 243.1.15 TriggerSource ‐‐‐‐‐‐‐‐‐‐‐‐‐‐‐‐‐‐‐‐‐‐‐‐‐‐‐‐‐‐‐‐‐‐‐‐‐‐‐‐‐‐‐‐‐‐‐‐‐‐‐‐‐‐‐‐‐‐‐‐‐‐‐‐‐‐‐‐‐‐‐‐‐‐‐‐‐‐‐‐‐‐‐‐‐‐‐‐‐‐‐‐‐‐‐‐‐‐‐‐‐‐‐‐ 243.1.16 TriggerActivation ‐‐‐‐‐‐‐‐‐‐‐‐‐‐‐‐‐‐‐‐‐‐‐‐‐‐‐‐‐‐‐‐‐‐‐‐‐‐‐‐‐‐‐‐‐‐‐‐‐‐‐‐‐‐‐‐‐‐‐‐‐‐‐‐‐‐‐‐‐‐‐‐‐‐‐‐‐‐‐‐‐‐‐‐‐‐‐‐‐‐‐‐‐‐‐‐‐‐‐‐ 243.1.17 TriggerDelayAbs ‐‐‐‐‐‐‐‐‐‐‐‐‐‐‐‐‐‐‐‐‐‐‐‐‐‐‐‐‐‐‐‐‐‐‐‐‐‐‐‐‐‐‐‐‐‐‐‐‐‐‐‐‐‐‐‐‐‐‐‐‐‐‐‐‐‐‐‐‐‐‐‐‐‐‐‐‐‐‐‐‐‐‐‐‐‐‐‐‐‐‐‐‐‐‐‐‐‐‐‐‐ 243.1.18 UserSetSeletor ‐‐‐‐‐‐‐‐‐‐‐‐‐‐‐‐‐‐‐‐‐‐‐‐‐‐‐‐‐‐‐‐‐‐‐‐‐‐‐‐‐‐‐‐‐‐‐‐‐‐‐‐‐‐‐‐‐‐‐‐‐‐‐‐‐‐‐‐‐‐‐‐‐‐‐‐‐‐‐‐‐‐‐‐‐‐‐‐‐‐‐‐‐‐‐‐‐‐‐‐‐‐‐ 243.1.19 UserSetLoad和UserSetSave ‐‐‐‐‐‐‐‐‐‐‐‐‐‐‐‐‐‐‐‐‐‐‐‐‐‐‐‐‐‐‐‐‐‐‐‐‐‐‐‐‐‐‐‐‐‐‐‐‐‐‐‐‐‐‐‐‐‐‐‐‐‐‐‐‐‐‐‐‐‐‐‐‐‐‐‐‐‐‐‐‐‐‐‐‐‐ 253.1.20 FilterEnable ‐‐‐‐‐‐‐‐‐‐‐‐‐‐‐‐‐‐‐‐‐‐‐‐‐‐‐‐‐‐‐‐‐‐‐‐‐‐‐‐‐‐‐‐‐‐‐‐‐‐‐‐‐‐‐‐‐‐‐‐‐‐‐‐‐‐‐‐‐‐‐‐‐‐‐‐‐‐‐‐‐‐‐‐‐‐‐‐‐‐‐‐‐‐‐‐‐‐‐‐‐‐‐‐‐‐‐ 253.1.21 Gauss5X5Coef ‐‐‐‐‐‐‐‐‐‐‐‐‐‐‐‐‐‐‐‐‐‐‐‐‐‐‐‐‐‐‐‐‐‐‐‐‐‐‐‐‐‐‐‐‐‐‐‐‐‐‐‐‐‐‐‐‐‐‐‐‐‐‐‐‐‐‐‐‐‐‐‐‐‐‐‐‐‐‐‐‐‐‐‐‐‐‐‐‐‐‐‐‐‐‐‐‐‐‐‐‐‐‐ 253.1.22 CannyWeakThres与CannyStrongThres ‐‐‐‐‐‐‐‐‐‐‐‐‐‐‐‐‐‐‐‐‐‐‐‐‐‐‐‐‐‐‐‐‐‐‐‐‐‐‐‐‐‐‐‐‐‐‐‐‐‐‐‐‐‐‐‐‐‐‐‐‐‐‐‐‐‐‐‐‐‐‐‐ 253.1.23 ImageShowType ‐‐‐‐‐‐‐‐‐‐‐‐‐‐‐‐‐‐‐‐‐‐‐‐‐‐‐‐‐‐‐‐‐‐‐‐‐‐‐‐‐‐‐‐‐‐‐‐‐‐‐‐‐‐‐‐‐‐‐‐‐‐‐‐‐‐‐‐‐‐‐‐‐‐‐‐‐‐‐‐‐‐‐‐‐‐‐‐‐‐‐‐‐‐‐‐‐‐‐‐‐ 254 相机功能描述 ‐‐‐‐‐‐‐‐‐‐‐‐‐‐‐‐‐‐‐‐‐‐‐‐‐‐‐‐‐‐‐‐‐‐‐‐‐‐‐‐‐‐‐‐‐‐‐‐‐‐‐‐‐‐‐‐‐‐‐‐‐‐‐‐‐‐‐‐‐‐‐‐‐‐‐‐‐‐‐‐‐‐‐‐‐‐‐‐‐‐‐‐‐‐‐‐‐‐‐‐‐‐‐‐‐‐‐‐‐‐‐‐‐‐‐‐ 26 4.1 AOI区域 ‐‐‐‐‐‐‐‐‐‐‐‐‐‐‐‐‐‐‐‐‐‐‐‐‐‐‐‐‐‐‐‐‐‐‐‐‐‐‐‐‐‐‐‐‐‐‐‐‐‐‐‐‐‐‐‐‐‐‐‐‐‐‐‐‐‐‐‐‐‐‐‐‐‐‐‐‐‐‐‐‐‐‐‐‐‐‐‐‐‐‐‐‐‐‐‐‐‐‐‐‐‐‐‐‐‐‐‐‐‐‐‐‐‐‐‐‐‐ 26 4.2 Trigger ‐‐‐‐‐‐‐‐‐‐‐‐‐‐‐‐‐‐‐‐‐‐‐‐‐‐‐‐‐‐‐‐‐‐‐‐‐‐‐‐‐‐‐‐‐‐‐‐‐‐‐‐‐‐‐‐‐‐‐‐‐‐‐‐‐‐‐‐‐‐‐‐‐‐‐‐‐‐‐‐‐‐‐‐‐‐‐‐‐‐‐‐‐‐‐‐‐‐‐‐‐‐‐‐‐‐‐‐‐‐‐‐‐‐‐‐‐‐‐‐ 274.2.1 接收Trigger命令流程 ‐‐‐‐‐‐‐‐‐‐‐‐‐‐‐‐‐‐‐‐‐‐‐‐‐‐‐‐‐‐‐‐‐‐‐‐‐‐‐‐‐‐‐‐‐‐‐‐‐‐‐‐‐‐‐‐‐‐‐‐‐‐‐‐‐‐‐‐‐‐‐‐‐‐‐‐‐‐‐‐‐‐‐‐‐‐‐‐‐‐‐‐‐‐‐‐‐ 274.2.2 发送Trigger命令流程 ‐‐‐‐‐‐‐‐‐‐‐‐‐‐‐‐‐‐‐‐‐‐‐‐‐‐‐‐‐‐‐‐‐‐‐‐‐‐‐‐‐‐‐‐‐‐‐‐‐‐‐‐‐‐‐‐‐‐‐‐‐‐‐‐‐‐‐‐‐‐‐‐‐‐‐‐‐‐‐‐‐‐‐‐‐‐‐‐‐‐‐‐‐‐‐‐‐ 27 4.3 滤波与边缘检测 ‐‐‐‐‐‐‐‐‐‐‐‐‐‐‐‐‐‐‐‐‐‐‐‐‐‐‐‐‐‐‐‐‐‐‐‐‐‐‐‐‐‐‐‐‐‐‐‐‐‐‐‐‐‐‐‐‐‐‐‐‐‐‐‐‐‐‐‐‐‐‐‐‐‐‐‐‐‐‐‐‐‐‐‐‐‐‐‐‐‐‐‐‐‐‐‐‐‐‐‐‐‐‐‐‐‐ 284.4 曝光 ‐‐‐‐‐‐‐‐‐‐‐‐‐‐‐‐‐‐‐‐‐‐‐‐‐‐‐‐‐‐‐‐‐‐‐‐‐‐‐‐‐‐‐‐‐‐‐‐‐‐‐‐‐‐‐‐‐‐‐‐‐‐‐‐‐‐‐‐‐‐‐‐‐‐‐‐‐‐‐‐‐‐‐‐‐‐‐‐‐‐‐‐‐‐‐‐‐‐‐‐‐‐‐‐‐‐‐‐‐‐‐‐‐‐‐‐‐‐‐‐‐‐‐ 295 故障处理与技术支持 ‐‐‐‐‐‐‐‐‐‐‐‐‐‐‐‐‐‐‐‐‐‐‐‐‐‐‐‐‐‐‐‐‐‐‐‐‐‐‐‐‐‐‐‐‐‐‐‐‐‐‐‐‐‐‐‐‐‐‐‐‐‐‐‐‐‐‐‐‐‐‐‐‐‐‐‐‐‐‐‐‐‐‐‐‐‐‐‐‐‐‐‐‐‐‐‐‐‐‐‐‐‐‐‐‐‐‐ 311 Windows 系统1、注意事项1.支持 JAI 软件版本在1.4以上,NI软件版本在2011及以上。
相机说明书

SD Card Slot SD Card Locking Door Micro USB Port456Shutter ButtonCamera Status Light (LED)Reset Button123·Instruction DiagramChargingMicro USB port supports DC 5-15V power supply. A DC 5V 1~2A charger is recommended.The Red LED will turn on during charging and turn off when charging is complete. It takes about 2 hours to get fully charged.Low Battery WarningsWhen powered on, if the charge is less than 25%, the Blue LED will continue to flash for 3 seconds.·Connection to ComputerAfter turning on the camera, connect it to the computer via USB cable, then it will be recognized as a removable disc.NOTICE: If the camera can not be recognized by the computer after connecting, please make sure that a microSD card is well inserted. If the information on microSD card can not be read normally, please try with another micro USB cable or USB port on the computer.·Firmware UpgradeTo ensure that the camera performs optimally, please use the latest firmware. Update method here: https:///download/runcam5.·microSD CardInsert the microSD card as indicated by the icon next to the card slot.that meet these requirements:• microSD, microSDHC, or microSDXC • U3 recommended (2.7K50/1080P120requires U3 or above; other resolutions require U1 or above)• Capacity up to 128GB·Technical SupportPlease visit:https://NOTICE: Use carefully when handling memory cards. Avoid liquids, dust, and debris. As a precaution, power off the camera before inserting or removing the card. Check manufacturer guidelines regarding use in acceptable temperature ranges.Abnormal SD Card Status: If the blue light continues to flash quickly after powering on, it indicates that the SD card is not inserted, or full or cannot be recognized.。
富士数码相机使用方法图片详解(S2600、S2900、S2950、S4050、HS22通用)
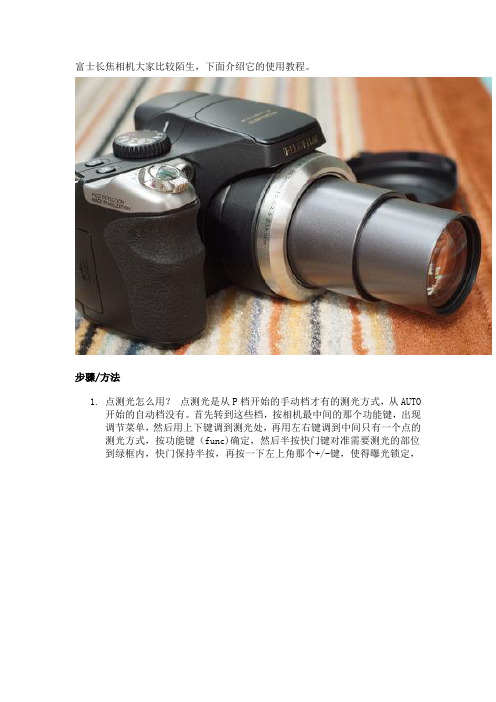
富士长焦相机大家比较陌生,下面介绍它的使用教程。
步骤/方法1.点测光怎么用?点测光是从P档开始的手动档才有的测光方式,从AUTO开始的自动档没有。
首先转到这些档,按相机最中间的那个功能键,出现调节菜单,然后用上下键调到测光处,再用左右键调到中间只有一个点的测光方式,按功能键(func)确定,然后半按快门键对准需要测光的部位到绿框内,快门保持半按,再按一下左上角那个+/-键,使得曝光锁定,然后松开快门,重新构图,最后就是按动快门。
2.什么是光圈优先与快门优先?分别在什么情况下用?我们知道,佳能A系列有光圈优先与快门优先档,他们分别用在什么情况下呢?光圈越大,则单位时间内通过的光线越多,反之则越少。
光圈的一般表示方法为字母“F+数值”,例如F5.6、F4等等。
这里需要注意的是数值越小,表示光圈越大,比如F4就要比F5.6的光圈大,并且两个相邻的光圈值之间相差两倍,也就是说F4比F5.6所通过的光线要大两倍。
相对来说快门的定义就很简单了,也就是允许光通过光圈的时间,表示的方式就是数值,例如1/30秒、1/60秒等,同样两个相邻快门之间也相差两倍。
光圈和快门的组合就形成了曝光量,在曝光量一定的情况下,这个组合不是惟一的。
例如当前测出正常的曝光组合为F5.6、1/30秒,如果将光圈增大一级也就是F4,那么此时的快门值将变为1/60,这样的组合同样也能达到正常的曝光量。
不同的组合虽然可以达到相同的曝光量,但是所拍摄出来的图片效果是不相同的。
3.这里就涉及到“景深”的概念,所谓景深就是指当镜头对焦于被摄体时,被摄体及其前后的景物有一段清晰的范围,这个范围就叫景深。
a、光圈优先大多用在拍人像以及风景时光圈优先就是手动定义光圈的大小,相机会根据这个光圈值确定快门速度。
由于光圈的大小直接影响着景深,因此在平常的拍摄中此模式使用最为广泛。
在拍摄人像时,我们一般采用大光圈长焦距而达到虚化背景获取较浅景深的作用,这样可以突出主体。
数码相机 说明书(6)

相機各部位介紹基本安裝 (2)安裝電池 (2)安裝相機吊繩 (3)安裝 SD/MMC 卡 (3)相機設置拍攝模式 (4)分辨率設置鍵 (4)閃光燈設置鍵 (4)自拍設置鍵 (4)菜單按鍵 (4)播放模式 (5)菜單按鍵 (5)拍照如何拍攝照片和錄製影片? (6)如何播放拍攝的照片/影片? (6)在相機的 LCD 顯示屏上播放 (7)在電視機上播放 (7)如何刪除相機中的相片/影片? (8)相機模式設置功能與模式 (9)連接電腦PC 使用者 (10)安裝驅動程序 (10)連接電腦 (10)Mass Storage Mode(可移動磁盤模式) (10)視頻攝像機模式 (10)MAC 使用者 (11)1.電源2.快門3.自拍指示燈4.閃光燈5.光感應器6.取景器7.視頻輸出接口B 連接接口9.近拍/一般模式按鈕10.鏡頭11.拍攝/播放模式切換鍵12.LCD 開/關13.LCD 液晶顯示屏14.菜單按鍵/向左鍵/退出鍵15.分辨率設置鍵/向上鍵16.閃光燈設置鍵/向右鍵/多張圖像選擇鍵17.自拍設置鍵/向下鍵18.電池指示19.分辨率指示20.閃光燈指示21.自拍指示22.剩余張數23.記憶卡指示24.近拍模式25.變焦指示26.夜間拍攝基本安裝安裝電池方向放入然後關上電池蓋安裝相機吊繩安裝 SD/MMC 卡(未搭配)將吊繩細的一端穿入吊環中將另一端穿入吊環中所形成的孔裡然後拉出來將記憶卡插槽蓋打開將SD 或MMC 記憶卡插入然後關上蓋子拍攝模式您可使用以下的按鍵選擇各項設置。
當您選到該項設置后,此設置值會立刻被紀錄下來。
分辨率設置鍵連續按下分辨率設置。
閃光燈設置鍵連續按下 鍵即可切換各種閃光燈設置。
自拍設置鍵連續按下 設置。
菜單按鍵當您按下 幕上會出現一個下拉式的菜單。
您可使用/鍵選取您想變更的項目然后按下鍵更改。
或者您也可以按下鍵即可切換各種 鍵即可切換鍵時,相機的屏自拍日光>-->-->泡菜單按鍵當您按下您可使用/鍵選擇您想變更的項目然后按下鍵更改。
Canon 摄影设备说明书
LOADING BATTERIES
Remove the cover of the POWER HOUSING and load three 67.5 volt dry batteries (See SPECIFICATIONS for suggested batteries) as illustrated. Be sure to connect battery and POWER HOUSING terminals securely.
For instance, when you need a maximum light output ( gteatet Guide Number ) , use the "ON HIGH" switch position, which provides a guide number of 110 for {he Black and White film with a film seed of ASA
CANON CAMERA co., INC. HEAD OFFICE & FACTORY
312 Shimomaruko-cho, Ohta·ku, Tokyo Japan
Tel: 73-2191 • 6111
. NEW YORK FACTORY BRANCH
550, Fifth Avenue, New York 36, N. Y. U. S. A.
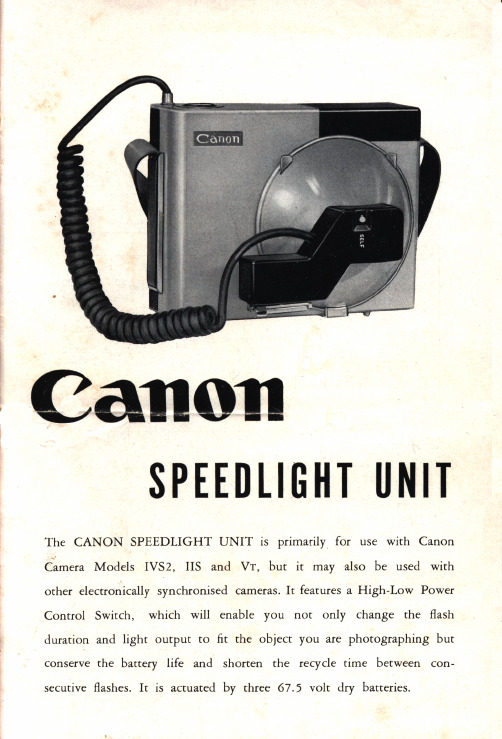
Canon
SPEEDLIGHT UNIT
The CANON SPEEDLIGHT UNIT is primarily for use with Canon
C~mera Models IVS2 , lIS and VT, but it may also be used with
FUJIFILM闪光灯产品说明书
AA Alkaline/Rechargeable Ni-MH BatteriesThe following describes the proper use of batteries and how to prolong their life. Incorrect use can shorten battery life or cause leakage, overheating, fi re, or explosion.■Cautions: Handling the Batteries• Do not expose to water, fl ame, or heat, or store in warm or humid condi-tions.• Do not transport or store with metal objects such as necklaces or hairpins.• Do not disassemble or modify the batteries or battery casing.• Do not subject to strong physical shocks.• Do not use batteries that are leaking, deformed, or discolored.• Keep out of reach of infants and small children.• Insert in the correct orientation.• Do not mix old and new batteries, batteries with diff erent charge levels, or batteries of diff erent types.• If the flash will not be used for an extended period, remove the batteries. Note that fl ash settings will be reset.• The batteries may be warm to the touch immediately after use. Turn the flash off and allow the batteries to cool before handling.• Battery capacity tends to decrease at low temperatures. Keep spare bat-teries in a pocket or other warm place and exchange as necessary. Cold batteries may recover some of their charge when warmed.• Fingerprints and other stains on the battery terminals can impair battery performance. Thoroughly clean the terminals with a soft, dry cloth before inserting them in the flash.If the batteries leak, clean the battery chamber thoroughly before inserting new batteries.If fl uid from the battery comes into contact with skin or clothing, fl ush the aff ected area with water. If fl uid enters your eyes, immedi-ately fl ush the aff ected area with water and seek medical attention.Donot rub your eyes.Failure to observe this precaution could result in per-manent visual impairment.■Ni-MH BatteriesThe capacity of Ni-MH batteries may be temporarily reduced when new, af-ter long periods of disuse, or if they are repeatedly recharged before being fully discharged. This is normal and does not indicate a malfunctio n.The flash draws a small amount of current even when off . Ni-MH batteries that have been left in the flash for an extended period may be drawn down to the point that they no longer hold a charge. Battery performance may also drop if the batteries are run down in a device such as a fl ashligh t. B atteries that no longer hold a charge even after repeatedly being discharged and recharged have reached the end of their service life and must be replaced.Ni-MH batteries can be recharged in a battery charger (sold separately). Bat-teries may become warm to the touch after charging. Refer to the instructions provided with the charger for more information. Use the charger with compat-ible batteries only.Ni-MH batteries gradually lose their charge when not in use.■DisposalDispose of used batteries in accord with local regulations.Liquid CrystalIn the event that the display is damaged, care should be taken to avoid con-tact with liquid crystal. Take the urgent action indicated should any of the following situations arise:• If liquid crystal comes in contact with your skin, clean the area with a cloth and then wash thoroughly with soap and running water.• If liquid crystal enters your eyes, fl ush the aff ected eye with clean water for at least 15 minutes and then seek medical assistance.• If liquid crystal is swallowed, rinse your mouth thoroughly with water. Drink large quantities of water and induce vomiting, then seek medical assistance.Caring for the FlashTo ensure continued enjoyment of the product, observe the following pre-cautions.■Storage and UseIf the fl ash will not be used for an extended period, remove batteries. Do not store or use the fl ash in locations that are:• exposed to rain, steam, or smoke• very humid or extremely dusty• exposed to direct sunlight or very high temperatures, such as in a closed vehicle on a sunny day• extremely cold• subject to strong vibration• exposed to strong magnetic fi elds, such as near a broadcasting antenna, power line, radar emitter, motor, transformer, or magnet• in contact with volatile chemicals such as pesticides• next to rubber or vinyl products■Water and SandExposure to water and sand can also damage the fl ash and its internal cir-cuitry and mechanisms. When using the fl ash at the beach or seaside, avoid exposing the fl ash to water or sand. Do not place the fl ash on a wet surface.■CondensationSudden increases in temperature, such as occur when entering a heated building on a cold day, can cause condensation inside the fl ash. If this occurs, turn the fl ash off and wait for the condensation to evaporate.■CleaningUse a blower to remove dust from the fl ash window, then gently wipe with a soft, dry cloth. Any remaining stains can be removed by wiping gently with a piece of FUJIFILM lens-cleaning paper to which a small amount of lens-cleaning fl uid has been applied. Care should be taken to avoid scratching the fl ash, particularly the fl ash window. The body of fl ash can be cleaned with a soft, dry cloth.Thank you for your purchase of a FUJIFILM EF-42 clip-on fl ash unit.Please read this manual thoroughly before using the product.■Using the FlashAfter mounting the fl ash on the camera, do not pick the camera up by the fl ash. The fl ash may become separated from the hot shoe, causing the camera to fall.For information on compatible cameras, visit our website at http:// /products/digital_cameras/index.html • M aximum fl ash output equivalent to a GN of 42/138 (ISO 100, m/ft): Auto zoom () automatically matches fl ash angle to lens focal lengths in the 24–105 mm range (35 mm format equivalent).• Flexible bounce-fl ash lighting: The fl ash head can be rotated 90° ver-tically, 180° left, or 120° right to provide bounce-flash lighting in nearly all situations.• Exposure compensation: Exposure compensation of ±1.5 EV gives free rein to your creative powers. Choose from settings of –1.5, –1, –0.5, 0, +0.5, +1, and +1.5 EV.• Adjustable fl ash output: Manual flash level adjustment gives you a choice of full output ( / ) or / , / , / , / , / , / of full power.• Adjustable focal length display: Lens focal can be displayed during shooting either in APS-C () or 35 mm () format.• Built-in wide panel: With coverage for focal lengths as short as 20 mm (35 mm format equivalent), the EF-42 can also be used for wide-angle shots.For Your Safety (14)Table of Contents (16)Principal Features (16)Parts of the Flash (17)Inserting Batteries (18)Attaching the EF-42 (18)Auto Power Off (18)The LCD Display (19)Through-the-Lens (TTL) Flash Photography (20)Adjusting Settings (21)Manual Flash Photography (22)Using the Wide Panel (23)Bounce Lighting (23)Continuous Use (24)Specifi cations (24)*Lights to assist the focus operation if the shutter button is pressed halfway when lighting is poor.May not light with some cameras.Built-in wide panelFlash windowBattery-chamber coverAF-assist lamp *Lock ringLCD displayThe EF-42 can be used with lithium, alkaline, nickel-metal hydride (NiMH), and Oxyride batteries. Choose NiMH batteries for reduced fl ash charging times and longer battery life. 1 Place your thumb in the depression at the top of the cover and push the cover slightly in to release the latch, then slide the cover down to open it.Q Before opening the cover, be sure the ON/OFF switch is in the OFF position.2 Insert four AA batteries in the orientationshown on the inside of the cover. Close thecover.Q Although the battery chamber is designed to prevent the batteries being inserted incor-rectly, failure to insert the batteries in the cor-rect orientation could result in malfunction.3 Turn the fl ash on. A beep will sound as thefl ash starts charging. The fl ash is ready foruse when charging is complete and the ready lamp lights.4 Turn the fl ash off. The ready lamp will turn off to show that the fl ash will not fi re.Q Turn the fl ash off before mounting it on the hot shoe. If the fl ash is on, it may short the hot shoe contacts, causing the fl ash to fi re unexpectedly or other product malfunction.Be sure the EF-42 is off before mounting it on or removing it from the camera. Failure to observe this precaution could result in damage to the camera.1 Rotate the fl ash lock ring to the right to release the lock.2 Mount the fl ash securely on the camera hot shoe.3 Rotate the lock ring to the left to lock the fl ash in plac e.Q B e sure the release the lock before attaching the fl ash. Attempting to at-tach the fl ash without releasing the lock could damage the hot shoe.Auto Power OffIf no operations are performed for 15 minutes while the fl ash is on, the displays will turn off and the fl ash will be disabled. Normal opera-tion can be restored by pressing the camera shutter button halfway or turning the fl ash off and then on again.R The fl ash continues to draw power from the batteries after the displays have turned off automatically. To reduce the drain on the batteries, turn the flash offwhen it is not in use.1. If this indicator is not displayed after the fl ash fi res, the subject may be underexposed. Move closer to your subject or choose a wider aperture (lower f-number).2. The fraction of full power at which the fl ash fi res in manual fl ash control mode.T TL fl ash control automatically adjusts fl ash output for optimal brightness. The fl ash also responds to changes in camera settings, allowing the flsync speed.To adjust fl ash settings, press MODE until theicon for the desired item blinks and then press SEL to choose an option while the red displaybacklight is on. Setting is complete when the backlight turns off and the icon stops blinking. 1 Turn the camera and fl ash on.2 Press MODE until the icon for the current fo-cal length display blinks and press SEL choose from (APS-C) or (35 mm).3 If (manual) is selected for zoom, press MODE unti l b links and press SEL to choos e (a uto zoo m). Z oom will be adjusted in response to changes in lens focal length in the 24 mm–105 mm range (35 mm format equivalent). 4 Settings are complete when the red backlight turns off W ait for the ready lamp to light before taking photographs.■TTL Flash ControlThe EF-42 instantly calculates the eff ective fl ash range based on aperture, sensitivity, and other camera settings. When the camerashutter button is pressed halfway or theicon lights, the range appears in the bar graph display, which shows distances of 0.5 m–32 m/1.6 ft.–105 ft. (greater distances are indicated by ). ■The Ready LampThe ready lamp blinks while the fl ash charges. If the fl ash is fi red im-mediately after charging, output will be reduced by the equivalent of about on e s top. For maximum fl ash output, wait until the ready lamp lights. Replace the batteries if charging takes over 30 seconds following a test fl ash performed with the EF-42 not mounted on the camera.■Performing a Test Flash To test the fl ash before taking a photograph, check that the ready lamp is lit and press the test button.■Exposure CompensationPress MODE until theor icon blinks and press SEL to adjust exposure compensa-tion.To adjust fl ash settings, press MODESEL to choose an option. Pressing the MODE button SEL button selects options in the order shown by thearrow.Focal length formatorChoose the focal length format(APS-C) (35 mm)Power ratioManual fl ash control is unaff ected by refl ections, making it the ideal choice for pictures of highly refl ective or unrefl ective subjects.1 Turn the camera and fl ash on.2Choose from the (APS-C) or (35 mm) focal length format displays.3 Adjust exposure compensation. Choose higher values to increasefl ash output, lower values to decrease.4 Adjust zoom.Note that if is selected, the fl ash not light theentire subject if zoom less than the focal length of the lens.5 Adjust fl ash output by choosing a power ratio (PR) and confi rmthat appears in the display.6 Settings are complete when the red backlight turns off and theicon for the selected setting stops blinking.Wait for the ready lamp to light before taking photographs.■Eff ective RangeThe eff ective shooting range of the fl ash in meters can be calculated by multiplying the guide number by the sensitivity (ISO) coeffi cient and dividing by the aperture (for feet, multiply the result by 3.28).Flash range = guide number× ISO coefficient ÷ aperture (f-number)For example, the range for a power ratio of / and a focal length of 35 mm, an aperture of f/4, and a sensitivity of ISO 400 is 10 (the guide number) × 2 (the ISO coeffi cient) ÷ 4 (the aperture), or in other words 5 m (16.4 ft.).R The bar graph in the fl ash unit display shows the range at which optimal exposure will be achieved; distances over 32 m (105 ft.) are shown by .The wide panel is located above the fl ash window. When shooting with wide-angle lenses with focal lengths as short as 20 mm (35 mm format equivalent), extend the wide panel (if is selected for zoom, you will also need to zoom the flash out to 24 mm).drops slightly when the wide panel is used.Wide panelLight from the EF-42 can be refl ected (bounced) from a ceiling or wall in TTL mode . Under some conditions, the fl ash may create dark shad-ows in the background when aimed directly at the subject. A softer,Q Do not attempt to rotate the fl ash head beyond the limits shown on the fl ash body. Failure to ob-serve this precaution could damage the fl ash. Q Flash intensity may drop by about 25% depend-ing on the color and type of the refl ecting sur-face.Q If possible, bounce lighting off a surface that is white or nearly white. Particular care is advised when taking color photographs, as light refl ected from colored surfaces may aff ect the colors in the image.Using the fl ash many times in quick succession can cause overheating that may damage the fl ash. It is recommended that you turn off the fl ash for ten minutes after about ten consecutive shots.Power zoom Adjusted automatically on signal from cameraCan be adjusted manually by pressing zoom button Color temperature Approx. 5,600 K when fi red at full powerBatteries Four AA lithium, alkaline, NiMH, or Oxyride batteries Operating temperature0 °C to 40 °C/32 °F to 104 °FDimensions (H × W × D)Approx. 116 mm × 64 mm × 102 mm/ 4.6 in. × 2.5 in. × 4.0 in.Weight Approx. 260 g/9.2 oz., excluding batteriesous three months. The number of uses is the number of times the fl ash can be fi red at intervals of 30 seconds; the count ends when the ready lamp takes more than 30 seconds to light.R The recycling time is the time needed after the fl ash fi res for the ready lamp to light, as measured under the conditions described above.。
- 1、下载文档前请自行甄别文档内容的完整性,平台不提供额外的编辑、内容补充、找答案等附加服务。
- 2、"仅部分预览"的文档,不可在线预览部分如存在完整性等问题,可反馈申请退款(可完整预览的文档不适用该条件!)。
- 3、如文档侵犯您的权益,请联系客服反馈,我们会尽快为您处理(人工客服工作时间:9:00-18:30)。
...........8 @ Strap Lug
3 . L o a d i n gt h e t a k e - u ps p o o l a n d f i | m . . . . . . . . . . . . .
...........9 @ Sync Socket Cover
4 . P o s i t i o n i n gt h e f i l m s t a r t m a r k
120 half-length, 120, and 220 roll film.
Same as Gw690lll. Sameas Gw690lll.
b<
Film Advance ExposureCounter
6. Winding the film and cocking the shutter
............f2 @ Pressure Plate
7 . U n l o a d i n gt h e f i l m
............12 @ Focal Plane Rail
8. Takingflash pictures................
Este manual le explica c6mo manejar y conservar correctamente su FUJI GW690ll Professional,FUJI GSW690il Professionalo FUJI GW670il Professional.Sirvase seguir atentamente las explicaciones. (Las instrucciones son identicas para las tres c6maras porque las 0nicas diferencias entre ellas son la distanciafocal del objetivo y el tamafro del negativo.)
Se reporter aux illustrationsen lisantle mode d'emploi.
entre eux r6sidentdans la longueurfocale de leur objectif et dans le format d'image.)
MANUAL DE INSTRUCCIONES
.....................13 @ take-up Spool
2. Checkingthe camera before shooting
.................13 @ Spool Knob ReleaseButtons
3 . C l e a n i n gt h e l e n s
GW6SIOITGSW6gOIGIIW670IIT
Professional
Professiona-'f Professional
O W N E R ' SM A N U A L BEDIENUNGSANLEITUNG M O D ED ' E M P L O I M A N U A LD E I N S T R U C C I O N E S
Espafrol (P6gina 36 46) Consulte las ilustracionesmientras lee este manual.
N A M E SO F P A R T S/ B E Z E I C H N U N GD E R T E I L E/ N O M E N C L A T U R E/ N O M E N C L A T U R A
S E T T I N GA N D A D J U S T I N GT H E C A M E R A C O N T R O L S ,E T C . . . . . . . . . 1 0 @ ViewtinOerEyepiece
1 . U n l o c k i n gt h e f r o n t s h u t t e rr e l e a s e . . . . . . . .
.........,,.............8@ Film Selector
4 . A t t a c h i n gt h e v i e w f i n d e re y e p i e c e
. . . . . . . . . . . . . . . . . . . . . . . . . . . 8@ Accessory Shoe (Hotshoe)
.............9 G Film LoadingKnob
5 . W i n d i n g t h e f i l m a n d p o s i t i o n i n gi t f o r t h e f i r s t s h o t . . . . . . . . . . . . . . . 9 @ tripod Socket
L O A D T N GT H E F I L M
.....................8 @ Level
1. Openingthe camerabackiewfinderWindow
2 . 1 2 O / 2 2 Of i l m s e | e c t o r . . . . . . . . . . . . . . . . . .
Frangais (Pages 26 35)
I
Professional,FUJI GSW690Iil Professional ou FUJI GW670m Professional.Veuillez le lire attentivement.
(Les instructions sont les mdmes pour les trois appareils car les seules differences
English (Pages 6 14) See illustrationswhile you read this manual.
BEDIENUNGSANLEITUNG
D i e s e A n l e i t u n g e n t h i l t a l l e s , w a s S i e u b e r d i e B e d i e n u n g u n d P fl e g e l h r e r F U J I GW690lll Professional,FUJI GSW690m Professionalbzw. FUJI GW670m Professional wissen mussen. Lesen Sie die Anleitung bitte aufmerksamdurch. ( D i e A n l e i t u n g i s t f u r a l l e d r e i M o d e l l e g l e i c h e r m a B e nz u t r e f f e n d ,d a d i e s e s i c h n u r i n d e r B r e n n w e i t ed e s O b j e k t i v s u n d i m B i l d f o r m a tv o n e i n a n d e ru n t e r s c h e i d e n . )
.............14
4. Precautions
........................14
,w
SPECIFICATIONS
GW690r[[Gw670rrrl
GSW690l[
Picture Size Film
6 x 9 cm [6 x 7 cm] format; actual picture size 56 x 82.6 mm [56 x 68.5 mm]
NAMES OF PARTS
e fitm Advance Lever ................7 @ Top Shutter Release . . . . . . . . . . . . . . . . . . . . . 8@ Exposure Counter .................8 @ Front Shutter Release
OWNER'S MANUAL
This manual will show you how to use and care for your FUJI GW690m Professional, FUJI GSW690lllProfessional,or FUJI GW670IIIProfessionalcorrectly. Pleasefollow the instructions carefully. (The instructions are the same for the three cameras because the only differences among them are in the lens focal length and picture size.)
j'
l-otl tr
2
o
.?
3
e o
o
Fig. 5 -
R
Fig. 9
t
F i g .1 3
Fis.| 4
Fig,17
!00[!r!!
Fig. 21
ris.15
rig.16
@\ B
-;
n 2o
il-
lcn -
Fig.23
uFa
ilFF-
l*CONTENTS NAMES OF PARTS. s P E C fF fC A T | O N S . . . . . . . . . . . HOW TO USE............ R E A D Y T N GT H E C A M E R A . . . . . . . . . . . . . .