NM-3000 MP3智能广播音乐播放器
Philips MCM2300 微型音乐播放器用户手册说明书
5
10 Troubleshooting
16
Overview of the main unit
6
Overview of the remote control
7
4 Get started
8
Connect speakers
8
Connect power
8
Prepare the remote control
8
2 Notice
Any changes or modifications made to this device that are not expressly approved by Gibson Innovations may void the user’s authority to operate the equipment.
Risk of short circuit or fire! • Before you connect the product to the
power outlet, make sure that the power voltage matches the value printed on the back of the product. Never connect the product to the power outlet if the voltage is different.
Risk of injury or damage to the product! • Visible and invisible laser radiation when
open. Avoid exposure to beam. • Do not touch the disc optical lens inside
MP3智能音乐播放系统6区说明书(内页)
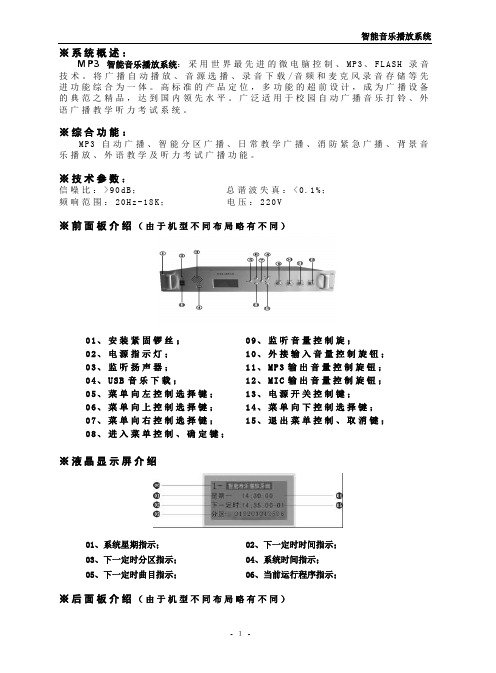
※系统概述:M P3智能音乐播放系统:采用世界最先进的微电脑控制、M P3、F L A S H录音技术。
将广播自动播放、音源选播、录音下载/音频和麦克风录音存储等先进功能综合为一体。
高标准的产品定位,多功能的超前设计,成为广播设备的典范之精品,达到国内领先水平。
广泛适用于校园自动广播音乐打铃、外语广播教学听力考试系统。
※综合功能:M P3自动广播、智能分区广播、日常教学广播、消防紧急广播、背景音乐播放、外语教学及听力考试广播功能。
※技术参数:信噪比:>90d B;总谐波失真:<0.1%;频响范围:20H z-18K;电压:220V※前面板介绍(由于机型不同布局略有不同)01、安装紧固锣丝;02、电源指示灯;03、监听扬声器;04、U S B音乐下载;05、菜单向左控制选择键;06、菜单向上控制选择键;07、菜单向右控制选择键;08、进入菜单控制、确定键;09、监听音量控制旋;10、外接输入音量控制旋钮;11、M P3输出音量控制旋钮;12、M I C输出音量控制旋钮;13、电源开关控制键;14、菜单向下控制选择键;15、退出菜单控制、取消键;※液晶显示屏介绍01、系统星期指示;03、下一定时分区指示;05、下一定时曲目指示;02、下一定时时间指示;04、系统时间指示;06、当前运行程序指示;※后面板介绍(由于机型不同布局略有不同)- 1-2注:(短路输入端囗: 当这个端囗有短路信号输入时,本机会立刻播放你放在內存里SP A 文件夹内的一首曲目,SP A 这文件夹內只能放一首要紧急报警用的歌曲,其它需要定时播放的歌曲要放在SPA 文件夹外面,如歌曲的路径放错则定时播放将不执行。
短路输出端囗: 这个端囗与功放电源和分区的动作同步,即当有定时点到时,这端囗即短路,当定时歌曲放完即断开,这端囗作用是用于控制电源时序器接多台功放之用。
※设备连接图(由于机型不同布局略有不同)※键盘锁01、天线; 03、mic 孔; 05、分区接线座; 07、220v 电源接线座;02、音频输入输出插孔; 04、短路输入输出紧急报警接口; 06、电源输出接线座;本系统有两种控制方式手动控制和自动控制,在系统上电时进入自动控制方式(显示屏的右上角出现上锁符号),如果直接按确定键,或按住“退出”键2秒左右,上锁符号消失,这时系统进入手动控制方式,键盘的其它按键有效,用户可以随心所欲操作本系统。
HT-3000自动广播系统说明书

航天广电HT-3000数字自动广播系统使用说明书南昌航天广信科技有限责任公司说明书版本信息:REV103VER001声明Copyright©2003-2012南昌航天广信科技有限责任公司及其许可者版权所有,保留一切权利。
未经本公司书面许可,任何单位和个人不得擅自摘抄、复制本书内容的部分或全部,并不得以任何形式传播。
是南昌航天广信科技有限责任公司的注册商标。
对于本手册中出现的其它公司的商标、产品标识及商品名称,由各自权利人拥有。
由于产品版本升级或其他原因,本手册内容有可能变更。
航天广电保留在没有任何通知或者提示的情况下对本手册的内容进行修改的权利。
本手册仅作为使用指导,航天广电尽全力在本手册中提供准确的信息,但是航天广电并不确保手册内容完全没有错误,本手册中的所有陈述、信息和建议也不构成任何明示或暗示的担保。
技术支持用户支持邮箱:customer_service@技术支持热线电话:400-6859998(固话拨打)400-6859998(手机、固话均可拨打)网址:相关资料及其获取方式相关资料手册名称《航天广电HT-3000数字自动广播系统使用说明书》资料获取方式您可以通过航天广电网站()获取最新的产品资料:资料意见反馈如果您在使用过程中发现产品资料的任何问题,可以通过以下方式反馈:E-mail:Customerinfo@目录第1章HT-3000新版软件功能 (1)1.1播放功能 (1)1.2控制功能 (1)第2章系统安装准备 (3)2.1HT-3000主机设备开箱 (3)2.2硬件连接准备 (3)2.3HT-3000数字自动广播典型系统连接图 (4)本软件说明书按此图举例操作 (4)第3章HT-3000广播主机 (5)3.1功能 (5)3.2前面板 (5)3.3后面板 (5)3.4HT-3000广播主机与电脑的连接 (6)第4章HT-3000广播软件的安装 (7)4.1加密狗安装 (7)4.2广播软件的安装及启动 (8)第5章HT-3000广播软件的配置及使用 (10)5.1终端(分区)地址的管理 (10)5.1.1终端管理界面操作按钮说明 (10)5.1.2终端(分区)名称添加或修改的步骤 (11)5.2设备管理 (12)5.2.1功放名称设置 (12)5.2.2外设名称及提前打开时间 (12)5.3手动播放操作 (13)5.4如何编程实现自动播放 (18)5.5系统设置 (23)5.5.1界面设置 (23)5.5.2作息类型 (24)5.5.3自动开关机设置 (25)5.5.3通信设置 (27)5.6关于播放器的使用 (29)5.7关于遥控 (37)5.8关于自动开关机的设置及测试 (39)5.8.1实现步骤 (39)5.8.2实现原理 (41)第6章HT-3000网络分控(软件分控) (42)6.1分控软件的安装及进入 (42)6.2分控软件如何连接主控软件? (42)6.3联机后如何用本地耳麦讲话? (43)6.3.1启动音频传输 (43)6.3.2开启相应终端(分区) (44)6.4直接用耳麦讲话 (45)第7章HT-3000分控键盘(硬件分控) (46)7.1面板按键说明 (46)7.2操作方法 (46)7.3后面板连接说明 (46)第1章HT-3000新版软件功能第1章HT-3000新版软件功能1.1播放功能支持自动播放和手动播放两种播放方式。
阳光电子EM34A EM34A-R EM34A-X音频播放器用户手册说明书
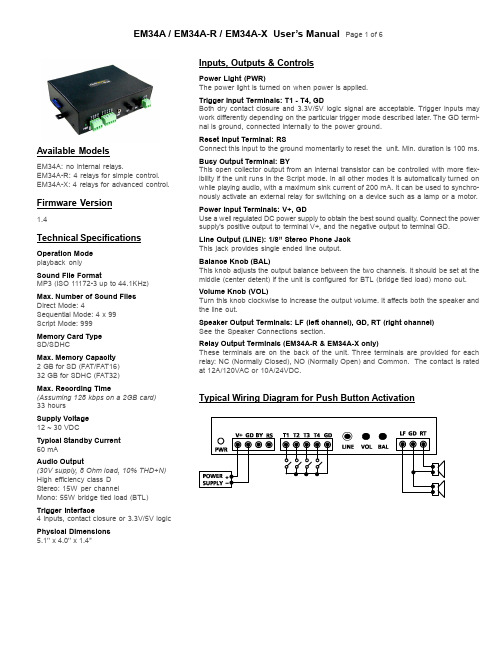
Available ModelsEM34A: no internal relays.EM34A-R: 4 relays for simple control. EM34A-X: 4 relays for advanced control. Firmware Version1.4Technical Specifications Operation Modeplayback onlySound File FormatMP3 (ISO 11172-3 up to 44.1KHz) Max. Number of Sound FilesDirect Mode: 4Sequential Mode: 4 x 99Script Mode: 999Memory Card TypeSD/SDHCMax. Memory Capacity2 GB for SD (FAT/FAT16)32 GB for SDHC (FAT32)Max. Recording Time(Assuming 128 kbps on a 2GB card)33 hoursSupply Voltage12 ~ 30 VDCTypical Standby Current60 mAAudio Output(30V supply, 8 Ohm load, 10% THD+N) High efficiency class DStereo: 15W per channelMono: 55W bridge tied load (BTL) Trigger Interface4 inputs, contact closure or 3.3V/5V logic Physical Dimensions5.1’’ x 4.0’’ x 1.4”Inputs, Outputs & ControlsPower Light (PWR)The power light is turned on when power is applied.Trigger Input Terminals: T1 - T4, GDBoth dry contact closure and 3.3V/5V logic signal are acceptable. Trigger inputs may work differently depending on the particular trigger mode described later. The GD termi-nal is ground, connected internally to the power ground.Reset Input Terminal: RSConnect this input to the ground momentarily to reset the unit. Min. duration is 100 ms. Busy Output Terminal: BYThis open collector output from an internal transistor can be controlled with more flex-ibility if the unit runs in the Script mode. In all other modes it is automatically turned on while playing audio, with a maximum sink current of 200 mA. It can be used to synchro-nously activate an external relay for switching on a device such as a lamp or a motor. Power Input Terminals: V+, GDUse a well regulated DC power supply to obtain the best sound quality. Connect the power supply’s positive output to terminal V+, and the negative output to terminal GD.Line Output (LINE): 1/8” Stereo Phone JackThis jack provides single ended line output.Balance Knob (BAL)This knob adjusts the output balance between the two channels. It should be set at the middle (center detent) if the unit is configured for BTL (bridge tied load) mono out. Volume Knob (VOL)Turn this knob clockwise to increase the output volume. It affects both the speaker and the line out.Speaker Output Terminals: LF (left channel), GD, RT (right channel)See the Speaker Connections section.Relay Output Terminals (EM34A-R & EM34A-X only)These terminals are on the back of the unit. Three terminals are provided for each relay: NC (Normally Closed), NO (Normally Open) and Common. The contact is rated at 12A/120VAC or 10A/24VDC.Typical Wiring Diagram for Push Button ActivationParallel Trigger ModesThe Trigger Mode defines how the playback is to be triggered via the parallel inputs. All inputs are internally pulled up and, if left unconnected, have a voltage of 3.3V (logic “1”). 5V signal is toler-ated and also seen as logic “1”. Logic “0” is ground.Direct Trigger (default)In this mode each input directly triggers a corresponding file: T1 = File 001, T2 = File 002, ......, T4 = File 004.A trigger is valid when the input is shorted to the ground for at least50 ms. The Direct Trigger is prioritized from T1 (the highest) to T4 (the lowest). However, it does not mean a higher priority input can interrupt a lower one. It only means that if multiple triggers are applied at the same time, the highest priority wins.Sequential TriggerUse the Sequential Trigger to sequentially trigger up to 99 different files per input as described below.T1 triggers File 001 ~ 099T2 triggers File 201 ~ 299T3 triggers File 301 ~ 399T4 triggers File 401 ~ 499Each trigger on the same input activates the next file in the se-quence. The sequence automatically restarts when either the end of the sequence is reached or there is a break in the sequence. For example, if there are only three files on the flash card: 001, 002, and 004, the system will only sequence from 001 to 002. File 004 will never be played because File 003 is missing.The Sequential Trigger is prioritized from T1 (the highest) to T4 (the lowest). However, it does not mean a higher priority input can interrupt a lower one. It only means that if multiple triggers are applied at the same time, the highest priority wins.Round-Robin TriggerThis mode is very similar to the Direct Trigger mode except that the inputs are not prioritized. So if multiple inputs are tied to ground then their files will be played one after another, instead of just the highest priority one. Round-Robin mode can only be used in con-junction with Non-interruptible Playback and Script Playback. Parallel Playback ModesNon-interruptible Playback (default)The file is played once per trigger. The playback is not interruptible except by the system reset. Looping is possible by applying a con-stant trigger on the input.Interruptible PlaybackThe file is played once per trigger if not interrupted. Any input can interrupt the playback except that an input cannot interrupt itself if the Trigger Polarity is either Close or Open.Holdable PlaybackThe file is played for as long as the input is triggered, looping if necessary. It is not interruptible except by the system reset. Script PlaybackThis mode allows many alternative playback options such as back-ground music and random play. Please see the Script Playback Mode section for descriptions.Parallel Trigger PolarityClose ContactInput is continuously triggered when it’s at 0V (ground), e.g. while a ground-connected push button is pressed and held down. Open ContactInput is continuously triggered when it’s left open or at 3.3V/5V, e.g. while a ground-connected push button is up.Make ContactInput is triggered one time as it goes from 3.3V/5V to 0V, e.g. when a ground-connected push button is pressed down.Break ContactInput is triggered one time as it goes from 0V to 3.3V/5V, e.g. when a ground-connected push button is released.Speaker ConnectionsRegular StereoVirtual Surround StereoThe left channel signal is internally inverted and that’s why the left speaker has an inverted polarity for regular stereo output. If the left speaker is not inverted then the output is virtual surround stereo. Regular MonoBTL Mono (4X Output Power)Since BTL mono provides four times the output power of regular mono at the same supply voltage, it is often used to boost the output power when the supply voltage is low. However, the speaker impedence should not be lower than 8 Ohms to avoid overloading the power amp.Script Playback ModeInstead of playing a single sound file, the Script Playback mode executes a script of commands for each trigger. Note that the Busy output will not turn on/off automatically in the Script mode. It must be specifically turned on/off with the BN and the BF commands. Written in the configuration file using plain text, the script consists of multiple lines each containing the commands for a particular trigger in the following format:nnn=Command1,Command2...Here “nnn” is the trigger number and “?” is one of the following: N - Non-interruptibleThis trigger is not interruptible.I - InterruptibleThis trigger can be interrupted by another trigger but not itself.H - HoldableExecution continues for as long as the trigger is applied, repeating if necessary. Stops immediately when the trigger is removed.In the DS and RS modes, there are 4 direct triggers (001 ~ 004, corresponding to T1 ~ T4).In addition to the direct triggers, there are also indirect triggers. An indirect trigger can be activated only by jumping from another trig-ger using the Jump command.In the DS and RS modes, there are 995 possible indirect triggers (005 ~ 999).These are the script commands:Fnnn - play file #nnn one timeExample: F168 plays file #168. Note that the next command (if any) will not be executed until the file has played to the end. Wnnnnn - wait nnnnn units of 0.1 secondMaximum value for nnnnn is 65535 (6553.5 seconds). Example: W00020 = wait 2 seconds.Note: W00000 = wait forever.Jnnn - jump to trigger #nnnExample: J007 jumps to trigger 007.BF - turn off the Busy outputUse this command to turn the Busy output off.BN - turn on the Busy outputUse this command to turn the Busy output on.Rgnn - random play one timePlay a random file from group g, within range 01 to nn. For ex-ample, R015 will random play a file within 001 to 015; R208 will random play a file within 201 to 208.XNn - turn on relay #n (EM34A-R & EM34A-X only) Example: XN3 turns on relay #3.XNN - turn on all relays (EM34A-R & EM34A-X only) Example: XNN turns on all relays.XFn - turn off relay #n (EM34A-R & EM34A-X only) Example: XF2 turns off relay #2.XFF - turn off all relays (EM34A-R & EM34A-X only) Example: XFF turns off all relays.ENDAlways add the word END at the end of the entire script. Y ou may add any comments for your own reference after END.Important Notes-All command letters must be in upper case.-Script lines must be separated by carriage returns (the Enter key). -A script line is limited to 128 characters, excluding ‘=’ and ‘,’. If more space is needed, use the Jump command.-A command is always fully executed before the next one starts. For example, the command after ‘F001’ will not be executed until the 001 file has played to the end.Automatic Execution of Script 000Upon powerup or reset, the system will automatically executes script 000 once if it exists.Script ExampleDSN001=F007,W00030,BN,R926,BF,J168I168=F001,W36000,J168H033=F273ENDDS is not really a script command, but it tells the system to enter the Direct Script mode. Y ou can also use RS to enable the Round-Robin Script mode.When the T1 input is triggered, the system start executing trigger N001. Since this trigger is non-interruptible, it will always executes to the end. Trigger N001 is executed as the following:-play file #007,-wait 3 seconds,-turn on the Busy output,-random play a file within 901 to 926,-turn off the Busy output,-jump to trigger 168 (I168).Trigger I168 is executed as the following:-play file #001,-wait 60 minutes,-jump back to itself.Since trigger I168 is interruptible, this endless loop can be broken by any future trigger.Trigger H033 will never be executed because it is an indirect trig-ger in the DS mode, yet it is not jumped to by any other trigger. Background Music ExampleThe automatic execution feature can be used to play background music while no trigger is being executed. For example, DSI000=F123,J000N001=F001,J000ENDHere file #123 is looped from power-up but can be interrupted by trigger inputs T1. The J000 command at the end of script 001 jumps to script 000, so file #123 starts to loop again (although from the beginning instead of where it left off).Random Play ConsiderationAll files within a random range must exist, or the system will play nothing when a non-existing file is selected for random play. For example, the script command R926 randomly selects a file within 901 to 926, so every file from 901 to 926 must exist.Note that random play does not guarantee that every file in the range will be played once before it selects the same file again.System Configuration FileBy default, the system works in the following mode without a configu ration file:Trigger Input: ParallelTrigger Mode: DirectPlayback Mode: Non-InterruptibleTrigger Polarity: Close ContactTo operate the system in any other modes, you need to create a plain text file called “MODE.TXT” with a line of three letters:First Letter: Trigger ModeD = DirectS = SequentialR = Round RobinSecond Letter: Playback ModeN = Non-interruptibleI = InterruptibleH = HoldableS = ScriptThird Letter: Trigger PolarityC (or no letter) = Close ContactO = Open ContactM = Make ContactB = Break ContactFor Script modes, enter the script starting from the second line. Be sure to add the word END at the end of the Script.After editing the configuration file, be sure to save it as a “plain text file”, “ASCII text file”, or simply “text file”. The system may not work if the configuration file is not created properly.File Number AssignmentSound files on the flash card must be assigned a unique file num-ber for identification purpose. The file number must be a three digit number within the following range:For Direct Trigger: 001 ~ 004For Sequential Trigger: 001 ~ 099 (for T1), 201 ~ 499 (for T2 ~ T4) Simply add the file number to the beginning of the original filename, e.g. “001tiger.wav”. Note that if the flash card is formatted with FAT (FAT16) and you want to store the maximum number of files (511) on the card, you should keep the filenames (including the file num-ber) within 8 characters and use only upper case letters and num-bers. If the flash card is formatted with FAT32 then you may use any filename that Windows allows.Relay Control (EM34A-R / EM34A-X only)The relays are controlled differently in different modes:QSA mode (EM34A-X only)Relays are pre-programmed for synchronized activations during audio playback by using the Windows based, user friendly QSAplay program. A PC is needed for programming only, but not for the actual operation.Script modeRelays are controlled by script commands. Please see the Script Mode section for details.All other modesA relay will turn on when the corresponding file is being played. Relay #1 corresponds to file #001, relay #2 corresponds to file #002, and so on. For example, relay #4 will be turned on when file #004 is being played.Trouble Shooting Guide1. No sound.a.File numbers are not assigned properly.b.The system is in the wrong mode due to missing or incorrectconfiguration file.c.If the flash card is inserted when the power is on, the systemmay not work. To fix this problem, recycle the power or use the RS input to reset the system.d.The output volume may have been set too low. Try turning it up.2. Plays the wrong file.a.File numbers are not assigned properly.b.The system is in the wrong mode due to missing or incorrectconfiguration file.3. Noisy playback.The speed of the flash card is too slow. Use a faster flash card or convert the file to a lower bit rate.Application ExampleTriggering with Normally Open Push Buttons1. Play without interruption.Intended Operation-Press button #1 to play file #001 once.-Press button #2 to play file #002 once.-When playing, pressing any button has no effect.Required Text in MODE.TXTNone, this is the default mode (DN).Notes-The button can be released or held down when playing.-If the button is held down when the playback finishes, the sound will be played again.-If both buttons are pressed or held down at the same time, button #1 prevails.2. Allow interruption during playback.Intended Operation-Press button #1 to play file #001 once.-Press button #2 to play file #002 once.-Playing can be interrupted by pressing any other button. Required Text in MODE.TXTD INotes-When playing, pressing the same button again has no effect.3. Play the sound only once even if the button is held down. Intended Operation-Press button #1 to play file #001.-Press button #2 to play file #002.-Don’t repeat the sound even if the button is held down. Required Text in MODE.TXTDSN001=F001,J888N002=F002,J888H888=J888ENDNotes-The system will stay in the “H888=J888” endless loop for as long as the button is held down.4. Play only when the button is held down.Intended Operation-Press & hold button #1 to play file #001.-Press & hold button #2 to play file #002.Required Text in MODE.TXTDH Notes-Playing stops as soon as the button is released. If the same button is pressed again later, playing re-starts from the begin-ning of the file instead of where it left off.-If both buttons are held down, button #1 prevails. To play both sounds alternately when both buttons are held down, use the RH mode.5. Play different sounds each time when the same button is pressed.Intended Operation-Press button #1 to play file #001 the first time, file #002 the second time, and etc.-Button #2 sequences through file #201, #202...-When playing, pressing any button has no effect.Required Text in MODE.TXTSNNotes-Up to 99 files can be assigned to each button and file numbers but be consecutive.-To allow playback interruption, use the SI mode.-To play only when the button is held down, use the SH mode. In the SH mode, the same sound will repeat for as long as the button is held down. To advance to the next sound, the button must be released first.6. EM34A-R: Turn on a single, different relay for each sound. Intended Operation-Turn on relay #1 when playing file #001.-Turn on relay #2 when playing file #002.Required Text in MODE.TXTOnly the mode letters are required, for example: DH.7. EM34A-R: Turn on multiple relays for each sound. Intended Operation-Press button #1 to play file #007 and turn on relays #1 & 2.-Press button #2 to play file #008 and turn on relays #2 & 3. Required Text in MODE.TXTDSN001=XN1,XN2,F007,XFFN002=XN2,XN3,F008,XFFENDNotes-XFF is used to turn off all relays.8. EM34A-X: Pre-program relays for synchronized activations during audio playback.The relays will be activated automatically when playing QSA files. There is no required text in MODE.TXT.Application ExampleAutomatic Playback on Power-up1. Repeat continuously on power-up.Intended Operation-Play file #001 on power-up if switch #1 is closed.-Play file #002 on power-up if switch #2 is closed. .........-Play file #004 on power-up if switch #4 is closed.-If more than one switch is closed, play all corresponding files sequentially.-Repeat the file(s) until power is turned off.Required Text in MODE.TXTRNNotes-If priority is required, use DN instead of RN. In this case switch #1 has the highest priority, switch #2 has the second highest priority, and switch #8 has the lowest priority. If more than one switch is turned on, only the file for the switch of the highest priority will be played.2. Repeat at intervals on power-up.Intended Operation-Same as the example above but play files at fixed intervals.-Only files with corresponding switches closed will play. Required Text in MODE.TXTRSN001=F001,W06000N002=F002,W06000.....N008=F008,W06000ENDNotes-W06000 is a delay loop of 6000 x 0.1 second = 10 minutes, so the file(s) will be played at an interval of 10 minutes, one file at a time.Application ExampleTriggering with Normally Closed Switches & Sensors1. Play when the switch/sensor opens, with no priorities. Intended Operation-Play file #001 when sensor #1 opens.-Play file #002 when sensor #2 opens.-Repeat the sound for as long as the sensor is open.-If multiple sensors are open at the same time, play all corre-sponding files sequentially.Required Text in MODE.TXTRNONotes-Unused inputs must be connected to the ground, as shown in the wiring diagram.2. Play when the switch/sensor opens, with priorities. Intended Operation-Same as the example above, but if multiple sensors are open at the same time, the sensor of the highest priority prevails. Required Text in MODE.TXTDNONotes-The sensor connected to T1 has the highest priority, and the sensor connected to T8 has the lowest priority.3. Play when the switch/sensor opens, but don’t repeat. Intended Operation-Play file #001 when sensor #1 opens.-Play file #002 when sensor #2 opens.-Do not repeat the sound.Required Text in MODE.TXTDSBN001=F001,J999N002=F002,J999H999=J999ENDNotes-The system will stay in the “H999=J999” endless loop for as long as the sensor is open. The system will not respond to other sensors until this one is closed.。
纽曼之音 A30 系列MP3 说明书
纽曼之音MP3用户手册VM.51本手册支持A30系列MP3产品前言感谢您使用本公司产品。
为了让您能够尽快熟练的操作本机,我们随机配备了内容详细的用户手册,从中您可以获取有关产品介绍、使用方法以及安全注意事项等方面的知识。
在编写本手册时我们非常小心谨慎,并认为手册中所提供的信息是正确可靠的,然而难免会有错误和疏漏之处,请您多加包涵并热切欢迎您的指正。
但是我们将不对本手册可能出现的问题和疏漏负责。
同时,由于我们无法控制用户对本手册可能造成的误解,因此,将不负责在使用本手册的过程中出现的事故或由此引起的损坏。
对于因使用MP3所造成的任何损坏或第三方的索赔不负责任。
对于因软件的误操作、产品维修、电池更换或其它意外情况等所引起的资料的删改或丢失不负任何责任,也不对由此造成的其它间接损失负责。
如果您在产品的使用过程中发现什么问题,请拨打我们的服务热线。
谢谢您的合作!本手册中的信息如有变动,恕不另行通知。
本手册的信息受到版权保护,其任何部分未经事先书面许可,不得以任何的方式影印或复制。
当您开始使用本产品时,我们认为您已经认真阅读了本手册,并已接受其中的所有条款。
1目录一.安全使用说明二.使用方法1.连接PC机2.数据存储和上载音乐3.开关机器4.播放音乐5.电池寿命三.使用MP3播放机1.接口和按键介绍2.正在播放显示3.锁定按键4.前进后退5.音量调节6.复读7.删除MP3文件四.和PC连接和闪盘功能实现1.USB连接2.USB传输和MP3文件上载3.WIN98下驱动程序的安装4.断开USB连接5.对MP3进行格式化五.产品规格表2一.安全使用说明1.为了保证您使用安全请勿在潮湿的地方使用本机或将水溅到机器上。
2.不要在特别热、冷、多尘潮湿的环境中使用播放机。
3.请勿自行拆开机器或维修,这样会影响产品质保。
MP3播放机本身没有使用者可以自行维修的部件.如果需要维修,请联系专业维修人员。
4.我们不建议您在开车时使用耳机.如果您正在开车或从事其它必须全神贯注的活动时,请不要使用MP3播放机,因为它使您的注意力不集中。
德龙k3000车载收音机操作流程
德龙k3000车载收音机操作流程德龙K3000车载收音机操作流程1. 准备工作•确保车辆发动机处于熄火状态•找到德龙K3000车载收音机并确认其电源已连接2. 开机•按下电源按钮,等待收音机启动3. 电台搜索•按下“搜索”按钮,收音机将自动搜索可接收的电台信号•如果搜索到电台信号,收音机将自动停留在第一个搜索到的电台•如需切换电台,使用上下方向键选择并按下“确认”键4. 手动调谐•如果想要手动调谐到特定频率,按下“手动调谐”按钮•使用数字键盘输入希望调谐的频率,并按下“确认”键•如果频率有效,收音机将跳转到指定频率的电台5. 存储电台•在搜索或手动调谐到电台后,按下“存储”按钮•使用数字键盘选择存储的位置,并按下“确认”键•该电台频率已存储到指定位置,下次可直接通过按下数字键盘上的对应数字键快速切换到该电台6. 调整音量•使用“音量+”和“音量-”按钮可调整收音机的音量大小•按住按钮可连续调节音量7. 调整音效•收音机提供多种音效调节选项,如音乐、新闻、经典等•按下“音效”按钮进入音效调节界面•使用上下方向键选择所需音效,并按下“确认”键8. 其他功能•德龙K3000车载收音机还提供其他多种功能,如收藏夹、定时开关机、蓝牙连接等•按下“菜单”按钮进入功能设置界面,使用方向键选择所需功能并按下“确认”键进行设置9. 关机•按下电源按钮,收音机将关闭•断开电源连接,完成操作以上为德龙K3000车载收音机的操作流程,按照步骤操作可快速使用和调节收音机功能。
请注意遵守交通规则,在驾驶过程中避免分散注意力。
10. 蓝牙连接•如果德龙K3000车载收音机支持蓝牙功能,可以连接手机或其他蓝牙设备进行音乐播放或通话•打开手机蓝牙功能,并在收音机上按下“蓝牙”按钮进入蓝牙连接界面•打开手机蓝牙设置页面,搜索附近的蓝牙设备•在搜索结果中找到“德龙K3000”(或类似名称)并点击配对连接•如果需要输入密码,根据收音机显示的密码进行输入•如果连接成功,收音机将显示蓝牙连接的状态,并根据手机的播放状态自动切换为蓝牙音源•在蓝牙连接状态下,可以通过收音机的按钮或手机来控制音乐播放或通话11. 更新收音机固件•德龙K3000车载收音机可能会发布新的固件版本,以提供更好的性能和功能•在德龙官网或相关论坛上查找最新的收音机固件版本•下载并将固件文件复制到U盘或SD卡中•关闭收音机,插入U盘或SD卡并重新开机•收音机在启动时会检测外部存储设备中的固件文件•在收音机显示屏上按照指示进行固件更新,一般需要按下“确认”键确认升级•等待固件升级完成,收音机将重新启动12. 故障排除•如果遇到收音机使用中出现故障或异常情况,首先尝试以下方法进行排除:–确保电源连接正常–检查天线连接是否良好–关机并重新开机–恢复出厂设置(按住某个按钮并开机,根据收音机的操作指南进行恢复)•如果问题仍未解决,建议联系德龙客服或前往正规的售后维修点进行维修。
HT-3000说明书V2.8(a5)8-17
尊敬的客户:真挚的感谢您使用我们航天系列广播产品!声明Copyright©2003-2012中国航天广电——南昌航天广信科技有限责任公司及其许可者版权所有,保留一切权利。
未经本公司书面许可,任何单位和个人不得擅自摘抄、复制本书内容的部分或全部,并不得以任何形式传播。
商标是中国航天广电——南昌航天广信科技有限责任公司的持有的法定注册商标。
如出现有假冒本公司商标及产品,我们将追究其法律责任。
本使用说明书仅供于为客户引导安装、操作维护、使用时参考。
如出现由于产品版本升级或其他原因,本手册内容有可能出现差异及变更,我们将保留对本手册的内容进行修改的权利。
我们将尽全力在本手册中提供准确的信息,本手册仅作为使用指导,请用户结合自己的应用情况,参考本说明书进行最佳的装备使用和维护保养。
技术支持用户支持邮箱:htjy9988@技术支持热线电话:400-685-9998产品技术网址:相关资料及其获取方式相关资料:手册名称《航天数字自动广播系统HT-3000使用说明书》资料获取方式:您可以通过航天广电网站()获取最新的产品资料资料意见反馈:如果您在使用过程中发现产品资料的任何问题,可以通过以下方式反馈E-mail:htjy9988@技术支持热线电话:400-685-9998目录第1章HT-3000广播系统功能简介 (1)第2章HT-3000广播系统装配及连接 (1)2.1 HT-3000主机设备开箱 (1)2.2 HT-3000广播系统硬件连接准备 (2)2.3 HT-3000数字自动广播典型系统连接图 (2)3.1 HT-3000广播主机功能 (3)3.2 HT-3000广播主机前面板 (3)3.3 HT-3000广播主机后面板 (3)3.4 HT-3000广播主机与电脑的连接 (4)第4章HT-3000广播软件的安装及启动 (5)4.1 广播软件功能简介 (5)4.1.1 播放功能简介 (5)4.1.2 控制功能简介 (5)4.2 加密狗安装 (6)4.3 HT-3000广播软件的安装及启动 (7)第5章HT-3000广播软件的设置及使用 (9)5.1 HT-3000广播系统设置 (9)5.1.1 界面设置 (9)5.1.2 作息类型设置 (10)5.1.3 自动开关机设置 (12)5.1.4 与广播主机的通信设置 (16)5.2 HT-3000广播系统分区管理 (17)5.2.1 分区管理界面操作按钮说明 (17)5.2.2 分区添加或修改 (18)5.2.3 查看分区状态 (19)5.2.4 如何开启分区 (20)5.3 HT-3000广播系统设备管理 (22)5.3.1 功放名称设置 (22)5.3.2 外设名称及提前打开时间 (22)5.3.3 如何开启功放及外设 (23)5.4 HT-3000广播软件播放器的设置及使用 (24)5.4.1 取消定时与恢复定时 (25)5.4.2 插播广播设置 (25)5.4.3 非定时状态下播放模式的选择 (26)5.5 手动广播播放设置 (27)5.5.1 如何选择并播放曲目 (27)5.5.2 手动播放设备控制 (28)5.5.3 保存及调用歌曲列表文件 (29)5.5.4 手动播放实例 (30)5.6 自动广播播放设置 (34)5.6.1 编制自动播放列表界面简介 (34)5.6.2 引用播放列表文件 (35)5.6.3 自动播放实例 (36)5.7 快捷播放按钮的设置 (40)第6章HT-3000广播系统遥控的设置及使用 (43)6.1 遥控器的按键功能 (43)6.2 .遥控播放列表的编制 (43)6.3 遥控对象的选择 (44)第7章HT-3000广播分控设置及使用 (45)7.1 HT-3000网络分控(软件分控) (45)7.1.1 分控软件的安装及启动 (45)7.1.2 分控软件连接主控软件 (45)7.1.3 实时采播 (46)7.1.4 远程文件上传 (47)7.1.5 远程控制分区开启 (49)7.1.6 远程音频点播 (50)7.2 HT-3000分控键盘(硬件分控) (50)7.2.1 面板按键说明 (50)7.2.2 操作方法 (51)7.2.3 后面板连接说明 (51)第8章售后服务注意事项 (52)第1章 HT-3000广播系统功能简介航天数字自动广播系统(HT-3000型)是采用微机为主控,形成主控中心自动广播节目播放和对各分区广播点音箱的播放开关控制功能,达到微机存储音乐和控制广播节目任意播放,并可实现按星期、日期编程自动广播和分区广播等综合功能。
德龙3000收音机说明
德龙3000收音机说明德龙3000收音机说明德龙3000收音机是一款便携式收音机,具有多种功能和易于使用的设计。
下面将详细介绍该收音机的特点和操作方法。
特点:1. 多功能收听:德龙3000收音机可以收听AM、FM和短波频段的广播,覆盖了各种音频内容和节目。
2. 高质量音质:该收音机具有内置扬声器和耳机插孔,可提供清晰而逼真的音质,无论是使用扬声器还是耳机,都能获得令人满意的听觉体验。
3. 耐用可靠:德龙3000收音机采用坚固耐用的外壳材料,具有抗震和防滑功能,适合户外使用。
4. 便携式设计:收音机尺寸小巧,轻便易携带,方便在旅行、露营或户外活动中使用。
5. 充电和电池供电:该收音机可通过USB充电,也可以使用电池供电,提供更多的使用选择。
操作方法:1. 频段选择:使用收音机顶部的旋钮选择AM、FM或短波频段。
2. 频率调谐:使用旋钮或按钮,调节频率以找到所需的广播电台。
3. 音量控制:通过旋钮或按钮,调整音量大小。
4. 扬声器和耳机模式切换:插入耳机时,声音会自动切换到耳机模式,拔出耳机后,声音会自动切换到扬声器模式。
5. 保存频道:该收音机可以保存一些常用的电台频道,只需将频道调到所需频率,然后按下保存按钮即可。
6. 充电和电池更换:通过插入USB充电线,将收音机连接到电源进行充电。
如果使用电池供电,只需打开收音机背部的电池仓盖,更换电池。
总结:德龙3000收音机是一款多功能且易于携带的收音机,适用于各种场合。
它具有高质量的音质、耐用可靠的设计和简单的操作方法。
无论您是在家中、户外或旅行中,该收音机都能带给您愉悦的收听体验。
- 1、下载文档前请自行甄别文档内容的完整性,平台不提供额外的编辑、内容补充、找答案等附加服务。
- 2、"仅部分预览"的文档,不可在线预览部分如存在完整性等问题,可反馈申请退款(可完整预览的文档不适用该条件!)。
- 3、如文档侵犯您的权益,请联系客服反馈,我们会尽快为您处理(人工客服工作时间:9:00-18:30)。
NM-3000 MP3智能广播音乐播放器
NM-9800 MP3智能广播控制器
网络广播系统中央控制中心 NM-9000
MP3智能广播音乐播放器采用先时的音频压缩技术,以MP3、WAM 、MIDI 等文件格式储音频数据,以微电脑控制台技术为核心,以海量的存储器为载体,可定时、定曲、定区播放用户所需之乐曲
MQ-8000 MP3是微电脑控制,轻触式操作的智能音乐源播放及外设控制中心,全中文菜单操作模式,采用可移动CF 卡存储,内置AM/FM 调谐器。
可实现灵活多变的音乐源播放。
可按星期天为周期的定播种及处控电源时序器,10路广播分区(实现定时分区播放)具有消防接口
校园数控广播自动控制器
校园MP3广播自动播放器
NM-8040教室广播功放
备注:内置校园常用歌曲,如:广播体操、眼保
操,优美校园歌曲,是校园自动广播的理想选择
内置校园常用歌曲,如:广播体操、眼保健操、优美校园歌曲,是校园、单位、工厂广播的理想选择。
2路话筒输入,2路Aux 输入70-100V 定压输出
LED 电平指示
各通道独立音量控制
30W 功率输出过热或输出短路保护
带前置定压功放
五分区带前置定压功放
带前置定压功放
设有1路话筒,2路线路输入 各通道音量独立控制;有高低音调控制 单机即为一完备的小广播系统
此功放属于超薄型,体积小,使用方便
另有5个独立分区 有强行切入优先功能
设有3个输入通道,每个通道可以独立调校 单机即为一完备的小广播系统
各通道音量独立控制,有高低音控制
设有5个输入通道,每个通道可以独立调校 有强行切入优先功能
各通道音量独立控制,有高低音控制 单机即为一完备的小广播系统
5分区带前置不定期压功放
带五分区合并式定压功放
带卡座合并式功放
设有5个输入通道,每个通道可以独立调校 有强行切入优先功能,另有5个独立分区 各通道音量独立控制,有高低音控制 单机即为一完备的小广播系统
设有3个输入通道,每个通道可以独立调校 有5个独立分区 有强行切入优先功能
各通道音量独立控制,有高低音控制
设有5输入通道,每个通道可以独立调校 有强行切入优先功能
各通道音量独立控制,有高低音控制 单机即为一完备的小广播系统
带前置定压功放
带图像可视合并式功放
设有5输入通道,每个通道可以独立调校 有强行切入优先功能
各通道音量独立控制,有高低音控制 单机即为一完备的小广播系统
设有5输入通道,每个通道可以独立调校 有强行切入优先功能
各通道音量独立控制,有高低音控制 单机即为一完备的小广播系统
设有6个输入通道,每个通道可以独立调校 有强行切入优先功能,具有钟声提示功能 各通道音量独立控制,有高低音调控制 单机即为一完备的小广播系统
可观看VCD ,DVD 电影,演唱会,歌手表演,带图像一体功放。
带前置定压功放
5分区带前置定压功放
设有6个输入通道,每个通道可以独立调校 有强行切入优先功能,具有钟声提示功能 另有5个独立分区、全区选择功能 单机即为一完备的小广播系统
设有6个输入通道,每个通道可以独立调校 有强行切入优先功能,具有钟声提示功能 各通道音量独立控制,有高低音调控制 单机即为一完备的小广播系统
设有6个输入通道,每个通道可以独立调校 有强行切入优先功能,具有钟声提示功能 另有5个独立分区、全区选择功能 单机即为一完备的小广播系统
收音定时功放
五分区五声道广播功放
纯后级广播功放
微电脑控制数字调谐系统,轻触式操作 随时可进入待机省电工作模式 可定时开关机及定时收音电台播放 AM/FM 或储60个台
具有1路MIC 输入,两路辅助输入,收音直接输出
5种音乐同时输入
5路信号输入,可独立调节声音音量 5×60W/5×120W (MAX ),五分区音量 可独控制(无级音量控制)
100V-70V 定压输出和4-16Ω定阻输出 RCA 插口和XLR 插口供方便地环接
输出短路何护及告警、过热告警和饱和失真告警 1单元LED 电平指示
纯后级广播功放
纯后级广播功放
前置放大器
100V-70V 定压输出和4-16Ω定阻输出 RCA 插口和XLR 插口供方便地环接
输出短路何护及告警、过热告警和饱和失真告警 2单元LED 电平指示
100V-70V 定压输出和4-16Ω定阻输出 RCA 插口和XLR 插口供方便地环接
输出短路何护及告警、过热告警和饱和失真告警 2单元LED 电平指示
设有10个输入通道,每个通道可以独立调校
有强行切入优先功能和提示钟声功能 另有5路话筒,3路线路,3路输出 有独立的音量调节,统一音调控制
十路分区器
二十路分区器
电源时序器
电子调谐器
Ab2路输入 十路输出
设有24V 直流供电
十路任意选择,LED 状态指示
Ab2路输入 二十路输出
设有24V 直流供电 二十路任意选择
设有8路电源输出,依次开启系统设备 8位电插座方便连接
可与定时器、智能控制器相连接,实现自动控制 公共广播系统电源管理设备之首选
微电脑控制,数字调谐系统,轻触式操作 全轻触式按键控制VFD 显示 具有自动收搜索和记忆功能 AM/FA 可储存20个电台
CD/MP3播放机
十分区寻呼器
区间强切电源
微电脑控制,轻触式操作 直选节目,荧光显示
兼容DVD/VCD/CD/MP3播放 能接受摇控定时控制
十通道分区寻呼 具有遥控系统
2话筒输入,2线路输入
内置钟声功能,具有默音功能
十路报警信号输入,十路报警连接输出 十路受报警控制的24V 输出 直流电源输出
可用于驱动强切换系统
主/备功放切换器
市话接口
单31段图示均衡器
4个独立通道,供4主/备功放 故障自动切换 有手动切换功能 状态显示,一目了然
具有自动转接电话的功能 直接进入广播系统
微电脑控制,轻微式操作 可形成电话会议系统
31段图示均衡 内置高通滤波电路
各频段相互干扰减至最低 输入电平调节,带削波指示灯
录音报警发生器
自动感温送风机
十路监听器
紧急报警信号功能
报警触发自动播放报警或录音 有自动和手动功能 有1分钟数字录音,1路报警信号输出不
风机两个ф120DC 24V 感温控制45℃
高强度的钢板机壳设计,结构坚固,操作容易
十路输入,任意选通 内置有源监听喇叭 监听音量可调
扩展矩阵器
信号分配器
NM-9819避雷器
微电脑控制,轻触式操作
设5路输入,10路输出,可任意选通
指示灯可判断哪区在工作,有寻呼和报警强切时 工作指示灯绿色变为红色指示
有记忆功能,断电不丢失,市电恢复自动选通
信号二进十二出 方便信号连接
5路输出,5路输入, 可防止雷电击入系统设备 雷击时自动切断输出 自动把雷电引入地下 用于户外线路
分区音量控制器
报警矩阵器
电脑节目编程器
1路输入,5路输出,音量单独控制 分路音量控制
紧急报警信号功能 报警触发自动播放
有30路可分区报总线制强切电源控制,可扩展120个区
NM-9822是以学样为主要使用对象而设计产生的电脑播控系统,同时也兼顾其它行业的应用整个系统电脑、播控柜(主要包括主控制器、功放和前置放大器等)几部分组成。
它利用电脑多媒体技术,集播放、定时控制、分区控制、电源控制、自动开关机、作息表管理和曲库管理于一体,功能强大,适用性好,自动化程度高,可以24小时无人值守运行,是理想的自动广播设备。
节目定时器
可寻址广播主机
MP3智能定时播放器
99个可编程程序,操作简单易型 升级时可控制NM-9805电源时序器 10路电源输出 带钟声提示音
可同时输入四种音源 具有射频调制功能
一组外接节目源,两组内置节目源,一组寻音输入,寻音电平可调
10分区控制采用并行数据控制 六组电源控制输出
存储容量达128M ,具消防功能
全功能遥控功能,所以操作均可在摇控器上完成
数字音频矩阵器
多音源可寻址主控机
无线广播分区管理器
大屏幕液晶显示屏,图形化界面,操作简捷 8路输入,16路输出
每路输出通道可以选择任意一路输入通道 可受中央系统控制
适合多种音乐输入和多达12种音乐同时输入 由闭路线传输,同时实现广播和电视的信号传输 任意分区功能,可实现多个区域的独立控制和任意组合
轻触式操作
采用选进的可寻址遥控编码技术,可控制1-16个区 可任意控制各个区域的音箱
有手动、自动控制,具有紧急广播强插入功能
调频广播发射机
立体声卡座
卡拉OK 功放
MP3中央控制系统
动态电平指示
话筒线路输出入,可外接CD 卡座、MP3 发射距离1-20公里
发射功率分别有
5W/10W/20W
双自动回卡座,一个放音,一个双向放音/录音 Dolby B/C 杂音抑制,内建MPX 滤波器 平速/高速录音带对寻,音乐/快速选取 到带后自动播放,寻音自动表音留白。