美的ps20c1使用说明书
CPS-20C1恒压供水控制器 说明书

CPS-20C1恒压供水控制器应用指南第一章对控制器的补充说明第1节概述CPS-20C1系列控制器是目前CPS系列恒压供水控制器产品之中功能最全,最强大的控制器。
此系列控制器适用于最多有6台主泵加1台附属小泵的供水系统。
所有主泵可设计成变频循环软启动的工作方式,也可设计成1台变频泵加5台工频定量泵,再加1台附属小泵的工作方式。
当然,少于此数目的供水系统也可使用此系列的控制器进行控制。
20C1系列控制器内部控制逻辑及控制算法均采用先进的现代控制理论进行设计,PID 参数免调试,所以用户使用起来,会感觉非常方便,而且供水系统的精度高,系统响应速度快,稳定性好。
除此之外,20C1系列控制器还有很多优点,诸如定时开关机,定时换泵功能,定量泵、变量泵自动巡检功能,故障自动诊断,避免频繁切换水泵等优点。
具体详细介绍,请参阅20C1控制器的说明书,在此就不再详细介绍了。
第2节四种型号20C1控制器的说明CPS-20C1控制器共有4种型号,即标准型(S型)和消防专用型。
其中消防专用型又根据消防泵的正常工作方式和巡检方式分为3种,包括消防泵定量工作,工频巡检(DD)型;消防泵变量工作,变频巡检(BB)型;消防泵定量工作,变频巡检(DB)型三种。
这里的定量和变量是指工频和变频的意思。
4种型号的控制器端子接线和参数代码完全相同,只是工作方式不同。
用户可自己检查控制器的型号,具体操作方法是:将控制器的键盘锁定开关拨至LOCK 位置,然后按下功能键(FUNC),通过面板下排数码管所显示的内容判断控制器的型号。
其中,“1 S-S”为S型,“2 b-b”为BB型,“3 d-d”为DD型,“4 d-b”为DB型。
自2000年7月以后的产品有此项功能,在此之前的产品无此功能。
以前产品的性能并没有差别。
敬请广大用户放心使用。
对这四种型号的控制器的工作方式的说明如下:1.标准型(S型)。
标准型控制器用于一般的生活供水系统,任何一台水泵可设置为变量泵“b”或定量泵“d”。
美的空调产品说明书.pdf_1718626939.2597423

97745C (Rev. C - 8/05)Installation/Care/Use ManualUSES HFC-134A REFRIGERANTFIG. 1SEE FIG.5528, 29, 31, 47, 5014, 15, 18,19, 20, 21, 2240104633124445, 49, 514248131738168436, 79323363739414, 321197745C (Rev. C - 8/05)F IG . 2F I N I S H E D F L O O R P I S O A C A B A D O P L A N C H E R F I N IE = I N S U R E P R O P E R V E N T I L A T I O N B Y M A I N T A I N I N G 4" (102m m ) (M I N .) C L E A R A N C EF R O M C A B I N E T L O U V E R S T O W A L L .A S EG U R E U N A V E N T I L A C I ÓN A D E C U A D A M A N T E N I E N D O U N E S P A C I O E 4" (102m m ) (M ÍN .) D EH O L G U R A E N T R E L A R E JI L L A D E V E N T I L A C I ÓN D E L M U E B L E Y L A P A R E D A S S U R E Z -V O U S U N E B O N N E V E N T I L A T I O N E N G A R D A N T 4" (102m m ) (M I N .) E N T R E L E S ÉV E N T S D E L ’E N C E I N T E E T L E M U R .F = P O W E R C O R D 4 F E E T (1219m m ) L O N G C A B L E E L ÉC T R I C O D E 4 P I E (1219m m ), D E L A R G O C O R D O N D ’A L I M E N T A T I O N 4' (1219m m )G = P L U M B I N G R O U G H -I N C A N B E L O C A T E D A N Y W H E R E W I T H I N T H I S A R E A .S E P U E D E C O L O C A R E L D E S B A S T E D E L A T U B E R ÍA E N C U A L Q U I E R L U G A R D E N T R O D E E S T A ÁR E A .O N P E U T P L A C E R L A T U Y A U T E R I E D A N S C E T T E R ÉG I O N .L E G E N D /L E Y E N D A /L ÉG E N D E A = R E C O M M E N D E D W A T E R S U P P L Y L O C A T I O N 3/8 O .D . U N P L A T E D C O P P E R T U B E C O N N E C T S T U B 1-1/2 I N . (38m m ) O U T F R O M W A L L S H U T O F F B Y O T H E R S S E R E C O M I E N D A U B I C A R E L T U B O C O R T O D E C O N E X I ÓN A L T U B O D E C O B R E S I N C H A P A R D E 3/8" D E D I ÁM . E X T . A 1-1/2"(38m m ) F U E R A D E L A L L A V E D E P A S O E N L A P A R E D C O L O C A D A P O R T E R C E R O S . E M P L A C E M E N T R E C O M M A N D É D 'A L I M E N T A T I O N E N E A U P A R T U B E E N C U I V R E N O N P L A Q U É D E 3/8 P O . (9,5 m m ) D .E .C O N N E C T A N T U N E T U Y A U T E R I E D E 1-1/2 P O . (38m m ) D E P U I S L E R O B I N E T D 'A R R ÊT F O U R N I P A R D 'A U T R E S .B = R E C O M M E N D E D L O C A T I O N F O R W A S T E O U T L E T 1-1/4” O .D . D R A I N U B I C A C I ÓN R E C O M E N D A D A P A R A E L D R E N A J E D E S A L I D A D E A G U A , D E 1¼” D E D I ÁM E T R O .E M P L A C E M E N T R E C O M M A N D É P O U R L E D R A I N D E D .E . 1-1/4" D E S O R T I E D ’E A U .C = 1-1/4 T R A P N O T F U R N I S H E D **P U R G A D O R D E 1¼ N O P R O P O R C I O N A D O **S I P H O N 1-1/4 N O N F O U R N I **D = E L E C T R I C A L O U T L E T L O C A T I O N U B I C A C I ÓN D E L A T O M A D E E L E C T R I C I D A D E M P L A C E M E N T D E L A P R I S E D E C O U R A N T97745C (Rev. C - 8/05)FIG. 3FIG. 4CONDENSER WATER VALVE ADJUSTMENTThe condenser water valve is factory preset for a condenser water outlet temperature of 95° to 105° F.If actual temperature varies greatly from this,readjust water flow rate at the valve using the following procedures.1. START UP COMPRESSORThis can be accomplished by depressing the cooler push button (See Fig. 5 - Item 24). Keep water running during the entire readjustment procedure.2. ADJUSTMENT CONDENSER WATER VALVE Adjust valve by rotating adjustment stem. Rotating stem clockwise will decrease water flow. Counterclock-wise rotation will increase water flow. Increasing water flow will result in a lower condenser outlet temperature,while decreasing water flow will result in a higher outlet temperature. Proper adjustment is attained when condenser outlet temperature is 95° to 105° F.STREAM HEIGHT ADJUSTMENT : Stream height is factory set at 45-50 PSI. If supply pressure varies greatly from this, remove items 24 and 25 (See figure 5) from bubbler assembly and adjust the screw on the regulator (Item 35). Clockwise adjust-ment will raise stream height and counterclockwise will lower the stream height. A stream height of 1-1/2" (38mm) is recom-mended.97745C (Rev. C - 8/05)ELKAY MANUFACTURING COMPANY • 2222 CAMDEN COURT • OAK BROOK, ILPRINTED IN U.S.A.PARTS LIST 115VP ART NO.DESCRIPTION10031C 10032274065015009C 70772C 27317C 28270C 28271C 28272C 28273C 28631C 28277C 28278C 27279C 35843C 35840C 36219C 35892C 35768C 35845C 35874C 35844C36095C 36114C40048C 40089C40322C 45675C 45718C 50005C 45703C 50368C 70767C 55996C 60291C 61313C 66203C 66674C 66677C 66693C 66679C 66680C 66681C 66682C 66685C 70421C 70682C 70750C 75494C 75602C 75603C 50144CNut-Retaining Gasket-Black Nipple-Bubbler Drain Plug BasinBrace-Cross Rear Brace-Cross Front Baseplate ShelfBracket-Strain Relief Panel-Front Panel-LH Side Panel-RH Side Relay Overload Cord-Power Cold Control Cover-Relay Cap-Capacitor Clip-Capacitor CapacitorBracket-Capacitor Compressor Button Nut-Cover Orifice Assy Bubbler Body Assy-Tailpipe Gasket-T ailpipe Bubbler Assy Drain ReceptorEvaporator Retaining Clip Strainer Screen-SSRegulator-Red Spring DrierAssy-WC Condenser Tube-WC Condenser Tube-Tee To Check Vlv Tube-CU 1/4 x 30Tube-CU 1/4 x 22Tube-Water Vlv To Check Vlv Heat Exchanger Assy-Evaporator Washer-Flat Fitting-1/4 Tee Hose Clamp Check Valve Cotter Pin Nut Hex SSGrommet-Compressor Mtg.123456789101112131415161718192021222324252627282930313233343536373839404142434445464748495051*INCLUDES RELAY , OVERLOAD & CAPACITOR. IF UNDER WARRANTY , REPLACE WITH SAME COMPRESSOR USED IN ORIGINAL ASSEMBLY .NOTE: All correspondence pertaining to any of the above water coolers or orders for repair parts MUST include Model No. and Serial No. of cooler, name and part number of re-placement part.ITEM NO.FIG. 52630FIG. 6REMOVE THIS PACKING BEFORE PUTTING UNIT INTO SERVICE 800-518-5388。
美的家电商品介绍书说明书
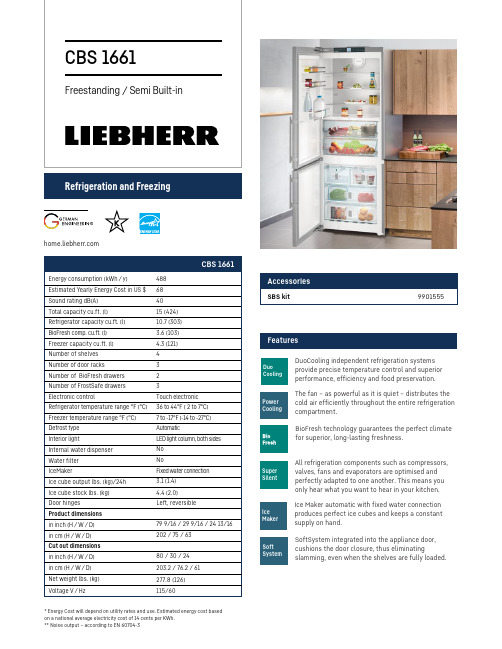
FeaturesRefrigeration and Freezing* Energy Cost will depend on utility rates and use. Estimated energy cost based on a national average electricity cost of 14 cents per KWh.** Noise output – according to EN 60704-3Super SilentAll refrigeration components such as compressors, valves, fans and evaporators are optimised andperfectly adapted to one another. This means you only hear what you want to hear in your kitchen.Soft SystemSoftSystem integrated into the appliance door, cushions the door closure, thus eliminatingslamming, even when the shelves are fully loaded.BioFresh technology guarantees the perfect climate for superior, long-lasting freshness.DuoCooling independent refrigeration systems provide precise temperature control and superior performance, efficiency and food preservation. DuoCoolingThe fan – as powerful as it is quiet – distributes the cold air efficiently throughout the entire refrigeration compartment.Power CoolingIce Maker automatic with fixed water connection produces perfect ice cubes and keeps a constant supply on hand.Ice MakerDiagramsSubject to modification. For up-to-date information, visit Specifications are for planning purposes only. For more detailed information, refer to installation instructions or Design Guide.30" (76.2 mm)The water line lead out position can be within the shaded area.IMPORTANTDo not install the shut-off valve for the water supply behind the appliance, to allow access to the shut off without having to pull out the applaince.The power cord exists the rear of the applianceat this location.CBS 1660, CBS 166180” (2032 m m )5”76”23 1/2”4”4”5”(597 mm)60” (1524mm) Side by Side24” m i n . (610 m m )。
美的jv20洗碗机说明书
美的jv20洗碗机说明书尊敬的用户:感谢您购买美的JV20洗碗机。
以下是使用说明书,请认真阅读并按照指引正确使用本产品。
一、产品概述美的JV20洗碗机是一种高效的家用洗碗设备,采用先进的洗涤技术和智能控制系统,可快速有效地清洗餐具和厨房用品,并节省您的时间和精力。
该设备适用于各种不同类型和材质的餐具和厨房用品。
二、产品特点1. 高效清洗:采用先进的洗涤技术和多重喷淋系统,可快速、彻底地清洗餐具和厨房用品。
2. 智能控制:配备先进的智能控制系统,可根据不同的洗涤需求自动调整洗涤参数。
3. 多功能应用:可适用于各种不同类型和材质的餐具和厨房用品,包括玻璃器皿、陶瓷餐具、不锈钢餐具等。
4. 安全耐用:采用优质材料和耐用设计,确保设备稳定、安全、耐用。
三、使用方法1. 准备工作:将餐具和厨房用品分类放置好,清理掉残留食物和油污。
2. 加入洗涤剂:按照说明书的要求,在洗碗机洗涤剂盒中加入所需数量的洗涤剂。
3. 设置程序:根据实际需要选择适当的洗涤程序,并设置洗涤时间和温度等参数。
4. 开始洗涤:按下启动按钮,启动洗涤程序,待程序执行完成后,取出清洗干净的餐具和厨房用品。
四、注意事项1. 在使用美的JV20洗碗机之前,请先仔细阅读使用说明书,并按照指引进行正确操作。
2. 请勿在设备未停止运行时进行任何维修或调整操作,以免发生意外。
3. 如洗涤过程中出现异常情况,请及时停止洗涤并按照说明书处理或联系售后服务中心。
总之,美的JV20洗碗机是一款高效、智能的家用洗碗设备,可适用于各种不同类型和材质的餐具和厨房用品。
希望以上内容能够对您提供帮助和指导。
美的空调线控器使用说明书

本说明书适用于以下型号的线控器:目 录使用注意事项..................使用条件......................主要功能......................线控器的配网..................线控器的使用..................故障代码. (112237)安装注意事项..................安装附件.....................安装方法.....................与空调器室内机配线图. (8)91013目录使用部分■为确保正确使用,请仔细阅读本注意事项,并请。
务必遵守严禁用户自行安装。
清洁或保养前,请切断电源开关,禁止用水洗刷,有发生触电的危险。
禁止用湿手操作,有发生触电的危险。
禁止用杀虫剂、消毒剂、可燃性喷雾材料直接喷射,否则可能引起火灾或器件变形。
切勿用手剥离显示面板,有触电的危险。
●电源电压适用范围:输入电压为直流12V ;●工作环境温度:-15℃~43℃;湿度:RH40%~RH90%;●电控安全符合:GB4706.32-2012、GB/T7725-2004要求。
使用部分●AP 配网模式:长按“风速”键,蜂鸣器长响一声后,液晶上的WiFi图标 开始快速闪烁 (1秒闪1次),使用美居App 的“添加设备”功能,选择“空调”类设备,选 择对应的型号,按其指示进行配网。
网络配置成功后,WiFi 图标长亮,并可以通过美居APP 对空调进行远程操控。
如果WiFi 图标熄灭或者无法进行远程操作,请检查配网时提供WiFi 热点的网络设备是否正常工作,或尝试重新进行网络配置。
●通过4芯电缆与室内机主控板连接;●通过按键操作,设定动作模式;●具有液晶显示功能。
仅适用于有WiFi 功能线控器请将线控器与空调室内机对接。
使用部分使用部分使用部分静压设置方法:“”“”在待机状态下,同时按住开关键和模式键8秒,蜂鸣器长响,显示屏显示“nA”后,再短按一次“确认”键。
美的厨房面板说明书
面板部件TEL 400-8899-315产 品 名 称:厨房面板产 品 型 号:MBT2K-T MBT2K-C MBT2K-H 制 造 商:广东美的制冷设备有限公司制造商地址:广东省佛山市顺德区北滘镇林港路邮 编:528311版 本 号:MBT2K-01物 料 编 码:16124000000021本资料上所有内容均经过认真核对,如有任何印刷错漏或内容上的误解,可向本公司咨询。
注:产品若有技术改进,会编进新版手册中,恕不另行通知。
产品外观、颜色如有改动,以实物为准。
使用前请仔细阅读本手册,并妥善保管使用说明书1.厨房出风面板与室内机组连接需要采用风管将出风面板上的进风法兰组件和室内机组上的进风法兰组件连接,确保密封,风管需有保温层,防止漏热和凝露。
配线的连接将厨房出风面板后侧连接线束解开。
拆开室内机组电控盒盖,根据接线铭牌的连接要求,与室内机组主控板上的接线端口插牢。
将接地线固定,盖上电控盒盖。
天花室内机组出风面板保温风管附件清单安装前确认安装厨房面板前,请根据室内机组附带的专业手册确认以下事项:室内机组下回风口与天花板开口的尺寸是否合适。
天花板开口边缘是否加固木条,木条最顶端到天花板下边缘距离是否大于50mm。
室内机组是否与天花机开口孔平行安装。
冷媒管路、排水管的隔热、连接线是否完成。
厨房面板安装尺寸600mm×300mm。
厨房出风面板安装位置距离厨房出风面板300mm以内需增加四个加强拉钩,防止龙骨压弯。
4.人站立位置出风口出风口出风口≤1.5m≤1.5m≤1.5m 提示。
美的牌微波炉说明书[修订]
![美的牌微波炉说明书[修订]](https://img.taocdn.com/s3/m/7f1a372a5627a5e9856a561252d380eb6294233a.png)
《美的牌微波炉说明书》Beautiful brand microwave oven specificationFunction introduction - the common functions1. Microwave cookingMicrowave cooking with 5 files microwave firepower, the period T = 22 seconds.(1) press "microwave" button, select the corresponding microwave power;(2) press "10 points", "1 cent", "10 seconds" button, adjust the cooking time, maximum cooking time for 99 points 90 seconds;(3) press the "start" button, cooking start;(4) during operation of the press the start / + 30 seconds "button, the cooking time increased 30 seconds, fire unchanged.2. Waves brittle roast/combination barbecue(1) press "light/combination barbecue" button, select combination gear;(2) press "10 points", "1 cent", "10 seconds" button, adjust the cooking time, maximum cooking time for 99 points 90 seconds;(3) press the "start" button, cooking start;(4) during operation of the press the start / + 30 seconds, "cooking time will add 30 seconds, fire unchanged.Combination firepower, the period T = 33 secondsKey number function display microwave power barbecue power1 barbecue G / 100%2 combination 1 gears C - 1 55% (18/33) 45% (15/33)3 combination 2 gears C - 2 36% (12/33) 64% (21/33)Note: barbecue time running to set time half, two sound, remind buzzer chirping door flip food.3. Quick nutrition menu(1) press steamed fish, steamed water eggs, steamed pork spareribs, steamed sweet potatoes, steamed seafood, frozen food, milk/coffee, turn over hot bread, boiled rice, vegetables, nutrition soup, stew chicken, roast chicken wings, kebabs arbitrary "campRaise menu key, can be directly show menus portions; select menu, the corresponding cooking mark light;(2) click "start / + 30 seconds" button to start cooking; The corresponding cooking mark twinkle;Note: barbecue menu operation to set time 2/3, two sound, remind buzzer chirping door flip food.4. Fast cookingIn standby mode, press the "start / + 30 seconds" button, but instantly start 30 seconds, 100% microwave firepower cooking, each click to increase 30 seconds cooking time, maximum cooking time 99 points 50 seconds.5. More paragraphs to cook(1) maximum input three sections of cooking;(2) if the three sections of cooking for a period, then thawed thaw cook cook suggested in the first paragraph.note(1) completed each segment of cooking bees two sound;(2) automatic menu cooking, electronic except taste for all segments of discomfort cooperation to cook.6. Quick freezing(1) press "quick freezing" button to display the default weight;(2) then click "quick freezing" button, can choose different weight;(3) press the "start" button, the thaw beginning.Note: to flip food to thaw halfway.Function is introduced - especially function1. TongSuo functionExecute the function, control panel into locking state, press any key cannot operate, avoid the incorrect operation dangerous child. Second-ranking locking: in standby continuous hold"pause/cancel" keys 3 seconds, a loud long "di," meaning that TongSuo state, LED display into the TongSuo mark light; clock, In Washington state, unlock: lock down "pause/cancel for 3 seconds," button with a long "di" will unlock, LED returns standby TongSuo marks the destroyer.2. Inquires the functionFirepower inquiresSecond-ranking can inquire firepower, microwave, barbecue, combination cooking condition can press microwave under fire. The key inquires the current3. Automatic prompt functionsAfter the show had cooking buzzer chirping sound, End; 5 If have no operation, every 2 minutes while buzzer chirping sound tip cook 5 ended. Meanwhile press any key invalid, until a door or press the cancel button returns the standby mode of operation.4. Be cancelled automatically functionSecond-ranking once set the cooking condition, and within one minute, no press the start button is display restored to the clock display6. Save electricityUnder the standby itself press the "save electricity" button, the machine into the province electricity state, monitors shut, for display closed press any key can restore display;tip(1) in function setting state, digital pipe display corresponding setting;(2) effective button with a buzzer chirping, invalid buttons without reaction;(3) in operation and suspended state, digital pipe display remaining cooking time.(4) please as soon as possible by the thawing food cooked or edible, unfavorable and chill under refrigeration.. (5) thawing thick food, please note that the time taken to obtain good food, flip the thawing effect.功能介绍-常用功能1. 微波烹调微波烹调具有5档微波火力,周期T=22秒。
美的 1.5匹 柜式空调 使用说明书
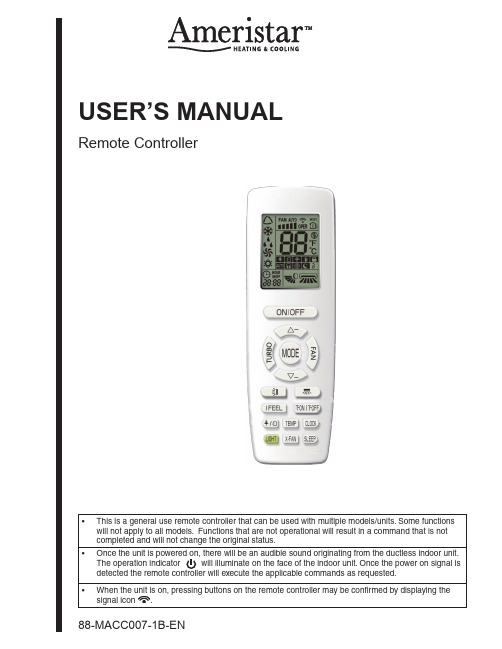
USER’S MANUAL Remote ControllerRemote Controller - User’s ManualAppearance and Functions6379101415131281154211ON/OFF 2Operation Mode 3Fan Speed 4Turbo Fan Speed 67 Vertical Air Direction 9I Feel13Display Light On/Off 1415Setpoint/Indoor/OutdoorTemperature Toggle11Set Time 1210Timer On/Off 8Sleep Mode 5▲/ Adjustment Buttons ▲Clean/Circulate Air X-Fan ModeScreen IconsTurbo mode℃ (46.4º F) heating function Child lock Vertical Air DirectionHorizontal Air Direction Sleep modeI feel、fan speed. DisplayedRemote Controller - User’s Manual Setting the TimeWhen using the remote controller for the first time or after replacing the batteries, please set the time of the system according to the current local time using the following steps:1. Press the CLOCK button, the icon will blink.2. Press the ▲ or ▼ buttons to adjust the time in 1 minute increments. Press and hold either ▲ or ▼button for a rapid increase or decrease of the time setting.3. Press the CLOCK button again to confirm/save the time and return to the display. The icon willstop blinking.On/Off ButtonPress this button to turn on or turn off the unit. After turning the unit on, the operation indicator on the indoor unit is ON and the indoor unit will make an audible sound indicating the unit has received the signal.Setting the Operation ModeWhen the unit is on, press the MODE button to cycle through the operating modes as shown below:• When selecting AUTO mode, the unit will operate automatically according to the sensed ambi-ent temperature. The set temperature cannot be adjusted and will not be displayed on the remote screen. The AUTO indicator will illuminate on the indoor unit and display on the remote controller screen. Press the FAN button to adjust the fan speed.• When selecting COOL mode, the unit will operate in air conditioning mode. The cooling indicator will illuminate on the indoor unit and display on the remote controller screen.• When selecting DRY mode, the unit will operate at a low fan speed to dry excess moisture from the indoor coil. The DRY indicator will illuminate on the indoor unit and display on the remote control-ler screen. The fan speed cannot be adjusted in dry mode.• When selecting FAN mode, the unit will only circulate air. No cooling or heating functions are acti-vated. No mode indicators will illuminate on the indoor unit, only the ON indicator will be dis-played.• When selecting HEA T mode, the until will operate in heat pump mode. The heat indicator will illu-minate on the indoor unit and display on the remote controller. The cooling only unit will not process the HEAT mode signal. Note: T o prevent cold air after activating heat mode, the indoor unit will delay the blower 1-5 minutes to allow the indoor coil to heat. The set temperature range from the remote controller is 61-86°F (16-30°C).Remote Controller - User’s Manual Setting the TemperatureWhen the unit is on, press the ▲ or ▼ button on the main screen to increase or decrease the set temperature by 1°F(1°C). Press and hold the ▲ or ▼ buttons to rapidly increase or decrease the tem-perature. Once the button is released the temperature setting will save and display on the remote con-troller. In COOLING, DRY , FAN and HEA TING mode, the indoor temperature setting range is 61°-86°F (16°-30°C). In AUTO mode, the set temperature cannot be adjusted.Setting the Fan SpeedWhen the unit is on, press the FAN button to cycle through the fan speeds in the following sequenceauto (AUTO), low (), medium () and high():When the operation mode changes, the fan speed will remain as originally set. When in AUTO mode, the system will select the proper fan speed automatically according to the factory setting. When in DRY mode, the fan speed is defaulted to low and cannot be adjusted.Setting Turbo Modeicon will be displayed when the TURBO function is on. When the icon is not displayed the achieve quick cooling or heating to reach the desired set point. When the TURBO function is off, the unit operates at the selected fan speed (Auto, Low, Medium, High).Setting the Horizontal Louver (swing angle) Air PositionNOTE: This function is not available for all models. If not available, pressing thebutton will result in no system change. If this function is not available, the horizontal louvers may be adjusted manually on the indoor unit to deflect the air in the desired direction. Do not attempt to manually adjust the vertical louvers.• Press and hold the button for more than 2 seconds; the louvers will swing back and forth from left to right. Release the button and the unit will stop and lock the louver angle in that position.• the louver (swing angle) option. If the button is pressed again within 2 seconds, the louver status will revert to the last louver status in the circular cycle as shown above.Remote Controller - User’s Manual Setting the Vertical Louver (swing angle) Air PositionWhen the unit is on, press the button to adjust the vertical or up/down louver position. The louver angle can be cycled circularly as shown below:at current position)• the unit will move the louvers up and down at the maximumangles for the largest distribution of airflow.• the unit will stop the louver at aarea.• toption.Note:• may not be available for all units. Selecting this option, if notavailable, will result in the full range automatic option.• When pressing and holding the button for more than 2 seconds, the main unit will enter the full range option. To stop the full range oscillation, release the button when the louvers are at the desired point. The louver position will be saved and held.• mode, pressing the button will turn the mode off or on or toggle circularlythrough the louver option steps as indicated above.Setting the TimerThe operation time of the unit can be set as needed. The TIMER ON and TIMER OFF functions can be set simultaneously to enable a system operating time frame. Before setting, check to ensure the system time is set to reflect the current time; if not, see “Setting the Time” on page 2 for instructions on setting the system clock.Setting Timer ON:1. Press the T-ON button, the icon disappears and the word ON will blink.2. Press the ▲ or ▼ buttons to adjust the timer time in 1 minute increments. Press and hold either ▲or ▼ button for a rapid increase or decrease of the timer setting.3. Press the T-ON button again to confirm the timer on setting. The word ON will stop blinking and theicon is displayed indicating the timer has been set. The display will then revert to displaying the system time.4. Press the T-ON button again to cancel the timer. ON will not be displayed indicating there is no ontimer set.Setting Timer OFF:1. Press the T-OFF button, the icon disappears and the word OFF will blink.2. Press the ▲ or ▼ buttons to adjust the timer time in 1 minute increments. Press and hold either ▲or ▼ button for a rapid increase or decrease of the timer setting.3. Press the T-OFF button again to confirm the timer off setting. The word OFF will stop blinking andthe icon is displayed indicating the timer has been set. The display will then revert to displaying the system time.4. Press the T-OFF button again to cancel the timer. OFF will not be displayed indicating there is noRemote Controller - User’s Manual Setting the I Feel FunctionWhen the unit is on, press the I FEEL button to activate the I FEEL function. The icon will only be displayed when the I FEEL function is on. When the I FEEL function is turned on, the remote control-ler will send the detected ambient temperature to the unit and the indoor temperature will be adjusted according to the detected temperature at the location of the remote controller. Note: For best results, the remote controller should be kept near the user. Do not put the remote controller near an object with excessively high or low temperatures, such as on an appliance or in direct sunlight to avoid detecting an inaccurate ambient temperature.Setting the Light DisplayThe light on the display panel of the indoor unit will display the present operation status. Press the LIGHT button to toggle between the display light ON or OFF status.Setting the Temperature FunctionSetting X-FAN ModeWhen the unit is on and in COOL or DRY mode, press the X-FAN button to activate the X-FAN function. The icon will be only displayed when the X-FAN function is on. When the X-FAN function is on, the indoor fan will continue to run for a two minutes to dry the indoor coil after the unit has been powered off. The fan will automatically stop after a preset time. The X-FAN function is not available in AUTO, FAN or HEAT mode. Note: The X-FAN function can be canceled or activated after powering the unit off by pressing the X-FAN button.Setting Sleep ModeWhen the unit is on and in COOL or HEA T mode, press the SLEEP button to activate the SLEEP func-tion. The icon will only be displayed when the SLEEP function is on. The SLEEP function cannot be set in AUTO, FAN or DRY mode. When the unit is turned off or the mode is changed the SLEEP function is automatically canceled.Note: When this function is turned on, the unit will operate according to the preset sleep curve to pro-vide a comfortable sleep environment.Clean/Circulate Air Functionbutton will result in no system change.Pressing the TEMP button determines what temperature is displayed on the remote controller. Bypressing the TEMP button, you can cycle through the display options as follows:Remote Controller - User’s ManualWhen the unit is ON, the display panel of the indoor unit is defaulted to display the set temperature. Press the TEMP button to view the indoor or outdoor ambient temperature on the display panel of the indoor unit.• The icon is displayed when the temperature displayed is the set temperature.• The icon is displayed when the temperature displayed is the indoor ambient temperature.• The icon is displayed when the displayed temperature is the outdoor ambient temperature. Note:• The outdoor temperature display is not available for some models. When the remote controller re-ceives the outdoor ambient temperature signal, it will default to display the set temperature.• When the unit is powered on, the default is the set temperature.• When selecting to display the indoor or outdoor ambient temperature, the indoor temperature in-dicator will display the corresponding temperature and automatically return to displaying the set temperature after 3-5 seconds.Setting Energy-Saving ModeWhen the unit is in COOL mode, press the TEMP and CLOCK buttons simultaneously to activate or deactivate the energy-saving function. When the energy-saving function is activated “SE” will display on the remote controller and the unit will adjust the set temperature automatically to a preset factory setting for the best energy-saving results. Press the TEMP and CLOCK buttons simultaneously again to deactivate the energy-saving function.Note:• When the energy-saving function is on, the fan speed is defaulted to AUTO and cannot be adjusted.• When this function has been set, the set temperature is displayed as “SE”. The system will run in an energy saving mode with the set temperature at 81°F (27°C).• The SLEEP function and energy-saving function cannot operate simultaneously. If the energy-sav-ing function has been set when the unit is in COOL mode, pressing the SLEEP function will cancel the energy-saving function. If the SLEEP function has been set when the unit is in COOL mode, turning on the energy-saving function will cancel the SLEEP function.Setting the 8°C (46°F) Heating Function (Vacation or Holiday)When the unit is in HEAdeactivate the 8°C (46°°C” (46°F) will display on the remote controller. Press the TEMP and CLOCK buttons simultaneously again to deactivate this function. When this function is activated, the unit will not allow the indoor ambient temperature to fall below 8°C (46°F). This function is typically used when away for vacation or holiday and is intended save energy and protect pipes or plants from freezing when the building is unoccupied.Note:• When the 8°C (46°F) function is on, the fan speed is defaulted to AUTO and cannot be adjusted.• When the 8°C (46°F) is on, the set temperature is calculated automatically and cannot be adjusted. • The SLEEP function and 8°C (46°F) function cannot operate simultaneously. If the 8°C (46°F) func-tion has been set when the unit is in HEA T mode, pressing the SLEEP function will cancel the 8°C (46°F) function. If the SLEEP function has been set when the unit is in HEA T mode, turning on the 8°C (46°F) function will cancel the SLEEP function.• When the temperature display is set to °F, the remote controller will display 46°F instead of 8°C.Remote Controller - User’s Manual Setting the Child LockPress the ▲ and ▼be displayed. Press the ▲ and ▼ buttons again simultaneously to unlock the buttons on the remotefunction of the button pressed is invalid.Setting the Temperature Display TypeWhen the unit is OFF , press the ▼ and MODE buttons simultaneously to toggle the temperature display between °C and °F .WIFI FunctionThis function is not available at this time.© 2018 All right reserved.Literature Order Number 88-MACC007-1B-EN DateJanuary 2018Supersedes 88-MACC007-1A-ENThe manufacturer has a policy of continuous product and product data improvement and reserves the right to change design and specifi cations without notice. Only qualifi ed technicians should perform the installation andservicing of equipment referred to in this manual.Replacing the Batteries and Additional Notes1. Lift the back cover in the direction of the arrow (As shown in step 1).2. Remove the original batteries (As shown in step 2).3. Insert two new AAA1.5V dry batteries, and pay attention to the polarity (As shown in step 3).4.Replace the back cover (As shown in step 4).• The remote controller should be kept at a minimum distance of 39 inches (1m) from other electrical appliances such as television, stereo, etc.• The maximum operating distance between the remote and the indoor unit should be no more than 26 feet (8m). The remote controller should be operated within it’s receiving range. If signals are not being processed, move the remote controller closer to the indoor unit. Check to make sure the batteries are good and installed correctly.• The remote controller should not be dropped or thrown. Keep the remote dry and free of liquid spills. • When replacing batteries do not use old or mis-matched batteries.• If the remote controller will not be in use for a period of time, remove the batteries and store separately.。
- 1、下载文档前请自行甄别文档内容的完整性,平台不提供额外的编辑、内容补充、找答案等附加服务。
- 2、"仅部分预览"的文档,不可在线预览部分如存在完整性等问题,可反馈申请退款(可完整预览的文档不适用该条件!)。
- 3、如文档侵犯您的权益,请联系客服反馈,我们会尽快为您处理(人工客服工作时间:9:00-18:30)。
美的ps20c1使用说明书
摘要:
一、产品简介
二、产品特点
三、产品功能
四、产品使用方法
五、产品维护与保养
六、安全注意事项
正文:
尊敬的用户,感谢您选择美的PS20C1产品!为了让您更好地了解和使用本产品,以下为您详细介绍美的PS20C1的使用方法、功能及注意事项。
一、产品简介
美的PS20C1是一款具有高性能、高性价比的家用电器产品。
本产品采用先进的技术,精心设计,旨在为用户提供便捷、舒适的生活体验。
二、产品特点
1.高效节能:美的PS20C1采用高效节能技术,降低能耗,为用户节省电费。
2.安全可靠:产品符合国家相关法规和安全标准,确保用户使用过程中的安全。
3.操作简便:人性化设计,使操作更加简便易懂。
4.品质保证:美的品牌信誉,严谨的品质控制,确保产品品质。
三、产品功能
1.基本功能:美的PS20C1具备常规的家电功能,满足用户日常生活需求。
2.智能控制:产品支持智能遥控操作,方便用户快速调整设备状态。
3.多种模式:提供多种工作模式,满足不同场景下的使用需求。
四、产品使用方法
1.在使用前,请确保电源线插头与插座连接牢固。
2.将产品放置在平稳、干燥的地方,避免阳光直射和潮湿环境。
3.打开产品包装,按照说明书组装配件。
4.接通电源,按照需求选择合适的工作模式。
5.使用过程中,请勿将水或其他液体洒入产品内部,以免造成短路。
五、产品维护与保养
1.定期清洁产品表面,保持外观整洁。
2.不要在产品上施加过重的物品,以免损坏机体。
3.长时间不使用时,请拔掉电源插头,以确保安全。
六、安全注意事项
1.操作过程中,请勿让儿童接近产品,以免发生意外。
2.请勿在潮湿环境下使用产品,以免触电。
3.电源线损坏时,请及时更换,以免造成安全隐患。
4.使用过程中如有异常声音、异味等现象,请立即停止使用,并联系售后服务。
感谢您选择美的PS20C1产品,祝您使用愉快!。