相机连接说明书
QooCam 8K全景相机说明书

标准配件相机便携袋说明书保修卡手绳保护壳USB-C To MICRO USB USB-CTo USB-A USB-C To USB-C MIC INCNQ键• 开机状态下,相机无任务进行,短按快速切换自定义拍摄模版。
Mode/电源键 • 关机状态下,长按2s开机;• 开机状态下,长按2s关机;• 开机状态下,相机无任务进行,短按快速切换到常用拍摄模式。
拍摄按键• 开机状态下,短按拍照或开始/停止录像。
触控屏机身零件标识按键功能❿❺❻❼❽❸❹❾❶❷⓬⓮⓯⓭⓫❶ Q键❷ 状态指示灯I ❸ microSD卡槽 ❹ 散热孔❺ 镜头I ❻ 拍摄键❼ 电源键❽ 触摸屏❾ 1/4螺纹孔❿ 扬声器⓫ USB-C接口⓬ 3.5mm音频口⓭ 麦克风⓮ 镜头II ⓯ 状态指示灯II CN CN引导设定:日期/时间使用触控屏从屏幕的边缘向左轻扫,进入【切换拍摄模式】• 快速切换至以下拍摄模式:普通照片/普通视频/延时摄影/SuperHDR/场景/自定义1/2/3/4拍摄模版。
从屏幕的边缘向下轻扫• 含自定义模版管理、Wi-Fi 开关、音量/亮度调节、更多设置。
从屏幕的边缘向上轻扫,进入当前拍摄模式的【参数设置】• 设置曝光模式、分辨率/帧率、文件格式、白平衡、倒计时/间隔时间等。
从屏幕的边缘向右轻扫,进入【回放】• 左右滑动可切换前/后一张照片/视频,可显示拍摄参数,可删除文件,可按分类查看照片/视频。
• 从屏幕的边缘向左/向右/向上/向下滑动,预览360°全景画面。
设置当前日期,然后按 “ ”设置当前时间,然后按 “ ”选择语种,然后按 “ ”下载QooCam APP ,然后按 “ ”保存设置并退出相机日期和时间信息与图像一起记录在文件上,使用前请务必在相机上正确设置。
CN CN使用触控屏相机设置❶ 自定义模板再次点击可保存当前拍摄参数至自定义模版,最多可保存4组。
短按Q键可切换自定义拍摄模版;❷ 更多设置防水壳模式开关、语言、日期、延时摄影类型选择等;❸ 提示音点击图标后,拖拽滑动条调整提示音音量档位,共4档;❹ 屏幕亮度点击图标后,拖拽滑动条调整屏幕亮度;❺ Wi-Fi开关默认打开,短按图标置灰后,关闭Wi-Fi。
数码相机 说明书

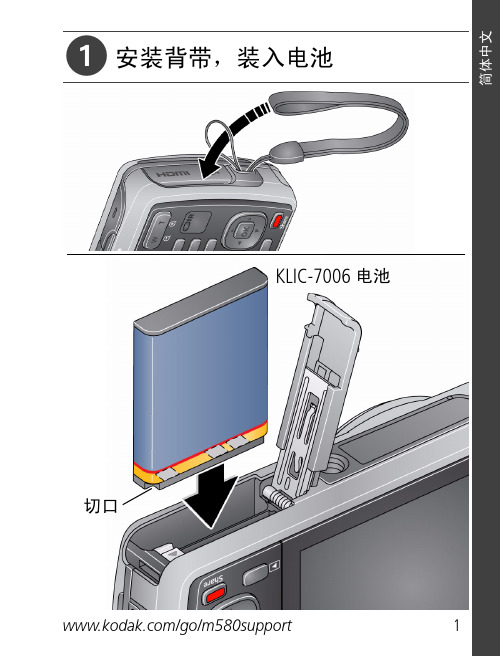
了解数码相机正面图1.快门键2.电源键3.状态指示灯4.闪光灯5.自拍指示灯6.麦克风7.镜头项目功能拍摄模式视频模式回放模式1.变焦广角远距变焦广角远距变焦2.菜单菜单菜单3.拍摄模式视频模式回放模式4.对焦自动>>>对焦自动>>向右旋转5.闪光灯Z>Y>X>W --下一个图像6.自拍关闭>10s>2s>10+2s 自拍关闭>10s>2s删除7.补偿>[--上一个图像8.设置情景模式设置设置准备1.连接相机吊带。
2.打开电池/存储卡盖。
3.4.插入 SD/SDHC 存储卡 (5.盖上电池/拍照模式拍摄照片您的相机配备一个 3.0" 全彩TFT液晶屏幕来帮助您构图、回放拍摄的相片/短片或调整菜单设置。
1.按下电源键打开电源。
状态指示灯亮绿光,表示相机启动。
2.将相机模式设置为[]。
3.在液晶屏幕中构图。
按下键拉近拍摄对象,然后在液晶屏幕中放大对象。
按下键进行广角拍摄。
使用脸部侦测技术进行拍照同时侦测出最多5张人脸。
1.将相机模式设置为[]。
2.按住m键直到[]图标出现在液晶显示屏上。
白色框被认作“最优先”面部(主对焦框),而周围其他面孔上会出现灰色框。
3.半按快门键以锁定焦距。
同时主对焦框会变成绿色。
如果“最优先”面部对焦不合适,屏幕上所有的框都将消失。
4.把快门键按到底就可以进行拍照。
短片模式录制短片1.将相机模式设置为2.构图。
3.按下快门键。
回放短片您可回放录制在相机上的短片。
1.将相机模式设置为 [x]。
屏幕上将显示最后一张影像。
2.使用e / f键选择要回放的短片。
3.按下SCN/SET键。
播放的过程中按下f / e键可快进/倒退。
如要停止回放短片,按下d键。
将停止回放并返回至短片的开始部分。
如要暂停回放短片,按下SCN/SET键。
将暂停短片回放。
要取消暂停,再次按下SCN/SET键。
回放模式回放静态图像您可在液晶屏幕上回放静态图像。
松下 数码相机 DC-ZS220 使用说明书

西的包内 • 在相机手带上悬挂装饰物等物件 • 对镜头或显示屏施加过大的压力 本相机不具备防尘、防滴、防水功能。 请避免在灰尘、沙粒或水等较多的环境下使用,以防灰尘、沙粒 或水等的渗入。 █ 结雾(镜头、显示屏或取景器起雾) ● 在温度或湿度有骤然变化的地方使用本相机时,会发生结雾现 象。这些情况下应避免使用相机,否则可能导致镜头、显示屏 或取景器脏污,出现霉点,或对相机造成损坏。 ● 如果发生结雾现象,请关闭相机电源,并放置两个小时后再使 用。相机适应了周围的温度后,起雾会自然消失。 █ 使用时 ● 请勿让可能会受电磁影响的物体靠近扬声器。 • 磁化的物体,例如银行卡、乘车月票、手表等,可能会受到
扬声器电磁的不良影响。
件
准备/基本
在使用相机之前,请确认随机附送的所有附件。部件编号为2018 年2月最新编号。
电池组 DMW-BLG10GK • 使用之前请给电
池充电。
• 电池组在文中表示为电池 组或电池。
USB连接线 K1HY04YY0106
手带 VFC4297
不符合HDMI标准的电缆不能工作。 “高速HDMImicro电缆”(D型-A型插头,最长2 m) 保持本机远离电磁设备(例如微波炉、电视机、游戏机等)。 • 如果您在电视机上面或附近使用本机,本机上的图像和/或声
音可能被电磁波辐射干扰。 • 请勿在移动电话附近使用本机,否则噪声可能对图像和/或声
音产生不良影响。 • 扬声器或大型电机产生的强大磁场可能造成记录的数据损坏或
• 如果您丢失随机附送的附件,请咨询经销处或您附近的维修中 心。(您可以另外购买附件。)
Panasonic LUMIX 智能手机相机连接指南说明书

4 TouchTouch3 Touch123 TouchSTEP2Compatible OSes (current as of August 2011)•For Android: Android2.1, Android2.2, Android2.3For iPhone: iOS3, iOS4The service may not be able to be used properly depending on the type of smartphone being used. For compatible devices, see the following support site.•http://panasonic.jp/support/global/cs/dsc/(This Site is English only.)If you are downloading or transferring still pictures and motion pictures using your mobile network, you may be subject to high network usage fees under your contract.•] icon will be added to the menu.The [45 Touch6 Touch123 Input4Start the smartphone application “LUMIX LINK”.If you are using the Wi-Fi function for the fi rst timeEasy connection setup guide*4 Setting is only required the fi rst time using a smartphone or a PC.Digital CameraModel No.DMC-FX90VQC8577-1Connect your smartphone and cameraConnectionSend still pictures or motion pictures from your camera to your smartphone LUMIX LINK LUMIX LINKSmartphone operationsConnetion waiting...LUMIX LINKSending multiple still pictures ormotion picturesThe screen returns to step 3.If the screen is not displayed during the sending, reconnect your•smartphone.Go to .If still pictures or motion pictures cannot be sent, check “Message•Display” and “Troubleshooting” on pages 28 to 31 of the “Basic Owner’sManual”.The camera cannot be used to connect to a public wireless LANconnection.Exit the menu after it is set. (Touch [ ] several times.)123 Touch 3412 Enter3 Checkthelogin ID, and touch[OK].A message will appear when the connection has•fi nished. Touch [OK].Exit the menu after it is set.•1You can change the page by dragging the screen left or right.•2 Enterapassword and touch[Set].Enter any combination of 8 to 16 characters•and numbers for the password.2(Touch [ ] several times.)1If you are using a wireless access point (broadband router) that supports the WPS (Wi-Fi Protected Setup) (PUSH button function)*WPS is a function that allows connection and security related settings to be changed easily on wireless LAN devices. See the instructions of the wireless access point (broadband router) being used to check if it iscompatible or not. If you are using a wireless access point (broadband router) that does not support WPS (PUSH button function), read through the “Owner’s Manual for advanced features (PDF format)”.Connect the camera to a wireless accesspoint (broadband router)Acquire a “LUMIX CLUB” login ID andpassword with the cameraRegister as a member of the “LUMIX CLUB” (free of charge). Registration allows still pictures or motion pictures to be sent to multiple WEB services via “LUMIX CLUB”.Refer to the “Owner’s Manual for advanced features (PDF format)” for details.Connection12 Touch3 Touch456 TouchWhen connecting with [Search Wireless AP]Touch [Search Wireless AP].1.Touch the wireless access point you are2.connecting to.Enter the encryption key and touch [Set].3.A message is displayed when the wireless access point (broadband router)•has been saved.Refer to the “Owner’s Manual for advanced features (PDF format)” for details.([])You will need your login ID and password to reset. Please be sure to take a•note of them.Login IDPasswordTo ensure reliable connection settings, it is•recommended to avoid covering the Wi-Fi transmitterwith your hand, and change settings near the wirelessaccess point (broadband router).Select still pictures or motion pictures and send them456 Touch7Setting isonly requiredthe fi rst time.Wi-Fi TransmitterThe name of the senddestination of this computer is“Pfs-XXXXXX”.。
Olympus 数码照相机 SH-50 使用说明书
数码照相机SH-50使⽤说明书● 感谢您购买 Olympus 数码照相机。
在使⽤新照相机之前,请仔细阅读本说明书,充分了解其性能以便延长照相机的使⽤寿命。
请妥善保存本说明书以供随时参考。
● 我们建议您在拍摄重要影像之前,先试拍⼏张不重要的影像,确保您能正确⽆误地操作本照相机。
● 为持续改良产品考虑,Olympus 保留对本说明书中所包含信息进⾏更新或修改的权利。
2CHS检查箱中物品3211 ⼿带安装环2 接⼝盖3 多功能接⼝4 HDMI 微型接⼝5 ⾃拍定时器指⽰灯/AF 照明灯6 闪光灯7 镜头8 扬声器9 三脚架固定螺孔10 电池/插卡盖11 电池/插卡盖锁箭头钮H(左)F(上)(右)FGHI 指⽰按上/下/左/右箭头钮。
1⽴体声麦克风2 闪光灯开关3显⽰屏4变焦杆5快门钮6模式拨盘7n 按钮8指⽰灯9F 钮(拍摄动态影像)10A 按钮(OK)11箭头钮INFO(改变信息显⽰)#(闪光灯)Y(⾃拍定时)(删除)12q 按钮(切换拍摄和回放)13 钮3CHS4CHS插⼊和取出电池和卡(市售)1 按照步骤 1 和2 打开电池/插卡盖。
电池/插卡盖如图所⽰,将电池的 C 标记朝向电池锁扣插⼊。
对电池外壳的损坏(如擦痕等)可能导致发热或爆炸。
将电池锁扣沿箭头⽅向推动解锁,然后取出电池。
●电池在出⼚时未充满电量。
在使⽤之前,请务必给电池充电,直到指⽰灯熄灭 (最多 4 ⼩时)。
5CHS当出现以下所⽰的错误信息时,请更换电池。
切勿使⽤任何附带或 Olympus 指定以外的USB电缆。
否则可能导致冒烟或烧毁。
附带的 F-2AC USB-AC 适配器 (以下均称为 USB-AC 适配器) 根据购买照相机的地区⽽异。
如果您拿到的是直接插⼊型 USB-AC 适配器,请将其直接插⼊ AC 插座。
附带的 USB-AC 适配器⽤于充电和播放。
照相机上连接了 USB-AC 适配器期间请勿拍照。
当充电完成或播放结束时,请务必从墙上插座断开 USB-AC 适配器的电源插头。
松下摄像机操作指南说明书

1 连接 USB 电缆和交流电适配器。 0 按 M 键约 2 秒钟,关闭摄像机。
外置蓝光驱动器上的电源键,打开电源。
A 按弹出按钮,打开光盘托架。 B 正确装入一张新的光盘。 C 按弹出按钮,关上光盘托架。
小心 : 0 连接设备时务必切断电源。
否则可能会发生电击或故障。
复制
..
4
1
兴VTC㌦⍤
ḥ㳂䒶徃惎◩ 兴ḥ㳂䒶㸑㍓⸨ 澐221!W兴351!W澑
1
⢗仯呞槲∩◩ 3
2
*图中所示的交流电适配器是 AC-V10M。 A 将外置蓝光驱动器的 USB 电缆连接至本机。 B 连接外置蓝光驱动器的交流电适配器。
C 打开外置蓝光驱动器。
D 把交流电适配器与本机连接。
0 连接交流电适配器时,本机自动接通电源。 0 本机打开,“备份”菜单出现。 0 连接 USB 电缆期间,显示“备份”菜单。 0 另请参阅外置蓝光驱动器的使用说明书。
Panasonic高清视频相机连接指南说明书

Wi-Fi Connection GuideHigh Definition Video CameraModel No. HC-W850/HC-V750HC-V550/HC-V250SQC0011It is required to install the “Image App” on your smartphone/tablet to connect this unit.1[Android ™]: Select “Google Play™ Store”.[iOS]: Select “App Store SM ”.2Enter “Panasonic Image App” into the search box.3Select “Panasonic Image App” and install it.Install the “Image App” on your smartphone/tablet Confirm the Wi-Fi ® connection method Connect to Wi-FiStep.1Install the “Image App” on your smartphone/tabletAn environment that can connect to the network is required.Step.2Confirm the Wi-Fi ® connection methodConfirm the wireless access point and smartphone used.When connecting to a wireless access point (wireless LAN router)When connecting to a smartphone1Check if the wireless access point is compatible with IEEE802.11b/g/n.≥Proceed to step 2 once the compatibility is confirmed.2Check if the wireless access point is compatible with WPS*.Compatible with WPS:Proceed to A [WPS Connection] of Step.3Not compatible with WPS:Proceed to B [Search for wireless network] of Step.3*WPS is an abbreviation for Wi-Fi Protected Setup™.Proceed to C [Direct Connection] of Step.3≥Android and Google Play are trademarks or registered trademarks of Google Inc.≥App Store is a service mark of Apple Inc.≥“Wi-Fi”, “Wi-Fi Protected Setup”, “WPA” and “WPA2” are marks or registered marks of the Wi-Fi Alliance.≥QR Code is a registered trademark of DENSO WAVE INCORPORATED.A [WPS Connection]1Press the Wi-Fi button on this unit to setup the Wi-Fi.2Touch a Blank row to register a new wireless network.3Touch [WPS Connection].4Press the WPS button on the wireless access point.≥When the connection is complete, a message is displayed on this unit.5Touch [Link to Cell] and start up the smartphone application “Image App”.≥When the connection is complete, images from this unit are displayed on the smartphone screen.B [Search for wireless network]≥Please refer to the operating instruction of the device in use for details about the setting and display of the wireless access point.1Press the Wi-Fi button on this unit to setup the Wi-Fi.2Touch a Blank row to register a new wireless network.3Touch [Search for wireless network].≥For more details about [Manual Setting], please refer to the owner’s manual (PDF format) of this unit.4Touch the wireless access point to connect.≥Touch [ENTER].≥If an Encryption key (Password) is not set on your router, the connection is complete and a message is displayed.5(When there is an Encryption key (Password))Enter the Encryption key (Password) of the wireless access point.≥For details on how to enter characters, refer to the owner’s manual (PDF format).≥When the entry is complete, touch [Enter].6Touch [Link to Cell] and start up the smartphone application “Image App”.≥When the connection is complete, images from this unit are displayed on the smartphone screen.C [Direct Connection]1Press the Wi-Fi button on this unit to setup the Wi-Fi.2Touch [Change connection type] and select [QR code].≥The QR code is displayed on this unit screen.3Start up the smartphone application “Image App”.4On the smartphone, select [QR code], and scan the QR code displayed on the screen of this unit.≥When using an iOS device, perform the following operations:1Select the option that allows you to install the app on the profilescreen of the “Image App“, and follow the on-screen instructions to complete the installation.2Press the home button to close the displayed screen.3After selecting the network name (SSID) of this unit from the Wi-Fi setup of the smartphone, start up “Image App“.≥When the connection is complete, images from this unit are displayed on the smartphone screen.This function can be used with the NFC compatible device with Android (OS version 2.3.3 or later). (Except for some models)NFC is an abbreviation for Near Field Communication.≥When this unit and the smartphone are connected to the same wireless access point, the result is a wireless access point connection. All others are direct connections.1Start up the smartphone application “Image App”.2Touch the smartphone on displayed on the smartphone screen.≥Touch [YES] on the screen of this unit, and proceed with the connection by following the smartphone screen instructions.≥When the connection is complete, images from this unit are displayed on the smartphone screen.≥The NFC function cannot be used on the smartphone when a message to touch the NFC mark of the device is not displayed. Try other connection methods.When connecting to a wireless access point (wireless LAN router)[Wi-Fi Setup] # [Wireless Settings][Wi-Fi Setup] # [Wireless Settings]A [Delete]B[ENTER]A [Delete]B[ENTER]When connecting to a smartphone[Wi-Fi Setup] # [Direct Connection]Connect with using NFC。
柯达 数码相机 说明书
分享和标记照片
使用键盘
当您需要键入字符时将会显示键盘。
1按
以选择一个字符,然后按 OK
(确定)。
2 完成时,按
以便选择“OK (确定)”,
然后按 OK (确定)。
3 如果您已添加了新名字,相机将会提示您更新所 有人脸以匹配指定的名字。选择“是”,然后按
OK (确定)。
名字将被指定给所有与其匹配的人脸。
以选择“管理电子邮件地址” (或“管理
相框”),然后按 OK (确定)。
2 要添加电邮地址或相框,请按
以选择“新
电邮”或“新相框”,然后按 OK (确定)。请使
用屏幕键盘进行添加。请参阅第 19 页。
(例如:JohnDoe@)
要编辑电邮地址或相框,请按
以选择地址
的昵称 (“父亲”或“Mary”)或相框,然后按
请参阅补充用户指南 /go/m580support
/go/m580support7来自简体中文前视图
闪光灯
自拍定时/录像/ 自动对焦辅助灯
镜头 麦克风 扬声器
8
/go/easysharecenter
简体中文
后视图
LCD Delete (删除)、 “Me信nu息(”菜按单钮)、(Re查vie看w) 按钮
注:(在智能拍摄模式下不 可用。)
在拍照前,闪光灯预闪,使瞳孔 收缩。
闪光灯不预闪,而是由相机来校正 红眼。
注: 使用数码校正功能时,影像 处理时间会比使用预闪功能 时要长。
不闪光
12 ZH-CN
/go/easysharecenter
关于相机的其它操作
使用光学变焦
1 使用液晶显示屏为主体 取景。
打印/数量 保护 电邮 照片/录像数
- 1、下载文档前请自行甄别文档内容的完整性,平台不提供额外的编辑、内容补充、找答案等附加服务。
- 2、"仅部分预览"的文档,不可在线预览部分如存在完整性等问题,可反馈申请退款(可完整预览的文档不适用该条件!)。
- 3、如文档侵犯您的权益,请联系客服反馈,我们会尽快为您处理(人工客服工作时间:9:00-18:30)。
如果有 windows安 全警报或杀 毒软件报警, 请选择允许 安装
之后一直默认安装即可。。。。。
之后一直默认安装即可,连续出现的几个NEXT,点 击即可,直到下图驱动安装完成。。。。。
之后一直默认安装即可。。。。。
安装加密狗驱动
打开下面的文件夹
安装加密狗驱动
安装加密狗驱动
安装加密狗驱动
视觉软件安装操作说明
1 软件的安装, 视觉系统需要安装如下三个软件
相机取像软件
Sherlock视觉软件
加密狗驱动
硬件配置
1.相机、镜头、光源 2.相机配套电源线一根 3.配套网线一根 4加密狗驱动一个 5.工控机一台(32位操作系统)
软件安装
打开此文件夹,选择主安装程序右键选择以管改软件及相机配 置文件生成
相机IP地址的修改和配置文件的生成
相机IP地址的修改和配置文件的生成
点击,会在文件夹
发现一个文件名为gevtest的文本文件
相机IP地址的修改和配置文件的生成
确认此序列号为已连 接的相机的序列号 可以把此文件拷贝到D:\DALSA文件夹下,也可以是别的路径,但需要记住此 路径,之后Sherlock需要调用此文件
Sherlock软件调用相机配置文件 把此项内容设定为1,然后保存
Sherlock正确取像的确认 1 把软件的授权狗,插到电脑上,在开始程序,找到如下 位置
打开
Sherlock正确取像的确认
此两项为绿色表明加密狗的驱动安 装正确
Sherlock正确取像的确认 在打开的sherlock软件里,找到Options----Application
安装加密狗驱动
安装加密狗驱动
安装Sherlock程序
安装Sherlock程序
安装Sherlock程序
安装Sherlock程序
安装Sherlock程序
安装Sherlock程序
安装Sherlock程序
相机IP地址的修改和配置文件的生成
双击打开
电脑网口的IP地址
侦测到的相机
状态显示
相机的IP地址,可以修改,保 证相机与工控机在同一网段
Sherlock正确取像的确认 这两项全部改为Flase
关闭Sherlock软件,再次打开,即可看到相机图像
Sherlock正确取像的确认 双击桌面图标,打开一个空的Sherlock程序
如果图像窗口内能看到图 像,那么相机的配置文件 就导入成功
Sherlock软件调用相机配置文件 1 删除自带的文件,在开始程序找到如下路径
打开
Sherlock软件调用相机配置文件 打开
Sherlock软件调用相机配置文件 打开IfcDrv
Sherlock软件调用相机配置文件
注意此路径为用idiscover生成的gevtest的位置,修改完 毕保存
Sherlock软件调用相机配置文件 返回到此目录下,双击打开此文件