LED吸顶灯安装说明书
OUTLINE Type U LED - 可调白度 LED 吸顶灯说明书

Features• Enhanced, uniform lighting delivers a balanced amount of light to walls, cubicles, work surfaces and people • Laser formed frosted lens• Standard low voltage 1%dimming (0-10v)• For use in insulated ceilingsFeatured Options • Tunable White• Emergency battery pack• Flexible metal whip - 6” x 3/18 gauge conductorsOptical SystemStandard frosted laser formed one-piece diffuser, offers high levels of efficiency and visual comfort.MountingThis luminaire has been specifically designed for T-Bar applications and features integral earthquake clips for additional support. Ceiling tile provided by others.ConstructionDie-formed, code gauge steel housing. Precision-formed steel reflector.FinishWhite polyester powder painted surfaces.ElectricalLong life LEDs coupled with high efficiency drivers, provide quality illumination.Rated to deliver L80 performance > 60,000 hours.Warranty5 year limited warranty. For complete warranty, click here:Consult installation guide for exact dimensions.Product DescriptionThe Outline TM LED luminaire provides dramatic visual impact to any modern architectural space. This specification-grade, recessed luminaire features angular accents and a single continuous lens for modern styling and high visual comfort. The Outline TM is perfect for use with indoor architectural applications where low-glare, high-quality and ease of installation are required. This IC-rated lay-in T-Bar luminaire’s low-profile design makes it ideal for shallow or obstructed plenum applications.ApplicationsOffice Areas, Retail Stores, ClassroomsDimensionsTop ViewEnd ViewApprovals• Approved to CSA/UL standards. UL listed for insulated ceilings.• Tested in accordance to IESNA LM-79.• Suitable for damp locations.Order KeyPerformance Data030L - 3000 (1000 lm/ft)045L - 4500 (1500 lm/ft)Driver OptionsLow voltage dimming (0-10v) standard B39 Emergency Lighting Battery Pack - LED*Packaging Options K0 Bulk Pack/Pallet Packed and/or Wrapped Housing Construction Options C45 Housing for tegular tilesWiring Options V09 Flexible Whip (standard 6Ft. x 3-18 ga.)V99(C01) Casambi Wireless Controller Module V99(L05) Lutron Wireless RF Sensor Controls OptionsTo view the controls guide Click Here .^ 90+ CRI reduces lumen output by 20%, not available with 5000K *All emergency models will be with remote lighting battery pack.*** When Selecting 2765KT, if a tunable white-compatible control is not selected the luminaire will come standards with two sets of 0-10V wires for dimming and color tuning (see tunable white diagram for details). For compatible control options please consult factory.Other options may be available, consult factory. Specifications and data subject to change without notice.EXAMPLE: OTLU2X2- LED840K030LUNV2765KT - 2700-6500 K(Tunable White)***Performance Scaling Factor** Ceiling tile or similar requiredLifetime ExpectancyPhotometricsWhen Selecting 2765KT, if a tunable white-compatible control is not selected the luminaire will come standard with two setsof 0-10V wires for dimming and color tuning. For compatible control options please consult factory.Dim and CCT control wire colors are subject to change without notice. All control wires are marked per the parentheses.Tunable WhiteBlack (Hot)White (Neutral)Green (Ground)Purple (Dimming +)Pink (Dimming -)Orange (CCT +)Brown (CCT -)。
吸顶灯的安装流程以及安装注意事项

电源,保留插座电源,安之前一定要用电笔试验,确保 照明电源真的没电了再行施工。2、拆开包装,取下灯罩。 我买的灯有雷士的,还有欧普的,一种是旋转卸灯罩, 一种是卡槽式的,掰开即可。3、取下灯管。4、利用底
有的家庭为了美观用油漆后的三夹板衬在吸顶灯的背后, 实际上这很危险,必须采取隔热措施;如果灯具表面高温 部位靠近可燃物时,也要采取隔热或散热措施。(5)吸顶 灯安装前还应检查:①引向每个灯具的导线线芯的截
面,铜芯软线不小于0.4mm2,铜芯不小于0.5mm2,否则 引线必须更换。②导线与灯头的连接、灯头间并联导线 的连接要牢固,电气接触应良好,以免由于接触不良, 出现导线与接线端之间产生火花,而发生危险。
(6)如果吸顶灯中使用的是螺口灯头,则其接线还要注意 以下两点:①相线应接在中心触点的端子上,零线应接 在螺纹的端子上;②灯头的绝缘外壳不应有破损和漏电, 以防更换灯泡时触电。(7)装有白炽灯泡的吸顶灯具
,灯泡不应紧贴灯罩;灯泡的功率也应按产品技术要求选 择,不可太大,以避免灯泡温度过高,玻璃罩破裂后向 下溅落伤人。(8)与吸顶灯电源进线连接的两个线头,电 气接触应良好,还要分别用黑胶布包好,并保持一定的
盘在棚顶钻眼处做好标记。5、钻眼,下膨胀胶塞。6、 将电线穿过底盘,然后用螺丝固定底盘。7、接线。8、 安上灯管,安上灯罩。9、所有的灯都安好后,通电开灯 试验。吸顶灯在安装和使用中应注意以下几点:(1)
在砖石结构中安装吸顶灯时,应采用预埋螺栓,或用膨 胀螺栓、尼龙塞或塑料塞固定;不可使用木楔。并且上述 固定件的承载能力应与吸顶灯的重量相匹配。以确保吸 顶灯固定牢固、可靠,术要求选择螺栓规格, 其钻孔直径和埋设深度要与螺栓规格相符。(3)固定灯座 螺栓的数量不应少于灯具底座上的固定孔数,且螺栓直 径应与孔径相配;底座上无固定安装孔的灯具(安装时自
Intense LED 灯具安装指南说明书
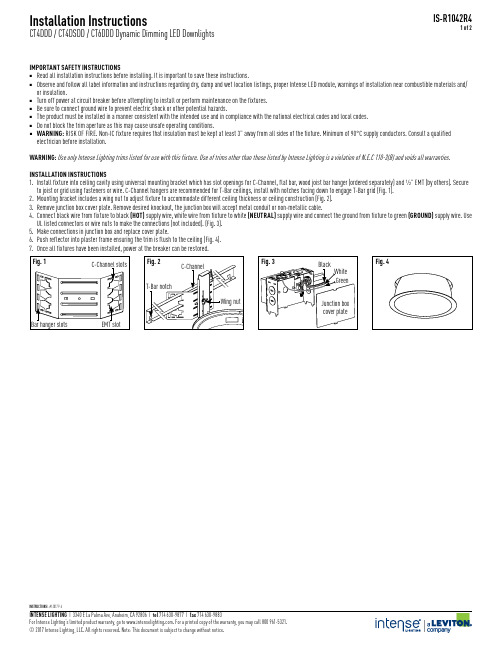
IMPORTANT SAFETY INSTRUCTIONS ■Read all installation instructions before installing. It is important to save these instructions. ■Observe and follow all label information and instructions regarding dry, damp and wet location listings, proper Intense LED module, warnings of installation near combustible materials and/or insulation. ■Turn off power at circuit breaker before attempting to install or perform maintenance on the fixtures. ■Be sure to connect ground wire to prevent electric shock or other potential hazards. ■The product must be installed in a manner consistent with the intended use and in compliance with the national electrical codes and local codes. ■Do not block the trim aperture as this may cause unsafe operating conditions. ■WARNING: RISK OF FIRE. Non-IC fixture requires that insulation must be kept at least 3” away from all sides of the fixture. Minimum of 90°C supply conductors. Consult a qualified electrician before installation.WARNING: Use only Intense Lighting trims listed for use with this fixture. Use of trims other than those listed by Intense Lighting is a violation of N.E.C 110-3(B) and voids all warranties.INSTALLATION INSTRUCTIONS 1. Install fixture into ceiling cavity using universal mounting bracket which has slot openings for C-Channel, flat bar, wood joist bar hanger (ordered separately) and 1/2” EMT (by others). Secure to joist or grid using fasteners or wire. C-Channel hangers are recommended for T-Bar ceilings, install with notches facing down to engage T-Bar grid (Fig. 1).2. Mounting bracket includes a wing nut to adjust fixture to accommodate different ceiling thickness or ceiling construction (Fig. 2).3. Remove junction box cover plate. Remove desired knockout, the junction box will accept metal conduit or non-metallic cable.4. Connect black wire from fixture to black (HOT) supply wire, white wire from fixture to white (NEUTRAL) supply wire and connect the ground from fixture to green (GROUND) supply wire. Use UL listed connectors or wire nuts to make the connections (not included). (Fig. 3).5. Make connections in junction box and replace cover plate.6. Push reflector into plaster frame ensuring the trim is flush to the ceiling (Fig. 4).7. Once all fixtures have been installed, power at the breaker can be restored.Fig. 4Installation Instructions CT4DDD / CT4DSDD / CT6DDD Dynamic Dimming LED DownlightsIS-R1042R41 of 20-10V DIMMING LUTRON ECOSYSTEM ® DIMMING COMPATIBLE CONTROL SYSTEMS Brand Model Part Number(s) ProtocolsAcuity Brands Fresco FCS 7TSN XE DBL EcoSystemCreston iLUX CLS-EXP-D I MFLV 0-10VCreston D I N D I N-4D I MFLV4 0-10VCreston Green Light GLX_DIMFLV8 0-10VCreston Green Light GLXP_DIMFLV8 0-10VEnocean LED Relay Zone Controller LEDR 0-10VETC UN I SON 0-10VETC PARAD I GM 0-10VETC MOSA I C 0-10VLeviton I llumatech I PL06-10Z 0-10VLeviton I llumatech I P710-LFZ 0-10VLeviton LevNet RF WSD01-001 0-10VLeviton Renoir II AWSMG-7DW 0-10VLutron D I VA DVSTV 0-10VLutron NOVA NTFTV 0-10VLutron NOVA NTTV 0-10VLutron HOMEWORKS QS LMJ-5T-DV-B 0-10VLutron HOMEWORKS QS QSN-4T16-S 0-10V, EcoSystemLutron POWPAK RMJ-5T-DV-B 0-10VLutron Grafik Eye 3000 GRX-TVI 0-10VLutron Grafik Eye 4000 GRX-TVI 0-10VPhillips Lightolier ZP600 0-10VVantage I NFUS I ON LVOS-0-10-PWM-D IN 0-10V 0-10V DIMMINGFor 0-10V Continuous CCT Control. Connect a 0-10V control device to the blue (+) and white(ground) wires. When the fixture is powered up, the 0-10V control will adjust the CCT over the tunablerange.A 0-10V control may also be added for dimming (as shown). Adjustments to dimming levels are apercentage of the 0-10V Dim setting (Trim). If a 0-10V control is notused for dimming, the gray (ground) and violet (+) wires must be grounded together.LUTRON ECOSYSTEM ® DIMMING■120V or 277V■Dims down to less than 1% or 5% light output■Consult dimming manufacturer for installation instructionsInstallation Instructions Dynamic Dimming LED Downlights / Wiring DiagramsIS-R1042R42 of 2。
自己组装led灯教程

自己组装led灯教程
组装LED灯教程:
步骤1:准备材料和工具
- LED灯珠
- LED灯座
- 电阻
- 电源线
- 铜线
- 麦克风线
- 锡膏
- 焊锡丝
- 镊子
- 高温胶枪
步骤2:安装LED灯珠
将LED灯珠插入LED灯座,并用镊子固定。
确保LED灯珠的正极与LED灯座的正极连接,负极与负极连接。
步骤3:安装电阻
将电阻连接到LED灯珠的正极和负极之间,确保合适的电阻数值用于限流。
步骤4:连接电源线
将电源线连接到LED灯座上的正负极。
确保连接牢固且正负极不相接触。
步骤5:焊接电路
使用锡膏和焊锡丝来焊接LED灯珠、电阻和电源线之间的连接。
确保焊接处牢固且不松动。
步骤6:使用高温胶固定电路
使用高温胶枪将高温胶涂抹在焊接处和其他松动部分,确保电路处于牢固的状态。
步骤7:测试LED灯
将电源线插入电源插座,打开电源,测试LED灯是否正常工作。
步骤8:固定LED灯
根据需要,将LED灯固定在适当的位置上,可以使用胶水或其他固定方式。
完成以上步骤后,您将成功组装了一盏LED灯。
请注意,操作时要小心,确保安全,避免触电或其他意外情况的发生。
鸟巢吸顶灯安装说明
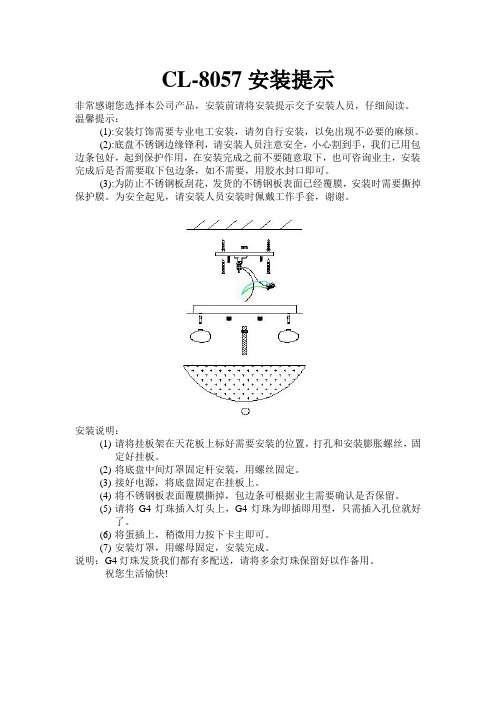
CL-8057安装提示
非常感谢您选择本公司产品,安装前请将安装提示交予安装人员,仔细阅读。
温馨提示:
(1):安装灯饰需要专业电工安装,请勿自行安装,以免出现不必要的麻烦。
(2):底盘不锈钢边缘锋利,请安装人员注意安全,小心割到手,我们已用包边条包好,起到保护作用,在安装完成之前不要随意取下,也可咨询业主,安装完成后是否需要取下包边条,如不需要,用胶水封口即可。
(3):为防止不锈钢板刮花,发货的不锈钢板表面已经覆膜,安装时需要撕掉保护膜。
为安全起见,请安装人员安装时佩戴工作手套,谢谢。
安装说明:
(1)请将挂板架在天花板上标好需要安装的位置,打孔和安装膨胀螺丝,固
定好挂板。
(2)将底盘中间灯罩固定杆安装,用螺丝固定。
(3)接好电源,将底盘固定在挂板上。
(4)将不锈钢板表面覆膜撕掉,包边条可根据业主需要确认是否保留。
(5)请将G4灯珠插入灯头上,G4灯珠为即插即用型,只需插入孔位就好
了。
(6)将蛋插上,稍微用力按下卡主即可。
(7)安装灯罩,用螺母固定,安装完成。
说明:G4灯珠发货我们都有多配送,请将多余灯珠保留好以作备用。
祝您生活愉快!。
吸顶灯的安装和使用

吸顶灯的安装和使用吸顶灯是家庭中非常常见的照明设备,安装和使用吸顶灯非常简单,下面是一个详细的指南。
第一步:选择合适的吸顶灯在安装吸顶灯之前,首先要选择一个适合的吸顶灯。
根据需要的照明强度和装饰风格选择灯具的亮度和形状。
此外,还要考虑使用的房间大小和高度,确保吸顶灯的尺寸合适。
第二步:准备工具和材料安装吸顶灯所需的工具和材料一般包括:螺丝刀、电钻、电线接头、螺丝、电线等。
在开始安装之前,请确保拥有正确的工具和材料。
第三步:关闭电源在安装吸顶灯之前,首先要关闭电源。
这是非常重要的,以确保安全。
第四步:拆卸原有灯具如果原有的吸顶灯需要更换,可以使用螺丝刀将其拆卸下来。
请注意,如果吸顶灯上还有灯泡,应先拆下灯泡,以免碎裂。
第五步:安装吸顶灯底座将吸顶灯底座安装到天花板上。
在安装过程中,可以根据需要使用螺丝钉将底座固定在适当的位置。
在安装底座之前,还要根据需要铺设电线,并将电线固定在天花板上。
第六步:连接电线将吸顶灯电线连接到房屋电源线上。
首先将电线的外皮剥开一小段,将裸露的电线末端插入电线接头中,然后拧紧接头。
确保连接稳固可靠,没有松动。
第七步:安装灯具将吸顶灯上的灯具安装到底座上。
根据吸顶灯的设计和制造方式,可能需要将灯具插入或拧入底座。
在安装灯具之前,还要根据需要放置灯泡。
第八步:置电源开关在确保吸顶灯已经安装好并且连接到电源线后,再次打开电源,然后通过房间墙上的电源开关来测试吸顶灯是否正常运作。
第九步:调整灯具角度如果需要,可以调整吸顶灯的角度,将光线照射到需要照明的地方。
大多数吸顶灯具有可调节的灯体和灯罩,通过旋转或倾斜来调整照明方向。
第十步:清洁和保养定期清洁吸顶灯,以防积尘影响光线亮度。
可以使用柔软的布或吸尘器轻轻擦拭吸顶灯外表面。
如果需要更换灯泡,也应先关闭电源,然后谨慎操作。
通过以上步骤,您就可以成功地安装和使用吸顶灯了。
在使用吸顶灯时,请注意安全,并确保遵循相关安装和使用指南。
吸顶灯可以为房间提供良好的照明效果,为您的家居环境增添舒适的氛围。
Yeelight吸顶灯说明书
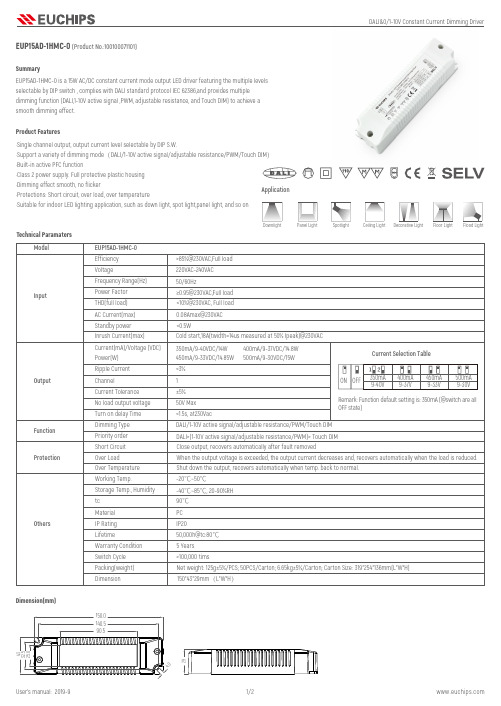
ApplicationDownlightPanel LightFlood LightSpotlightCeiling LightFloor LightDecorative LightSummaryProduct FeaturesEUP15AD-1HMC-0 (Product No.:100100071101)Technical ParamatersDimension(mm)EUP15AD-1HMC-0 is a 15W AC/DC constant current mode output LED driver featuring the multiple levels selectable by DIP switch , complies with DALI standard protocol IEC 62386,and provides multiple dimming function (DALI,1-10V active signal ,PWM, adjustable resistance, and Touch DIM) to achieve a smooth dimming effect.·Single channel output, output current level selectable by DIP S.W.·Support a variety of dimming mode (DALI/1-10V active signal/adjustable resistance/PWM/Touch DIM )·Built-in active PFC function·Class 2 power supply. Full protective plastic housing ·Dimming effect smooth, no flicker·Protections: Short circuit, over load, over temperature·Suitable for indoor LED lighting application, such as down light, spot light,panel light, and so onPush DIM(Touch DIM) DiagramPush DIM Function1. Short press the Touch DIM switch (<0.5s) to control the lamp on or off.2. Long press the Touch DIM switch (>0.5s) to dim the brightness of light. The dimming direction will change every time after pressing switch.3. Double-click the Touch DIM switch (<0.3s), then all lamps connected on the device will be set maximum brightness.4. The brightness adjustment range is 1%-100%, and the light can be turned off through short pressing when doing the adjustment with long pressing Touch DIM switch.5. With the Power off memory function, the power-down state will be recovered when power on again.DALI DiagramRemark: Only use open push button without indicator light. Maximum cable length between each Unit: 20 meters.※ The contents of this manual are updated without prior notice. If the function of the product you are using is inconsistent with the instructions, the function of the product shall prevail.Please contact us if you have any questions .DALI Dimming Curve20406080100120DALI Dimming Level O u t p u t C u r r e n t (%)Derating Curve1-10V/PWM/adjustable resistanceAmbient Temperature(℃)-20020406080100120L o a d (%)-100102030405060Cautions1.This product should be installed by qualified personnel.2.This product is non waterproof, need to avoid sun and rain.In case of outdoor use, please ensure it is mounted in a water proof enclosure.3.Good heat dissipation conditions extend product life. Please install the product in a well-ventilated environment.4.Please make sure LED power supply output voltage, current is used to meet the product requirements.5.Please ensure that adequate sized cable is used from the controller to the LED lights to carry the current. Please also ensure that the cable is secured tightly in the connector.6.Due to safety concerns, PVC or rubber cord of 0.75- 1.5mm ² is recommended for input and output terminal(s)(excluding signal terminals). Flat power cord is not suitable.Ensure all wire connections and polarities are correct before applying power to avoid any damages to the LED lights.7.In case of malfunction, do not repair it yourself.12010080604020Input signal (%)O u t p u t (%)071319263239455258657177849097·DALI Mode·1-10V/PWM/adjustable resistanceDALI Signal InputDALI MasterL NL N·Touch DIM Mode应用筒灯面板灯投光灯射灯吸顶灯落地灯装饰灯概述产品特点·单通道恒流输出,多级电流可选·支持多种调光方式(DALI/1-10V 有源信号/可调电阻/PWM/Touch DIM )·高电压输入:220VAC ~ 240VAC ·Class 2电源, 全防护塑胶外壳·内建主动式PFC 功能·短路保护,过载保护,过温保护·适用于LED 室内灯具,比如筒灯,射灯,面板灯等EUP15AD-1HMC-0 (产品代码:100100071101)EUP15AD-1HMC-0 是一款可以提供350/400/450/500mA 4档电流的LED 驱动器。
LED吸顶灯使用说明书

L E D吸顶灯使用说明书-CAL-FENGHAI.-(YICAI)-Company One1LED节能型吸顶灯使用说明书致尊敬的用户:感谢您购买产品!为了你更好的使用,安装使用前请仔细阅读本使用说明书!以便正确安装使用,同时请保管好此说明书。
安全注意事项:[ 警告 ]¤请严格按照使用说明书进行安装。
安装不当易引起坠落、触电、火灾等事故发生。
¤请勿随意改造、调换灯具部件,以免灯具破损、坠落、触电、火灾等事故发生。
[ 注意 ]¤电源电压不要超过规定范围(额定电压230±10V,频率50Hz)。
灯具长时间在非额定电压范围下工作,易引起灯具过早损坏。
¤请勿将灯具安装于倾斜场所,不稳定、不坚固的天花板。
此灯具专用于天花吸顶安装。
¤请勿将灯具安装于浴室等潮湿场所或室外使用。
¤请勿安装于高温物体上方,不可安装在火炉、煤气及排气筒等物体正上方,以免引起损坏。
¤请勿与调光器及频繁开关的电器(如声光控,感应开关等)并联使用。
本灯具为非调光型产品,请勿接调光控制器,避免出现故障。
¤为确保安全,维修、检查灯具时,请委托电器专业人员操作。
非专业人员施工容易发生危险。
¤灯具发生异常现象时,请迅速切断电源,并请专业人士检查维修。
¤灯具表面有脏物时需擦拭时,请用柔软布料沾肥皂水拧干后擦拭,再用干布擦净。
请不要用稀释剂、汽油等易腐蚀液体进行擦拭,否则会导致灯具变色或损坏。
各部件名称及安装方法:注意:安装前请务必切断电源,以防触电!1.打开包装取出灯具,逆时针旋转,取下灯罩。
2.根据底盘的安装孔位在天花等墙体安装位置打孔,装膨胀螺钉(或尼龙塞、塑料塞等),再进行底盘安装,然后用自攻螺丝锁住。
3.接好AC电源输入线,并做好绝缘防护措施。
4.安装好底盘,检查电源连接正确,底盘牢固后,将灯罩装入底盘,顺时针旋紧灯罩。
5.注意:①灯具若安装不稳,需重新寻找可以牢固安装位置,以免灯具坠落。