Little life智能鱼缸手机app使用说明书
Smart Life APP使用说明书

成型尺寸:78x135mm 印刷颜色:4色成型方式:骑马钉2. If you cannot add the device in Quick Connection, please choose “Addingdevice in AP Mode”.3. If you would like to reset the device, please press and hold the powerbutton for 3-5 seconds. Once you have reset the smart device, you will find thatthe WIFI icon on Screen will flash 3 times per second.4. If you cannot add the device after choosing 2.4G Wi-Fi network, please makesure that your Wi-Fi password is correct.5. Router’s wireless MAC filtering function is enabled. Remove the device from thefilter list and make sure that router is not prohibiting device from connection.6. If you cannot log in the app, please make sure that your password and ID arecorrect.12STEP 2How to Sign Up an AccountYou will need to sign up for an account after downloading the app. There are twoways to sign up for an account, using your cell phone number or your email address.Select the country you living in, and enter your cell phone number or emailwhichever makes you feel comfortable.Product Description2Power Plug:US StandardSocket Panel: AC Socket in accordance with US StandardPower Button: c an be used as a wifi pairing button③① Power Plug135. After successfully connecting, you can modify the Smart Device’s name.③④⑤⑥⑦⑧⑨②Temperature Senor③Current temperature④High temperatureLow Temperature⑤Power Button⑥⑦Setting ButtonIncrease Button⑧Decrease Button⑨⑩Heating output Socket11Cooling Output SocketDecrease Button: Long press 3S to turn off the buzzerSetting Button: can be switch Centigrade or Fahrenheit unitControl Function Instructions1. Turn ON / Turn OFF2. Maximum Temperature Setting1. Heating ModeWhen the measured temperature PV LV(Low Temperature Value),the controller will enter the heating state, the is on, HEATING output works.When the measured temperature PV HV- 2℃(High Temperature Value),the is off and the HEATING output turns off.2. Cooling ModeWhen the measured temperature PV HV (High Temperature Value) ,The controller will enter the cooling state, the is on, COOLING output works;When measured temperature PV ℃ (Low Temperature Setting Value),The is off and the COOLING output turns off3. Normal ModeFor example ,setting HV=26.0℃, ℃,when the PV > 26.0℃, the controller will enter the Cooling state;when the PV < 25.0℃, the cooling will stopwhen the PV < 23.0℃, the controller will enter the Heating state;when the PV >24℃, the Heating will stopPress the screen will be displayed;Press the screen & socket turn off2.1 High temperature settingLong press the setting key 3s, the decimal place will be flash,click the setting key could choose the number of digits,long press could be turn up or turn down. Press the setting key to confirm.2.2 Minimum Temperature SettingLong press the setting key 3s, the decimal place will be flash,click the setting keycould choose the number of digits,Long press could be turn up or turn down. long press the setting key 3s toexit the setupThe machine do not work while the measured temperature is between HV/LV,the icon is not displaywill be show the state.Button Operation Instructions5. Other FunctionNote: The next mode will be started in 15sWe committed to 90 days returns replacements and exchanges, and 12 monthquality warranty.If you want to extend warranty to 2 years, please join our smart family by scanningthe following QR code.Quality AssuranceFor any inquiries comments concerning to our products, please do no hesitate tosend us email, and we will respond to you as soon as possible.We appreciate your support!WTESKE customer service email:Contact usQuality Warranty20C。
小美智能喂鱼器说明书
小美智能喂鱼器说明书1. 产品介绍小美智能喂鱼器是一款便捷、智能化的设备,旨在为鱼类饲养提供方便和舒适的环境。
该喂鱼器采用先进的技术和设计,具有自动化喂食、定时喂食、远程控制等功能,可满足不同类型和数量的鱼类的喂食需求。
2. 主要特点2.1 自动化喂食小美智能喂鱼器配备了精密的计量系统和智能控制器,可以根据预设的喂食计划自动投放适量的饲料。
用户只需设置好时间和分配量,设备便可按照设定进行准确的投食。
2.2 定时喂食用户可以根据自己的需求,在小美智能喂鱼器上设置多个定时喂食计划。
例如,早上、中午和晚上各一次,或者每隔一段时间进行一次喂食等。
这样可以保证鱼类得到均衡而规律的饮食。
2.3 远程控制小美智能喂鱼器支持远程控制功能,用户可以通过手机App或者电脑端软件对设备进行控制。
无论身在何处,只需连接网络即可随时随地监控和调整喂食计划。
2.4 防潮设计为了保护饲料的新鲜度和设备的寿命,小美智能喂鱼器采用了防潮设计。
密封良好的容器可以有效地防止空气中的湿度进入,保持饲料的干燥和新鲜。
2.5 多种喂食方式小美智能喂鱼器提供多种喂食方式供用户选择。
除了传统的散装投放方式外,还可以选择颗粒状、片状或者浮游颗粒等不同形式的饲料。
这样可以满足不同类型和大小的鱼类的口味需求。
3. 使用方法3.1 安装将小美智能喂鱼器放置在合适的位置上,确保它稳固而平稳地固定在水族箱或池塘边缘上。
根据需要调整投食口的高度和角度。
3.2 设置首次使用前,用户需要连接设备并进行设置。
按照说明书上的指引,下载并安装小美智能喂鱼器的手机App或者电脑端软件。
通过这些软件,用户可以进行设备的初始化、WiFi连接、时间和喂食计划的设置等。
3.3 喂食计划设置在小美智能喂鱼器的控制界面上,用户可以根据自己的需求设置喂食计划。
选择合适的时间和分配量,并根据需要调整其他参数,如投食口开启时间、投放速度等。
3.4 远程控制用户可以通过手机App或者电脑端软件对小美智能喂鱼器进行远程控制。
鱼乐宝使用方法

鱼乐宝使用方法鱼乐宝是一款专为鱼类爱好者设计的智能鱼缸控制系统,它能够帮助您轻松管理和监控您的鱼缸,让您的宠物鱼儿生活得更加健康和快乐。
下面,我将为您介绍鱼乐宝的使用方法,让您能够更好地享受它为您带来的便利和乐趣。
首先,您需要将鱼乐宝设备连接到您的鱼缸。
在连接之前,请确保您的鱼缸已经安装了相应的传感器和控制器。
然后,按照说明书上的步骤,将鱼乐宝设备连接到您的家庭Wi-Fi网络。
连接成功后,您可以通过手机App或者电脑浏览器来管理和监控您的鱼缸。
接下来,您可以根据您的鱼缸类型和鱼儿的需要,设置相应的参数和定时任务。
通过鱼乐宝的App,您可以轻松地调节水温、光照、水质等参数,以及设置定时喂食、换水等任务。
这样,您就可以在不同的时间段内为您的鱼儿提供最适宜的生活环境和饲养管理。
除此之外,鱼乐宝还具有智能监控和报警功能。
当鱼缸内的水温、PH值、溶解氧等参数超出设定范围时,鱼乐宝会立即发出警报,并通过手机App提醒您及时处理。
这样,您可以第一时间了解鱼缸的状况,避免因为疏忽而对鱼儿造成不必要的伤害。
最后,鱼乐宝还支持远程监控和控制。
无论您身在何处,只要有网络连接,您都可以通过手机App或者电脑浏览器来远程监控和控制您的鱼缸。
这样,即使您不在家,也能够随时随地照顾您的宠物鱼儿,让它们能够得到最好的照顾和关爱。
总之,鱼乐宝是一款功能强大、操作简便的智能鱼缸控制系统,它能够帮助您轻松管理和监控您的鱼缸,让您的宠物鱼儿生活得更加健康和快乐。
希望通过本文的介绍,您能够更加了解鱼乐宝的使用方法,让您能够更好地享受它为您带来的便利和乐趣。
鱼缸智能管护系统操作说明
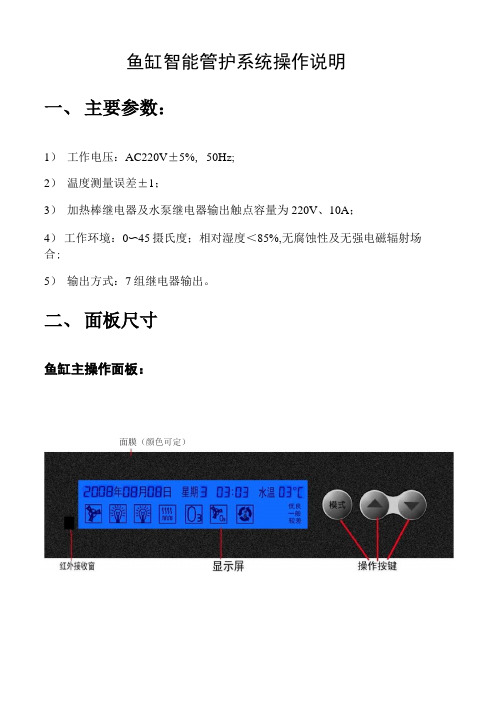
鱼缸智能管护系统操作说明一、主要参数:1)工作电压:AC220V±5%, 50Hz;2)温度测量误差±1;3)加热棒继电器及水泵继电器输出触点容量为220V、10A;4)工作环境:0〜45摄氏度;相对湿度<85%,无腐蚀性及无强电磁辐射场合;5)输出方式:7组继电器输出。
二、面板尺寸鱼缸主操作面板:面膜(颜色可定)三、操作说明面板操作说明:说明:系统加电后,各功能系统默认为自动运行状态,显示屏显示时间、日期、水温、水质及自动运行的设备。
其余图标不显示,通过遥控或面板可逐步开启各个功能系统,开启后,则相应图标加亮显示。
子系统开启和设置说明:3.1水泵,常开,自动运行时自动启动按“模式”键,到手动模式,选“水泵”图标(“水泵”图标闪动),按“▲” 键(“水泵”图标常亮),水泵启动;按“▼”键,水泵停止“水泵”图标闪动);3.2照明1,自动打开关闭,每日8点到18点为打开,其他时间关闭,时间可设定a)照明启动、停止按“模式”键,到手动模式,选“照明1”图标(“照明1”图标闪动),按“▲”键(“照明1”图标常亮),照明1启动;按“▼”键,照明 1停止(“照明1”图标闪动);按“模式”键确认转到下一个需要设置的设备。
b)照明时间设置开始时间设置:按“模式”键到设置模式,选“照明1 ”图标“照明1”图标常亮),再按“模式”键,时间显示归零,可设置照明自动运行的时间。
按“▲” 键设置开始时间(小时)数字在原基础上加1;按“▼”键设置开始时间(小时)数字在原基础上减1;按“模式”键确认转到分钟设置,按“▲” 键设置开始时间(分钟)数字在原基础上加1;按“▼”键设置开始时间(分钟)数字在原基础上减1;按“模式”键确认转到停止时间的小时设置(“照明1”图标闪动),按“▲”键设置停止时间(小时)数字在原基础上加1;按“▼”键设置停止时间(小时)数字在原基础上减1;按“模式”键确认转到分钟设置,按“▲”键设置停止时间(分钟)数字在原基础上加1;按“▼”键设置停止时间(分钟)数字在原基础上减1;按“模式”键确认(“照明1”图标常亮),在按“▲”键转到下一个需要设置的设备。
智能鱼缸过滤器产品说明书

智能鱼缸过滤器产品说明书一、产品概述智能鱼缸过滤器是一款通过先进的智能技术,实现鱼类生命环境净化和维护的高效设备。
它具备自动循环过滤、调节水温、增氧等功能,为鱼儿提供清洁健康的生存环境,为您打造一个宜人的观赏鱼缸空间。
二、产品特点1.自动循环过滤:智能鱼缸过滤器内置高效过滤系统,能够自动循环过滤鱼缸水体,保持水质清洁。
通过物理过滤、生物过滤和化学过滤等多种方式,有效去除水体中的杂质和有害物质,保持水质清澈透明。
2.调节水温功能:智能鱼缸过滤器可根据鱼类生活的温度需求,进行自动调节水温。
内置的温度控制系统能够精确感知水温,并根据设定温度进行自动加热或制冷,保持水体温度在适宜的范围内。
3.增氧功能:智能鱼缸过滤器还拥有增氧功能,通过气泵和气石的配合,将空气中的氧气注入到鱼缸水体中,提供鱼类所需的充足氧气,提高水中氧含量,改善鱼儿的生存环境。
4.智能控制:智能鱼缸过滤器配备智能控制面板,可实现各种参数的精确调节和显示,如水流速度、水温、氧气泡数等。
通过简单的操作按钮,用户可方便地自主管理并控制鱼缸环境。
5.节能环保:智能鱼缸过滤器采用先进的节能技术,具备低噪音、低功耗等特点。
在满足高效过滤的同时,更加注重对环境的保护,让您能够同时享受健康与绿色。
三、使用说明1.安装:将智能鱼缸过滤器按照说明书指导连接到鱼缸中,确保连接密封可靠。
2.开机:接通电源后,按下电源键,智能鱼缸过滤器将开始工作。
控制面板将进行自检,显示相关指示灯,操作简便。
3.调节参数:通过面板上的按钮,可对水流速度、水温、氧气泡数进行调整。
用户可根据具体需求,进行个性化设置。
4.维护清洁:定期清洗过滤器滤芯和过滤器壳体,以保持过滤器内部的清洁。
清洗时,先关机,拆卸滤芯,用清水冲洗干净后再安装回来。
过滤器壳体可使用湿布擦拭清洁。
5.注意事项:使用时,请务必遵循说明书中的指引,避免过度使用或不当使用,以免造成设备故障或鱼类伤害。
四、维修与保养1.智能鱼缸过滤器使用过程中如出现故障,请先查看说明书中故障排除部分的相关内容,尝试排除常见故障。
鱼缸的使用操作流程

鱼缸的使用操作流程准备工作1.确定鱼缸的位置:选择一个光照充足、通风良好的位置,远离直接阳光和暖气等热源。
2.清洗鱼缸:使用温水和无香料的肥皂清洗鱼缸,确保彻底清除污垢和残留物。
3.选购鱼缸设备:购买合适的过滤器、加热器、照明设备和水泵等,根据鱼类的需求来选择。
4.准备鱼缸底材和装饰物:选择合适的底材和装饰物,如沙子、石头、水草等。
设置鱼缸1.填充鱼缸:将清洗过的鱼缸放置在固定位置,填满适量的水,注意不要使用含氯的自来水,可以使用净化过的水或添加水处理剂去除氯。
2.安装过滤器:根据过滤器的说明书,安装过滤器并调整水流方向,确保水体循环和过滤效果。
3.安装加热器:根据加热器的说明书,将加热器安装在合适的位置,调整适当的水温。
4.安装照明设备:根据照明设备的说明书,安装照明设备并调整照明时间,一般鱼类需要12-14小时的光照时间。
5.添加水泵:根据水泵的说明书,将水泵安装在合适的位置,保证水体循环和氧气供应。
鱼缸调理1.循序渐进添加鱼类:在鱼缸完全搭建好后,先添加少量适应环境的硬y鱼类,它们可以帮助建立水体的菌群。
2.监测水质参数:定期使用水质测试工具测量水质参数,包括氨氮、硝酸盐和pH值等,确保水质处于适宜的范围。
3.定期更换水体:每1-2周更换约1/4-1/3的水体,去除底部的污垢和残留物,同时添加适量的水处理剂来保持水质的稳定。
4.饲养规律:根据鱼类的特点和需求,定期喂养适量的鱼食,注意避免过度喂养和残余的食物污染水质。
5.定期清洗过滤器:定期清洗过滤器中的滤材,去除污垢,确保过滤效果和水质处理能力。
6.注意观察鱼类:每天观察鱼类的行为和习性,如果出现异常,及时进行调整和处理。
鱼缸的养护1.定期合理修剪水草:适量修剪和清除过长或过密的水草,保持水草的健康生长和水流的畅通。
2.注意防止鱼病:定期检查鱼类身体和鳃的状态,如果发现鱼病的迹象,及时采取措施治疗,避免疾病的传播。
3.定期清洗鱼缸:每3-4个月进行一次彻底的鱼缸清洗,清除底部的污垢和细菌,同时检查设备的运行情况。
FeiyuTech Vlog Pocket Gimbal说明书

Foldable Smartphone Gimbal In st ructio nsEN V 1.2Catalogue1. Overview1223355672. Start to Use3. Function Operation3.1 Function / Modes Introduction 3.2 Function Button Operation 3.3 Shutter Button Operation 2.1 Fold and Unfold 2.2 Charging2.3 Smartphone Installation 1111115. Download and Connect App5.1 Download the App 5.2 Connect the App104. Gimbal Initialization12125.3 Shooting / control interface5.4 Firmware Upgrade136. Specifications3.4 Trigger Button Operation 3.5. Landscape and Portrait Shot Switching 3.6 Light Indicator8892.4 Power on / off42.5 Landscape Switching4SuggestionDownload the Feiyu ON AppVlog pocket includes below information, please read the information before using the gimbalThe tutorial videos can be watched at FeiyuTech official website or scan the QR code as below: /play/Please download Feiyu ON at your smartphone app store or can the QR code below.1. Quick start guide2. Online instruction3. TutorialiOS Version Android Version* Requires iOS 9.0 or later, Android 6.0 or later.VLOG pocket is a three-axis handheld gimbal suitable for mobile phones. It is small and foldable which can be folded into a pocket. The gimbal supports landscape and portrait shooting, which can also control phone shooting.1. OverviewX1X1Tripod1210512. Tilt axis clamp13. Pan axis clamp14. Micro-USB port 5. Tilt axis17. Status indicator11. Roll axis clamp8. Vertical arm15. Handle3. Trigger button9. Folding knob1. Function button2. Shutter button10. Smartphone holder4. Roll axis 16. 1/4 inch thread hole6. Pan axis7. Cross arm*This product does not include the smartphone!(1) Please fully charge the battery before powering on the gimbal for the first time.(2) If the power is too low, the red light will flash three times every five seconds that indicating you should charge it immediately.(3) When not in use, power off the gimbal.(4) Unlock the three axis clamp before powering on the gimbal.(5) Landscape to mount smartphone.TIPS2. Start to Use2.1. Fold and Unfold(1) Loosen the folding knob and tighten the knob after unfolding the vertical arm.(2) Unlock the three axis clamp.(1) Lock the three axis clamp.It is recommended to remove the smartphone case before installation and keep the logo of the smartphone holder upward.Keep the smartphone holder in center.Wrong operationthe Trigger buttonPlease do not rotate the gimbal from your right side to upside down position.3.1 Function / Modes Introduction3. Function OperationPanning Mode(Default mode)Lock ModeFollow ModeThe roll direction is fixed, and the smartphone moves according to the left-right movements, up-down movements of the user's hand.The roll and tilt direction are fixed, and the smartphone moves according to the left-right movements of the user's hand.The orientation of the camera is fixed.Single click thefunction buttonDefault modeClick again thefunction button Press and hold theShortcut button ResetManual LockReturn to panning mode, three axises return to default position.Slide the tilt axis to one position for shooting.Landscape and Portrait ShotAssist landscape or portrait shooting.3.2 Function Button OperationBluetooth connection3.3 Shutter Button Operation(1)Power on VLOG pocket, open smartphone bluetooth.(2)Choose below Bluetooth connection way:a. Choose VLOG pocket Bluetooth to connect like FY_PocketV_xx.b. Open Feiyu ON app, logon or register via tips to connect.(3)After Bluetooth connecting successful, the shutter button is activated.The gimbal can control the photography after only Bluetooth is connected with smartphone.The green light flashes once while other indicator status (About every 5 seconds flashes once)3.4 Trigger Button OperationTrigger ButtonDouble click the function button to switch modes between landscape and portrait.Double click 3.5 Landscape and Portrait Shot Switching3.6 Light Indicator(3) After the initialization is successful, click the function button to wake up. Note: if the initialization is not successful, click the function button to wake up. restartinitialization process.Please download Feiyu ON at your smartphone app store or can the QR code below.iOS VersionAndroid Version* Requires iOS 9.0 or later, Android 6.0 or later.5. Connect and Use Feiyu ON App5.2 Connect the App5.1 Download the AppOpen Feiyu ON app and connect the gimbal via tips.Format Bluetooth of gimbal: FY_PocketV_XXPath time-lapse Zooming Firmware upgradePhoto/Video Timer photographyOverlapping imagesLandscape and portrait switchingVideo editingBeauty Light tracking photographyFace lockingObject tracking Ultra-wide angle panorama ......Slow motion FilterUpgrade the firmware through the App.Upgrade type introductions:(1) Click the icon (2) Select upgrade type.(3) Follow the prompts to upgrade the firmware.Keyboard firmware update: Repair / update or newly add button/touch screen/interaction functions, update more compatibility cameras which can be controlled through WIFI, repair few bugs about camera control through WIFI, and etc.Bluetooth firmware update: Repair / update or 5.3 Shooting / control interface5.4 Firmware UpgradeVirtual JoystickReset TutorialUpgrade BackAlbum Switch between photo/ recordingmodeFace/objecttrackingiPhone and Android phones( The width of the phone is between 42~88mm )240gStandby Time 14 Hours AdaptersmartphonesWeight Payload272g ( Not including the smartphone )Operation Time 8 HoursMax. Tilting Range165°Max. Rolling Range 240°Max. Panning Range330°Product NameVLOG pocket Foldable Smartphone Gimbal6. SpecificationsDisclaimerThanks for using Feiyu Gimbal. The information in this document affects your safety and your legal rights and responsibilities. Read the entire document carefully to ensure proper configuration before use, Failure to read and follow instructions and warnings in this document may result in serious injury to yourself or others, or damage to your products or damage to other objects in the vicinity.By using this product, you hereby signify that you have read this disclaimer and warning carefully and that you understand and agree to abide by the terms and conditions herein. You agree that you are solely responsible for your own conduct while using this product, and for any consequences thereof. You agree to use this product only for purposes that are proper and in accordance with all applicable laws, rules, and regulations, and all terms, precautions, practices, policies and guideline FeiyuTech has made and may make available. FeiyuTech accepts no liability for damage, injury or any legal responsibility incurred directly or indirectly from the use of product.FeiyuTech will not provide any service for any product obtained from abnormal channels.NoticeStorage and Maintenance1. 2. 3. 4. Make sure motor spinning is not blocked by external force when gimbal is power on.Gimbal DO NOT contact water or other liquid if the gimbal is not mark waterproof or splash-proof. Waterproof and splash-proof product DO NOT contact sea water or other corrosive liquid.DO NOT disassembly the gimbal except marked detachable. It need send to FeiyuTech after-sales or authorized service center to fix it if you accidently disassembly and cause abnormal work. The relevant costs are borne by user.Prolonged continuous operation may cause the motor surface temperature to rise, please operate carefully.5. DO NOT drop or strike batteries. If the battery is abnormal, contact Feiyu After-sales support.1. 2. 3. 4. Keep the gimbal and battery out of the reach of children and pets.DO NOT leave the gimbal and battery near heat sources such as a furnace or heater. DO NOT leave the gimbal and battery inside of a vehicle on hot days.Please storage the battery in dry environment.DO NOT overcharge or overuse the battery, otherwise it will cause damage to the battery core 5. Never use the gimbal and battery when the temperature is too high or too low.Official Social MediaFacebook Youtube Twitter Instagram Facebook: /feiyutechYouTube Channel: /c/Feiyu-techTwitter: /feiyutechInstagram: /FeiyuTechYouTube Channel: /c/Feiyu-techOnline Store: Guilin Feiyu Technology Incorporated CompanyFor more information, please visit our official website E-mail:**********************Tel: +86 773 2320865。
智能养鱼宝说明书(V1.10)

智能养鱼宝说明书(V1.10)一、主要功能及技术指标1. 主要功能:本控制仪为制热型,一路水温,有独立的水泵、气泵、照明控制,并有自动和手动两种模式。
带红外遥控(可选配)。
2. 主要技术指标:a) 温度显示范围: -50~125°C b) 温度设定范围: 0~50°C c) 测量精度 : ±1°Cd) 电源电压 : AC 220V±10%e) 使用环境 : 温度-10℃~45℃,湿度≤85%,无凝露f) 输出触点容量: 加热装置20A/250VAC,其他2A/250VAC (均为纯阻性负载) g) 温度传感器 : NTC R25=5kΩ,B(25/50)=3470K h) 执行标准 : Q/320585 XYK 01-2007二、操作指南1. 按键功能图标按键名 功能照明 打开/关闭灯光照明 水泵 打开/关闭水泵 气泵 打开/关闭气泵 模式 灯光模式的选择 时间 设置时钟和时段 上键 菜单或参数增加 下键 菜单或参数减小设定菜单进入退出和确认2. 具体操作菜单功能:长按“设定”键三秒进入菜单;这时显示器上显示“Uxx”,其中xx 是两位数字,表示参数代码。
用上键或下键可选择参数代码,选择一个代码后按设定键则显示该代码对应的参数值,这时再用上键或“下键即可对参数值进行设置,设置完成后再按设定键,回到显示参数代码状态。
内部参数代码如下表所示:类别 代码 参数名称 设定范围 出厂设定 单位 备注U11设定温度0—5025℃温控类U16 背光颜色设定 0—3 10:无背光1:蓝背光 2:黄背光 3:黄蓝背光测试类 U18 显示控制器型号怎样选择工作模式?按“模式”键可以在自动模式和手动模式间切换。
怎样调整时间?按“时间”键,时钟的小时闪烁,按上键或下键进行调整;然后按“时间”键,分钟闪烁,按上键或下键进行调整;再按“时间”键,调整完毕。
设置自动模式工作时段参数设置U11和U16之间,设置照明时段;可根据显示屏上指示依次设置三个照明时段。
- 1、下载文档前请自行甄别文档内容的完整性,平台不提供额外的编辑、内容补充、找答案等附加服务。
- 2、"仅部分预览"的文档,不可在线预览部分如存在完整性等问题,可反馈申请退款(可完整预览的文档不适用该条件!)。
- 3、如文档侵犯您的权益,请联系客服反馈,我们会尽快为您处理(人工客服工作时间:9:00-18:30)。
LITTLE LIFE智能鱼缸系统
手机APP使用说明书
2019-11-12
常州倍速智能科技有限公司
常州市鸣新中路常州科教城中科创业中心A3-301
Little life智能鱼缸
APP
使用说明书
(常州倍速智能科技有限公司)
目录
第一章软件概述
1.1功能概述
1.2 运行开发环境
第二章手机欢迎页…………………………………………
第三章添加设备………………………………………………………
3.1 扫码添加…………………………………………………
3.2 一键配置…………………………………………………
3.3 热点配置…………………………………………………
第四章自定义环境……………………………………………………
4.2 温度设置…………………………………………………
4.3 灯光设置…………………………………………………
4.3 水泵设置…………………………………………………
第五章一键配置………………………………………………………第六章鱼说……………………………………………………………
6.1 观赏鱼类划分……………………………………………
6.2 混养推荐…………………………………………………第七章运行监测………………………………………………………第八章设置……………………………………………………………
第一章软件概况
1.1功能概述
Little life手机app主要功能是智能鱼缸联网和在线控制,通过手机配置鱼缸联网环境,并连接家庭无线wifi网络,同时通过app远程控制鱼缸环境。
APP内部收录常见鱼类生存的基本水质和温度环境,为普通爱好者提供便捷服务。
1.2运行环境和开发环境
运行环境:系统版本大于android4.0版本
开发工具:android studio 3.0.3
开发语言:JAVA、PHP
第二章手机欢迎页
(1)欢迎页延时1s进入自动添加设备页面。
图1-1 首页欢迎页面
第三章设备管理页
(1)欢迎页1秒后进入该也
(2)常用设备表示之前已配置好的设备
(3)发现设备是指当前局域网内的设备,通过扫描二维码或者手动添加连接
(4)右上角按钮可进入扫码界面,扫码设备新激活连接设备
(5)左上角【+】按钮表示两种添加方式
图3-1 我的设备页面
3.1 添加设备
(1)【一键配置】根据软件提示输入局域网账号密码,自动连接配置设备(2)【热点配置】自动获取当前的wifi信号,根据设备型号选择硬件设备,然后自动连接配置设备
图3-2 设备配置页面
3.2一键配置
(1)点击一键进入,输入本地局域网选择wifi账号输入密码,点击下一步
图2-3 设备连接wifi页面
(2)确认信息无误后,点击确认按钮,开始主动链接硬件。
图3-4 搜素连接页面
3.3 热点配置
(1)根据当前的硬件所携带的的wifi模组名称选择硬件名称,
(2)选择当前无线热点,并输入对应的密码,
(3)确认信息无误后,点击确认按钮,开始连接对应的WiFi设备。
图3-5 热点配置页面页面
第四章自定义环境
4.1 温度设置
(1)在配置首页滑动【轮播图】选择养鱼种类,然后点击【自定】按钮进去自定义页面
(2)在自定义界面可选择温度、灯光、水泵运行/间隔进入其对应设置界面
(3)点击【温度】按钮进入温度设置界面
图 4-1 进入自定义温度设置界面
(4)在【运行】界面,点击温度控制按钮也可以进入自定义温度调节界面
(5)在温度调节界面,包含加热棒的开关和高低温值控制
图 4-2 进入自定义温度设置界
4.2 灯光设置
(1)灯光设置与温度设置类似,在【自定义界面中】选择点击【灯光】栏进入灯光设置界面
图 4-3 进入自定义灯光设置界面
(2)在【运行】界面,点击灯光控住按钮也可以进入自定义温度调节界面
(3)灯光控制界面主要包含持续白光、炫彩灯光和运行时间设置
(4)持续白光默认关闭,打开后鱼缸一直处于白光照射。
(5)炫彩灯光打开,白光关闭,可根据拉动横向滑动条,选择一种常亮颜色。
(6)点击【立即生效】按钮配置的灯光效果会生成到自定义效果中。
图 4-4 进入自定义灯光设置界面
4.3 水泵设置
(1)水泵设置与温度设置类似,在【自定义界面中】选择点击【水泵运行】栏进入灯光设置界面
图 4-5 进入自定义灯光设置界面
(2)在【运行】界面,点击水泵控制按钮也可以进入自定义温度调节界面
(3)水循环有利于水质改善,增加水含氧量,同时,水泵开启时有噪音,所以可定时开关水泵,可点击设置开启时间和结束时间。
图 4-6 进入自定义灯光设置界面
第五章一键配置
(1)根据系统预置的数值和自定义的数值点击【一键配置】可将当前的配置数据发送到鱼缸,让鱼缸按当前的配置运行。
(2)系统中预置12种常见观赏鱼的鱼缸环境和一项自定义环境,滑动轮播图自由选择。
图 5-1设置界面
第六章鱼说
6.1 鱼类百科
(1)在首页点击【鱼说】进入。
图 6-1鱼类百科界面
6.2 混养推荐
(1)在混养推荐中主要介绍鱼类搭配,和配套养殖环境介绍。
图 6-2混养推荐界面
第七章运行监测
(1)当连接上鱼缸时,可在当前页面查看当前鱼缸的温度、ph值、灯光颜色、加热棒状态。
(2)点击温度数值可以进入24小时鱼缸温度变化,为鱼缸健康提供参考。
图 7-1混养推荐界面
第八章设置
(1)在设置界面,包含版本更新、意见反馈、关于我们、退出登录等模块
(2)点击首页左上角按钮滑出操作界面,点击对应栏进入对应界面。
图 7-1 APP设置界面。