激光水平仪 各种光色
激光水平仪简易操作方法

激光水平仪简易操作方法激光水平仪是一种高精度的测量仪器,用于确定水平面或垂直面的位置。
它通过发射激光束并测量返回的信号来确定平面的水平位置。
以下是激光水平仪的简易操作方法和注意事项:1. 准备工作:在操作激光水平仪之前,需要先确保仪器处于正常工作状态。
检查仪器的电池电量是否充足并正确安装,清洁仪器的光学元件,确保它们没有灰尘或污垢。
2. 选择安装方式:激光水平仪通常可以通过三种方式安装:三脚架、墙壁固定或磁吸安装。
根据实际需要选择适合的安装方式。
确保安装位置稳固,并避免因外部震动或移动而影响测量结果。
3. 打开仪器:按下仪器上的电源按钮,通常激光水平仪会有一个自动水平功能,也可以手动调整水平。
在等待仪器自动水平的过程中,避免移动或触摸仪器。
4. 测量水平位置:当仪器自动水平完成后,激光束将发射出来。
在测量水平位置时,将仪器放置在需要测量的水平面上。
激光水平仪通常有一个水平气泡,通过调整仪器的姿态,使气泡位于中央位置。
同时,使用仪器上的水平调节装置进行微调,确保仪器与水平面重合。
5. 调整垂直位置:激光水平仪也可以用于测量垂直面的位置。
在测量垂直位置时,将仪器竖直放置在需要测量的垂直面上。
同样地,通过调整仪器的姿态和使用垂直调节装置进行微调,使仪器与垂直面重合。
6. 注意事项:- 在使用激光水平仪时,需要保持仪器远离强磁场和振动源,以免影响测量精度。
- 在室外使用激光水平仪时,避免直接暴露在阳光下,因为阳光可能会干扰激光束的可见性。
- 当仪器不再使用时,应该切断电源,以延长电池的使用寿命。
- 在操作仪器时,需要小心、轻手轻脚,以免损坏仪器造成测量误差。
- 定期检查仪器的工作状态和准确性,如发现问题,及时维修或更换仪器。
总结:激光水平仪是一种高精度的测量仪器,用于确定水平面或垂直面的位置。
操作激光水平仪的步骤包括准备工作、选择安装方式、打开仪器、测量水平位置和调整垂直位置。
在操作过程中需要注意保持仪器远离强磁场和振动源,避免直接暴露在阳光下,小心轻手轻脚地操作仪器,并定期检查和维护仪器的工作状态。
ROTEC激光水平仪说明书
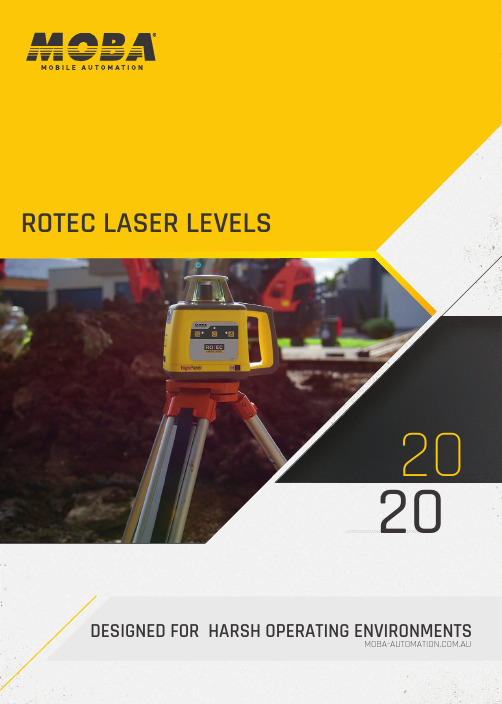
2020 DESIGNED FOR HARSH OPERATING ENVIRONMENTS.AULS.RH.HP Automatic, horizontal, self-levelling laser with manual mode, hi-alert and alkaline battery pack LS. RHVAutomatic horizontal/verticalself-levelling laser withmanual mode, dual plumbbeams, alkaline andrechargeable battery packsLS.RHVGGreen beam, automatichorizontal/verticalself-levelling laser withmanual mode, dual plumbbeams, hi-alert, alkalineand rechargeable batteryMOBA tripods are sturdy, heavy aluminumHeavy duty and reliable wall brackets madeof aluminum and easily mountable for your Wall bracketA.MCE.100MAGNETIC TINTED LASER TARGETSA.100.004 Standard ceiling targetIdeal for getting a precise line whenmeasuring and setting up for the jobACCURATEElectronic self-leveling and on-sitecalibration ensure you´re always on level.COMPACT & LIGHTWEIGHTSmall, lightweight and compact, yet packedwith loads of great features.MANUAL SLOPE FUNCTIONEasily set single or dual manual slope.RECEIVERS / REMOTESThe MOBA family of receivers and accessories offers solutions for any general construction and interior application. They are engineered to the highest quality and work seamlessly with you on the jobsite.MILLIMETRE RECEIVERUpgrade your standard MOBA hand held receiver to a heavy duty millimeter receiver for a small cost. Quote the model number of the laser, followed by upgrade when ordering your kit. Why upgrade your receiver? The unit measures the distance between the laser beam’s hitting point and the marking notch and displays the value on the LCD screen in millimetres. Thus, level differences can be easily measured. Upon powerup, the device automatically performs a self-calibration procedure. This guarantees consistent accuracy.Would you like to know how the system has already been successfully deployed by our customers? In the online expert blog, MOBA Community, you will find everything from job stories, feature releases, discussion forums to field reports to inform you in detail about our technologies.Besides blog contributions regarding automation solutions of MOBA Mobile Automation AG, the Community offers numerous forums, discussions, event announcements or expert contributions about various topics of automation of construction machines. The MOBA Community acts as an interactive, international exchange platform for everybody who would like to participate actively in the development of this industry.Contribute your own know-how and perspectives to interesting dialogues, post important questions regarding the (r)evolution of the industry and exchange opinions and experiences with other experts.THE EXPERT NETWORK -INSPIRING MOBILE AUTOMATIONACCESSORIESENGINEERED TO THE HIGHEST QUALITYDisplayed in mm5 accuracy settingsExtra long reception windowMOBA GROUPThe MOBA GROUP is a leading global player in the world of mobile automation. Close collaborations between the headquarters in Limburg an der Lahn and subsidiaries all over Europe, Asia, North and South America create new perspectives for recent and future developments.Superior technical know-how and more than 40 years of experience combined with an international dealer network guarantee a premium support – worldwide.INSPIRING MOBILE AUTOMATION - this is what the MOBA GROUP stands for since more than 40 years.MOBA USA 30269 Peachtree City / USA Phone: +1 678 8179646E-mail:****************MOBA INDIAB 210-211 Gandhinagar / India Phone: +91 989 855 6608E-mail:**************MOBA SPAIN 08211 Barcelona / Spain Phone: +34 93 715 87 93 E-mail:****************MOBA CHINA116600 Dalian / ChinaPhone: +86 411 39269388E-mail:*******************MOBA FRANCE77164 Ferrières en Brie / FrancePhone: +33 (0) 1 64 26 61 90E-mail:******************** MOBA UKS72 7PD Barnsley / UKPhone: +44 (0) 1226 444250E-mail:***************MOBA SWEDEN 861 36 Timrå / Sweden Phone: +46 (0) 73-3750097 E-mail:*****************MOBA SPAIN08700 Barcelona / SpainPhone: +34 93 804 24 85E-mail:**********************MOBA DENMARK5250 Odense / DenmarkPhone: +45 70 26 96 91E-mail:*****************MOBA BRASILBelo Horizonte - MG / BrasilPhone: +55 31 7513-4959E-mail:********************MOBA GERMANY65555 Limburg / GermanyPhone: +49 6431 9577-0E-mail:*************MOBA AUSTRALIAVictoria 3076 / AustraliaPhone: +61 3 9357 0055E-mail:**************MOBA AUSTRIA A-2544 Leobersdorf / Austria Phone: +43 664 251 0906 E-mail:***************MOBA CHILEAvda. Providencia 1476Phone: +56 (9) 61678464E-mail:***************NOVATRON FINLAND33960 Pirkkala / FinlandPhone: +358 (0) 3 357 26 00E-mail:*****************YOUR LOCAL MOBA PARTNER:MOBA ITALY37069 Villafranca di Verona / ItalyPhone: +39 045 630-0761E-mail:******************。
约翰森级别和工具自动水平旋转激光水平仪说明书
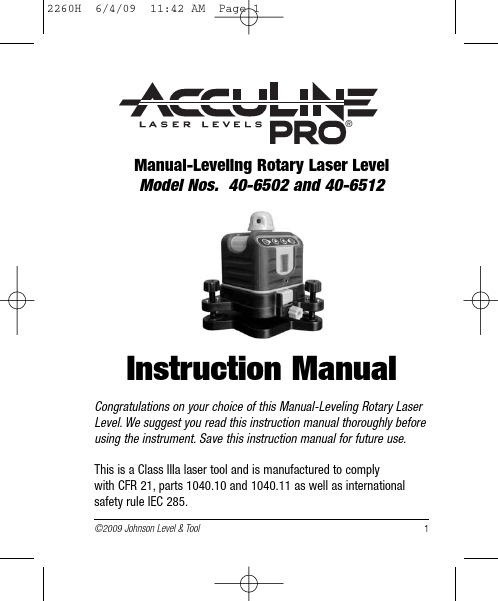
®Manual-Leveling Rotary Laser LevelModel Nos. 40-6502 and 40-6512Instruction Manual Congratulations on your choice of this Manual-Leveling Rotary Laser Level.We suggest you read this instruction manual thoroughly before using the instrument.Save this instruction manual for future use.This is a Class IIIa laser tool and is manufactured to complywith CFR 21,parts 1040.10 and 1040.11 as well as international safety rule IEC 285.©2009 Johnson Level & Tool1ATTENTION IMPORTANT •Read all instructions prior to operating this laser tool.Do not remove any labels from tool.•Do not stare directly at the laser beam.•Do not project the laser beam directly into the eyes of others.•Do not set up laser tool at eye level or operate the tool near a reflective surface as the laser beam could be projected into your eyes or into the eyes of others.•Do not place the laser tool in a manner that may cause someone to unintentionally look into the laser beam.Serious eye injury may result.•Do not operate the tool in explosive environments,i.e.in the presence of gases or flammable liquids.•Keep the laser tool out of the reach of children and other untrained persons.•Do not attempt to view the laser beam through optical tools such as telescopes as serious eye injury may result.•Always turn the laser tool off when not in use or left unattended for a period of time.•Remove the batteries when storing the tool for an extended time (more than 3 months) to avoid damage to the tool should the batteries deteriorate.•Do not attempt to repair or disassemble the laser tool.If unqualified persons attempt to repair this tool,warranty will be void.•Use only original AccuLine Pro®parts and accessories purchased from your AccuLine Pro authorized e of non-AccuLine Pro parts and accessories will void warranty.4©2009 Johnson Level & Tool4.Location/Content of Warning Labels©2009 Johnson Level & Tool5DC 6V outletY-vial leveling knobX-level VialY-level VialX-vial levelingknob5/8”©2009 Johnson Level & Tool6.Operating InstructionsIMPORTANT: It is the responsibility of the user to verify the calibration of the instrument before each use.1.Power ON/OFF2.Power LED3.Decrease rotationspeed/rotate scan clockwise4.Increase rotation speed/rotate scan counterclockwise5.Scan mode LED6.Scan mode key1.Power ON/OFF:Press this key to turn on or turn off the laser.ON rotary laser is on,power LED(2) is on (whenbattery is low the power LED will blink)OFF laser and power LED (2) is off2.Scan mode key:Press this key to change the scan sizeSmall scan Big scan DOT Fast rotation Fast Rotation:When the laser is turned on,the laser is in its fastest rotation speed (scan mode LED(5) is on),laser is rotating.Small scan:Laser is in small scan (scan mode LED(5) blinks).Big scan:Laser is in big scan (scan mode LED(5) blinks).©2009 Johnson Level & Tool7DOT:Laser stops rotating and projects a DOT(scan mode LED (5) blinks).3.UP and Down Keys:In the rotation mode:Press rotation speed increases (Note:when turning the power on, the laser is in its highest rotation speed)Press rotation speed decreasesIn the scan mode:Press scan moves in counterclockwise directionPress scan moves in clockwise direction8©2009 Johnson Level & Tool©2009 Johnson Level & Tool 9ing the ProductConnecting the Laser to its BasePosition the two slots on the laser into the base,tighten the locking knob to secure the base to the laser.The laser can now be secured to a tripod.Battery Installation1.Disconnect the laser from the base as shown in the figure on the next page (rotate the base unlock/lock knob counterclockwise to unlock the laser from the base).2.Remove battery cover (rotate the battery compartment knob coun-terclockwise to the open position).3.Put in 4 “AA”alkaline batteries following the polarity specified in the battery compartment.Base Unlock/Lock KnobHorizontalVerticalBattery compartment Base Unlock/Lock KnobX-level VialY-level Vial Z-level VialZ-viallevelingknobX-vial levelingknobY-vialleveling knobHorizontal status Vertical status(a) StructureWhen first turning the detector on,indicator turns red first and then turns green.gives two short sounds and the unit powers offautomatically,seriously low and it is necessary to replace the batteryimmediately.signal indicator flashes,and it is necessary to replace the battery.Power Key:Note:Take the batteries out when the unit is not in use for a The lower red LED is on Sound:Single short sound Laser Line Laser Line Laser Line Laser LineThe upper red LED is on The middle LED is orange The middle LED is green All LEDs are offSound:Single short sound Sound:Single short sound Sound:Solid sound Sound:No Sound The laser beam is up The laser beam is down The laser beam is close to center The laser beam is exactly to center No laser beam is detectedHorizontal Vial2.Keep the detecting window facing therotating laser.3.Keep the detector still while detecting thelaser beam4.When the laser beam is centered,mark atthe front reference marker.5.When the detector does notreceive a laser signal for 6minutes,and there are no buttonspushed during these 6 minutes,the middle signal indicator will turngreen first and then turn red.Thehorn will give two short sounds and the unit will power offautomatically.5.Accessories Usage•Connecting to the grade rod bracket14©2009 Johnson Level & ToolX+X-L(50’)Use a 2.5 Metric Hex Key to remove the X vial screw in the X level vial calibration aperture.Then using the 2.5 Metric Hex Key,adjust the vial bubble to the middle of the vial as shown below.Repeat the same procedure for the Y vial.2.5 Metric Hex KeyY Level VialY Level VialCalibrating Aperture X Level Vial Calibrating Aperture X Level Vial©2009 Johnson Level & Tool17Ceiling installation Anti-static flooring installation Window installation Baseboard installationHanging pictures Dormer installation©2009 Johnson Level & Tool19。
激光水平仪

激光水平仪可广泛用于作效率成衣激光定位、服装钉钮点光源定位、裁布机裁布辅助标线、服装折边激光标线定位、缝纫机/裁剪机/钉钮机/自动手动断布机辅助标线定位各种。
可用于钉扣机、铆钉机、开袋机、裁床、套结机、拉布机等等。
木材加工、铁材加工、轮胎成型加工、橡胶加工、高尔夫球具加工、组杆、布料加工、焊接加工、PCB加工…方便快捷、直观实用。
能较大幅度的提高工作效率。
而且,激光水平仪在工业和工艺待业的校正与定位中,取代了标尺、三角板、挡块等设备。
并且能够帮助您在无法采用机械导向或在需要双手同时工作的地方工作。
可以调节颜色和亮度,使之适合于材料表面和您所在位置的环境光线。
该公司开发生产的半导体激光光源,具有体积小,寿命长,稳定性好,使用安全方便,可用于各大专院校、实验室及科研院所。
波长:532nm 635nm 650nm(可定制)管芯功率:0~200mw(按要求定制)工作电流:0~2000mA(可定制)工作电压:5V 12V 24V 36V外形尺寸:Φ16×55mm Φ16×80mm Φ22×85mm Φ26×110mm(可选择)光束发散度:0.3~1.5mrad出光张角:10 º~135º光线直径:≤0.5mm @0.5m;≤1.0mm @3.0m;≤1.5mm @6.0m;直线度:≤1.0mm @3.0m光学透镜:光学镀膜玻璃或塑胶透镜工作温度:-10~75℃储存温度:-40~85℃工作介质:半导体等级:Ⅲb可选配:专用支架、电源温馨提示:专用电源:具有很强的抗干扰性、高稳定性、抑制浪涌电流及缓启动等特点,特别适于恶劣的工作环境,能有效保证镭射激光产品的稳定性和使用寿命。
专用支架:具有良好的导热性和灵活性,使镭射激光产品可安装在任何垂直或水平面,并使之在三维空间任意微调,以达到最佳使用效果。
激光水平仪使用方法图解

激光水平仪使用方法图解内容来源网络,由“水平仪厂家独家”收集整理!更多产品展示效果,就在足足足水平仪。
一、激光水平仪的详细操作步骤随着科学技术的进步,越来越多的仪器设备能够帮助我们更好的工作,像一些检测、测量就可以使用到激光到水平仪。
若与光电接收靶的水准尺配合,即可进行水准测量。
它与光学水准仪相比,具有精度高、视线长和能进行读数和记录等等,它有以下这几个特点。
激光水平仪是一种智能化显示装置仪器。
激光水平仪的作用是可安装于墙体或平面之上,采集地平仪信号,在较大的视场显示地平线,实时显示出物体是否处于平衡状态。
激光水平仪为室内施工放样和校准提供了精确的的水平、垂直基础和铅垂基准,他操作方便,用途广泛。
主要用于:手工艺还有建筑、室内外装修、吊顶、贴砖砌墙等领域。
二、那么应该如何使用激光水平仪呢?1 、打开激光投线仪工具箱,取出激光水平仪主机(图一)以及4000mAh-6000mAh的大容量电池 (图二) 。
取出主机是一定要轻拿轻放,防止破坏激光投线仪的精密度。
(图一)(图二)2 、一般不用的水平仪会被取出电池,所以重新安装电池,然后自然轻松的放入卡槽(图三) 。
(图三)3 、把投线仪放到我们想放的位置,准备进行激光投线,此时若发现水平仪激光线闪烁并伴有蜂鸣声说明仪器已超出安平范围,应该调整仪器将其放平。
(图四)4、水平仪偏离测量物体,此时不宜直接使用激光投线仪,我们立刻调节投线仪下方三个升降台或三脚架上的螺母进行三维水平调节,如下(图五)方法就是对螺母进行旋转。
5、经过对三个支撑脚上的螺母进行顺时针或者逆时针一番调整后,投线仪上方的水平仪完全水平或垂直。
6、此时代表:此时此刻在投线仪的固定点,投线仪可以开机工作了。
如下图 1 所示,一般情况下,旋钮开关指向OFF状态,此时表示是关机关电源状态。
为了使用,需要把旋钮顺时针旋转指向ON 状态视线回归到控制面板上,找V 按钮 (vertical)(手指方向 ),并用手指轻轻按一下该案出,此时显示一条竖直的激光线同样的方法:视线回归到控制面板上,找到H按钮 (Horizontal)(手指方向 ),并用手指轻轻按一下该案出,此时显示一条水平的激光线(图 2) 。
「一看就会」激光水平仪的正确使用方法

「⼀看就会」激光⽔平仪的正确使⽤⽅法⽔平仪是⼀种常见的校准⼯具,⽤于测量相对于⽔平位置的倾斜⾓、机床类设备导轨的平⾯度和直线度、设备安装的⽔平位置和垂直位置等,下⾯我们来看看⽔平仪的正确使⽤⽅法!戴安全帽的装修⼯⼈⽤红外线⽔平仪测量调整仪器1、将仪器放置在基准平⾯或脚架上。
2、开机后激光闪烁报警则调整仪器放置位置或微调脚架使仪器安放⾯趋于⽔平。
3、通过摇动⼿柄或升降脚架来调整仪器架设⾼度。
4、如果激光线较暗或明亮不⼀,检查光线出⼝,如有污垢,请⽤棉花棒浸上酒精以后擦拭⼲净。
激光投线仪操作⽅法1、把开关旋转到ON位置,即解除锁紧状况,开启电源,此时⽔平激光线与垂直激光线将点亮并且投影在⽬标上。
2、在⽔平⽅向旋转仪器,使垂直激光线落在所需要的位置。
3、操作完毕后需要关闭电源,将旋钮开关旋到OFF位置,否则会影响到精度。
注意:当仪器需要长距离运输或者移动仪器放⼊包装箱内时应将开关旋钮旋到OFF。
维修与保养 1、该仪器请⼩⼼使⽤,并妥善保管避免强烈震动或跌落⽽损坏仪器; 2、移动或运输仪器前,请将开关旋钮置于锁紧状态,避免影响精度; 3、不要尝试打开仪器,不专业的拆动将会损坏仪器; 4、仪器在使⽤及存储过程中不可浸⽔或长时间放置在⾬中及潮湿地区; 5、保持激光输出窗清洁,定期⽤洁净的软布或沾过酒精的棉签轻擦⼲净; 6、长期不⽤应取出电池,不⽤时应将仪器放在仪器箱或软包内,并置于通风⼲燥的房间内。
使⽤安全1、不要直视激光光束;2、激光标记输出位于输出孔处;3、不要拆开仪器进⾏内部维修,只能通过授权维修中⼼才能进⾏维修;4、仪器⼀般符合激光辐射安全等级标准。
激光投线仪。
激光水平仪校准精度的方法

激光水平仪校准精度的方法宝子们,今天咱们来唠唠激光水平仪校准精度这事儿呀。
咱先得知道,要是激光水平仪精度不准了,那可太影响使用啦。
比如说你想靠着它把画挂得整整齐齐的,结果因为精度差,画挂得歪歪扭扭,那多闹心呀。
那咋校准呢?有一种简单的办法呢,就是找一个相对平整的墙面。
这个墙面得是那种比较大,而且咱们肉眼看起来就比较平的哦。
然后把激光水平仪放在一个比较稳固的地方,让它朝着墙面发射激光线。
这时候呢,你可以用一把长尺子,最好是那种精度比较高的钢尺哦。
把尺子垂直地靠在墙面上,然后看看激光线和尺子边缘是不是平行的。
要是不平行,那就说明水平仪可能有偏差啦。
如果发现有偏差呢,水平仪一般都有调节的小旋钮或者螺丝啥的。
这个时候呀,你就可以小心翼翼地拧动这些调节的地方。
一边拧呢,一边观察激光线和尺子的平行情况。
就像给一个调皮的小娃娃调整姿势一样,要慢慢来,要有耐心哦。
还有一个办法呢,就是利用一些已知水平或者垂直的物体。
比如说家里的窗框呀,窗框一般都是安装得比较垂直的。
把激光水平仪对着窗框发射激光线,看看激光线是不是和窗框完全重合。
要是不重合,那也是水平仪精度有问题啦。
同样的,通过调节水平仪的调节装置来校准。
在整个校准的过程中呀,宝子们可千万要细心呢。
就像对待自己心爱的小宠物一样,要温柔又谨慎。
而且呀,校准完了之后,最好再检查个一两次,确保这个精度是真的校准好啦。
这样咱们以后用激光水平仪的时候,就可以放心大胆地让它帮我们干活儿啦,不管是装修还是搞一些小的家居布置,都能准确无误,就像有个超级靠谱的小助手在身边呢。
激光水平仪器操作方法

激光水平仪器操作方法
激光水平仪是一种测量工具,用于确定水平平面的位置。
以下是激光水平仪的操作方法:
1. 准备工作:将激光水平仪放置在平稳的表面上,并将其开关打开。
2. 校准仪器:在使用激光水平仪之前,必须先进行校准。
有些激光水平仪具有自动校准功能,只需要将其放置在水平平面上,然后等待几秒钟,仪器将自动校准。
如果仪器没有自动校准功能,需要使用一些调节螺丝来将水平仪调整到水平位置。
3. 确定工作区域:确定需要测量的工作区域,并将激光水平仪放置在适当的位置上,确保其激光线能够覆盖整个工作区域。
4. 开始测量:打开激光水平仪的激光发射功能,通常是按下一个按钮或旋转一个旋钮。
激光水平仪将发射一条水平的激光线。
在仪器上,通常有一条准线或标尺,你可以用它来测量某些点与激光线的垂直距离。
5. 进行调整:如果测量出的点与激光线的垂直距离不为零,需要进行调整。
如果激光水平仪有调整螺丝,可以使用它们来微调仪器位置,直到测量出的点与激光线的垂直距离为零。
6. 完成测量:当测量完成后,关闭激光水平仪的激光发射功能,并将仪器关机。
需要注意的是,在操作激光水平仪时,要避免直接注视激光光束,以免对眼睛造成损伤。
另外,在使用激光水平仪之前,最好熟悉仪器的使用说明,并按照说明进行操作。
- 1、下载文档前请自行甄别文档内容的完整性,平台不提供额外的编辑、内容补充、找答案等附加服务。
- 2、"仅部分预览"的文档,不可在线预览部分如存在完整性等问题,可反馈申请退款(可完整预览的文档不适用该条件!)。
- 3、如文档侵犯您的权益,请联系客服反馈,我们会尽快为您处理(人工客服工作时间:9:00-18:30)。
激光水平仪各种光色
光线清晰,出光张角大,直线度高。
我们可以制作固定焦点同时可以制作可调粗细的红光线状激光器,客户可以根据各种要求调整焦点。
应用领域本产品安装使用简单方便,通电即可使用,可广泛应用于轮胎成型机、纸张裁切机、金属锯床、pcb电路板切割机等工业机械的辅助定位,能较大幅度的提高工作效率。
一字线激光器线条清晰,小巧,易于安装,可为各种工业设备生产厂家提供配套产品和技术支持。
参数光斑形状:一字线型波长:532nm635nm650nm(可定制)管芯功率:0~200mw(按要求定制)工作电流:0~2000mA(可定制)工作电压:5V12V24V36V外形尺寸:Φ1655mm Φ1680mm Φ2285mm Φ26110mm(可选择)光束发散度:0、3~1、5mrad出光张角:10 ~135光线直径:
≤0、5mm@0、5m;≤1、0mm@3、0m;≤1、5mm@6、0m;直线度:≤1、0mm@3、0m光学透镜:光学镀膜玻璃或塑胶透镜工作温度:-10~75℃ 储存温度:-40~85℃工作介质:半导体等级:Ⅲb可选配:专用支架、电源温馨提示:专用电源:具有很强的抗干扰性、高稳定性、抑制浪涌电流及缓启动等特点,特别适于恶劣的工作环境,能有效保证镭射激光产品的稳定性和使用寿命。
专用支架:具有良好的导热性和灵活性,使镭射激光产品可安装在任何垂直或水平面,并使之在三维空间任意微调,以达到最佳使用效果。
售后服务对本公司售出的产品一律保证一年保修,三
年维修的原则,在保修期内出现的任何质量问题将给予认真负责的处理。
欢迎用户提供宝贵的改进意见。
y xl。