梦之旅3攻略大全
X3重聚攻略
任务1 Accompany Gamma squadBan Danna是父亲的老朋友,在舰队工作,现在请娃帮忙去带领一伙新兵巡逻。
理由是舰队只剩30%的兵力了,练兵是最重要的任务,而且不许损失人手,如果不带队,就上船去看看父亲。
算鸟,娃还是巡逻容易些。
穿过眼前的传送门,娃来到Home of Light星区。
前面缓缓飞着gamma小队,在屏幕上有白框显示。
他们的队长gamma leader跟娃联络,一口一个长官,娃只好说娃不是长官,也没在军队服役。
简单相互介绍之后,大伙便一起开始巡逻。
(飞行时按j就是seta模式,加快时间的,默认是6倍速,可以在option里面调到10倍)途中杀出几只Kha’ak的飞船(红色目标,按End键可以锁定和切换目标,8过娃调到了鼠标滚轮上,打起来更方便些),干掉他们,继续巡逻,来到通往Red light的跳跃门。
大家穿过这道门继续巡逻,沿途平安无事,新兵不再紧张,七嘴八舌地议论开到底是大型航母还是中型航母最适合对抗Kha’ak纸老虎,但紧接着就在小行星带遭遇Kha’ak飞船的伏击。
好容易扭转了局势,但巡逻队的5号船也完蛋了。
最后按照自动路径指引来到通向Cloudbase Southwest的跳跃门。
穿过去后,和Gamma道别,任务完成。
任务2 *Turret missions*正在茫然之间,一个名叫Noah Gaffelt的和尚出现在屏幕上。
他要娃到Goner Temple停一下。
这地方就在不远处(靠港很容易嘛,自动完成)。
上岸后,在通讯处(comms)联系上Noah。
原来他叫娃保护一艘货船船,押运的Saya只说是石头,但一个和尚说漏了嘴,是白色水晶,远古族的遗物(大家看过Star Gate靡?里面的设定是人类只是地球上第二次进化的结果,上次进化的高智能种族(基因基本与人类相同)自称Ancient,e文里就是远古族。
这个种族制造了星际之门)。
娃一出港,就被自动传送到那艘飞船的尾炮炮塔上(这是啥科技,好像Star Track里面的那种,Star Gate里面仙女座人也有)。
牧场物语3攻略

牧场物语3攻略主角男特徵:1对农事很在行2体力充沛不易累3对动物的照顾只会餵饲料初期装备:·镰刀LV1 神奇手套·锄头LV1 大头菜种子·铁鎚LV1 甘藷种子·斧头LV1 芦笋种子·洒水壶LV1最初体力值150P 最大体力值250P 最初金钱1000元女特徵:1对动物可以有最充分的照顾2体力较少3农耕道具等级不会上升初期道具:·镰刀刷子·锄头挤牛奶器·斧头饲料一组(32份)·洒水器大牛(母)·铁鎚最初体力100P 最大体力200P最初金钱2000元宠物共有4种8类型狗猪会驱赶野狗所以可以安心的放牧鹰猫会以10/1的机率捡花种子回来而猫会有另一失踪事件会拣回来的种子·春之月1~10芦笋11~20雪割草21~30樱草·夏之月1~10西瓜11~20流星花21~30彗星草·秋之月1~10甘薯11~20满月草21~30哈鲁奇草·冬之月1~10小麦11~20稻米21~30牧草六个数值主角的体力60点擦汗40喘气20坐在地上0倒在地上重点1使用道具收成货物时减少2体力值变成零时无法工作3吃饭泡温泉可恢复体力4用力量树果实会恢复10点的体力和上升最大值10点5用动作来判断体力剩馀多少从事活动恢复量泡温泉50吃早午晚餐20咖啡50红茶50定食全部恢复点心20力量树的果实10/最大体力值加10力量树果实入手法1耕地16,63,127,159,207,225次时出现2海的洞窟里的人鱼给的3钓到所有鱼的种类4滑雪一回合连续滑倒20次5山上锺乳洞里小矮人给的主角的疲劳度1天气不好时在外工作就会增加2男生每使用一种工具就会增加1p的疲劳度3女生每次使用就会增加1p的疲劳度4疲劳度太高就会生病5泡温泉可以减少疲劳度主角的名声1接受牧场组织的委托的到好成绩就会提高知名度2在本土的早市卖东西3名声可由牧场组织得为托任务内容得知夥伴的爱情度1结婚事件跟爱情度有关2根据爱度会出现夥伴的质问事件3用收获物当礼物可增加爱情度ㄡ夥伴的信赖度1信赖度高工作完成度就会提高2用收获物当礼物信赖度就会增加3动物死掉就降低信赖度4信赖度增加就会发生事件收获物*猫或老鹰拣回来,通信交换随机获的春天出荷价格男女(信赖度) 天数(施肥後)马铃薯50 +1 +1 7 4大头菜40 +1 +1 5 3芦笋60 +1 +1 9 5满天星50 +1 +2 6 5樱草150* +1 +2 9 7雪割草150* +1 +2 9 7夏天玉蜀黍70 +1 +1 12 9西瓜90 +1 +1 12 9蕃茄50 +1 +1 10 7月光草50 +1 +2 5 4流星花200* +1 +2 6 5彗星草300* +1 +2 7 6秋天落花生50 +1 +1 7 4甘藷60 +1 +1 9 5茄子40 +1 +1 5 3满月草300* +1 +2 7 6哈鲁玛奇草300* +1 +2 11 8*以下两种作物第2年才会卖小麦100 +2 +2 一定要春天播种夏天才能收获60天稻米150 +2 +2 同上&~鸡只资料一览表~购入条件:所需放牧地25格以上所需牧草25个以上药物价格:鸡药( 800G )爱情度资料:行为爱情度影响餵饲+1放牧+1忘记餵饲-1在六点後放牧-1在雨天放牧-2放牧後忘记收回-2生病-5鸡只价格:买入1000G卖出500G (爱情度1-29)750G (爱情度30-69)1000G (爱情度70以上)10000G (爱情度MAX 的金鸡)出产物:名称出售价格取得方法鸡蛋50G 爱情度於1 –29金蛋200G 爱情度达到满点时沙拉300G 购买沙拉制造机或沙拉之书--------------------------------------------------------------------------------~羊只资料一览表~购入条件:所需放牧地50格以上所需牧草50个以上药物价格:羊药( 1500G )爱情度资料:行为爱情度影响餵饲+1放牧+1用毛刷刷身+1忘记餵饲-1在六点後放牧-1在雨天放牧-2放牧後忘记收回-2生病-5羊只价格:买入3000G卖出2500G (爱情度1-29)3000G (爱情度30-69)5000G (爱情度70以上)出产物:名称出售价格取得方法S羊毛150G 爱情度於1 –29M羊毛200G 爱情度於30 - 69L羊毛250G 爱情度於70以上编织物300G 购买编织物制造机或编织之书--------------------------------------------------------------------------------~牛只资料一览表~购入条件:所需放牧地50格以上所需牧草50个以上药物价格:牛药( 1000G )爱情度资料:行为爱情度影响餵饲+1放牧+1用毛刷刷身+1忘记餵饲-1在六点後放牧-1在雨天放牧-2放牧後忘记收回-2生病-5牛只价格:买入5000G卖出2500G (爱情度1-29)3000G (爱情度30-69)5000G (爱情度70以上)品评会:排名所需爱情度知名度的影响第1名90 以上+20第2名80 –89 +10第3名70 –79 +7第4名60 –69 +5第5名50 –59 +3不入围40 –49 X不入围30 –39 -1不入围20 –29 -3不入围10 –19 -5不入围01 –09 -10出产物:名称出售价格取得方法S牛奶150G 爱情度於1 –29M牛奶200G 爱情度於30 - 69L牛奶250G 爱情度於70以上牛油300G 购买牛油制造机或牛油之书芝士300G 购买芝士制造机或芝士之书--------------------------------------------------------------------------------~马匹资料一览表~购入条件:所需放牧地50格以上所需牧草50个以上药物价格:马药( 2000G )爱情度资料:行为爱情度影响餵饲+1放牧+1用毛刷刷身+1忘记餵饲-1在六点後放牧-1在雨天放牧-2放牧後忘记收回-2生病-5马匹价格:买入4000G卖出2500G (爱情度1-29)3000G (爱情度30-69)5000G (爱情度70以上)竞赛:排名所需爱情度知名度的影响第1名90 以上+20第2名80 –89 +10第3名70 –79 +7第4名60 –69 +5第5名50 –59 +3不入围40 –49 X不入围30 –39 -1不入围20 –29 -3不入围10 –19 -5不入围01 –09 -10『牧场物语3』问题集大床(婴儿床)的下面有一个(看起来也像床?)1000G的东西,那是什么?怎么装?A:那1000G的东西应该是用来坐马的。
明星志愿3 ~全攻略
1 游戏一开始与助理的对话后,突然电话门铃同时响起。
选“躲到桌子下”2 躲在桌子底下后,会看到依莉的履历,直接选立刻签约。
秘书莉铃会说依莉有种好熟悉的感觉。
选“对她有种似曾相识的感觉”3 一开始排程就排模特儿工作五天,并跟随依莉五天,第一天之后,依莉会来问你是否有心事,然后有个选项会问你明天要不要取消原定的跟随行程去看老爹?选“算了” (如果你选“好,去看老爹”的话,那一开始依莉做模特儿工作的天数及跟随就得排满六天,因为你去看老爹扣掉了一天,不然是无法触发接下来的剧情的)4 随后依莉会跑来问你(只要有跟满她五天),在她进公司之前是不是有发生什么重大变故?否则为什么行程不是训练却只有打工,而主角也跟着她打工了五天。
选“我担心你的工作出状况”5 之后如果好感度够的话,工作跟随她之后,依莉会问你,假如你喜欢上一个身体很不好的女孩子,你会怎么做?选“我希望他健康的活下去”6 接拍电视剧,第一次让他疲劳压力满点,会出现她在片场累倒的新闻。
隔周不要休息再让她满点累垮一次,就会出现她泪洒片场的新闻了。
然后当周安排行程的时候,与依莉沟通会有为什么泪洒片场的黄色重要对话。
选“是不是我给你的压力太大了”7 之后继续把电视剧拍到快杀青的时候,陈革非就会来找你。
(依莉当时是在SOSA电视的电视剧里以女配角参与演出)8 戏剧部经理陈革非会主动来公司问你能不能修改剧本,让依莉能依照她实际的身体状况演出心脏病突发身亡的戏码提早退出剧组,答应后剩余拍片时间会剩下一天。
选“接受安排”9 如果你答应修改剧本的话,随即会触发与依莉沟通有黄色“超重要”对话,不要忘了跟依莉对话,不然就算你到了片场也不会触发与依莉之间的剧情,但依莉仍然会照着修改的剧本演完。
此外,请“手动”到拍片现场触发剧情。
10 来到拍片现场,与依莉对话后依莉会自责是她自己不能达到导演的要求,才让她扮演的角色需要提早退场。
选“抱歉没办法替你争取更多的权益”11 拍完之后陈革非会来感谢你,隔天也会有导演称赞依莉完美诠释心脏病患的新闻。
《梦之旅2》正式版具体攻略

《梦之旅2》正式版详细攻略第一关,捡锤子敲破玻璃拿书,点墙上的图案,出去第二关,找对应的动物拼到树上,得到树皮,把树皮补好,门开。
动物所在地方不是固定的,我两次打这关松鼠的位置就不一样。
这关有宝石架子拿。
第三关,左右两个门石块的图案被打乱,取下来重新拼,然后水塘里出现多个石头,选择正确的路线就可以到中间那个门,错了可以重选。
中间门的图案随便点点就可以拼对,汗第4-8关先在地上找到4个圆石,放入三个门前对应的底座中,门旁就出现放置木板的凹槽地上还可捡到一个金属模块,几块木板,把带图案的木板嵌入左边门旁的凹槽中,打开左门。
进去捡起装置装好机器,将金属模板放在上槽,空白木板放在下槽,制作右门的钥匙。
回到中庭,在右门旁的凹槽放入做好的木板,打开右门。
进去可以捡到几个金属白板和6把锤子。
捡起装置装好机器,有一个长支架在右下角草丛里,不是很好找,其他都很简单。
放入金属白板,将金属白板刻出花纹,回到中庭,用锤子敲开长木板,得到12个木块,再去左室,继续制作中间门的钥匙。
用做好的木板钥匙嵌入中间门旁凹槽,打开中间门。
进去后捡到几块长木板和一个金属白板,再回右室和左室制作钥匙,把做好的4块木板嵌入凹槽,对面瀑布关掉。
然后铺上长木板补上桥,来到对面。
出现的门上丢失了4块钥匙,回到桥对面,中庭,右室,左室,可以捡回4把钥匙。
将钥匙按进门里,转到合适的方向,打开门,进入迷宫。
第九关,迷宫,先捡到三张纸,拼成迷宫路线图,然后按图走就很简单。
先捡一个粗钥匙,打开通道的门,走到最里面捡锤子,然后回来砸破桶,就可以拿到4把最后的门钥匙,地上还捡到一个,一共5个钥匙,嵌到最后那扇门里,转到合适位置,打开门,进入第10关第10-11关左下角找到一根翘棒,撬开下面的铁板,按相同颜色依次按下花朵形状按钮(类似简单的考记忆的配对图形游戏),关掉洒水器。
挡住门的植物会枯萎掉,露出门。
进入左边的屋子,在右下方捡到一个托盘,装在右边吊绳上,出门在中庭右下角捡块石头放入托盘,水力发电机开始运行。
梦之旅4(Dream Chronicles4:The Book of Air)图文攻略(含附加任务)
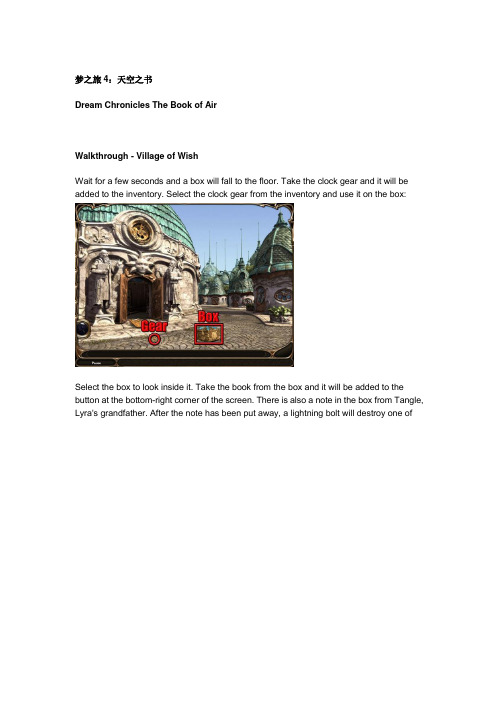
梦之旅4:天空之书Dream Chronicles The Book of AirWalkthrough - Village of WishWait for a few seconds and a box will fall to the floor. Take the clock gear and it will be added to the inventory. Select the clock gear from the inventory and use it on the box:Select the box to look inside it. Take the book from the box and it will be added to the button at the bottom-right corner of the screen. There is also a note in the box from Tangle, Lyra's grandfather. After the note has been put away, a lightning bolt will destroy one ofthe guardian statues outside the school. Find the nine pieces of the statue:Put the pieces on the incomplete statue in the following order: Foot, three stone pieces, right side arm, book, left side arm, hand, head. Enter the school and click anywhere in the classroom. Find the eleven dream pieces:Examine the chalkboard at the back of the classroom. Find the two dream pieces:Examine the paper on the chalkboard to read another note from Tangle. Pull the handle in the middle of the chalkboard to reveal a strange message. Select the decipher spell at the left side of the screen:The message is translated and Lyra knows that she needs to find the map from the cabinet. Back away from the chalkboard. Three books can be found in the classroom.Select the three books to open them:Examine the left book and find the four dream pieces. Cast the decipher spell to understand the writing in the book. Select the symbols from the left page of the book to change the symbols on the right page. Put the correct symbols in the spaces on the grid to make all of the boxes green.Casual mode: Left book:Casual mode: Right book:Challenge mode: Middle book:Examine the cabinet at the left side of the room. Select the paper: Tangle mentions that Lyra's father may have hidden the combination to the cabinet in the classroom. Find the four jewel pieces:Select the dials at the top of the cabinet to change them to the ones shown in the books. The symbols are random with each new game. After the correct symbols have been entered, the map pieces will fly out of the cabinet and land in the classroom. Back awayfrom the cabinet and find the six map pieces:Examine the cabinet and use the map pieces on the light area. Select the pieces and place them in the correct positions in the cabinet:On challenge mode, there are twice as many puzzle pieces to use but the picture ends up looking the same. Examine the chalkboard and select the note from Tangle. Cast the decipher spell to translate the symbols on the chalkboard. Click the letters to spell out the names of the shapes shown on the left side of the chalkboard. The locations of the words are random with each new game.AirshipFind the eight dream pieces, the large key and the colored stones:Use the large key on the closed door at the right side of the airship. Enter the airship and select the note on the floor. Find the six dream pieces:Use the map on the desk at the right side of the room. Examine the map and then cast the reveal spell to see the Crater of Time. Back away from the map and examine the control wheel near the large middle window. Set the course and heading bar to the settings for the Crater of Time that were shown on the map. The course and heading are random each time a new game is played. A noise will be heard after the course and heading have been set correctly. Back away from the control wheel and examine the device at the right side of the room. Use the colored stones on the hole at the bottom-right corner of the device panel. Select Tangle's note at the bottom-left corner of the device to read about the fuel generator. Find the six dream pieces:Aim to click stones when they are within groups of the same color. The larger the group of stones, the more fuel will be generated. The puzzle will be completed when the needle on the fuel gauge reaches its maximum level. Exit the airship and find the seven parts:Use all of the parts on the airship, placing the balloon last. Enter the airship. Select the lever to take off for the Crater of Time:Crater of TimeSelect Tangle's note. Find the eight dream pieces:Examine the clock and find the five dream pieces:Press the small button on the clock and then press the small button again when the hour hand reaches VI. Go upstairs to arrive outside the wooden house. Take the note from Tangle and find the seven dream pieces:Examine the door at the left side of the area to see a mechanism. Exit the view of the mechanism and take the two small gears:Examine the left door again to see the mechanism. Select the note from Tangle and the three dream pieces. Switch the tiles and the gears so that all of the gears rotate.Casual mode:Challenge mode:Take Tangle's note, the metal bell and the pipe. Find the twelve dream pieces. Use the metal bell on the incomplete bell and the pipe on the incomplete pipe:Examine the book on the counter. Cast the reveal spell to display the writing on the right page. Drag letters from the left page to the spaces on the right page to complete thewords. Find the six dream pieces:Back away from the book and examine the mechanism on the wall. Select the note from Tangle. Use the metal tile on the mechanism. Rotate the tiles so that they are in the same positions as the circles on the diagram shown in the book. Find the five dream pieces:Back away from the book and select the bell on the counter to lower the pipes. Examine the pipes to speak to the clockmaker. Select the following answers to the clockmaker's questions:∙“I'm trying to find my way home. I don't belong here.”∙“Yes. I need to get back to my own dimension.”∙“Where are they?”∙“That sounds difficult, but I will do my best.”∙“Very well. I shall return.”Move back and examine the door at the right side of the wooden house. Examine the note from Tangle and then cast the reveal spell to show the puzzle pieces. Find the three dream pieces. Place the puzzle pieces in the correct positions.Casual mode:Challenge mode:Select Tangle's note. Find the ten dream pieces:Examine the clock above the right door to see that the time is set to 6 o' clock, the same as the sundial outside. The aim now is to use the two switches and the button to set all of the clocks on the wall to 6 o' clock. The left switch changes the amount that each hour hand will move, the button between the two switches adjusts the hour hand on the currently selected clock, and the right switch changes the clock selection. After setting all of the clocks to 6 o'clock, take the colored stones from the doorway that opens. Move back to front of the wooden house and go through the middle doorway. Enter the airship.Examine the device at the right side of the room. Use the colored stones on the hole and select the matching stones to create enough fuel. Move back and examine the map on the wall. Cast the reveal spell to show the location of the Treehouse Village. Exit the view of the map and examine the control wheel, then set the course and heading to the settings shown on the map for the Treehouse Village. Exit the view of the wheel and select the lever.Treehouse VillageTake the note from tangle and find the twelve dream pieces. Also take the pile of sticks and some stones:Cast the transmute spell. The four trees in the area can now be examined. Each tree has a puzzle that needs to be solved. The aim in each puzzle is to place the correct sticks on the pegs, and then press the button at the top of the screen so that the walnut falls into the hole.Tree 1:Tree 3:Take the ornate key that appears. Enter the airship and examine the device. Use the colored stones on the hole and select the matching stones to create enough fuel. Move back and examine the map on the wall. Cast the reveal spell to show the location of Wind Music Island. Exit the view of the map and examine the control wheel, then set the course and heading levers to the settings shown on the map for Wind Music Island. Exit the view of the wheel and select the lever.Wind Music IslandTake the colored stones and the note from Tangle. Find the ten dream pieces:Go up to the columns at the top-right corner of the area. Take the note from Tangle and find the eight dream pieces:The aim here is to rotate the sections of the columns to make all of the symbols green. Rotate each section until the green symbol is shown in the following order:Casual mode:Challenge mode:Back away from the columns and enter the cave. Cast the brilliance spell to illuminate the cave. Take the note from Tangle, the two metallic cylinders, the hammer and the eight dream pieces:Use the hammer on the blue crystal four times to create four blank stones. Use the two metallic cylinders and one of the blank stones on the machine. The aim now is to make the same symbols on the blank stone that were visible on the columns. The symbols thatneed to be made on the four stones are shown below:After one stone has been completed, back away from the view of the stone and then pull the handle to make the symbols. Exit the cave and examine the broken section of the building:Read the note from Tangle. Use one of the blue stones on the left slot until a song is heard and the island will then shake. If one of the stones was printed incorrectly, it will become a blank stone again and can be reprinted back in the cave. Back away from the view of thestones and find the ten sculpture pieces:Place all of the sculpture pieces on the broken stones. The completed sculptures are shown below:Inspect the broken section of the building and use the blue stones on the slots to play the song. Inspect the broken section of the building again and find the nine dream pieces:Back away from the view of the stones. Enter the airship and examine the device. Use the colored stones on the hole and select the matching stones to create enough fuel. Move back and examine the map on the wall. Cast the reveal spell to show the location of the Water Collector. Exit the view of the map and examine the control wheel, then set the course and heading levers to the settings shown on the map for the Water Collector. Exit the view of the wheel and select the lever.Water CollectorTake the note from Tangle, the colored stones, the three pipe pieces, the small key and the thirteen dream pieces:Cast the thunder spell to refill the pool. Use the three pipe pieces on the broken pipe behind the pool. Use the small key on the hut door. Enter the hut and cast the brilliance spell to illuminate the room. Take the note from Tangle, the six curved planks, the five containers and the ten dream pieces:Examine the wheel at the right side of the room to see five markings. Back away from the view of the wheel. The aim now is to use a combination of different planks on the slots above the scale to make one of the markings on the wheel. Once the planks have been used to make the symbol, place a container on the right side of the scale and pull the lever at the left side of the slots. If the scales do not balance, keep trying different containers until the scales are balanced and a bell rings. Once this happens, take the container from the scale, examine the wheel and then place the container on the correct marking. Repeat this method of creating the markings with the planks, filling the correct container and placing it on the appropriate wheel marking with the remaining four containers. A third key will be received after the puzzle has been completed. Exit the hut.Enter the airship and examine the device. Use the colored stones on the hole and select the matching stones to create enough fuel. Move back and examine the map on the wall. Move the mouse cursor over the Crater of Time to reveal the course and heading. Exit the view of the map and examine the control wheel, then set the course and heading levers to the settings shown on the map for the Crater of Time. Exit the view of the wheel and select the lever.Crater of Time RevisitedExamine the front door and go upstairs to the front of the wooden house. Examine the door at the top of the house:Back away from the mechanism view and find the three clock numbers:Examine the top door again and use the clock numbers on the mechanism. Take the three dream pieces:The aim now is to repeat the sequence of Roman Numerals that are indicated by the arrow. Cast the brilliance spell to illuminate the room. Take the five dream pieces and theiron key:Use the three ornate keys on the locked covers. Examine the left cover and select the note from Tangle. Use the iron key on the locked gear. The aim now is to place the gears so that they all rotate when the machine is turned on. To remove an incorrectly placed gear, select it and then click the reset button. Put the gears in the correct positions, move the speed slider to the right and then press the on button:Examine the middle cover. Put the gears in the correct positions, move the speed slider to the right and then press the on button:Examine the right cover. Put the gears in the correct positions, move the speed slider to the right and then press the on button:Exit the house and go through the right doorway. Take the colored stones from the hole in the wall:Exit the house and go through the middle doorway. Enter the airship and examine the device. Use the colored stones on the hole and select the matching stones to create enough fuel. Move back and examine the map on the wall. Move the mouse cursor over the village of Wish to reveal the course and heading. Exit the view of the map and examine the control wheel, then set the course and heading levers to the settings shown on the map for the village of Wish. Exit the view of the wheel and select the lever to complete the game.Bonus ChapterThe bonus chapter is available in the collector's edition of the game. Select the book on the sofa:Examine the book and select the letters to fill in the spaces:Take the vibrating roll and use it on the frame:Take the first intricate key:and complete the jigsaw puzzle:Back away from the map and take the second intricate key:Dreams and fill in the missing words:Back away from the map and take the third intricate key:and complete the jigsaw puzzle:Back away from the map and take the fourth intricate key:fill in the missing wordsBack away from the map and take the fifth intricate key:Lost and complete the jigsaw puzzle:。
幽魂旅店3 图文攻略(英文完整版 )

Haunted Hotel: Lonely Dream WalkthroughPosted on August 27, 2010 in OtherWelcome to the Haunted Hotel: Lonely Dream Walkthrough!Explore the Haunted Hotel and experience supernatural phenomenon for yourself in Haunted Hotel: Lonely Dream!Whether you use this document as a reference when things get difficult or as a road map to get you from beginning to end, we’re pretty sure you’ll find what you’re looking for here.This document contains a complete Haunted Hotel: Lonely Dream game walkthrough featuring annotated screenshots from actual gameplay!We hope you find this information useful as you play your way through the game. Use the walkthrough menu below to quickly jump to whatever stage of the game you need help with.General Tips∙You can change players by clicking on your username in the bottom corner of the screen.∙From the Players Screen you can delete, rename, or create profiles. ∙From the Main Menu you can adjust sound volume, screen mode, and watch the credits.∙When you start the game you must choose between Casual and Advanced Mode. Casual Mode has more, and faster recharging, hints; Advanced Mode gives you less help.∙There is also a short tutorial at the beginning of the game that you may skip. This walkthrough covers the tutorial section as well. ∙In the game, there is a journal highlighted in red in the bottom left corner of the screen. This keeps all of the storylineinformation collected for you.∙There are three types of cursors used in the game.∙The Eye Cursor, in green, shows you that there is something of interest in an area.∙The Hand Cursor, in blue, shows you that an item can be picked up. ∙And the Gears Cursor, in yellow, shows you that you can use an item at that spot.∙If you are stuck, you can click on the Tasks Button to see what you are supposed to do next.∙If you are still stuck, you can click the Hint Button to get more specific information.∙The Hint Button also lets you skip puzzles and helps you find hidden objects, one at a time.Level 1∙Collect the SNOW in the bottom right corner (1).∙Click the SNOWBALL in the inventory and drag it to the camera in the upper left corner (2).∙Click on the wooden box and it will be moved to the right.∙Collect the SCREWDRIVER (3).∙Collect the LADDER and click it on the window (4).∙Use the SCREWDRIVER from the inventory to open the window (5).∙Click the window to go to the next scene.∙Use the SCREWDRIVER to open the ventilation cover (1).∙Collect the STOOL, KETTLE, WIRE and PLIERS circled in red (2). ∙Turn on the fan circled in green (3).∙Click on the hotspot highlighted in yellow in the left of the screen(4).∙Find 12 hidden objects listed at the bottom of the screen, in any order, circled in green in the image.∙The hidden objects are randomized and may be different in your playthrough.∙You will receive the KEY after finishing the scene.∙Click on the small box in the middle (1).∙Use the KEY from the inventory to open the small box (2).∙Collect the BATTERIES in the box (3).∙Go inside the ventilation shaft (4).Level 2∙Collect the KEY circled in yellow in the table.∙Click on the fireplace to zoom in and collect the LIGHTER and CAMERA circled in yellow (1).∙Open the inventory. Click the BATTERIES and combine them with the CAMERA (2).∙Check the printer on the table. You will need to use it later (3). ∙Click on the couch hotspot to enter another hidden object scene (4).∙Find 12 hidden objects listed at the bottom of the screen, in any order, circled in green in the image.∙The hidden objects are randomized and may be different in your playthrough.∙You will receive the POWDER COMPACT.∙Click on the bottom of the screen to move back to the storeroom.∙Use the KEY in the inventory to open the door. ∙Move through the door to the hallway.∙Place the STOOL under the surveillance camera in the upper right corner (1).∙Take the picture with the CAMERA in the inventory from the surveillance camera angle (2).∙Enter the den from the door on the right. You won’t need to use the ventilation shaft anymore.∙Place the CAMERA WITH PHOTO from the inventory to the printer on the table to print.∙Take the PHOTO.∙Return to the hallway by clicking the bottom of the screen.∙Set the WIRE from the inventory onto the surveillance camera (1). ∙Place the PHOTO from the inventory on to the WIRE (2).∙Enter the winter room (3).∙Click on the table and collect the GAS HANDLE and the CLAMP circled in yellow.∙Return to the back yard through the right side of the storeroom. ∙Click the KETTLE in the inventory and drag it to the SNOW on the right side of the screen, on top of the red box.∙Go back to the storeroom through the window.∙Place the GAS HANDLE from the inventory onto the gas pipe (1). ∙Open the gas by clicking the GAS HANDLE.∙Use the LIGHTER to light the hotplate (2).∙Set the KETTLE WITH SNOW onto the hotplate (3).∙After the water begins boiling, collect the KETTLE WITH HOT WATER. ∙Return to the winter room through the hall.∙Use the KETTLE WITH HOT WATER to melt the ice on the lever on the right (1).∙Click on the cable in the middle to zoom in.∙Put the CLAMP to the cable (2).∙Use the PLIERS to connect the cable (3).∙Click on the lever on the right to turn on the machine.∙Return to the hall and click on the elevator button in the left.∙Click on the elevator button again to open the doors and then enter the elevator.∙Enter the artist’s room on the right side of the hall, the door farthest from you.Level 3∙Collect the belt circled in green (1).∙Click on the picture in the middle to zoom in. Collect the DISPOSABLE CUP and the GLUE (2).∙Click on the dresser in the left to zoom in. Collect the SOLVENT and the CHISEL (3).∙Click on the window in the left to go to the next room (4).∙Place the BELT from the inventory onto the statue in the upper middle to have something to grab on your way across.∙Enter the next room, through the window on the right.∙Collect the RAG, CLOCK, BOX, and STOOL circled in green in the screenshot.∙Use the POWDER COMPACT to show the security beam on the door (1). ∙Place the STOOL on the right side of the door (2).∙Place the BOX on the left side of the door (3).∙Place the CLOCK on the box (4).∙Break the mirror with the SCREWDRIVER (5) and pick up the pieces on the chair.∙Put the GLUE on the lamp (6).∙Put the GLUE on the brush (7).∙Attach the BROKEN MIRROR to the lamp and brush (8).∙Use the BROKEN MIRROR on the STOOL to start the next puzzle.∙Finish the puzzle by making the laser travel from the bottom left corner of the screen to the top right corner of the screen.∙Use the pieces of glass from your inventory on the different squares on the puzzle board.∙If the laser hits an angled mirror piece, it will reflect at a 90 degree angle. Refer to the image for the solution.∙Pieces inside circles can be rotated by clicking on them.∙You do not need to use all of the pieces to finish the puzzle. ∙See the screenshot for one possible solution.∙Use the BROKEN MIRROR on the clock on the left to start another laser puzzle.∙Refer to the image for the solution to that puzzle.∙Return to the hall through the artist’s room from the window.∙Place the DISPOSABLE CUP in the water machine to take the WATER. ∙Return to the artist’s room.∙Click on the dresser to zoom in.∙Pour the WATER into the can (1).∙Add the SOLVENT to the can (2).∙Soak the RAG in the can (3).∙Drag the mixture in the can to the picture (4) and then scrape off the painting with the RAG (5).∙You will see a secret picture of the key’s location under the old painting.∙Return to the next room through the window.∙Take off the piece of wood on the floor highlighted in green with the CHISEL.∙Collect the KEY.∙Open the door with the KEY on the left.∙Enter the bathroom.∙Find 12 hidden objects listed at the bottom of the screen, in any order, circled in green in the image.∙The hidden objects are randomized and may be different in your playthrough.∙You will receive the STACK OF TOWELS.∙Return to the previous room.∙Tie the STACK OF TOWELS to the radiator in the right (1).∙Move to the outside from the window (2) and then click on the rags coming out of the window to the right.Level 4∙Collect the WIRE, circled in green, in the bottom right corner. ∙Move the cardboard box and the wooden box, both highlighted in yellow.∙Click on the shelf highlighted in purple.∙Find 12 hidden objects listed at the bottom of the screen, in any order, circled in green in the image.∙The hidden objects are randomized and may be different in your playthrough.∙You will receive the PLUG and return to the previous room.Click the electricity box to open it and then place the WIRE in it to start the next puzzle.∙Finish this puzzle by turning all of the lights green on the board. ∙Every piece has different colored wires coming off of it.∙Click on any two pieces to switch their places.∙Connect the pieces to each other so that all of the pieces are connected with no dead ends, and the wires touching each other are all the same color.∙If all the pieces connected to a light are in the correct place, and they are connected to the right pieces, the light will turn green.∙See the screenshot for the correct solution.∙Click the door to the right of the electricity box and then click again to go up the stairs.∙Once you are in the hall, go forward one more time.∙Enter the store through the middle of the right side doors.∙Find 12 hidden objects listed at the bottom of the screen, in any order, circled in red in the image.∙The hidden objects are randomized and may be different in your playthrough.∙You will receive the POWER DRILL.∙Return to the hall.∙Enter the summer room, the first door on the left.∙Find the LENS FRAME in the middle. Place the LENS FRAME onto the lens frame holder (1).∙Combine the POWER DRILL and PLUG in the inventory (2).∙Make a hole in the floor with the POWER DRILL (3) on the right side of the room.∙Exit the room and enter the workshop that is to the right of the summer room.∙Collect the FOIL, KNIFE, and INSULATING TAPE circled in green (1). ∙Combine the KNIFE and INSULATING TAPE in the inventory (2).∙Cut the LONG WIRE on the table with the KNIFE (3).∙Return to the summer room.∙Connect the long wire to the transformer (1), directly above the hole in the floor.∙Use the foil on the broken reflector to the left of the scene (2). ∙Exit the room and enter the store again from the middle door on the right.∙Find 12 hidden objects listed at the bottom of the screen, in any order, circled in red in the image.∙The hidden objects are randomized and may be different in your playthrough.∙You will receive the HACKSAW.∙Return to the hall. Click the bottom side of the screen twice to go to the basement.∙Cut the ROD with the HACKSAW (1).∙Click on the shelf hotspot again (2).∙Find 12 hidden objects listed at the bottom of the screen, in any order, circled in green in the image.∙The hidden objects are randomized and may be different in your playthrough.∙You will receive the CRANE HANDLE.∙Place the crane handle on to the crane, highlighted in green in the previous image.∙Return to the workshop.∙Open the drawer with the ROD (1).∙Collect the LENSES in the drawer (2).∙Return to the summer room and place the LENSES onto the lens frame.∙Return to the basement.∙Turn on the crane by clicking the CRANE HANDLE.∙Return to the hall to see a cut scene.∙Push the elevator button and then enter the elevator.∙Enter the door labeled Antigravity, the leftmost door on the left side of the hallway.Level 5∙Find 12 hidden objects listed at the bottom of the screen, in any order, circled in green in the image.∙The hidden objects are randomized and may be different in your playthrough.∙You will receive the SPOOL OF THREAD.∙Exit the room and enter the writer’s room, the left door on th e right side of the hallway.∙Find the BULB and PAPERCLIP, both highlighted in green (1).∙Find the STATUETTE and place it on the stand highlighted in light blue (2).∙Collect the CANDLE circled in yellow and light it with the candle on the desk (3).∙Place the BURNING CANDLE on the candle holder (4).∙Click on the wall panel in the right and the safe will appear (5). ∙Move to the second part of the room by clicking the left side of the screen.∙Open the inventory and combine the PAPERCLIP and the THREAD.∙Drag the HOOK ON A THREAD to the aquarium on the left.∙Catch the three parts of the key in the aquarium with the HOOK ONA THREAD.∙The fish will follow your hook and if they touch the key pieces, those pieces will fall back down to the bottom.∙If you pull the pieces too fast, they will fall as well.∙After getting all the pieces of the key, return to the previous screen.∙Open the safe with the key in the inventory (1).∙Collect the SLIDE in the safe and click on the note to zoom in (2). ∙Return to the second part of the room.∙Set the BULB into the projector in the middle of the bottom half of the screen.∙Insert the SLIDE into the projector.∙Click each symbol in correct order.∙When you make a wrong click there will be a red “X” visible above the symbol. When the click is correct it will show a green mark.∙There is a note in the bottom left corner that will give you a clue to the answer.∙See the image for the solution.∙Collect the BOTTLE and click the manuscript in the bookshelf.∙Exit the room and return to the hall.∙Enter the store room in the rightmost door on the right side of the hall.Level 6∙Find 12 hidden objects listed at the bottom of the screen, in any order, circled in green in the image.∙The hidden objects are randomized and may be different in your playthrough.∙You will receive the CORKSCREW.∙Enter the spring room, the leftmost door on the left side.∙Collect the TOWEL, POT WITH CARBON, and HOSE, all highlighted in red.∙Enter the bathroom on the right through the wooden door.∙Collect the SCRAPER highlighted in green (1).∙Collect the PIPE PIECE and connect the PIECE PIPE to the missing spot (2).∙Click on the bathtub hotspot on the right (3).∙Find 12 hidden objects listed at the bottom of the screen, in any order, circled in red in the image.∙The hidden objects are randomized and may be different in your playthrough.∙You will receive the PIPE PIECE.∙Connect the PIPE PIECE in the missing spot (1).∙Set the HOSE onto the faucet on the right (2) and then click it again to turn the water on.∙Click on the water box (3) in the middle.∙Connect all of the pipes together without any of them leaking. ∙Click any pipe to rotate it once.∙Pipes that are connected to the water source will turn blue. ∙The ends of pipes that aren’t connected will leak water.∙Turn all of the pipes blue to finish the puzzle.∙See the image for the solution.∙Click on the connector highlighted in yellow to fill the can with water (1).∙Click on the can and collect the PIPE PIECE (2).∙Connect the PIPE PIECE to the missing spot (3) at the top of the screen.∙Click on the connector again until the upper pipe fills with water. ∙Click on the bathtub hotspot (4).∙Find 12 hidden objects listed at the bottom of the screen, in any order, circled in red in the image.∙The hidden objects are randomized and may be different in your playthrough.∙You will receive the FUSE.∙Return to the first room of the spring room.∙Combine the WINE BOTTLE and the CORKSCREW in the inventory. Put the CORK into the leaking hole (1).∙There are four bolts in the fuse box cover under the boiler. Open the fuse box cover with the SCREWDRIVER (2).∙Put the FUSE in the fuse box (3).∙Click on the dirty tank in the middle to zoom in.∙Open the left (1) and then the right handles to fill the tank with water (2).∙Clean up the tank with the SCRAPER in the inventory (3).∙Open the bottom handle to empty the dirty water from the tank (4).∙Click the same handle again to fill the tank with clean water.∙Combine the TOWEL and POT CARBON in the inventory. Place the result in the filter, in the middle (5).∙After a short cut scene you will be in the hallway again. Enter the autumn room at the end of the hall.Level 7∙Collect the HAMMER, FILTER, SENSOR PLATE, FILTER RING, and SPEAKER WITH MAGNET, all highlighted in green (1).∙Click the sensor on the left to zoom in.∙Place the SENSOR PLATE between the tubes (2).∙Combine the HAMMER and the SPEAKER WITH MAGNET to take out the MAGNET.Attach the plate to the MAGNET (3).∙Exit the room and enter the left room on the right side.。
梦之旅5图文攻略

捡起地上5个雕像放在柱子上,具体要求看箭头指的墙嘛!!或者看我玩的嘛!!放对了会白光biubiu的有木有!!捡了所有能捡的,然后点小木偶点对了有声音的嘛!!!讨厌的左右右左,敲门不开的话再点一下右的木偶嘛!别说你没耳机嘛!!!右边灯光下照着的一小堆石头就是飞船燃料两个“关闭”有什么!!!拿油壶捡宝箱才是正经事嘛!!!油壶上油摆pose截图嘛!!然后快点从左边进去嘛!!!别说你黑乎乎啥也看不见,学会用魔法嘛!!捡起地上的榔头狠狠的砸向那个什么玩意,然后接好电源,其实你懂我说什么嘛!!进个门都得搞个拼图,真是烦死人了嘛!!回家老爹昏迷。
只好去找妈咪~男人果然不靠谱,关键时刻还得看半边天的有没有!!!咱们转身回小屋拼东西学魔法嘛!!!不把药水倒在书上你就俗了!!!我们来拼火车好不好嘛!!!不按顺序拼你就out了!!!铁路那个别问我,我玩不过去按了跳过的嘛~!!!拿了东西去飞船那拼木头玩,别问我怎么拼的,我就是不截图嘛!!!点第二个魔法修好飞船就起飞,我还是不想截图嘛!!飞过去以后,进入药水合成的那个房间,别问我怎么解锁嘛,3和8要在一列的嘛!!房间好熟悉有没有,梦三里面搞死人的药水有没有!!!拿起地上一空瓶子接些紫药水嘛!!!飞回家里,喂老爹喝药,真是不给力!!!还得去搞被糊射的海水有没有!!你别吵着看图了好不好,我忘记截图了嘛!!!飞到海边,捡起地上的斧头砍木桶找到钥匙进右边的小红屋嘛!!点那个书,然后字谜,you must stop them,英文密码有没有,美女师妹帮我解密的有没有!!然后blablabla一段文字慢慢看嘛!!!右边墙上的地图点起,然后貌似拿到一把钥匙,问怎么拿钥匙你就俗了!!!拿着钥匙去后面的小屋开门进去,正对面的鱼竿图纸点开嘛!!!找齐东西,就快点把鱼骨头放到架子上嘛!!!鱼竿丢那里,再找到另一把钥匙去开左边的屋子,尼玛不许问我钥匙是那里来的!!!!!!!!!!!!!!!找到刷子然后回右边小红屋,在地图下方的两摞破纸就会出来颜料配方,拿笔记下来嘛!!!回到左边小屋里配色啊,尼玛别跟我说没有绿色,蓝色加黄色就是绿色有么有!!!!小学生都懂的有没有!!!!那个颜色配好了拿去刷鱼竿,很丑有没有!!!拿着魔法鱼竿在水里一点就出来宝贝了嘛!!!!然后咱们会飞船去另外一个地方嘛!!在院子里捡东西眼神要好有没有@!!!!留声机也可以全国包邮哦~~~捡6边形的木块,我忘记几块了,游戏有提示的嘛!!!一开始忘记了,我补画了嘛~~~~下一个场景很简单,你随便玩玩就能过去嘛~~~手柄在右边,我跟你说过了找东西什么最费眼神了有么有!!!!又回到南瓜屋,进厨房拿书然后过来开门捡铁锨和碎纸片,然后把书放上去,然后拿铁锨挖宝贝嘛!!!你又问我碎纸片做什么,我怎么记得啊,真是好讨厌啊!!!回到钟楼了有没有!!!玩过梦4的都知道要按门铃有没有!!!快点blablabla完了闪人!!!!到个坑前面,每个门都进去,拼图如下拿到所有鬼画符回家,放在pose姐下面,然后over……。
梦之旅4图文攻略(下)

——树屋村1、收集12块梦之碎片,阅读纸条,使用回春瑰宝,将树木复活,捡起地图中间的木棍。
2、每颗树都有2块梦之碎片和一道谜题——将坚果弄至树洞中,完成4个谜题。
3、完成谜题后,出现一把钥匙,捡起钥匙和彩色纸条,回到飞艇,去下一个地点。
接攻略<上>http://j0y.me/abayG——风音岛1、乐器:收集10块梦之碎片,阅读纸条,来到图腾柱。
2.图腾柱:收集8块梦之碎片,阅读纸条,得知要将图腾柱的音符回复。
恢复之后得到音符密码。
列出恢复顺序第一根:EDCBA第二根:ABCDE第三根:CBADE第四根:任意。
3.山洞:1)用光明瑰宝使山洞变亮,收集8块梦之碎片,两个圆筒,一把锤子。
2)将圆筒安装在印刷机上,用锤子捶打水晶得到4块水晶板。
3)点击圆筒所在的地方,按照之前所得的音符密码输入音符,将水晶板插入孔中,拉动拉杆印刷。
4、乐谱:1)收集9块梦之碎片,阅读纸条,将印刷好的水晶板放入相应的位置(若放入错误则水晶板变空白,要重新印刷),放入第一块之后,大地震动,乐器被震坏了。
2)出来岛上收集乐器碎片10块。
3)将乐器组装好。
4)回去乐谱处继续安装水晶板,音乐过后得到第二把钥匙。
5、拿彩色石头回飞艇去下一个地点。
接攻略<上>http://j0y.me/abayG——蓄水池1、蓄水的池子:1)收集13块梦之碎片、3根管子、钥匙,阅读纸条。
2)使用雷雨瑰宝下雨使池子里的水蓄满。
3)将管子安装好。
4)用钥匙打开小屋的门,进去。
2、小屋里:1)用光明瑰宝点亮小屋。
2)收集10块梦之碎片,阅读纸条。
3)收集6块木板、5个酒杯。
4)点击木轮,观测到木轮上有一些图案,而捡到的木板正好可以组合成这5个图案,依次选出图案所需的木板放在引水机器的插槽上,将酒杯放在天平的右边,拉动拉杆引水,选出平衡的那个酒杯,放在木轮所对应的图案上,将所有的酒杯都摆好,得到第三把钥匙。
3、拿彩色石头,回到时之塔。
- 1、下载文档前请自行甄别文档内容的完整性,平台不提供额外的编辑、内容补充、找答案等附加服务。
- 2、"仅部分预览"的文档,不可在线预览部分如存在完整性等问题,可反馈申请退款(可完整预览的文档不适用该条件!)。
- 3、如文档侵犯您的权益,请联系客服反馈,我们会尽快为您处理(人工客服工作时间:9:00-18:30)。
梦之旅3攻略大全电脑 2009-08-12 18:21 阅读2306 评论0字号:大中小树屋1、从左边靠窗的位置拿到一本书。
2、从左边墙的架子上拿到一个玻璃水壶,在着火的水晶球上使用2次后灭火。
3、从左边窗前的垫子上拿到一把金黄色的小钥匙。
图1.14、从右边出门点击地上的出口,但毯子盖上后出口消失了,毯子也消失了,左边的门被锁上了。
捡起窗前地上的宝石架和门把手,在挂着4个相框的墙靠上的横梁上捡到一把钥匙,屋里还散落着一些透明的宝石(在游戏中的每个场景几乎都有,就不再每次都重复了)。
5、把门把手装在被锁住的门上,用在横梁上捡到的钥匙开门后进入。
图1.2小钥匙分别打开缝纫机的两个抽屉,拿到布和一个缝纫机轮子。
捡起缝纫机上的绿色线轴。
图1.37、在中间房间图1.2的地上捡到一条皮带。
8、点击back返回卧室图1.1,用钥匙打开地上的大箱子,拿到一块布。
捡起右边墙角的大轮子。
图1.119、返回缝纫机室图1.3,把线轴装在1处,小轮装在缝纫机上面2处,大轮和绳子装在下面3处,缝纫机修好了。
A处放两块布后按下B处的踏板,缝纫机开始工作把两块布缝合,依次把4块布全部缝成毯子后出门。
图1.2110、在中间的房间,把毯子放在地上,出口出现了离开树屋。
11、观察左下角A处的树桩后退出,捡起散落在各处的8块彩色的石头,4紫3蓝1红,然后打开树桩,蓝色放在+号处,紫色放在方块处,红色放在三角标志处。
然后就可以去对面的传送门里了。
图1.412、进入传送门来到一个有很多门的传送室,后面的剧情都是从这个房间里依次进入的。
先捡起地上1处的宝石架和散落在各处的宝石。
然后拉机器左边A处的把手,门转到了下一个,门上的宝石亮起来。
图2.2.01庄园以下内容只有回复后才可以浏览1、在大厅里收集一下屋里的宝石,直接点左边的门出去。
2、出门后发现门被锁上打不开了,而且门很脏,需要打开风车从井里提水清理一下。
风车缺少扇页,在风车脚下捡到一片风车的扇叶和一个大螺栓,房前拿水桶,水桶边还有一片扇叶,房子右边的绿栅栏上有一片扇叶。
收集完东西然后从房子左边的铁门进入后园。
图2.13、右边墙上拿铁锹和一把榔头,上面的阳台捡扇叶(屏幕的右上角),在小路上捡扇叶,挨着绿色的大铁门处还有一片扇叶。
总共6片扇页,收集齐回到房子门口。
图2.24、回到风车图2.1处,把6片扇叶装上后再安上螺栓,风车转动后下面的井里有水了。
用水桶打水,得到4桶水,在南瓜门上使用1个,剩下3桶水后面要用到。
把门擦干净,发现上面的南瓜装饰少了一块。
5、返回后园图2.2处,用榔头把稻草人打坏,捡起一块南瓜、草帽(草帽就在后面地上,仔细找一找)、稻草人的衣服和一根棍子。
在屏幕左下角的一个南瓜上捡到一把钥匙。
图2.21以无限次拿,但一次只能拿一个,一会再拿也可以。
然后进入里面的厨房。
图2.3钥匙把C处门打开,这里可以直接通往南瓜地。
然后打开D处的书,开始准备做药。
图2.48、先做准备工作,观察桌上的书按上面的提示操作:图2.41(1)从右边架子的a处罐子里拿red rose petals放在左边A处的大碗里捣成粉末(捣成粉末都是在这个罐子里进行的)。
(2)门边有三个大玻璃罐,把捣好的粉末放入右边1处。
(3)再拿b处的sunflower捣成粉末后放进2处中间的玻璃罐。
(4)最后拿c处的lavender捣成粉末放入左边3处的玻璃罐。
最后在三个玻璃罐中分别加入刚才得到的3桶水,就变成了紫、黄、红三种液体,按一下玻璃罐下面的小阀门,让液体流到下面的杯子中9、再去看书,分别点击右边那页的三个药方,把里面缺少的单词拼好。
(1)Quick Ripen PotionFollow this recipe exactly to make a potion that will ripen fruit immediately.1.Place some orange at the bottom of the glass.2.Pour in some sunflower liquid essence.3.Carefully add some rose liquid essence to the glass.4.Finally add. 图2.51(2)Instant Growth PotionThis potion will make any plant instantly grow to full size.1.Heat some sunflower petals in the cauldron and add them to the glass.2.Then crush and heat some juniper berries and add them to the potion.3.Pour in some lavender liquid essence.4.Finally add. 图2.52(3)Memory Recovery PotionWarning: This potions is extremely strong and should only be consumed in small doses.1.Place one freshly cut grey rose in the glass.2.Add some crushed orange peel and then some lavender liquid essence.3.Add heated lemongrass to the glass.4.Crush some bitter aloe and add it to the mixture.5.Finally add. 图2.5310、单词拼好后,每一页下面都有红色的字,是需要最后添加的,得到完整的药方后就可以开始配药了。
先简单解说一下做药需要用到的物品:A处玻璃杯,所有的材料都要放在这里面,如果顺序或者物品放错了,就要重来,而且必须按照书上的顺序依次做三个药品。
B处的罐子,可以把物品磨成粉末,配方中带有crush,crushed就是磨成粉末。
C处的大锅炉,用来加热物品的,配方中带有heat,heated的就是需要加热,注意有的是要先磨粉末再加热,有的直接加热。
D处的勺子,加热后的物品要用它盛起来放在A玻璃杯中。
E处的液体,属于基本材料,配方中表示为“quid essence”。
F处的8个罐子,最基本的材料,磨粉、加热、都需要先从这里拿果实和种子,在配方中显示peel,seeds,可以把鼠标放在上面不动,看一下物品的名字,和配方中的名字进行对照。
另外还需要的物品有雨滴rainwater,在大厅图2.3中的雨伞处获得(注:一开始是得不到雨滴的,要打开书做完准备工作,要做快速生长药的时候再去拿)。
图2.5Quick Ripen Potion(快速成熟药):在桌子中间的玻璃杯放入orange peel,再放入sunflower liquid essence(就是玻璃罐里的黄色液体,点下面的开关可以接出液体,再点一下下面的容器就可以拿到一瓶液体了),再放入rose liquid essence(红色液体),最后把lemongrass放入左边的大碗捣成粉末加入。
Instant Growth Potion(快速生长药):把sunflower petals放入火上的大锅里加热,再从左边墙上拿一把勺子,把它捞出来放入中间的玻璃杯。
把juniper berries捣成粉末再放入大锅里加热后,用勺子捞出放入玻璃杯。
再放入lavender liquid essen ce(紫色液体),最后需要加入一滴雨水rainwater(在厨房外的客厅里的雨伞上可以找到)。
做完这两个药后要收集一下第三个药剂需要的物品:11、先在厨房拿一些greyrose seeds,一会要用到,再回来拿也可以。
通过传送室,转动右边的把手,返回树屋。
12、在树屋发现梯子没了,需要找齐11根木头,拼好梯子,进入树屋后去缝纫室图1.3,把稻草人的破衣服缝好(如果没得到稻草人的衣服,去南瓜地再找),然后返回庄园。
图2.613、通过传送门回到庄园的南瓜地,把a快速成熟药水Quick Ripen Potion浇在A南瓜处,南瓜立刻就成熟了,取下南瓜用来当稻草人的头,按照顺序把木头、衣服、南瓜、帽子(帽子就在南瓜地找到的,如果没找到请仔细看图2.21~)放回B处重新做好稻草人。
先做好稻草人再种灰玫瑰,不然会被乌鸦吃掉,白种了,还要再回去拿种子...14、用铁锹(最右边墙上获得的)在稻草人左边的空地D处挖个洞,把greyrose seeds(在厨房获得的)放入,倒上c快速生长药后得到一枝灰玫瑰。
图2.715、回厨房继续配药Memory Recovery Potion(恢复记忆药):在中间的玻璃杯中放入灰玫瑰。
把orange peel捣成粉末放入,然后放入lavender liquid essence(紫色液体)。
把lemongrass放入锅中加热,用勺子捞出放入玻璃杯。
把bitter aloe捣成粉末放入,再把juniper berries捣成粉末后再加热放入。
16、药配好后得到一个奇怪的标志strange symbol。
17、返回传送室图2.0的房间,用strange symbol在右下角的地板上点一下,露出一个楼梯,进入新的场景。
铸造处1、在正中间有一个铸造用的台子。
先捡2根木头,然后到左边房子的门前,看到一个机关,需要按下面三个按钮,把所有的圆形标记转到上面使其成为一竖排,就可以把门打开了。
图3.1图3.11装在B处,拉动一下把手,窗户打开,房间内就变亮了。
图3.23、捡起散落在屋里的物品:2根木头、6个金块gold nugget、3个地球仪缺少的球、钥匙、透镜片teles cope lens、放大镜和取景器viewfinder。
用钥匙打开左边A处的箱子,得到一本书,把书放在B处。
打开书发现还缺少一些物品,去外面找找吧~从望远镜底座的门离开,在机关门的右下角捡到1个球,再去铸造台。
图3.214、到铸造台处捡4个球和一个透镜片,然后回到图3.2望远镜房间。
图3.125、根据书上的提示进行:先把8个球放回原位使望远镜下的梯子打开(右边书架顶上放3个,左边书架上放5个,很容易)。
梯子打开后才可以把取景器viewfinder放在望远镜的尾部A处,透镜片telescope lens放在B处(注意:透镜片要一个一个的放,不能一次放两个,后面得到的镜片也要拿到这里来放到B处做成模具,再去铸造台做成宝石架)。
图3.226、放好后就可以点A处观察天空了,可是什么都没发现,因为天空太亮了,要想办法把白天变成黑天。