梦之旅5水之书——游戏攻略解说
绿色循环圈水魔塔攻略

绿色循环圈水魔塔攻略简介绿色循环圈水魔塔是一款经典的角色扮演游戏,具有独特的迷宫解谜体验。
本文档将为玩家提供一份详细的攻略指南,帮助玩家顺利通过水魔塔,并获取丰厚的奖励。
请注意,本攻略仅适用于绿色循环圈水魔塔的主线剧情。
游戏基本操作在开始攻略之前,我们先来了解一下游戏的基本操作。
绿色循环圈水魔塔是一款回合制游戏,玩家需要通过控制角色进行战斗和解谜。
以下是游戏的基本操作:•使用方向键或鼠标点击进行移动。
•按下空格键与NPC进行对话。
•在战斗中,使用技能、物品或逃跑等指令。
挑战水魔塔前的准备在挑战水魔塔之前,我们需要做一些准备工作,以增强角色的战斗能力。
以下是准备阶段需要注意的事项:1.升级角色等级:在水魔塔附近区域,有许多怪物可供练级,可以通过和怪物战斗以获取经验值提升角色等级。
进入水魔塔前,建议将角色等级提升至30级以上。
2.装备强化:在附近的商店中,可以购买到各种装备,例如武器、护甲、饰品等。
同时,在装备突破系统中,可以使用金币和材料提升装备的属性。
3.学习技能:在水魔塔中,战斗技能是非常重要的。
建议在挑战水魔塔之前,确保角色拥有强大的技能,以提高战斗能力。
入口及走位指南在找到水魔塔的入口后,我们需要选择正确的走位以正常进入塔内。
以下是一些建议的走位指南:1.进入塔内后,首先要注意选择正确的楼层。
绿色循环圈水魔塔共有30层,每层都有不同的宝藏和怪物。
2.注意观察各层楼梯的位置,并使用合适的路径前往下一层。
有时,一些隐藏楼梯需要触发特定的事件才能出现。
3.在寻找楼梯的过程中,要小心避开怪物的攻击。
如果受伤过多,可以返回上一层休息,回复生命值和魔法值。
怪物和宝藏在水魔塔中,各层都有不同的怪物和宝藏等待着玩家的发现。
以下是一些玩家需要注意的事项:1.怪物:每层的怪物都有不同的攻击方式和技能,玩家需要根据怪物的特点进行克制,合理利用技能进行攻击。
有些怪物还会掉落宝藏或者经验值。
2.宝藏:在水魔塔中,各层都有宝藏等待玩家的发现。
牧场物语精灵驿站攻略完全版
牧场物语精灵驿站攻略完全版牧场MM1月,AM10:00~12:00,雨或雪,到她自宅2月或火以外4:00~6:00前往女神之泉途中3水或金AM10:00~12:00,進醫生家4水以外PM5:00~6:00,進入酒吧發生矿厂MM1PM10:00~12:00,發掘場2除火日外pm1:00~3:00到宿屋3水日,pm11:00~12:00到礦場大地圖4火日外,am11:30~pm3:30到礦場宿屋MM1火日,天氣雨雪,pm12:00~2:00,宿屋2水日,am6:00~10:00,進入宿屋3購入廚房後,火日在自宅發生4木日在自宅發生酒吧MM??1PM5:00,酒吧2土10:00~11:00,海岸3PM6:00,酒場4夏天,家門口千金MM1PM4:00~8:00,她的家2主角購買dvd及dvd機後,主角起床後3月火日之外的pm4:00~pm6:00,從小精靈之家走出來3,8,13,18,23,28這月火日之外的pm9:00~pm11:00,進入其家人鱼MM和科學家的友好度超過101再到地下室1晴天隨時,雨天不能,進入科學家的地下室2同上3同上4同上,但要手持裝信的瓶子基本上一樣,但要起了池才行最先動頭三個事件,再令到人魚紅心,再動最後的事件之後到火日晚上到大海求婚公主1到高級礦場255給予究咖哩至高的咖哩2同上地點,給予失敗飲料或消閒茶3同上地點,照板上所寫的寶石給予她4同上地點,給矛黃金資材女神1救出60隻精靈2萬步計、釣魚和出荷一千以找到一個礦洞,來到女神泉39頻後到女神泉4向女神泉投500和貢品後,一日一次,來到女神泉5出荷物全出荷+ 101精靈全救出礦全開+目到女神和魔女重遇後即可結婚魔女1拜訪地圖右上方的家2動物死亡超過50隻,收獲祭投入大量毒菇五次以上,主角暈倒,試途逃出忘憂谷,亂丟垃圾,收到魔女贈物各十次後,到女神泉3送魔女1000次禮物,其實100己足夠,但實驗以上的都足以被村民姦殺了,所以最終來說是10004用雜草來做料理,兩手空空走到魔女家結婚條件:1救出女神2所有戀愛事件發生及選對3有大床4女孩心是紅色符合以上條件,將青之羽根交給對像操作方法说明:十字键:控制主角移动方向A键:捡起,扔掉物品,决定,调查,对话B键:跑Y键:使用农具,手上有东西时为将东西放入背包(猫狗和鸡鸭不能)X键:吃拿在手上的东西L键:口哨R键:单独按好像没有用R+A键:切换手中物品R+B键:向右变更道具R+Y键:向左变更道具R+X键:变更装饰物下屏操作说明:日记:通过触笔来存档/读挡用背包:用来存放物品的,本作中基本所有物品都可以99个一起堆放,拿出来时也是99个一起拿出来--b不是很方便,如要只取出一个,需要轻点物品后,在物品周围出现一圈细框,再在空格的地方或者在此物品上再点击一下,就可取出单一物品地图:点击某一个区域可放大查看,装备了特殊的首饰后可以实现如:瞬移。
冒险岛水世界范本 冒险岛水路攻略(优秀2篇)

冒险岛水世界范本冒险岛水路攻略(优秀2篇)(经典版)编制人:__________________审核人:__________________审批人:__________________编制单位:__________________编制时间:____年____月____日序言下载提示:该文档是本店铺精心编制而成的,希望大家下载后,能够帮助大家解决实际问题。
文档下载后可定制修改,请根据实际需要进行调整和使用,谢谢!并且,本店铺为大家提供各种类型的经典范文,如总结报告、心得体会、应急预案、演讲致辞、合同协议、规章制度、条据文书、教学资料、作文大全、其他范文等等,想了解不同范文格式和写法,敬请关注!Download tips: This document is carefully compiled by this editor. I hope that after you download it, it can help you solve practical problems. The document can be customized and modified after downloading, please adjust and use it according to actual needs, thank you!Moreover, our store provides various types of classic sample essays, such as summary reports, insights, emergency plans, speeches, contract agreements, rules and regulations, documents, teaching materials, complete essays, and other sample essays. If you would like to learn about different sample formats and writing methods, please pay attention!冒险岛水世界范本冒险岛水路攻略(优秀2篇)2023年冒险岛水世界篇一大家好!商鞅,他冒险改革,推行新法,不畏险阻,虽得罪贵族,被五马分尸,却为秦国统一六国打下了厚实的基础;加加林,他冒险航天,奋力登月,不惧生死,为后人的航天事业指引前进方向。
冒险岛克拉齐亚攻略

冒险岛克拉齐亚攻略简介《冒险岛》是一款经典的2D横版冒险游戏,其中的克拉齐亚是一个具有挑战性的地图。
本攻略将为玩家提供关于克拉齐亚地图的详细介绍,以及通关攻略和建议。
克拉齐亚地图克拉齐亚地图是冒险岛世界中的一个隐藏地图,它位于精灵森林的深处。
这个地图由多个关卡组成,每个关卡都有不同的特点和挑战。
关卡一:精灵之森精灵之森是克拉齐亚的第一个关卡。
在这里,玩家需要与各种强力的怪物进行战斗,并解开森林中的谜题。
同时,玩家还需要小心森林中的陷阱和障碍物。
关卡二:魔法之山魔法之山是克拉齐亚的第二个关卡。
这里有更加强力的怪物和更复杂的谜题,玩家需要不断提升自己的战斗技能和解谜能力。
关卡三:神秘之海神秘之海是克拉齐亚的最后一个关卡。
这个关卡中有大量的水域,玩家需要操控船只穿越海洋,同时面对海盗和其他威胁。
最终,玩家需要找到并击败克拉齐亚的头目。
通关攻略和建议以下是一些通关克拉齐亚地图的攻略和建议:1.准备充足:在冒险之前,确保自己的储备足够充足。
准备好足够的药品、装备和魔法物品,以应对各种挑战和怪物。
2.提升战斗技能:在进入克拉齐亚前,提升自己的战斗技能是非常重要的。
通过击败其他怪物和完成任务来获取经验值,提升等级和技能。
3.注意观察:在克拉齐亚地图中,有很多隐藏的道路和秘密。
玩家需要仔细观察地图,寻找线索和提示,以找到隐藏的宝箱和特殊道具。
4.解谜技巧:克拉齐亚地图中有很多谜题需要解开。
玩家可以利用游戏中的道具和技能来解谜,或者寻找NPC的提示。
5.队伍合作:如果你觉得难以应对克拉齐亚地图的挑战,可以考虑组队和其他玩家一起冒险。
合作可以提高战斗和解谜的效率。
6.制定策略:在面对克拉齐亚地图中的强力怪物时,制定一个合理的战斗策略非常重要。
了解怪物的弱点和攻击模式,并根据自己的能力选择合适的战术。
7.冒险心态:克拉齐亚地图是一个具有挑战性和复杂性的地方。
玩家需要保持一个积极的冒险心态,不断尝试和学习,才能克服困难并获得成功。
梦幻侠士水路副本攻略

在遇到突发状况时 ,要根据实际情况 调整战术和策略, 灵活应对,确保攻 略成功。
06
攻略技巧
技能连招
技能组合:根据 敌人类型选择合 适的技能组合, 提高输出和生存 能力
连招顺序:合理 安排技能的释放 顺序,实现技能 的连续攻击效果
技能升级:优先 升级核心技能, 提高技能效果和 输出能力
技能搭配:根据 战斗需要,灵活 搭配控制技能和 位移技能,提高 战斗灵活性
副本难度
普通难度:适合新手玩家,难度 较低
英雄难度:适合高手玩家,难度 较高
添加标题
添加标题
添加标题
添加标题
精英难度:适合有一定经验的玩 家,难度适中
噩梦难度:适合顶尖玩家,难度 极高
副本奖励
装备:副本中掉落高品质装 备,提升角色实力
经验值:完成副本可获得大 量经验值,提升角色等级
技能书:副本中可能掉落技 能书,提升角色技能
汐学院
梦幻侠士水路副本攻略
单击添加副标题
汇报人:汐
目录
01 03 05
单击添加目录项标题
02
队伍配置
04
注意事项
06
副本介绍 打法流程 攻略技巧
01
添加章节标题
02
副本介绍
副本背景
梦幻侠士游戏中 的重要副本之一
水路副本具有独 特的场景和难度
副本中包含多个 关卡和BOSS
完成副本可以获 得丰厚的奖励和 经验
避免失误,稳定心态
保持冷静,不要因为失误而影响心态 熟悉副本地图,避免走错路或绕远路 注意与队友的配合,避免出现混乱 遇到困难时,不要放弃,积极寻找解决方法
感谢观看
汇报人:汐
添加标题
添加标题
aab水之洞窟行走路线

aab水之洞窟行走路线1. 前往"维诺亚村"东南方的"水之洞穴"(429.570)。
等级不到Lv60无法进入。
建议70级以上,这样比较安全。
里面怪物无属性、不可封印。
水洞的怪物为54—61的水晶螃蟹、猫妖、水蓝鸟魔(均为无属性) 猫妖会吸魔一次吸25% 螃蟹很硬防魔单陨7级还没把握砸死它水蓝鸟魔会四种属性魔法1楼Lv542~5 Lv556~10 Lv5611~15 Lv5715~19 Lv5820(中层) 沒怪物出现21 Lv5922~25 Lv6026~29 Lv612. 在"水之洞穴20楼"会被要求从4条道路中选择一条道路。
3条是错误的道路,一条是正确的道路。
3. 从错误的路走到"水之试练"和"温迪妮"说话,获得"水之牌",自己必须按照原路返回到"水之洞穴20楼"选择其他的路线行进。
4. 从正确的路上到"水之试练"和"水之斗神"发生战斗。
Lv80 水之斗神;二只Lv74~76 温迪妮(水精);二只Lv72 变种液态史莱姆水之斗神会使用:连击、乾坤一掷、诸刃、Lv10补血魔法温迪妮:强力冰冻魔法、超强混乱魔法、超强中毒魔法、超强补血魔法变种液态史莱姆:扰乱攻击、明镜止水、强力冰冻魔法装备纯地水晶比较好。
另外如果玩家在有的时候血不满,水之斗神和水精还会给玩家加血,有点像就职格斗的绿先生。
不过可以带宠物。
变种液态史莱姆惧怕必杀,在血被打掉很多的情况下可能会逃跑。
BOSS打法:先打水精、再打斗神,最后合死史莱姆。
5. 击倒"水之斗神"后,被传送往"迷一般的房间"。
6. 在"迷一般的房间"里交给"水精"(9.4)一个纯水水晶,将得到"水精的福袋"。
梦之旅4(Dream Chronicles4:The Book of Air)图文攻略(含附加任务)
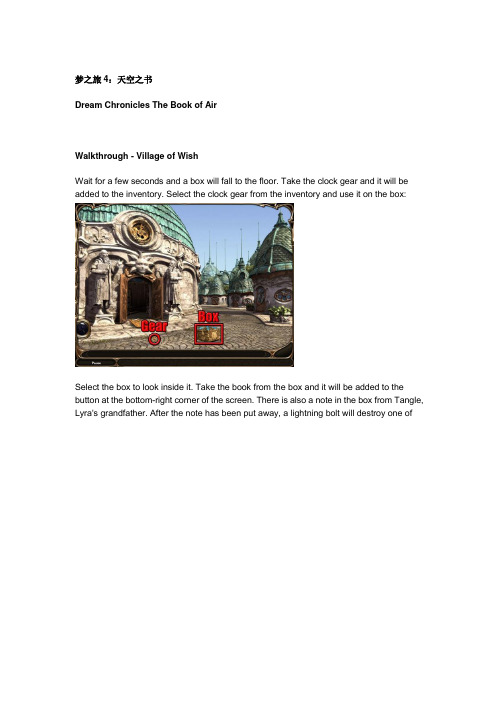
梦之旅4:天空之书Dream Chronicles The Book of AirWalkthrough - Village of WishWait for a few seconds and a box will fall to the floor. Take the clock gear and it will be added to the inventory. Select the clock gear from the inventory and use it on the box:Select the box to look inside it. Take the book from the box and it will be added to the button at the bottom-right corner of the screen. There is also a note in the box from Tangle, Lyra's grandfather. After the note has been put away, a lightning bolt will destroy one ofthe guardian statues outside the school. Find the nine pieces of the statue:Put the pieces on the incomplete statue in the following order: Foot, three stone pieces, right side arm, book, left side arm, hand, head. Enter the school and click anywhere in the classroom. Find the eleven dream pieces:Examine the chalkboard at the back of the classroom. Find the two dream pieces:Examine the paper on the chalkboard to read another note from Tangle. Pull the handle in the middle of the chalkboard to reveal a strange message. Select the decipher spell at the left side of the screen:The message is translated and Lyra knows that she needs to find the map from the cabinet. Back away from the chalkboard. Three books can be found in the classroom.Select the three books to open them:Examine the left book and find the four dream pieces. Cast the decipher spell to understand the writing in the book. Select the symbols from the left page of the book to change the symbols on the right page. Put the correct symbols in the spaces on the grid to make all of the boxes green.Casual mode: Left book:Casual mode: Right book:Challenge mode: Middle book:Examine the cabinet at the left side of the room. Select the paper: Tangle mentions that Lyra's father may have hidden the combination to the cabinet in the classroom. Find the four jewel pieces:Select the dials at the top of the cabinet to change them to the ones shown in the books. The symbols are random with each new game. After the correct symbols have been entered, the map pieces will fly out of the cabinet and land in the classroom. Back awayfrom the cabinet and find the six map pieces:Examine the cabinet and use the map pieces on the light area. Select the pieces and place them in the correct positions in the cabinet:On challenge mode, there are twice as many puzzle pieces to use but the picture ends up looking the same. Examine the chalkboard and select the note from Tangle. Cast the decipher spell to translate the symbols on the chalkboard. Click the letters to spell out the names of the shapes shown on the left side of the chalkboard. The locations of the words are random with each new game.AirshipFind the eight dream pieces, the large key and the colored stones:Use the large key on the closed door at the right side of the airship. Enter the airship and select the note on the floor. Find the six dream pieces:Use the map on the desk at the right side of the room. Examine the map and then cast the reveal spell to see the Crater of Time. Back away from the map and examine the control wheel near the large middle window. Set the course and heading bar to the settings for the Crater of Time that were shown on the map. The course and heading are random each time a new game is played. A noise will be heard after the course and heading have been set correctly. Back away from the control wheel and examine the device at the right side of the room. Use the colored stones on the hole at the bottom-right corner of the device panel. Select Tangle's note at the bottom-left corner of the device to read about the fuel generator. Find the six dream pieces:Aim to click stones when they are within groups of the same color. The larger the group of stones, the more fuel will be generated. The puzzle will be completed when the needle on the fuel gauge reaches its maximum level. Exit the airship and find the seven parts:Use all of the parts on the airship, placing the balloon last. Enter the airship. Select the lever to take off for the Crater of Time:Crater of TimeSelect Tangle's note. Find the eight dream pieces:Examine the clock and find the five dream pieces:Press the small button on the clock and then press the small button again when the hour hand reaches VI. Go upstairs to arrive outside the wooden house. Take the note from Tangle and find the seven dream pieces:Examine the door at the left side of the area to see a mechanism. Exit the view of the mechanism and take the two small gears:Examine the left door again to see the mechanism. Select the note from Tangle and the three dream pieces. Switch the tiles and the gears so that all of the gears rotate.Casual mode:Challenge mode:Take Tangle's note, the metal bell and the pipe. Find the twelve dream pieces. Use the metal bell on the incomplete bell and the pipe on the incomplete pipe:Examine the book on the counter. Cast the reveal spell to display the writing on the right page. Drag letters from the left page to the spaces on the right page to complete thewords. Find the six dream pieces:Back away from the book and examine the mechanism on the wall. Select the note from Tangle. Use the metal tile on the mechanism. Rotate the tiles so that they are in the same positions as the circles on the diagram shown in the book. Find the five dream pieces:Back away from the book and select the bell on the counter to lower the pipes. Examine the pipes to speak to the clockmaker. Select the following answers to the clockmaker's questions:∙“I'm trying to find my way home. I don't belong here.”∙“Yes. I need to get back to my own dimension.”∙“Where are they?”∙“That sounds difficult, but I will do my best.”∙“Very well. I shall return.”Move back and examine the door at the right side of the wooden house. Examine the note from Tangle and then cast the reveal spell to show the puzzle pieces. Find the three dream pieces. Place the puzzle pieces in the correct positions.Casual mode:Challenge mode:Select Tangle's note. Find the ten dream pieces:Examine the clock above the right door to see that the time is set to 6 o' clock, the same as the sundial outside. The aim now is to use the two switches and the button to set all of the clocks on the wall to 6 o' clock. The left switch changes the amount that each hour hand will move, the button between the two switches adjusts the hour hand on the currently selected clock, and the right switch changes the clock selection. After setting all of the clocks to 6 o'clock, take the colored stones from the doorway that opens. Move back to front of the wooden house and go through the middle doorway. Enter the airship.Examine the device at the right side of the room. Use the colored stones on the hole and select the matching stones to create enough fuel. Move back and examine the map on the wall. Cast the reveal spell to show the location of the Treehouse Village. Exit the view of the map and examine the control wheel, then set the course and heading to the settings shown on the map for the Treehouse Village. Exit the view of the wheel and select the lever.Treehouse VillageTake the note from tangle and find the twelve dream pieces. Also take the pile of sticks and some stones:Cast the transmute spell. The four trees in the area can now be examined. Each tree has a puzzle that needs to be solved. The aim in each puzzle is to place the correct sticks on the pegs, and then press the button at the top of the screen so that the walnut falls into the hole.Tree 1:Tree 3:Take the ornate key that appears. Enter the airship and examine the device. Use the colored stones on the hole and select the matching stones to create enough fuel. Move back and examine the map on the wall. Cast the reveal spell to show the location of Wind Music Island. Exit the view of the map and examine the control wheel, then set the course and heading levers to the settings shown on the map for Wind Music Island. Exit the view of the wheel and select the lever.Wind Music IslandTake the colored stones and the note from Tangle. Find the ten dream pieces:Go up to the columns at the top-right corner of the area. Take the note from Tangle and find the eight dream pieces:The aim here is to rotate the sections of the columns to make all of the symbols green. Rotate each section until the green symbol is shown in the following order:Casual mode:Challenge mode:Back away from the columns and enter the cave. Cast the brilliance spell to illuminate the cave. Take the note from Tangle, the two metallic cylinders, the hammer and the eight dream pieces:Use the hammer on the blue crystal four times to create four blank stones. Use the two metallic cylinders and one of the blank stones on the machine. The aim now is to make the same symbols on the blank stone that were visible on the columns. The symbols thatneed to be made on the four stones are shown below:After one stone has been completed, back away from the view of the stone and then pull the handle to make the symbols. Exit the cave and examine the broken section of the building:Read the note from Tangle. Use one of the blue stones on the left slot until a song is heard and the island will then shake. If one of the stones was printed incorrectly, it will become a blank stone again and can be reprinted back in the cave. Back away from the view of thestones and find the ten sculpture pieces:Place all of the sculpture pieces on the broken stones. The completed sculptures are shown below:Inspect the broken section of the building and use the blue stones on the slots to play the song. Inspect the broken section of the building again and find the nine dream pieces:Back away from the view of the stones. Enter the airship and examine the device. Use the colored stones on the hole and select the matching stones to create enough fuel. Move back and examine the map on the wall. Cast the reveal spell to show the location of the Water Collector. Exit the view of the map and examine the control wheel, then set the course and heading levers to the settings shown on the map for the Water Collector. Exit the view of the wheel and select the lever.Water CollectorTake the note from Tangle, the colored stones, the three pipe pieces, the small key and the thirteen dream pieces:Cast the thunder spell to refill the pool. Use the three pipe pieces on the broken pipe behind the pool. Use the small key on the hut door. Enter the hut and cast the brilliance spell to illuminate the room. Take the note from Tangle, the six curved planks, the five containers and the ten dream pieces:Examine the wheel at the right side of the room to see five markings. Back away from the view of the wheel. The aim now is to use a combination of different planks on the slots above the scale to make one of the markings on the wheel. Once the planks have been used to make the symbol, place a container on the right side of the scale and pull the lever at the left side of the slots. If the scales do not balance, keep trying different containers until the scales are balanced and a bell rings. Once this happens, take the container from the scale, examine the wheel and then place the container on the correct marking. Repeat this method of creating the markings with the planks, filling the correct container and placing it on the appropriate wheel marking with the remaining four containers. A third key will be received after the puzzle has been completed. Exit the hut.Enter the airship and examine the device. Use the colored stones on the hole and select the matching stones to create enough fuel. Move back and examine the map on the wall. Move the mouse cursor over the Crater of Time to reveal the course and heading. Exit the view of the map and examine the control wheel, then set the course and heading levers to the settings shown on the map for the Crater of Time. Exit the view of the wheel and select the lever.Crater of Time RevisitedExamine the front door and go upstairs to the front of the wooden house. Examine the door at the top of the house:Back away from the mechanism view and find the three clock numbers:Examine the top door again and use the clock numbers on the mechanism. Take the three dream pieces:The aim now is to repeat the sequence of Roman Numerals that are indicated by the arrow. Cast the brilliance spell to illuminate the room. Take the five dream pieces and theiron key:Use the three ornate keys on the locked covers. Examine the left cover and select the note from Tangle. Use the iron key on the locked gear. The aim now is to place the gears so that they all rotate when the machine is turned on. To remove an incorrectly placed gear, select it and then click the reset button. Put the gears in the correct positions, move the speed slider to the right and then press the on button:Examine the middle cover. Put the gears in the correct positions, move the speed slider to the right and then press the on button:Examine the right cover. Put the gears in the correct positions, move the speed slider to the right and then press the on button:Exit the house and go through the right doorway. Take the colored stones from the hole in the wall:Exit the house and go through the middle doorway. Enter the airship and examine the device. Use the colored stones on the hole and select the matching stones to create enough fuel. Move back and examine the map on the wall. Move the mouse cursor over the village of Wish to reveal the course and heading. Exit the view of the map and examine the control wheel, then set the course and heading levers to the settings shown on the map for the village of Wish. Exit the view of the wheel and select the lever to complete the game.Bonus ChapterThe bonus chapter is available in the collector's edition of the game. Select the book on the sofa:Examine the book and select the letters to fill in the spaces:Take the vibrating roll and use it on the frame:Take the first intricate key:and complete the jigsaw puzzle:Back away from the map and take the second intricate key:Dreams and fill in the missing words:Back away from the map and take the third intricate key:and complete the jigsaw puzzle:Back away from the map and take the fourth intricate key:fill in the missing wordsBack away from the map and take the fifth intricate key:Lost and complete the jigsaw puzzle:。
《梦之旅4:天空之书》E文版中文图文攻略

《梦之旅4:天空之书》E文版中文图文攻略梦之旅Dream Chronicles以最为耐人寻味的逃脱密室为主线,结合巧妙的关卡设计,使之成为解谜游戏中佼佼者特别是唯美的画面更是让大家在轻松愉快的心情下完成解密因为梦之旅四刚出来,网上没攻略,通关费了很大力气特将攻略奉上,让后来的人有个参照. 但是建议遇到实在解决不了的问题时再来阅读,否则就失去解谜游戏的乐趣了好了,让我们开始神奇的梦幻之旅吧开始小女孩被传送到梦之世界的时候有个有个箱子,捡起地上的齿轮安装在箱子上箱子打开后,取出爷爷是信,情节继续发展乌云密布,闪电击中石像,将散落的石像捡起安装到原来位置这时大门打开,进入教室满地的宝石,赶紧捡起来梦之旅另一个吸引人的地方就是宝石收集系统在梦之旅四中,宝石收集系统简化了,但是作用更重要,必须收集一定量的宝石才能开启左边栏的功能:包括翻译异世界语言,解开地图地理位置,转换,照明,闪电等所以不要漏掉任何眼前的宝石,如果实在找不出,可以点击左下角的放大镜来求助点击黑板,拾取信件,然后再推开黑板下一层,会发现一些看不懂的文字不用担心,左边栏的第一功能就是翻译,如果你已经收集够十颗宝石,就可以使用要求解开教室里的三本书上暗示的符号第一本书先用右边栏翻译下书里内容这本书是沿着对角线对称的(每个人看到的应该不同,但是只要记住对角线对称就可以解开)并且获得一个符号第二本书每间隔两个字母中间是隔两个字母的解开后获得一个符号第三本书上下左右对称获得一个符号好了,解密用的三个符号都得到了,现在进入黑板左边的柜子里按照书本里的符号及位置排列之后柜子打开,地图散落一地捡起来拼好,这样就有一副异世界地图了有了地图可以去冒险了!再次进入黑板,出现新的谜题要找出右边单词阵的规律,很容易,只要对照着鼠标放提示就可以了注意这些单词,正着倒着,斜方向出现都有可能好了神奇的旅行开始了先进入飞艇飞艇是梦之旅4中最重要的交通工具我们先要修好它捡起钥匙打开飞艇门,好多宝石,快捡,将地图放壁上,拉动启动杆后听到异响出去一看,飞艇散架了异世界的豆腐渣工程,我们捡起地上各种零件,再组装起来回到船里,右边有个燃烧投料室将外面捡的彩色石头放进去,就可开始个小消除游戏将相邻的同色石头消除能获得动力,动力够了之后就可以起飞了充满能力时候指针最右边这时就已经准备就绪了.我们先获得目的地坐标,点击船壁上的地图,再点击左边栏的第二项触发地图,出现新的坐标,坐标分为两部分course 和heading记住这两个数值,到舵盘处输入OK,拉动启动杆,出发!熊熊的炉火,奔腾的蒸汽,飞行在异大陆的天空可惜时间太短,还没坐够就到目的地了我承认刚刚偷懒跳过一些介绍,但是之前都是比较简单的,就不详细介绍,只是把截图献出和机器喇叭对话之后,获得寻找三把钥匙的任务好我们去上面大钟处逛逛弄了一地碎片捡起来按上按照指针的位置重复一遍,就可以打开上面的门但是发现里面黑洞洞的看来得要激活光照这个左边栏的功能,手里的宝石还不够去右边门里逛下,抢些宝石再说点左边栏第二项激活游戏然后拼图即可进房间之后看到满墙的钟全部调成6点整不要问我为什么.我也不知道,试了很多种方案找出的好第四个功能光也被激活了,进阁楼看看点击光亮,发现一把钥匙,捡起来揣兜里再去外面右边门拿上燃料继续做飞艇去上飞艇后,打开地图,点击左功能栏第二项,激活一个地址好的,我们飞过去看看有什么好东西到了后看到四棵金色的树,点左边栏第三个变化成绿色天然植物让四棵树的坚果进树洞即可解开四棵树后,取得一把钥匙,之后回到飞艇点击地图,用左边栏第二项激活新地址风乐岛开动飞艇,向新目标进发到达后,进一层洞中取得锤子将水晶敲下四块之后到顶楼解密石柱左数第一从下往上调第二空缺第三从上往下调第四中间往两边调最后一个随便然后记住石柱上符号及位置,进第一层用冲机冲印这是第三个柱子上的符号及顺序四个石头全部冲印好之后去第二层按照石柱顺序摆好先摆左边一个,刚刚放好听到外面有古怪的声音,赶紧出去瞅瞅出去一看,地上的石像美女竟然都碎了赶紧扶起来,修修好上去继续填空全部填完之后再得到一把钥匙回到飞艇上继续点地图,再次发现新目标到达后点击闪电(左边栏最后一项)天空开始下雨将水池注满水用水管接到小屋进入小屋之后,用水闸数量判断捡到的金属件重量如图.用上面水闸的开关和下面的天平来判断金属件的重量这个图表示牛头件的重量可以用上面四个符号表示组合起来就是,牛头所对应的符号,将牛头放对位置后能听到一声清脆的提示音成功之后会再得到一把钥匙这样三把钥匙(小钥匙)就有了,回时间小屋顶楼解开三个封印解决三个封印之后,机器开始运转,时间恢复正常坐上飞艇飞往最开始来的地方游戏结束~!真的结束了?没有,进游戏主画面,还有增加的关卡。