T9使用说明书(ver 1.01)
福玛特T9使用说明
福玛特T9使用说明一、概述福玛特T9是一款功能强大、操作简单的智能手机。
它采用了最新的技术,拥有高清屏幕、强大的处理器和丰富多样的功能,为用户提供了出色的体验。
本使用说明将介绍福玛特T9的基本操作方法和一些常用功能的使用方法。
二、开机与解锁1.开机:长按手机侧面的电源按钮,手机将自动开机并显示欢迎界面。
2.解锁:滑动屏幕上的解锁图标或使用指纹识别功能进行解锁。
三、主界面1.快捷方式图标:用于快速启动应用程序的图标。
2.小部件:可以在主界面上显示有用信息的小部件,如天气预报、日历事件等。
3.文件夹:用于将相似的应用程序图标组合在一起,以便更好地组织应用程序。
4.应用程序列表:包含所有已安装应用程序的列表,可以通过滑动屏幕或使用功能找到所需应用程序。
四、应用程序的安装与卸载2.卸载应用程序:长按应用程序图标,选择卸载选项,确认卸载即可将应用程序从手机中删除。
五、通知中心与快捷设置面板1.通知中心:从屏幕顶部向下滑动,即可打开通知中心,显示最近的通知消息。
2.快捷设置面板:从通知中心向下滑动,即可打开快捷设置面板,显示一些常用设置选项,如蓝牙、Wi-Fi、飞行模式等。
六、拍照与录像1.打开相机应用程序:在主界面或应用程序列表中找到相机图标,点击即可打开相机应用程序。
2.拍照:对准拍摄对象,点击拍照按钮,相机将立即拍摄照片并保存到相册中。
3.录像:在相机应用程序中切换到录像模式,点击录像按钮开始录制,再次点击停止录制。
八、上网与应用程序的使用1.Wi-Fi连接:打开设置应用程序,点击Wi-Fi选项,选择要连接的无线网络并输入密码,完成连接。
2.上网浏览:打开浏览器应用程序,输入网址,点击进入网站即可开始浏览网页。
3.应用程序的使用:根据需要,打开相应的应用程序并根据界面上的指引操作即可。
九、其他功能1.音乐播放器:打开音乐播放器应用程序,点击音乐文件进行播放。
2.日历:打开日历应用程序,查看日期、添加日程、设置提醒等。
JP6C-T9变频器使用手册

JP6C-T9 变频器使用手册
一、变频器的检查、搬运与保修
1、 检查变频器是否在运输过程中造成损伤,查看铭牌,确认与订货是否相符,若有问题请与本公 司或代理商、经销商联系。 同时,请说明产品型号、规格、编号及购买日期和破损程度。
2、搬运产品时,请务必抓稳机体。若只抓住盖板或部件,可能摔坏变频器。 3、产品的保修 顾客购买产品之日起一年内为产品保修期,但下述情况时,即使在保修期内,也是有偿服务:
BX-CM 之间接通,立即切断变 用触摸面板控制起停时,BX 信号
频器输出,电动机自由运转后 停止,不输出报警信号。
能自保持。当运转指令由 FWD 或 REV 控制,BX 信号不能自保持。 若断开 BX-CM,则从起动频率起动
在运行中若 THR-CM 之间断开, 出厂时,THR-CM 之间用短接片 变频器的输出切断,电动机自由 连接,若 THR-CM 断开,显示 运转,并输出报警。这个信号在 OLE,呈报警状态。若使用外部
模拟信号输入
C2
端子
SW1 示意图
SW1 拨号开关置位 输入信号 3#置 ON,4#置 OFF C2 端子 1~5V 电压信号输入 3#置 ON,4#置 ON C2 端子 4~20mA 电流信号输入 3#置 OFF,4#置 OFF C2 端子 2~10V 电压信号输入
控制 输入
FWD REV
正转运行、停止 指令输入端 反转运行、停止 指令输入端
为了正确安装及操作本变频器,充分发挥其功能,请务必仔细阅读这本使用手册, 并请妥善保管。
此使用手册也适用于 MT9 密封柜式系列产品。 由于产品的改进等原因,本使用手册的内容有时会有变化,敬请谅解。
特别注意事项: 切勿将电源线接到变频器输出端子(U、V、W)上; 切勿将兆欧表接到控制板端子上; 在电容充电指示灯未熄灭之前,切勿触摸内部电路及零部件; 变频器接地端子 PE 必须正确接地。
AT9使用说明书.pdf
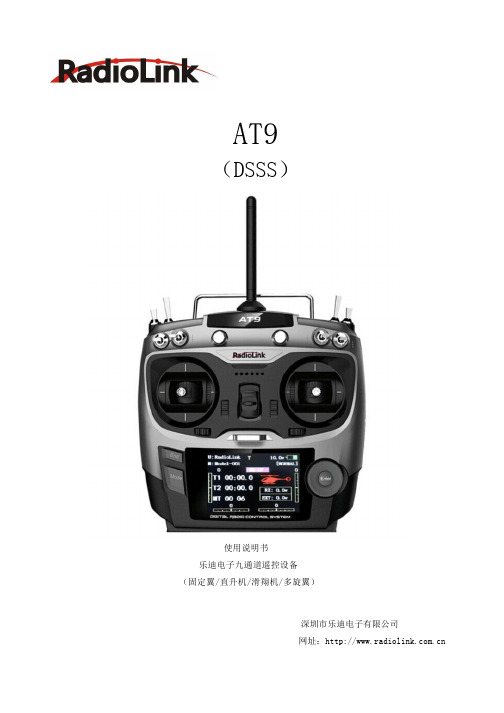
AT9
(DSSS)
使用说明书 乐迪电子圳市乐迪电子有限公司 网址:
简介
感谢您选择深圳市乐迪电子有限公司(RadioLink)生产的专业航模设备及周边产品。 乐迪 AT9 是迄今为止功能最完整的遥控设备,它可遥控直升机,固定翼,滑翔机,多旋翼四大类所有机型的飞行器, 通信系统采用抗干扰最强的 DSSS(直接序列扩频系统),功能强大但人性化的菜单设计对初学者与熟练者均适用。 为了您更好地使用我们的遥控设备并确保安全飞行,请您仔细阅读使用说明书。建议您在阅读本说明书的同时打开 遥控器和接收机,并将接收机连接舵机等相关设备,边阅读边操作。 如果您在使用过程中遇到任何问题可查阅说明书或致电我们的售后 0755-88361717,也可登录航模类论坛,如: htpp:// htpp:// htpp:// 更多的产品信息及最新程序下载,请登录:
售后服务条款
1,本条款仅适用于深圳市乐迪电子有限公司所生产的产品,乐迪通过其授权经销商销售的产品亦适用本条款。 2,乐迪产品自购买之日起,一周内经我司核实为质量问题,由乐迪承担返修产品的往返快递费,购买乐迪产品超 过一周到一年内经我司核实为质量问题,用户和乐迪各自承担寄出返修产品的快递费。 3,返修时需提供购买凭证和保修卡或网络平台交易记录。 4,乐迪产品自购买之日起七天内,在正常使用情况下出现质量问题,外观无损坏,凭保修卡及购机凭证在经销商 处协商可以免费更换同型号产品;经销商在收到更换产品时必须第一时间通知乐迪公司予以备案更换。 5,乐迪产品将由深圳市乐迪电子有限公司提供终身售后服务, 属于质量问题一年内免费保修;对于自购买之日起人 为损坏、改装、拆机及超过一年免费保修期的,用户必须支付往返邮费及维修成本费用。 收费标准: 人工费(20 元)+配件费用 6,为确保您的权益受到保护,并能及时有效的为您服务,请在购买乐迪产品时完整填写好保修卡及索要购机凭证。 用户享受本售后服务条款必须提供保修卡及购机凭证。 7,返修产品将于乐迪公司收到后 15 个工作日内寄回给顾客,并附上维修报告. 8,以上售后服务条款仅限于中国大陆销售的乐迪产品。 9,港澳台及海外客户的售后问题发至邮箱 after_service@,具体售后细则视情况而定。 本方案最终解释权归乐迪电子所有
T9S 供水说明书-2023

T9S系列恒压供水主要功能介绍
T9S供水专用变频器技术指标:
为主回路端子 为控制回路端子 请使用屏蔽线
制动电阻
T9S功能参数简表-202304版
PP-00 设为非0值,即设置了参数保护密码,在功能参数模式和用户更改参数模式下,参数菜单必须在正确输入密码后才能进入,取消密码,需将PP.00设为0。
P组、C组是基本功能参数,D是监视功能参数。
功能表中符号说明如下:
“☆”:表示该参数的设定值在变频器处于停机、运行状态中,均可更改;“★”:表示该参数的设定值在变频器处于运行状态时,不可更改;“●”:表示该参数的数值是实际检测记录值,不能更改;“*”:表示该参数是“厂家参数”,仅限于制造厂家设置,禁止用户进行操作;
基本功能参数简表:
监视参数简表:
故障报警内容:故障代码地址:便于触摸屏通讯读取
供水设备变频器报警处理对策
泵无效的端子信息B1 表示1号泵端子无效
B2 表示2号泵端子无效
B3 表示3号泵端子无效
B4 表示4号泵端子无效
1检查控制线路S1.S2.S3.S4是否
正常
2有故障泵停泵退出使用
3:参数与功能不匹配
一控二接线图:一控三接线图:
参数宏:。
tp-link archer t9uh user 说明书

User GuideAC1900 High Gain Wireless Dual Band USB AdapterArcher T9UH© 2018 TP-Link REV2.0.0 1910011886ContentsAbout This Guide 1Chapter 1 Get to Know About Your Adapter2 1. 1. Product Overview . . . . . . . . . . . . . . . . . . . . . . . . . . . . . . . . . . . . . . . . . . . . . . . . . . . . . . . . . . 3 1. 2. LED Status . . . . . . . . . . . . . . . . . . . . . . . . . . . . . . . . . . . . . . . . . . . . . . . . . . . . . . . . . . . . . . . . . 3Chapter 2 Connect to a Computer 4Chapter 3 Windows 6 3. 1. Install Driver and WPS Tool. . . . . . . . . . . . . . . . . . . . . . . . . . . . . . . . . . . . . . . . . . . . . . . . . . 7 3. 2. Join a Wireless Network. . . . . . . . . . . . . . . . . . . . . . . . . . . . . . . . . . . . . . . . . . . . . . . . . . . . . 9 3. 3. Uninstall Driver and WPS Tool. . . . . . . . . . . . . . . . . . . . . . . . . . . . . . . . . . . . . . . . . . . . . . 10Chapter 4 Mac OS X 11 4. 1. Install Driver and Utility. . . . . . . . . . . . . . . . . . . . . . . . . . . . . . . . . . . . . . . . . . . . . . . . . . . . 12 4. 2. Join a Wireless Network. . . . . . . . . . . . . . . . . . . . . . . . . . . . . . . . . . . . . . . . . . . . . . . . . . . . 144. 2. 1. TP-Link Utility . . . . . . . . . . . . . . . . . . . . . . . . . . . . . . . . . . . . . . . . . . . . . . . . . . . . . 144. 2. 2. WPS (Wi-Fi Protected Setup). . . . . . . . . . . . . . . . . . . . . . . . . . . . . . . . . . . . . . . 15 4. 3. Management . . . . . . . . . . . . . . . . . . . . . . . . . . . . . . . . . . . . . . . . . . . . . . . . . . . . . . . . . . . . . 19 4. 4. Uninstall Driver and Utility. . . . . . . . . . . . . . . . . . . . . . . . . . . . . . . . . . . . . . . . . . . . . . . . . 20 Chapter 5 Linux 22Appendix: Troubleshooting 24About This GuideThis guide is a complement to Quick Installation Guide. The Quick Installation Guide instructs you on quick installation, and this guide provides the product overview and detailed instructions for each steps.When using this guide, please notice that features of the adapter may vary slightly depending on the model and software version you have. All screenshots, images, parameters and descriptions documented in this guide are used for demonstration only.ConventionsIn this guide, the following conventions are used:More Info• The latest software and utility can be found at Download Center at http://www.tp-link. com/support.• The Quick Installation Guide (QIG) can be found where you find this guide or inside the package of the product.• Specifications can be found on the product page at .• Our Technical Support contact information can be found at the Contact Technical Support page at /support.Chapter 1Get to Know About Your AdapterThis chapter introduces what the adapter can do and shows its appearance. This chapter contains the following sections:•Product Overview•LED StatusChapter 1Get to Know about Your Adapter1 1 Product OverviewTP-Link Wireless USB Adapter connects your computer to a Wi-Fi network for smooth HD video, voice streaming and online gaming.•Compatible with 802.11 ac/a/b/g/n products•Beamforming technology delivers a more targeted and highly efficient wireless connections•High gain antennas ensure superior range and stability•Equipped with a USB 3.0 cradle for flexible deployment•With WPS button, the adapter provides secured connection at the push of a button •Supports ad-hoc and infrastructure mode•Supports 64/128 bit WEP, WPA-PSK/WPA2-PSK•Supports Windows, Mac and Linux1 2 LED StatusYou can check the adapter’s working status by following the LED Explanation table.Tips:If the LED is off, try these troubleshooting tips:1. Check if the adapter is recognized and enabled or not. Refer to Troubleshooting-T2 for detailed instructions.2. Remove and reconnect the adapter.3. Reinstall the software, if necessary.Chapter 2Connect to a Computer This chapter introduces how to connect the adapter to your computer.Chapter 2Connect to a Computer Before you start using your adapter, insert the adapter into a USB port on your computer directly or connect the adapter to your computer using the USB cradle provided.Note:If interference appears on your computer’s monitor, try moving the adapter further from your computer.After connecting your adapter to the computer, please follow the instructions in the appropriate chapter for your operating system: Windows, Mac OS X, Linux.Chapter 3WindowsThis chapter introduces how to install your adapter’s driver and WPS Tool, use your adapter to join a wireless network, and uninstall your adapter in a Windows system. The adapter is equipped with a Setup Wizard, which can guide you through the installation process.This chapter includes the following sections:• Install Driver and WPS Tool• Join a Wireless Network• Uninstall Driver and WPS Tool3 1 Install Driver and WPS Tool1 Insert the resource CD into your CD drive and run the Autorun.exe from the pop-upAutoplay window.Note:1. You can also download the driver from the product’s Support page at www tp-link com.2. In some operating systems, the CD screen will pop up automatically. Otherwise, run the CD manually.2 Select Archer T9UH and follow the instructions to complete the installation.Note:If you can’t install the driver successfully, disable the antivirus software and firewall, then try again.3 When the following screen appears, the driver has been installed successfully.4 If you want to connect effortlessly with the push of a WPS button, click Yes andfollow the instructions to install the mini WPS Tool.Note:For Windows XP, WPS Tool is not supported. Please use Windows built-in wireless utility to join the wireless network.5 When the following screen appears, the WPS Tool has been installed successfully.You can enjoy connecting to your Wi-Fi with the push of the WPS button., (Network icon) on the taskbar. Select the Wi-Fi network you want to join, and click2. When the network icon changes to3. When the “Success!” message appears, your computer is connected to Wi-Fi.3 3 Uninstall Driver and WPS ToolThe software uninstallation steps vary a bit from different systems. Please follow the appropriate instructions for your Windows operating system: Windows 8/8.1/10, Windows XP/7.• Windows 8/8 1/10Go to Start menu to find the TP-Link application. Click Uninstall TP-Link Archer T9UH Driver, then follow the on-screen instructions to complete the uninstallation.• Windows XP/7Go to Start > All Programs > TP-Link > Uninstall TP-Link Archer T9UH Driver.Follow the on-screen instructions to complete the uninstallation.Chapter 4Mac OS XThis chapter introduces how to install your adapter’s driver and utility, use your adapter to join a wireless network, manage your adapter and uninstall your adapter in Mac OS X.This chapter includes the following sections:• Install Driver and Utility• Join a Wireless Network• Management• Uninstall Driver and Utility4 1 Install Driver and UtilityWe take the steps in Mac OS X 10.10 as an example - the steps may vary slightly for other versions of Mac OS.1 Download the driver and utility from this product’s Support page from TP-Link’sofficial website .Note:The CD is included in the package. If your computer has a CD drive, you can also run the included CD to install the driver and utility.2 Double click to unzip the downloaded folder and run the Install.pkg.3 The Install TP-Link Wireless USB Adapter Utility and Driver Wizard window willappear. Click Continue and follow the instructions to complete the installation.4 When the following screen appears, the driver and utility have been installedsuccessfully. Click Restart to finish the installation.5 After restarting the computer, the TP-Link Utility icon will appear on the menubar in the upper-right corner of the screen. To use the utility to join a Wi-Fi network with your adapter, refer to Join a Wireless Network.Note:If the TP-Link Utility icon does not appear on the menu bar, make sure the USB wireless network adapter is connected properly and its LED is on.4 2 Join a Wireless NetworkThere are two options of using the adapter to join a Wi-Fi network.Option 1: TP-Link UtilityTP-Link Utility lets you easily connect the adapter to a Wi-Fi network and manage the adapter.Option 2: WPS (Wi-Fi Protected Setup)WPS (Wi-Fi Protected Setup) is a network security standard for easily adding computers and other devices to a home network. Use this method if your wireless router or access point supports WPS.4 2 1 TP-Link UtilityOption 1Click the TP-Link Utility icon on the menu bar, and choose a Wi-Fi network from the list. Enter the password when prompted.When you are connected to the internet, the network icon will change to .Option 21 Click the TP-Link Utility icon on the menu bar, and then click Open WirelessUtility at the bottom of the network list.2 Select the network you want to join from the list and enter the password whenprompted. Click Join.Note:•2. The following screen indicates a successful connection by WPS. Click OK.Option 21. Press the WPS/QSS button on your router or AP.2. Within 2 minutes, click the TP-Link Utility icon on the menu bar, and then click WPS at the bottom of the network list.3. Click PBC.4. The following screen indicates a successful connection by WPS. Click OK.• PIN1. Click the TP-Link Utility icon on the menu bar, and then click WPS at the bottomof the network list.2. Click PIN.4. The following screen indicates a successful connection by WPS. Click OK.4 3 ManagementTP-Link Utility provides you with an easy way to manage various connection settings of your Wi-Fi network.1 Click the TP-Link Utility icon on the menu bar, and then click Open WirelessUtility at the bottom of the network list.2 TP-Link Utility will pop up. Click the Profiles button to open the Profiles screen.3 The Profiles screen lets you manage different Wi-Fi connection settings as profilesso that you can connect to your network easily.Preferred Networks displays the networks that you once connected to. The networks’ status and information are displayed on the table.• To join a Wi-Fi networkIf you want to join a Wi-Fi network that is listed on the profile screen, select the profile and click Apply in the bottom right corner.• To manage an existing profileIf you want to change the wireless settings of an existing profile, select it and then you can edit its Security and Password. If you want to delete a profile, select it and click Remove.4 4 Uninstall Driver and Utility1 Double click mand in the downloaded folder.2 Enter the password of you computer and when the “Uninstall Complete” messageappears, the uninstallation is complete.Chapter 5LinuxThis chapter introduces how to install your adapter’s driver in a Linux system.Chapter 5Linux Visit the TP-Link’s website at , and go to Archer T9UH’s product page. Then find the compatible version of driver in the support page. Download and install the driver on your computer.Appendix: Troubleshooting T1. W hat should I do if the adapter is not detected?• Make sure the adapter is securely connected to the computer.• Make sure you meet the minimum system requirements for the adapter and that the latest Windows and system updates are installed on your computer.• Make sure you use the latest driver for your specific adapter. The latest drivers can be found at the product’s Support page at .• If you are using the USB cradle that connects the USB adapter, try to connect the adapter directly to the computer.• Try a different USB port on the computer.• Try restarting the computer or try using the adapter on a different computer.T2. H ow to check if I have installed the driver for my adapter successfully or not?1. On your computer, please right click Computer icon and go to Manage;2. Open the Device Manager and go to Network adapters, and then find the corresponding TP-Link adapter, right click it and then go to Properties;3. If you can see “This device is working properly.” in the red box, you have already installed the driver successfully.T3. W hat should I do if can’t connect to the Wi-Fi after installing the driver?• Refer to T2to check if you have installed the driver for your adapter successfully .• Make sure the adapter is securely connected to the computer.• Disable the antivirus software and firewall, then try again.• Try a different USB port on the computer.• Re-install the driver and try again.T4. H ow to find the hardware version of the adapter?• The hardware version is printed on the product label on the package or the adapter. There is a character string “Ver:X.Y” (for example, Ver:2.0) in the Serial Number field, and the number X is the hardware version of the adapter.• Visit /faq-46.html and follow the second method to find the hardware version of the adapter.FCC STATEMENTThis equipment has been tested and found to comply with the limits for a Class B digital device, pursuant to part 15 of the FCC Rules. These limits are designed to provide reasonable protection against harmful interference in a residential installation. This equipment generates, uses and can radiate radio frequency energy and, if not installed and used in accordance with the instructions, may cause harmful interference to radio communications. However, there is no guarantee that interference will not occur in a particular installation. If this equipment does cause harmful interference to radio or television reception, which can be determined by turning the equipment off and on, the user is encouraged to try to correct the interference by one or more of the following measures:• Reorient or relocate the receiving antenna.• Increase the separation between the equipment and receiver.• Connect the equipment into an outlet on a circuit different from that to which the receiver is connected.• Consult the dealer or an experienced radio/ TV technician for help.This device complies with part 15 of the FCC Rules. Operation is subject to the following two conditions:1 ) This device may not cause harmful interference.2 ) This device must accept any interference received, including interference that maycause undesired operation.Any changes or modifications not expressly approved by the party responsible for compliance could void the user’s authority to operate the equipment.Note: The manufacturer is not responsible for any radio or TV interference caused by unauthorized modifications to this equipment. Such modifications could void the user’s authority to operate the equipment.FCC RF Radiation Exposure Statement:This equipment complies with FCC radiation exposure limits set forth for an uncontrolled environment. End users must follow the specific operating instructions for satisfying RF exposure compliance. This transmitter must not be co-located or operating in conjunction with any other antenna or transmitter. This equipment has been SAR-evaluated for use in hand. SAR measurements are based on a 5mm spacing from the body and that compliance is achieved at that distance.CE Mark WarningThis is a class B product. In a domestic environment, this product may cause radio interference, in which case the user may be required to take adequate measures. OPERATING FREQUENCY(the maximum transmitted power)2412MHz—2472MHz (20dBm)EU declaration of conformityTP-Link hereby declares that the device is in compliance with the essential requirements and other relevant provisions of directives 2014/53/EU and 2011/65/EU.The original EU declaration of conformity may be found at /en/ ce.RF Exposure InformationThis device meets the EU requirements (2014/53/EU Article 3.1a) on the limitation of exposure of the general public to electromagnetic fields by way of health protection. This device has been tested and meets the ICNIRP exposure guidelines and the European Standard EN 62209-2. SAR is measured with this device at a separation of 0.5 cm to the body, while transmitting at the highest certified output power level in all frequency bands of this device. Carry this device at least 0.5 cm away from your body to ensure exposure levels remain at or below the as-tested levels.Canadian Compliance StatementThis device complies with Industry Canada license-exempt RSSs. Operation is subject to the following two conditions:1 ) This device may not cause interference, and2 ) This device must accept any interference, including interference that may causeundesired operation of the device.Le présent appareil est conforme aux CNR d’Industrie Canada applicables aux appareils radio exempts de licence. L’exploitation est autorisée aux deux conditions suivantes :1 ) l’appareil ne doit pas produire de brouillage;2 ) l’utilisateur de l’appareil doit accepter tout brouillage radioélectrique subi, memesi le brouillage est susceptible d’en compromettre le fonctionnement. Radiation Exposure Statement:This EUT is compliance with SAR for general population/uncontrolled exposure limits in RSS-102 and had been tested in accordance with the measurement methods and procedures specified in IEEE 1528 and IEC 62209. This equipment should be installed and operated with minimum distance 1.0 cm between the radiator and your body. Thisdevice and its antenna(s) must not be co-located or operating in conjunction with any other antenna or transmitter.Déclaration d’exposition aux radiations:Cet équipement est conforme aux limites d’exposition aux rayonnements IC établies pour un environnement non contrôlé. Cet équipement doit être installé et utilisé avec un minimum de 20 cm de distance entre la source de rayonnement et votre corps. Industry Canada StatementCAN ICES-3 (B)/NMB-3(B)Korea Warning Statements당해 무선설비는 운용중 전파혼신 가능성이 있음.NCC Notice注意!依據 低功率電波輻射性電機管理辦法第十二條 經型式認證合格之低功率射頻電機,非經許可,公司、商號或使用者均不得擅自變更頻率、加大功率或變更原設計之特性或功能。
T9使用说明书

D E S I G N B Y I R I V E R T9U S E R G U I D E目录 入门组件定位控件电源管理连接设备使用 iriver plus 4 03 03 05 06 080103 02使用 T9主屏幕 音乐运动收音机录音浏览器设置11121415171819其他信息重要安全信息故障排除版权认证注册商标豁免212223242424组件组件如有变更,恕不另行通知,组件可能与所示图片存在差异。
部件的外表及所印刷或刻印的内容可随型号或各部件的名称而异。
定位控件及设备保修耳机:您可以将耳机连接到设备以输出声音。
快速入门指南:本手册将帮助您了解如何使用我们的设备。
设备质量保证书:请将其妥善保管,您可能在保修时使用它。
耳机插孔:在此处插入耳机以收听音乐。
麦克风:通过麦克风录制声音。
电源:按住此处可关闭电源。
快速按下可切换成待机模式。
吊带孔:连接吊带绳。
重置:重置设备。
LCD:显示屏幕。
上:播放时移动上一曲和快退。
收听FM广播时切换上一个频点。
下:播放时移动下一曲和快进。
收听FM广播时切换下一个频点。
左:切换到上级菜单/上-页右:确认和执行选定的项目。
USB 端口:您可以使用此端口连接计算机或为电池充电。
音量:控制声音大小。
USB 端口滑盖:推动滑盖可拉出或插入 USB 端口。
1.如使用该设备时按下 [ ] 按钮,该设备将被锁定。
2.您可以再次按 [ ] 按钮以解锁设备。
电源管理 1.按住 [ ] 打开电源。
2.当设备打开时,按住 [ ] 可关闭电源。
开机/关机该型号支持自动省电功能,减少电池消耗。
根据 [设置-定时器-自动关机],若在规定时间内没有任何按键操作,设备将自动关闭。
(请参考第 20 页)即使您使用了重置功能,仍将保留当前的时间和记忆数据。
设备正在播放时,请不要使用重置功能。
可能会对内存造成严重破坏。
使用锁定功能1.若使用设备时按钮不工作,请按 [重置]。
使用重置功能1.打开计算机。
T-960说明书v1.01

T-960可编程控制器使用说明注意!操作前请认真阅读本手册!安装配线前请断开输入电源!通电前请确认配线是否正确!请在规定的电压范围内操作!1.T-960概述T-960可编程逻辑控制器是我公司T-960系列PLC其中一款产品,使用最大频率72MHz 的ARM工业级CPU,外扩32M SDRAM和4M FLASH,嵌入式操作系统,2M用户程序存储区和2M用户数据存储区。
编程软件使用KW MULTIPROG,通过以太网下载程序,另有2路RS232/485接口。
T-960集成8路DI、6路DO、3路AI、1路AO、3路交流电压采样、3路交流电流采样于一体,是一款可满足电力系统应用的可编程控制器。
1.1.物理特性1.2.电源特性L N1.3.通信系统运行/停止(停止状态仅PLCRUN 运行灯(闪)、COM1 1.4.存储器特性1.5.常规特性1.6.I/O特性2.寄存器配置及映射2.1.输入映射%IB 256个2.2.输出映射%QB 256个2.3.中间变量映射%MB 40000个2.4.数字量输出定义功能码:01/05,共65535个2.5.数字量输入定义功能码:02,共65535个2.6.输入寄存器定义功能码:04,共65535个2.7.保持寄存器定义功能码:03/06,共65535个2.8.波特率设置表:3.软件使用说明3.1.软件安装1.安装PLC编程软件:SETUP.exe (默认目录安装)2.安装NET Framework 2.0.exe3.安装T-900系列驱动:eCLR21.exe (默认目录安装)4.安装PLCdriver.msi驱动补丁包(默认目录安装)3.2.编程时物理硬件配置1.PLC类型:eCLR / ARM_LE_GCC32.打开模板工程开始编程3.在程序安装目录下(C:\KW-Software\MULTIPROG Express\PLC\FW_LIB)有系统功能块固件包,在编程环境中可以增加自己所需要的功能包进行编程应用。
Ergotron 9WorkFit Dual Monitor Kit 用户指南说明书

WorkFit Dual Monitor Kitfor WorkFit-T and WorkFit-PDUser's Guide - English Guía del usuario - EspañolManuel de l’utilisateur - Français Gebruikersgids - DeutschBenutzerhandbuch - Nederlands Guida per l’utente - Italiano Användarhandbok - svenska 用户指南 : 汉语IncludesConstant Force ™TechnologyENGLISHFor the latest User Installation Guide please visit: User's GuideMoving Parts Can Crush & CutThese symbols alert users of a safety condi-tion that demands attention. All users shouldbe able to recognize and understand thesignifi cance of the following Safety Hazardsif encountered on the product or within thedocumentation. Children who are not ableto recognize and respond appropriately toSafety Alerts should not use this product with-out adult supervision!Hazard SymbolsReviewSafetyImportant! You will need to adjust thisproduct after installation is complete.Make sure all your equipment isproperly installed on the product beforeattempting adjustments. This productshould move smoothly and easilythrough the full range of motion andstay where you set it. If movements aretoo easy or diffi cult or if product doesnot stay in desired positions, follow theadjustment instructions to create smoothand easy movements. Depending onyour product and the adjustment, it maytake many turns to notice a difference.Any time equipment is added or removedfrom this product, resulting in a changein the weight of the mounted load, youshould repeat these adjustment steps toensure safe and optimum operation.6 - 14 lbs(2.72-6.35 kg)6 - 14 lbs(2.72-6.35 kg)< 5 lbs(2.25 kg)< 2 lbs(0.9 kg)A B CDA +B +C +D < 31 lbs (14 kg)12xM6 x 30mm4mmab2xM6 x 35mmWorkFit-PD1acWorkFit-T 4x4xM6 x 25mm4mmbE N G L I S H8Adjustment Stepproperly installed on the product before attempting adjustments. This product should move smoothly and easily through the full range of motion and stay where you set it. If movements are too easy or dif fi cult or if product does not stay in desired positions, follow the adjustment instructions to create smooth and easy movements. Depending on your product and the adjustment, it may take many turns to notice a difference. Any timeequipment is added or removed from this product, resulting in a change in the weight of the mounted load, you should repeat these adjustment steps to ensure safe and optimum operation.WorkFit-PD onlyFor local customer care phone numbers visit: Learn more about ergonomic computer use at:Set Your Workstation to Work For YOU!Height Position top of screen slightly below eye level.Position keyboard at about elbow height with wrists fl at.Distance Position screen an arm's length from face—at least 20” (508mm).Position keyboard close enough to create a 90˚ angle in elbow. Angle Tilt screen to eliminate glare.Tilt the keyboard back 10° so that your wrists remain fl at.To Reduce FatigueBreathe - Breathe deeply through your nose.Blink - Blink often to avoid dry eyes.Break • 2 to 3 minutes every 20 minutes• 15 to 20 minutes every 2 hours.。
- 1、下载文档前请自行甄别文档内容的完整性,平台不提供额外的编辑、内容补充、找答案等附加服务。
- 2、"仅部分预览"的文档,不可在线预览部分如存在完整性等问题,可反馈申请退款(可完整预览的文档不适用该条件!)。
- 3、如文档侵犯您的权益,请联系客服反馈,我们会尽快为您处理(人工客服工作时间:9:00-18:30)。
SP-T9便携式热敏打印机使用说明书VER 1.01北京思普瑞特科技发展有限公司目录注意事项 (1)安全注意事项 (1)使用注意事项 (1)存放注意事项 (2)第一章打印机外观及型号 (3)1.1外观 (3)1.2型号 (3)第二章性能特点 (4)2.1打印性能 (4)2.2物理参数 (4)2.3环境参数 (4)2.4其他性能 (5)第三章使用方法 (6)3.1使用前的准备 (6)3.1.1 电池安装 (6)3.1.2 打印纸卷安装 (7)3.2基本功能使用 (8)3.2.1 开机 (8)3.2.2 关机 (8)3.2.3 走纸(手动进纸) (8)3.2.4 自检测 (8)3.2.5 十六进制打印 (8)3.2.6打印机参数设置 (9)3.2.7 充电 (9)3.3打印机参数设置 (10)3.4打印机连接及打印 (10)3.4.1 USB连接 (10)3.4.2 蓝牙连接 (10)3.4.3 蓝牙绑定地址 (11)3.5指示灯及蜂鸣器说明 (11)第四章其他信息 (14)4.1指令编程手册 (14)4.2预印刷黑标说明 (14)附录 (16)注意事项在使用打印机之前,请仔细阅读本章内容!安全注意事项本打印机只能使用本公司提供的专用电池和电源适配器,否则可能引起产品损坏,电池漏液、起火甚至爆炸。
不要将电池投入火中,不要将电池短路、拆散或加热,否则可能导致电池漏液、起火甚至爆炸。
如果长时间不使用打印机,务必将电池从打印机中取出,否则可能导致电池漏液。
电池中的液体具有腐蚀性,如果操作不慎导致电池漏液并将液体粘到皮肤或衣物上,请立即用清水洗掉,如不慎进入眼睛内,请立即用大量清水彻底冲洗眼睛并去看医生。
打印时或刚打印结束时不要开启纸仓盖,用手或身体的任何部位接触打印机芯,以免过高的温度导致烫伤。
使用注意事项打印机不可浸入水中,也不要将其暴露在雨中,否则可能导致打印机损坏。
打印过程中不得打开纸仓盖,否则可能导致打印机工作不正常。
在使用USB接口打印时,在打印过程中不能将USB线拔下,否则可能导致打印数据不完整。
在使用蓝牙方式打印时,在打印过程中距离不能超过10米,否则可能导致打印乱码或无法打印。
虽然打印机可以在0℃到50℃稳定工作,但过高的环境温度(45℃)或过低的环境温度(5℃)会导致打印质量降低。
过高的环境湿度(85%相对湿度以上)或过低的环境湿度(20%相对湿度以下)会导致打印质量降低。
使用劣质的打印纸或存放时间过长的打印纸可能造成打印质量降低,甚至损坏打印机。
打印机在黑标检测方式下工作时(打印印有黑标的预印刷票据时),要求预印刷在打印纸上的黑标符合黑标印刷规范(详见4.2 黑标检测说明),否则可能导致打印机无法准确检测黑标。
打印机在充电前尽量将电池电量用完后再充电,这样可以有效地保证电池的使用寿命。
存放注意事项打印机需存放在温度为-40℃到70℃、相对湿度在10%到95%的环境中。
如果长时间存放打印机,请务必取出打印机中的电池单独存放,否则可能导致电池失效、甚至漏液,进而损坏打印机。
普通热敏打印纸的存放时间较短,如果要打印需长期保存的单据,请选用长效热敏打印纸。
打印纸不要放在高温或阳光直射的地方储存,如果已经拆封,请放在避光的地方保存。
第一章打印机外观及型号1.1外观【CHARGE】:充电指示灯,【ERROR】: 错误指示灯【FEED】:进纸键,【MODE】:模式键。
1.2型号SP-RMT9 支持USB通讯接口。
SP-RMT9BT 支持USB和蓝牙两种通讯接口。
第二章性能特点2.1 打印性能打印方式:行式热敏;打印纸宽:80mm;打印宽度:72mm;分辨率:8点/mm(203dpi);每行点数:576点;打印速度:MAX 80mm/S;纸张厚度:60~80μm;可打印内容:GB18030全部汉字及字符,BIG5全部繁体汉字,ASCII 字符,自定义字符。
2.2 物理参数外观尺寸:105(L)×101(W)×46.6(H)mm;重量:250g(不含纸卷和电池);纸卷直径:≤40mm;接口方式: USB、蓝牙;2.3 环境参数工作温度:0℃~50℃;工作湿度:10%~80%;储藏温度:-40℃~70℃;储藏湿度:10%~95%。
2.4 其他性能装纸方式:蛤壳式装纸(装纸方法详见3.1.2 打印纸卷安装);黑标定位:有(详见4.2 预印刷黑标说明);纸尽检测:当纸用尽时打印机ERROR指示灯会长亮,如果正打印时,内部蜂鸣器还会发出鸣响,并停止打印。
打印控制指令:ESC/POS兼容指令集(详见《T9指令编程手册》.供电方式:7.4V/1500mAh可充电聚合物锂电池;电量报警:当电池电量将消耗完时,打印机【电量】指示灯闪烁。
充电:快速充电,约3小时即可充满;一次充电可用时间:25%打印密度下打印长度大于120米,待机时间大于100小时。
本参数是参考参数,电池在使用很久之后,可能导致容量下降,不能确保打印时间。
第三章使用方法3.1 使用前的准备3.1.1 电池安装1.将电池放入电池仓内。
2.装上电池盖。
3.1.2 打印纸卷安装1.用手拿住纸仓盖两边,打开纸仓盖。
2.放入新的纸卷。
注意请使用有效打印面在外面的打印纸。
3.将纸端拉出一部分,放于机器出纸口中心。
4.关上纸仓盖,撕去多余的纸。
3.2 基本功能使用3.2.1 开机按住【电源】键,打印机电源指示灯亮,约1秒后,会听到“一低一高”提示音,然后松开【电源】键,打印机进入工作模式,电池电量指示灯显示电池的电量。
3.2.2 关机开机状态下,按住【电源】键,约1秒后打印机发出“一高一低”提示音,打印机电源指示灯灭,然后松开【电源】键,打印机关机。
3.2.3 走纸(手动进纸)打印机在正常工作状态下,按下【FEED】键,打印机开始走纸,松开【FEED】键则停止走纸。
在黑标纸模式下,按下【FEED】键,打印机开始走纸,走过黑标并停止走纸,如不是黑标纸,则走纸30cm 后自动停止走纸。
3.2.4 自检测用户拿到打印机后,可以随时对打印机进行自检,以检测打印机当前的设置和状态。
进入自检测:关机状态下,按住【FEED】键,再开机,在听到“一低一高”的开机提示音后,松开【电源】键和【FEED】键,则打印输出当前打印机的状态和设置。
3.2.5 十六进制打印十六进制打印功能:是将从主机接收的数据用十六进制数和其相应的字符打印出来,方便调试应用程序。
进入十六进制打印:关机状态下,先按住【MODE】键,再开机,在听到“一低一高”的开机提示音后,松开【电源】键,再按下【FEED】键,然后松开【MODE】键和【FEED】键,打印机进入十六进制打印模式,并打印进入十六进制打印模式的提示。
退出十六进制打印:关闭电源或按【FEED】键三次打印机退出十六进制打印模式,并打印退出十六进制打印模式的提示。
3.2.6打印机参数设置该功能是设置打印的一些简单参数进入参数设置:关机状态下,先按住【MODE】键,再开机,在听到“一低一高”的开机提示音后,先松开【电源】键然后松开【MODE】键,则打印进入参数设置模式。
并打印出第一项可设置参数及其当前设定值。
详细设置方法请参见附录部分。
退出参数设置:先按住【MODE】,再按住【FEED】键,然后松开【MODE】键和【FEED】键,保存设定的参数值并退出参数设置模式。
进入正常工作模式。
若直接按住【电源】键关闭打印机,则设定的参数值不保存。
3.2.7 充电打印机在使用一段时间后,打印机电池的电量会消耗光。
当打印机电池的电量已经接近用完时,最低的电池电量指示灯会闪烁报警,此时用户需要对电池进行充电。
充电的方法如下:将电源适配器的市电插头插入220V、50HZ 的电源插座,然后将充电插头插入打印机的电源插座,打印机就开始充电,充电过程中,打印机的【CHARGE】灯为红色,当电池电量充满,【CHARGE】灯为色蓝,充电所需的时间在3小时左右。
在充电过程中,如果使用打印机,充电时间将会延长。
充电过程中,如果【CHARGE】灯显示为红蓝双色,表示电池充电故障。
如电池安装不良、接触不好、电池内部温度过高或过低。
3.3 打印机参数设置打印机可以利用专用软件〈T9设置工具软件〉通过计算机进行更多的参数设置。
可设置打印机的语言、字体、打印浓度、默认代码页、打印机的蓝牙设备名称及密码等。
设置方法详见〈T9设置工具软件帮助〉文件,该帮助文件随软件一起提供。
3.4 打印机连接及打印3.4.1 USB连接SP-RMT9打印机的标准配置中配备有一条标准 MINI USB 线,用于连接打印机和主设备。
打印机的USB属于从设备类型(DEVICE)。
3.4.2 蓝牙连接带蓝牙接口的手持设备,笔记本电脑,或其他信息终端,可以通过蓝牙接口驱动SP-RMT9打印。
SP-RMT9便携式打印机的蓝牙兼容B luetooth 2.0蓝牙规范,功率级别为CLASS 2,有效距离10m。
打印机的蓝牙属于从设备。
初始设备名称为T9 BT Printer,初始密码为“1234”。
用户可以使用〈T9设置工具软件〉根据需要修改设备名称和密码等,更改设备名称及密码的方法详见〈T9设置工具软件〉的帮助文件。
SP-RMT9便携式打印机工作前需与控制打印机的蓝牙主设备配对,配对由主设备发起。
通常的配对过程如下:1、打印机开机,2、主设备搜寻外部蓝牙设备,3、如果有多台外部蓝牙设备的话,选中T9 BT Printer打印机4、输入密码“1234”5、完成配对。
具体的配对方法请参阅主设备蓝牙功能说明。
注意:①配对时,SP-RMT9便携式打印机必须处于开机状态。
②打印机的蓝牙设备一旦和主机蓝牙设备配对成功,它将不再为其他主蓝牙设备提供搜索和链接服务,直到和链接它的主设备断开连接。
③配对成功后,打印机【电源】指示灯闪烁。
3.4.3 蓝牙绑定地址绑定地址时:打印机会自动记忆设置后的第一次与其配对的主设备的地址,一旦打印机记忆了地址,则连接只能在它与它记忆的设备之间建立,而不能被其它设备查询和配对。
所以在绑定地址时,如果希望与其它设备建立连接,则必须清除记忆的地址或设置为不绑定地址模式。
重新设置绑定地址模式(设置或取消)打印机自动清除记忆的地址。
不绑定地址时:打印机可以被其它主设备查询和配对。
所以,如果希望打印机只能与指定的主设备连接而不能被其他的主设备连接,最好绑定地址。
设置地址绑定的方法详见〈T9设置工具软件〉3.5 指示灯及蜂鸣器说明打印机有四个指示灯,分别是红蓝双色的【CHARGE】灯、红色的【ERROR】灯、蓝色的【电量】指示灯和蓝色的【电源】指示灯。
以下是指示灯含义。
【电源】指示灯:长亮:打印机已开机,且蓝牙处于断开状态。
闪烁:打印机已开机,且蓝牙处于连接状态。