P-touch P700标签机使用手册
兄弟打标机的使用方法
云南九九彩印有限公司
“一点课程”教案
记录编号:JJ.374 部门设备基建部
主题兄弟打标机的使用方法编号
制作人李俊
类别□基础知识
□改善案例
□问题实例
部门负责人直属上级班组长
张天佑胡朔文
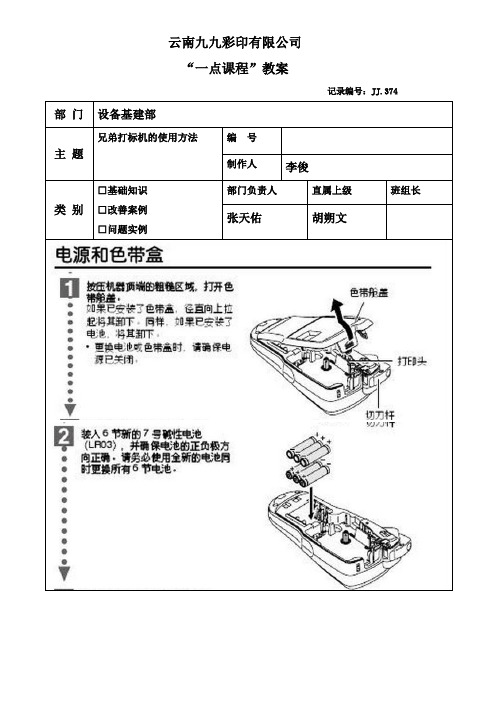
安装色带:
1. 根据使用的兄弟标签机型号选择可使用色带类型,安装色带前关闭标签机电源,确保色带的末端正确穿过导带槽,如果色带松动,则用您的手指沿色带盒上箭头的方向转动齿形轮。
2. 安装说明书正确安装好色带,按下标签机电源按钮,按下送带/剪切按钮以清除色带松弛现象。
3. 您只可在打印机的滚轴组件松开时取出色带盒。
如果您按下打印机正面的电源按钮,或在打印标签之后10 分钟之内未执行其他操作,则它将自动松开。
创建打印标签:
1. 启动P-touch Editor软件,在P-touch Editor中输入标签文字等信息。
编辑完毕后,可按预览键,将显示预览画面(打印内容、所装入的色带宽度及打印长度)。
2. 确认无误后,按直接打印便可把标签打印出来。
培训纪录
培训日期
讲师
受培训者评价
备注:评价分数1)知道但不会做—“评分1”;2)在别人的帮助下会做—“评分2”;3)能独立进行操作—“评分3”;4)不仅会操作,还能教育别人—“评分4”。
贴标机的使用操作流程示

贴标机的使用操作流程示例1. 检查贴标机设备及准备工作在使用贴标机之前,确保进行以下检查和准备工作:•确认贴标机设备是否完好,无损坏或故障。
•准备所需的标签纸和墨盒,并确保其充足。
•检查贴标机连接电源和网络线,并确认其正常工作。
2. 打开贴标机电源•确保贴标机已连接到电源,并确认电源线与插座连接稳固。
•按贴标机上的电源按钮,将其打开。
3. 调整贴标机设置在使用贴标机之前,需要根据具体需求调整相关设置:•通过触摸屏或按钮菜单,进入贴标机的设置界面。
•根据需要,选择合适的标签尺寸、打印速度、标签布局等设置参数。
•保存设置并退出设置界面。
4. 安装标签纸和墨盒•打开贴标机的标签仓门,将标签纸放入标签仓内,并确保纸张放置正确、紧密。
•安装墨盒并确保其与贴标机正确连接。
•关闭标签仓门,确保其锁定紧固。
5. 贴标机打印准备•点击贴标机的打印预览按钮,调整并预览标签的布局和内容。
•根据需要,对标签上的文字、图像等进行编辑和调整。
•检查贴标机与打印机的连接,确保打印机正常工作。
6. 进行标签打印•将需要贴标的物品放置在贴标机的工作平台上。
•点击贴标机上的打印按钮,开始打印标签。
•贴标机将自动进行标签打印和贴标的操作。
•等待贴标机完成打印和贴标过程,确保标签贴附在物品上。
7. 检查打印贴标结果•检查打印的标签上的文字、图像等内容是否清晰可见。
•检查标签是否正确贴附在物品上,并确保粘贴牢固。
•如发现问题,可重新调整贴标机设置,重复进行打印贴标过程。
8. 关闭贴标机及清理工作•打印和贴标完成后,将贴标机设备关闭。
•清理和维护贴标机设备,包括清理标签纸残留、墨盒更换等工作。
•将贴标机放置在干燥、通风的环境中,并确保其安全保存。
以上为贴标机的使用操作流程示例。
确保按照流程进行操作,可以提高贴标效率和准确性。
根据实际情况,可能会有一些细节上的差异,请参考贴标机设备的用户手册进行操作。
Brother_P-touch 标签机使用手册中文
安全提示
可能发生电击的提示。
ii
警告
充电电池组 为可避免火灾、高温、损坏和触电危险,请遵守下列指导。
本打印机禁止使用指定之外的任何充电 电池组。 对充电电池组充电时,先将充电电池组安 装到打印机,然后使用本打印机专配的 AD-18ES 电源适配器接通电源。 请勿将任何充电电池组安装到除本打印 机之外的任何设备中使用。请勿将其直接 连接电源、汽车点烟器或电源插座。 请勿将充电电池组或安装有充电电池组 的打印机曝露于高压、高温、电荷或微波 之下。 请勿将充电电池组或安装有充电电池组的 P-touch 打印机放在火堆旁边或者高温位置 (例如靠近火焰或火炉、太阳下或温度达 到或超过 60°C 的位置,如发热的车内)。
使用 P-touch 打印机时,内部不得存在异 物。如果水、金属物质或任何异物进入打 印机,应断开电源连接并取出电池,然后 联系销售本打印机的零售店或当地的授 权维修中心。
请勿触摸切刀的刀片。
iv
注意
色带切刀 为避免引起人身伤害和打印机受损,请遵守下列指导。
请勿在操作切刀时打开色带盒盖。
请勿对切刀用力过猛。
请勿在腐蚀性环境中使用(例如曝露于含 盐份的空气或水汽或者酸性、碱性或腐蚀 性气体)。 请勿在接通交流电源的情况下安装或取 出充电电池组。
P700说明书

前言尊敬的用户您好!感谢您购买驰为P700高清PMP产品,P700是驰为数码精心打造的一款超高清、高品质、高性能的PMP播放器,在您使用本机之前,请仔细阅读随机提供的说明书,以便您能正确使用本机的各项功能!免责声明:1、请务必使用5V/2A原装充电器,对于未使用原装充电器所产生的故障或其他问题,本公司不承担任何责任。
2、数码产品为高科技产品,其中包括软件和硬件部分,您可以使用第三方提供的视频、音乐、图片和软件,但因产生的版权问题或者产品故障,本公司不承担任何责任。
3、如果产品发生故障,本公司严格按照保修条款进行服务,但对于用户使用而有可能导致的财产损害或者经济损失不承担任何赔偿责任。
4、我们可能在未先通知您的情况下,对产品进行改进或者升级,更改一些产品的规格和外观,请以实物为准。
在使用中敬请注意以下几点:1、因为机器在播放视频文件的时候功耗比较大机器的温度很高,所以请不要长时间连续使用机器,避免因为温度高而出现死机等异常现象。
2、如果播放器长时间不使用,请一个星期左右充满一次电再存放,防止机器长久不使用而无法启动机器。
3、机器在充电的时候,机器的显示屏上有个充电的图表在闪动,充满后会自动进入主界面,充满电需要5个小时。
4、USB线和充电器必须使用驰为公司原配的,否则可能会出现找不到U盘和充不进电的现象。
5、请在下列情况下充电:A、电池电量图标显示没电时。
B、系统自动关机或者不能开机。
C、操作按键没反应。
6、如果机器的性能需要升级的时候请到驰为官方网站下载最新的固件和升级工具,按照说明书“固件升级”方法操作。
机器使用过程中,TFT液晶显示屏上有时候会直径约0.2MM左右的亮点(白点、黑点、红点或者是绿点)的情况。
这是有源矩阵TFT液晶显示屏的一个正常现象,并非机器或显示屏有故障。
出现亮点的主要原因是:TFT液晶显示屏显示大幅画面细腻的彩色图像,需要整个显示屏有高达几十万的像素,其像素数为1200(X)X234(Y)=2808800个(28万个像素)而每个像素接近或重叠时就会出现此现象,所以东芝、松下、日立、夏普等公司一般都规定3个直径在0.2MM左右以内的亮点液晶显示屏为合格品。
小七 标签打印机 使用说明书

标签打印机 使用说明书小七包装清单试用标签带×1数据线×1说明书×1注:本产品不标配电源适配器插头,用户使用标准充电插头即可;开箱时请您确认物品完好,如果有物品损坏或缺失,请您联系销售商。
标签打印机×1使用介绍指示灯状态说明绿色常亮可正常打印/待打印状态蓝色常亮蓝牙状态未连接黄色常亮充电状态黄色闪烁1S/次电量低红色闪烁1S/次设备异常/打印异常指示灯状态说明指示灯电源/打印按键使用说明:1、关机状态下,长按电源/打印按键2秒,指示灯常亮蓝色,标签机进入待机工作状态。
2、开机状态下,单击电源/打印按键重复上一次打印功能。
3、开机状态下,连续点击电源/打印按键3次,标签机打印APP 连接二维码一张。
4、长按电源/打印按键2秒,指示灯熄灭,标签机进入关机模式。
APP操作1、扫码下载APP iPhone 版Android 版2、确定手机蓝牙功能处于开启状态3、打开APP ,点击右上角“未连接”4、找到对应设备型号点击连接注:连续点击电源/打印按键3次,机器自动打印二维码标签,用APP 扫码与机器连接蓝牙。
Android 版下载时建议从下载商城或浏览器直接扫描二维码或搜索“硕方打印”。
耗材安装1、向下按压指示箭头所处位置,开启后盖2、观察机器内部标签带放置方向示意图4、闭合机器后盖3、按照示意图安装标签带,并确保已安装到正确位置功能说明多份标签连续打印可一次打印多张标签,满足批量需求。
内容记忆上一次打印完成后,机器可自动记忆打印内容,如需再次打印或批量打印可单击电源/打印按键快速打印。
精准定位每卷耗材在出厂时都会将首张标签统一规范到标准打印位,保证后续使用的每张标签都处于标准打印位置,可以避免出现打印位置不准确的情况。
热转印技术机器采用热转印印刷技术,字迹清晰、标签保存更持久。
丰富云端模板APP中包含多行业/多样式打印模板,更方便更省心。
故障处理故障列表APP提示异常状态异常原因解决方案电源电量低指示灯黄灯闪烁1S/次电池电量低插入电源打印模糊、断断续续未识别耗材已装耗材,机器未识别/机器未识别到耗材假冒耗材/标签带未安装到位/未装耗材更换耗材/重新安装耗材/装入耗材打印异常机器正常打印、未走纸耗材用完/卡纸/未关闭纸仓盖检查耗材余量/检查出纸口重新安装耗材/闭合纸仓盖重新打印1、故障指示通常情况下,当机器发生故障或异常状况时,手机APP会显示故障提示,机器与手机之间的通讯和打印动作也将停止。
兄弟PT-70电子标签机使用手册说明书
English / Français www.brother.ca
LW7595001 Printed in China
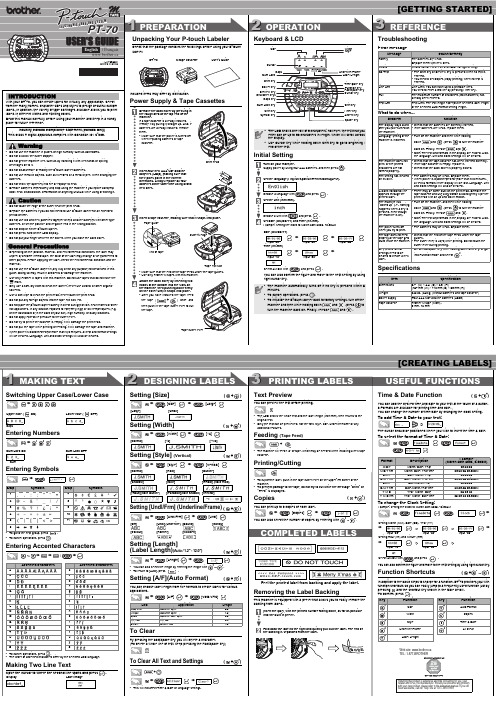
1 PREPARATION
Unpacking Your P-touch Labeler
Check that the package contains the followings before using your P-touch labeler.
Shift key Enter key Accent key Space key
• The LCD shows one row of 8 characters; however, the text that you enter can be up to 80 characters in length, which will scroll across the display.
beverages on to it. • Do not disassemble or modify the P-touch labeler/batteries. • Do not use metallic objects, such as tweezers or a metallic pen, when changing the
• Use Cursor key while holding down Shift key to go to beginning / end of the text.
Initial Setting
Turn on your machine. Supply power by using four AAA batteries, and then press .
爱普生SureColor P700 P900快速入门指南说明书
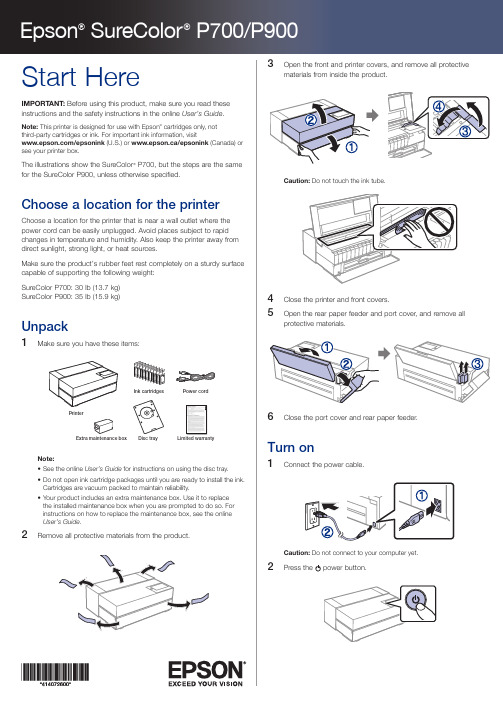
Limited warranty3Raise the control panel if necessary.4 Select your language, date, and time on the LCD screen.Note: You can change these settings later using the product’s controlpanel. For more information, see the online User’s Guide.Install ink cartridgesCaution: Keep the ink cartridges out of the reach of children and do not drink the ink.Note: The included initial cartridges are designed for reliable printer setup and cannot be used as replacement cartridges or resold. The ink supplied with your printer is used during initial setup. In order to produce the highest quality prints, the printer needs to be and will be fully charged with ink. After setup is complete, the ink remaining in the cartridges, and the service life of the maintenance box will be limited. Even if ink levels are low, or the service life of the maintenance box is nearing an end, you can continue to print until the printer displays replacement instructions. However, we recommend being prepared with replacement ink cartridges. An additional maintenance box is included with the printer.1 Open the front and printer covers.2 Shake the ink cartridges gently about 15 times, then unpack them.Caution: Do not touch the areas shown below. Doing so may preventnormal operation and printing.3 I4 C lose the front and printer covers.5 W hen you see a message to begin inkcharging on the LCD screen, select OK.The printer begins charging the ink delivery system. This takesabout 15 minutes. When you see a completion message on theLCD screen, charging is complete.Caution: Donʼt turn off the printer, load paper, or open any covers while the printer is charging or youʼll waste ink.Load paperSee the online Userʼs Guidefor information about loading capacity, available paper types and sizes, and using the disc tray.Rear paper feederYou can load plain paper, and most glossy and matte papers, in the rear paper feeder.1 Open and extend the rear paper feeder.SureColor P700SureColor P9002Slide the edge guides all the way out.3Insert paper, glossy or printable side up, and short edge first.Install softwareNote: An Internet connection is required to obtain the product software.Firmware Update Notice: The printer is designed to work only with genuine Epson-branded cartridges. Other brands of ink cartridges and ink supplies are not compatible and, even if described as compatible, may not function properly or at all. Epson periodically provides firmware updates to address issues of security, performance, minor bug fixes and ensure the printer functions as designed. These updates may affect the functionality of third-party ink. Non-Epson branded or altered Epson cartridges that functioned prior to a firmware update may not continue to function.1M ake sure the product is NOT CONNECTED to your computer.W indows ®: If you see a Found New Hardware screen, click Cancel and disconnect the USB cable.2D ownload and run your productʼs software package:SureColor P700/support/p700 (U.S.) www.epson.ca/support/p700 (Canada)SureColor P900/support/p900 (U.S.) www.epson.ca/support/p900 (Canada)3F ollow the instructions on the screen to run the setup program.4When you see the Select Your Connection screen, select one of the following:• W ireless connectionIn most cases, the software installer automatically attempts to set up your wireless connection. If setup is unsuccessful, you may need to enter your network name (SSID) and password.• D irect USB connectionM ake sure you have a USB 2.0 or 3.0 cable (not included).Note: If you do not use a USB 2.0 or 3.0 cable, print speed and performance may decline.• W ired network connectionM ake sure you have an Ethernet cable (not included).Epson Print LayoutEpson Print Layout makes it easy to print photos with a simple printprocess. Select your application, operating system, and printer driver settings within a single window and preview your changes in real time before you print. This free software is available for download from your productʼs support page as an Adobe ®Photoshop ®plug-in or as a standalone application. For more information, see /epsonprintlayout (U.S.) or www.epson.ca/epsonprintlayout (Canada).Using the LCD screen1234121110567891A ccesses printer settings 2D isplays your print history 3T urns on or off the printer’s interior light 4S witches the screen view to display additional informationSelect the media type you want to load.Follow the instructions on the LCD screen to load the paper.5D isplays maintenance settings6D isplays the network connection status7D isplays notifications8D isplays the printer’s status9D isplays the paper settings10D isplays ink and maintenance box levels11E jects loaded paper12Selects paper size and type settingsAny problems?Network setup was unsuccessful.P rint a network connection report to identify network problems and solutions. See your online Userʼs Guide for instructions.M ake sure you select the right network name (SSID).R estart your router (turn it off and then on), then try to connect to it again.I f you see a firewall alert message, click Unblock or Allow to let setup continue.I f your network has security enabled, make sure you enter your network password (WEP key or WPA passphrase) correctly. Be sure to enter your password in the correct case.Any questions?User’s GuideWindows: Click the icon on your desktop or Apps screen to access the online Userʼs Guide.Mac: Click the icon in Applications/Epson Software/Guide to access the online Userʼs Guide.If you donʼt have a Userʼs Guide icon, go to the Epson website, as described below.VideosVisit /support (U.S.) or www.epson.ca/support (Canada) and search for your product to view support videos. SupportVisit /support (U.S.) or www.epson.ca/support (Canada) and search for your product to download software and utilities, view manuals, get FAQs and troubleshooting advice, or contact Epson. Call (562) 276-7272 (U.S.) or (905) 709-2567 (Canada), 6 AM to 8 PM, Pacific Time, Monday through Friday, and 7 AM to 4 PM, Pacific Time, Saturday. Days and hours of support are subject to change without notice. Toll or long distance charges may apply.RecyclingEpson offers a recycling program for end-of-life hardware and ink cartridges. Please go to /recycle (U.S.) or www.epson.ca/recycle (Canada) for information on how to return your products for proper disposal.Need paper and ink?Ensure brilliant results with Epson specialty and plain papers, engineered specifically for Epson printers. Find Epson papers and Epson Genuine Ink at (U.S. sales) or www.epson.ca (Canadian sales) and at Epson authorized resellers. Call 800-GO-EPSON (800-463-7766).Genuine Epson paperEpson offers a variety of specialized papers to meet your needs.For more information on Signature Worthy® and Legacy Papers, visit /professional-imaging-media (U.S.) or www.epson.ca/professional-imaging-media (Canada).Signature Worthy PapersRepresenting the finest in color fidelity,smoothest tonal transitions, and exceptionalblack density and longevity, Signature WorthyPapers are developed and tested at thehighest levels to work collectively with Epsonʼsindustry-leading professional printers and inks.Legacy PapersDesigned for artists who intend to sell theirprints. Legacy Papers marry the artistry ofrevered European papermaking with the latestadvancements in inkjet coating technology.Epson SureColor P700/P900 replacement ink cartridgesColor SureColor P700 (25 ml)SureColor P900 (50 ml) Photo Black T7701T46Y1Cyan T7702T46Y2Vivid Magenta T7703T46Y3Yellow T7704T46Y4Light Cyan T7705T46Y5Vivid Light Magenta T7706T46Y6Gray T7707T46Y7Matte Black T7708T46Y8Light Gray T7709T46Y9Violet T7700T46YDEPSON, Signature Worthy, and SureColor are registered trademarks and EPSON Exceed Your Vision is a registered logomark of Seiko Epson Corporation.Windows is a registered trademark of Microsoft Corporation in the United States and/or other countries. Mac is a trademark of Apple Inc., registered in the U.S. and other countries.General Notice: Other product names used herein are for identification purposes only and may be trademarks of their respective owners. Epson disclaims any and all rights in those marks.This information is subject to change without notice.© 2020 Epson America, Inc., 9/20CPD-58608R1。
(兄弟)标签机说明书

113 mm 25 mm 32 mm 25 mm 35 mm
长度
+) +)
也可以使用以上菜单选项的快捷键,详细请参见本页菜单标题右边的 说明。例如:选择 [ 修饰 ],可按住设定键不放,再按 2 键。
3 打印标签
文本预览
( +)
可以在打印前预览文本。
>
[预览]
• 液晶屏会显示完整的文本和标签长度 (mm),然后返回到原始的文本。 • 只可以对文本进行预览,而不能预览字体、修饰、尺寸、下划线/边框或任何附加功
源插座中拔出电源线时,请务必握住插头。 • 为防止火灾或触电,请确保将插头完全插入到电源插座中。切勿使用松散的插座。 • 切勿弄湿机器/ AC 电源适配器/电源插头,如用湿手操作或在其上泼洒饮料。 • 切勿拆卸或改装机器/ AC 电源适配器/电池。 • 使用或保存时如果发现任何异味、热量异常、变色、变形或任何异常情况,请立即断
PT-1010CH
铅
汞
镉
六价铬 多溴联苯 多溴二苯醚
部件名称
(Pb) (Hg) (Cd) (Cr(VI)) (PBB) (PBDE)
按键
○
○
○
○
○
○
机械装置
×
○
○
○
○
○
盖板
○
○
○
○
○
○
检测器
○
○
○
○
○
○
控制电路板
×
○
○
○
○
○
液晶显示
×
○
○
○
○
○
附件
○
○
○
○
○
- 1、下载文档前请自行甄别文档内容的完整性,平台不提供额外的编辑、内容补充、找答案等附加服务。
- 2、"仅部分预览"的文档,不可在线预览部分如存在完整性等问题,可反馈申请退款(可完整预览的文档不适用该条件!)。
- 3、如文档侵犯您的权益,请联系客服反馈,我们会尽快为您处理(人工客服工作时间:9:00-18:30)。
P-touch P700标签机使用手册
一、该标签机可分为两种打签方式
1、直接在软件中编辑打印,方便快捷,但是只能单个打印。
2、打印excel文件,批量打印。
二、方式1:
1、打开P-touch Editor 5.1软件,图标如下所示:
图1
2、打开后出现如下所示界面,双击第二个图标“电缆标签向导”。
图2
3、出现如下图所示窗口,在窗口中可选择各种想要的标签类型,设置标签长度,根据
所使用的标签色带型号选择对应的标签宽度等,然后点击确定。
图3
4、如下图所示,在软件主界面底部选择express模式,然后编辑要打印的标签内容并
设置想要的参数(标签类型、长度等),然后点击打印。
图4
5、在打印窗口中选择要打印的副本数量然后确定,即可打印出想要的标签。
图5
三、方式二:
1、首先创建excel文件,格式如下图所示,也可只有一个字段。
图6
2、将创建好的excel文件放入数据库中,路径C:\Program Files\Brother\Ptedit51\Samples
(软件按默认路径安装)。
3、在软件主界面底部选择professional模式,然后在工具栏中点击数据库选项,然后
再弹出的窗口中选择要连接的数据库文件,点击下一步,如下图7:
图7
4、弹出如下对话框,在对话框中点击字段,完成数据库字段的映射,然后选择要打印
的字段,点击确定。
图8
5、在编辑区域的下方勾选需要打印的内容,在左上角选择要打印副本的份数,然后点
击旁边的打印即可按excel表格中的内容批量打印。
图9
图10
四、更多强大和细节的功能待大家以后用的过程中慢慢发掘。