AMS160 音频监听音箱系统 用户手册
GALAXY AUDIO CM-150 160 声音测量仪操作手册说明书

CM-150/CM-160Instruction ManualGA I OCM-150/160 Operation ManualCONTENTSTITLE PAGEI. Safety Information (1)Environmental operating conditions (1)Maintenance & Cleaning (1)Safety symbols (1)II. General Description (1)III. Specifications (2)IV. Names and Functions CM-150 (3)V. Auto Power Off (6)VI. Names and Functions CM-160 (7)VII.Data Logger Clock & Internal Setup (10)VIII. Calibration Procedures (11)IX. Measurement Preparation (12)X. Operating Precautions (12)XI. Measurement (13)XII. Setup Test Link SE-322(Sound Level Meter) USBInterface software (13)Tutorial - Quick Start toUse SE322 Test Link (17)Frequently Asked Questions (20)I. SAFETY INFORMATIONRead the following safety information carefully before attempting tooperate or service the meter.Use the meter only as specified in this manual; otherwise, the protection provided by the meter may be impaired.Environmental operating conditions§Altitude up to 2000 meters§Relative humidity 90% max.§Ambient Operating Temperature 0 ~ 40ºCMaintenance & Cleaning§Repairs or servicing not covered in this manual should only beperformed by qualified personnel.§Periodically wipe the case with a dry cloth. Do not use abrasives orsolvents on this instrument.Safety symbolsComplies with EMCWhen servicing, use only specified replacement parts.II. GENERAL DESCRIPTIONThank you for using the Galaxy Audio Checkmate SPL meters. To ensurethat you can get the most from them, we recommend that you read and follow the manual carefully before use.These units conform to the IEC651 type2 and ANSI S1.4 Type2 forSound Level Meters. It uses a USB interface to perform bi-directional communication with aPC.The CM 160 Data Logger Sound Level Meter’sinternal memory can store up to 32000 records.(Note 1.)CENote1:Every time you press the “REC” button to start recording data and press the “REC” button again to stop recording, there will be a data set placed in memory You can store as many data sets as you want until the memory is full.III. SPECIFICATIONSStandard applied: IEC651 Type2, ANSI S1.4 Type2.Frequency range: 31.5Hz ~ 8KHzMeasuring level range: 30 ~ 130dBFrequency weighting: A / CMicrophone: 1/2 inch electret condenser microphoneDisplay: LCDDigital display: 4 digitsResolution: 0.1dBDisplay Update: 0.5 sec.Analog display: 50 segment bar graphResolution: 1dBDisplay Update: CM-150 100 mSCM-160 50 mSTime weighting: FAST (125mS), SLOW (1 sec.)Level ranges: Lo: 30 – 80 dBMed: 50 – 100 dBHi: 80 – 130 dBAuto: 30 – 130 dBAccuracy: 1.5dB (under reference conditions @ 94dB, 1KHz)Dynamic range: 100 dBAlarm function: “OVER” is when the input is more than upper limit of range.“UNDER” is when the input is less than lower limit of range. MAX/MIN hold: Hold readings of the Maximum and Minimum Values.AC output: 1 Vrms at FS (full scale).Output impedance: Approx. 100FS: means the upper limit of each level range.DC output: 10mV / dB, output impedance approx. 1K Power supply: One 9V battery, 006P or IEC 6F22 or NEDA 1604.Power life: About 50hrs (alkaline battery)AC adapter: Voltage 9 VDC (8-15VDC Max)Supply current : > 30mADC Socket : pin GroundCasing Positive External Diameter 3.5mm Internal Diameter 1.35mm±ΩΩZ Z Z ZElectromagnetic Compatibility:RF field = 3V/mTotal accuracy = specified accuracy + 0.5dBOperation temperature: 0 to 40ºC ( 32 to 104ºF )Operation humidity: 10 to 90%RHStorage temperature: -10 to 60 ( 14 to 140 )Storage humidity: 10 to 75%RHDimensions : 275 (L) x 64 (W) x 30 (H)mm10.8 (L) x 2.5 (W) x 1.2 (H)inchWeight: 285g (including battery)Included Accessories: 9V battery, carrying case, screwdriver, instruction manual, windscreen, 3.5 mm plug, software, and USB cable. (Software, USB cable not included with CM-150).IV . NAME AND FUNCTIONS CM-150ºC ºFWindscreen If you operate at wind speeds over 10m/sec, install the windscreenonto the meter’s microphone. SYMBOL FUNCTION MAX Maximum value displayedMIN Minimum value displayedOver range Under rangeFAST Fast response SLOW Slow responsedBA A-WeightingDisplay Power & Backlight buttonThe key turns the CM-150 ON or OFF and the backlight ON & OFF.Press it once to turn on the CM-150.Press it again for a moment to turn the backlight ON or OFF. .Press and hold this button for 3 seconds to turn OFF the power.¡321MAX / MIN hold buttonis pressed, the range level is increased from “ Lo ” Level to “ Hi “ Level to “Auto” Level.is pressed. The range level is decreased from “Auto” Level to “ Hi ” Level to “ Lo “ Level.Frequency Weighting select buttonA: A - Weighting filters out low frequencies to approximate the response of the human ear at lower SPL's.C: C - Weighting filters less low frequencies to approximate the response of the human ear at higher SPL's. (a flatter response.)Time weighting select buttonFAST: for normal measurementsSLOW: for checking average level of fluctuating noise.Microphone1/2 inch Electret Condenser microphoneCAL potentiometerCalibration control for level calibration adjustment.RS-232 Interface:The USB signal output is a 9600 bps USB interface.4109876Signal output terminalAC: 1 Vrms Corresponding to each range step.Output impedance = 100ΩOutput signal by standard 3.5mm mini stereo jack with signal on tip. Note: “Med” or “Hi” level range.DC: Output: 10mV/dBOutput impedance = 1K ΩExternal DC 9V power supply terminal For connection with AC adapter. Tripod mounting screw.Battery Cover V . AUTO POWER OFFBy default, when the meter is powered on, it is under auto power off mode. The meter will shut itself off after 30 minutes if there is no key 11121314VI. NAMES AND FUNCTIONS CM-160Windscreen If you operate at wind speeds over 10m/sec, install the windscreen onto the meter’s microphone. SYMBOL FUNCTIONMAX Maximum value displayedMIN Minimum value displayedOver range Under rangeFAST Fast responseSLOW Slow responsedBA A-WeightingDisplay 321MAX / MIN hold buttonFrequency Weighting select buttonA: A - Weighting filters out low frequencies to approximate the responseof the human ear at lower SPL's.C: C - Weighting filters less low frequencies to approximate the response of the human ear at higher SPL's. (a flatter response.)Time weighting select buttonFAST: for normal measurementsSLOW: for checking the average level of fluctuating noise.Microphone1/2 inch Electret Condenser microphoneCAL potentiometerCalibration control for level calibration adjustment.USB Interface:The USB signal output is a 9600 bps USB interface.410987611Signal output terminalAC: 1 Vrms Corresponding to each range step.Output impedance = 100ΩOutput signal by standard 3.5mm mini stereo jack with signal on tip.Note: “Med” or “Hi” level range.DC: Output: 10mV/dBOutput impedance = 1K ΩExternal DC 9V power supply terminal For connection with AC adapter. Tripod mounting screw.Battery Cover 12131415VII. DATA LOGGER CLOCK & INTERVAL SETUPDataLogger:Clock Setup :When the "REC " button is pressed, the meter will startrecording. Pressing the "REC " button again will stoprecording. If you want to clear the memory, power off themeter. Press and hold the “REC ” button and press thepower button and hold it for at least 5 seconds. The LCD willshow "CLR " and “SURE ” to clear the memory.1: press and hold the“A/C ” button and then power up the meter:2: press the“MAX/MIN ”(clock) button: 3: Press "REC " or "LEVEL " to increase or decrease the number. Press the “MAX/MIN ”(clock) button toadjust the next item. The adjusting order is year month day hour minute. Press the “MAX/MIN ” (clock) button to finish adjusting. If you want to abort during asetup process, press the power button to cancel.p q ZZZ ZRecording Interval Setup :1: press and hold the “A/C ” button and then power up the meter:2: press the “FAST/SLOW "(INTV) button:3: press "REC " or "LEVEL " to increase or decrease the number. Press the “FAST/SLOW " (INTV) button to adjust next item. Press“FAST/SLOW ” (INTV) to finish. If you want to abortduring a setup process, press the power button tocancel.p qAuto Power Off:By default, when the meter is powered on, it is in the auto power off mode. The meter will shut itself off after 30 minutes if there is no key(1) Make the following switch settings.Display: dBATime weighting : FASTMeasurement mode : MAX/MIN Mode function disabled.Level range: 50 to 100dB(2) Insert the microphone housing carefully into the insertion hole of the calibrator.(3) Turn on the calibrator and adjust the CAL potentiometer of theSPL meter, until the value displayed matches the value supplied by the calibrator. All products are well calibrated before shipment.Recommended Recalibration cycle: 1 year.IX. MEASUREMENT PREPARATION(1) Battery LoadingRemove the battery cover on the back and put in one 9V Battery.(2) Battery Replacement(1) AC Adapter ConnectionWhen the AC adapter is used, insert the plug of the adapter into the DC9V connector on the side panel.X. OPERATING PRECAUTIONS(1) Wind blowing across the microphone can cause extraneous noise. When using the instrument in the presence of wind, mount thewindscreen to the mic to avoid picking up undesirable signals.(2) Calibrate the instrument before operation if the instrument was not in use for a long time or has been operated in an unfavorableenvironment.(3) Do not store or operate the instrument in high temperature or high humidity environments.(4) Keep the microphone dry and avoid severe vibration.(5) Take out the battery and keep the instrument in a low humidityenvironment when not in use.XI. MEASUREMENT(1) Open battery cover and install a 9V battery in the batterycompartment.(2) Turn the power on and select the desired response Time and Weighting. If the sound source consists of short bursts or only intermittent sound peaks, set the response to FAST. To measure an average sound level, use the SLOW setting. Select A-weighting which filters out lowfrequencies to approximate the response of the human ear at lower SPL's. C - Weighting filters less low frequencies to approximate the response of the human ear at higher SPL's. (a flatter response.)(3) Select desired Level Range.(4) Hold the instrument comfortably in your hand or mount to a tripod and point the microphone at the suspected noise source. The sound pressure level will be displayed.(5) When MAX/ MIN (maximum, minimum hold) mode is chosen. The instrument captures and holds the maximum and minimum noise level for a long period using any of the time weightings and ranges. Press the MAX /MIN button for 2 seconds to clear the MAX/MIN reading. MAX/MIN ” symbol disappears.(6) Turn OFF the instrument. Remove the battery if the meter is not to be used for an extended period.XII. CM-150 / CM-160Setup Test Link SE-322 USB interface software:1. 80mm Test Link CD.2. Custom designed USB cable for Test Link.3. 80mm USB driver CDSystem Required:Windows 95, Windows 98, or Windows NT 4.0 and higher..Minimum Hardware Required:PC or Notebook with Pentium 90MHz or higher, 32 MB RAM.At least 5 Mb hard disk space available to install Test Link.Recommended resolution 800X600.Install TestLink:1 It is recommended that all other applications be closed before installing Test Link.2. Insert setup CD disk into CD disk drive.3. From the Start button on the Taskbar select Run.The Test Link package contains:4. Type E:\SETUP (where E is the letter of the CD drive) and choose OK.The SE322.exe(executable file) and help file will be copied to the hard drive (default is c:\program files\TestLink\SE322). For detailed operationinstructions, refer to online help while executing SE322.Main MenuFile | Open- Retrieve files from the disk.Save - Save the active window(when the caption bar is highlighted)data to the disk.Print - Print the data of the active window(graph or list).Printer Setup - Select printer.File | Exit: Terminates Test Link program.View | Control Panel: By opening the Panel Window, the user cancontrol the meter via the button in this window.View | Real-Time Graph: Open Real-Time Graph display to graph thepresent data.Real Time Data | Run - Start collecting real time data .Stop - Stop collecting real time data .Data Logger: By opening the Data Logger Window, the user canload recorded data from the meter to the PC in this window.Output To Graph - Graph tabular data.GraphTool Bar- Display or hide Statistic1.- Display or hide Statistic2.- Normal cursor.- When selected, the mouse cursor will become a cross sign whenmoving on the graph. Click on the graph to mark a cross sign onthe graph.- When selected, the mouse cursor will become a "T” sign when moving on the graph. Click on the graph to add text annotations.- Color graph.- Monochrome graph.You can choose a rectanglular area on the graph to zoom into for detail. There are two vertical lines (CURSOR A and CURSOR B)in the graph. There are time and value displays on the top and the right side of each cursor. You can move the mouse cursor over cursor A or B and click to drag the cursor to the left or right. Right below cursor A and B is a slider. You can also click and drag the slider to move cursor A or B. Below the slider are the statistics that display start time, sampling rate, data number, and maximum and minimum levels shown on the graph. The statistics also display themaximum, minimum, and average between cursor A and B. This data updates automatically when cursor A or B is moving.You can double click the graph to call up the option dialog. In the option dialog, the graph style can be customized.You can right click on the graph (not available for real time graphs) to call up the popup menu.You can Zoom the graph by using the mouse:To Zoom:1. Press the left mouse button and drag the cursor to select the area on which you want to zoom in.2. Release the mouse button.To Undo the Zoom - Right click on the graph to bring up the pop-up menu. Select Undo Zoom .DataLoggerApplies to CM-160 onlyWhen you have a Sound Level DATA LOGGER meter connected to aPC and select "Data Logger" from main menu or click from the toolbar recorded data will be downloaded from the meter and there will be a progress indicator to show the loading progress. If an error occurs, click "Data Logger" again.After the data is loaded, the left hand side will show how many data sets were loaded and detailed information for each data set (start date, start time, recording rate, and record numbers).examples:The first data set will be transferred to the graph and the tabular on the right hand side every time after recorded data has been downloaded from the Sound Level Meter. Click any data set to select that set for the graph. On the right hand side is the waveform graph and statistics for the data set that is chosen.Tutorial - Quick Start to Use SE322 Test Link (1.) Recording real time data in waveform.1. Power on the Sound Level Meter and connect it to aUSB port with the USB cable.2. Start the SE322 program.3. If the connection is successful the panel will display the same value as the Sound Level Meter. If there is a failure to connect the meter with the PC, the display will read "No Connection" in theTest Link Se322 panel window.4. When the connection is successful, click to start recording real time data, There will be a waveform displayed in the Real Time Graph Window.5. Click to start recording. (2.) How to save the recorded real time data to a file.1. Click the graph window you want to save and the graph window will become active. Choose File | Save the from main menu or click from the tool bar .2. There will be a save dialog window where the file name and type can be specified. There are three types of files that can be chosen: binary file (*.ghf), text file (*.txt) and EXCEL format file (*.csv). The *.ghf file uses much less disk space to save the data than the other two file formats, but it can only be used in Test Link SE322. The text file can be opened by Test Link SE322 and any other word processor program like Word, Notepad, etc. EXCEL format file can be opened by Test Link SE322 and Microsoft EXCEL.(3.) How to load the recorded data from the memory of a Sound Level Meter and save it to a file(Only for models with Data Logger) 1. Power on the Sound Level Meter.2. Press the REC button of the meter to start recording data.3. When finished, press the REC button again to stop recording data.4. Connect the Sound Level Meter to a PC5. Start SE322 program.6. Choose Data Logger from the main menu or click from the tool bar.7. Proceed with download as described on page 17.Frequently Asked Questions 1. I have connected a Sound Level Meter to a PC USB port and turned meter power on, but the PC still shows "NO CONNECTION".Answer: It could be that all USB ports are occupied by otherapplications. Close all other applications . If there is still "NO CONNECTION", restart your computer and run Test Link SE322 again.2. How can I save the graph to a file which can be used in EXCEL ? Answer: When you save a graph to a file , the default file format is "*.ghf" but you can select *.csv to save files. CSV is an EXCEL file format. You can open it in EXCEL.3. How do I uninstall Test Link SE322 ?Answer:Uninstall Test Link SE322 by launching the Add/Remove Programs applet out of the Control Panel, highlighting the SE322, and clicking on the Add/Remove... push button. The SE322 folder and files will be removed from your computer.4. Why did data downloading fail?Answer:This might be caused by the slow response of some PC systems.5. How do I zoom in on the graph?Answer: Press the left mouse button and drag the cursor to select the area on which you want to zoom in. Release the mouse button.6. When I setup the real time sampling with a fast rate(eg. 0.1 sec), some of the sampling data gets lost.Answer: This might be caused by slow response time of some PC systems.601 E. PawneeWichita, KS 67211316.263.2852 FAX 316.263.0642 G A IOInstruction Manual CM-150/CM-160。
AMS 客户端操作手册说明书

AMS客户端操作手册安装使用前请仔细阅读操作手册目录1AMS客户端软件介绍 (4)2AMS客户端软件连接方法 (5)2.1直连模式 (5)2.2网络连接模式 (5)3AMS客户端软件安装与卸载 (7)3.1软件安装 (7)3.2软件卸载 (9)4AMS客户端软件登录 (12)5AMS客户端设备管理 (13)5.1添加设备 (13)5.1.1搜索添加设备 (13)5.1.2手动添加设备 (15)5.2修改设备信息 (16)5.3删除设备 (16)5.3.1单个删除 (16)5.3.2批量删除 (17)5.4设备列表重置顺序 (17)5.5本地与P2P设备 (18)6AMS客户端预览 (20)6.1界面简介 (20)6.2实时预览 (21)6.2.1开启预览 (21)6.2.2预览操作 (22)6.2.3调整监视窗口数 (23)6.3云台设置 (23)6.3.1设置预置位 (24)6.3.2设置巡航 (25)7回放 (26)-1-7.1录像回放 (26)7.2回放设备录像 (28)7.3回放本地录像 (29)8云平台登录 (31)9云平台预览 (33)9.1云平台界面简介 (33)9.2云平台实时预览 (34)9.2.1开启云设备预览 (34)9.2.2云平台预览操作 (35)9.2.3调整监视窗口数 (36)9.3云平台设备云台设置 (36)10云平台回放 (37)10.1录像回放 (37)10.2回放云服务录像 (39)10.3回放本地录像 (40)11日志查询 (41)11.1查询系统日志 (41)11.2查询报警日志 (42)11.3查询智能报警日志 (43)12事件 (45)12.1查询报警事件 (45)12.2查询智能报警事件 (46)12.3报警联动本机录像 (47)13抓拍 (49)13.1抓拍图像 (49)13.2抓图预览 (49)14录像下载 (52)14.1查询录像 (52)14.2下载录像 (53)15云录像下载 (55)-2-15.1查询云录像 (55)15.2下载云录像 (56)16设备配置 (58)17用户配置 (62)17.1用户管理 (62)17.2用户参数 (63)18系统设置 (65)18.1基本设置 (65)18.2磁盘设置 (65)18.3关于 (66)18.4切换用户 (66)18.5操作手册 (66)18.6退出系统 (66)-3-1AMS客户端软件介绍AMS客户端软件是一款功能完整的网络监控管理软件,它支持网络摄像机、网络球机、NVR设备接入。
音频系统指南说明书

Quick Reference GuideVOL / AUDIO(Home) Icon (Back) Icon(Day/Night) Icon(Eject) ButtonDisc SlotModels with Blu-ray or CD playerTMFeaturesAbout Your Audio SystemThe audio system features AM/FM radio and SiriusXM ® Radio * service. It can also play audio CDs *, USB flash drives, and iPod, iPhone, iPad * and Bluetooth ® devices.You can operate the audio system from the buttons * and knobs on the panel, the remote controls on the steering wheel, or the icons on the touchscreen interface *.1About Your Audio SystemiPod, iPad, iPhone and iTunes are trademarks of Apple Inc.State or local laws may prohibit the operation of handheld electronic devices while operating a vehicle.Video CDs, DVDs *1, Blu-ray Discs *1, and 3-inch (8-cm) mini CDs are not supported.*1: Models with CD playerSiriusXM ® Radio*is available on a subscription basis only. For more information on SiriusXM ® Radio *, contact a dealer.SiriusXM ® Radio * is available in the United States and Canada, except Hawaii, Alaska, and Puerto Rico.SiriusXM ®* is a registered trademark of SiriusXM Radio *, Inc.After you set the power mode to VEHICLE OFF, you can use the audio system for up to 30 minutes per driving cycle, or until opening the driver’s door.However, whether you can continue using the audio system depends on the battery condition. Repeatedly using this feature may drain the battery.Models with Blu-ray TM or CD playerModels with Display AudioRemote ControlsiPodUSB Flash Drive*1:Models with color audio system *2:Models with Display Audio*1*2uu Audio System u Audio Remote ControlsFeatures Allow you to operate the audio system while driving. The information is shown onthe driver information interface.+/-(Volume) BarPress +: To increase the volume.Press -: To decrease the volume.1Audio Remote ControlsSome modes appear only when an appropriatedevice or medium is used.Depending on the Bluetooth® device you connect,some functions may not be operated.Press the (back) button to go back to theprevious screen or cancel a command.Press the (home) button to go back to the home ENTER Button+/-Bar///Buttons34screen of the driver information interface.You can show or hide the audio mode icons, orchange the order of the icons.uu Audio System u Audio Remote ControlsFeatures////ENTER Buttons•When selecting the audio modePress or to select Now Playing on the home screen of the driver information interface, and then press the ENTER button.Pressor : To cycles through the audio modes as follows:Android Auto/Apple CarPlay →SiriusXM ®*→Rear Entertainment *→AUXInput →AM →Bluetooth ® Audio →Social Playlist →FM →My Honda Music →USB/iPod →CD *•When listening to the radio Press : To select the next preset radio station.Press : To select the previous preset radio station.Press and hold : To select the next strong station.Press and hold : To select the previous strong station.•When listening to a CD *, iPod, USB flash drive, My Honda Music, or Bluetooth ®AudioPress : To skip to the next song.Press : To go back to the beginning of the current or previous song.•When listening to an iPod, USB flash drive, My Honda Music, Bluetooth ® Audio,or Apple CarPlay Press and hold /: To move rapidly within a song.343434uu Audio System Basic Operation u Audio/Information ScreenFeatures Audio/Information ScreenDisplays the audio status and wallpaper. From this display, you can go to varioussetup options.■Using the audio/information screenSelect to go to the home screen.Select the following icons on the home screen or after selecting All Apps.■Switching the Display1Audio/Information ScreenTouchscreen Operation•Use simple gestures - including touching, swiping,and scrolling - to operate certain audio functions.•Some items may be grayed out during driving toreduce the potential for distraction.•You can select them when the vehicle is stopped oruse voice commands.•Wearing gloves may limit or prevent touchscreenresponse.You can change the touchscreen sensitivity setting.(Home) IconAll Appsuu Audio System Basic Operation u Audio/Information ScreenFeatures■PhoneDisplays the HFL information.■Trip ComputerDisplays the trip computer information.•Current Drive tab: Displays the current trip information.•Trip A /Trip B tab: Displays information for the current and three previous drives.The information is stored every time you reset Trip A/B.To reset Trip A/B, select Reset .To change the setting of how to reset Trip A/B, select Settings , then select Trip A Reset Method or Trip B Reset Method .■ClockDisplays the clock.■System UpdatesUpdates the software version of the audio system.■FM/AM/Sirius XM /CD /USB/Bluetooth Audio/AUX Input/My Honda**Music/Social PlaylistDisplays the each audio information.■SettingsEnters the customizing menu screen.uu Audio System Basic Operation u Audio/Information ScreenFeatures ■Navigation*Displays the navigation screen.■HondaLinkDisplays the HondaLink® screen.■Apple CarPlay/Android AutoDisplays the Apple CarPlay or Android Auto.■MessagesDisplays the text message screen.■CabinTalk*Displays the CabinTalk screen.■CabinWatch*Displays the CabinWatch screen.■Rear Entertainment*Displays the rear audio screen.uu Audio System Basic Operation u Audio/Information Screen■AT&T Hotspot*Displays the AT&T Hotspot screen.■File ManagerDisplays the file manager screen.Featuresuu Audio System Basic Operation u Audio/Information ScreenFeatures Some of the audio system’s apps can be updated wirelessly when connected via Wi-Fi, or Bluetooth® in conjunction with the HondaLink® app installed on a compatibleiOS or Android device. If an update is available, a notification is displayed at the topof the screen with the respective app’s update icon.■To update an app:1.A notification appears and notifies you of aupdate message on the header area.2.Select the system status icon, and thenselect the software update notificationfrom the list.■Updating Apps1Updating AppsThe wireless updates are for the apps on the audiosystem only.To update compatible apps on your iPhone orAndroid phone, please visit the App Store or GooglePlay Store, respectively.uu Audio System Basic Operation u Audio/Information ScreenFeatures3.Select Download .4.Select OK .u A notification appears on the screen if the update is successful. Select OK .u Restart the engine for the update to be applied.12:34。
Galaxy Audio AS-1400 无线个人监听器系统说明书
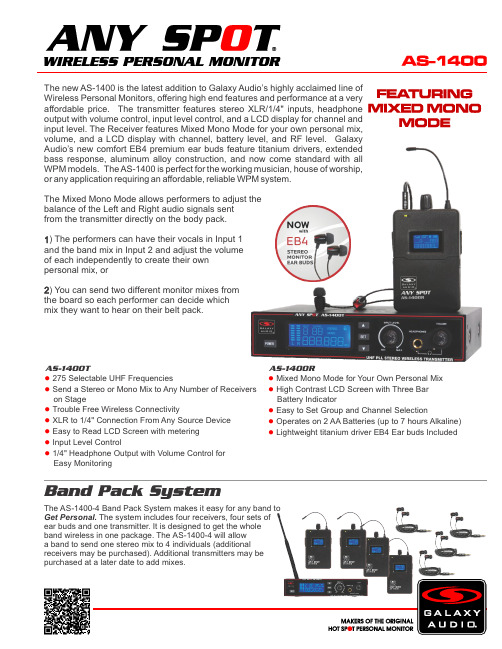
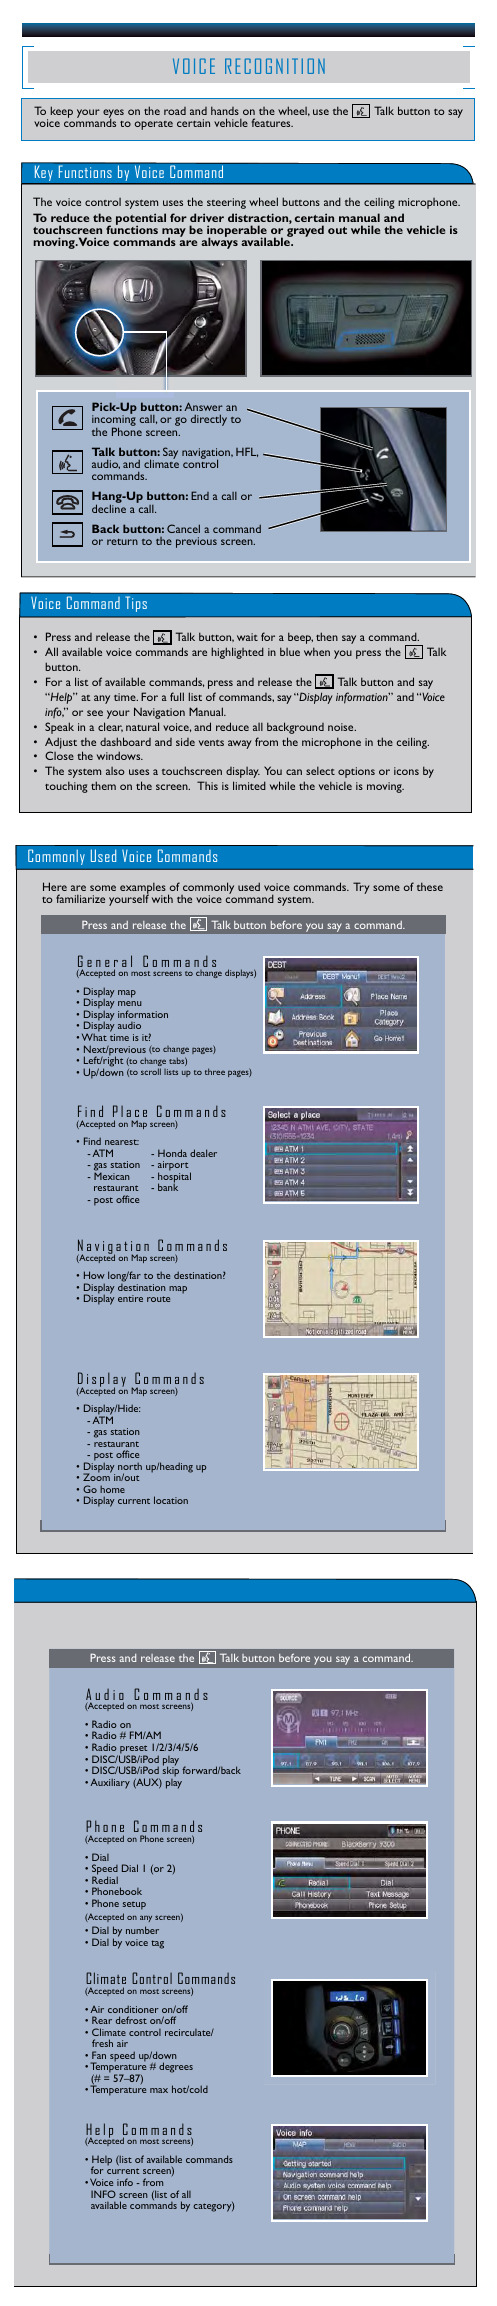
The new AS-1400 is the latest addition to Galaxy Audio’s highly acclaimed line of Wireless Personal Monitors, offering high end features and performance at a very affordable price. The transmitter features stereo XLR/1/4" inputs, headphone output with volume control, input level control, and a LCD display for channel and input level. The Receiver features Mixed Mono Mode for your own personal mix, volume, and a LCD display with channel, battery level, and RF level. Galaxy Audio’s new comfort EB4 premium ear buds feature titanium drivers, extended bass response, aluminum alloy construction, and now come standard with all WPM models. The AS-1400 is perfect for the working musician, house of worship, or any application requiring an affordable, reliable WPM system.The Mixed Mono Mode allows performers to adjust thebalance of the Left and Right audio signals sentfrom the transmitter directly on the body pack.1) The performers can have their vocals in Input 1and the band mix in Input 2 and adjust the volumeof each independently to create their ownpersonal mix, or) You can send two different monitor mixes from2the board so each performer can decide which mix they want to hear on their belt pack.275 Selectable UHF Frequencies● Send a Stereo or Mono Mix to Any Number of Receivers● on StageTrouble Free Wireless Connectivity● XLR to 1/4 Connection From Any Source Device●" Easy to Read LCD Screen with metering● Input Level Control● 1/4 Headphone Output with Volume Control for●" Easy Monitoring Mixed Mono Mode for Your Own Personal Mix ● High Contrast LCD Screen with Three Bar ● Battery Indicator Easy to Set Group and Channel Selection ● Operates on 2 AA Batteries (up to 7 hours Alkaline)● Lightweight titanium driver EB4 Ear buds Included ●The AS-1400-4 Band Pack System makes it easy for any band toGet Personal. The system includes four receivers, four sets ofear buds and one transmitter. It is designed to get the wholeband wireless in one package. The AS-1400-4 will allowa band to send one stereo mix to 4 individuals (additionalreceivers may be purchased). Additional transmitters may bepurchased at a later date to add mixes.AS-1400T AS-1400RSpecifications subject to change without notice.V20170502601 E. Pawnee Wichita, KS 67211 316. 263.2852 FAX 316.263.0642 Distributed in Canada by Audio Distributors International (ADI ) 1275 Newton, unit 6 Boucherville, QC J4B 5H2 Canada 450.449.8177 FAX 450.449.8180TradeLink America, LLC.Distributed outside the United States by 230 Kings Mall Ct., Suite 182 Kingston, NY 12401 ******************************.845.246.6200FAX1.845.746.9070AS-1400 SystemBand:UHFFrequencies: 275 Selectable FrequenciesTransmitter Output Level: 30 mWOperating Range: Under Typical Conditions 300' (92m)Note: actual range depends on RF signal absorption,reflection, interference, and battery characteristicsAudio Frequency Response: +/-3dB 40Hz~16kHzTotal Harmonic Distortion: < 0.4% @ 1kHzSignal to Noise: >105dBAMaximum Deviation Range: +/-68kHzDynamic Range: >90dB A-weightedOperating Temperature: Range 14ºF to 122ºF (-10º C to +50º C)Note: battery characteristics may limit this rangeIncluded Accessories: Power Supply, EB4 Ear Buds, Antenna,Single/Dual Rack Ears, Quick Start GuideAS-1400T TransmitterMain Frame Size: EIA STANDARD 1/2UModulation Mode: FM Stereo ModulationRF Output: 30 mWMax Audio Input Level: +6dBVGain Adjustment Range: 33dBAudio Input: Line Level x 2, XLR/ 1/4" Combo JackXLR input: BalancedPin: 1 Ground (cable shield)Pin: 2 Audio +Pin: 3 No Audio -Audio Output: 1/4" Headphone OutDimensions: 1.7" x 8.2" x 7.1" (44 x 209 x 180 mm) (HxWxD)Weight: 37.4 oz. (1,060 g)12-18 V DC at 300mA supplied byPower Supplied By:external power supplyAS-1400R Body Pack ReceiverAudio Output Level: 100mWSensitivity: 6dBμV, S/N>60dBStereo Separation: 45db (at 1kHz)Output Connector: 1/8" (3.5mm) Stereo Earphone ConnectorDimensions: 4.33" x 2.56" x 0.87" (110 x 65 x 22 mm) (HxWxD)Weight: 5.12 oz (145 g) without batteries2 (AA) size alkaline or rechargeable batteriesPower Supplied By:Battery Life: About 7 hours (alkaline)。
QS600 6寸2路全频专业扬声器系统用户手册说明书

QS6006寸2路全频专业扬声器系统用户手册CN UM-QS600-20170808Ve r B感谢您购买 产品!请仔细阅读本手册,它将帮助你妥善设置并运行您的系统,使其发挥卓越的性能。
并保留这些说明以供日后参照。
警告:为了降低火灾与电击的风险,请不要将产品暴露在雨中或潮湿环境中。
警告:为了降低电击的风险,非专业人士请勿擅自拆卸该系统。
仅供专业人士操作。
等边三角形中的闪电标记,用以警示用户该部件为非绝缘体,系统内部存在着电压危险,电压。
可能足以引起触电。
可能足以引起触电如系统标有带惊叹号的等边三角形,则是为提示用户严格遵守本用户指南中的操作与维护规定。
注意:请勿对系统或附件作擅自的改装。
未经授权擅自改装将造成安全隐患。
警告:燃不得将明火源(如点的蜡烛)放在器材上面。
1. 请先阅读本说明。
2. 保留这些说明以供日后参照。
3. 注意所有警告信息。
4. 遵守各项操作指示。
5. 不要在雨水中或潮湿环境中使用本产品。
6. 不要将产品靠近热源安装,例如暖气管、加热器、火炉或其它能产生热量的装置(包括功放机 )。
7. 不要破坏极性或接地插头的安全性设置。
如果提供的插头不能插入插座,则应当请专业人员更换插座。
8. 保护好电源线和信号线,不要在上面踩踏或拧在一起(尤其是插头插座及穿出机体以外的部分 )。
9. 使用厂商规定及符合当地安全标准的附件。
10.雷电或长时间不使用时请断电以防止损坏产品。
12. 不要让物体或液体落入产品内——它们可能引起火灾或触电。
13. 请注意产品外罩上的相关安全标志。
. 仅与厂商指定或与电器一同售出的推车、架子、三脚架、支架或桌子一起使用。
推动小车电/器时,应谨防翻倒。
11注意事项产品的安装调试须由专业人士操作。
在使用非本厂规定的吊装件时,要保证结构的强度并符合当地的安全规范。
警告:1扬声器及扬声器系统的产品有限保修期为自正式购买日起的3年。
由于用户不合理的应用而导致音圈烧毁或纸盆损坏等故障,不包含于产品保修项目。
音频控制系统说明书
(Accepted on most screens)
• Radio on • Radio # FM/AM • Radio preset 1/2/3/4/5/6 • DISC/USB/iPod play • DISC/USB/iPod skip forward/back • Auxiliary (AUX) play
button. • For a list of available commands, press and release the Talk button and say
“Help” at any time. For a full list of commands, say “Display information” and “Voice info,” or see your Navigation Manual. • Speak in a clear, natural voice, and reduce all background noise. • Adjust the dashboard and side vents away from the microphone in the ceiling. • Close the windows. • RTGh_e sysGte_mN aWlso useLs a t8o/ u5c/h2s0c1r3ee2n 0dispPlay. PYoagu ca1n2 select options or icons by touching them on the screen. This is limited while the vehicle is moving.
Press and release the Talk button before you say a command.
Soundstream EXACT5.2 Coaxial 潜音门系统说明书

1
Coaxial Speaker System
INTRODUCTION AND REGISTRATION
Congratulations on your purchase of the Soundstream EXACT5.2 Coaxial Speaker System. You now own one of the finest car audio speaker systems available.
Hardware 12 each - #8 x 1" sheet metal screws (for mounting speakers and crossovers)
ቤተ መጻሕፍቲ ባይዱ
Connectors 8 each - gold spade connectors (for connecting to crossover)
EXACT5.2X Passive Crossover Network
The EXACT5.2X Passive Crossover represents a new concept in crossover philosophy. The EXACT5.2X crossover consists of high quality, multi-element components with two switchable functions. First is a three position tweeter level control. Second, is a two position midrange “presence” control. The combination of each allows for a multitude of control options. Dual inputs allow for multi-channel amp operation of woofer and tweeter circuits. • 24 dB/octave Acoustic Summation Crossover Slopes • Variable Tweeter and Midrange Controls for added flexibility • Dual Inputs for multi-amp operation and further flexibility • Dynamic Tweeter Level Control allows for improved power handling and continuous output • Ultra-low DCR Inductors for minimal signal loss (High power Air-core in woofer path) • Mylar Film Capacitors to ensure low saturation and accuracy in the high frequencies
扬声器压缩器 限制器160SL用户手册说明书

160SLStereo Compressor/LimiterOwner’s ManualRefer all servicing to qualified service personnel. Servicing is required when the apparatus has been damaged in any way, such as power-supply cord or plugManufacturer’s Name: dbx Professional Products Manufacturer’s Address: 8760 S. Sandy Parkway Sandy, Utah 84070, USA declares that the product:Product name: dbx 160SL N ote: Product name may be suffixed by the letters-EU. Product option: None conforms to the following Product Specifications:Safety: IEC 60065 -01+Amd 1 EMC: EN 55022:2006 (N/A; Analog Product) I E C61000-4-2 I E C61000-4-3 I E C61000-4-4 I E C61000-4-5 I E C61000-4-6 I E C61000-4-8 I E C61000-4-11Supplementary Information:The product herewith complies with the requirements of the:Low Voltage Directive 2006/95/EC EMC Directive 2004/108/EC.RoHS Directive 2002/95/EC WEEE Directive 2002/96/EC With regard to Directive 2005/32/EC and EC Regulation 1275/2008 of 17 December 2008, this product is designed, produced, and classified as Professional Audio Equipment and thus is exempt from this Directive.Roger Johnsen Director, Engineering Signal Processing 8760 S. Sandy Parkway Sandy, Utah 84070, USA Date: August 16, 2011European Contact: Your local dbx Sales and Service Office or Harman Signal Processing8760 South Sandy Parkway Sandy, Utah 84070 USA Ph: (801) 566-8800Fax: (801) 568-7583DECLARATION OF CONFORMITY eLectroMaGnetIc coMPatIBILItythis unit conforms to the product specifications noted on the Declarationof Conformity . operation is subject to the following two conditions:• t his device may not cause harmful interference, and• t his device must accept any interference received, includinginterference that may cause undesired operation.operation of this unit within significant electromagnetic fields should beavoided.• use only shielded interconnecting cables.u.K. MaInS PLuG WarnInGA molded mains plug that has been cut off from the cord is unsafe.discard the mains plug at a suitable disposal facility.NEVER UNDER ANY CIRCUMSTANCES SHOULD YOUINSERT A DAMAGED OR CUT MAINS PLUG INTO A 13AMP POWER SOCKET.do not use the mains plug without the fuse cover in place.replacement fuse covers can be obtained from your local retailer.replacement fuses are 13 amps and must be AstA approved toBs1362.Operatingto your systemOperatingto your systemOperatingSpecifications Manual DesignBlock mounted above or below anything that doesn’t create excessive heat, since it requires no specialventilation. Ambient temperatures should not exceed 113°F (45°C) when equipment• M ake connections via XLR connectors.T wo Basic Compressor Setups:A : C hannel One shows processing of a groupFigure 4to your systemto your systemOperating-20-20DesignBlock ControlsThis panel is removed when an output option card is installed in your 160SL. Connecting a custom designed digital output module in the option portBU and S/PDIF output capabilities for the 160SL. The digital outputs of the 160SL operate simultaneously with the analog outputs, providing the possibility of running to three different devices at the same time: analog, AES/EBU, and S/PDIF. For more information on the digital output option, contact dbx customer service.17TechnicalSpecifications Using PeakStop The Stop Level control sets the maximum peak output level of the 160SL irrespective of any other control. PeakStop consists of a sophisticated voltage-controlled Instantaneous Transient Clamp that produces a minimum of audible distortion. It rounds the corners of a peak rather than cutting it off sharply, as “clippers” do. By making a signal’s leading and trailing edges curved instead of sharp corners, it reduces the amount of higher odd-order, offensive-sounding harmonics that conventional clipping causes.Connection Installation Technical1921Operating23OperatingDesign25OperatingTechnical27Operating8760 South Sandy Pkwy.Sandy, Utah 84070Phone: (801) 568-7660Fax: (801) 568-7662Int’l Fax: (603) 672-4246Questions or comments?E•mailusat:*******************or visit our website at:5018577-A04/09/12。
- 1、下载文档前请自行甄别文档内容的完整性,平台不提供额外的编辑、内容补充、找答案等附加服务。
- 2、"仅部分预览"的文档,不可在线预览部分如存在完整性等问题,可反馈申请退款(可完整预览的文档不适用该条件!)。
- 3、如文档侵犯您的权益,请联系客服反馈,我们会尽快为您处理(人工客服工作时间:9:00-18:30)。
输入信号源 指示 SDI1 SDI2 A1 A2
状态
AMS160 状态
绿色 绿色 绿色 绿色
亮:输入信号为 SDI1 嵌入音频(AMS160-A2 无指示) 亮:输入信号为 SDI2 嵌入音频(AMS160-A2 无指示) 亮:输入信号为模拟音频输入 1(AMS160-D2 无指示) 亮:输入信号为模拟音频输入 2(AMS160-D2 无指示)
第三章 安装 ..................................................................................................... 2
拆箱........................................................................................................................................... 2 安装至机架............................................................................................................................... 3
型号
型号 AMS160-A2 AMS160-D2
AMS160-DA2
配置 模拟音频监听系统. 2 路模拟音频输入,两个 UV/PPM 显示, 带音频监听功能和耳机插口。 SDI 嵌入音频监听系统. 2 路 SDI 输入,任选一路解嵌和监听。 两路 SDI 输出和一路模拟视频输出,两个 UV/PPM 显示,带 音频监听功能和耳机插口。 SDI 及模拟音频监听系统. 2 路 SDI 输入,2 路模拟音频输入, 任选一路 SDI 解嵌和监听。两路 SDI 输出和一路模拟视频输 出,两个 UV/PPM 显示,带音频监听功能和耳机插口。
AMS160 音频监听音箱系统
-1-
第二章 外观
前面板
1-2 3-4 G1 G2 G3 G4
SEL
AMS160 Audio Monitoring System
POWER
SDI 1 SD耳机输出接口 3 -监听音量调节旋钮 4 -监听音量平衡调节旋钮 5 -嵌入音频组指示灯和嵌入音频组选择按钮 6 -三色 LED 电平表 7 -电源指示灯 8 -输入信号源指示灯和输入信号源选择按钮 9 –时代奥视公司 osee 标识
监听音量增益调节
AMS160 可通过前面板上音量调节旋钮调节音频监听音量,顺时针调节音量增大,逆时针调 节音量减小。
AMS160 也可通过设置后面板上控制拔码的后 2 位拔码的状态来设置音频监听音量,状态如 下:
增益设置
-12dB -18dB -20dB -24dB
拔码状态 2
DOWN DOWN
AMS160 音频监听音箱系统
用户手册
产品信息
名称:AMS160 音频监听音箱系统 版本号:1.1 修改时间:2008 年 4 月 8 日
公司名称
北京时代奥视数码技术有限公司 Beijing Osee Digital Technology Ltd.
联系方式
地址:北京市海淀区上地三街 9 号金隅嘉华大厦 D 座 702 室 邮编:100085 电话:010-62968823 传真:010-62977165 网址:/ E-mail:sales@
第四章 操作说明 .............................................................................................. 3
面板使用方法和状态指示....................................................................................................... 3 面板控制................................................................................................................................... 4 外部控制................................................................................................................................... 5
第四章 操作说明
面板使用方法和状态指示
三色 LED 电平表显示
三色 LED 电平表显示用来指示两路音频 PPM 和 VU 表。 旋钮
AMS160 面板上有一个音量调节电位器旋钮及一个音量平衡电位器旋钮。 LED 指示
电源指示 POWER
状态 绿色
AMS160 状态 亮:电源 1 工作正常 灭:电源 1 工作不正常
AMS160 音频监听音箱系统
-3-
面板控制
选择输入音频源
AMS160 可以通过“输入信号源选择按钮”来选择输入音频源,最多可以有五种输入状态选 择。每按一下“输入信号源选择按钮”进入不同输入状态,并在“输入信号源指示灯组”中指示 作为输入的信号源,同时在三色电平表中显示输入音频的 PPM 和 VU 表。
第五章 规格参数 .............................................................................................. 5
规格........................................................................................................................................... 5
适用型号 AMS160-D2 AMS160-DA2 AMS160-D2 AMS160-DA2 AMS160-A2 AMS160-DA2 AMS160-A2 AMS160-DA2
AMS160-A2 AMS160-DA2
嵌入音频组及音频通道选择
当信号源输入为 SDI 嵌入音频时,必须选择正确的音频组及音频通道。通过“嵌入音频组选 择按钮”可选择嵌入音频四个音频组中的任两个音频通道作为输入音频源。按下“嵌入音频组选 择按钮”可实现循环选择,并在嵌入音频组指示灯中有相应指示。
特点
1U 机架安装方式; 可选模拟、SDI 嵌入音频输入; 2 路模拟音频、2 路 SDI 输入; 两路 SDI 视频输出和一路模拟视频输出; 可同时监听 2 路音频信号、显示 2 路音频信号电平; 2 个 26 段三色 LED 电平表同时显示 PPM 和 VU 表; 防磁设计宽频响扬声器; 带耳机插口。
后面板
100-240 VAC 50/60HZ
RS232
RS 485
SETUP
A1 IN
A2 IN
COMP OUT SDI IN1
SDI IN2
SDI OUT1 SDI OUT2
1 100~240V AC 交流电源输入端口 2 RS232 控制端口 3 RS485 控制端口(一个接 75Ω终接电阻) 4 控制拔码 5 两路模拟音频输入端口 6 模拟视频输出端口(AMS160-A2 无作用) 7 SDI 视频输出端口 1(AMS160-A2 无作用) 8 SDI 视频输出端口 2(AMS160-A2 无作用) 9 SDI 视频输入端口 1(AMS160-A2 无作用) 10 SDI 视频输入端口 2(AMS160-A2 无作用)
嵌入音频通道组 指示 G1 1-2 G1 3-4 G2 1-2 G2 3-4 G3 1-2 G3 3-4 G4 1-2 G4 3-4
状态
AMS160 状态(AMS160-A2 无指示)
黄色 黄色 黄色 黄色 黄色 黄色 黄色 黄色
亮:调节输入音频组 1 中的通道 1 和通道 2 音量 亮:调节输入音频组 1 中的通道 3 和通道 4 音量 亮:调节输入音频组 2 中的通道 1 和通道 2 音量 亮:调节输入音频组 2 中的通道 3 和通道 4 音量 亮:调节输入音频组 3 中的通道 1 和通道 2 音量 亮:调节输入音频组 3 中的通道 3 和通道 4 音量 亮:调节输入音频组 4 中的通道 1 和通道 2 音量 亮:调节输入音频组 4 中的通道 3 和通道 4 音量
目录
第一章 简介 ..................................................................................................... 1
特点........................................................................................................................................... 1 型号........................................................................................................................................... 1
第二章 外观 ..................................................................................................... 2
前面板....................................................................................................................................... 2 后面板....................................................................................................................................... 2