javaredis缓存实现方法
redis java单例写法

redis java单例写法
在Java中,使用Redis作为缓存时,通常需要创建一个Redis客户端实例。
为了减少资源浪费和避免重复创建Redis客户端实例,可以使用单例模式来确保在整个应用程序中只有一个Redis客户端实例。
下面是一个简单的Redis Java单例写法:
java
import redis.clients.jedis.Jedis;
public class RedisSingleton {
private static RedisSingleton instance;
private Jedis jedis;
private RedisSingleton() {
// 创建Jedis实例,这里使用了Redis默认的地址和端口号 jedis = new Jedis("localhost", 6379);
}
public static synchronized RedisSingleton getInstance() { if (instance == null) {
instance = new RedisSingleton();
}
return instance;
}
public Jedis getJedis() {
return jedis;
}
}
在这个示例中,RedisSingleton类使用了单例模式,它有一个私有的静态实例变量instance,在类加载时创建了一个实例。
getInstance()方法是获取该实例的静态方法,如果instance为空,则创建一个新的实例。
getJedis()方法返回Jedis实例,用于与Redis进行交互。
Redis缓存的数据压缩和序列化方法
Redis缓存的数据压缩和序列化方法数据压缩和序列化对于Redis缓存的性能和效率至关重要。
本文将介绍Redis缓存中常用的数据压缩和序列化方法,包括压缩算法和序列化协议的选择,以及实现这些方法的步骤。
一、数据压缩方法数据压缩是将原始数据通过特定算法进行压缩,减少数据量以提高存储和传输效率。
在Redis缓存中,常用的数据压缩方法包括Gzip和Lzf。
1. Gzip压缩方法Gzip是一种常见的压缩算法,能够有效地压缩文本和二进制数据。
在Redis中使用Gzip进行数据压缩的步骤如下:(1)安装Gzip库:首先需要在服务器上安装Gzip库,以便使用Gzip算法。
(2)配置Redis服务器:在Redis服务器的配置文件中,将压缩选项设置为启用,并指定使用Gzip算法进行压缩。
(3)压缩和解压缩数据:在应用程序中,使用Gzip算法对需要存储到Redis缓存的数据进行压缩,或者从Redis缓存中获取数据后解压缩。
2. Lzf压缩方法Lzf是一种高效的压缩算法,特别适用于压缩简单的文本数据。
在Redis中使用Lzf进行数据压缩的步骤类似于Gzip:(1)安装Lzf库:在服务器上安装Lzf库,以便使用Lzf算法。
(2)配置Redis服务器:在Redis服务器的配置文件中,将压缩选项设置为启用,并指定使用Lzf算法进行压缩。
(3)压缩和解压缩数据:在应用程序中,使用Lzf算法对需要存储到Redis缓存的数据进行压缩,或者从Redis缓存中获取数据后解压缩。
二、数据序列化方法数据序列化是将对象或数据结构转换成字节流,以便在不同的应用程序之间进行传输和存储。
在Redis缓存中,常用的数据序列化方法包括JSON、MessagePack和Protobuf。
1. JSON序列化方法JSON是一种轻量级的数据交换格式,常用于Web应用程序中的数据传输。
在Redis中使用JSON进行数据序列化的步骤如下:(1)选择合适的JSON库:根据编程语言的不同,选择适合的JSON库进行序列化和反序列化操作。
java redis 分页缓存实现原理

java redis 分页缓存实现原理Redis是一个开源的内存数据库,通过将数据存储在内存中来加快读写速度。
在使用Redis进行分页缓存时,可以将查询结果存储在Redis中,以便下次查询时能够减少数据库的查询次数,提高系统性能。
Redis提供了多种数据结构,可以根据具体需求选择合适的数据结构来实现分页缓存。
常用的数据结构有字符串(String)、列表(List)、哈希表(Hash)、有序集合(Sorted Set)等。
下面以列表和哈希表两种数据结构为例,详细说明Redis分页缓存的实现原理。
1. 列表(List)数据结构:使用列表数据结构进行分页缓存时,可以将查询结果作为一个列表存储在Redis中。
每一条数据可以作为列表中的一个元素,通过列表相关命令可以实现分页查询。
- 将查询结果存储到Redis列表中:可以使用LPUSH命令将每条数据作为一个列表元素存储到Redis中,例如:LPUSH key value1、LPUSH key value2...。
每次查询时,使用LRANGE 命令获取指定范围的数据,例如:LRANGE key start end,其中start为起始索引,end为结束索引。
- 分页查询:每次查询时,可以通过计算起始索引和结束索引,来获取对应页码的数据。
例如,每页显示10条数据,查询第2页时,起始索引就是10,结束索引就是19。
使用LRANGE命令获取指定范围的数据,例如:LRANGE key 10 19。
- 实现缓存更新:当数据库中的数据发生变化时,需要更新Redis缓存中对应的数据。
可以使用LTRIM命令截取列表,保留指定的数据范围。
例如,数据库中某条数据更新后,可以使用LTRIM命令截取列表,保留除了更新数据之外的其他数据,然后再将更新后的数据插入到列表的首位。
2. 哈希表(Hash)数据结构:使用哈希表数据结构进行分页缓存时,可以将查询结果作为一个哈希表存储在Redis中。
redis缓存实现原理
redis缓存实现原理Redis缓存实现原理是基于内存的键值存储系统,具有快速读写操作和持久化功能。
以下是Redis缓存的实现原理:1. 内存存储:Redis将数据存储在内存中,以实现高速读写操作。
内存存储方式使得Redis能够快速地响应请求,并处理大量并发访问。
2. 键值对存储:Redis以键值对的形式存储数据。
每个键都与一个特定的值相关联。
这种存储模型使得Redis能够将数据分组并按需访问。
3. 数据类型:Redis支持多种数据类型,包括字符串、哈希表、列表、集合和有序集合。
不同的数据类型适用于不同的应用场景,提供了灵活性和高效性。
4. 持久化:Redis提供了两种持久化方式,即RDB(Redis数据库)和AOF(Append Only File)。
RDB在指定时间间隔内将内存中的数据快照保存到硬盘上,而AOF则记录了所有对数据的修改操作,通过重放这些操作来恢复数据。
5. 缓存淘汰策略:Redis通过设置缓存的最大内存容量,当达到容量限制时会触发缓存淘汰策略。
常见的淘汰策略包括LRU(最近最少使用)、LFU(最不常使用)和随机替换等。
6. 分布式部署:Redis支持分布式部署,通过在多个节点之间共享数据进行负载均衡和高可用性。
分布式Redis使用一致性哈希算法来确定数据在哪个节点中存储,同时使用复制和故障转移机制来提高可用性。
总之,Redis缓存实现原理基于内存存储、键值对存储和多种数据类型支持。
它通过持久化、缓存淘汰策略和分布式部署等机制实现高速读写、数据可持久化和可扩展性。
java redis 缓存分页实现原理
java redis 缓存分页实现原理Java Redis缓存是一种用于在Web应用程序中提高数据访问性能的技术。
它通过将常用的数据存储在内存中,以便更快地访问和获取,从而减少了对数据库的访问。
分页是Web应用程序中常见的功能之一,它允许用户在列表或表格中浏览数据,并按页查看数据,以减少数据量和提高用户体验。
Java Redis缓存的分页实现原理是,将查询的结果集划分为多个页,并将每个页的数据存储在Redis缓存中,以供后续的访问和查询。
下面将详细介绍Java Redis缓存分页的实现原理。
1.将查询结果集分页:在数据库查询之后,将结果集按照每页显示的数量划分为多个页,例如每页显示10条数据,将结果集分为若干个包含10条数据的页。
这样可以方便后续的分页访问和查询。
2.将每页的数据存储到Redis缓存中:对于每个分页的数据,将其存储到Redis缓存中。
可以使用Redis 的数据结构Hash或List来存储每页的数据。
对于Hash结构,可以使用页号作为Key,对应的数据作为Value,将所有页的数据存储到一个Hash中。
对于List结构,可以使用一个List来存储所有的分页数据,每个分页数据作为一个元素。
通过使用Redis缓存,可以提高分页的访问速度和性能。
3.使用Redis缓存进行分页查询:当用户请求分页数据时,首先从Redis缓存中获取对应页的数据。
如果缓存中存在该页的数据,则直接返回给用户;如果缓存中不存在该页的数据,则从数据库中查询该页的数据,并存储到Redis缓存中,以供后续的查询和访问。
4.缓存失效和更新:为了保证数据的实时性,需要处理缓存的失效和更新问题。
当用户修改或删除数据时,需要更新对应页的数据缓存,或者将所有缓存的数据进行失效处理,以保证数据的一致性。
可以通过监听数据的修改和删除操作,在数据库操作完成后,更新或失效对应的缓存数据。
5.缓存过期时间设置:为了控制内存使用和避免缓存数据过时,可以设置缓存数据的过期时间。
Java中的分布式缓存框架有哪些
Java中的分布式缓存框架有哪些随着互联网应用的快速发展,分布式缓存已经成为了提高系统性能和扩展性的关键技术之一。
在Java开发领域,也涌现了许多优秀的分布式缓存框架。
本文将介绍几个Java中常用的分布式缓存框架,并分析它们的特点和适用场景。
一、EhcacheEhcache是一个开源的Java缓存框架,被广泛应用于各种Java应用中。
它提供了基于内存和磁盘的缓存机制,支持分布式部署,能够满足大规模应用的缓存需求。
Ehcache具有轻量级、易于使用和快速的特点,适合用于小型和中型的应用系统。
二、RedisRedis是一种高性能的内存数据存储系统,支持多种数据结构,可以用作分布式缓存的解决方案。
Redis提供了持久化和复制机制,可以实现高可用性和数据持久化。
同时,Redis还具有丰富的功能,如发布订阅、事务管理等,使得它不仅可以作为缓存系统,还可以用于其他用途,如消息队列等。
Redis适用于各种规模的应用系统。
三、MemcachedMemcached是一个简单的高性能分布式内存对象缓存系统。
它使用键值对的方式存储数据,提供了多种API,支持分布式部署。
Memcached具有高速的读写性能和可扩展性,通常被用于缓存数据库查询结果、页面内容等。
它适用于大规模应用和高并发场景,但需要注意的是,Memcached不提供数据持久化功能。
四、HazelcastHazelcast是一个基于Java的开源分布式缓存框架,它提供了分布式数据结构和集群管理功能。
Hazelcast采用了集中式架构,能够实现多节点之间的数据共享和同步。
它具有简单易用的特点,并提供了多种数据结构和并发算法的支持。
Hazelcast适用于构建复杂的分布式应用系统。
五、CaffeineCaffeine是一个在Java中最受欢迎的缓存库之一,它提供了高性能、无锁的内存缓存解决方案。
Caffeine采用了分片策略来管理缓存对象,提供了各种缓存策略和配置选项,可以根据实际需求进行灵活配置。
ssm+redis如何更简洁的利用自定义注解+AOP实现redis缓存

ssm+redis如何更简洁的利⽤⾃定义注解+AOP实现redis缓存基于 ssm + maven + redis 使⽤⾃定义注解利⽤aop基于AspectJ⽅式实现redis缓存 如何能更简洁的利⽤aop实现redis缓存,话不多说,上demo 需求: 数据查询时每次都需要从数据库查询数据,数据库压⼒很⼤,查询速度慢, 因此设置缓存层,查询数据时先从redis中查询,如果查询不到,则到数据库中查询 然后将数据库中查询的数据放到redis中⼀份,下次查询时就能直接从redis中查到,不需要查询数据库了 实现过程: 先搭建ssm的架⼦,引⼊redis,编写redis 缓存⽅法 RedisCache.java以及序列化⽤到的⼯具类 ⾃定义注解 getCache ⽬的: 被这个注解标记的⽅法实现aop 防⽌redis key重复 编写切⾯ @Aspect @Pointcut("@annotation(com.spring_redis.cache.GetCache)") 切⼊点为⾃定义注解即每个被该注解标记的⽅法实现通知 @Around("getCache()") 利⽤环绕通知 过程:查询时,先查询redis 如果存在key-value,则返回不查询 如果不存在,则查询数据库,之后将查询到的数据存⼊到redis缓存中 redis key格式:为了防⽌key冲突,创建的key格式为: 包名.类名.⽅法名.参数类型.参数值",类似 "your.package.SomeService.getById(integer).123" ⽬录结构 maven依赖:1 <properties>2 <project.build.sourceEncoding>UTF-8</project.build.sourceEncoding>3 <!-- spring版本号 -->4 <spring.version>4.0.6.RELEASE</spring.version>5 <!-- mybatis版本号 -->6 <mybatis.version>3.2.7</mybatis.version>7 </properties>8 <dependencies>910 <!-- spring核⼼包 -->11 <!-- springframe start -->12 <dependency>13 <groupId>org.springframework</groupId>14 <artifactId>spring-core</artifactId>15 <version>${spring.version}</version>16 </dependency>1718 <dependency>19 <groupId>org.springframework</groupId>20 <artifactId>spring-web</artifactId>21 <version>${spring.version}</version>22 </dependency>2324 <dependency>25 <groupId>org.springframework</groupId>26 <artifactId>spring-oxm</artifactId>27 <version>${spring.version}</version>28 </dependency>2930 <dependency>31 <groupId>org.springframework</groupId>32 <artifactId>spring-tx</artifactId>33 <version>${spring.version}</version>34 </dependency>3536 <dependency>37 <groupId>org.springframework</groupId>38 <artifactId>spring-aop</artifactId>39 <version>${spring.version}</version>40 </dependency>4142 <dependency>43 <groupId>org.springframework</groupId>44 <artifactId>spring-jdbc</artifactId>45 <version>${spring.version}</version>46 </dependency>4748 <dependency>49 <groupId>org.springframework</groupId>50 <artifactId>spring-webmvc</artifactId>51 <version>${spring.version}</version>52 </dependency>5354 <!-- https:///artifact/org.springframework/spring-context-support -->55 <dependency>56 <groupId>org.springframework</groupId>57 <artifactId>spring-context-support</artifactId>58 <version>4.0.6.RELEASE</version>59 </dependency>6061 <dependency>62 <groupId>org.springframework</groupId>63 <artifactId>spring-context</artifactId>64 <exclusions>65 <exclusion>66 <groupId>commons-logging</groupId>67 <artifactId>commons-logging</artifactId>68 </exclusion>69 </exclusions>70 <version>${spring.version}</version>71 </dependency>72 <dependency>73 <groupId>org.springframework</groupId>74 <artifactId>spring-test</artifactId>75 <version>${spring.version}</version>76 </dependency>77 <!-- springframe end -->7879 <!-- aop注解 -->8081 <dependency>82 <groupId>org.aspectj</groupId>83 <artifactId>aspectjrt</artifactId>84 <version>1.6.12</version>85 </dependency>86 <dependency>87 <groupId>org.aspectj</groupId>88 <artifactId>aspectjweaver</artifactId>89 <version>1.6.12</version>90 </dependency>91 <dependency>92 <groupId>cglib</groupId>93 <artifactId>cglib</artifactId>94 <version>2.2</version>95 </dependency>9697 <!-- mysql驱动包 -->98 <dependency>99 <groupId>mysql</groupId>100 <artifactId>mysql-connector-java</artifactId> 101 <version>5.1.31</version>102 </dependency>103104 <!-- dbcp2连接池 -->105 <dependency>106 <groupId>mons</groupId> 107 <artifactId>commons-dbcp2</artifactId>108 <version>2.0.1</version>109 </dependency>110111 <!-- json数据 -->112 <dependency>113 <groupId>org.codehaus.jackson</groupId> 114 <artifactId>jackson-mapper-asl</artifactId> 115 <version>1.9.13</version>116 </dependency>117118 <!-- mybatis核⼼包 -->119 <dependency>120 <groupId>org.mybatis</groupId>121 <artifactId>mybatis</artifactId>122 <version>${mybatis.version}</version>123 </dependency>124 <!-- mybatis/spring包 -->125 <dependency>126 <groupId>org.mybatis</groupId>127 <artifactId>mybatis-spring</artifactId>128 <version>1.2.2</version>129 </dependency>130131 <dependency>132 <groupId>org.springframework.data</groupId> 133 <artifactId>spring-data-redis</artifactId>134 <version>1.6.1.RELEASE</version>135 </dependency>136 <dependency>137 <groupId>redis.clients</groupId>138 <artifactId>jedis</artifactId>139 <version>2.7.3</version>140 </dependency>141142 <!-- servlet-api -->143 <dependency>144 <groupId>javax.servlet</groupId>145 <artifactId>javax.servlet-api</artifactId>146 <version>3.0.1</version>147 <scope>provided</scope>148 </dependency>149 <dependency>150 <groupId>javax.servlet.jsp</groupId>151 <artifactId>jsp-api</artifactId>152 <version>2.2</version>153 <scope>provided</scope>154 </dependency>155 <!-- servlet-api end -->156157 <dependency>158 <groupId>log4j</groupId>159 <artifactId>log4j</artifactId>160 <version>1.2.17</version>161 </dependency>162 </dependencies>163 这⾥只给出redis 的相关配置 在applicationContext-dao.xml ⾥添加1 <?xml version="1.0" encoding="UTF-8"?>2 <beans xmlns="/schema/beans"3 xmlns:xsi="/2001/XMLSchema-instance" xmlns:p="/schema/p"4 xmlns:context="/schema/context"5 xmlns:aop="/schema/aop" xmlns:tx="/schema/tx"6 xmlns:util="/schema/util"7 xsi:schemaLocation="/schema/beans8 /schema/beans/spring-beans-3.2.xsd9 /schema/context10 /schema/context/spring-context-3.2.xsd11 /schema/tx12 /schema/tx/spring-tx-3.2.xsd13 /schema/aop14 /schema/aop/spring-aop-3.2.xsd15 /schema/util16 /schema/util/spring-util-3.2.xsd">171819 <!-- 加载db.properties⽂件中的内容,db.properties⽂件中key命名要有⼀定的特殊规则 -->20 <context:property-placeholder location="classpath:properties/db.properties" />21222324 <!-- 配置数据源,dbcp -->2526 <bean id="dataSource" class="mons.dbcp2.BasicDataSource">27 <property name="driverClassName" value="${jdbc.driver}" />28 <property name="url" value="${jdbc.url}" />29 <property name="username" value="${ername}" />30 <property name="password" value="${jdbc.password}" />31 </bean>323334 <bean id="sqlSessionFactory" class="org.mybatis.spring.SqlSessionFactoryBean"35 p:dataSource-ref="dataSource" p:configLocation="classpath:mybatis/sqlMapConfig.xml"36 ></bean>37 <!-- Redis和缓存配置开始 -->38 <!-- jedis 配置 -->39 <bean id="poolConfig" class="redis.clients.jedis.JedisPoolConfig" >40 <property name="maxIdle" value="100" />41 <property name="maxWaitMillis" value="1000" />42 <property name="testOnBorrow" value="true" />43 </bean >4445 <!-- redis连接池 -->46 <bean id="jedisPool" class="redis.clients.jedis.JedisPool" destroy-method="close">47 <constructor-arg name="poolConfig" ref="poolConfig"/>48 <constructor-arg name="host" value="127.0.0.1"/>49 <constructor-arg name="port" value="6379"/>50 </bean>5152 <!-- redis服务器中⼼ -->53 <bean id="connectionFactory" class="org.springframework.data.redis.connection.jedis.JedisConnectionFactory" >54 <property name="poolConfig" ref="poolConfig" />55 <property name="port" value="6379" />56 <property name="hostName" value="127.0.0.1" />57 <!-- <property name="password" value="${redis.password}" /> -->58 <property name="timeout" value="10000" ></property>59 </bean >60 <bean id="redisTemplate" class="org.springframework.data.redis.core.RedisTemplate" >61 <property name="connectionFactory" ref="connectionFactory" />62 <property name="keySerializer" >63 <bean class="org.springframework.data.redis.serializer.StringRedisSerializer" />64 </property>65 <property name="valueSerializer" >66 <bean class="org.springframework.data.redis.serializer.StringRedisSerializer" />67 </property>68 </bean >697071727374 <!-- cache配置 -->75 <bean id="putCache" class="com.spring_redis.cache.PutCacheAOP" >76 <property name="redisTemplate" ref="redisTemplate" />77 </bean>7879 <!-- cache配置 -->80 <bean id="getCache" class="com.spring_redis.cache.GetCacheAOP" >81 <property name="redisTemplate" ref="redisTemplate" />82 </bean>8384 <!-- Redis和缓存配置结束 -->8586 <!-- mapper扫描器 -->87 <bean class="org.mybatis.spring.mapper.MapperScannerConfigurer">88 <!-- 扫描包路径,如果需要扫描多个包,中间使⽤半⾓逗号隔开 -->89 <property name="basePackage" value="com.spring_redis.mapper"></property>90 <property name="sqlSessionFactoryBeanName" value="sqlSessionFactory"/>91 </bean>9293 <bean id="roomservice" class="com.spring_redis.service.impl.RoomServiceImpl" >9495 </bean>9697 </beans> springmvc.xml1 <beans xmlns="/schema/beans"2 xmlns:xsi="/2001/XMLSchema-instance" xmlns:mvc="/schema/mvc"3 xmlns:context="/schema/context"4 xmlns:aop="/schema/aop" xmlns:tx="/schema/tx"5 xsi:schemaLocation="/schema/beans6 /schema/beans/spring-beans-3.2.xsd7 /schema/mvc8 /schema/mvc/spring-mvc-3.2.xsd9 /schema/context10 /schema/context/spring-context-3.2.xsd11 /schema/aop12 /schema/aop/spring-aop-3.2.xsd13 /schema/tx14 /schema/tx/spring-tx-3.2.xsd ">1516 <aop:aspectj-autoproxy proxy-target-class="true"/>1718 <!-- 可以扫描controller、service、... 这⾥让扫描controller,指定controller的包 com.ssm.controlle -->19 <context:component-scan base-package="com.spring_redis">20 </context:component-scan>21 <!-- 使⽤ mvc:annotation-driven代替上边注解映射器和注解适配器配置 mvc:annotation-driven默认加载很多的参数绑定⽅法 -->22 <mvc:annotation-driven />23 <!-- 视图解析器解析jsp解析,默认使⽤jstl标签,classpath下的得有jstl的包 -->24 <bean25class="org.springframework.web.servlet.view.InternalResourceViewResolver">26 <!-- 配置jsp路径的前缀 <property name="prefix" value="/jsp/"/> -->27 <!-- 配置jsp路径的后缀 -->28 <property name="suffix" value=".jsp" />29 </bean>303132 </beans><aop:aspectj-autoproxy proxy-target-class="true"/> 开启注解这个⼀定要写到springmvc.xml⾥,否则注解会不起作⽤ 那重点开始了 创建⾃定义注解1/**2 * ⾃定义注解,对于查询使⽤缓存的⽅法加⼊该注解3 * @author Chenth4*/5 @Retention(RetentionPolicy.RUNTIME)6 @Target({ElementType.METHOD})7public @interface GetCache {8 String name() default "";9 String value() default "";10 } 被这个⾃定义注解所标记的⽅法将实现下⾯的切⾯ 配置切⾯1package com.spring_redis.cache;23import java.io.Serializable;4import ng.reflect.Method;567import ng.JoinPoint;8import ng.ProceedingJoinPoint;9import ng.annotation.Around;10import ng.annotation.Aspect;11import ng.annotation.Pointcut;12import ng.reflect.MethodSignature;13import org.springframework.beans.factory.annotation.Autowired;14import org.springframework.data.redis.core.RedisTemplate;15import ponent;1617import com.spring_redis.util.RedisCache;1819 @Component20 @Aspect21public class GetCacheAOP {2223 @Autowired24private RedisTemplate<Serializable, Object> redisTemplate;2526private RedisCache redisCache = new RedisCache();272829 @Pointcut("@annotation(com.spring_redis.cache.GetCache)")30public void getCache(){31 System.out.println("我是⼀个切⼊点");32 }3334/**35 * 在所有标注@getCache的地⽅切⼊36 * @param joinPoint37*/38 @Around("getCache()")39public Object beforeExec(ProceedingJoinPoint joinPoint){404142//前置:到redis中查询缓存43 System.out.println("调⽤从redis中查询的⽅法...");4445//redis中key格式: id46 String redisKey = getCacheKey(joinPoint);4748//获取从redis中查询到的对象49 Object objectFromRedis = redisCache.getDataFromRedis(redisKey);5051//如果查询到了52if(null != objectFromRedis){53 System.out.println("从redis中查询到了数据...不需要查询数据库");54return objectFromRedis;55 }5657 System.out.println("没有从redis中查到数据...");5859//没有查到,那么查询数据库60 Object object = null;61try {62 object = joinPoint.proceed();63 } catch (Throwable e) {6465 e.printStackTrace();66 }6768 System.out.println("从数据库中查询的数据...");6970//后置:将数据库中查询的数据放到redis中71 System.out.println("调⽤把数据库查询的数据存储到redis中的⽅法...");7273 redisCache.setDataToRedis(redisKey, object);74 System.out.println("redis中的数据..."+object.toString());75//将查询到的数据返回76return object;77 }7879/**80 * 根据类名、⽅法名和参数值获取唯⼀的缓存键81 * @return格式为 "包名.类名.⽅法名.参数类型.参数值",类似 "your.package.SomeService.getById(int).123" 82*/8384 @SuppressWarnings("unused")85private String getCacheKey(ProceedingJoinPoint joinPoint) {868788 MethodSignature ms=(MethodSignature) joinPoint.getSignature();89 Method method=ms.getMethod();90 String ActionName = method.getAnnotation(GetCache.class).name();91 String fieldList = method.getAnnotation(GetCache.class).value();92//System.out.println("签名是"+ms.toString());93for (String field:fieldList.split(","))94 ActionName +="."+field;9596//先获取⽬标⽅法参数97 String id = null;98 Object[] args = joinPoint.getArgs();99if (args != null && args.length > 0) {100 id = String.valueOf(args[0]);101 }102103 ActionName += "="+id;104 String redisKey = ms+"."+ActionName;105return redisKey;106 }107108109public void setRedisTemplate(110 RedisTemplate<Serializable, Object> redisTemplate) {111this.redisTemplate = redisTemplate;112 }113 }@Pointcut("@annotation(com.spring_redis.cache.GetCache)") 这个切⼊点的作⽤是 在所有标注@getCache的地⽅切⼊@Around("getCache()")这⾥⽤的是后置通知,即查询之前先查询redis,如果有数据就返回数据,没有就穿透的数据库查询数据,之后再缓存到redis中 这⾥并没有太多的讲解配置ssm框架,可能后续会写关于spring+springmvc+mybatis的框架整合 编写mapper层,service层,controller层 mapper/**** @author cmy* @date 2016-10-22* @description 持久化*/public interface RoomMapper {@Insert("insert into room(roomName,address) values(#{roomName},#{addRess})")int insert(Room room);@Select("select * from room where id=#{id}")public Room selectByPrimaryKey(@Param("id")Integer id);} service1/**2 *3 * @author cmy4 * @date 2016-10-225 * @description test6*/7public interface RoomService {8910int insert(Room room)throws Exception;111213 Room selectByPrimaryKey(Integer id)throws Exception;1415 }1617// 实现18/**19 * @author cmy20 * @date 2016-10-2221 * @description test 实现22*/23public class RoomServiceImpl implements RoomService{2425 @Autowired26private RoomMapper mapper;2728 @Override29public int insert(Room room) throws Exception {3031return mapper.insert(room);32 }3334 @Override35public Room selectByPrimaryKey(Integer id) throws Exception {3637return mapper.selectByPrimaryKey(id);38 }394041 } controller/**** @author cmy* @date 2016-10-22* @description test controller*/@Controller@RequestMapping("room")public class RoomController {@Autowiredprivate RoomService roomService;@GetCache(name="room",value="id")@RequestMapping("selectByPrimaryKey")public @ResponseBody Object roomList(Integer id) throws Exception{System.out.println("已查询到数据,准备缓存到redis... "+roomService.selectByPrimaryKey(id).getRoomName());return roomService.selectByPrimaryKey(id);}} 缓存要⽤到的⼯具类 RedisCache1public class RedisCache {23 @Autowired4private JedisPool jedisPool = new JedisPool();567//从redis缓存中查询,反序列化8public Object getDataFromRedis(String redisKey){9//查询10 Jedis jedis = jedisPool.getResource();11byte[] result = jedis.get(redisKey.getBytes());1213//如果查询没有为空14if(null == result){15return null;16 }1718//查询到了,反序列化19return SerializeUtil.unSerialize(result);20 }2122//将数据库中查询到的数据放⼊redis23public void setDataToRedis(String redisKey, Object obj){2425//序列化26byte[] bytes = SerializeUtil.serialize(obj);2728//存⼊redis29 Jedis jedis = jedisPool.getResource();30 String success = jedis.set(redisKey.getBytes(), bytes);3132if("OK".equals(success)){33 System.out.println("数据成功保存到redis...");34 }35 }36 } 缓存要⽤到的序列化和反序列化⼯具1/**2 *3 * @Description: 序列化反序列化⼯具4*/5public class SerializeUtil {6/**7 *8 * 序列化9*/10public static byte[] serialize(Object obj){1112 ObjectOutputStream oos = null;13 ByteArrayOutputStream baos = null;1415try {16//序列化17 baos = new ByteArrayOutputStream();18 oos = new ObjectOutputStream(baos);1920 oos.writeObject(obj);21byte[] byteArray = baos.toByteArray();22return byteArray;2324 } catch (IOException e) {25 e.printStackTrace();26 }27return null;28 }2930/**31 *32 * 反序列化33 * @param bytes34 * @return35*/36public static Object unSerialize(byte[] bytes){3738 ByteArrayInputStream bais = null;3940try {41//反序列化为对象42 bais = new ByteArrayInputStream(bytes);43 ObjectInputStream ois = new ObjectInputStream(bais);44return ois.readObject();4546 } catch (Exception e) {47 e.printStackTrace();48 }49return null;50 }51 } 以上就是利⽤aop+⾃定义注解实现 redis缓存的过程了 有不对之处,还望指出 欢迎留⾔有参考到的⽂章:/mrlinfeng/p/5857775.html /chentian610/article/details/51012789。
Redis缓存,泛型集合与json字符串的相互转换实例
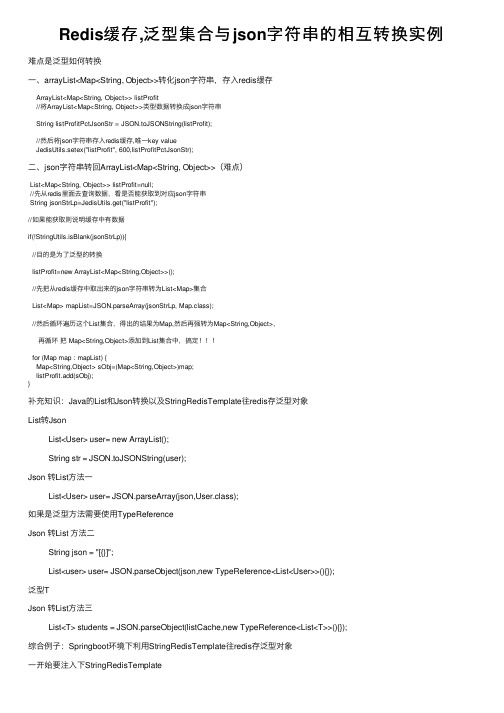
Redis缓存,泛型集合与json字符串的相互转换实例难点是泛型如何转换⼀、arrayList<Map<String, Object>>转化json字符串,存⼊redis缓存ArrayList<Map<String, Object>> listProfit//将ArrayList<Map<String, Object>>类型数据转换成json字符串String listProfitPctJsonStr = JSON.toJSONString(listProfit);//然后将json字符串存⼊redis缓存,唯⼀key valueJedisUtils.setex("listProfit", 600,listProfitPctJsonStr);⼆、json字符串转回ArrayList<Map<String, Object>>(难点)List<Map<String, Object>> listProfit=null;//先从redis⾥⾯去查询数据,看是否能获取到对应json字符串String jsonStrLp=JedisUtils.get("listProfit");//如果能获取则说明缓存中有数据if(!StringUtils.isBlank(jsonStrLp)){//⽬的是为了泛型的转换listProfit=new ArrayList<Map<String,Object>>();//先把从redis缓存中取出来的json字符串转为List<Map>集合List<Map> mapList=JSON.parseArray(jsonStrLp, Map.class);//然后循环遍历这个List集合,得出的结果为Map,然后再强转为Map<String,Object>,再循环把 Map<String,Object>添加到List集合中,搞定for (Map map : mapList) {Map<String,Object> sObj=(Map<String,Object>)map;listProfit.add(sObj);}补充知识:Java的List和Json转换以及StringRedisTemplate往redis存泛型对象List转JsonList<User> user= new ArrayList();String str = JSON.toJSONString(user);Json 转List⽅法⼀List<User> user= JSON.parseArray(json,User.class);如果是泛型⽅法需要使⽤TypeReferenceJson 转List ⽅法⼆String json = "[{}]";List<user> user= JSON.parseObject(json,new TypeReference<List<User>>(){});泛型TJson 转List⽅法三List<T> students = JSON.parseObject(listCache,new TypeReference<List<T>>(){});综合例⼦:Springboot环境下利⽤StringRedisTemplate往redis存泛型对象⼀开始要注⼊下StringRedisTemplate@Autowiredprivate StringRedisTemplate redisTemplate;Redis获取值不存在就从数据库取出来json化存缓存,存在则直接反序列化json为List List<T> list;String listCache=redisTemplate.opsForValue().get(key);if(listCache!=null){list = JSON.parseObject(listCache,new TypeReference<List<T>>(){});}else {list = userService.getAllList();redisTemplate.opsForValue().set(key, JSON.toJSONString(list), 60 * 1, TimeUnit.SECONDS);}附录:TypeReference源码package com.alibaba.fastjson;import ng.reflect.GenericArrayType;import ng.reflect.ParameterizedType;import ng.reflect.Type;import ng.reflect.TypeVariable;import java.util.List;import java.util.concurrent.ConcurrentHashMap;import java.util.concurrent.ConcurrentMap;import com.alibaba.fastjson.util.ParameterizedTypeImpl;import com.alibaba.fastjson.util.TypeUtils;/*** Represents a generic type {@code T}. Java doesn't yet provide a way to* represent generic types, so this class does. Forces clients to create a* subclass of this class which enables retrieval the type information even at* runtime.** <p>For example, to create a type literal for {@code List<String>}, you can* create an empty anonymous inner class:** <pre>* TypeReference<List<String>> list = new TypeReference<List<String>>() {}; * </pre>* This syntax cannot be used to create type literals that have wildcard* parameters, such as {@code Class<?>} or {@code List<? extends CharSequence>}.*/public class TypeReference<T> {static ConcurrentMap<Type, Type> classTypeCache= new ConcurrentHashMap<Type, Type>(16, 0.75f, 1);protected final Type type;* Constructs a new type literal. Derives represented class from type* parameter.** <p>Clients create an empty anonymous subclass. Doing so embeds the type* parameter in the anonymous class's type hierarchy so we can reconstitute it* at runtime despite erasure.*/protected TypeReference(){Type superClass = getClass().getGenericSuperclass();Type type = ((ParameterizedType) superClass).getActualTypeArguments()[0];Type cachedType = classTypeCache.get(type);if (cachedType == null) {classTypeCache.putIfAbsent(type, type);cachedType = classTypeCache.get(type);}this.type = cachedType;}/*** @since 1.2.9* @param actualTypeArguments*/protected TypeReference(Type... actualTypeArguments){Class<?> thisClass = this.getClass();Type superClass = thisClass.getGenericSuperclass();ParameterizedType argType = (ParameterizedType) ((ParameterizedType) superClass).getActualTypeArguments()[0]; Type rawType = argType.getRawType();Type[] argTypes = argType.getActualTypeArguments();int actualIndex = 0;for (int i = 0; i < argTypes.length; ++i) {if (argTypes[i] instanceof TypeVariable &&actualIndex < actualTypeArguments.length) {argTypes[i] = actualTypeArguments[actualIndex++];}// fix for openjdk and android envif (argTypes[i] instanceof GenericArrayType) {argTypes[i] = TypeUtils.checkPrimitiveArray((GenericArrayType) argTypes[i]);}// 如果有多层泛型且该泛型已经注明实现的情况下,判断该泛型下⼀层是否还有泛型if(argTypes[i] instanceof ParameterizedType) {argTypes[i] = handlerParameterizedType((ParameterizedType) argTypes[i], actualTypeArguments, actualIndex); }}Type key = new ParameterizedTypeImpl(argTypes, thisClass, rawType);Type cachedType = classTypeCache.get(key);if (cachedType == null) {classTypeCache.putIfAbsent(key, key);cachedType = classTypeCache.get(key);}type = cachedType;}private Type handlerParameterizedType(ParameterizedType type, Type[] actualTypeArguments, int actualIndex) {Class<?> thisClass = this.getClass();Type rawType = type.getRawType();Type[] argTypes = type.getActualTypeArguments();for(int i = 0; i < argTypes.length; ++i) {if (argTypes[i] instanceof TypeVariable && actualIndex < actualTypeArguments.length) {argTypes[i] = actualTypeArguments[actualIndex++];}// fix for openjdk and android envif (argTypes[i] instanceof GenericArrayType) {argTypes[i] = TypeUtils.checkPrimitiveArray((GenericArrayType) argTypes[i]);// 如果有多层泛型且该泛型已经注明实现的情况下,判断该泛型下⼀层是否还有泛型if(argTypes[i] instanceof ParameterizedType) {return handlerParameterizedType((ParameterizedType) argTypes[i], actualTypeArguments, actualIndex); }}Type key = new ParameterizedTypeImpl(argTypes, thisClass, rawType);return key;}/*** Gets underlying {@code Type} instance.*/public Type getType() {return type;}public final static Type LIST_STRING = new TypeReference<List<String>>() {}.getType();}TypeReference的存在是因为java中⼦类可以获取到⽗类泛型的真实类型。
- 1、下载文档前请自行甄别文档内容的完整性,平台不提供额外的编辑、内容补充、找答案等附加服务。
- 2、"仅部分预览"的文档,不可在线预览部分如存在完整性等问题,可反馈申请退款(可完整预览的文档不适用该条件!)。
- 3、如文档侵犯您的权益,请联系客服反馈,我们会尽快为您处理(人工客服工作时间:9:00-18:30)。
javaredis缓存实现方法
Java Redis缓存实现方法
Redis是一种基于内存的高性能键值数据库,常用于缓存、消息队列等场景。
在Java中,我们可以使用Java Redis客户端来操作Redis数据库,实现缓存功能。
本文将介绍如何使用Java Redis客户端实现缓存。
一、引入Java Redis客户端依赖
我们需要在项目中引入Java Redis客户端的依赖。
常用的Java Redis客户端有Jedis、Lettuce等。
以Jedis为例,我们可以在Maven项目中添加以下依赖:
```
<dependency>
<groupId>redis.clients</groupId>
<artifactId>jedis</artifactId>
<version>3.7.0</version>
</dependency>
```
二、连接Redis数据库
在使用Java Redis客户端之前,我们需要先连接Redis数据库。
在Jedis中,可以通过以下代码实现连接:
```java
import redis.clients.jedis.Jedis;
public class RedisCache {
private Jedis jedis;
public RedisCache() {
jedis = new Jedis("localhost", 6379);
}
// 其他操作方法...
}
```
以上代码中,我们通过Jedis的构造方法连接到本地的Redis数据库,指定了Redis服务器的IP地址和端口号。
三、设置缓存
在连接Redis数据库之后,我们可以使用Java Redis客户端设置缓存。
Redis中的缓存是以键值对的形式存储的,我们可以使用Jedis 的`set`方法来设置缓存。
例如,设置一个名为`username`的缓存:
```java
public void setUsername(String username) {
jedis.set("username", username);
}
```
通过以上代码,我们将`username`作为键,`username`的值作为值,存储到Redis数据库中。
四、获取缓存
除了设置缓存,我们还可以使用Java Redis客户端获取缓存。
在Jedis中,可以通过`get`方法获取缓存的值。
例如,获取名为`username`的缓存:
```java
public String getUsername() {
return jedis.get("username");
}
```
通过以上代码,我们可以获取到`username`键对应的值。
五、设置缓存过期时间
在使用缓存时,我们经常需要设置缓存的过期时间,以控制缓存的有效期。
在Jedis中,可以通过`expire`方法设置缓存的过期时间。
例如,设置名为`username`的缓存在10分钟后过期:
```java
public void setUsername(String username) {
jedis.set("username", username);
jedis.expire("username", 600);
}
```
通过以上代码,我们设置了`username`键的缓存值,并将其过期时间设为600秒,即10分钟。
六、删除缓存
当缓存不再需要时,我们可以使用Java Redis客户端删除缓存。
在Jedis中,可以通过`del`方法删除指定的缓存。
例如,删除名为`username`的缓存:
```java
public void deleteUsername() {
jedis.del("username");
}
```
通过以上代码,我们可以删除`username`键对应的缓存。
七、使用缓存应注意的问题
在使用Java Redis缓存时,需要注意以下几点:
1. 缓存的键名应具有唯一性,避免键名冲突;
2. 缓存的值应为可序列化的类型,以便能够正确存储和读取;
3. 缓存的过期时间应根据实际需求进行设置,避免缓存过期时间过长或过短;
4. 缓存的使用应考虑并发安全性,避免多线程环境下的并发访问问题。
总结:
通过Java Redis客户端,我们可以方便地实现缓存功能。
本文介绍了Java Redis缓存的基本实现方法,包括连接Redis数据库、设置缓存、获取缓存、设置缓存过期时间和删除缓存。
在使用缓存时,需要注意缓存的键名唯一性、值的序列化、过期时间的设置以及并发安全性等问题。
希望本文对您理解和使用Java Redis缓存有所帮助。