如何在64位系统vba自创建的窗体中增加最大化及最小化按钮
VB实现在窗口的标题栏上添加一个按钮的功能实现程序最小化到系统托盘
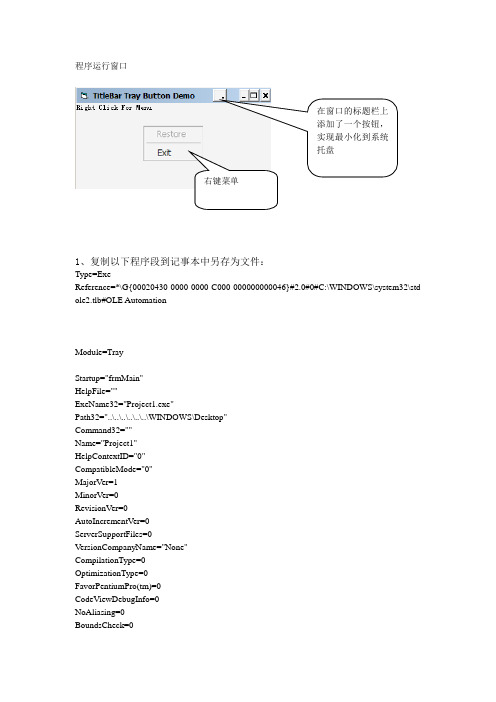
程序运行窗口在窗口的标题栏上添加了一个按钮,实现最小化到系统托盘右键菜单1、复制以下程序段到记事本中另存为文件:Type=ExeReference=*\G{00020430-0000-0000-C000-000000000046}#2.0#0#C:\WINDOWS\system32\std ole2.tlb#OLE AutomationModule=TrayStartup="frmMain"HelpFile=""ExeName32="Project1.exe"Path32="..\..\..\..\..\..\WINDOWS\Desktop"Command32=""Name="Project1"HelpContextID="0"CompatibleMode="0"MajorVer=1MinorVer=0RevisionVer=0AutoIncrementVer=0ServerSupportFiles=0VersionCompanyName="None"CompilationType=0OptimizationType=0FavorPentiumPro(tm)=0CodeViewDebugInfo=0NoAliasing=0BoundsCheck=0OverflowCheck=0 FlPointCheck=0 FDIVCheck=0 UnroundedFP=0 StartMode=0 Unattended=0 Retained=0 ThreadPerObject=0 MaxNumberOfThreads=1[MS Transaction Server] AutoRefresh=1Begin VB.Form frmMainAutoRedraw = -1 'TrueCaption = "TitleBar Tray Button Demo"ClientHeight = 2040ClientLeft = 60ClientTop = 345ClientWidth = 4680LinkTopic = "Form1"ScaleHeight = 2040ScaleWidth = 4680StartUpPosition = 3 '窗口缺省Begin VB.Menu mnuPopUpCaption = ""Visible = 0 'FalseBegin VB.Menu mnuRestoreCaption = "Restore"EndEndEndAttribute VB_Name = "frmMain"Attribute VB_GlobalNameSpace = FalseAttribute VB_Creatable = FalseAttribute VB_PredeclaredId = TrueAttribute VB_Exposed = FalsePrivate Sub Form_Load()Print "Right Click For Menu"Me.ScaleMode = vbPixels 'The API works in pixelsHook Me 'FormHook Hook()End SubPrivate Sub Form_MouseDown(Button As Integer, Shift As Integer, x As Single, y As Single)If Button = 2 Then TrayMenu Me 'TrayNotify TrayMneu()End SubPrivate Sub Form_Unload(Cancel As Integer)UnHook 'FormHook UnHook()End SubAttribute VB_Name = "ToolTip"Const WS_EX_TOPMOST = &H8&Const TTS_ALWAYSTIP = &H1Const HWND_TOPMOST = -1Const SWP_NOACTIVATE = &H10Const SWP_NOMOVE = &H2Const SWP_NOSIZE = &H1Const WM_USER = &H400Const TTM_ADDTOOLA = (WM_USER + 4)Const TTF_SUBCLASS = &H10Declare Function CreateWindowEx Lib "user32" Alias "CreateWindowExA" (ByVal dwExStyle As Long, ByVal lpClassName As String, ByVal lpWindowName As String, ByVal dwStyle As Long, ByVal x As Long, ByVal y As Long, ByVal nWidth As Long, ByVal nHeight As Long, ByVal hWndParent As Long, ByVal hMenu As Long, ByVal hInstance As Long, lpParam As Any) As Long Declare Function DestroyWindow Lib "user32" (ByVal hwnd As Long) As Long Declare Function SetWindowPos Lib "user32" (ByVal hwnd As Long, ByVal hWndInsertAfter As Long, ByVal x As Long, ByVal y As Long, ByVal cx As Long, ByVal cy As Long, ByVal wFlags As Long) As LongPublic Declare Function SendMessage Lib "user32" Alias "SendMessageA" (ByVal hwnd As Long, ByVal wMsg As Long, ByVal wParam As Long, lParam As Any) As LongType TOOLINFOcbSize As LonguFlags As Longhwnd As Longuid As LongRECT As RECThinst As LonglpszText As StringlParam As LongEnd TypePublic hWndTT As LongPublic Sub CreateTip(hwndForm As Long, szText As String, rct As RECT)hWndTT = CreateWindowEx(WS_EX_TOPMOST, "tooltips_class32", "",TTS_ALWAYSTIP, _0, 0, 0, 0, hwndForm, 0&, App.hInstance, 0&)SetWindowPos hWndTT, HWND_TOPMOST, 0, 0, 0, 0, _SWP_NOMOVE Or SWP_NOSIZE Or SWP_NOACTIVATEDim TI As TOOLINFOWith TI.cbSize = Len(TI).uFlags = TTF_SUBCLASS.hwnd = hwndForm.uid = 1&.lpszText = szText & vbNullChar.RECT = rctEnd WithSendMessage hWndTT, TTM_ADDTOOLA, 0, TIEnd SubPublic Sub KillTip()DestroyWindow hWndTTEnd Sub4、复制以下程序段到记事本中另存为文件:Attribute VB_Name = "DrawButton"Declare Function GetWindowDC Lib "user32" (ByVal hwnd As Long) As Long Declare Function DrawFrameControl Lib "user32" (ByVal hdc As Long, lpRect As RECT, ByVal un1 As Long, ByVal un2 As Long) As LongDeclare Function GetTitleBarInfo Lib "user32" (ByVal hwnd As Long, pti As TitleBarInfo) As BooleanDeclare Function FillRect Lib "user32" (ByVal hdc As Long, lpRect As RECT, ByVal hBrush As Long) As LongDeclare Function GetSysColorBrush Lib "user32" (ByVal nIndex As Long) As LongDeclare Function OffsetRect Lib "user32" (lpRect As RECT, ByVal x As Long, ByVal y As Long) As LongType RECTLeft As LongTop As LongRight As LongBottom As LongEnd TypeType TitleBarInfocbSize As LongrcTitleBar As RECT 'A RECT structure that receives the coordinates of the title barrgState(5) As Long 'An array that receives a DWORD value for each element of the title barEnd Type'rgState array Values'0 The titlebar Itself'1 Reserved'2 Min button'3 Max button'4 Help button'5 Close button''rgstate return constatnts'STATE_SYSTEM_FOCUSABLE = &H00100000'STATE_SYSTEM_INVISIBLE = &H00008000'STATE_SYSTEM_OFFSCREEN = &H00010000'STATE_SYSTEM_PRESSED = &H00000008'STATE_SYSTEM_UNAVAILABLE = &H00000001Const DFC_BUTTON = 4Const DFCS_BUTTONPUSH = &H10Const DFCS_PUSHED = &H200Declare Function GetSystemMetrics Lib "user32" (ByVal nIndex As Long) As LongPublic Declare Function PtInRect Lib "user32" (lpRect As RECT, ByVal x As Long, ByVal y As Long) As LongPublic Declare Function GetCursorPos Lib "user32" (lpPoint As POINTAPI) As LongPublic Type POINTAPIx As Longy As LongEnd TypeConst SM_CXFRAME = 32Const COLOR_BTNTEXT = 18Dim lDC As LongPublic R As RECTPublic Sub ButtonDraw(frm As Form, bState As Boolean)Dim TBButtons As IntegerDim TBarHeight As IntegerDim TBButtonHeight As IntegerDim TBButtonWidth As IntegerDim DrawWidth As IntegerDim TBI As TitleBarInfoDim TBIRect As RECTDim bRslt As BooleanDim WinBorder As IntegerWith frmIf .BorderStyle = 0 Then Exit Sub ' Don't draw a button if there is no titlebar'----How Many Buttons in TitleBar------------------------------------------If Not .ControlBox Then TBButtons = 0If .ControlBox Then TBButtons = 1If .ControlBox And .WhatsThisButton ThenIf .BorderStyle < 4 ThenTBButtons = 2ElsetButtons = 1End IfEnd IfIf .ControlBox And .MinButton And .BorderStyle = 2 Then TBButtons = 3If .ControlBox And .MinButton And .BorderStyle = 5 Then TBButtons = 1If .ControlBox And .MaxButton And .BorderStyle = 2 Then TBButtons = 3If .ControlBox And .MaxButton And .BorderStyle = 5 Then TBButtons = 1'------------------------------------------------------------------------'----Get height of Titlebar----------------------------------------------'Using this method gets the height of the titlebar regardless of the window'style. It does, however, restrict its use to Win98/2000. So if you want to'use this code in Win95, then call GetSystemMetrics to find the windowstyle'and titlebar size.TBI.cbSize = Len(TBI)bRslt = GetTitleBarInfo(.hwnd, TBI)TBarHeight = TBIRect.Bottom - TBIRect.Top - 1'-----------------------------------------------------------------------'----Get WindowBorder Size----------------------------------------------If .BorderStyle = 2 Or .BorderStyle = 5 ThenR.Top = GetSystemMetrics(32) + 2WinBorder = R.Top - 6ElseR.Top = 5WinBorder = -1End IfEnd With'---------------------------------------------------------------------------'----Use Titlebar Height to determin button size----------------------------TBButtonHeight = TBarHeight - 4TBButtonWidth = TBButtonHeight + 2'and the size and space of the dot on the buttonDrawWidth = TBarHeight / 8'---------------------------------------------------------------------------'----Determin the position of our button------------------------------------R.Bottom = R.Top + TBButtonHeightSelect Case TBButtonsCase 1R.Right = frm.ScaleWidth - (TBButtonWidth) + WinBorderCase 2R.Right = frm.ScaleWidth - ((TBButtonWidth * 2) + 2) + WinBorderCase 3R.Right = frm.ScaleWidth - ((TBButtonWidth * 3) + 2) + WinBorderCase ElseEnd SelectR.Left = R.Right - TBButtonWidth'--------------------------------------------------------------------------'----Get the Widow DC so that we may draw in the title bar-----------------lDC = GetWindowDC(frm.hwnd)'--------------------------------------------------------------------------'----Determin the position of thedot--------------------------------------Dim StartXY As Integer, EndXY As IntegerSelect Case TBarHeightCase Is < 20StartXY = DrawWidth + 1EndXY = DrawWidth - 1Case ElseStartXY = (DrawWidth * 2)EndXY = DrawWidthEnd Select'--------------------------------------------------------------------------'----We have all the information we need So Draw the button----------------Dim rDot As RECTIf bState ThenDrawFrameControl lDC, R, DFC_BUTTON, DFCS_BUTTONPUSH Or DFCS_PUSHEDrDot.Left = R.Right - (1 + StartXY): rDot.Top = R.Bottom - (1 + StartXY)rDot.Right = R.Right - (1 + EndXY): rDot.Bottom = R.Bottom - (1 + EndXY)ElseDrawFrameControl lDC, R, DFC_BUTTON, DFCS_BUTTONPUSHrDot.Left = R.Right - (2 + StartXY): rDot.Top = R.Bottom - (2 + StartXY)rDot.Right = R.Right - (2 + EndXY): rDot.Bottom = R.Bottom - (2 + EndXY)End IfFillRect lDC, rDot, GetSysColorBrush(COLOR_BTNTEXT)'---------------------------------------------------------------------------'----SetTooltip------------------------------------------------------------ Dim TTRect As RECTTTRect.Bottom = R.Bottom + (TBarHeight - ((TBarHeight * 2) + WinBorder + 5))TTRect.Left = R.Left - (4 - WinBorder)TTRect.Right = R.Right - (4 - WinBorder)TTRect.Top = R.Top + (TBarHeight - ((TBarHeight * 2) + WinBorder + 5))KillTip 'ToolTip KillTip()CreateTip appForm.hwnd, "System Tray", TTRect 'ToolTip CreateTip()End Sub5、复制以下程序段到记事本中另存为文件:Attribute VB_Name = "TrayNotify"Declare Function Shell_NotifyIcon Lib "shell32.dll" Alias "Shell_NotifyIconA" (ByVal dwMessage As Long, lpData As NOTIFYICONDATA) As LongDeclare Function CreatePopupMenu Lib "user32" () As LongDeclare Function TrackPopupMenu Lib "user32" (ByVal hMenu As Long, ByVal wFlags As Long, ByVal x As Long, ByVal y As Long, ByVal nReserved As Long, ByVal hwnd As Long, ByVal lprc As Any) As LongDeclare Function AppendMenu Lib "user32" Alias "AppendMenuA" (ByVal hMenu As Long, ByVal wFlags As Long, ByVal wIDNewItem As Long, ByVal lpNewItem As Any) As LongDeclare Function DestroyMenu Lib "user32" (ByVal hMenu As Long) As LongType NOTIFYICONDATAcbSize As Longhwnd As Longuid As LonguFlags As LonguCallbackMessage As LonghIcon As Longsztip As String * 64End TypeConst NIM_ADD = &H0Const NIM_DELETE = &H2Const NIM_MODIFY = &H1Const NIF_MESSAGE = &H1Const NIF_ICON = &H2Const NIF_TIP = &H4Const MF_GRAYED = &H1&Const MF_STRING = &H0&Const MF_SEPARATOR = &H800&Const TPM_NONOTIFY = &H80&Const TPM_RETURNCMD = &H100&Public bTraySet As BooleanDim lMenu As LongPublic Sub TraySet(frm As Form, sztip As String, hIcon As Long)Dim NID As NOTIFYICONDATAWith NID.cbSize = Len(NID).hIcon = hIcon.sztip = sztip & vbNullChar.uCallbackMessage = WM_LBUTTONUP.uFlags = NIF_MESSAGE Or NIF_ICON Or NIF_TIP .uid = 1&End WithShell_NotifyIcon NIM_ADD, NIDbTraySet = TrueEnd SubPublic Sub TrayRestore(frm As Form)Dim NID As NOTIFYICONDATAWith NID.cbSize = Len(NID).uid = 1&End WithShell_NotifyIcon NIM_DELETE, NIDbTraySet = FalseEnd SubPublic Sub TrayMenu(frm As Form)Dim hMenu As Long, tMenu As LongDim MP As POINTAPIGetCursorPos MPhMenu = CreatePopupMenu()If bTraySet ThenAppendMenu hMenu, MF_STRING, 1000, "Restore" ElseAppendMenu hMenu, MF_STRING Or MF_GRAYED, 1000, "Restore"End IfAppendMenu hMenu, MF_SEPARATOR, 0&, 0&AppendMenu hMenu, MF_STRING, 1010, "Exit"tMenu = TrackPopupMenu(hMenu, TPM_NONOTIFY Or TPM_RETURNCMD, MP.x, MP.y, 0&, frm.hwnd, 0&)Select Case tMenuCase 1000TrayRestore frmCase 1010TrayRestore frmUnHookUnload frmCase Else'do nothingEnd SelectDestroyMenu hMenuEnd Sub6、复制以下程序段到记事本中另存为文件:Attribute VB_Name = "FormHook"Declare Function CallWindowProc Lib "user32" Alias "CallWindowProcA" _ (ByVal lpPrevWndFunc As Long, _ByVal hwnd As Long, _ByVal Msg As Long, _ByVal wParam As Long, _ByVal lParam As Long) As LongDeclare Function SetWindowLong Lib "user32" Alias "SetWindowLongA" _ (ByVal hwnd As Long, _ByVal nIndex As Long, _ByVal dwNewLong As Long) As LongDeclare Function GetAsyncKeyState Lib "user32" (ByVal vKey As Long) As IntegerPublic Const GWL_WNDPROC = -4Public Const WM_LBUTTONDOWN = &H201Public Const WM_LBUTTONUP = &H202Public Const WM_MOUSEMOVE = &H200Public Const WM_NCMOUSEMOVE = &HA0Public Const WM_NCLBUTTONDOWN = &HA1Public Const WM_NCLBUTTONUP = &HA2Public Const WM_NCLBUTTONDBLCLK = &HA3Public Const WM_NCRBUTTONDOWN = &HA4Public Const WM_NCRBUTTONUP = &HA5Public Const WM_ACTIVATE = &H6Public Const WM_NCPAINT = &H85Public Const WM_PAINT = &HFPublic Const WM_ACTIVATEAPP = &H1CPublic Const WM_MOUSEACTIVATE = &H21Public Const WM_COMMAND = &H111Public Const WM_NCACTIVATE = &H86Public Const WM_DESTROY = &H2Public Const WM_SIZE = &H5Global lpPrevWndProc As LongGlobal gHW As LongGlobal appForm As FormPrivate Function MakePoints(lParam As Long) As POINTAPIDim hexstr As Stringhexstr = Right("00000000" & Hex(lParam), 8)MakePoints.x = CLng("&H" & Right(hexstr, 4)) - (appForm.Left / Screen.TwipsPerPixelX)MakePoints.y = CLng("&H" & Left(hexstr, 4)) - (appForm.Top / Screen.TwipsPerPixelY)End FunctionPublic Sub Hook(frm As Form)Set appForm = frmlpPrevWndProc = SetWindowLong(gHW, GWL_WNDPROC, AddressOf WindowProc)End SubPublic Sub UnHook()Dim lngReturnValue As LonglngReturnValue = SetWindowLong(gHW, GWL_WNDPROC, lpPrevWndProc) End SubFunction WindowProc(ByVal hwnd As Long, _ByVal uMsg As Long, _ByVal wParam As Long, _ByVal lParam As Long) As Long'------------------------------------------------------------------------------'Messing around in here can cause allsorts of problems.'So, if you must, make sure you save everytihing you want to keep 'before you run the program.'Don't run anything outside of a message selection as it will be 'executed so many times per second that it will slow down system response.Dim lRslt As LongDim retProc As BooleanStatic STButtonState As BooleanStatic Toggle As BooleanStatic i As IntegerOn Error Resume NextSelect Case uMsgCase WM_DESTROYTrayRestore appFormKillTip 'ToolTip KillTip()UnHookretProc = TrueCase WM_NCMOUSEMOVE'Only draw the button when necessaryIf GetAsyncKeyState(vbLeftButton) < 0 ThenIf OverButton(lParam) ThenIf Toggle = False ThenToggle = TrueButtonDraw appForm, Toggle 'DrawButton ButtonDraw()End IfElseIf Toggle = True ThenToggle = FalseButtonDraw appForm, Toggle 'DrawButton ButtonDraw()End IfEnd IfElseSTButtonState = FalseretProc = TrueEnd IfCase WM_NCLBUTTONDOWNIf OverButton(lParam) ThenSTButtonState = TrueButtonDraw appForm, True 'DrawButton ButtonDraw()ElseSTButtonState = FalseretProc = TrueEnd IfCase WM_NCLBUTTONUPSTButtonState = FalseIf OverButton(lParam) ThenTraySet appForm, appForm.Caption, appForm.Icon'TrayNotify TraySet()ButtonDraw appForm, False 'DrawButton ButtonDraw()retProc = FalseElseretProc = TrueEnd IfCase WM_LBUTTONUPSTButtonState = FalseButtonDraw appForm, False 'DrawButton ButtonDraw()If GetAsyncKeyState(vbLeftButton) < 0 And bTraySet Then TrayMenu appForm 'TrayNotify TrayMenu()End IfretProc = TrueCase WM_NCLBUTTONDBLCLK, WM_NCRBUTTONDOWNIf Not OverButton(lParam) ThenretProc = TrueEnd IfCase WM_SIZE, WM_NCPAINT, WM_PAINT, WM_COMMANDButtonDraw appForm, False 'DrawButton ButtonDraw()retProc = TrueCase WM_ACTIVATEAPP, WM_NCACTIVATE, WM_ACTIVATE, WM_MOUSEACTIVATEButtonDraw appForm, False 'DrawButton ButtonDraw()retProc = TrueCase ElseretProc = TrueEnd SelectIf retProc ThenWindowProc = CallWindowProc(lpPrevWndProc, hwnd, uMsg, wParam, lParam)ElseWindowProc = 0End IfEnd FunctionPrivate Function OverButton(lParam As Long) As Boolean Dim MP As POINTAPIMP = MakePoints(lParam)If PtInRect(R, MP.x, MP.y) Then OverButton = True End Function双击工程文件:运行,就可以看到效果。
VBA修改窗口为最小化、最大化代码
VBA修改窗口为最小化、最大化代码 以下的VBA代码,均于Excel中的VBA有关,是用来修改应用程序的相关属性的。
代码收藏如下。
Application.WindowState = xlMinimized ‘窗口最小化 Application.WindowState =xlMaximized 最大化 Application.WindowState =xlNormal 为正常 Application.Cursor = xlIBeam ‘设置光标形状为Ⅰ字形 Application.Cursor = xlWait 为沙漏(等待)形 Application.Cursor = xlNormal 为正常 Application.StatusBar = "大众计算机" ’在地址栏中显示文本 Application.Caption= "大众计算机" 修改标题栏的文字. 其它的知识 Application.TemplatesPath ‘获取工作簿模板的位置 Application.CalculateFull ’重新计算所有打开的工作簿中的数据 Application.RecentFiles.Maximum = 3 ’将最近使用的文档列表数设为3 Application.RecentFiles(6).Open ’打开最近打开的文档中的第6个文档 Application.AutoCorrect.AddReplacement "good", "大众计算机" ’自动将输入的"good"更正为"大众计算机" Application.Dialogs(xlDialogPrint).Show ‘显示打印文档的对话框。
vba?最小化excel?只显示窗体,并且窗体一直在所有程序的前面

sub auto_open()
formname.show 1
end sub
如果是fromname.show 0 或者formname.show则窗体不会强制在最前面
如果想只显示窗体,EXCEL隐藏,则可通过下面语句可以设置EXCEL为不可见,只显示窗体:
private sub From_Load()
如果你是想在显示窗体的时候窗体一直在excel表格的最前面那么在显示窗体的语句处使用有模的方式打开就是在show后面加个1
vba 最小化excel 只显示窗体,并且窗体一直在所有程序的前面
如果你是想在显示窗体的时候窗体一直在EXCEL表格的最前面,那么在显示窗体的语句处使用有模的方式打开,就是在show后面加个1:
application.visible=faபைடு நூலகம்se
end sub
2016新编VB窗体显示小结
VB窗体显示小结1、将窗体移动到屏幕的中间Me.Move (Screen.Width - Me.Width) \ 2, (Screen.Height - Me.Height) \ 2 'Me指当前窗体2、最大化显示窗体有个属性WindowState:当值为0时表示窗体Normal;当值为1时表示最小化;当值为2时表示最大化。
窗体支持RESIZE 事件,程序如下:Private Sub Form_Resize()Me.WindowState = 2'最大化显示End SubPrivate此时,最大化右上角存在最大化、最小化、关闭按钮。
3、全屏显示BorderStyle设置成了0-None,WindowState = 2进行最大化, 全屏显示窗体。
4、最大化显示(程序实现)(1)设计时,可以正常窗口呈现,并屏蔽窗体的最大化按钮,自己做个替代的“最大化”按钮,实现窗体放大。
当点击“最大化”时,触发Form的ReSize 事件,在Form的ReSize事件中,写入:Private Sub Form_Resize()Form1.Left = 0Form1.Top = 0Form1.Width = Screen.WidthForm1.Height = Screen.Height - GetTaskbarHeightEnd Sub(当程序启动时,也会同时触发Form_ReSize的)其中,GetTaskbarHeight的获取要写进模块文件中:Public Declare Function SystemParametersInfo Lib "user32" Alias "SystemParametersInfoA" (ByVal uAction As Long, ByVal uParam As Long, ByRef lpvParam As Any, ByVal fuWinIni As Long) As LongPublic Const SPI_GETWORKAREA = 48Public Type RECTLeft As LongTop As LongRight As LongBottom As LongEnd TypePublic Function GetTaskbarHeight() As IntegerDim lRes As LongDim rectVal As RECTlRes = SystemParametersInfo(SPI_GETWORKAREA, 0, rectVal, 0) GetTaskbarHeight = ((Screen.Height / Screen.TwipsPerPixelX) -rectVal.Bottom) * Screen.TwipsPerPixelXEnd Function(2)设置FORM的属性StartUpPosition为0Private Sub Command1_Click()Dim h As LongDim w As LongMe.WindowState = 2h = Me.Heightw = Me.WidthMe.WindowState = 0Me.Width = wMe.Height = h - 300End SubPrivate Sub Command2_Click()'结束EndEnd Sub如属性选择默认则点击该控件为最大化显示,且可显示出任务栏与2情况相同。
VBA中的快捷键设置与应用技巧
VBA中的快捷键设置与应用技巧VBA(Visual Basic for Applications)是一种用于进行自动化操作的编程语言,常用于Microsoft Office软件中,如Word、Excel、PowerPoint等。
它可以帮助用户通过编写宏来提高工作效率和减少重复性操作。
在VBA中,设置和使用快捷键是一个非常实用的技巧,可以进一步提高工作效率。
本文将介绍VBA中的快捷键设置与应用技巧,帮助读者更好地利用VBA进行自动化操作。
一、设置自定义的快捷键在VBA中,通过设置自定义的快捷键,可以方便地执行特定的操作。
下面是设置自定义快捷键的步骤:1. 打开VBA编辑器:在需要设置快捷键的Office软件中,按下“Alt +F11”键,即可打开VBA编辑器。
2. 选择代码窗口:在VBA编辑器中,选择你需要设置快捷键的模块或代码窗口。
3. 打开属性窗口:在VBA编辑器的“视图”菜单中,选择“属性窗口”选项,即可打开属性窗口。
4. 设置快捷键:在属性窗口中,找到“名称”属性,双击该属性,即可编辑快捷键。
输入你想要的快捷键组合,如Ctrl+Shift+P。
5. 编写VBA代码:在代码窗口中,编写你想要执行的VBA代码。
例如,你可以编写一个用于插入当前日期的代码。
6. 关闭VBA编辑器:保存你的VBA代码,并关闭VBA编辑器。
现在,你可以使用你设置的快捷键组合来执行相应的操作。
按下你设置的快捷键时,VBA代码将会被执行,完成相应的任务。
二、常用的快捷键技巧除了设置自定义的快捷键,VBA中还有一些常用的快捷键技巧,可以帮助用户更高效地进行编程和操作。
1. 执行代码:在VBA编辑器的代码窗口中,按下“F5”键,即可执行当前选中的VBA代码。
这对于测试代码和调试程序非常有用。
2. 注释代码:在VBA编辑器的代码窗口中,选中需要注释的代码,然后按下“Ctrl + Shift + C”键,即可将选中的代码添加注释。
[WPF]自由配置窗体最大化、最小化按钮是否可用,窗口大小不可改变
![[WPF]自由配置窗体最大化、最小化按钮是否可用,窗口大小不可改变](https://img.taocdn.com/s3/m/943072fb80c758f5f61fb7360b4c2e3f572725a7.png)
[WPF]⾃由配置窗体最⼤化、最⼩化按钮是否可⽤,窗⼝⼤⼩不可改变最近做项⽬碰到⼀个需求,要求该窗体禁⽤最⼤化按钮,但是保留最⼩化按钮。
窗体⼤⼩不可改变。
献贴上效果图下⾯是具体做法:1. ⾃定义了两个DependencyProperty,具体实现需要⽤到User32.dll中的函数。
代码如下:public static class WindowCustomizer{#region CanMaximizepublic static readonly DependencyProperty CanMaximize =DependencyProperty.RegisterAttached("CanMaximize", typeof(bool), typeof(Window),new PropertyMetadata(true, new PropertyChangedCallback(OnCanMaximizeChanged)));private static void OnCanMaximizeChanged(DependencyObject d, DependencyPropertyChangedEventArgs e){Window window = d as Window;if (window != null){RoutedEventHandler loadedHandler = null;loadedHandler = delegate{if ((bool)e.NewValue){WindowHelper.EnableMaximize(window);}else{WindowHelper.DisableMaximize(window);}window.Loaded -= loadedHandler;};if (!window.IsLoaded){window.Loaded += loadedHandler;}else{loadedHandler(null, null);}}}public static void SetCanMaximize(DependencyObject d, bool value){d.SetValue(CanMaximize, value);}public static bool GetCanMaximize(DependencyObject d){return (bool)d.GetValue(CanMaximize);}#endregion CanMaximize#region CanMinimizepublic static readonly DependencyProperty CanMinimize =DependencyProperty.RegisterAttached("CanMinimize", typeof(bool), typeof(Window),new PropertyMetadata(true, new PropertyChangedCallback(OnCanMinimizeChanged)));private static void OnCanMinimizeChanged(DependencyObject d, DependencyPropertyChangedEventArgs e){Window window = d as Window;if (window != null){RoutedEventHandler loadedHandler = null;loadedHandler = delegate{if ((bool)e.NewValue){WindowHelper.EnableMinimize(window);}else{WindowHelper.DisableMinimize(window);}window.Loaded -= loadedHandler;};if (!window.IsLoaded){window.Loaded += loadedHandler;}else{loadedHandler(null, null);}}}public static void SetCanMinimize(DependencyObject d, bool value){d.SetValue(CanMinimize, value);}public static bool GetCanMinimize(DependencyObject d){return (bool)d.GetValue(CanMinimize);}#endregion CanMinimize}public static class WindowHelper{private const Int32 GWL_STYLE = -16;private const Int32 WS_MAXIMIZEBOX = 0x00010000;private const Int32 WS_MINIMIZEBOX = 0x00020000;[DllImport("User32.dll", EntryPoint = "GetWindowLong")]private extern static Int32 GetWindowLongPtr(IntPtr hWnd, Int32 nIndex);[DllImport("User32.dll", EntryPoint = "SetWindowLong")]private extern static Int32 SetWindowLongPtr(IntPtr hWnd, Int32 nIndex, Int32 dwNewLong); /// <summary>/// Disables the maximize functionality of a WPF window./// </summary>/// <param name="window">The WPF window to be modified.</param>public static void DisableMaximize(Window window){lock (window){IntPtr hWnd = new WindowInteropHelper(window).Handle;Int32 windowStyle = GetWindowLongPtr(hWnd, GWL_STYLE);SetWindowLongPtr(hWnd, GWL_STYLE, windowStyle & ~WS_MAXIMIZEBOX);}}/// <summary>/// Disables the minimize functionality of a WPF window./// </summary>/// <param name="window">The WPF window to be modified.</param>public static void DisableMinimize(Window window){lock (window){IntPtr hWnd = new WindowInteropHelper(window).Handle;Int32 windowStyle = GetWindowLongPtr(hWnd, GWL_STYLE);SetWindowLongPtr(hWnd, GWL_STYLE, windowStyle & ~WS_MINIMIZEBOX);}}/// <summary>/// Enables the maximize functionality of a WPF window./// </summary>/// <param name="window">The WPF window to be modified.</param>public static void EnableMaximize(Window window){lock (window){IntPtr hWnd = new WindowInteropHelper(window).Handle;Int32 windowStyle = GetWindowLongPtr(hWnd, GWL_STYLE);SetWindowLongPtr(hWnd, GWL_STYLE, windowStyle | WS_MAXIMIZEBOX);}}/// <summary>/// Enables the minimize functionality of a WPF window./// </summary>/// <param name="window">The WPF window to be modified.</param>public static void EnableMinimize(Window window){lock (window){IntPtr hWnd = new WindowInteropHelper(window).Handle;Int32 windowStyle = GetWindowLongPtr(hWnd, GWL_STYLE);SetWindowLongPtr(hWnd, GWL_STYLE, windowStyle | WS_MINIMIZEBOX);}}/// <summary>/// Toggles the enabled state of a WPF window's maximize functionality./// </summary>/// <param name="window">The WPF window to be modified.</param>public static void ToggleMaximize(Window window){lock (window){IntPtr hWnd = new WindowInteropHelper(window).Handle;Int32 windowStyle = GetWindowLongPtr(hWnd, GWL_STYLE);if ((windowStyle | WS_MAXIMIZEBOX) == windowStyle){SetWindowLongPtr(hWnd, GWL_STYLE, windowStyle & ~WS_MAXIMIZEBOX);}else{SetWindowLongPtr(hWnd, GWL_STYLE, windowStyle | WS_MAXIMIZEBOX);}}}/// <summary>/// Toggles the enabled state of a WPF window's minimize functionality./// </summary>/// <param name="window">The WPF window to be modified.</param>public static void ToggleMinimize(Window window){lock (window){IntPtr hWnd = new WindowInteropHelper(window).Handle;Int32 windowStyle = GetWindowLongPtr(hWnd, GWL_STYLE);if ((windowStyle | WS_MINIMIZEBOX) == windowStyle){SetWindowLongPtr(hWnd, GWL_STYLE, windowStyle & ~WS_MINIMIZEBOX);}else{SetWindowLongPtr(hWnd, GWL_STYLE, windowStyle | WS_MINIMIZEBOX);}}}}2. 在窗体中使⽤这两个Property,就可以⾃由enable/disable最⼤化和最⼩化按钮了。
VBA窗体中最小化和最大化按钮的显示
VBA窗体中最小化和最大化按钮的显示在插入的用户窗体项目中右击鼠标—>查看代码,打开窗体的代码窗口,然后输入下面的API系统调用程序(不需要做任何改动,以下代码与窗体属性值无关):Option ExplicitPrivate Declare Function GetWindowLong Lib "user32" Alias "GetWindowLongA" (ByVal hWnd As Long, ByVal nIndex As Long) As LongPrivate Declare Function FindWindow Lib "user32" Alias "FindWindowA" (ByVal lpClassName As String, ByVal lpWindowName As String) As LongPrivate Declare Function SetWindowLong Lib "user32" Alias "SetWindowLongA" (ByVal hWnd As Long, ByVal nIndex As Long, ByVal dwNewLong As Long) As LongPrivate Const GWL_STYLE = (-16)Private Const WS_THICKFRAME As Long = &H40000 '(恢复大小)Private Const WS_MINIMIZEBOX As Long = &H20000 '(最小化)Private Const WS_MAXIMIZEBOX As Long = &H10000 '(最大化)'窗体UserForm的初始化Private Sub UserForm_Initialize()Dim hWndForm As LongDim IStyle As LonghWndForm = FindWindow("ThunderDFrame", Me.Caption)IStyle = GetWindowLong(hWndForm, GWL_STYLE)IStyle = IStyle Or WS_THICKFRAME '还原IStyle = IStyle Or WS_MINIMIZEBOX '最小化IStyle = IStyle Or WS_MAXIMIZEBOX '最大化SetWindowLong hWndForm, GWL_STYLE, IStyleEnd Sub完成后运行用户窗体就可以观察到最大化和最小化窗口的效果了。
ExcelVBA编程调整窗体中的控件

ExcelVBA编程调整窗体中的控件Excel VBA 编程调整窗体中的控件设计⽤户窗体时,要求尽可能的美观整洁、简单实⽤。
当⽤户窗体中的控件数量较多时,如何安排各控件的位置,以及设置控件的⼤⼩等操作就显得⾮常的重要了,下⾯介绍快速调整控件⼤⼩及排列控件位置的⽅法。
1.设置控件⼤⼩要设置⽤户窗体中控件的⼤⼩时,可通过拖动⿏标来控制控件的⼤⼩。
对于已经添加到窗体上的控件,单击并选中控件时,其周围将出现8个控制点,拖动这些控制点也可以设置控件的⼤⼩。
除了使⽤⿏标拖动的⽅式来设置控件的⼤⼩外,还可以使⽤Height 和Width 属性来设置控件的⾼度与宽度,以磅为单位的数值类型的值。
当窗体中的控件较多时,⼀般还需要将类似的控件设置为⼤⼩相同。
可在窗体中选择要设置的控件,并在【属性】窗⼝中,为其Height 和Width 属性指定值,来设置所选择的控件的⼤⼩。
还可以在选择控件后,并右击其中的⼀个控件,执⾏【统⼀尺⼨】|【两者有相同】命令,设置控件⼤⼩(宽度和⾼度)相同。
如图12-13所⽰。
图12-13 设置控件⼤⼩【统⼀尺⼨】菜单下有三个⼦菜单命令,其作⽤为:●宽度相同该命令可使被选择的所有控件的宽度相同●⾼度相同该命令可使被选择的所有控件的⾼度相同●两者相同该命令可使被选择的所有控件的宽度和⾼度相同。
执⾏该命令等于分别执⾏了【宽度相同】和【⾼宽相同】。
提⽰在使⽤右键快捷菜单中的命令,来控制控件的⼤⼩统⼀相同的时候,选择的控件将以拥有⽩⾊控制点的控件的⼤⼩为准。
在本书中称其为“参照控件”。
2.设置控件布局控件布局是指在窗体中添加控件之后,对控件的⼤⼩、位置、间距等格式的设置。
通过对窗体控件的布局的设置,可使窗体界⾯变得更加整齐和美观,并为⽤户提供⼀个更加友好的⽤户界⾯。
在⽤户窗体中,分别提供了对窗体对象的对齐、⽔平间距、垂直间距、窗体内居中和排列按钮等内容设置,下⾯来介绍这些设置的作⽤,如表12.5所⽰。
