思科交换机的VLAN、TRUNK、VTP配置教程
实验二VLAN以及Trunk实验(思科)
实验二VLAN以及Trunk配置(第2 次课 1 学时)一、【实验目的】1.了解交换机的工作原理,掌握交换机的基本配置命令。
1、掌握VLAN基本配置。
2、掌握静态接口VLAN划分。
二、【实验器材】1.思科3400交换机2台、PC机每组个2台。
2.连接console电缆线两条、标准网线若干。
三、【实验重点和难点】1.熟练使用交换机的常用配置命令。
2. 验证VLAN实现两个PC之间的连通性。
四、【实现功能】通过VLAN实现两个PC之间的连通性。
五、【思考题】不同VLAN间的PC是否可以相互访问,相同VLAN间的PC是否可以相互访问。
实验内容一、基本VLAN实验实验拓扑:实验需求:在交换机switch上面创建两个VLAN,vlan2和vlan3,vlan 名称分别为HR、ENG ,将主机PC1、PC2分别划入两个VLAN中步骤一:创建VLAN2与VLAN3Switch#config terminalSwitch(config)#vlan 2Switch(config-vlan)name HRSwitch(config-vlan) exitSwitch(config)#vlan 3Switch(config-vlan) name ENG步骤二:将与两台PC连接的两个接口分别划入相同的VLAN2中Switch(config)#int f0/1Switch(config-if) switch access vlan 2Switch(config-if)port nni//将接口划入指定VLAN中Switch(config-if)int f0/2Switch(config-if) switch access vlan 2Switch(config-if)port nni//将接口划入指定VLAN中Switch(config-if)exit验证结果:使用show vlan 2查看试验结果,在PC1以及PC2上使用ping 命令查看连通性。
cisco交换机配置简单教程
文档一、标识交换机二、设置口令及用户三、配置VTP (Vlan 中继协议)四、配置中继线(Trunk )五、创建、描述Vlan 及设置Vlan IP六、划分、描述及设置Vlan 端口七、配置STP(生成树协议)八、启用Vlan 间Router九、配置ACL 十、配置DHCP 中继代理十一、配置DHCP 服务器十二、配置HSRP (热备路由协议)十三、保存配置附1:命令行编辑键附2:SHOW 命令附7:ACL 例子一、标识交换机Switch#configure terminal 进入配置状态Switch(config)#hostname “ hostname” 设置Switch 名称Switch (config)#no hostname 取消Switch 名称Switch(config)#end 结束本次配置二、设置口令及用户Switch#configure terminal 进入配置状态Switch(config)#enable secret “ password” 设置特权模式口令及口令Switch(config)#no username “ username” 删除本地用户Switch(config)#service password-encryption 加密所有明文口令Switch(config)#no password-encryption 拒绝加密所有明文口令S w i t c h(c o n f i g)#e n d结束本次配置1、配置console 用户用口令Switch#configure terminal 进入配置状态Switch(config)#line console 0 进入console 口配置状态Switch(config-line)#login local 设置登录模式为本地用户验证模式Switch(config-line)#no login local 取消本地用户验证模式Switch(config-line)#end 结束本次配置或Switch#configure terminal 进入配置状态Switch(config)#line console 0 进入console 口配置状态文档Switch(config-line)#login 设置登录模式为线性登录模式Switch(config-line)#password “ password” 设置线性登录模式口令Switch(config-line)#no login 取消线性登录模式Switch(config-line)#end 结束本次配置2、配置tenlnet(vty) 用户及口令Switch#configure terminal 进入配置状态Switch(config)#line vty 0 15 进入vty 配置状态Switch(config-line)#login local 设置登录模式为本地用户验证模式Switch(config-line)#no login local 取消本地用户验证模式三、配置VTP (Vlan 中继协议)Switch#vlan database 进入vlan 数据库配置状态Switch(vlan)#vtp domain “ domainname” 设置vtp 域Switch(vlan)#vtp server|client| transparent 设置模式Switch(vlan)#vtp password “ password” 设置vtpSwitch(vlan)#no vtp password 取消vtp 口令Switch(vlan)#exit 退出vlan 数据库配置状态Switch(config)#interface range “ interface mod/port -port ” 进入端口组配置状态Switch(config-if-range)#switchport trunk encapsulation dot1q|isl| negotiate 设置干道封装模式Switch(config-if-range)#switchport mode trunk 设置端口为干道模式Switch(config-if-range)#no shutdown 启用端口Switch(config-if-range)#end 结束本次配置五、创建、描述Vlan 及设置Vlan IPSwitch#vlan database 进入vlan 数据库配置状态文档Switch(vlan)#vlan “ vlan-num ” name “ vlan-name” 建立vlan 及名称Switch(vlan)#no vlan “ vlan-num ” 删除vlanSwitch(vlan)#exit 退出vlan 数据库配置状态Switch(config-if)#description “ description ” 描述vlanSwitch(config-if)#no description 取消描述Switch(config-if)#ip address “ ip-address subnet-mask” 设置vlan 网关的ip 地址Switch(config-if)#no shutdown 启用vlanSwitch(config-if)#end 结束本次配置六、划分、描述及设置Vlan 端口Switch#configure terminal 进入配置状态Switch(config)#interface “ interface mod/port ” 进入端口配置状态Switch(config-if)#switchport mode access 设置端口为访问模式Switch(config-if)#switchport access vlan “ vlan-num ” 设置端口所属VlanSwitch(config-if)#no shutdown 启用端口Switch(config-if)#end 结束本次配置或Switch#configure terminal 进入配置状态Switch(config)#interface range “ interface mod/port -port ” 进入端口组配置状态Switch(config-if-range)#description “ description ” 描述端口Switch(config-if-range)#speed auto|100|10 设置端口速率模式Switch(config-if-range)#duplex auto|full|half 设置端口双工模式Switch(config-if-range)#switchport mode access 设置端口为访问模式Switch(config-if-range)#switchport access vlan “ vlan-num ” 设置端口所属Vlan Switch(config-if-range)#no shutdown 启用端口Switch(config-if-range)#end 结束本次配置七、配置STP(生成树协议)Switch#configure terminal 进入配置状态Switch(config)#spanning-tree portfast default 设置所有访问端口为快速模式Switch(config)#no spanning-tree portfast default 取消所有访问端口为快速模式Switch(config)#spanning-tree uplinkfast 设置上行端口为快速模式Switch(config)#no spanning-tree uplinkfast 取消上行端口为快速模式Switch(config)#end 结束本次配置或Switch#configure terminal 进入配置状态Switch(config)#interface “ interfacemod/port ” 进入端口配置状态Switch(config-if)#spanning-tree portfast 设置端口为快速模式文档Switch(config-if)#no shutdown 启用端口Switch(config-if)#end 结束本次配置或Switch#configure terminal 进入配置状态Switch(config)#interface range “ interface mod/port -port ” 进入端口组配置状态Switch(config-if-range)# spanning-tree portfast 设置端口为快速模式Switch(config-if-range)#no shutdown 启用端口Switch(config-if-range)#end 结束本次配置八、启用 Vlan 间 RouterSwitch#configure terminal 进入配置状态Switch(config)#ip routing 启用 ip 路由Switch(config)#ip route “ Destination-prefix Destination-prefix-mask Forwarding-router 's-address ” Switch(config)#end 结束本次配置九、配置 ACLSwitch#configure terminal 进入配置状态Switch(config)#interface vlan “ vlan-num ” 进入 vlan 配置状态 Switch(config-if)#ip access-group “ acl-num ” in|out 应用 acl 到 vlan Switch(config-if)#end 结束本次配置 Switch#configure terminal 进入配置状态Switch(config)#line vty 0 15 进入 vty 配置状态Switch(config-line)#access-class “ acl-num ” in|out 应用 acl 到 vtySwitch(config-if)#end 结束本次配置例:Switch(config)#access-list 101 deny ip host 192.168.2.11 host 192.168.10.21 Switch(config)#access-list 102 deny ip host 192.168.2.13 192.168.10.0 0.0.0.255 Switch(config)#access-list 103 deny ip 192.168.2.0 0.0.0.255 192.168.10.0 0.0.0.255 Switch(config)# access-list 104 deny ip 192.168.2.0 0.0.0.255 host 192.168.10.25十、配置 DHCP 中继代理Switch#configure terminal 进入配置状态Switch(config)#service dhcp 启用 dhcp 服务Switch(config)#ip dhcp relay information option 启用 dhcp 代理服务Switch(config)#interface vlan “ vlan-num ” 进入 vlan 配置状态Switch(config-if)#ip helper-address “ ip-address ” 启用 dhcp 代理服务器 ip 地Switch(config-if)#end 结束本次配置文档十一、配置 DHCP 服务器Switch#configure terminal进入配置状态Switch (config)#ip dhcp pool “ Pool-name ” 设置 dhcp 地址池名称Switch (dhcp-config)#network “ Network-num Network-mask ” 设置 dhcp 地址池 ip 围 Switch (dhcp-config)# dns-server “ ip-address ” 为客户机分配 DNS 服务器 ip 地址 Switch (dhcp-config)#netbios-name-server “ ip-address ” 为客户机分配 WINS 服务器 ip 地址Switch#configure terminal 进入配置状态Switch(config)#service dhcp 启用dhcp 服务wyz(config)#ip dhcp excluded-address “ Low-ip-address High-ip-address ” 设置保留ip 地址Switch(config-if)#end 结束本次配置十二、配置HSRP (热备路由协议)Switch#configure terminal 进入配置状态Switch(config)#interface vlan “ vlan-num ” 进入vlan 配置状态Switch(config-if)#ip address “ ip-address subnet-mask” 设置vlan 物理ip 地址Switch(config-if)#standby “ group-num ” ip “virtual-ip-address ” 设置vlan 虚拟ip 地址Switch(config-if)#standby priority “ Priority-value ” 设置路由器优先等级Switch(config-if)#standby preempt 设置hsrp 抢占功能Switch(config-if)#standby timers “ Hello-interval-in-seconds Hold-time-in-seconds ”设置hello 信息Switch(config-if)#end 结束本次配置十三、保存配置Switch#write memory或Switch#copy running-config startup-config 附1:命令行编辑键TAB 补全命令?查看可用命令Ctrl + P 粘贴历史命令Ctrl + E 将光标移至命令末尾Ctrl + F 将光标向前移动Ctrl + B 将光标向后移动Ctrl + Z 返回#命令模式Ctrl + U Clear Line and Put in BufferCtrl + W Delete Word Backwards and Put in Buffer文档Ctrl + Y Paste Buffer ContentsCtrl + X Clear Line to the Left and Put in BufferCtrl + T Flip Last 2 CharactersCtrl + J ReturnCtrl + L Refresh LineCtrl + I Refresh Line and Goto EndCtrl + K Delete everything on the Right of cursorCtrl + V Allows to type control characterCtrl + M ReturnCtrl + H Backspace Character to the LeftCtrl + R 刷新行附2:SHOW 命令Switch#show version 显示版本信息Switch #show arp | include “ ip-address” 显示ip 地址对应的mac 地址信息Switch#show mac-address-table 显示mac 地址信息Switch#show mac-address-table | include “ mac-address” 格式:xxxx.xxxx.xxxx.xxxx Switch #show mac-address-table dynamic address “ mac-address” 显示mac 地址对应的端口信息Switch#show mac-address-table dynamic interface “ interface mod/port ” 显示端口对应的mac 地址信息Switch#show tech-support 显示技术支持信息Switch#show interfaces 显示接口信息Switch#show vlan 显示vlan 信息Switch#show startup-config 显示启用配置文件Switch#show running-config 显示运行配置文件Switch#show ip route 显示ip 路由状态Switch#clear counters interface “ interface mod/port ” 清除端口计数器Switch(config)#default interface “ interface mod/port ” 恢复端口出厂设置Switch#clear interface “ interface mod/port ” 重置端口的硬件逻辑keyada#show cdp neighbors “ interface mod/port ” detail 附7:ACL 例子VLAN1 需实现以下效果:1、VLAN1 主机192.168.1.240 可以访问所有网段;2、VLAN1 其余主机可以访问除VLAN2 、VLAN3 及VLAN4 外所有网段。
思科交换机配置教程

思科交换机配置教程首先,我们需要登录到交换机的控制台界面。
可以通过串口连接,或者通过网络连接,例如通过SSH协议进行连接。
登录后,我们进入到交换机的命令行界面。
接下来,我们需要进行基本的配置。
思科交换机的配置是通过命令行界面进行的,配置的命令是不同的,但是有一些通用的配置信息,我们可以先进行配置。
首先,我们要为交换机设置一个主机名。
可以使用如下命令进行配置:```Switch(config)# hostname Switch1```这样就为交换机设置了一个名字为"Switch1"的主机名。
接下来,我们可以配置交换机的管理IP地址。
可以使用如下命令进行配置:```Switch(config)# interface vlan 1Switch(config-if)# ip address 192.168.1.1 255.255.255.0Switch(config-if)# no shutdown```这样就为交换机的VLAN1接口配置了一个IP地址为192.168.1.1,子网掩码为255.255.255.0,并且启用了这个接口。
除了基本配置信息,我们还需要进行一些其他的配置,例如VLAN的配置。
VLAN是虚拟局域网的意思,可以将交换机的端口划分到不同的VLAN中,实现不同VLAN之间的隔离。
可以使用如下命令进行VLAN的配置:```Switch(config)# vlan 10Switch(config-vlan)# name VLAN10Switch(config-vlan)# exitSwitch(config)# interface fastEthernet 0/1Switch(config-if)# switchport access vlan 10Switch(config-if)# exit```这样就创建了一个编号为10的VLAN,名称为"VLAN10"。
Cisco交换机VLAN的配置解读
SW1conf t SW1configint fa0/12 SW1configifswitchport mode trunk //将f0/12端口设置为trunk模式 SW1configifswitchport trunk encapsulation isl //可选项;模拟器中不支持isl识别协议 SW1configifend SW1configinterface range fa 0/ 13 //进入快速以太网0槽位的1至3号端口 SW1configifrangeswitchport mode access //设置端口模式为access模式 SW1configifrangeswitchport access vlan 10 //将1到3号端口划分到vlan10 SW1configinterface range fa 0/ 4 6 SW1configifrangeswitchport mode access SW1configifrangeswitchport access vlan 20
二 VLAN的划分方法
1 静态VLAN 静态VLAN按交换机的端口来划分;即将以太网交换机上的端口分配给某一个VLAN;这些端口一直保持这种配置关系直到人工改变它们;每个VLAN可以使用一个或几个交换机端口;这种方法因为配置容易且安全性较高;所以是比较常用的方法;缺点是当用户主机发生移动时;可能就需要重新配置 2 动态VLAN 1 按MAC地址来划分 由网管指定有哪些主机的网卡地址组成一个VLAN 优点是当主机搬迁时;其所在的VLAN不会发生变化;只要主机的网卡不变;它将一直属于原VLAN的成员;无需网管对交换机软件进行重新配置;但缺点是配置工作量很大 2 按IP地址来划分 由网管指定有哪些IP地址属于一个VLAN 优点是当主机搬迁时;其所在的VLAN不会发生变化 缺点是IP地址可人为更改;会带来安全隐患 由于第二层交换机不能识别IP地址;所以这种划分方法只能用于第三层交换机
实验8 CISCO交换机VTP配置
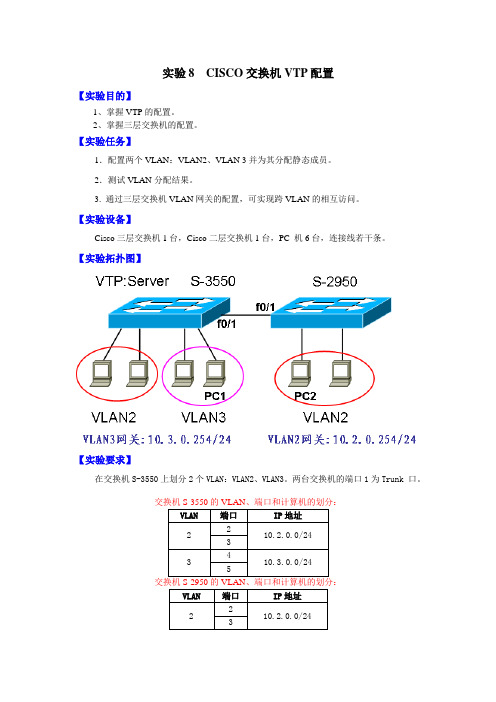
实验8 CISCO交换机VTP配置【实验目的】1、掌握VTP的配置。
2、掌握三层交换机的配置。
【实验任务】1.配置两个VLAN:VLAN2、VLAN 3并为其分配静态成员。
2.测试VLAN分配结果。
3. 通过三层交换机VLAN网关的配置,可实现跨VLAN的相互访问。
【实验设备】Cisco三层交换机1台,Cisco二层交换机1台,PC 机6台,连接线若干条。
【实验拓扑图】【实验要求】在交换机S-3550上划分2个VLAN:VLAN2、VLAN3。
两台交换机的端口1为Trunk 口。
交换机S-3550的VLAN、端口和计算机的划分:交换机S-2950的VLAN、端口和计算机的划分:【实验步骤】1、按照拓扑图把相应的设备连接好。
2、配置交换机S3550的VTP模式:Server模式、域名MYVTP、密码CISCO。
3、在交换机S3550上创建VLAN2、VLAN3。
4、把交换机S3550的端口2、3划分到VLAN2中。
5、把交换机S3550的端口4、5划分到VLAN3中。
6、查看S3550已经划分好的VLAN及相应的端口7、把交换机S3550端口1配置为主干道trunk模式8、配置交换机S2950的VTP模式:Client模式、域名MYVTP、密码CISCO9、查看S2950的VLAN划分情况10、把交换机S2950端口2、3划分到VLAN2中11、把交换机S2950端口1配置为主干道trunk模式12、配置各台PC机的IP地址、子网掩码(注意:同一VLAN的PC机必须处于同一个子网内)13、测试各台PC间的连通性(测试可得,同一VLAN的PC可以ping通,但不同VLAN的PC机不可以ping通)14、在交换机S3550上配置三层交换机,分别把VLAN2、VLAN3的网关(即VLAN的IP地址)设置为10.2.0.254/24、10.3.0.254/2415、配置各台PC机的网关(注意:处于哪一个VLAN内的PC机就必须配置其网关为对应VLAN的网关)16、再次测试各台PC间的连通性(测试可得,无论是相同VLAN或者不同VLAN的PC都可以ping通,即可以实现不同VLAN间的通信)。
思科设备交换机vtp学习功能配置

本次讲解交换机vtp的vlan学习功能(相对于上一期各交换机vlan配置,使用中继线相连的交换机都需要进行相应的配置。
如果更改 VLAN,所有的相关交换机也要做变更,这样工作就太大了。
采用VTP (VLAN Trunking Protocol)协议可以简化配置工作。
VTP有三种工作模式:服务器模式、客户端模式和透明(transparent)模式,默认是服务器模式。
服务器模式的交换机可以设置VLAN配置参数,服务器会将配置参数发给其他交换机。
客户端模式的交换机不能设置VLAN配置参数,只能接受服务器模式的交换机发送的VLAN配置参数。
透明模式的交换机是相对独立的,它允许设置VLAN配置参数,但不向其他交换机发送自己的配置参数。
当透明模式的交换机收到服务器模式的交换机发送的VLAN配置参数时,仅仅是简单地转发给其他交换机,并不用来设置自己的VLAN参数。
当交换机处于VTP服务器模式时,如果删除一个VLAN,则该VLAN将在所有相同VTP的交换机上被删除。
当在透明模式下删除时,只在当前交换机上被删除)本例配置模型图命令行:SwitchA配置如下:Switch>enableSwitch#vlan database //进入vlan配置模式% Warning: It is recommended to configure VLAN from config mode,as VLAN database mode is being deprecated. Please consult userdocumentation for configuring VTP/VLAN in config mode.Switch(vlan)#vtp domain tzt //配置switchA为vtp域名为tztChanging VTP domain name from NULL to tztSwitch(vlan)#vtp password 123 //配置switchA为vtp密码为123Setting device VLAN database password to 123Switch(vlan)#vtp server //配置switchA为vtp服务器(默认为服务器模式)Device mode already VTP SERVER.Switch(vlan)#vlan 2 name TztA //配置vlan 2 名字为TztAVLAN 2 added:Name: TztASwitch(vlan)#vlan 3 name TztB //配置vlan3 名字为TztBVLAN 3 added:Name: TztBSwitch(vlan)#exitAPPLY completed.Exiting....Switch#show vtp statusVTP Version : 2Configuration Revision : 2Maximum VLANs supported locally : 255Number of existing VLANs : 7VTP Operating Mode : Server //显示switchA为vtp服务器模式VTP Domain Name : tzt //显示switchB的vtp域名为tztVTP Pruning Mode : DisabledVTP V2 Mode : DisabledVTP Traps Generation : DisabledMD5 digest : 0xF6 0x64 0x53 0x6B 0xF9 0x2F 0xA3 0xC2 Configuration last modified by 0.0.0.0 at 3-1-93 00:02:05Local updater ID is 0.0.0.0 (no valid interface found)Switch#show vlan //查看已配置vlan信息VLAN Name Status Ports---- -------------------------------- --------- -------------------------------1 default active Fa0/1, Fa0/2, Fa0/3, Fa0/4Fa0/5, Fa0/6, Fa0/7, Fa0/8Fa0/9, Fa0/10, Fa0/11, Fa0/12Fa0/13, Fa0/14, Fa0/15, Fa0/16Fa0/17, Fa0/18, Fa0/19, Fa0/20Fa0/21, Fa0/22, Fa0/23, Fa0/24Gig1/1, Gig1/22 TztA active //此处为刚才配置的vlan3 TztB active1002 fddi-default act/unsup1003 token-ring-default act/unsup1004 fddinet-default act/unsup1005 trnet-default act/unsupVLAN Type SAID MTU Parent RingNo BridgeNo Stp BrdgMode Trans1 Trans2---- ----- ---------- ----- ------ ------ -------- ---- -------- ------ ------1 enet 100001 1500 - - - - - 0 02 enet 100002 1500 - - - - - 0 03 enet 100003 1500 - - - - - 0 01002 fddi 101002 1500 - - - - - 0 01003 tr 101003 1500 - - - - - 0 01004 fdnet 101004 1500 - - - ieee - 0 01005 trnet 101005 1500 - - - ibm - 0 0Remote SPAN VLANs------------------------------------------------------------------------------Primary Secondary Type Ports------- --------- ----------------- ------------------------------------------Switch#conf t //进入全局模式Enter configuration commands, one per line. End with CNTL/Z.Switch(config)#int g1/1Switch(config-if)#switchport mode trunk //配置trunk模式%LINEPROTO-5-UPDOWN: Line protocol on Interface GigabitEthernet1/1, changed state to down %LINEPROTO-5-UPDOWN: Line protocol on Interface GigabitEthernet1/1, changed state to upSwitch(config-if)#switchport trunk allowed vlan all //允许所有vlan通过switchA的端口g1/1 Switch(config-if)#exitSwitch(config)#exitSwitchB配置如下:Switch>enableSwitch#show vlan //查看当前已配置vlan信息。
思科Cisco交换机配置——单交换机划分VLAN配置实验操作详解
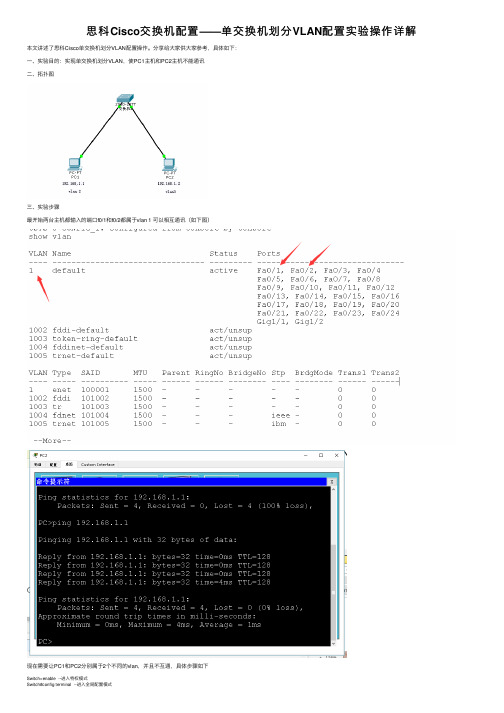
思科Cisco交换机配置——单交换机划分VLAN配置实验操作详解本⽂讲述了思科Cisco单交换机划分VLAN配置操作。
分享给⼤家供⼤家参考,具体如下:⼀、实验⽬的:实现单交换机划分VLAN,使PC1主机和PC2主机不能通讯⼆、拓扑图三、实验步骤最开始两台主机都输⼊的端⼝f0/1和f0/2都属于vlan 1 可以相互通讯(如下图)现在需要让PC1和PC2分别属于2个不同的vlan,并且不互通,具体步骤如下Switch>enable --进⼊特权模式Switch#config terminal --进⼊全局配置模式Enter configuration commands, one per line. End with CNTL/Z.Switch(config)#hostname S1 --修改交换机主机名为S1S1(config)#vtp domain test --创建⼀个vtp域Changing VTP domain name from NULL to testS1(config)#vtp mode server --设置当前vtp⾝份为serverDevice mode already VTP SERVER.S1(config)#vlan 2 --创建并进⼊vlan 2端⼝S1(config-vlan)#name V2 --命名vlan 2名字为V2S1(config-vlan)#vlan 3 --创建并进⼊vlan3端⼝S1(config-vlan)#name V3 --命名为V3S1(config-vlan)#interface f0/1 --进⼊f0/1端⼝S1(config-if)#switchport mode access --将端⼝模式改为access模式S1(config-if)#switchport access vlan 2 --将端⼝划分到vlan 2S1(config-if)#interface f0/2 --进⼊到f0/2端⼝S1(config-if)#switchport mode access --将端⼝模式改为access模式S1(config-if)#switchport access vlan 3 --将端⼝划分到 vlan 3S1(config-if)#end --发回特权模式S1#copy running-config startup-config --保存配置Destination filename [startup-config]?%SYS-5-CONFIG_I: Configured from console by consoleBuilding configuration...[OK] --成功保存四、验证PC1和PC2是否不互通,f0/1和f0/2是否分别划分到vlan 2和vlan 3⾥(1)验证vlan(2)验证是否相互不能ping通PC1:PC2。
cisco交换机的vlan怎么设置
cisco交换机的vlan怎么设置cisco交换机的vlan怎么设置步骤:1.首先,安装cisco packet tracer软件,当前的版本应该是到了6点几了,我这边用的是6.0版本的,安装完成之后打开该软件,进入软件配置主界面!2.接着,我们以cisco交换机3560为例讲述如何创建交换机的vlan。
那么下一步就是添加cisco交换机3560了:逐步点击“交换机”分类,然后选择cisco3560交换机,用鼠标拖到工作区间就可以了。
3.然后,单击Cisco交换机3560进入“CLI”界面,输入“enable”命令进入特权配置模式。
并输入“vlan database”命令进入vlan配置模式。
4.接着,进入vlan的配置模式后,输入命令“?”,可以查看当前模式下有哪些命令是可以使用的:exit:退出vlan模式;no:删除某项vlan配置;vlan:vlan模式下更深入的配置;vtp:vlan下面vtp域的配置;5.然后,我们开始为cisco交换机添加一个vlan 300,那么直接运行命令”vlan 300“即可。
6.接着,我们执行”exit“命令退出vlan配置模式,执行命令”show vlan“在特权模式下查看cisco交换机的所有vlan信息。
可以发现交换机已经添加了我们需要的vlan 300。
7.然后,vlan已经添加,但还没有任何交换机的接口归属于这个vlan,也就是说这个vlan没有任何意义。
所以,下一步就是添加一个交换机接口到这个vlan 300。
进入全局配置模式,把Fa0/1接口的模式配置为access,并归属于vlan 300,具体命令为:Switch(config)#int fa0/1Switch(config-if)#switchport mode accessSwitch(config-if)#switchport access vlan 3008.接着,回到特权模式,执行命令”show vlan“查看当前的vlan 配置信息,可以发现,接口Fa0/1已经被划分到了vlan 300。
- 1、下载文档前请自行甄别文档内容的完整性,平台不提供额外的编辑、内容补充、找答案等附加服务。
- 2、"仅部分预览"的文档,不可在线预览部分如存在完整性等问题,可反馈申请退款(可完整预览的文档不适用该条件!)。
- 3、如文档侵犯您的权益,请联系客服反馈,我们会尽快为您处理(人工客服工作时间:9:00-18:30)。
思科交换机的VLAN、TRUNK、VTP配置教程
CISCO交换机配置实例(VTP、VLAN、TRUNK、channel) 本文通过实例为大家介绍CISCO交换机的一些常用功能的配置方法,你还在为不知道思科交换机的VLAN、 TRUNK 、VTP 配置教程而烦恼么?接下来是小编为大家收集的思科交换机的VLAN、TRUNK 、VTP 配置教程,希望能帮到大家。
思科交换机的VLAN、 TRUNK 、VTP 配置教程:
1. 配置 CISCO 二层交换机的IP 地址(catalyst 2950 为例)
SW1(config)#int vlan 1 //进入管理接口interface vlan 1
SW1(config-if)#ip address 11.1.1.2 255.255.255.0 //配置IP 地址
SW1(config-if)#no shutdown
SW1(config-if)#exit
SW1(config)#ip default-gateway 11.1.1.1 //配置网关,可通过show run 查
查看所配置的 IP 地址:
SW1#show int vlan 1
Vlan1 is up, line protocol is up
Hardware is CPU Interface, address is 0008.20ff.6400 (bia 0008.20ff.6400)
Internet address is 11.1.1.2/24
2.配置交换机的端口速度和双工(Speed and Duplex)
SW1(config)#interface fa0/1
SW1(config-if)#speed {10 | 100 | auto} //10M/100M/自适应SW1(config-if)#duplex {auto | full | half} //自适应/全双工/半双工
一般情况下,交换机两端的端口速度和双工要匹配,这样通信质量才能得到保证,在相同厂家的产品
(比如说Cisco 的交换机互连)中端口协商不用配置一般不会有什么
问题,可以通过show interface 查
看端口的速度和双工。
通常在不同厂家的产品中(比如说Cisco 和华为互连)如果通过查看发现端口速
度和双工不匹配,可以通过手工配置来解决。
通过 show interface 查看端口的速度和双工:
SW1#show interfaces fastEthernet 0/24
FastEthernet0/24 is up, line protocol is up (connected)
Hardware is Fast Ethernet, address is 0008.20ff.6418 (bia 0008.20ff.6418)
MTU 1500 bytes, BW 100000 Kbit, DLY 100 usec,
reliability 255/255, txload 1/255, rxload 1/255
Encapsulation ARPA, loopback not set
Keepalive set (10 sec)
Full-duplex, 100Mb/s, media type is 100BaseTX
input flow-control is unsupported output flow-control is unsupported
ARP type: ARPA, ARP Timeout 04:00:00
Last input 00:00:03, output 00:00:00, output hang never
注:CISCO 交换机端口默认值:Auto-duplex, Auto-speed, media type is 100BaseTX
3.设置永久MAC 地址不过期
SW1(config)#mac-address-table static mac_addr {vlan vlan_id} [interface int1 [int2 ... int15]]
SW1(config)#mac-address-table static 1111.1111.a111 vlan 1 interface f0/1
配置后show mac-address-table 可以看到静态添加的MAC 地址1111.1111.a111
SW1#show mac-address-table
Vlan Mac Address Type Ports
---- ----------- -------- -----
All 000f.72db.4ec0 STATIC CPU
1 1111.1111.a111 STATIC Fa0/1
4.管理MAC 地址表
SW1#show mac-address-table
Mac Address Table
-------------------------------------------
Vlan Mac Address Type Ports
---- ----------- -------- -----
All 000f.72db.4ec0 STATIC CPU
1 0000.0c3f.0b05 DYNAMIC Fa0/12
1 0030.94e6.391d DYNAMIC Fa0/11
1 00e0.b05a.5bfe DYNAMIC Fa0/10
1 1111.1111.a111 STATIC Fa0/1
5.设置交换机端口的访问模式(三种) access /dynamic / trunk
SW1(config-if)#switchport mode ?
access Set trunking mode to ACCESS unconditionally
dynamic Set trunking mode to dynamically negotiate access or trunk mode
trunk Set trunking mode to TRUNK unconditionally
SW1(config)#int fastEthernet 0/1
SW1(config-if)#switchport mode access //设置FA0/1 为ACCESS 模式
SW1(config-if)#switchport mode trunk //设置FA0/1 为TRUNK 模式
SW1(config-if)#switchport mode dynamic auto //设置FA0/1 为自动直协商模式(默认)
交换机TRUNK 端口配置:
1)一般交换机与交换机相连接的端口要设置为trunk 模式
2 )如果是梳心交换机与非网管的交换机相连,梳心交换机端口设置为access 模式。