zsign ipa使用方法
越狱后你该干什么?越狱、cydia使用、必备软件使用终极教程
随着绿毒完美越狱的发布,广大原生4.2.1的FY以及误升4.2.1未备份4.2b3 SHSH的朋友大部分都越狱了IP4。
寒假即将结束,利用最后几天写个教程,方便小白们更好的使用IP4,更好的发挥越狱后的强大功能!一、越狱论坛教程很多,这里不多说。
简单的说下(windows版为例):1.手机关机链接电脑。
2.运行greenpois0n,打开itunes(不知道什么原理,我是全程开的itunes)。
3.点击Prepare to Jailbreak (DFU)4.按提示前3秒什么都不做,接着2秒按住开机键,再10秒不松开机键按住HOME键,最后15秒松开开机键持续按住HOME键。
5.点击Jailbreak,等待。
6.手机重启后桌面多出了loder图标,运行,下载安装cydia。
7.重启,越狱成功。
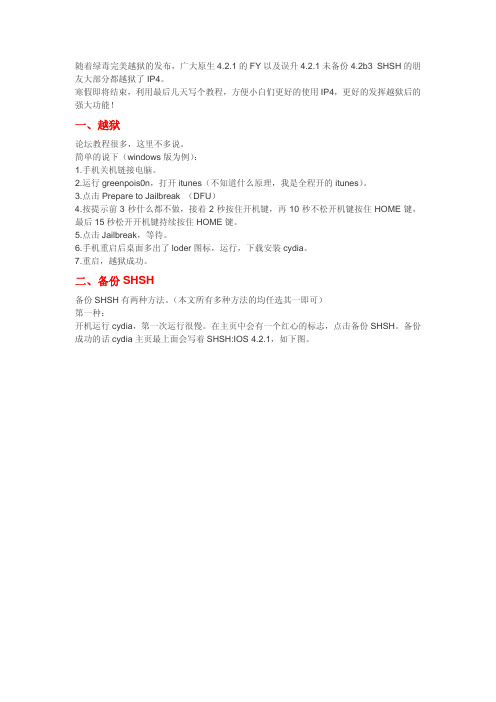
二、备份SHSH备份SHSH有两种方法。
(本文所有多种方法的均任选其一即可)第一种:开机运行cydia,第一次运行很慢。
在主页中会有一个红心的标志,点击备份SHSH。
备份成功的话cydia主页最上面会写着SHSH:IOS 4.2.1,如下图。
这种方法比较方便,推荐懒人用这种方法。
第二种:用TinyUmbrella即原Firmware Umbrella工具备份运行TinyUmbrella。
将iPhone联机,点击Save My SHSH开始备份。
SHSH文件的位置位于: Windows XP C:\Documents and Settings\用户名\.shshWindows7 C:\Users\用户名\.shsh\Mac /Users/用户名/.shsh/注意:1,在Mac下面文件夹.shsh是隐藏的,要想显示,需在终端中输入:defaults write com.apple.finder AppleShowAllFiles -bool true命令后重启Finder;恢复隐藏,则将true改为false,重启finder。
ipad itouch iphone 越狱后用Cydia下载软件
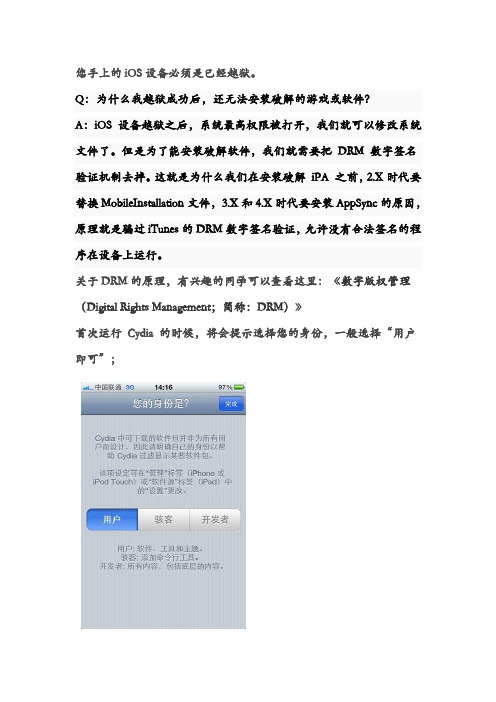
您手上的 iOS 设备必须是已经越狱。
Q:为什么我越狱成功后,还无法安装破解的游戏或软件?A:iOS 设备越狱之后,系统最高权限被打开,我们就可以修改系统文件了。
但是为了能安装破解软件,我们就需要把DRM 数字签名验证机制去掉。
这就是为什么我们在安装破解iPA 之前,2.X时代要替换MobileInstallation文件,3.X和4.X时代要安装AppSync的原因,原理就是骗过iTunes的DRM数字签名验证,允许没有合法签名的程序在设备上运行。
关于DRM的原理,有兴趣的同学可以查看这里:《数字版权管理(Digital Rights Management;简称:DRM)》首次运行Cydia 的时候,将会提示选择您的身份,一般选择“用户即可”;首先,打开Cydia,点击下方"管理",接着,选择"软件源";点击左上角的"编辑"按钮,之后选择左上角的“添加”按钮;在弹出窗口中输入“”,以添加Hackulo 源;接着,静候Cydia 下载Hackulo 源;添加完“Hackulo”源之后,点击进去Hackulo 源,选择对应的iOS 版本的iPA 补丁(也就是Appsync),目前iOS 只有3.1,3.2,4.0+ 三个大版本(2.X的版本已经不提供支持),我们只需根据大版本添加补丁即可;这里演示的是iOS 4.2.3,因此选择Appsync for OS 4.0+,点击上方的"Install" 按钮;点击右上方"Confirm" 确认按钮进行安装确认后,Cydia 将会自动下载安装iPA补丁(Appsync)。
安装完成之后,我们就可以看到已经安装成功的IPA 补丁了;添加其他源的时候也如上面所说的一样。
另:上面的图片是以iphone为例,其他的apple产品在方法相同。
也由于Cydia的版本不同,可能存在一些差异,但是只要找到与图中所描述的地方就可以了。
教你ios越狱后,iphone,touch安装网上下载的文件。(ipa格式)

教你ios越狱后,iphone,touch安装网上下载的文件。
(ipa格式)
废话不多说,潜水多年,看到有人问,就发个伪教程吧。
当然前提是越狱,不然只能通过itunes下载软件,而且不能安装在网上下的ipa格式应用哦!!!
准备工具:同步助手,数据线,电脑,iphone(touch,ipad都行)
第一步:下载安装同步助手后,找到你要安装的ipa文件:(下图的这种)
没有下载同步助手的人请度娘搜索,这里就不给同步助手做广告了
--------------------------------------------------------
然后双击它:就会弹出直接安装的框框,点右下角安装到iphone
PS:只有安装了同步助手才能弹出这个,不然这类ipa文件无法打开的
最后坐等安装成功吧。
再次强调,只有越狱后才能实现,一些appstore里没有的ipa软件也能这样安装进去,你懂的
如果你不想这样用,或者你没越狱,打开同步助手,在这里面的资源站也能下载,自己去研究吧。
gd32 ipa用法 -回复

gd32 ipa用法-回复gd32 ipa用法是指在使用gd32 MCU进行固件烧录时,使用ipa(In-System Programming Algorithm)算法对固件进行编程的一种方法。
gd32 ipa用法包括以下几个步骤:第一步:准备工作在使用gd32 ipa进行固件烧录之前,需要准备以下工作:1. 安装STLink驱动:gd32 MCU通常使用STLink进行烧录和调试,因此需要在电脑上安装STLink驱动,以确保成功连接gd32 MCU。
2. 安装gd32 ipa工具:gd32 ipa工具是一款可在命令行下运行的软件,用于加载和执行ipa算法。
在这一步中,我们需要下载并安装gd32 ipa 工具。
第二步:选择合适的ipa算法gd32 MCU支持多种ipa算法,不同的算法适用于不同型号的芯片和具体的烧录任务。
在这一步中,我们需要选择适合当前芯片和烧录任务的ipa 算法。
通常,gd32官方网站上会提供各种型号芯片的ipa算法文件。
第三步:配置ipa工具在使用gd32 ipa工具之前,需要进行一些配置。
这些配置包括:1. 设置串口波特率:通过设置串口波特率,可以确保与芯片的通信正常进行。
通常,gd32 MCU的默认波特率为115200。
2. 设置STLink连接方式:gd32 MCU可以通过SWD或JTAG接口与STLink进行连接。
在这一步中,我们需要选择合适的连接方式,确保与芯片的正常通信。
第四步:连接芯片在进行固件烧录之前,需要先将STLink与gd32 MCU进行连接。
通常,连接步骤如下:1. 将STLink的SWD或JTAG线缆与gd32 MCU的对应接口相连。
2. 将STLink的USB接口与电脑相连。
3. 启动gd32 ipa工具,并选择合适的连接方式。
第五步:烧录固件在完成连接后,就可以开始进行固件烧录。
烧录步骤如下:1. 在gd32 ipa工具中,选择要烧录的ipa算法文件。
Z-CAM-IPMAN-S-简易使用说明说明书

盒子里有什么?●一台 Z CAM IPMAN S 主机●两根 Wi-Fi 天线如何给 Z CAM IPMAN S 供电?●把 NP-F 电池插上主机背电池插座位置。
●如需取下 NP-F 电池,按住电池插座旁按钮,向上方推出电池。
●如选择外接电源,把电源线DC插头连接到主机侧DC电源插座(6.2~18V)。
如何启动 Z CAM IPMAN S?●确认电源已连接。
●把电源开关拨至上方ON位置。
●如需关闭电源,将电源开关拨到至下方OFF位置。
如何连接信号源至 Z CAM IPMAN S 之 HDMI 输入?●把摄影机或其他设备之 HDMI 输出端连接至主机侧 HDMI IN 插座。
如何连接 Z CAM IPMAN S 之 HDMI 信号源输出?●从主机侧 HDMI OUT 插座连接至监视器或其他 HDMI 设备输入端。
如何安装 WiFi 天线?●把天线底部对准主机顶之天线插座。
●顺时针旋转天线直至位置固定。
●两根天线均需装上。
如何切换 Z CAM IPMAN S 操作模式?●主机侧模式切换开关,拨至上方 Rx 位置,屏幕显示 RX 为当前模式。
●主机侧模式切换开关,拨至中间 M 位置,屏幕显示 M 为当前模式。
●主机侧模式切换开关,拨至上方 Tx 位置,屏幕显示 TX 为当前模式。
如何使用无线实时监控图像功能?●摄影机输出 HDMI 图像信号必须为 1080p60或以下(不支持1080i)。
●把摄影机输出 HDMI 连接至主机 HDMI IN,此主机设置为 TX 模式。
●把另一主机设置为 RX 模式,HDMI OUT 连接至监视器输入端。
●在两台主机分别长按前方中间功能键约两秒,待配对图出现后松开,等待自动配对。
●配对成功后,所有主机屏幕显示之频道数字应该一致。
●此时若摄影机有 HDMI 图像信号输出,连接 RX 主机之监视器将显示实时监控图像信号。
●如需增加 RX 模式主机,按上述方法配对,最多可连接四台 RX。
使用itms-services从浏览器安装IPA包

使⽤itms-services从浏览器安装IPA包itms-service是apple为iOS企业⽤户($299)提供的⽆线分发安装⽅式所使⽤的协议,个⼈⽤户和公司⽤户也可以使⽤这种⽅式通过⽹页发布测试应⽤,但只有设备的UDID被包含在对应帐户的Device ID中的设备可以安装,⽽Device ID对数⽬是有限制的,IPA包是包。
服务器上的⽂件准备⼯作:1.plist⽂件:其中的url 是IPA包所在服务器上的下载链接title:应⽤名字bundle-version:版本号bundle-identifier:bundle id2.IPA包使⽤xcode 导出archive后的IPA,描述⽂件要选择对应的3.⽀持HTTPS的服务器,⼀定要⽀持HTTPS然后在HTML中<!DOCTYPE html><html lang="en"><head><meta charset="UTF-8"><meta name="viewport"content="width=device-width, initial-scale=1.0"><meta http-equiv="X-UA-Compatible"content="ie=edge"><title>Document</title><style>div {width: 100px;padding: 10px;text-align: center;border: 1px solid#666;margin: 0auto;}</style></head><body><div><a href="itms-services://?action=download-manifest&url=https://xxx/app.plist">点击下载</a></div> <div>点击下载</div><div>点击下载</div></body></html>⾄此就应该可以从服务上下载安装IPA⽂件了。
ios企业证书使用方法
ios企业证书使用方法iOS企业证书使用指南什么是iOS企业证书?iOS企业证书是由苹果公司颁发的一种证书,用于企业开发、测试和分发iOS应用程序。
企业可以通过申请和安装这种证书,实现在公司内部设备上无需使用App Store即可安装和使用应用程序。
申请iOS企业证书的方法1.登录[Apple开发者中心]( Identifiers & Profiles”页面。
2.在左侧菜单中选择”Certificates”,点击”+“按钮,选择”iOS App Development”。
3.按照页面提示,使用Keychain Access创建证书签发请求文件(.csr)。
4.将证书签发请求文件上传至开发者中心,并等待证书生成。
5.下载生成的证书文件(.cer),双击安装到Keychain Access。
6.在Keychain Access中导出证书为.p12文件。
配置iOS企业证书在Xcode中配置1.打开Xcode,选择你的项目。
2.进入”Signing & Capabilities”选项卡。
3.选择”Team”为你的企业开发者账号。
4.在”Signing Certificate”中选择你之前下载和安装的iOS企业证书。
在企业分发时配置1.将应用打包成IPA文件,并将IPA文件上传至企业分发的服务器。
2.在服务器上创建一个名为”“的文件,内容如下:<key>items</key><array><dict><key>assets</key><array><dict><key>kind</key><string>software-package</string><key>url</key><string></dict></array><key>metadata</key><dict><key>bundle-identifier</key><string></string><key>bundle-version</key><string></string><key>kind</key><string>software</string><key>title</key><string>My App</string></dict></dict></array>3.将”“文件上传至服务器,并确保可以通过URL访问到。
ZEISS Labscope App 教程:使用iPad进行微观镜和相机的无线图像捕捉说明书
With Labscope, you can transform your ZEISS microscope and camera into a WiFi-enabled imaging system. Be it in the laboratory, university, school or even for your hobby – Labscope snaps images and records videos of your microscopic samples, easier than ever. You can create annotations and reports, do image processing and save the files to your Windows network, or simply share them with anyone, anywhere. Benefit from more than 160 years of experience in microscopy and explore the freedom of mobile digital imaging. Easy. Precise. Efficient.Version used for this manual: 1.3.1 (released September 9, 2015)Compatibility – requires iOS 7.0 or later. This app will only run on an Apple iPad. Languages available – English, Czech, French, German, Italian, Japanese, Korean, Polish, Portuguese, Russian, Simplified Chinese, SpanishLabscope is for Research Use Only – not for use in Diagnostic procedures. (A Research application is not intended for in vitro diagnostic or in clinical use, but is intended solely for use in the research or educational setting, for example university or pharmaceutical development. These applications are described as Research Applications or Research Use Only.)Visit /labscope to learn more.Visit the Labscope Support Forum at:/microscopy/community/forumdisplay.php?f=34To get started, the Labscope app must first be installed on the iPad. This can be done over a wireless connection through the App Store directly from the iPad, or it can be done by connecting the iPad to iTunes and downloading/installing the app that way. In either case, you will need to create an Apple ID (free registration) in order to download, install, or update the application. Please visit https:///account for more details.After you turn on the iPad, check that the device is properly connected to your wireless router. If you’re using an AirPort wireless router from Apple, you can use the AirPort app to check this connection. Alternatively, from the home page of the iPad, go to Settings > Wi-Fi and click on your network to join it. The network you join must be the one to which the Axiocam ERc 5s or Primostar HD head is tethered.Once your WiFi connection is established, look for the Labscope app on your home screen. Tap on it once to open.On the home screen of Labscope, you will see the following features.Labscope will always start with two Virtual Microscopes so you can test out the features of the software. You can configure Virtual Microscopes to simulate real microscopes. To configure a camera or microscope (real or virtual), click the gear beneath the system you wish to edit. To confirm that you are configuring the correct camera/microscope, the initial name field will contain the hardware address (second part of the MAC address) of the microscope or camera head.On the configuration screen (gear icon beneath each system), you are presented with a couple of items. First, select from the left side the system you are setting up. There are three options:Primo Star: This is Primostar HD, with a 5MP integrated camera in the binocular tubePrimovert HDcam: The is Primovert with the integrated 5MP camera to which an iPad can be mountedStemi 305 cam: Zeiss’ simple stereoscope with integrated wireless 1.2MP cameraAxiocam ERc 5s (Rev.2) Compound/Stereo microscope: Choose from these options based on your type of microscope stand when utilizing the standalone Axiocam ERc 5s cameraOptions are slightly different among the system you configure. All three are shown below.Primostar HD(continued on the next page)Primovert HDcamStemi 305 camAxiocam ERc 5s (Rev. 2), compound microscopeAxiocam ERc 5s (Rev. 2), stereo microscopeFor all systems, you can configure the following options:Microscope name: Give this system a unique identifying name (max. 12 characters, no spaces)Lock configuration: Add a security code so that no one can alter this configuration without a passcodeShading correction: Enable or disable the shading correction that you create for this system. Click the gear underneath the rotating nosepiece to enter the shading correction setup.Magnification: It is possible to add the objective lens to the configuration so that you can properly scale the images. It is recommended that you add objectives for the purpose of tracking your imaging data. Scalings allow for accurate measurements in microns.When you are all set, click Apply (top right). Repeat this process for any additional systems.ImagingFrom the home screen, click on the live window for the system you wish to view. NOTE: With a camera attached, the scale bar will read in microns (µm).Choose objective: Select the objective that is currently in place on the microscope so proper scalings are connected to the image prior to captureSet the exposure and white balance: Choose from automatic or manual camera controlsLive measurements: Draw a scale bar and various polygons, arrows, and angles on your Live image.Snap: Capture single images, begin a video recording, begin a timelapse recording, or use the iPad’s built-in camera to capture scaled macro images (via the drop-down menu)Image display properties: Change how the image looks on the screenReviewing, Processing and Exporting ImagesWhen you have snapped an image/video, or when you would like to review images you’ve taken or shared, switch to the folder screen. Initially, you will see files taken locally on this iPad. To change views, click the tree icon (top right, below the iPad battery indicator).In this window, you can search your network for a file server (top), manually locate and connect to a file server on a domain (middle), or work with images on your iPad (bottom).Labscope contains some basic image processing features so you can work on your images directly from the app. To view images you’ve already captured or ones you’ve imported to Labscope, click on the folder icon. You will now see a list of images you have access to view.To view an individual image up close, click on that image.Upon opening an image, you will be presented with the following tools:Edit image display properties: Change brightness, gamma, contrast, color intensity (saturation) and sharpness of detail; rotate the image; flip the image horizontally, vertically, or both; cut a Region of Interest (ROI) from the imageROI screen detail – Choose a shape for the ROI (rectangle/square, circle, triangle) and use the handles at the corners and the rotation handle to specify the ROI to cut out.For any changes you make, use the checkmark (lower left) to accept them and the “X” to reject them and return to the previous screen.Measurement Tool: Choose a tool to place on the image from the top of the window. If necessary, click on the image to add relevant points (such as where to place the vertices of a parallelogram). Use the grab handles at the corner to reshape the tool. Click the color block (left side) to open the tool options (change the color of the outline, size of the text and border). Activate the feature right below the color block to lock the tool to expand or contract proportionally. Activate the third tool, with a scale bar and an eye, to display the area and perimeter of the tool on the image. (see image on next page)Additionally, click on the Scale Bar in the image to drag it around the image or position it in another corner of the image.For any changes you make, use the Checkmark (lower left) to accept them and the “X” to reject them and return to the previous screen.Create a report, or export measurement data: Once you have performed all of your measurements, you can format that data into a preloaded Report template in Labscope.Alternatively, choose to export the data to a CSV file, which you can then mail to yourself (see the next section) or copy to shared network for further processing in Excel. ZEN 2012 will also open the CSV file for access to ZEN’s data processing features.If you have added any tools; manipulated the image display; or created a report and you wish to save the result, press the Save button (floppy disk, lower left). You will be prompted to overwrite the existing image file. If you say YES, the original image will be overwritten. If you say NO, a second image with the adjustments will be saved in addition to the original image; the updated image will now be called“original_file_name(01, 02,03, etc).czi” (czi or jpg, depending on your Save options – more on that later).When you are all done with your images and would like to move them off the iPad, you can:1) Connect to a server and offload the images directly to a shared folder (throughthe Folder icon, using the branch menu to access the drive).2) Connect the iPad to iTunes and offload the images from Labscope (switch to theiPad in iTunes, click the Apps tab, and scroll down to File Sharing). Now you can offload CZI files and preserve image scalings and annotations.3) Save the images to the iPad’s Camera Roll, connect the iPad to a computer andoffload the images (automatically converted to JPG format – scalings andannotations are lost).4) Print the images (physical copies) or mail the images to yourself (through theiPad’s mail client – you must set up your email to do this).To perform options 3 and 4, switch to the Folder icon and place a checkmark next to the items you wish to move elsewhere. Click the share button (rectangle with an arrow going up and to the right).NOTE: The “Convert to JPG” option will only appear if no JPG files are highlighted.If you choose to save to camera roll, select the files you want and then choose this option. Then, connect the iPad to a computer. Once the iPad is recognized, locate the iPad in My Computer (Windows). Right-click on the iPad and choose to “Import pictures and videos.”Troubleshooting1) I do not have the option to “Save to Camera Roll.”Solution: Open the iPad Settings and click “Privacy.” Click on Photos and ensure that the Labscope app is allowed access to Photos.2) My images are saving only as JPGs/only as CZIs, and I would prefer theother format/both formats at once.Solution: Open the iPad Settings and scroll down to the Labscope entry. Here,you can choose the default image format; decide if Labscope will automaticallyoverwrite files on saving; and select if images should be automatically saved and uploaded to a network folder after capture.3) I offloaded my CZI files to my computer but no program will open them.How can I open them?Solution: You must install a program that will read CZI files. The best software for this is ZEN, from Zeiss. You can download ZEN lite from the following link:/microscopy/en_us/products/microscope-software/zen-lite.html#downloadsZEN allows for manipulation of the image; the addition, modification or removal of measurement tools; and it gives you the ability to export your image to other file formats for presentations, emails, etc.。
honey select ipa使用
honey select ipa使用【实用版】目录1.Honey Select IPA 的概述2.Honey Select IPA 的使用方法3.Honey Select IPA 的优缺点4.总结正文1.Honey Select IPA 的概述Honey Select IPA 是一款由日本 Cygames 公司开发的视觉小说阅读器,适用于 Windows 和 Mac 操作系统。
该软件以其独特的用户界面和强大的功能受到许多视觉小说爱好者的喜爱。
2.Honey Select IPA 的使用方法要使用 Honey Select IPA,首先需要下载并安装该软件。
安装完成后,打开软件,可以看到一个简洁的界面。
在主界面上,可以浏览已安装的视觉小说,点击封面即可开始阅读。
同时,用户还可以自定义界面颜色、字体、背景音乐等,以提高阅读体验。
在阅读过程中,用户可以使用各种功能,如自动播放、跳转到指定章节、书签等。
此外,Honey Select IPA 还支持多种文件格式,包括 HTML、EPUB、TXT 等,用户可以自由选择。
3.Honey Select IPA 的优缺点优点:(1)界面简洁,操作便捷;(2)支持多种文件格式,用户可以选择喜欢的阅读方式;(3)自定义功能丰富,可以满足不同用户的需求;(4)软件免费,无需付费购买。
缺点:(1)仅支持 Windows 和 Mac 操作系统,对其他操作系统的用户不友好;(2)部分用户反映软件运行速度较慢,可能影响阅读体验。
4.总结总的来说,Honey Select IPA 作为一款视觉小说阅读器,凭借其简洁的界面、强大的功能和良好的用户体验,在视觉小说爱好者中具有较高的口碑。
然而,软件仅支持部分操作系统,以及部分用户反映的速度问题,仍有待改进。
导出ios应用ipa包的方法
导出ios应用ipa包的方法导出iOS应用的IPA包是将开发者通过Xcode构建的应用打包成可供其他设备下载和安装的文件。
IPA包可以用于发布应用到App Store或将应用传输给用户进行测试。
以下是一步一步的详细方法:步骤1:准备工作在开始导出IPA包之前,确保你已经完成了以下准备工作:1. 安装并配置好Xcode:Xcode是苹果开发者工具套件,在Mac上运行。
你需要安装最新版本的Xcode,并确保它已经配置好开发者账号信息。
2. 创建应用ID和Provisioning Profile:在苹果开发者账号网站上创建一个应用ID,并生成一个用于该应用的Provisioning Profile。
3. 添加必要的证书:在苹果开发者账号网站上生成和下载开发者证书以及相关的私钥。
步骤2:设置应用的Build配置在导出IPA包之前,需要确保你的应用的Build配置是正确的。
请按照以下步骤操作:1. 打开Xcode并选择你的项目。
2. 在菜单栏上选择`Product`,然后选择`Scheme`,接着选择`Edit Scheme`。
3. 在弹出的窗口中,选择`Archive`,然后选择`Release`(或者其他你想要发布的类型,如Debug或Adhoc)。
4. 确保Build Configuration选项被设置为`Release`(或相应的发布类型)。
5. 点击`Close`保存设置。
步骤3:构建和存档应用完成了上述准备工作和设置之后,现在可以构建和存档你的应用了。
按照以下步骤进行操作:1. 在Xcode中,选择`Product`,然后选择`Archive`。
2. Xcode将开始构建应用,并将最终结果存档于Archives目录下。
3. 构建完成后,Xcode的Organizer窗口将自动打开,显示构建的存档。
4. 在Organizer窗口中,你可以看到所有你已经构建并存档的应用。
选择你想要导出的应用。
步骤4:导出应用的IPA包接下来,根据你的需求,选择合适的方式来导出应用的IPA包。
- 1、下载文档前请自行甄别文档内容的完整性,平台不提供额外的编辑、内容补充、找答案等附加服务。
- 2、"仅部分预览"的文档,不可在线预览部分如存在完整性等问题,可反馈申请退款(可完整预览的文档不适用该条件!)。
- 3、如文档侵犯您的权益,请联系客服反馈,我们会尽快为您处理(人工客服工作时间:9:00-18:30)。
zsign ipa使用方法
zsign ipa是苹果移动设备开发人员常用的一款数字签名工具,用于签名iOS应用程序(IPA)文件以便在设备中进行安装。
本文将介绍
zsign ipa的使用方法。
第一步:下载zsign ipa软件
zsign ipa软件有两种下载方式,一是从Github官网下载源码并编译
生成,二是从开发者提供的二进制文件中直接下载。
选用哪种方式由
自己的技术水平而定。
第二步:准备证书和配置文件
在使用zsign ipa之前,你需要准备好iOS开发者证书和相应的配置
文件。
证书可从苹果开发者平台获取,配置文件通常包括描述文件和plist文件。
第三步:使用zsign ipa进行签名
在终端或命令提示符中进入zsign ipa软件所在路径,运行以下命令:
./zsign -s 证书.p12 -p 密码 -m 描述文件.mobileprovision -f 待
签名的IPA文件.ipa -o 签名后的IPA文件.ipa
其中,-s参数为证书文件路径,-p为证书密码,-m为描述文件路径,-f为待签名的IPA文件路径,-o为签名后的IPA文件路径。
如果签名成功,会输出Success! Signed: 签名后的IPA文件路径。
第四步:安装签名后的IPA文件
将签名后的IPA文件拷贝到同步到设备,使用设备自带的文件管理器或第三方工具安装即可。
总结:
如上,我们完成了zsign ipa的使用方法介绍。
这个过程主要就分为准备证书和配置文件,使用zsign ipa进行签名以及安装签名后的IPA文件等步骤。
希望可以帮助开发人员更好的操作该工具。