oligo7
使用oligo 6和primer premier 5.0等软件设计pcr引物

使用Oligo 6和Primer Premier 5.0等软件设计PCR引物张新宇(中国医科院肿瘤研究所,北京100021)电子邮件: ********************在当今分子生物学研究中,PCR技术已成为使用最多,最广泛的技术之一。
而引物设计是PCR技术中至关重要的一环。
在PCR扩增以前,一般模板序列已被全部或部分确定。
要想扩增出理想的目的片断,一般都得通过正确设计PCR引物。
也有的人不经过设计直接取模板序列的两个片段作为引物,这样很可能导致实验失败,如扩增出多条带(引发错配所致),不出目的带或出目的带很弱(引物引发效率低下),引物二聚体带(引物与引物之间形成稳定二聚体)等等。
现在PCR引物设计都通过计算机软件进行。
生物信息学发展至今日,具有引物设计功能的软件有很多,其中大部分是免费软件,可直接从网上下载,安装并运行。
这类软件大都简单易用,但其引物设计功能一般不很强,通过它们设计的引物常常不尽如人意,而专门进行引物设计的商业版软件功能强大,但使用起来不太容易。
本文就这一问题进行探讨。
引物设计的原则引物设计有几条基本原则:首先引物要跟模板紧密结合,其次引物与引物之间不能有稳定的二聚体或发夹结构存在,再次引物不能在别的非目的位点引起DNA聚合反应(即错配)。
围绕这几条基本原则,设计引物需要考虑诸多因素,如引物长度(primer length),产物长度(product length),序列Tm值(melting temperature),ΔG值(internal stability),引物二聚体及发夹结构(duplex formation and hairpin),错误引发位点(false priming site),引物及产物GC含量(composition),有时还要对引物进行修饰,如增加限制酶切点,引进突变等。
以使用Oligo软件分析设计引物为例,笔者总结出以下的要点:1.引物的长度一般为15-30bp,常用的是18-27bp,但不能大于38,因为过长会导致其延伸温度大于74℃,即Taq酶的最适温度。
oligo7评价引物标准

oligo7评价引物标准
Oligo 7是一款引物设计软件,可以对引物进行评价。
以下是Oligo 7评价引物的标准:
1. 引物的特异性:评价引物与非特异性序列的结合能力,以及在基因组中的潜在结合位点。
2. 引物的长度:引物的长度会影响其特异性,太长或太短的引物可能导致不准确的PCR产物。
3. 引物的GC含量:GC含量过高或过低可能导致PCR过程中退火温度的选择和产物稳定性出现问题。
4. 引物二聚体和发卡结构:这些结构可能导致引物自身结合,影响PCR扩增效率。
5. 引物间的互补性:评价引物之间是否存在互补区域,这可能导致引物二聚体的形成。
6. 引物与模板的互补性:评价引物与模板DNA的结合能力,以确保PCR 产物的一致性。
7. 引物的突变和多态性:评价引物对基因突变和多态性的敏感性,以确保引物适用于不同基因型。
8. 引物的热稳定性:评价引物的解离温度(Tm),以确保PCR过程中选择合适的退火温度。
9. 引物的安全性:评价引物是否可能产生任何安全性问题,如对实验者的毒性或对环境的污染。
这些标准可以帮助您评估Oligo 7设计的引物质量,以确保PCR实验的成功和准确性。
Oligo 7操作方法
构建含目的片段的质粒载体概述:构建质粒载体的总体思路是:通过查文献获得目的基因序列,对目的基因加以修饰,再根据需要分两种情况将其导入质粒:①总体导入——这种情况下直接给这段序列人为地加上2个特异的酶切位点并且这2个新加的位点必须是原先在目的基因里没有而在质粒上是存在的,那么经过双酶切则在质粒和目的基因两端都暴露出2段不同的碱基序列,通过碱基互补配对会自动组合得到新质粒;细节问题:所选的两个酶切位点在质粒上不要过于靠近,至少隔开一个。
②将目的基因先分2段后再导入——这种情况我们对怎么分要先做筛查,切目的基因的位点必须在目的基因序列里是唯一的、在质粒上是同时存在的、而且最好能将目的基因4:6等分,然后再同上一步在两端添加特异酶切位点,组合新质粒;细节问题:切割目的基因的位点引物无需加防错配碱基。
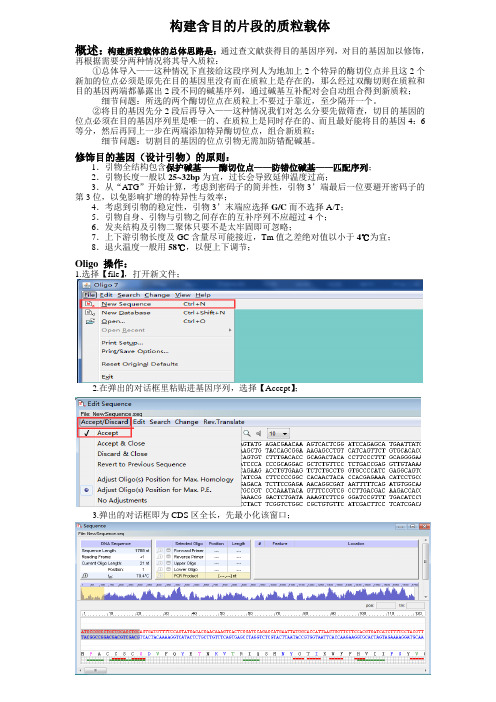
修饰目的基因(设计引物)的原则:1.引物全结构包含保护碱基——酶切位点——防错位碱基——匹配序列;2.引物长度一般以25~32bp为宜,过长会导致延伸温度过高;3.从“ATG”开始计算,考虑到密码子的简并性,引物3’端最后一位要避开密码子的第3位,以免影响扩增的特异性与效率;4.考虑到引物的稳定性,引物3’末端应选择G/C而不选择A/T;5.引物自身、引物与引物之间存在的互补序列不应超过4个;6.发夹结构及引物二聚体只要不是太牢固即可忽略;7.上下游引物长度及GC含量尽可能接近,Tm值之差绝对值以小于4℃为宜;8.退火温度一般用58℃,以便上下调节;Oligo 操作:1.选择【file】,打开新文件;2.在弹出的对话框里粘贴进基因序列,选择【Accept】;3.弹出的对话框即为CDS区全长,先最小化该窗口;4.选择【edit】——【forward primer】,编辑上游引物;4.从全长序列5’端复制前30个碱基粘贴进新弹出的对话框中编辑,第一步筛选酶切位点【search】—【for Restriction Sites】,主要看是否是多克隆位点判断是否为多克隆位点(②法导入须看)提示目的基因里没有的酶切位点(①法导入须看)5.配合质粒图筛选出合适的两端酶切位点(质粒中存在而目的基因里不存在)6.在第4步得到的30位匹配序列对话框中,参照图5输入酶切位点序列→参照附录2输入保护碱基→参照原则输入防错位碱基,再在尾端删除配对序列碱基直至符合原则要求;7.上游引物就设计好了,点击确定保存,跳到全序列窗口,点击【change】--【Strands】转向反向互补链,复制30个,同理编辑下游引物;8.点击确定9.点击save,保存结束。
oligo7中文说明
Oligo使用方法介绍作为目前最好、最专业的引物设计软件,Oligo的功能很强,在这里我们介绍它的一些主要功能:如:普通引物对的搜索、测序引物的设计、杂交探针的设计以及评估引物对质量等等。
在正式进行引物设计前,我们首先面临的一个任务就是向Oligo程序导入模板序列,根据不同的实验情况,导入模板有三种方法:1,直接用键盘输入:a,点击file菜单中的New Sequence 浮动命令,或直接点击工具栏中的New Sequence命令,进入序列展示窗口;b,此时即可键入DNA序列;c,如果需要的话,Oligo提供碱基回放功能,在边键入时边读出碱基,防止输入错误。
点击Edit菜单中的“Readback on”即可。
2,利用复制和粘贴:当我们序列已经作为TXT文件存在或其它oligo不能直接open的文件格式,如word文件.html格式,这个功能就显得很有用了。
在相应文件中复制序列后在序列展示窗口粘贴,oligo会自动去除非碱基字符。
当序列输入或粘贴完成后,点击Accept/Discard菜单中的Accept浮动命令,即可进入引物设计模式。
3,如果序列已经保存为Seq格式或者FASTA,GenBank格式时,oligo就可以直接打开序列文件。
点击File菜单中的“Open”浮动命令,找到所需文件,打开即可。
进入引物设计模式后,oligo一般会弹出三个窗口,分别是6-碱基频率窗口,碱基退火温度窗口以及序列内部碱基稳定性窗口,其中的退火温度窗口是我们引物设计的主窗口,其它的两个窗口则在设计过程中起辅助作用,比如6-碱基频率窗口可以使我们很直观地看到所设计引物在相应物种基因组中的出现频率,如果我们的模板是基因组DNA或混合DNA时,该信息就显得有用了,而内部稳定性窗口则可以显示引物的5’端稳定性是否稍高于3’端等。
一,普通引物对的搜索:以Mouse 4E(cDNA序列)为例。
我们的目的是以Mouse 4E(2361 bp)为模板,设计一对引物来扩增出600-800bp长的PCR产物。
引物设计的原则以及常见引物设计软件的使用

450-500 P.E.
# range. ——p70,oligo7 manual
三 常用软件使用方法
4.Beacon Designer8
与primer premier6界面类似,增加了设计引物的种类,可用于设
计各种实时定量的引物和探针,分子信标等。
三 常用软件使用方法
4.Beacon Designer8
一 前言
如何设ቤተ መጻሕፍቲ ባይዱ引物?
遵循引物设计的原则 设定引物的一些参数 利用引物设计软件搜索,评价引物
Back to contents
二 引物设计原则
1.引物的长度
引物的长度一般选择在18-27个碱基之间,过长和过短都会降 低引物结合效率。
2.引物的Tm值
引物的Tm值一般选择在55-65℃之间,上下游引物之间Tm相差 不宜超过4℃。 Tm值:两段互补的碱基序列解链50%时的温度 估算Tm=4*(G+C)num+2*(A+T)num
此外,Beacon Designer增加了标记外显子的选项,使得方便设计跨外 显子的引物,提高实时定量引物的特异性。 Locate exon + Junction Primer serach
三 常用软件使用方法
4.Beacon Designer8
导出引物信息为表格文件-Export Results
引物设计的原则以及
常见引物设计软件的使用
伏东科 20150618
目录
一 前言 二 引物设计原则 三 常用软件使用方法
四 常见问题
一 前言
什么是引物?
引物(primer),又称引子,是一小段单链DNA或RNA,用来作 为DNA复制的起始点(终点)。
oligo7官方说明 中文版
稳定性较差的引物与产物相差30°Tm。一组警告并不会取消它的资格,而只是表明它可能不是最优的选择。 当警告是“前向起爆药的终端稳定性太高”时,并不意味着反应会受到任何损害。这意味着当使用复杂的 底物时,如基因组DNA或逆转录的总mRNA,你可能会有错误的产物形成问题。至少有必要仔细检查预测产品 的大小。
The next slide shows the calculation graphically (data for temperature of 37° ).
DG 计算示例
Total DG = 1+1+0.3+0.5-1.3-1.3-2.2 = -2.0 kcal/mol
这是一种罕见情况。通常情况下,悬挂的末端正在稳定下来。这是在提醒你,有时添加一个基 地可能会降低双相熔化温度,后面展示了一个即使添加两个碱基也不会影响TM的例子
在搜索引物和探针之后,您可 以打开选定的寡核苷酸窗口。 在此示例中,在所选寡核苷酸 窗口底部列出的文件中执行了 对一致性引物的排序搜索(要以 此方式搜索,您需要单击 Search for Primer&Probe(搜 索引物和探针)窗口的 “SubSearches”(子搜索)选项 卡,然后单击“Consensus Primers”(一致性引物)检查 框中,选择文件并开始搜索。)。选中“选择共识寡核 苷酸”框时,如右图所示,当您双击显示有关给定引 物信息的行时,Oligo 7会选择共识引物。
引物位置的列表可以通过点击(或按住Option键单击)窗口的标题来按分数、寡头位置或/和窗 口的任何其他列进行排序。左上角的下拉菜单允许您选择正向或反向引物显示。在搜索T aqMan集合或嵌套引物之后,您将有更多的选择。
寡核苷酸设置窗口
甘托姆7七色RGBW加UV LED灯光源说明书
GANTOM 7: COMPACT SEVEN COLOR DMX SPOTLIGHTUSER GUIDEThe Gantom 7 packs seven-color output into a tiny package. With a native 15 degree beam angle, this LED spotlight produces a punchy yet soft beam with homogeneous color mixing even at a close distance. Included micro-lens diffusers and the magnetic accessory holder offer easy beam control solutions; diffusing the spotlight to a floodlight is literally a snap. Native DMX control and a balanced, non-linear dimming curve satisfies the most demanding theming tasks. This compact spotlight features lime, amber, and ultraviolet beyond the common RGBW to achieve colors unavailable in standard LED fixtures. With the Gantom 7, lighting designers obtain a virtually unlimited color palette in a compact and efficient 7-Watt LED fixture. The Gantom 7 is configured using our DMX Programmer app, available free for Apple and Android devices.Featureso Full spectrum output with 7 LED colors. Multiple color profiles selectable (RGB, RGBA, RGBW, RGBAWUv, RGBAWLUv).o Color control via DMX512 or DMX Programmer app.o Precision-tuned non-linear dimming curve and color balance algorithm.o Standalone mode allows set and forget operation without DMX signal (requires DMX Programmer app).o DMX address and configuration stored in memory.o Low voltage and minimal heat for improved safety over incandescent sources.o Internal constant current driver gives highly efficient and consistent output.o Minimal maintenance required with over 50,000 hour lamp life.o Indoor and outdoor use.Available ModelsThe Gantom DMX is available in full color RGBW or Dynamic White. It is also available as either a Spot or Flood light.POWER AND WIRING REQUIREMENTSThe Gantom 7 has a maximum fixture wattage of 7.5W and an operating voltage of 12V DC. For recommended power supplies check /power-supplies/Gantom ’s standard DMX controllable light fixtures have a 2.1mm DC barrel jack for power and a 3.5mm TRS jack for the control signal. Additionally, screw terminal adapters are included with every fixture to simplify custom wiring. You can screw bare wires directly into these adaptersRather than using a typical XLR cable for carrying the DMX signal, standardGantom fixtures use 3.5mm TRS cables. Gantom makes an XLR 5 Pin to 3.5mmTRS adapter (product number CB51) that is perfect for connecting Gantomproducts to an XLR based DMX environment.The Gantom 7 is also available in our Gantom Pro configuration. This version has a single lockingconnector which combines both power and data into one cable. This version is compatible with our G8 Power/Data Distribution Box and Pro Cable system. A single cable for power and data greatly simplifies installation and the locking connector gives a secure connection for long term use. The Gantom Pro series is recommended for permanent installations.CONFIGURING THE LIGHT FIXTUREThe Gantom 7 is programmed and configured using the free DMX Programmer App by Gantom. In addition to setting the DMX starting address for the fixture, the app allows you to save a default color and brightness for standalone operation of the light fixture if the application does not require any DMX control.What you need:o An Android or iOS device for running the Gantom Programmer app. Please note that a headphone port is required to connect to the device to the fixture. The iPhone7 does workwith, but you will need to use the headphone port adapter that is included with the phone.o A male-to-male 3.5mm audio 3.5mm cable. This is the same type of cable that you would use to connect your Android or iOS device to headphones or to an AUX port.o Power supply for the fixture. All Gantom fixtures accept 12v DC power. We recommend using one of our PowerPak Mini units if you are just going to power a single fixture.o The free DMX Programmer app by Gantom. This can be found by searching “Gantom” in iTunes for an Apple device or Google Play for an Android deviceo If you have a Gantom Pro series fixture, you will also need the CB107 programming adapter cableFirst, open the DMX Programmer app by Gantom. The app will open tothe screen you see here. From this screen, select Generic Console.The app will then provide you instructions on how to connect the lightfixture to the tablet or smartphone. Please note the order in which thecables should be connected. First connect the headphone cable to thelight fixture and to the tablet/smartphone. Next, connect the power tothe fixture. When prompted by the app, tap the “Next” button and youwill be taken to the control screen.CONTROL SCREENo Address – This box shows the address that will beassigned to the fixture if you hit the “Assign Address”buttono Assign Address– Hitting this button will assign theselected address to the fixture. The light fixture shouldblink in response to having a new address assigned.o Save button– this will allow you to save a settingsprofile into the app. Use this if you need to configuremany fixtures to have the exact same settings. Pleasenote that this button DOES NOT save the currentprofile or address to the fixture.o Console Sliders – These sliders allow you to setintensity levels for each channel. There are severaldifferent channel mapping options which are coveredin the DMX Controlled Operation section of thisdocument.o Store as Default– hitting this will save the currentcolor and brightness to be the default state for thelight when it turns on. If the light does not see DMXsignal when it is powered on, it will go to this state.OTHER OPTIONS SCREENIf you hit the “Other Options” button on the control screen, th e following menu appears:o Reset - selecting this will reset the fixture to its defaultfactory settings. Do this if you are running into programmingissues.o Lock/Unlock 9600– The Gantom DMX fixture can listento either a standard DMX signal OR to the special controlsignal that comes from the app. Lock 9600 will turn OFF thefixture’s ability to listen to DMX and ONLY allow it to becontrolled through the app interface. For most applications itis recommended that you keep “UNLOCK 9600” selected.BOOT SEQUENCE FLASHINGWhen the fixture first receives power, before it enters normal operation, it will first report its channel mapping profile and second report its DMX address through a sequence of flashes.Profile Report: Though the Gantom 7 has seven colors available, not all DMX consoles have the ability to utilize all seven of them. Some users may prefer to operate the Gantom 7 as though it were an RGBW or RGBA fixture because there are readily available preset profiles for those fixtures on many existing DMX control environments. The Gantom 7 has five channel mapping profiles available: RGB, RGBA, RGBW, (MASTER)RGBAWU, and (MASTER)RGBAWLU. More information on these can be found later in the DMX Controlled Operation section. The Gantom 7 will report the profile it has selected by rapidly flashing through the colors of that profile. There will be a slight pause, then the fixture will report its DMX address.Address Report: After reporting which channel mapping profile is selected, The Gantom 7 will report its DMX address by flashing through another sequence of colors which represent its DMX address. Red flashes indicate the first digit, green flashes indicate the second digit, and blue flashes indicate the third digit of the DMX address. For example, if the Gantom 7 is assigned to address 245 it will indicate its channel mapping profile, then report its address by flashing red 2 times, then flashing green 4 times,then flashing blue 5 times. If it is assigned to DMX address 038, it will report its channel mapping profile then report its address by flashing red 0 times, then flashing green 3 times, then flashing blue 8 times.TURN OFF/ON boot sequence flashing: You may not want your fixture to report its channel mapping profile and address every time it receives power. In order to toggle the boot sequence flashes on/off, follow these steps. First, tap the number field next to the word “Address”. A new screen will appear asking you to enter a DMX start address. Enter the number 512. Finally, hit the “Assign Address” button. This will not actually change the DMX address of the light fixture, it will simply toggle the boot sequence flashing either on or off.STANDALONE OPERATIONSome applications may not require live DMX control. In order to configure your Gantom 7 for standalone operation, all you must do is use the channel sliders on the Generic Console screen to set the desired levels for each channel. Once the light has the desired output, tap the “STORE AS DEFAULT”button at the lower left portion of the screen to save this setting directly into the light fixture.Now, when the light fixture receives power it will automatically go to this newly saved DEFAULT setting once it’s boot sequence is complete.Please note that if DMX signal is passed to the fixture while it is operating in standalone mode, the DMX signal will override the standalone setting.DMX CONTROLLED OPERATIONThe Gantom 7 was designed for use with standard DMX512 control systems. In order to maximize compatibility with existing control hardware and software, the Gantom 7 has several different DMX channel mapping profiles available. Some users may prefer to operate the Gantom 7 as though it were an RGBW or RGBA fixture because there are readily available preset profiles for those fixtures on many existing DMX control environments. The Gantom 7 has five channel mapping profiles available: RGB, RGBA, RGBW, (MASTER)RGBAWU, and (MASTER)RGBAWLU.ADDRESSING YOUR GANTOM DMXThe Gantom 7 can be given any DMX address from 1-506. To set your DMX address, first connect the Gantom 7 to the DMX Programmer app by Gantom as was outlined earlier in this document. With the Generic Console screen open, you should have full control of the fixture through the channel sliders. If the light fixture is connected to the app but is not responding, try power cycling the light fixture.Once you have verified that the light fixture is responding to controlsignal from the app, tap the number field next to the word“Address”. A new screen will pop up, prompting you to enter a DMXaddress. After you enter your desired DMX address, the app willreturn to the Generic Console screen. Finally, you must hit theASSIGN ADDRESS button in order to save the new address into thefixture. Hitting the “Save” button will not save anything to the lightfixture’s memory.SELECTING A DIFFERENT DMX CHANNEL MAPPING PROFILEIn order to select the preferred DMX channel mapping profile, you will need to follow the same procedure for addressing the fixture, but instead of a fixture address you will enter one of the numbers from the following table:Once you have entered the address corresponding to the desired profile, hit the “ASSIGN ADDRESS”button. The light fixture should then cycle through a sequence of color flashes that matches the profile you have selected. Please note that this will NOT actually change the DMX address of the fixture, since the fixture can only be set to address 1-506.BEAM SHAPING DIFFUSERSThe Gantom 7 has a beam angle of 15° and a field angle of 35°. For increasing the width of the beam, included with the Gantom 7 is a set of Brightview diffusers which are pre-cut to fit the fixture. Also included is a magnetic ring which can be used to attach the diffusers to the face of the light fixture. Each diffuser is marked by having notches cut into the outside of it. The diffusers are described in the following table:Product Support:We hope that this guide has been effective for learning how to use your Gantom DMX light fixture. However, if you run into a wiring issue, a bug in the software, or just a light that doesn’t seem to want to cooperate, we at Gantom are ready to help you out! Just send an email to ****************** and we will get back to you as soon as possible.。
Oligo+BANDSCAN软件使用详细说明.doc
Oligo 6 Tour 主要功能介绍Oligo是一种多功能的程序,通过从一个序列中搜索、选择寡核苷酸而广泛运用于PCR、DNA 测序、定向诱变及各种杂交中。
它采用nearest neighbor thermodynamic values的方法计算出杂交的温度及寡核苷酸的二级结构。
Oligo软件已经被认可作为一种选择及分析寡核苷酸的工业软件,运用于各种分子生物学中。
最早的商业化的软件在1989年被开发出来。
本文描述了Oligo软件的最重要的特征及性能。
1、主窗口当你运行Oligo、并输入序列之后,Oligo出现了两个窗口:上面的一个为Tm窗口(The Melting Temperature window),下面的一个为内部稳定性窗口(五聚体的DG),还有第三个窗口,即寡核苷酸频率窗口,隐藏在内部稳定性窗口之后。
--图1,2Tm窗口显示了一部分的DNA/RNA的活性片段,Tm的散点图显示了在这个片段中的每20个碱基的Tm值。
分析的片段的长度是可变的,取决于monitor resolution。
圈出来的序列部分及黄色的bar即代表当前分析的20个碱基的Tm值【注:Olig6.71的版本为20个碱基,与原文的21个碱基不同】.可通过点击窗口的左下角的Upper、Lower按钮选择上游引物、下游引物。
划分Tm图二等分的水平线代表了这个序列的所有的21个碱基的寡核苷酸的平均Tm值(or free energy or degeneracy or %GC)。
在Tm图的分别为双链的核苷酸序列及相应的氨基酸【彩色的代表使用的密码子】--图3内部稳定性窗口显示了寡核苷酸的内部稳定性(五具体的自有能)。
可被用于预测用于PCR 或测序反应特异性的把握度2. Analyze - Key Info显示寡核苷酸的基本信息。
--图4,53. Analyze - Duplex Formation显示了上游引物、下游引物的潜在的二级结构的形成。
分子生物学L7-L12问题及答案
L71.gene family:基因家族。
它是指生物基因组中存在的许多来源相同,结构相似、功能相关的一组基因。
其成员可以成簇排列在一起或散布在不同染色体上(或兼而有之)。
2.Alu family:Alu家族,又称Alu序列。
是一种长度约为300 bp的DNA序列,因其第170位置附近都有AGCT 这样的限制性内切酶AluⅠ识别位点,可被限制性内切酶AluⅠ所切割(AG↓CT)而得名。
Alu族序列成员众多,在基因组中重复百万次以上,且广泛散布在非重复序列之间。
3.Satellite DNA:卫星DNA。
是位于真核细胞染色体中,由许多相同或相关的短小重复序列高度串联重复而成的DNA序列区。
它主要存在于染色体的着丝粒部位,通常不被转录。
因其碱基组成中GC含量少,与染色体其他部分DNA相比具有不同的浮力密度,在氯化铯密度梯度离心后呈现与大多数DNA有差别的“卫星”带而得名。
Minisatellite:小卫星DNA。
是一种存在于真核生物基因组DNA中比卫星DNA短的串联重复序列,重复序列单位长度在10-100bp 之间, 且在其重复单元之间并不存在间隔序列。
Microsatellite:微卫星DNA。
它是存在于真核基因组DNA中的一种具有比小卫星DNA更短重复单元(2~4bp)的卫星DNA,重复序列单位长度小于10 bp(一般是2-5,最多为6) ,例如真核生物染色体末端的端粒就是一种微卫星DNA。
STR:短串联重复序列(short tandem repeat,STR),又称微卫星DNA(microsatellite DNA)。
VNTR:(Variable number of tandem repeat),即数目可变的串联重复序列,又称小卫星DNA (Minisatellite DNA)。
4.globin:珠蛋白。
是具有携带氧能力的蛋白质。
如血红蛋白、肌红蛋白、神经珠蛋白、胞红蛋白等。
5.To illustrate the developmental control via example. (via globin)通过珠蛋白阐述发育控制?血红蛋白是脊椎动物红血球的主要成分,其功能是运送氧气和二氧化碳。
实时荧光定量PCR
实时荧光定量PCR目前实时荧光定量PCR已得到广泛应用,如:扩增特异性分析、基因定量分析、基因分型、SNP分析等......荧光定量PCR最常用的方法是DNA结合染料SYBR Green I 的非特异性方法和Taqman水解探针的特异性方法SYBR Green I 的非特异性方法(试剂盒:LightCycler 480 SYBR Green I Master)SYBR Green I是一种结合于所有dsDNA双螺旋小沟区域的具有绿色激发波长的染料。
在游离状态下,SYBR Green I发出微弱的荧光,但一旦与双链DNA结合后,荧光大大增强。
因此,SYBR Green I的荧光信号强度与双链DNA的数量相关,可以根据荧光信号检测出PCR 体系存在的双链DNA数量。
一、实验前准备:实验试剂及耗材:试剂:特异性PCR引物,新鲜提取备用的总RNA试剂盒:Transcriptor First Strand cDNA Synthesis Kit、LightCycler 480 SYBR Green I Master1号管包含:热启动Taq DNA Polymerase、反应缓冲液、dNTP mix、SYBR Green I染料、MgCI2仪器及耗材:罗氏LightCycler 480全自动实时定量PCR仪以及配套使用的48或96孔板;Thermo Scientific Arktik PCR仪、F1单道移液器、冰盒、QSP盒装吸头等正式实验开始前,冰上解冻各个试剂【注意:SYBR Green I Master 需要避光放置】二、反转录实验操作时注意:所有RNA相关的操作均需要佩戴手套,防止RNase污染。
严格按照试剂盒使用说明进行相关操作。
按照体系配方在冰上的Rnasefree的灭菌PCR管中配置Templateprimer mix,总体系13ul。
本实验是联合使用anchored oligo dT引物和随机六聚体引物进行的反转录。
- 1、下载文档前请自行甄别文档内容的完整性,平台不提供额外的编辑、内容补充、找答案等附加服务。
- 2、"仅部分预览"的文档,不可在线预览部分如存在完整性等问题,可反馈申请退款(可完整预览的文档不适用该条件!)。
- 3、如文档侵犯您的权益,请联系客服反馈,我们会尽快为您处理(人工客服工作时间:9:00-18:30)。
Oligo使用方法介绍作为目前最好、最专业的引物设计软件,Oligo的功能很强,在这里我们介绍它的一些主要功能:如:普通引物对的搜索、测序引物的设计、杂交探针的设计以及评估引物对质量等等。
在正式进行引物设计前,我们首先面临的一个任务就是向Oligo程序导入模板序列,根据不同的实验情况,导入模板有三种方法:1,直接用键盘输入:a,点击file菜单中的New Sequence 浮动命令,或直接点击工具栏中的New Sequence命令,进入序列展示窗口;b,此时即可键入DNA序列;c,如果需要的话,Oligo提供碱基回放功能,在边键入时边读出碱基,防止输入错误。
点击Edit菜单中的“Readback on”即可。
2,利用复制和粘贴:当我们序列已经作为TXT文件存在或其它oligo不能直接open的文件格式,如word文件.html格式,这个功能就显得很有用了。
在相应文件中复制序列后在序列展示窗口粘贴,oligo会自动去除非碱基字符。
当序列输入或粘贴完成后,点击Accept/Discard菜单中的Accept浮动命令,即可进入引物设计模式。
3,如果序列已经保存为Seq格式或者FASTA,GenBank格式时,oligo就可以直接打开序列文件。
点击File菜单中的“Open”浮动命令,找到所需文件,打开即可。
进入引物设计模式后,oligo一般会弹出三个窗口,分别是6-碱基频率窗口,碱基退火温度窗口以及序列内部碱基稳定性窗口,其中的退火温度窗口是我们引物设计的主窗口,其它的两个窗口则在设计过程中起辅助作用,比如6-碱基频率窗口可以使我们很直观地看到所设计引物在相应物种基因组中的出现频率,如果我们的模板是基因组DNA或混合DNA时,该信息就显得有用了,而内部稳定性窗口则可以显示引物的5’端稳定性是否稍高于3’端等。
一,普通引物对的搜索:以Mouse 4E(cDNA序列)为例。
我们的目的是以Mouse 4E(2361 bp)为模板,设计一对引物来扩增出600-800bp长的PCR产物。
1,点击“Search“菜单中的”For Primers and Probes“命令,进入引物搜索对话框;2,由于我们要设计的是一对PCR引物,因此正、负链的复选框都要选上,同时选上Compatible pairs。
在Oligo默认的状态下,对此引物对的要求有:a,无二聚体;b,3’端高度特异,GC含量有限定,d,去除错误引发引物等。
3,剩下的工作是确定上、下游引物的位置及PCR产物的长度以及引物设计参数。
①单击:“search Ranges”按钮,弹出“Search Ranges”对话框。
输入上游引物的范围:1-2000,下游引物的位置:100-2300;PCR产物的长度600-800bp。
②单击“Paramaters”按钮进入“Search Parameters”对话框,对话框种分三个活页,分别是:不同设定,参数以及更多参数。
③在“普通设定”窗口,为我们提供了对引物非常直观的设定方法,从高到低分六个等级,最后还有一个用户定制选项。
④当我们对引物的各种参数的含义及应该设定多大值并不是特别清楚时,就可以直接设定Very high/High等来完成对引物设计参数的设定。
⑤当我们选中“Automatically Change String”后,Oligo会在引物搜索过程中:如果在高等级设定中无法找到引物对时自动降低一个定级来进行搜索,知道找到引物对。
在设计反向PCR 引物对时,就选中“Inverse PCR”复选框。
⑥我们还可以让引物的长度可以改变,以适应设定的Tm值或PE?(Prime Effitions,引发效率)。
也可以限定所选引物对的最大数目。
⑦在“Parameters”窗口中,实际上需要我们改动的只有引物的长度,根据试验的要求作相应的改变,如23nt。
其他参数就使用Oligo的默认值,一般无需改变。
在“More Parameters“窗口中,一般也无需作任何改变,直接用Oligo的默认值。
4,点击“确认”-“Ok”进入搜索窗口,再次单击“OK”后,Oligo自动完成引物对的搜索,并出现一个搜索结果窗口。
显示出得到的引物对数目。
5,点击“Ok”,出现“PrimerPairs”窗口,在窗口中列出了7对引物的简单信息,引物位置,产物长度,最佳退火温度及GC含量。
单击“Sort”按钮,可以按产物长度,最佳退火温度及GC含量从小到大或从大到小的顺序排列。
6,点击任意一对引物,在旁边马上弹出一个叫“PCR”的窗口,在窗口中我们可以看到这对引物在模板中的大概位置,最佳退火温度(该温度可以直接应用于我们实际PCR中的第二步退火)。
另外还有引物的Tm值,GC含量,引发效率,同时还计算出了产物的Tm值于引物Tm值的差异以及引物间Tm值的差异。
一般我们尽量保持前者在20度以内,后者在5-6度以内。
点击不同的引物对时,PCR窗口内容同时作相应的改变。
7,要想了解引物的详细信息,如二聚体,发卡结构形成情况、组成、Tm值和错误引发位点等,这时只需点击“Analyze”菜单中的相应命令,就可以分别得到相关信息。
例如点击“Duplex Formation”,我们就可以得到上游引物间,下游引物间及上下游引物间形成二聚体的情况。
同理,“Hairpin Formation”,“Composition and Tm”,“False Priming Sites”等命令就可以显示出相关信息。
所有这些分析的结果都有助于我们从Oligo搜索得到的多对引物中选择最佳的引物对。
需要说明的是,1,如果一次搜索得到的引物对太多时,我们可以适当提高选定的条件和规定更合适的搜索范围来减少引物对数;2,引物一般尽量不要在3’端或是离3’端太近的位置形成二聚体,同时二聚体的自有能绝对值尽量小于10;3,对于错误引发,在普通PCR中,如果引发效率在160 points以上时,就可能出现杂带,在测序反应中,错误引发效率则应该严格控制在120 points以下。
8,Oligo中每对引物的详细信息可以直接导出为一个文本文件:首先点击“File”菜单中的“Print/Save Options”,在出现的对话框中的普通设定选中“Selected”;在“Analyze I”中选择需要保存的信息,在“Analyze II”中选中PCR。
单击确定按钮退出,这时再次点击“File”菜单,Save浮动命令中的“Data Save as”,选择路径及文件名即可。
二,测序引物的设计:在oligo中,测序引物设计过程与普通引物设计大部分都很相似。
还是以Mouse 4E为例,假如我们要在600-800bp的位置设计一条测序引物。
Open-Search在“Search”窗口中,选中“Sequece Primer”,同时去除负链Search的选中在“Search Range”窗口,输入正链的600-800bp在“Parameters”中选定very high ,引物长度改为18bp结果得到11条测序引物,与普通引物同理,根据其详细信息就可以挑选到一条最佳的测序引物。
三,探针的设计:探针的设计与测序引物设计基本相同,只需使“Search”窗口的探针设计选中,改变探针的长度就可以。
四,评估引物对:我们在各种文献中查到的引物,如果直接进行PCR,往往很难重复别人的实验结果。
这时就想到,是不是引物的质量有问题?能不能用软件来对这些问题引物进行一些分析呢?答案时肯定的。
1,点击File菜单中的New命令;2,在“Edit New Sequence”的窗口中用键盘输入上游引物;3,如果该引物的首位置不是1的话,可以在“Edit”窗口中输入新的5’端位置数字,如20;4,点击Accept/Discard菜单的Accept命令;5,如果引物序列长度不同于当前的引物的话,可以从“Change”菜单中改变当前的引物长度;6,选取当前序列为上游引物(点击“upper”按钮);7,从Edit菜单中选取“Lower Primer”命令,在Edit Lower窗口中输入下游引物的序列;8,在Edit窗口的上角处,输入相应的5’位置;9,选取“Accept and Quit”命令;如果想让程序给出最佳退火温度,在此时的对话框中输入PCR产物的长度以及GC含量所占百分比,一般哺乳动物的cDNA序列中GC大约占44%。
10,点击OK就可以在“Analyze”菜单中完成各种分析了。
心得yvette wrote:对于作PCR的来说,最难的莫过于设计引物了,理论现在已经很多了,但是真正实践起来是要付出一定的心智的,记得曾经看到某一位主任说他设计了上千对引物,从没有失手的时候,真是让我佩服得五体投地。
最近看了一下OLIGO6.0的使用说明,英文的,感觉有很多地方还是讲得不很明白,比如Nested primers design 及multiplex PCR Primer design.下面我先来讲讲普通的利用OLIGO 设计引物的方法吧:1 从文件菜单打开模板序列,当然,不是随便什么序列都可以打开的,要有特定的格式,一般扩展名为*.seq的序列可以直接打开,或者就从文件菜单选择new sequence打开一个空窗口,然后利用复制/粘贴也可以导入模板序列,或者直接在该窗口中写,然后要打开文件菜单旁边的accept 菜单,选accept就可以了;这时候有三个窗口,重叠在一起,很不方便看,可以从window菜单选Tile,这样,三个窗口就平行排列了。
2 从search菜单选primers and probes,打开了引物搜索窗3 点黑PCR下面的compatible pairs 前面的小圆孔4 在oligonucleotide with GC clamp 及Eliminate false priming 前的小方格里打上勾5 如果在PCR中可能存在其他的模板,要想使所设计的引物与该模板不会形成错配,可在And continue above search in other files 的条目前方格中打勾,这时会出现一个新的select files窗,导入可能会形成错配的模板序列。
点OK6 点Search ranges按钮,输入你想要的上游和下游引物在模板序列上的区间及想要的产物的长度,点OK7 点parameters 即引物参数按钮,一般将搜索严谨性设为high,如果搜不到,再降低严谨性,另外,在adjust length to match Tm's前的方格中打勾。
点OK8 点击OK开始自动搜索9 搜索完成后,在search status窗口的下部选show:primer primers, 点OK10 得到的引物可以根据位置、长度、退火温度及GC含量进行排序(sort)11 点击您所想要的就打开了一个窗口显示引物的位置、退货温度、GC含量、PE(Priming efficiency 引发效率)等。