SuperSleep紫光物联智能睡眠监测系统说明书
智能家居系统说明书.pdf_1718157109.9943464

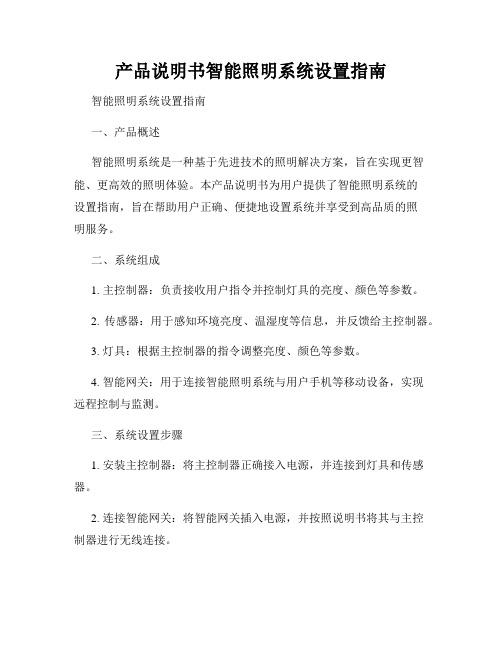
connect everythingSECURITY ALARMMotion sensor Noise sensor Shock sensor T ouch keypadMulti-sound alarm siren Photo and video messages 24/7 central monitoringRemote control with smartphoneTHERMOSTATGas/floor heating T emperature meterExterior temperature meter Air condition controlRemote control with smartphoneIP CAMERA2 megapixelsLive video stream H.264Motion and scheduled recordingsRemote control with smartphoneHOME AUTOMATIONRemote control with smartphone Online rule creator Scene manager Room managerZ-Wave, ZigBee, Nest, Philips Hue,Sonos, Bluetooth...INTERCOMSIP server client Door phone control Conference calls Video callsDual-network IP connectivityRemote control with smartphoneWALL PANELRoom temperature Room illuminance Room humidity Weather forecast Sticky notes News stream Photo frameEmail, Skype, browser Multimedia controlScene controller with 6 buttonsELDERL Y CAREMotion sensor Noise detectorAutomatic check calls Panic button with auto call Sound remindersVideo and voice callsOne device = complete home control and automationWiFiZIPATILEA L L I N O N EAPPLICATIONSSecurity System ThermostatElderly Care System Home Automation Video Monitoring IntercomRoom ControllerSYSTEMARM Cortex-A9, Quad-core 1.6GHz CPU 1024MB RAM 8192MB FLASH A ndroid 5 Lollipop NETWORKWi-Fi 802.11 b/g/n Ethernet (with optional adapter) Bluetooth 4.0 P hilips Hue Sonos NestZ-Wave+ (500 series) Z igBee HA SENSORSN oise Light Humidity Temperature Motion ShockPOWERPower input: 5VDCPower supply input: 100-240VAC, 50/60Hz Power usage: <2W (Idle), 7W (Max.) B ackup battery: Li-Ion 3.7V 2000mAh INPUT/OUTPUTT ouch sensitive 8” screen, 800x1280 px 6 programmable scene buttonsDry output 230VAC, 1A (EU: 2x; US: 3x) Dry input 12-24VDC (only EU version)External temperature sensor (1-Wire DS18B20) 2MP video camera Muti-sound alarm siren SD cardSpeaker 8Ω/1.5W MicrophoneACCESSORIESI n-Wall power supply W all socket adapter Wall holder Screws Table standQuick start guidePHYSICAL DIMENSION8.05(W) x 8.05 (H) x 0.55 (D) inches 205(W) x 205(H) x 14(D) millimeters WEIGHTN etto: 579g (20.4oz)Brutto: 1,121kg (39.54oz)ENVIRONMENTALOperating temperature: 0°C to 40°C (32°F to 104°F) Storage temperature: -25°C to 70°C (-13°F to 158°F) Humidity: 5% to 95% non-condensing REGULATIONSafety: UL power supply CE, FCC, IC ROHS, REACH MODELSzt.zwauzbee Black Australiazt.zweuzbee.b Black United Kingdomzt.zweuzbee.g Black Europe zt.zwinzbee Black India zt.zwiszbee Black Israel zt.zwruzbee Black Russia zt.zwuszbee Black United States zt.zwauzbee.wht White Australiazt.zweuzbee.b.wht White United Kingdomzt.zweuzbee.g.wht White Europe zt.zwinzbee.wht White India zt.zwiszbee.wht White Israel zt.zwruzbee.wht White Russia zt.zwuszbee.wht WhiteUnited StatesWARRANTY1 year standardTECHNICAL SPECIFICATIONZipatile is the complete home control system in a form of a single device. It can easily be mounted on any wall, in any home. Featuring large number of built-in sensors and hardware modules, ZipaTile will replace numerous home devices such as security system, thermostat, automatic controller , IP camera, alarm siren orintercom, and bring them together in one, smart and beautiful device.ZIPATILE。
商品说明书智能手环的功能介绍与操作指南

商品说明书智能手环的功能介绍与操作指南商品说明书:智能手环的功能介绍与操作指南智能手环是一种结合了传感器、计算机和通信技术的智能穿戴设备,它可以监测人体各项生理指标,并与智能手机等设备实现数据同步和信息交互。
本商品说明书将详细介绍智能手环的功能和操作指南,帮助用户更好地了解和使用该产品。
一、功能介绍1. 健康监测功能智能手环搭载了多种传感器,包括心率传感器、血压传感器、睡眠监测传感器等,能够实时监测用户的心率、血压、睡眠质量等健康指标。
通过手机APP与手环进行连接后,用户可以清晰地了解自己的身体状况,并据此进行科学合理的运动和健康管理。
2. 运动记录与分析功能智能手环具备运动记录功能,可以准确地记录用户的步数、运动距离、卡路里消耗等数据,并可通过手机APP进行数据分析,帮助用户了解自己的运动情况和趋势。
在日常生活中,用户也可以通过手环来设置运动目标,并根据手环的提醒进行督促和规划。
3. 来电和信息提醒功能智能手环与手机通过蓝牙连接后,可以自动同步手机上的来电和信息提醒,用户可以在手环上直接查看来电和信息的相关信息。
当手机在静音或离身时,手环还能通过振动提醒用户不错过重要的来电和信息,有效增加了用户的使用便利性。
4. 远程拍照功能智能手环还具备远程拍照功能,用户只需将手机放置在一定距离的地方,然后通过手环上的拍照按钮就可以远程控制手机拍照。
这项功能在自拍、团体合照等场景下非常实用,为用户带来了便捷和乐趣。
二、操作指南1. 下载并安装相关App首先,用户需要在手机应用商店中下载并安装与手环对应的APP,例如“智能手环助手”。
安装完成后,打开APP并按照指引进行注册和登录。
2. 绑定手环与手机确保手机的蓝牙功能已打开,然后打开APP,点击“设备连接”或类似的选项。
手环进入配对模式后,APP将会搜索到手环,点击连接并按照提示进行配对,直到成功连接。
3. 设置个人信息和健康目标在APP上进入个人设置页面,填写个人信息,如性别、身高、体重等。
智能运动手环说明书

智能运动手环说明书开始使用一、手环操作模式1、单击:界面切换2、长按:确认/退出、切换模式3、触摸有效区域见下方示意图:4、开机:长按手环触摸区域3秒以上开机。
5、关机:点击手环触摸区域切换到关机页面,长按弹出“YES”与“NO”选项,选择“YES”,长按后关机。
关机界面可查看手环的蓝牙名称、版本号、蓝牙ID末4位数。
6、当电量低时,电量图标能量格数减少到最后红色一格时,会有震动提示,表示手环低电压,请及时为手环充电。
以免由于电量低,系统自动关机引起运动数据丢失。
7、手环短表带连接处拔开后可见USB充电插头,插入标准5V充电器USB口进行充电。
8、充电时间约1.5小时,充电完成后显示会跳转到时间界面。
长期不使用,请务必关机并保证每1个月补充电1次,定期清洁USB插头端的金手指,减少接触不良引起不充电。
二、下载应用与连接APP操作1、手环需要应用支持才可以与手机相连,可通过二维码先扫描下载应用。
Google Play App IOS App Android App2、安卓系统可通过Google play搜索WearHealth下载应用,IOS系统可通过App Store搜索WearHealth下载应用。
手机操作系统最低要求为安卓4.4,IOS 系统8.2版本以上。
3、手环与APP连接:第一步:打开手机蓝牙,第二步:下载“Wear Health”APP应用,按要求注册个人帐号,或使用第三方帐号登录。
第三步:打开“Wear Health”APP应用界面,在“我的”选项界面,点击“连接手环”来搜索手环的蓝牙设备”。
找到需要连接的蓝牙名称点击连接,连接成功后手环的时间界面会出现“蓝牙图标”,手环会同步手机时间,同步各项运动数据等。
如不确定蓝牙名称,可以把手环切换到关机界面查看手环蓝牙名称与蓝牙地址(未连接手机时,手环不会显示蓝牙图标.)。
三、解绑APP操作1、安卓手机解绑方式:在“Wear Health”APP手环管理界面点击“断开手环连接”。
智能仪表操作说明

智能仪表操作说明仪表操作面板如下:调整键:数据调整增加键校零键:数据左移键设置键:功能选择一.通讯参数设置密码0485一).输入密码:测量状态下按设置键,屏显示按设置键确认后,屏显示“0000S 最右边闪烁,按调整键(数据增加键)5次,屏显示“0005”,按校零键(数据左 移键),屏显示“0005S 十位闪烁,按调整键(数据增加键)8次,屏显示“0085笃 按校零键(数据左移键),屏显示"0085^ 口位闪烁,按调整键(数据增加键)4 次,屏显示“0485”,按设置键确认后进入通讯参数设置界面 二入 选择地址编号,范围为001〜255屏显示“addr”,按设置键显示“001”(上次设置值,这里是001,也可能是 1 到255之间的任意值),通过校零键(数据左移键)和调整键(数据增加键)来设 置地址数值(范围1-255),设置好后按设置键显示“bps”・ 三人选择波特率:按设置键显示1200S 通过校零键(数据左移键)和调整键(数据增加键)来调整 波特率,调整好后按设置键,设置好的参数写入EEPROM,系统回到测量模式。
四)、奇偶校验:按设置键显示bl ・“x”按调整键选择:N :无校验E :偶校验 O :奇校验二.仪表基本参数设置 密码0101'C KPa Mpa m 012 3 0代表无小数点3代表3位小数点 CY —X X 为 2. 3.5 YP1显示点1 (零点) YP2显示点2 YP3显示点3 YP4显示点4 范圉・1999-9999YP5显示点5(满量程)范围-1999—99991. YC 选择仪表单位2. Yd 选择小数点3・选择系统采样点4. 5. 6. 7. 8. 范围-1999-9999范围-1999-9999范围-1999-9999注:5个显示点的设置必须等间隔如:传感器为压力传感器0…50MPa,YC选MPa, Yd选2, YP1选00.00.YP2 选 12.50.YP3 选 25.00.YP4 选 37.50.YP5 选 50.00。
产品说明书智能照明系统设置指南
产品说明书智能照明系统设置指南智能照明系统设置指南一、产品概述智能照明系统是一种基于先进技术的照明解决方案,旨在实现更智能、更高效的照明体验。
本产品说明书为用户提供了智能照明系统的设置指南,旨在帮助用户正确、便捷地设置系统并享受到高品质的照明服务。
二、系统组成1. 主控制器:负责接收用户指令并控制灯具的亮度、颜色等参数。
2. 传感器:用于感知环境亮度、温湿度等信息,并反馈给主控制器。
3. 灯具:根据主控制器的指令调整亮度、颜色等参数。
4. 智能网关:用于连接智能照明系统与用户手机等移动设备,实现远程控制与监测。
三、系统设置步骤1. 安装主控制器:将主控制器正确接入电源,并连接到灯具和传感器。
2. 连接智能网关:将智能网关插入电源,并按照说明书将其与主控制器进行无线连接。
3. 下载APP并注册账号:在手机应用商店下载智能照明系统的控制APP,并按照指引完成账号注册与登录。
4. 添加设备:在APP中选择“添加设备”功能,根据提示将主控制器和传感器添加到系统中。
5. 设置场景:根据自己的需求,创建不同的照明场景,并在每个场景中设置相应的灯光亮度、颜色等参数。
6. 远程控制:用户可以通过智能网关将系统连接到互联网,并远程控制照明系统的开关、亮度等参数。
四、使用技巧1. 场景定时:用户可以根据自己的作息时间,在APP中设置定时开关,实现智能照明系统的自动调节。
2. 语音控制:对于支持语音控制的智能设备,用户可以通过语音指令来控制智能照明系统的开关、亮度等参数。
3. 联动控制:用户可以将智能照明系统与其他智能设备(如智能音箱、智能门锁等)进行联动控制,实现更智能、便捷的居家体验。
五、注意事项1. 防水安装:在安装灯具时,请注意选择适合安装环境的防水等级,确保系统正常运行。
2. 维护保养:定期清洁灯具表面,确保其发光效果良好;及时更换电池等易损件。
3. 电源稳定:请确保系统所连接的电源稳定,避免由于电压不稳造成的系统异常。
学校用智能家居物联网实训系统使用说明书

学校用智能家居物联网实训系统使用说明书1、简介智能家居系统以中央控制器网关为核心,以及外围被控家用电器组成,适用于家庭大部分区域场所应用,实现灯光,窗帘,智能插座,电视等的智能化控制。
系统通过有线或无线家庭网络组网和RF射频通讯技术,实现对家电设备的无线控制。
智能家居系统网关,是微分电子研发的一个linux系统的嵌入式网关,硬件平台采用4核心cortext-armA9处理器,实现了生活中家居以及设备的智能化管控,主要功能有:房间管理,房间中的电器设备管理,家电管理,安防管理,自定义场景切换,家电红外学习、智能插座以及能源管理,娱乐。
智能手机通过客户端连接到该网关,可实现手机控制家用电器、点灯、开关、安防监控,火灾和入侵报警等。
2、系统使用说明1.系统供电打开实验台子上的电源开关,为整个实验台供电.工位路由器SSID为smarthome+工位编号,工位编号在右上角标签纸。
2.设备入网供电后,若网关完全启动,出现以下界面:主界面若设备已经入网过则无需再次进行此项操作打开用户设置->工程维护->传感网组网工程维护点击【允许入网】按钮后让传感器节点依次发起入网。
此过程中可以点击【刷新】按钮,刷新显示新入网的设备(ZigBee设备),直到所有设备都入网之后,点击禁止入网,以免其他非法设备入网;“IP设置”选项点击后,可进入网关IP地址设置界面设置IP地址;ZigBee设备入网操作1.光照传感器组网功能:需要针型物品按下内部功能按键。
指示灯状态:没有入网时:红色指示灯常亮入网成功后:红色指示灯熄灭恢复出厂设置时:红色指示灯闪烁恢复出厂功能:长按黑色按键直到红色LED灯闪烁,松开按键。
2.人体红外传感器组网功能:图中红色框中的位置使用针型物品按下内部按键,短按按键实现组网。
红色指示灯:上传一次有人报警,红色LED闪烁一次。
黄色指示灯:没入网:黄色指示灯常亮;入网成功:黄色指示灯熄灭;恢复出厂时:黄色指示灯闪烁;恢复出厂设置:图中红色框中的位置使用针型物品按下内部按键,长按按键直到从正面看到黄色LED灯闪。
深圳市拓普瑞 无线智能仪表监测终端用户使用手册说明书

无线智能仪表监测终端用户使用手册深圳市拓普瑞电子有限公司版本:A发行日期:2019.7.26目录1安全指南 (4)1.1安全图标 (4)1.2安全注意事项 (4)1.3应用范围 (4)1.4安装和调试操作 (4)2概述 (5)2.1产品特点 (5)2.2规格型号 (6)2.3数据上传 (8)2.3.1传时间间隔 (8)2.3.2波动阈值 (8)2.3.3低报警值 (8)2.3.4高报警值 (8)2.3.5在线数据 (8)2.3.6离线数据与补发 (9)2.3.7报警信息 (9)3安装 (9)3.1外形尺寸 (9)3.2安装注意事项 (11)4调试操作 (12)4.1按键与操作说明 (12)4.2连网 (12)4.3远程监测 (13)4.4安装SIM卡 (14)4.5更换电池 (14)4.6配置IP等主要信息 (14)5运输、贮存 (14)5.1运输 (14)5.2贮存 (14)5.3产品标识 (14)6保修 (14)7故障诊断与排除 (15)8保修 (16)1安全指南1.1安全图标为了您能更好地应用这份说明,以及保障你在调试,运行和维修这台仪器时的安全,请注意下列警告注意1.2安全注意事项提示1、本设备的设计满足先进的安全要求,通过出厂测试,出厂时操作安全有效。
本设备遵守相关的法规和标准。
2、本设备制造商保留在修改技术参数时不提前通知的权利。
3、必须遵守允许的存储、运输和操作温度。
4、必须遵循设备上附带的警告标志、铭牌和接线图中所含的信息。
1.3应用范围本设备主要应用于供水、排水、消防水系统、天然气、石油管道相关远程监测应用。
注意1、除本手册规定的应用范围,其它任何应用范围均会对人员和整个测量系统的安全造成威胁,禁止使用。
2、制造商对于操作不当或者非指定用途引起的损害不承担责任。
1.4安装和调试操作注意1、本设备只能由经过培训的合格专业人员(如电工)进行安装、连接、调试和维护,并需要完全遵守《用户使用手册》指引、相关应用规范、法律法规要求中的规定,并具有相应的资质证书(与应用条件相关)。
Swann 智能监控系统用户手册说明书

© Swann 2014AThe SwannView Link Mobile App ENHave a Smartphone or Tablet? With the free SwannView Link app, you can turn your iOS or Android mobile device into a monitoring centre for your DVR. Have the peace of mind that you can monitor your home at any time from any place. With “SwannLink” Peer to Peer technology, connecting your mobile device to your DVR is so easy - there’s no need to fiddle around with complicated network configurations. Best of all, it only takes minutes to get it up and running!Scan these QR codes to download the relevant app for your mobile device. You can also go to your relevant app store and type in the following - “SwannView Link” for Handsets and Tablets. Follow the on-screen instruc-tions for installation and accept any license requirements that may appear.iOS AndroidB Setting up your Handset or TabletThe screenshots used on this page are from the Android version of SwannView Link. The functions, buttons and overall look and feel are identical for the iOS version.After downloading and installing SwannView Link on your Handset or Tablet,locate the app and tap the icon to run. Take your mobile device over to yourDVR and follow the instructions provided.The SwannView Link app is continu-ally being tweaked and improved, sothe following screenshots may differslightly.123Tap “Menu” to open the menu bar.Tap “Device” to open the de-vice list.Tap “+” to add your DVR.456Tap the QR code icon to open the scanning page, and then hold your mobile device over the QR code sticker located on top of your DVR to scan.The UID of your DVR will au-tomatically be entered sim-ilar to the one shown in theabove screenshot.Tap “Device Name” to nameyour DVR. Enter the pass-word (default 12345) or theone that you created in thesetup wizard.789Tap the “Save” button at the top-right to save and verify the connection.Tap the “Start Preview” but-ton. The app will test yourconnection and then con-firm the number of channelsavailable.When you have successfullyconnected, you will see a liveview of all your cameras con-nected.C Using SwannView LinkWow, that was easy! Start getting yourself familiar with the con-trols and impress your family and friends. A brief description ofthe various buttons and functions can be found below.Double tap one of the cameras to view fullscreen. Double tap again to return.1. Menu2. Camera List3. Live View (active cameras)4. Alarm Menu5. Group Indicator6. Snapshot7. PTZ Control 8. Stop/Start all Cameras9. Stop/Start selected Camera10. Record selected Camera11. Enable/Disable Audio12. Video QualityThe PTZ function requires a PTZ cam-era to be connected. The audio func-tion requires a camera with a built-in microphone.1. Menu - Opens the menu to allow you to select the various dif-ferent menu screens.2. Camera List - Gives you access to the camera list which allows you to enable or disable the cameras available.3. Live View - The Live View screen. A red border will surround the currently selected camera.4. Alarm Menu - Tap this to access the alarm menu (see page 8).5. Group Indicator - SwannView Link can display up to 4 channels at a time. The white dot shows which group of 4 cameras you are currently viewing. Swipe left or right to change.6. Snapshot - Takes a snapshot of the currently selected camera and it saves to your mobile device.7. PTZ - Tap this to control any PTZ camera that is connected.8. Stop/Start all Cameras - Tap this to stop the live view of all cameras. Tap again to restart all cameras.9. Stop/Start selected Camera - Tap this to stop the currently selected camera. Tap again to restart.10. Record selected Camera - Records video from the selected camera to your mobile device.11. Enable/Disable Audio - Tap this to enable or disable audio.12. Video Quality - Tap this to access the video quality menu. This will change the live view image only. You can select either a clear image or fluent movement.1. Live - Takes you back to the Live View screen from any other screen.2. Video Playback - Takes you to the video playback page where you can playback video that you have previously recorded to your mobile device or remotely from your DVR or NVR.3. Device - The Device Management screen where you can add, edit or remove your DVR.4. Help & About Us - Tap this to access the built-in manual as well as the version information.Alarm MenuEnable Push - Tap this if you would like to receive notifications from the DVR when the alarm sensors have been activated. Disable Push - Tap this to disable notifications.Arm - Tap this to enable all sensors. This means any movement within the vicinity of the PIR sensor or if a door or window has been opened will alert the siren to be activated.Home - Tap this to enable the door/window sensors only. This enables movement within the house but if a door or window has been opened, it will alert the siren to be activated.Disarm - Tap this to disarm all sensors.DVideo Playback Done0:30-0:15Drag the slider left or right to adjust the vol-ume.Tap and drag to skip to a specific part of the video.Tap to play or pause playback.Tap this to return to the Video Play-back page.Tap this to initiate full screen playback.Turn your mobile device horizontally todisplay the video in the correct aspectratio.© Swann 2014AWant to view your cameras from your PC? The SwannView Link software located on the CD that is included inside, allows you to access and control your DVR from the comfort of your computer. Best of all, it only takes minutes to get it up and running!SwannView Link for Windows ENTake the CD from its sleeve andplace it in the CD drive of yourcomputer. You will see the fol-lowing “AutoPlay” message on-screen. Click “Open autorunmenu” to begin installation ofthe SwannView Link software.“AutoPlay” not working? This indicates that “Autoplay” is disa-bled. To access the installation menu, open ”Computer” from the “Start Menu” and find the CD icon that has the Swann logo on it. Double click to see its contents. You will see a program with a blue CD icon called “swannmenu.exe”. Double click this to begin installation of the SwannView Link software.Click on “Install SwannView Link PC Moni-toring Software” to commence installation.1234 Click “Next” to begin.Accept the Start Menu name, click“Next”.Click “Next”.Select a location for the SwannView Link shortcut, click “Next”.Now that SwannView is installed, you can use it to view, playback and config-ure your DVR from the comfort of your computer. To connect, simply click on the device name, enter the password (default 12345 or the password you created previously) and click “Login” to connect.567Click “Install” to install the software.The “Search & Login” window allows you to login to your DVR.Click “Finish” to complete the installa-tion.DVR 192.168.99.1679000The SwannView Link software allows you to control your DVR from within the same network (this usually means in the same building) or remotely over the Internet. The following instructions will explain what you can do and which buttons control what functions.B Using SwannView LinkDVR192.168.99.1679000If you don’t have Swann-View Link running, locate the shortcut on your com-puter’s desktop and double click to run. You will see the following screen. In the example shown, the DVR is automatically detected on the same network as the computer.12Click “Search” to see the DVR on yournetwork.DVR192.168.99.1679000Your DVR will be displayed. Click this to select.3DVR192.168.99.1679000*****To connect, you need to login. You can use the default user name admin, or you can use a different name. Next, enter your pass-word 12345, or use the password you creat-ed during the setup wizard.If you are connecting to the DVR on the same network, select “Main Stream” under Stream Type. If you are connecting over the Internet, select “Sub Stream” which will run smoother for remote viewing.Click “Login” to connect.C UID Mode & IP Address ModeDVR192.168.99.1679000Let’s explain the differences between UID mode and IP address mode.UID Mode (top): H ere we have selected UID mode. This mode provides the option of connect-ing to your DVR without the working knowledge of networking to connect over the Internet. The UID is provided on the sticker located on your DVR or from the email you sent yourself during the setup wizard. Use this mode if your DVR is in a different location to your computer (e.g. DVR at home; computer at work). For Stream Type se-lect “Sub Stream”.IP Address Mode (bottom): This is the standard method of connecting your DVR to your computer provided they are located on the same network. This mode normally requires a working knowl-edge of networking to connect over the Internet. Don’t use this mode if your DVR and computer are in different locations.D Configuring SwannView LinkYou can configuremost settings on theDVR from the com-fort of your comput-er. The screenshot onthe left will give yousome idea of the dif-ferent options you canaccess when you clickon the “Device Set-tings” button.When making chang-es, click “OK” to savechanges to the DVR,and then close thesettings window to re-turn to Live View.For more details and instructions,please have a look at the full usermanual located on the CD.E Viewing your Cameras03/12/2013 10:30:15 Tue03/12/2013 10:30:15 Tue03/12/2013 10:30:15 Tue03/12/2013 10:30:15 Tue1234567891. Start Live View2. Stop Live View3. Snapshot4. Video Capture5. Previous Page6. Next Page7. Volume8. Screen Mode9. Full ScreenExpand this tosee Basic Set-tings such asbrightness andcontrast.Advance Set-tings allowsyou to alterhow each cam-era adapts todifferent lightconditions forday and night.Double-click the mouse on one of the cam-eras to view full screen. Dou-ble-click again to return. Preview mode allows you to watch all your cameras live on your computer.FRemote Playback03/12/2013 10:30:15 TueCamera 1Select a cam-era you want to search.Select a start & end for the date and time then click the search button.After search-ing, select a file to play.Play/Pause, Stop, Step Forward, Snapshot, Download and Play-back Speed Control.You can use the mouse to jump to a different segment of vid-eo located on the timeline.You can adjust the volume level or mute the audio.。
- 1、下载文档前请自行甄别文档内容的完整性,平台不提供额外的编辑、内容补充、找答案等附加服务。
- 2、"仅部分预览"的文档,不可在线预览部分如存在完整性等问题,可反馈申请退款(可完整预览的文档不适用该条件!)。
- 3、如文档侵犯您的权益,请联系客服反馈,我们会尽快为您处理(人工客服工作时间:9:00-18:30)。
手机未连接网络
将手机连接上 WiFi、 GPRS 等数 据通 信网 络。
注册 账号了 但是 没有 为账 户添 加 在设备管理下添加设
没有数据
设备
备。
无法 看到昨 夜的 数据没有同步
在 睡眠 报 告 界面 下 拉
分析数据
一下页面,同步数据。
有人 但是实 时界 传感 器连 接线 掉 检查传感器连接线是
面没有数据
了
否连接好;
通讯故障
请检查网络连接是否 正常。
11 客户须知
1.本产品定位为对睡眠进行监测并提出预防建议的辅助产品, 请谨记本产品并不是医疗设备或者防猝死的设备,使用者不 应该完全依赖设备而忽略对被监测者的照顾。对于有疾患的 使用者,家人应不时亲自检查被监测者的情况。 2.此产品不适用于戴心脏起搏器的人群,请谨记! 3.该产品内置传感器,过度弯折可能会损坏传感器。 4.请勿将产品接触高温设备,请勿和电热毯等设备仪器使用。 5.请勿将传感器丢入水中,如有脏污可使用湿毛巾擦拭。 6.传感器适用于平坦稳固的表面,请勿将传感器放置于 有活动功能的床上(如吊床),此举可导致传感器不能发 挥其正常功能。 7.如长期不使用本品,请断开控制器电源,可把传感器卷 起来存放,切勿把传感器折叠、压缩收纳,容易导致产品 损坏。 8.以上所有提到WiFi字样的信息,只针对WiFi版产品才拥有。 9.GPRS版设备出厂已经内置一张SIM卡,客户可以免费使用 一年,期满后请和我司联系续费事项。
检测垫 重量
700mm*240mm*1mm 150g
供电方式
DC 5V 1A
通讯方式
WiFi/GPRS/Zigbee(可选)
软件平台
Andro上)
*所有技术信息以实际性能为准,我司保留最终解释权。
10 常见问题
问题
原因
解决方法
账号无法注册
修普诺斯睡眠监测系统说明书 V1.3
紫光物联集团 2015年9月
1 产品示意图
2 设备安装
A)将传感器带铺在床单下面(平时睡觉时的胸部位置); B)将传感器带和电源适配器插头插在主机上,并给主机上电;
3 安装APP
方法一:扫描二维码快速下载; 方法二:各大安卓市场,iOS应用市场下载; 方法三:访问下载;
13 保修卡
产品信息 产品名称 产品序列号 用户信息 姓名 联系电话 用户地址 维修记录 日期
维修内容
产品型号 购买日期
邮政编码
修理者
14 联系我们
QQ交流群 有任何问题或是建议,欢迎您随时联系我们。
客服电话:400-666-8906
产产品品合合 格格证证
限公司
产品名称:修普诺斯睡眠监测系统
产品型号:
APP二维码地址
4 用户注册
点击“注册”,填写用户名和密码,注册必须填写手机号;
5 添加设备
注册、登录后点击左上角菜单 ,选择“设备管理”添 加新设备。手动输入设备背面编号或者扫描二维码添加新 设备。
6 WIFI配置(仅限WiFi版)
步骤一、将手机连接上你准备连接的WiFi网络
步骤二、输入WiFi网络密码,长按设备SET按键,等待 指示灯出现快闪后松手,设备进入WiFi配置模式,然 后点击“开始”,等待配置成功。如果配置失败,请 重复WiFi配置步骤。
7 绑定使用者
设备添加/WiFi配置完成后,点击绑定使用者。
8 指示灯说明
指示灯状态 1秒一次闪烁 3秒一次闪烁 呼吸式渐变
快闪 亮 2秒,灭 0.2秒
说明 正在连接网络 已经连接网路,无人 已经连接网路,有人 WiFi 配置状态 设备固件升级状态
9 参数列表
控制器主机
106mm*106mm*25mm
执行标准:GB9254/GB4943 物联技术有
出厂日期:
光
河南紫
检 验 员:
公司地 址 : 郑 州 市 西 三 环 电 厂 南 路 大
质检专用 章
学科技园1号楼C座
12 产品保修
产品质量问题一个月包换、一年保修。 下列情况不属于免费保修范围,但可提供有偿服务: 1.未按使用说明操作,致产品故障或损坏; 2.擅自修理或遗留明显拆机痕迹; 3.超出保换、保修期; 4.产品序列号或型号与产品本身不符; 5.因意外或人为导致产品损坏(如传感器折叠); 6.客户发回返修途中导致的产品问题; 其他非质量问题导致的故障或损坏。