海尔彩晶王子228 wb cs ay使用说明书
海尔电器洗衣机指南说明书

9001617797 (020406) SMI4HCS48E
*9001617797*
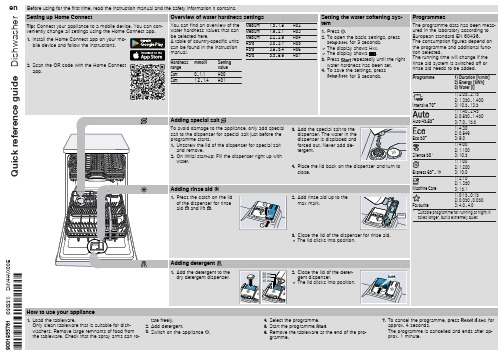
How to use your appliance
1. Load the tableware.
tate freely.
Only clean tableware that is suitable for dish-
2. Add detergent.
washers. Remove large remnants of food from 3. Switch on the appliance .
the tableware. Check that the spray arms can ro-
4. Select the programme. 5. Start the programme . 6. Remove the tableware at the end of the pro-
residue.
2. Turn the coarse filter anticlock-
2
wise and re-
move the filter
system .
1
3. Pull down the micro filter to remove.
4. Press the locking
catches to-
Cause and troubleshooting
Supply hose is kinked. ▶ Install the supply hose without kinks.
Water tap is turned off. ▶ Turn on the water tap.
Water tap is jammed or furred up. ▶ Turn on the water tap.
海尔电子产品指南说明书

7. To cancel the programme, press
for
approx. 4 seconds.
The programme is cancelled and ends after ap-
prox. 1 minute.
Cleaning filters
1. After each wash check the filters for
residue.
2. Turn the coarse filter anticlock-
2
wise and re-
move the filter
system .
1
3. Pull down the micro filter to remove.
4. Press the locking
catches to-
bile device and follow the instructions.
2. Scan the QR code with the Home Connect app.
Overview of water hardness settings
You can find an overview of the water hardness values that can be selected here. A table of country-specific units can be found in the instruction manual.
4. Place the lid back on the dispenser and turn to close.
2. Add rinse aid up to the max mark.
海尔电子电子产品用户指南说明书
Quick reference guide Dishwasher
Setting up Home Connect
and remove. 2. On initial start-up: Fill the dispenser right up with
water.
Adding rinse aid
1. Press the catch on the lid
of the dispenser for rinse
2
aid and lift .
4. Place the lid back on the dispenser and turn to close.
2. Add rinse aid up to the max mark.
max
Programmes
The programme data has been measured in the laboratory according to European standard EN 60436. The consumption figures depend on the programme and additional function selected. The running time will change if the rinse aid system is switched off or rinse aid needs to be added.
Adding detergent
1. Add the detergent to the dry detergent dispenser.
海尔电器智能洗衣机指南说明书

50 ml
2. Close the lid of the deter-
25 ml
gent dispenser.
15 ml
a The lid clicks into position.
Programmes
The programme data has been measured in the laboratory according to European standard EN 60436. The consumption figures depend on the programme and additional function selected. The runtime will change if the rinse aid system is switched off or rinse aid needs to be added.
Water tap is turned off. ▶ Turn on the water tap.
Water tap is jammed or furred up. ▶ Turn on the water tap.
The flow rate must be at least 10 l/min when the water supply is open.
en Before using for the first time, read the instruction manual and the safety information it contains.
Quick reference guide Dishwasher
Setting up Home Connect
for 3 seconds. a The display shows H:xx. a The display shows . 3. Press or repeatedly until the
海尔电子科技有限公司家用电器产品用户手册说明书

water.
3. Add the special salt to the dispenser. The water in the dispenser is displaced and forced out. Never add detergent.
water hardness values that can Medium 1.9 - 2.1 H:03
1. Install the Home Connect app on your mobile device and follow the instructions.
be selected here.
gramme.
7. To cancel the programme, press
for
approx. 4 seconds.
The programme is cancelled and ends after ap-
prox. 1 minute.
Cleaning filters
1. After each wash check the filters for
en Before using for the first time, read the instruction manual and the safety information it contains.
Quick reference guide Dishwasher
Setting up Home Connect
2
max mark.
max
1
3. Close the lid of the dispenser for rinse aid. a The lid clicks into position.
海尔电器产品说明书

Operating instructions Page 12 No-frost combined refrigerator-freezer12Disposal notesThe appliance contains reusable materials and should be disposed of properly - not simply with unsorted household refuse. Appliances which are no longer needed must be disposed of in a professional and appropriate way, in accordance with the current local regulations and laws.When disposing of the appliance, ensure that the refrigerant circuit is not damaged to prevent uncontrolled escape of the refrigerant it contains (data on type plate) and oil.• Disable the appliance.• Pull out the mains plug.WARNINGDo not allow children to play with packaging material. Take the packaging material to an official collection point.Range of appliance useThe appliance is suitable solely for cooling food in a domestic environment or similar. This includes, for example, use- in staff kitchenettes, bed and breakfast establish-ments,- by guests in cottages, hotels, motels and other forms of accommodation,- in catering and similar services in the wholesale trade.Use the appliance solely as is customary within a domestic envi-ronment. All other types of use are inadmissible. The appliance is not suitable for storing and cooling medicines, blood plasma, laboratory preparations or similar substances and products cov-ered by the 2007/47/EC Medical Devices Directive. Any misuse of the appliance may result in damage to or spoilage of stored goods. Furthermore, the appliance is not suitable for operation in potentially explosive atmospheres.or the door falling open!tipping. This can lead to injury or property damage. support until it reaches the floor. Then turn it another 90°.ENSafety instructions and warnings• T o prevent injury or damage to the unit, the ap-pliance should be unpacked and set up by two people.• In the event that the appliance is damaged on delivery, contact the supplier immediately before connecting to the mains.• T o guarantee safe operation, ensure that the ap-pliance is set up and connected as described in these operating instructions.• Disconnect the appliance from the mains if any fault occurs. Pull out the plug, switch off or remove the fuse.• When disconnecting the appliance, pull on the plug, not on the cable.• Any repairs and work on the appliance should only be carried out by the customer service department, as unauthor i sed work could prove highly dangerous for the user. The same applies to changing the mains power cable.• Do not allow naked flames or ignition sources to enter the appliance. W hen transporting and clean-ing the appliance ensure that the refrigerant circuit is not damaged. In the event of damage, make sure that there are no ignition sources nearby and keep the room well ventilated.• Do not stand on the plinth, drawers or doors or use them to support anything else.• This appliance can be used by children of 8 years old and over, and also by persons with restricted physical, sensory or mental capacity or lack of experience and knowledge, if they are supervised or have been instructed on safe use of the appli-ance and understand the resulting risks. Children must not be allowed to play with the appliance. Cleaning and user maintenance must not be car-ried out by children without supervision.• Avoid prolonged skin contact with cold surfaces or chilled/frozen food. T his could cause pain, numb-ness and frostbite. In the case of prolonged skin contact, protective measures should be taken, e.g. gloves should be worn.• Do not eat ice cream, particulary ice lollies or ice cubes, immediately after taking them from the freezer compartment as there is a risk of "burn-ing" because of the very cold temperatures.• Do not consume food which has been stored for too long, as it could cause food poisoning.• Do not store explosives or sprays using combusti-ble propellants such as butane, propane, pentane etc. in the appliance. Electrical components might cause leaking gas to ignite. Y ou may identify such sprays by the printed contents or a flame symbol. • Do not use electrical appliances inside the appli-ance.• The appliance is designed for use in enclosed areas. Do not operate the appliance outdoors or in areas where it is exposed to splash water or damp conditions.• The LED light strips illuminate the interior of the appliance. T hey are not suitable for lighting a room.Climate ratingperformance.plate.The position of the type plate is shown inthe section entitled Description of the appliance. Climate rating Room temperatureSN +10°C to +32°CN +16°C to +32°CST +16°C to +38°CT +16°C to +43°CSN-ST +10°C to +38°CSN-T +10°C to +43°CDo not operate the appliance outside the speci-fied room temperature range.EPREL databaseAs from 1 March 2021, information about energy labelling and ecodesign requirements will be available in the European product database (EPREL). You can access the product database using the following link: https://eprel.ec.europa.eu/. You will be asked to enter the model identifier. You will find the model identifier on the type plate.1314Operating and control elements(1) On/Off button, refrigerator compartment (2) Alarm symbol (3) SuperCool button (4) SuperFrost button (5) SuperFrost symbol(6) On/Off button, freezer compartment (7) Ventilation button (8) Alarm button(9) Down setting button, freezer compartment (10) Freezer compartment temperature display (11) Up setting button, freezer compartment(12) Refrigerator compartment temperature display (13) Down setting button, refrigerator compartment (14) Ventilation symbol(15) Up setting button, refrigerator compartment (16) Child-proofing symbol (17) Power failure symbol(18) Menu symbol > Setup mode is activated (activating thechild lock and adjusting the display brightness)(19) Net@Home symbol (20) SuperCool symbolElectrical connectionOnly operate the appliance with alternating current (AC).The permissible voltage and frequency are indicated on the type plate. The position of the type plate is shown in the section entitled Description of the appliance .Dimensions (mm)Setting up• Do not place the appliance in areas of direct sunlight or next to a cooker, radiator or similar object.• The floor on which the appliance stands should be horizontal and level. T o compensate for any unevenness, adjust the height of the •35 mm.consumption.right at the top.15ENBrightness of the temperature displayYou can adjust the brightness of the temperature display to the light conditions of the room in which the appliance is installed.Adjusting the brightnessThe brightness is adjustable between 0 (no illumination) and5 (maximum brightness).• Press the SuperFrost button (4) for about 5 seconds.• The display indicates .• Using the Up button (11) or Downbutton (9)select .• Briefly press the SuperFrost button (4).• T o make the display brighter: press Up button (11).• T o make the display darker: press Down button (9).• Press the SuperFrost button (4).• The brightness is adjusted to the new value.• Press the freezer compartment On/Off button (6) or wait for 5 minutes.Child proofingThe child-proofing function enables you to make sure that the appliance is not inadvertently switched off by playing children.Setting the child-proofing function• Press the SuperFrost button (4) for about 5 seconds.• The display indicates .• Briefly press the SuperFrost button (4) to confirm.When 1display:• T o activate the child lock, briefly press the SuperFrost button (4).• The child lock symbol lightsup.flashes in the display.When 0display:• T o deactivate the child lock, briefly press the SuperFrost button (4).• The child lock symbol goes out.flashes in the display.• Press the On/Off button (6) or wait for 5 minutes.Switching the appliance on and offClean the interior of the appliance before switching it on for the first time (see "Cleaning ").To switch onPress the On/Off button (1) or (6) so that the temperature displays light up.To switch the refrigerator com-partment offPress the On/Off button (1) for ap -prox. two seconds.Note: (On/Off button (6)) is switched off, the entire appliance will be switched off.Setting the temperatureThe temperature of the refrigerator set separately.Setting the refrigerator temperatureWarmer temperature setting > press button (15)Colder temperature setting > press button (13)Setting the freezer temperatureWarmer temperature setting > press button (11)Colder temperature setting > press button (9)- While you are setting the temperature, the temperature display will flash.- When you press the setting buttons for the first time, the set temperature will be displayed.- Y ou can change the settings in increments of 1°C by briefly press-ing the buttons again.- About 5 seconds after the button was last pressed the average interior temperature will be displayed.Adjustable temperature rangesRefrigerator compartment: 11°C to 2°C.Freezer compartment: -16°C to -26°C.Saving energy- Always ensure good ventilation. Do not cover ventilation openings or grille.- Always keep fan louvres clear.- Do not place appliance in areas of direct sunlight or next to a stove, heater or similar object.- The energy consumption depends on the installation conditions, e.g. the ambient temperature.- Keep the time the appliance is open to a minimum.- Store food logically.- Ensure that all food is well packed and covered for storage. This will prevent frost from forming.- First cool warm food to room temperature before storing it.- Defrost frozen food in the refrigerator.- If there is a thick layer of frost in the appliance: defrost the appli-ance.- Empty and switch off refrigerating unit for longer vacation periods.- Use the vacation function for longer vacation periods.Accumulated dust increases the energy consumption:- Once a year, dust the refrigerating unit together with the metal grille of the heat exchanger at the back of the appliance.16Equipmentas required.Lift the glass shelf, align the recess over the support and replace the shelf in a higher orlower position.Place the shelf rails provided, fig. 1, on the supports on the left and right at the desired height.Insert the glass shelves (1) and (2) as shown in fig. 2.If you need to make space for tall containers, simply slide the front half of the sectioned glass shelf carefully underneath the back half, fig. 2.Net@Homewith the retrofit modules for theH model and equipment.The modules are available from your specialist dealer.You will find more information on the internet at .Power failure displayIf appears in the display, the freezer temperature has risen too high due to a power failure.• Press the Alarm button (8).> The highest temperature during the power failure will be displayed.displayed.Do not eat perished food!Do not refreeze thawed food!Press the Alarm button (8) again to cancel the display.Audible warning signalAudible door alarmIf an appliance door is left open for more than 60 sound. Press the audible warning on/off button (8) to cancel the alarm. The alarm switches back to standby when the door is shut.Audible/visual temperature alarmIf the temperature in the freezer compartment rises too high, the audible warning signal will sound and the alarm symbol (2) and the tem-perature display will flash.Press the audible warning on/off button (8) flashing. The symbol (2) will disappear as soon as the temperature in the freezer compartment is low enough.This can be caused by:• the freezer door being left open for a long time, allowing warm ambient air to enter;• a long power failure;• a fault in the appliance.In each case, make sure food has not thawed or perished. If the alarm symbol does not go out, contact the customer service de-partment (see section on Malfunctions).Interior lightdoor is opened.laser class 1/1M.Importantstaff. If the cover is removed, do not look directly at thelight through optical lenses from close distance. This candamage your eyes.uctsdrinksNote•upright.•used for packaging.SuperCoolBy activating the SuperCool function, the temperature in the refrig-erator compartment will drop to its lowest value. It is recommendedif large quantities of food are to be cooled rapidly.To switch on: Press the SuperCool button (3) briefly > LED (20)lights up.Note:The SuperCool function switches off automatically afterabout 6 hours.Cooling with fanWith the fan function switched on, abe attained in the refrigerator com-partment.This is recommended:- in high room temperatures (approx.33°C or higher),- if the air humidity is high (e.g. duringthe summer).To switch onPress the fan button (7) - the symbol(14) lights up.LightingClass1Light sourceThis product contains a light source thatmeets energy efficiency rating G LED1The appliance may contain light sources with differentenergy efficiency classes. The lowest energy efficiency classis indicated.1718CleaningBefore cleaning always switch off the appliance. Pull out the mains plug or remove/unscrew the fuse.• Clean the side panels and door surfaces with a clean and soft cloth. If necessary, use a moist cloth (water + detergent). Alternatively, use a micro-fibre cloth.- Do not use abrasive sponges or scourers, do not use concentrated cleaning agents and never use cleaning agents containing sand, chloride or acid or chemical solvents, as these would damage the surfaces and could cause corrosion.• Clean the inside and equipment parts with lukewarm water and a little detergent.Do not use steam cleaners because of the risk of injury and damage.• Ensure that no cleaning water penetrates into the electrical com-ponents or ventilation grille.• Dry all parts well with a cloth.• Do not damage or remove the type plate on the inside of the ap-pliance. It is very important for servicing purposes.Making ice cubes• Fill the ice-cube tray with water.and leave it to freeze.• short time under running water.Notes on freezing• Pack food which you are freezing yourself in quantities appropriate to your household. T o ensure that the food freezes right through, the following quantities should not be exceeded per pack a ge: fruit, vegetables: up to 1 kg, meat: up to 2.5 kg.• Do not allow fresh food which is to be frozen to come into contact with food already frozen. Always keep packs dry in order to avoid them sticking together.• Always write the date and contents on the pack and do not exeed the stated storage time for the food.• Do not freeze bottles and cans which contain carbonated drinks as they might burst.• Only take out as much food as is immediately required for thawing. Use food which has been thawed in prepared meals as quickly as possible.Frozen food can be thawed in the following ways: in a fan oven, in a microwave oven, at room temperature, in the refrigerator.FreezingSuperFrostBy activating the SuperFrost function the temperature in the freezer compartment will drop to the lowest attainable value. Thus food can be rapidly frozen to the core and the quality is preserved.• Press the SuperFrost button (4) - up.• For small amounts of frozen food, beforehand, and for the maximum quantity 24 hours beforehand.• Place the fresh food in the freezer.• Depending on the quantity of food placed in the freezer, the ap-pliance switches back to normal operating mode after 30 to 65 hours.Y ou should not switch on the SuperFrost function- when placing frozen food in the freezer,- when freezing up to approx. 2 kg fresh food daily.19ENMalfunctionsYou may be able to rectify the following faults by checking the possible causes yourself:• Appliance does not function:– Is the appliance switched on?– Is the plug correctly fitted in the mains socket?– Is the socket fuse intact?• Loud running noise:– Is the appliance set up firmly on the floor?– Does the appliance cause nearby items of furniture or objects to vibrate? Please note that noises caused by the refrigerant circuit cannot be avoided.• The temperature is not low enough:– Is the temperature setting correct (see "Setting the temperature")?– Have excessive amounts of fresh food been placed in the appli-ance?– D oes the separately installed thermometer show the correct read-ing?– I s the ventilation system working properly?– IInstalling appliance in a row of kitchen unitsTo adapt the height of the appliance to the surrounding furniture a top unit (1) can be added. A gap of at least 50 behind and along the entire ensure sufficient ventila -tion. The area of ventila-tion underneath the ceiling should be at least 300 cm 2. When setting up the appli-ance next to a wall distance of approx. 50 mm appliance and the wall (for the handle when the door is open).Shutting your appliance downIf your appliance is to be shut down for any length of time, switch it off and disconnect the plug or switch off or unscrew the fuse. Clean the appliance and leave the door open in order to prevent unpleasant smells.The appliance complies with the relevant safety regulations and EU Directives 2014/30/EU and 2014/35/EU.Changing over door hingesDoor hinges should only be changed by a trained expert. Changing the door hinges must be done by two people. Caution! Before changing over door hinges, disconnect the appliance from the mains.1. Open top door.2. T3. T4. Remove the front panel using a flat-blade screwdriver.5.and slide away. Tthe other side. Tside.9.Tposite side.10.11.Remove bottom door.15.16.Topposite side.17.T6.Remove cover.7.Undo the screws. 8.with hinge and cable.20close.28. Insert middle hinge pin.29. the cover on the door.30. Disconnect the plug.31. complete with cable.sert hinge.24. T posite side.25. 26. adjustable foot.23. T 27.Liebherr Hausgeräte Lienz GmbH Dr.-Hans-Liebherr-Strasse 1A-9900 LienzÖsterreich。
海尔电器22英寸柜体冰箱产品说明书
MANUAL NO. 107177 REV. 06 (03/09/04)Parts ManualModels:PR22B5FAPR22B5NRA PR22B8FA PR22B8NRA PR22GH5NRA PR22H5FA PR22H5NRAPR22NEFA22" HANDLE ASSEMBLY22" HANDLE ASSEMBLYITEM PART NO. QTY. DESCRIPTION1......106765........ 1.......HANDLE2...... 52561........ 2.......FOAM GRIP3......106823........ 1.......CABLE BRACKET4......990639........ 1.......HCS 1/4C X 1 1/25......976978........ 1.......NUT, 1/4, NYLOC6......100481........ 2.......KNOB7......100472........ 2.......RHSB 5/16C X 1 1/48......100556........ 2. (I)9......990692........ 2.......WASHER, 5/16, FLAT10......106766........ 2.......HANDLE SIDE11......106824........ 1.......BAIL12......976526........ 1.......ADJ. LEVER GRIP13......106770........ 1.......LEVER14......106768........ 1.......HEIGHT PLATE15......990588........ 1.......HCS 3/8C X 216......990517........ 4.......WASHER, 3/8, FLAT17......976438........ 1.......SPRING18......990536........ 6.......HCS 3/8C X 119......976979........ 7.......NUT, 3/8C, NYLOC20......102563........ NYARD21......108068........ 1.......SCREW, 3/8-16, BUTTONHEAD22...... 0221........ 1.......NUT, 3/8-16, ACORN22" BODY ASSEMBLYITEM PART NO. QTY. DESCRIPTION1......107355.......... 1........BODY W/DECALS2......976941.......... 2........HCS 3/4C X 1 1/43......976979..........4........NUT, 3/8C, NYLOC4......990692.......... 7........WASHER, 5/16, .............................................FLAT5......106847.......... 2........BUSHING6......990550.......... 2........WASHER, 1/2, .............................................FLAT7......101332.......... 2........HCS 1/2C X 2 3/48......990627.......... 6........HCS 5/16C X 1 1/49......100488.......... 2........C.I. FLANGE BRG.10......100439.......... 1........BELT11......106805.......... 1........LINKAGE12......5051............. 2........WHEEL, 8 X 1 3/413......110311.......... 1........IDLER PULLEY14......106643.......... 1........REAR FLAP15......106843.......... 1........FRONT AXLE16......108541.......... 1........PULLEY .............................................W/ SET SCREWS17......990637.......... 2........HCS 3/8C X 2 1/218......990613.......... 4........NUT, 3/8C, SERR.19......990717..........10.......NUT, 5/16, NYLOC20......100482.......... 1.......BUSHING21......990655.......... 1.......HCS 3/8C X 1 1/222......106672.......... 1.......FLAP ROD23......990037.......... 2.......COTTER PIN24......990580..........10.......HCS 1/4C X 3/425......976978..........10.......NUT, 1/4C, NYLOC26......990037.......... 2.......COTTER PIN27......106754.......... 1.......SHAFT GUARD28......108069.......... 1.......BELT GUARD29......106771.......... 1.......BACKING PLATE30......106827.......... 1.......CABLE31......990625.......... 2.......NUT, 1/2C, JAM32......106686.......... 1.......IDLER ARM ITEM PART NO. QTY. DESCRIPTION33......990588.......... 1.......HCS 3/8C X 234......990669.......... 4.......HCS 5/16 X 1 3/435......990187.......... 4.......LOCKWASHER, 5/1636......910061.......... 2.......KEY, 3/16 X 3/16 X 137......540000058.... 1.......WHEEL, 10 X 1 3/4, .............................................DRILLED 38......53401............ 1.......WHEEL, 10 X 1 3/4, .............................................W/BUSHINGS39......106663.......... 1.......REAR AXLE40......0364............. 1.......ROLL PIN, 1/4 X 1 1/841......0319C........... 2.......BEARING, 5/8" .............................................W/COLLAR 42......0321C........... 4.......FLANGE, FOR .............................................BEARING 5/8"43......990297.......... 2.......COTTER PIN44......106839.......... 1.......COVER45......990072.......... 5.......HCS 1/4C X 5/846......976978.......... 5.......NUT, 1/4C, NYLOC47......990052.......... 6.......LOCKWASHER, 1/448......105308.......... 1.......KEY 1/4" .............................................(8 H.P. ENGINE) ..........910061.......... 1.......KEY 3/16" .............................................(5.5 H.P. ENGINE) 49......108542.......... 1.......PULLEY .............................................W/SET SCREWS .............................................(8 H.P. ENGINE) ..........108543.......... 1.......PULLEY .............................................W/SET SCREWS .............................................(5.5 H.P. ENGINE) 50......51925............ 1.......DEFLECTOR .............................................(HONDA EXHAUST) 51......0113.............. 2.......SCREW .............................................(HONDA EXHAUST)52......0436............. 1.......WASHER, 5/853......990598.......... 6.......WASHER, 1/4, FLAT54......108147.......... 6.......KNURLED INSERT, .............................................1/4-20........108112................1.........BLADES W/SHAFTS & HARDWARE SET (32 BLADES) 5......101949................8.........E-RING 1/222" DELTA REEL ASSEMBLYITEM PART NO.QTY. DESCRIPTION........107184................1.........22" DELTA REEL (COMPLETE)1......100530................2.........JAM NUT W/SETSCREW2......106653................2.........END SPACER3......106651................15........BLADE MTG. PLATE4......106652................14........SPACER - LONG5......106650................1.........SHAFT6......108116................1.........BLADE W/HARDWARE SET (30 BLADES)7......108117................1.........SCREW & NUT SET (60 EACH)22" SPRING REEL ASSEMBLYITEM PART NO.QTY. DESCRIPTION........107185................1.........22" SPRING REEL (COMPLETE)1......106683................1.........SHAFT2......108119................1.........SPRING W/HARDWARE SET (42 SPRINGS)DECALSDECALSITEM PART NO. QTY DESCRIPTION1.......8338.............1........DECAL, BLUEBIRD 15" LOGO2.......107381.........1........DECAL, PR183.......107191.........1........DECAL, PR224.......108064.........1........DECAL, DEPTH5.......540200141...1........DECAL, SEEDER DIAL6.......540200076...1........DECAL, DANGER FOOT7.......540200140...1........DECAL, SEED APPLICATION8.......101881.........1........DECAL, PROP 659.......540200143...1........DECAL, OPEN-CLOSE10.......107359.........1........DECAL, SAFETY GRAPHICS11.......108143.........1........DECAL, WARNING DISENGAGE BLADES12.......107244.........1........DECAL, HANDLE PIN13.......8337.............1........DECAL, BLUEBIRD 4"14.......107192.........1........DECAL, LAWN SEEDER S22P.O. Box 8Beatrice, Nebraska 68310。
- 1、下载文档前请自行甄别文档内容的完整性,平台不提供额外的编辑、内容补充、找答案等附加服务。
- 2、"仅部分预览"的文档,不可在线预览部分如存在完整性等问题,可反馈申请退款(可完整预览的文档不适用该条件!)。
- 3、如文档侵犯您的权益,请联系客服反馈,我们会尽快为您处理(人工客服工作时间:9:00-18:30)。
海尔彩晶王子228wbcsay使用说明书尊敬的海尔用户您好!电脑板控制的冰箱,在人工智慧功能和锁定状态时是无法调节温度的,而是机器自己控制温度,若是想要调节,首先取消人工智慧,方法长按人工智慧按键3秒钟,小人头图标消失即可,然后按冷藏调节冷藏温度,按冷冻调节冷冻温度,不过调节好后,机器会显示几秒钟您设定的温度,之后跳回当前的温度,不过机器会慢慢工作把温度降到您调节的温度,海尔彩晶王子冰箱怎么调温度;冰箱温度可以按以下调节。
冰箱冷藏内保鲜室温度可以设置在容4-5度,这种温度有利于食物的保鲜,可以保鲜3-5天时间冰箱如果有冷藏室(变温室),温度可以设置在0度或1度,这种温度即不会结冰(冻),又能冷藏食品。
冰箱急冻室可以设置在零下-18度,这种零下温度在急冻时,是比较快的,有利于是加快食品快速解冻。
以上冰箱的温度设置可以一年四季常年不变的。
此答案适用于任何海尔冰箱。