LOMO推出Neptune Convertible可变式镜头套装
莱卡R镜头杂谈

莱卡R镜头杂谈Leica Summicron-R 50mm/F2Leica Summicron-R 50mm/F2 结像踏实,还原逼真,层次丰富,特别是对暖色的还原特别艳丽。
手感极佳,松弛有度,是一款很好的镜头。
值得拥有!第一版加产E55和后期德产ROM版E55,虽说光学结构没有变化,但明显感觉ROM版在解像力和画面均衡度上都较前期E55要好。
最大光圈表现已经很优异,F4到F8锐不可挡,难怪国外称Summicron-R 50是上世纪最伟大的标头之一。
和老大哥Summilux-R 50/1.4相比各有千秋,同级光圈在各种评测中Summicron-R 50/2锐度均能胜出,足见其光学结构设计的优异。
LEICA Elmarit-R 28mm/f2.8LEICA Elmarit-R 28/2.8 当我第一次把这个头拿在手上的时候,不得不感叹德国的机械工艺,完美!出的片子有油画般的感觉,全开光圈,画面锐利,色彩还原极品,虚化的效果很浓郁。
还原配一个非常漂亮的遮光罩。
LEICA Elmarit-R 28/2.8 这只经典的广角镜头在各个方面都体现了经典的徕卡质量。
在F/2.8时,从中心到影像边沿的锐度和反差都堪称楷模。
收缩光圈后,品质还会有所提高。
镜头使用一片浮动镜片,保证了从30厘米的最近对焦距离到无穷到调焦范围内都具有很高的成像性能。
新款E55与E48的结构不同,经过改进加了一组浮动镜组,使得焦外色散,边缘成像又有所提高,堪称135镜头28mm焦段的王者!Leica R Vario-Elmar 35-70mm/F3.5徕卡非常好的一款变焦头,从实测数据看,德制的这款头较之早期美能达制造的R35-70/3.5和后期京瓷制造的R35-70/4相比,无论从成像质量还是分辨率上都占优,比西格玛制造的R28-70/3.5-4.5更是高出很多.是除R35-70/2.8外徕卡35-70焦段的不二选择!分辨率高,解像力高,畸变和反差控制好,细节刻画细腻,色彩还原真实,极具徕卡镜头韵味.机械性能优良,做工精细扎实,是替代徕卡定焦头的最好选择.与R21-35,R70-180可以并称为徕卡TOP变焦三剑客!Leica Summilux-R 80mm/F1.4 Rom徕卡1980年发表Summilux- R 80mm f/1.4是人像摄影的梦幻镜头,即使是在昏暗的拍摄环境下,f/1.4的大光圈也能提供给观景窗非常明亮的影像,使对焦与构图都能精确进行,整支镜头的重量也只有700公克,最近对焦距离为0.8米,全开光圈远近成像是同样优秀。
蔡司镜头大全(蔡司主义)

蔡司镜头大全bullcai2006.6.2蔡司,这个创造了无数传说的光学巨人,在制作了一大批具有极高水准的高端产品的同时,对其低端产品仍然保持一丝不苟的态度。
有蔡司以后,享受超高成像质量不再是富人俱乐部的专利。
一支P50/1.7足以让你一窥摄影的精彩世界,仅仅千余元的P45/2足以和价格几倍于它的镜头抗衡!作为一个以盈利为目的生产厂商,一分钱一份货本无可厚非,但是蔡司做到了一分钱三分货。
一下是本人对蔡司的不负责任的狂想,取名蔡司主义。
喜欢的色友不妨进来多看两眼,不喜的朋友尽可以嗤之以鼻,嘟囔一句烧糊了的发烧友Y/C口单反镜头Distagon T* 25mm F2.8Distagon 取名于Distance(距离),和Gonio(角度)。
由于SLR的特有的反光镜结构,所以不得不增加法兰距离,由Erhard Glatzel博士(同时也是Hologon的设计者)设计。
在Distagon的家族里有D16,D15,D18,D21, D25, D28和D35等。
这支Distagon 25/2.8 被称为“素人好きなレンJn7;”,行家里手的最爱!那谁谁,大师寇德卡不就是就是用D25吗!D25/2.8,早在Contarex时代就存在的老设计,80度的视角,仅仅比26mm稍微大一点点。
奇了怪了,视角和D28mmF2.8相近,光圈也一般大,相比之下D28mm还要锐利一些,可偏偏就要贵出近一倍的价钱?如果评论一张作品仅仅限于锐度的话,那么就说明你还处于初级阶段:P一幅油画,凑到跟前看,仅仅是一笔一笔的油彩而已,后退几步以后它才是艺术。
D25在光圈圈开时画面中央超过220pl/m的解像度,由中心至周边解像度渐次下降。
利用这个特性可以创造出它特有的立体感,适合人文题材的拍摄。
实际上蔡司的D18,D25,D28都存在[像场面弯曲]的情况,但是在蔡司的神来之笔下,却创造出它独特的魅力,不得不佩服这位光学巨人才华!D25的光圈收到F8的时候,周边的解像度和反差大幅度改善,又是拍风景的好头。
各种单反镜头的分类
各种单反镜头的分类(转载)2008-11-21 21:41:20| 分类:默认分类| 标签:|字号大中小订阅一、镜头的分类1、按照品牌分镜头一般按照品牌区分,比如尼康的镜头,佳能的镜头,宾得镜头,SONY的镜头。
请注意的是这些品牌的镜头之间都是不能直接换用的,因为他们的机身卡口都不一样。
如果你选择了尼康的单反F卡口,那么就很难再使用佳能的镜头了,因为他们的卡口设计不一样。
尽管单反的乐趣就是换镜头,但是我们往往发现可以换的镜头其实很少,呵呵,这个是利益所决定的,短期内不可能改变。
(其实也可以通过转接环实现换用,佳能的卡口可以转换的镜头很多,比如尼康的,蔡司的等等。
但是并不见得能实现全部的功能)如果按照品牌区分有一个特殊的镜头群——副厂镜头。
一旦我们买了某个品牌的镜头比如尼康,我们一般来说会选择尼康自己生产的镜头,称之为“原厂镜头”,还可以选择像适马、腾龙、图丽这样的第三方公司为尼康机身生产的镜头,我们称这样不是尼康原厂的厂商生产的镜头为“副厂镜头”。
同理,佳能、宾得的机身不仅可以用自己生产的镜头,也可以选择适马、腾龙、图丽为他们生产的配套镜头。
(一个比较特殊的副厂是大名鼎鼎的光学巨人卡尔-蔡司,这个BT委托日本的另外一个光学BT厂商COSINA也就是日本确善能现在在生产尼康卡口的ZF系列镜头,目前有七支,这些镜头都是手动对焦的,但是个个品质都很好,后面我会专门的写一下!!!)但是因为一个买单反的用户机身大多只买一台,镜头却可能买几个,厂商的利润更多的是体现在镜头以及相关的配件上面,所以尼康、佳能这样既可以生产机身又可以生产镜头的厂商恨不得全世界的人民都只买它们自己的相机和镜头。
因此副厂们是很难得到尼康、佳能的技术支持的,所以它们设计生产的部分产品在兼容性上往往会有一些问题,再加上制造经验、质量控制等原因,个体差异会比较大,也就是说你可能运气好买到一个什么问题也没有的镜头,也可能运气更好买到一个什么问题都有的,甚至你连续换几个还是有问题的。
传奇“巨无霸”,魔力“软焦点” universal heliar,福伦达的传世人像神器
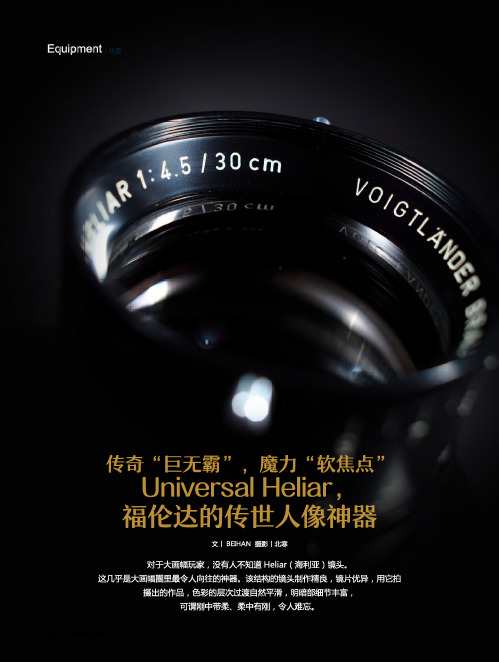
EgmipMe w/玩家传奇“巨无霸”,魔力“软焦点”Universal Heliar,福伦达的传世人像神器Hdiar是福伦达系列中最著名的镜头结构,是由Carl August Hans Harting(卡尔•奥格斯特•汉斯・哈丁)于1900年设计,是福伦达第一个大中画幅镜头设计方案。
后来,Haas Harting又对Heliar结构做了调整和改进,并衍生出了Universal Heliar>Color Heliar>APO-lanthar等。
Hdiar最初是一个3组5片的结构,_片凹镜置于两个凹凸粘合mm这种设计本质上是库克三片镜(Cooke Triplet)的改良版,都是在中央透镜基础上额外加入两个光学单元,并且采用对称式的设计。
这些改良帮助三组镜结构克服了纵向像差(longitudinal aberratioiis)问题,同时仍能保证使用大光圈。
这个镜组能够做到f45的光圈,并且覆盖50。
的像场,其大光圈使其特别适合拍摄人像和快朋影。
Heliar早期的镜头全部为铜制裸镜,稍后期的产品则在铜镜表面烤了一层黑漆。
Heliar经过多次改版和升级,其镜头成像层次丰富,描写力细致,从而享誉摄影界多年,成为圈内大画幅玩家推崇的神器之一,并成为福伦达镜头史上最成功的镜头作品。
据说,日本天皇裕仁的标准照就是用Heliar镜头拍摄的,并且裕仁要求他的照片只用Heliar镜头拍摄。
而Heliar系列中,最经典的当属Univetsal Heliar o 镜头中的“巨无霸”,俗称“宇宙海利亚”Universal Heliar,是基于Voigtlander Heliar制作的,是一个传奇般的经典镜头,可谓是镜头中的"巨无霸”,俗称"宇宙海利亚”。
它增加了控制球差的调节环,从而调整镜头的柔光程度。
时至今日,它仍旧受至!J很多摄影师的追捧,并创作出了不俗的作品。
用Universal Heliar拍摄的8X10英寸大画幅人像作品,成像细腻柔顺,层次过渡自然平滑,明暗部细节表现达到极致,就连衣服上的纤维都可以清晰的辨别。
nfd镜头参数
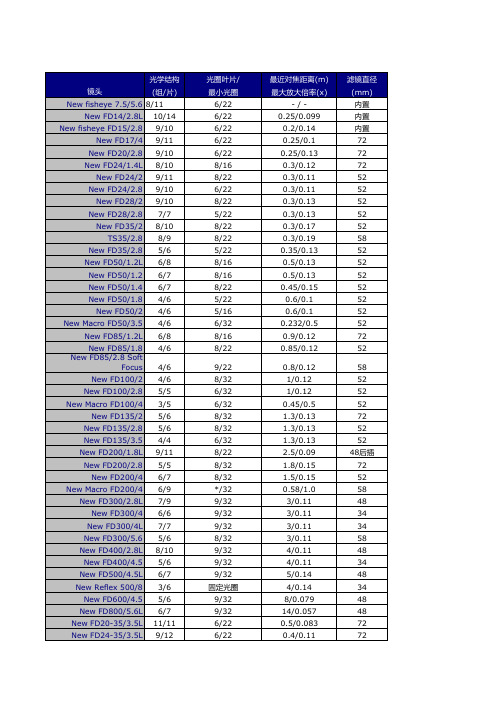
光圈叶片/ 最小光圈 6/22 6/22 6/22 6/22 6/22 8/16 8/22 6/22 8/22 5/22 8/22 8/22 5/22 8/16 8/16 8/22 5/22 5/16 6/32 8/16 8/22 9/22 8/32 6/32 6/32 8/32 8/32 6/32 8/22 8/32 8/32 */32 9/32 9/32 9/32 8/32/32 6/22 6/22
9/10 10/10 11/13 10/10 8/9 8/8 8/8 13-15 11/14 12/16 13-16 9/12 9/12 8/11 11/15 12/14 5/8 11/15 9/14 10/15 15/19
8/22 5/22 8/22 8/22 8/22 6/22 6/22 5/22 5/22 8/32 8/32 6/32 8/32 6/32 8/32 8/32 6/32 8/32 8/32 8/32 9/32
滤镜直径 (mm) 内置 内置 内置 72 72 72 52 52 52 52 52 58 52 52 52 52 52 52 52 72 52 58 52 52 52 72 52 52 48后插 72 52 58 48 34 34 58 48 34 48 34 48 48 72 72
New FD28-50/3.5 New FD28-55/3.5-4.5 New FD28-85/4 New FD35-70/2.8-3.5 New FD35-70/3.5-4.5 New FD35-70/4 New FD35-70/4 AF New FD35-105/3.5 New FD35-105/3.5-4.5 New FD50-135/3.5 New FD50-300/4.5L New FD70-150/4.5 New FD70-210/4 New FD75-200/4.5 New FD80-200/4 New FD80-200/4L New FD100-200/5.6 New FD85-300/4.5 New FD100-300/5.6 New FD100-300/5.6L New FD150-600/5.6L
徕卡M8说明书

LEICA M8Anleitung/Instructions1.2 1.11.161.141.13a 1.13b1.13 1.13c1.14a1.121.211.21a 1.21b 1.15 1.21.31.4 1.5 1.71.6 1.81.91.20a1.201.191.181.171.21c 1.281.29 1.301.311.321.331.271.261.251.241.231.221.101.341.91.371.361.351.40 1.381.391.411.41a1.42 1.431.461.451.44Foreword Dear customerLeica would like to thank you for purchasing theLEICA M8 and congratulate you on your choice. Withthis unique digital view- and rangefinder camera, youhave made an excellent choice.We wish you a great deal of pleasure and successusing your new LEICA M8.In order to make best use of all the opportunitiesoffered by this high performance camera, we recom-mend that you first read these instructions.This manual has been printed on 100% chlorine free bleachedpaper. The complex manufacturing process eases the burdenon the water system and thus helps to protect our environment. 70/ ForewordThis is a Class B product based on the standard of the Voluntary Control Council for Interference from Information Technology Equipment (VCCI). If this is used near a radio or television receiver in a domestic environment, it may cause radio interference. Install and use the equipment according to the instruction manual.FCC Note: (U.S. only)This equipment has been tested and found to complywith the limits for a Class B digital device, pursuant toPart 15 of the FCC Rules. These limits are designed toprovide reasonable protection against harmful interfer-ence in a residential installation. This equipment gen-erates, uses, and can radiate radio frequency energyand, if not installed and used in accordance with theinstructions, may cause harmful interference to radiocommunications. However, there is no guarantee thatinterference will not occur in a particular installation.If this equipment does cause harmful interference toradio or television reception, which can be determinedby turning the equipment off and on, the user isencouraged to try to correct the interference by oneor more of the following measures:• Reorient or relocate the receiving antenna.• Increase the separation between the equipment andreceiver.• Connect the equipment into an outlet on a circuitdifferent from that to which the receiver is connected.• Consult the dealer or an experienced radio/TVtechnician for help.FCC Caution:To assure continued compliance, follow the attachedinstallation instructions and use only shielded inter-face cables with ferrite core when connecting to com-puter or peripheral devices.Any changes or modifications not expressly approvedby the party responsible for compliance could void theuser’s authority to operate this equipment.Trade Name:LEICAModel No.:LEICA M8Responsible party/Support contact:Leica Camera Inc.156 Ludlow AvenueNorthvale, New Jersey 07647Tel.:+12017679608Fax:+12017678666e-mail: olesin@This device complies with Part 15 of the FCC Rules.Operation is subject to the following two conditions:(1) This device may not cause harmful interference,and (2) this device must accept any interferencereceived, including interference that may cause unde-sired operation.This Class B digital apparatus complies with CanadianICES-003Leica Camera Inc.1 Pearl Court, Unit AAllendale, New Jersey 07401Tel.: +1 201 995 0051 232Fax: +1 201 995 1684repair@Safety instructions / 71Table of ContentsForeword . . . . . . . . . . . . . . . . . . . . . . . . . . . . . . . . . . .70 Warning messages . . . . . . . . . . . . . . . . . . . . . . . . . . . .74 Legal notes . . . . . . . . . . . . . . . . . . . . . . . . . . . . . . . . . .74 Disposal of electrical and electronic equipment . . . . . .74 Scope of delivery . . . . . . . . . . . . . . . . . . . . . . . . . . . . .75 Designation of parts . . . . . . . . . . . . . . . . . . . . . . . . . . .76 The displaysIn the viewfinder . . . . . . . . . . . . . . . . . . . . . . . . . . .78 In the top panel LCD . . . . . . . . . . . . . . . . . . . . . . . .78 In the monitor . . . . . . . . . . . . . . . . . . . . . . . . . . . . .79 Menu itemsIn the main menu . . . . . . . . . . . . . . . . . . . . . . . . . . .80 In the picture parameters menu . . . . . . . . . . . . . . .80 Quick guidePresets . . . . . . . . . . . . . . . . . . . . . . . . . . . . . . . . . . .81 Taking photographs . . . . . . . . . . . . . . . . . . . . . . . . .81 Viewing pictures . . . . . . . . . . . . . . . . . . . . . . . . . . . .81 Enlarging pictures on the monitor . . . . . . . . . . . . . .81 Deleting pictures . . . . . . . . . . . . . . . . . . . . . . . . . . .81 Comprehensive instructionsPreparations . . . . . . . . . . . . . . . . . . . . . . . . . . . . . . . . .82 Attaching the carrying strap . . . . . . . . . . . . . . . . .82 Charging the battery . . . . . . . . . . . . . . . . . . . . . . .82 Inserting the battery into the camera/removing the battery from the camera . . . . . . . . .84 Charge level displays . . . . . . . . . . . . . . . . . . . . . . .84 Inserting and removing the memory card . . . . . . .85The most important settings/controlsLeica M lenses . . . . . . . . . . . . . . . . . . . . . . . . . . . .86Turning the lens type detection on/off . . . . . . . .86The extension factor . . . . . . . . . . . . . . . . . . . . . . .87Attaching a lens . . . . . . . . . . . . . . . . . . . . . . . . . .87Removing a lens . . . . . . . . . . . . . . . . . . . . . . . . . .87Switching the camera on and off/the main switch . . . . . . . . . . . . . . . . . . . . . . . . . . .88Selecting picture taking and review modes . . . . . .88Review for unlimited time . . . . . . . . . . . . . . . . . .88Automatic review of last picture . . . . . . . . . . . . .89The shutter release button . . . . . . . . . . . . . . . . . . .89Serial exposures . . . . . . . . . . . . . . . . . . . . . . . . .90The shutter speed dial . . . . . . . . . . . . . . . . . . . . . .91The monitor . . . . . . . . . . . . . . . . . . . . . . . . . . . . . .92Setting the brightness . . . . . . . . . . . . . . . . . . . . .92Displaying picture data . . . . . . . . . . . . . . . . . . . .92The histogram . . . . . . . . . . . . . . . . . . . . . . . . . . .92Menu control . . . . . . . . . . . . . . . . . . . . . . . . . . . . .93PresetsBasics settings for the camera . . . . . . . . . . . . . . .95Menu language . . . . . . . . . . . . . . . . . . . . . . . . . .95Date and time . . . . . . . . . . . . . . . . . . . . . . .95/96Automatic power off . . . . . . . . . . . . . . . . . . . . .96Button acknowledgement and signal tones . . . .96Basic picture settingsResolution . . . . . . . . . . . . . . . . . . . . . . . . . . . . .97Compression rate/file format . . . . . . . . . . . . . .97White balance . . . . . . . . . . . . . . . . . . . . . . . . . .98For automatic or fixed settings . . . . . . . . . . . .98For direct setting of color temperature . . . . . .99For manual setting by metering . . . . . . . . . . . .99ISO sensitivity . . . . . . . . . . . . . . . . . . . . . . . . .100Image properties (contrast, sharpness,color saturation) . . . . . . . . . . . . . . . . . . . . . . . .100Working color space . . . . . . . . . . . . . . . . . . . .100Holding the camera correctly . . . . . . . . . . . . . . . . . . .100The bright-line frame view- and rangefinder . . . . . . . .102The frame selector . . . . . . . . . . . . . . . . . . . . . . . . .102Distance metering /focusing . . . . . . . . . . . . . . . . . . .104Superimposed image method (double image) . . . .104Split image method . . . . . . . . . . . . . . . . . . . . . . . .104Exposure metering . . . . . . . . . . . . . . . . . . . . . . . . . . .105Turning the exposure meter on/off . . . . . . . . . . .105Exposure modes . . . . . . . . . . . . . . . . . . . . . . . . .106Aperture priority . . . . . . . . . . . . . . . . . . . . . . . .106Metering memory lock . . . . . . . . . . . . . . . . . . .106Exposure compensation . . . . . . . . . . . . . . . . . .107Manual exposure setting . . . . . . . . . . . . . . . . . .107The B setting . . . . . . . . . . . . . . . . . . . . . . . . . . .108Exposure meter metering range . . . . . . . . . . . . . .108Working below the metering range . . . . . . . . . .108Metering diagram . . . . . . . . . . . . . . . . . . .108/10972/ Table of ContentsGeneral information on flash exposuremetering and control . . . . . . . . . . . . . . . . . . . . . . .110 Compatible flash units . . . . . . . . . . . . . . . . . . . . .110 Attaching the flash unit . . . . . . . . . . . . . . . . . . . . .111 Flash mode . . . . . . . . . . . . . . . . . . . . . . . . . . . . . .111 The settings for camera-controlled automaticflash mode . . . . . . . . . . . . . . . . . . . . . . . . . . . . .112 The flash exposure control displays in the viewfinder with dedicated flash units . . . . . . . . .112 In automatic flash mode . . . . . . . . . . . . . . . . . .112 When the flash unit is set to cameracontrol (A) or manual mode (M) . . . . . . . . . . . .112 Selecting the sync speed/the sync speed range . .119 Selecting the firing moment . . . . . . . . . . . . . . . . .119 Additional functionsUser/application specific profiles . . . . . . . . . . . .114 Resetting all custom settings . . . . . . . . . . . . . . . .115 Review mode . . . . . . . . . . . . . . . . . . . . . . . . . . . . .115 Viewing other pictures/“Scrolling” inthe memory . . . . . . . . . . . . . . . . . . . . . . . . . . . . .115 Enlarging/selecting the section/simultaneous viewing of several reduced pictures . . . . . . . . . . .116 Deleting pictures . . . . . . . . . . . . . . . . . . . . . . . . .117 Protecting pictures/Clearing delete protection . .118Additional functionsChanging the picture numbering . . . . . . . . . . . . .120Formatting the memory card . . . . . . . . . . . . . . . .120Taking photographs with the self timer . . . . . . . .120Transferring data to a computer . . . . . . . . . . . . . . . . .121with Windows® XP . . . . . . . . . . . . . . . . . . . . . . .121with Mac® OS X . . . . . . . . . . . . . . . . . . . . . . . . .121with card reading units . . . . . . . . . . . . . . . . . . . .121Data structure on the memory card . . . . . . . . .122Installation of supplied software . . . . . . . . . . . . . . . . .122Working with DNG raw data . . . . . . . . . . . . . . . . . . . . .123Computer remote control of the camera . . . . . . . . . . .123MiscellaneousSystem accessories for the LEICA M8 . . . . . . .124Exchangeable lenses . . . . . . . . . . . . . . . . . . . .124Filters . . . . . . . . . . . . . . . . . . . . . . . . . . . . . . .124Universal Wideangle Viewfinder M . . . . . . . . .124Viewfinder Magnifier M 1.25x . . . . . . . . . . . . . .124Handgrip M8 . . . . . . . . . . . . . . . . . . . . . . . . . .124Correction lenses . . . . . . . . . . . . . . . . . . . . . .124Cases . . . . . . . . . . . . . . . . . . . . . . . . . . . . . . .124Spare parts . . . . . . . . . . . . . . . . . . . . . . . . . . . .124Precautions and care instructionsGeneral precautions . . . . . . . . . . . . . . . . . . . .125LCDs . . . . . . . . . . . . . . . . . . . . . . . . . . . . . . . .125Condensation . . . . . . . . . . . . . . . . . . . . . . . . .125Care instructions . . . . . . . . . . . . . . . . . . . . . . .126For the camera . . . . . . . . . . . . . . . . . . . . . . . .126For lenses . . . . . . . . . . . . . . . . . . . . . . . . . . . .126For the battery . . . . . . . . . . . . . . . . . . . . . . . .127For the charger . . . . . . . . . . . . . . . . . . . . . . . .127For memory cards . . . . . . . . . . . . . . . . . . . . . .127Cleaning the sensor . . . . . . . . . . . . . . . . . . . .128Storage . . . . . . . . . . . . . . . . . . . . . . . . . . . . . .129Warning messages . . . . . . . . . . . . . . . . . . . . . . . . . . .130Malfunctions and their resolution . . . . . . . . . . . . . . . .131Index . . . . . . . . . . . . . . . . . . . . . . . . . . . . . . . . . . . . . .132Technical data and descriptions . . . . . . . . . . . . . . . . .134Leica Academy . . . . . . . . . . . . . . . . . . . . . . . . . . . . . .137Leica on the Internet . . . . . . . . . . . . . . . . . . . . . . . . . .137Leica information service . . . . . . . . . . . . . . . . . . . . . .137Leica Customer Service . . . . . . . . . . . . . . . . . . . . . . .137Table of Contents / 73Warning messages• You should use exclusively the recommended accessories to prevent faults, short circuits or electric shock.• Do not expose the unit to moisture or rain.• Do not attempt to remove parts of the body (covers); specialist repairs can be carried out only at authorized service centers.Legal notes• Please ensure that you observe copyright laws.The recording and publication of pre-recordedmedia such as tapes, CDs, or other published orbroadcast material may contravene copyright laws.• This also applies to all of the software supplied.• The SD logo is a registered trademark.• Other names, company or product names referredto in this manual are trademarks or registeredtrademarks of the relevant companies.Disposal of electric andelectronic equipment(Applicable in the EU, and other European countrieswith segregated waste collection systems)This device contains electricaland/or electronic componentsand should therefore not be dis-posed of in general householdwaste! Instead it should be dis-posed of at a recycling collectionpoint provided by the local author-ity. This costs you nothing.If the device itself contains exchangeable (recharge-able) batteries, these must be removed first and, ifnecessary, also be disposed of according to the rele-vant regulations (see also the respective comments inthis unit’s instructions).Further information on this point is available at yourlocal administration, your local waste collection com-pany, or in the store where you purchased this device.74/ Warning messagesScope of delivery Before using your LEICA M8 for the first time, pleasecheck that the accessories supplied are complete.A.BatteryB.ChargerB connecting leadD.Carrying strapE.CD-ROM with instructional PDF, remote controlsoftware LEICA DIGITAL CAPTURE 1.0F.CD-ROM with Capture One LE from Phase OneScope of delivery / 75Designation of parts Front view1.1Lens release button1.2Eyelets for carrying strap1.3Distance meter viewing window1.4Brightness sensor11.5Bright line illumination window1.6Viewfinder window with reflectors for bettervisibility of the viewfinder displays in very brightconditions1.7Self timer LED1.8Frame selector1.9Bottom cover retaining clipFront view of camera bayonet /rear viewof lens bayonet1.10Sensor for lens identification code1.11 6 bit lens identification code Top view1.12LCD1.13Fixed ring witha. Index for distance settingb. Depth of focus scale andc. Red index button for changing lenses1.14Distance setting ring witha. Finger grip1.15Aperture setting ring1.16White index point for aperture setting1.17Lens hood1.18Shutter speed dial with- A detent position for automatic control 1.19Main switch with detent positions for– OFF(camera switched off)– S(single pictures)(series exposures)(self timer)1.20Shutter release button witha. Thread for cable release1.21Flash (hot) shoe witha. Central (firing) andb. Control contacts, andc. Hole for locking pin1Leica M lenses with viewfinder attachments cover the brightnesssensor. Information about the use of these and other lenses canbe found in the sections “The displays/In the viewfinder”, p. 78,and “Leica M lenses”, p. 86.Illustrations inside front and rear covers76/ Designation of partsRear view1.22SET button for calling up the picture parametermenus/for calling up the sub-menus within themenus/for confirming settings/functionsselected in the sub-menus1.23INFO button for displaying image data whenreviewing pictures1.24PROTECT button for selecting delete protectionfunction1.25DELETE button for selecting delete function 1.26USB port cover1.27PLAY button for switching on (continuous)review mode/for return to full-size picture display 1.28Viewfinder eyepiece1.29MENU button for entering and exiting the mainmenu1.30Central setting ring for navigation in menus/setting the selected menu items/functions,scrolling in the memory and for enlarging/reducing the pictures viewed1.31Direction buttons for navigation within themenus/for setting the selected menu items/functions and for scrolling through the memory 1.32LED for indicating picture taking mode/recording data on to the card1.33Monitor View with USB port cover open1.34USB port (5-pin, for connecting to computers)Bottom view(with bottom cover in place)1.35Tripod thread A 1/4, DIN 4503 (1/4”).1.36Bottom cover1.37Locking toggle for bottom cover(with bottom cover removed)1.38Battery compartment1.39Battery locking catch1.40Memory card slotCharger1.41Charging bay for battery witha. Contacts1.42Green (POWER) LED to indicate mainsconnection1.43Yellow (CHARGE) LED to indicate charging1.442-pin socket for car charging cable1.45Unlocking slider for1.46Interchangeable mains plugs (Euro/GB/USA)Designation of parts / 7778/ The displays/In the viewfinderThe displays2.In the viewfinder2.1LEDS (L ight E mitting D iodes)(with automatic brightness control, adapts to the ambient brightness 1) for:2.1.1Four-digit seven-segment digital display withdots above and below Digital display:– Display of the automatically determined shut-ter speed for aperture priority mode, or for counting down exposure times longer than 1s– Warning that the metering or setting ranges are overshot or undershot using aperture priority mode– Information that the buffer memory is (temporarily) full Dot above:– Information (when lit) that metering memory lock is being used Dot below:– Information (flashing) that an exposure compensation is set2.1.2Two triangular and one circular LED:– Jointly used as light balance for manual exposure control– Warning of values below the metering range 2.1.3Flash symbol:– Flash readiness– Details of flash lighting before and after the picture 2.2Bright line frames for 24mm and 35mm (example)2.3Metering field for distance setting3.In the top panel LCD 3.1Number of pictures remaining 3.2Battery status1The automatic control is not available for Leica M lenses with viewfinder attachments, since they cover the brightness sensor 1.4 which supplies the information required for their operation. In such cases the displays always maintain a constant brightness.The displays/In the monitor / 794.In the monitor 4.1At normal review(image/s fill the entire monitor area)4.1.1Delete protection symbol (only if set)4.1.2Picture number/total number of availablepictures 4.1.3Enlargement level and/or position of sectionshownschematic, for enlarged view only)4.1.4Selected picture(for reduced viewing of 4 or 9 pictures only)4.2Reviewing with additional information(INFO ; reduced picture size)4.2.1Picture (if necessary with “Clipping” display 1)4.2.2.Histograma. Luminance (brightness)b. Red/green/blue(separate display of individual colors)4.2.3Delete protection symbol (only if set)4.2.4Date/time4.2.5Picture number/total number of availablepictures4.2.6Picture informationa.Exposure mode and shutter speedb.Focal length 2c.Sensitivityd.Exposure compensatione.Resolutionpression/file formatg.White balanceer profile numberj.Folder number/file namek.Size and position of section (only if in use)1see “The Histogram”, p. 922Only with the latest M lenses with 6-bit coding, or suitably converted lenses (see p. 86)4.1.14.2.3 4.2.4 4.2.54.1.21.3a b c k e f g i jdMenu items 5.1In the main menu5.1.1Lens Detection Lens type detection5.1.2Save User Profile User-specific profile (save)5.1.3Self timer Self timer delay time5.1.4Sharpening Sharpening of image5.1.5Color Saturation Color saturation of image5.1.6Contrast Image contrast5.1.7Monitor Brightness5.1.8Histogram Graphic to indicate distri-bution of brightness5.1.9Picture Numbering5.1.10Auto Review Automatic replay of lastpicture5.1.11Auto Power Off Automatic power off5.1.12Flash Sync Firing time of flash5.1.13Auto Slow Sync Shutter speed with flash5.1.14Color Management Working color space5.1.15Reset Reset all settings (to origi-nal factory settings)5.1.16Sensor Cleaning Shutter opening for clean-ing the sensor5.1.17Date5.1.18Time5.1.19Acoustic Signal Button acknowledgementtones5.1.20Language5.1.21Format Formatting the memorycard5.1.22Firmware Firmware version5.2In the picture parameters menu5.2.1ISO Sensitivity5.2.2Exp. comp.Exposure compensation 5.2.3White Balance5.2.4Compression Compression rate/fileformat5.2.5Resolution5.2.6User Profile User-specific profile(recall)80/ Menu itemsQuick guideYou will need the following items:• Camera• Battery (A)• Memory card (not supplied)• Battery charger (B)Presets1.Insert the battery (A) into the charger (see p. 83)2.Connect the charger (B) to the mains, to chargethe battery (see p. 83)3.Set the main switch (1.19) to OFF.4.Insert the charged battery into the camera (seep. 84).5.Insert a memory card (see p. 85).6.Set the main switch (1.19) to S.7.Select the desired language (see p. 95).8.Format the memory card (see p. 120).Notes:• This is required generally only if the card has not been factory-formatted• Formatting deletes all data on the memory card.9.Set the date and time (see p. 95/96).Taking photographs10.Attach the desired lens to the camera (see p. 87).11.With the viewfinder to the eye, set the focus usingthe distance setting ring on the lens (see p. 104).12.Press the shutter release button (1.20) as far asthe first pressure point to activate the cameraexposure metering.13.Set the exposure using the aperture setting ringon the lens (1.15) and/or the camera shutterspeed dial (1.18) (see p. 107)14.Press the shutter release button all the way downto take the picture.Viewing picturesFor automatic brief reviews of the last picture (withinpicture taking mode).The LEICA M8 is factory-set to this function - AutoReview. Various function options can be selected inthe main menu under this item (5.1.10) (see p. 89).For review without a time limit:1.Select review mode by pressing the PLAY button(1.27) (see p. 88).2.Press the left or right direction button (1.31) toview other pictures.Enlarging pictures in the monitorTurn the central setting ring (1.30) to the right (clock-wise) to enlarge the picture display (see p. 116).Deleting picturesPress the delete button (DELETE, 1.25) and folllowthe instructions in the monitor (1.33) (see p. 117).Quick guide / 81Comprehensive instructions PreparationsAttaching the carrying strapCharging the batteryThe LEICA M8 is powered by a Lithium ion battery (A).Attention:• Only the battery type specified and described inthis manual, and/or battery types specified anddescribed by Leica Camera AG, may be used in thiscamera.• This battery may only be used in the units for whichit is designed and may only be charged exactly asdescribed below.• Using this battery contrary to the instructions andusing non-specified battery types can result in anexplosion under certain circumstances.• Never throw batteries into a fire as this can causethem to explode!• The charger supplied should be used exclusively forcharging this battery type. Do not attempt to use itfor other purposes.• Ensure that the mains outlet used is freely accessi-ble.• The charger may not be opened. Repairs may onlybe carried out by authorized workshops.Notes:• The battery should be charged before the LEICA M8is used for the first time.• The battery must have a temperature of 0°-35°C/32°–95°F to be charged (otherwise the charger willnot switch on, or will switch off again).• Lithium ion batteries can be charged at any time,regardless of their current charge level. If a batteryis only partly discharged when charging starts, it ischarged to full capacity faster.• The batteries warm up during the charging process.This is normal and not a malfunction.• If the yellow CHARGE LED (1.43) flashes aftercharging has started, this indicates a charging fault.In this case, disconnect the charging unit from themains and remove the battery. Ensure that theabove temperature conditions are met and thenrestart the charging process. If the problem per-sists, please contact your dealer, the Leica office inyour country or Leica Camera AG.• A new battery only reaches its full capacity after ithas been fully charged and – by use in the camera –discharged 2 or 3 times. This discharge procedureshould be repeated every 25 cycles. To ensure amaximum service life of the battery, it should not beexposed to constant extremes of temperature (e.g.in a parked car in the summer or winter).• Even with optimum conditions of use, every batteryhas a limited service life! After several hundredcharging cycles, this becomes noticeable as theoperating times get significantly shorter. !12a2b34582/ Comprehensive instructions/Preparations• Defective batteries should be disposed of according to the respective instructions (see p. 74).• The replaceable battery provides power to a back-up battery which is built into the camera. This back-up battery maintains the reference data such as the date for up to 3 months. If this back-up batterybecomes discharged it must be recharged by insert-ing the replaceable main battery. Once the replace-able battery has been inserted, the full capacity of the back-up battery is recovered after about 60hours. This process does not require that the cam-era be switched on.1. Insert the plug appropriate to the mains supply into the charger. To do this the unlocking slider (1.45)must bea. pushed upwards (towards the plug),b. held there, andc. the mains plug (1.46) exchanged for the appro-priate sort2.Insert the mains plug into a socket.• The green LED (1.42) marked POWER lights up.3.Insert a battery with its contacts and the endmarked with an arrow facing downwards obliquely in the charging bay (1.41) of the charger.4.Then press it downwards until it lies flush in the charging bay.• When it is in the correct position the yellowCHARGE LED (1.43) will light up to confirm that charging is in progress. After completion of charging – about 3 hours – the yellow LED goes out.5.The charger should then be disconnected from the mains. However, there is no risk of overcharging.6.Remove the battery by pulling its upper faceupwards a little and then pulling it out of the charg-er bay.The following LED displays indicate that charging is defective or is not possible:If a fault cannot be resolved by eliminating the causes stated in the above table, you should contact your dealer, the Leica office in your country or Leica Cam-era AG.Comprehensive instructions/Preparations / 83Green /a. Mains connection –POWER LEDnot correct b. Inserted battery cannot be chargedYellow / Battery is not beinga. Battery outside tem-chargedperature range speci-CHARGE LED a. Battery not insertedfied abovecorrectlyb. Battery totally dis-b. Inserted battery charged, pulsed already fully charged precharging will be carried out firstLED not litLED flashing。
尼康和佳能的历史
我看完这段时间在娱乐圈火爆的《为什么这么多人黑周星驰》的一篇PO文之后,一直淡定不下来,原来电视荧幕上出现的周星驰这么多故事。
不管周星驰这人到底如何,反正看完之后,我感动得一塌糊涂。
我突然就开始对相机厂商中的平生发起了浓厚的兴趣....。
在关于相机,在国内,大家永远无法忽视的相机厂商莫过于尼康和佳能了。
可以说,任何一个对相机稍有兴趣的人都不可能跳开这两家公司。
然而绝大多数人可能都不曾去了解过这两家的历史以及他们之间的渊源。
佳能与尼康的历史,就是一部百年以内的影像产业发展史,而作为尼康和佳能自己的发展历程,也是相互缠绕着进行的,有合作,有竞争,整理下来,竟然有几分波澜壮阔荡气回肠的意思来。
1917:一个时代的开始虽然现在尼康和佳能在135相机市场上从高端到低端都打的难解难分一副你死我活的样子(不过日本公司之间更加强调竞合,而不是单纯的竞争,和本国的民族企业们有着天壤之别),但在他们成立之初,这两家还有过一段不短的露水姻缘,关系维持了差不多13年(1934-1946)才审美疲劳,感情破裂,一拍两散,反目成仇,然后就开始了这一段持续70年的争斗,回顾起来,真是一路的刀光剑影。
开始正题尼康比佳能的历史要长上那么几十年,到今年已经91年了,尼克尔镜头也度过了75年的光辉岁月1917年,东京计器制作所的光学计量仪器部门和岩城玻璃制作所的反射镜部门合并,成为一家更完善的光学企业,并命名为Nippon Kogaku K.K。
(日本光学工业株式会社) 然后又兼并了藤井镜头制作所,这奠定Nikon 日后的发展基础,而Nippon Kogaku K.K。
这一个名字一直沿用至1988年,只是它的知名度却远不及它的品牌——Nikon,因此,Nippon Kogaku K.K。
早已改称Nikon Corporation(这种只知有家不知有国的情况非常多,举例来说,大家都知道Panasonic,很少有人知道松下其实叫Matsushita 吧)。
尼康镜头
1、尼康的变焦牛头尼康AF-S 17-35mm f/2.8D IF-ED 镜头参考价:¥9800——大名鼎鼎的“金广角”,尼康的变焦三剑客之一。
除开价格高以外,在数码时代抗紫边和抗眩光有一些问题,其它没啥缺点,成像好,抗畸变,色彩好。
(跟D3搭配主要还是28端以下的暗角问题,这个问题没办法,是现在全画幅的硬伤。
紫边等问题没有发现有改善)尼康AF-S DX 17-55mm F2.8G IF-ED 镜头参考价:¥12000——尼康在数码单反时代新推的一个牛头,针对数码机身做了优化。
成像更加优异,色彩更加的艳丽,只是支持不好全副135相机。
这个头的价格说实话俺觉得蛮离谱的,才上市的时候1万左右,现在是经常变化,想买的朋友多问问价啦。
(跟D3搭配发现居然只能用上区区的几百万像素了,看来DX 镜头还是在DX机身上用更合适)尼康AF-S 28-70mm F2.8D IF-ED 镜头参考价:¥10300——镜皇,曾经是尼康中焦变焦的最佳选择,各个焦段的成像都很好,而且还是恒定的F2.8大光圈。
尼康的变焦三剑客之一。
在数码时代的问题是紫边现象比较严重,但是数码时代用软件一处理这个问题也就不是问题了。
(在D3上面终于恢复到一个舒服的视觉了,我哭…………但是紫边问题还是有的,其它的我没觉得有啥不妥,因为身边一时没有24-70F2.8G所以没办法做比较,下次一定做一个比较)尼康AF-S VR 70-200mm F2.8G IF-ED 镜头参考价:¥13000——小竹炮,个人觉得是尼康镜头里最值得考虑的变焦镜头。
成像超棒的一个变焦超级牛头!尼康的变焦三剑客之一。
这个头除开重以外,没啥缺点,真的没有,成像在光圈全开F2.8的时候各个焦段都很好,尼康唯一让我流口水的变焦镜头。
这个头也老爱涨价,哎……(搭配D3很好,论坛里面的毒图也很多)(补:以上几个牛头,有好几位大侠都说F2.8的时候成像不锐利,比较肉。
是的,但是有几个头最大光圈的时候不肉?莫非都要人去买莱卡、蔡司的那些神镜么?关于尼康新出的14-24和24-70的评价都是非常的高,所以对于这两支镜头我觉得只要是有钱都是可以考虑的,尤其是24-70F2.8G搭配D3既可以拍风景也可以人文,十分的舒服!)2、尼康的定焦牛头尼康Ai AF 85mm F1.4D IF 镜头参考价:¥6600——人像王,成像是典型的焦内锐利,焦外柔和,色彩好,数码时代紫边问题比较突出。
大玩LOMO与玩具相机读后感10篇
大玩LOMO与玩具相机读后感10篇《大玩lomo与玩具相机》是一本由朴相姬著作,北方文艺出版的454图书,本书定价:45.00元,页数:2021-1,特精心从网络上整理的一些读者的读后感,希望对大家能有帮助。
《大玩lomo与玩具相机》读后感(一):《大玩lomo与玩具相机》评论-7分非常调皮的一本书,从外包装外观至内容当中的诸多二维手绘插页,整体设计的非常时尚,合乎了lomo这个开朗的生活元素。
lomo这个话题,我还算是小有体会的,我个人也有几个lomo相机,偏爱它突如其来的莫名惊喜。
我也会向我的学生们大力的推荐lomo,越是在数码相机膨胀的时代里,胶片的不可复制性就越尽显它的魅力,这也是大家钟爱它的根本。
书中了解了主流的几款lomo相机,分析的还是很精细的,包含相机的性能数据和具体操作方法,但还是比较多,除了很多款式没被提到。
还了解了诸多摄制lomo须要特别注意的细节,这和其他的摄影种类还是存有显著区别的。
第三部分,主要写了黑白摄影的后期制作,个人觉得这个部分和lomo有些偏离了,不该出现在这本书中,还不如再增加些lomo相机的介绍,成为一本真正的lomo使用手册。
翻译的虽然通顺,但并不生动。
《大玩lomo与玩具相机》读后感(二):复古与狂热“串起每一刻,别让她溜走”,相信这句话大家还记忆犹新,是的,这是柯达公司在中国投放的广告词,但就在不久前,柯达在纽约依据美国《破产法》第十一章提出破产保护申请,这家百年辉煌的老店,即将“溜”出我们的视线。
还记得小时候父亲手里拿的黑白照相机,曾经令我痴迷,喜欢跟在他屁股后面,钻进暗房,欣赏影像逐渐显现在相纸之上的神奇。
后来长大了,开始有了自己的相机,每次按完快门,还要手动倒下胶卷,有的时候被拍的人都摆好姿势了,这边忘了过卷,白白浪费表情。
刚刚出现数码相机的时候,我觉得好神奇,竟然不用换胶卷了!随便照不用担心花钱,照了不好的删掉就可以,方便至极,但用久了,却越来越觉得拍照变得漫不经心,反正错误可以修正,劣迹也可以删掉重来,反倒有些怀念胶卷时代,那瞬间即为永恒的时代。
禄莱6008三款AF配套镜头测试
禄莱6008三款AF配套镜头测试Schneider-Kreuznach80mm f/2.8 AF-Xenotar技术数据:焦长80mm,最大光圈f/2.8,7片6组。
对焦顺时针旋转160度,视角为对角52度,重量503克,滤镜规格为VI插口,卡口为禄来Rolleiflex 6008 AF,定价2,400美元,美国市场参考零售价约2000美元。
外观与操作:和目前所有禄来6008 AF的配套自动对焦镜头一样,这款标准镜头为德国施耐德公司制造。
其PQS表示其镜间快门的最快速度可以达到1/1000秒。
在同类镜头中显得大且略重,机身为漂亮的半哑黑色电镀,在6008AF相机上平衡很好。
对焦环宽大,带棱纹的橡胶包裹,手动对焦模式时转动顺畅,阻尼佳,且自动对焦时不转动。
光圈值和公制对焦距离刻值黑底白字,大且醒目,详尽的景深刻线黑底黄字,还有红色的红外线对焦标记。
英制对焦距离刻值黑底绿字,不够醒目。
光圈环锁定于“A”时配合机身设置可进行快门优先自动曝光或者程序优先自动曝光。
测试情况:由于测试仪器限制无法测试此镜头的SQF值,代之以每毫米线的解像率测试。
有很小的桶型畸变(0.19%),表现极佳。
实际最近对焦距离为1米,此时放大率为1∶10.2,中央和边缘锐度在所有光圈下均极佳,最佳光圈为f/8。
使用情况:反转片实拍测试很锐利,反差好。
眩光在所有光圈下得到很好地控制。
所有光圈下均没有看到四周光量下降——表现杰出。
结论:是我们测试过最好的6×6厘米画幅80mm f/2.8镜头之一。
Schneider-Kreuznach60-140mm f/4.6 AF-Variogon技术数据:焦长60-140mm,最大光圈f/4.6,13片11组,对焦顺时针旋转手动对焦环130度,变焦从60mm到140mm逆时针旋转变焦环70度,焦长刻值有60mm,80mm,100mm,120mm和140mm。
重量2608克,滤镜规格M122×1,卡口Rolleiflex 6008 AF,定价5850美元,美国市场参考零售价约5100美元。
- 1、下载文档前请自行甄别文档内容的完整性,平台不提供额外的编辑、内容补充、找答案等附加服务。
- 2、"仅部分预览"的文档,不可在线预览部分如存在完整性等问题,可反馈申请退款(可完整预览的文档不适用该条件!)。
- 3、如文档侵犯您的权益,请联系客服反馈,我们会尽快为您处理(人工客服工作时间:9:00-18:30)。
u 发 1亿像素A61)-lOOc'一lJ画幅航扣
厄反 机
哈苏公司推出了旗下又一款搭载1亿像素中画幅影像传感
器的新机A6D一100c,不过这台相机是专为航拍用途而设计的
无反相机系统新机脱胎于哈苏此前推出的航拍相机产品,并
在此基础上加入了诸多新特性、除搭载了一块1亿像素的中画
幅影像传感器外,新机还将最高快门速度提升至1/4000s,并
号称具备了15档动态范围
除此之外,哈苏A6D一1 00c还具备了仅在20 us内便可
同步8台A6D相机进行拍摄的能力,以及可以通过uSB3 0
tyPe—C接口进行数据传输等 哈苏表示,目前公司已经推出
了9支H系统镜头的航拍相机版本,而本次推出的A6D一1OOc#l ̄
机也16-会以有IR滤镜和无lR滤镜两种版本上市销售
林巴斯发布新款…:.防式 片0LTG-5
奥林巴斯正式发布了早前传闻的新款三防式卡片机
TG一5该机进化自奥林巴斯此前颇受欢迎的明星机型TG~4,
并在此基础上采用了最新的影像传感器和图像处理器,同时
提升了追焦能力,并加入了4K视频、wl_Fi等功能。首先,新
机将影像传感器的有效像素降至1200万以获得更好的画质表
现。与之相配的是同样用于E—M1 Ma rk ll 1 ̄gTruePic\111图像处
理器 尽管新机配备的依旧是等效25~1O0mm F2~4 9的变焦
镜头,但这次镜头特别做了防雾处理来应对气温的快速变化 、
除此之外,新机在三防的性能方面也得到了加强。奥林 巴斯TG一5最高可提供15m防水、2.1m防跌落、1OOkg防压以 及一14℃防冻的能力 而在机身的外观设计上,新机将变焦控 制器设计得更为传统,在机身顶部也加入了控制拨盘最后, 奥林巴斯TG一5还能够拍摄30p1 ̄94K视频及1 20fPs的全高清慢 速视频 据悉,奥林巴斯TG一5计划于6月上市销售,其售价 为449美元(约3100元人民币)、 86 照相机 琶思发布世界首款1亿像素黑rI中画幅棚 机数码后背 飞思公司推出了一款搭载1亿像素传感器的中画幅相机数 码后背,只不过这次发布的是一款纯黑白的后背产品 本次推 出的飞思IQ3 Ach romatjc。,是世界首款像素数量达到1亿的 黑白中画幅数码后背这部价值50000美元(约34 5万元人民 币)的产品,采用无彩色滤镜和I R滤镜的设计,因此具备更高 的锐度和更好的高感表现。此外,1Q3 Achtomatlc 可搭配包 括飞思自家的IQ3×F相机在内的多款中画幅机身使用 当被问 到为何要推出黑白版本时,飞思方面提出了“永恒的表达”这 一概念,并且表示新机将会吸引到致力于建筑、人像、风光以 及艺术摄影领域的摄影师..据悉,新款飞思IQ3’Ach r0matic 中画幅数码后背将于今年8月初限量销售 I ̄OMO推出Neptune Convertible可变式 镜头套装 Lomog raPhy近期在众筹网站KIcksta rte r推出了全新 Neptune Conve rtible可变式镜头套装 该套装依据法国发明 家夏尔・雪弗莱于1840年推出的可转换镜头系统进行设计, 共由35mm F3 5、50mm F2 8及80mm F4三个不同焦段的镜 头组成,同时也拥有尼康F、佳能EF和宾得K三种卡口版本 除了能够使用传统的光圈系统外,Neptune Conve rtIble镜头
还能够通过加入投放式的特别光圈片来自由地控制散景效果
以及形状..此外,由于前镜组与镜尾能够分离,该系统也具备
了很强的扩展性。LOM0表示,公司目前已经在着手设计更多
不同效果和焦段的前镜头。据悉,新款Lomog raphy Neptune
Conve rtIbIe镜头计划于6月7日上市销售,其售价为690美元
(约4760元人民币)