饮水机说明书
洞庭山饮水机使用说明书

洞庭山饮水机使用说明书摘要:1.引言2.洞庭山饮水机的产品特点3.安装与使用4.维护与保养5.安全注意事项6.结论正文:【引言】感谢您选择洞庭山饮水机!为了帮助您更好地使用本产品,我们特地为您提供了这份详细的使用说明书。
请您仔细阅读以下内容,以便充分发挥产品的性能,确保安全、便捷地使用。
【洞庭山饮水机的产品特点】洞庭山饮水机凭借其先进的过滤技术,为您带来安全、健康的饮用水。
产品特点如下:1.多重过滤:本饮水机采用五层过滤技术,有效去除水中的杂质、细菌、病毒等有害物质,保障水质安全。
2.节能环保:洞庭山饮水机采用低能耗设计,运行过程中噪音低,不影响您的正常生活。
3.智能恒温:饮水机内置智能恒温系统,可自动调节水温,保证您随时饮用到适宜的水温。
4.大容量水箱:洞庭山饮水机配备大容量水箱,满足您一家的日常用水需求。
【安装与使用】1.安装:在收到产品后,请先检查包装是否完好。
打开包装,按照说明书的指示,将各部件组装在一起。
2.使用:将电源线插入插座,打开开关,待水箱中的水加热至适宜温度后,您可以开始饮用。
【维护与保养】为了确保洞庭山饮水机的正常运行,延长使用寿命,请您定期进行以下维护工作:1.定期清洗水箱,建议每三个月清洗一次。
2.定期更换滤芯,建议每六个月更换一次。
3.如发现产品异常,请立即断电,并联系售后服务。
【安全注意事项】1.请勿将饮水机置于潮湿、高温的环境中。
2.请勿让儿童单独操作饮水机。
3.请勿将饮水机用于饮用以外的用途。
【结论】感谢您选择洞庭山饮水机,希望这份使用说明书能为您提供帮助。
如果您在使用过程中遇到任何问题,请随时联系我们的售后服务,我们将竭诚为您解答。
airmate小型桌上饮水机说明书

airmate小型桌上饮水机说明书
1、将纯净水桶顶端的塑料薄膜撕下,清洁备用。
2、用双手握着,将纯净水桶倒立。
轻轻的放在饮水机顶上的进水孔內的柱上。
3、等到捅里水流一会儿再将饮水机的插头插到电源插座上。
4、打开饮水机上的电源开关,过一会儿就可以喝出热水了。
使用饮水机的安全注意事项:
1、选择插饮水机的插座电线要达到饮水机的功率要求。
2、如果关停饮水机机,应先将饮水机上的开关关闭,然后再拔掉插座。
不可以将拔出插头,或插入插头作为饮水机的开机或关机操作。
3、如果是饮用热水时,应等到水进入加热容器后(刚刚更新水桶时),再插上电源使用。
4、饮水机应放在平稳的地方使用,不宜放在振动或者不稳的地方使用。
5、饮水机应放在干燥,阴凉,通风处使用,不宜放在潮湿的地方使用。
6、教育儿童不要玩饮水机的出水口,以免烫伤儿童。
海尔 YR2106D-CB 立式热饮机清饮系列 使用说明书
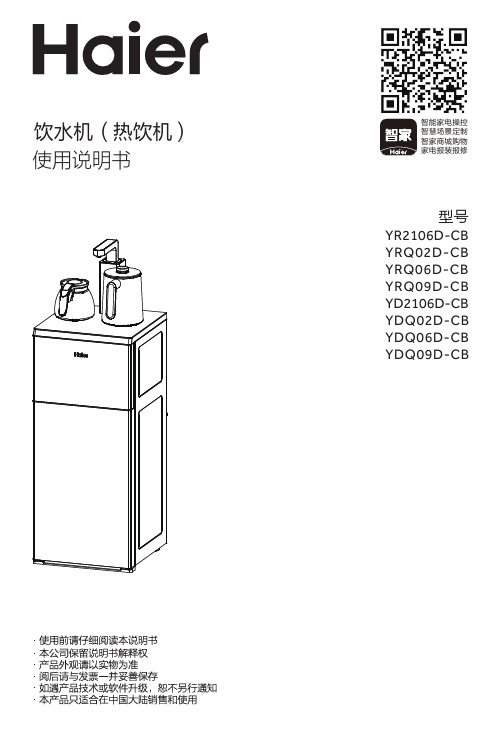
使用说明书型号YR2106D-CB YRQ02D-CB YRQ06D-CB YRQ09D-CB YD2106D-CB YDQ02D-CB YDQ06D-CB YDQ09D-CB饮水机(热饮机)智能家电操控智慧场景定制智家商城购物家电报装报修目录使用注意事项.......................................1产品简介 (2).产品部件..........................................2.装箱清单..........................................2.技术数据..........................................3.电气原理图......................................3.产品特点..........................................3.产品功能..........................................4安装及维护..........................................5.安装方法..........................................5.固定说明..........................................5故障诊断及排除...................................6环保清单.............................................7.产品中限用物质的名称及含量..........7产品中与水接触材料列表.....................7保修服务 (8).用户须知.........................................8.保修说明.........................................8“1+5”成套服务. (9).温馨提示..........................................5.清洁保养 (6)尊敬的用户:您好!为保证使用安全,防止人身伤害及物品损坏,使用本产品前请务必仔细阅读本说明书并遵守所有注意事项。
艾肯饮水机使用说明书

饮水机操作说明
饮水机操作说明饮水机是一种常见且广泛应用于办公室、学校、商场和家庭等场所的设备。
它为用户提供清洁、便利的饮用水,满足人们日常生活的需求。
为了更好地使用饮水机,以下是详细的操作说明。
一、基本功能饮水机的基本功能是提供冷热饮用水,并可选择直饮水或热水。
通过简单的操作,用户可以快速获得满足饮水需求的水源。
二、开关机操作饮水机通常配备有一个独立的开关按钮,用于控制整机的开关机。
当需要使用饮水机时,按下开关按钮,饮水机即开始运转。
相反,当不需要使用饮水机时,再次按下开关按钮即可停止饮水机的运行。
三、选择供水温度饮水机提供的供水温度通常有冷水、常温水和热水三种选择。
用户可以根据实际需要选择不同的供水温度。
常见的调节方式是通过在饮水机面板上的按钮或滑动调节条进行操作。
四、冷水功能1. 供应冷水前,请确保饮水机已连接电源并开启。
2. 按下选择冷水的按钮或将调节条调至冷水位置,等待片刻。
3. 当冷水准备就绪时,轻按冷水出水口下方的按钮,即可畅享清凉的冷水。
五、常温水功能1. 饮水机的常温水功能无需特殊操作,水温会自动保持适宜的常温。
2. 直接轻按常温水出水口下方的按钮,即可畅饮舒适的常温水。
六、热水功能1. 供应热水前,请确保饮水机已连接电源并开启。
2. 按下选择热水的按钮或将调节条调至热水位置,等待片刻。
3. 当热水准备就绪时,轻按热水出水口下方的按钮,即可获得暖意满满的热水。
七、更换水桶1. 当饮水机水桶中的水快用尽时,饮水机会发出警示声音。
2. 打开饮水机的上盖,将已用尽的水桶取出。
3. 将新的水桶整齐地放入饮水机底部的水桶座上,确保桶盖与机器配对牢固。
4. 关闭饮水机的上盖,水桶更换完成。
八、注意事项1. 使用饮水机前,请先阅读并遵守使用说明书上的安全须知。
2. 饮水机为家庭使用者,应注意防止儿童或宠物误操作,避免意外发生。
3. 定期清洁饮水机,保持水质的新鲜和机器的卫生。
4. 饮水机水源较为特殊,请定期更换水桶,避免使用过期的水源。
美的饮水机使用说明书

Installation / Care / Use ManualOriginal InstructionsModels: EFA8*2YJO, EFA8*F2YJO, EFA8*P2YJO, EFA8*FP2YJODescriptionRefrigerated Drinking Fountain (Cooler) delivers chilled, clean potable drinking water. Water Cooler houses the refrigeration and delivers a steady stream of water for direct drinking at the press of the pushbutton.Ratings• Electrical: 230Vac, 50Hz, (See nameplate for Amperage), 1 phase. • Ambient Air Temperature: 50-100.4 °F (10-38 °C).• Water Pressure: 20-100 psig (0.14-0.69 MPa).• Maximum Water Temperature: 90 °F (32 °C).• Refrigerant: HFC-R134a • Ingress Protection: IP21• For Indoor Commercial Use only.• Water Inlet: 3/8”O.D. unplated copper tube. • Waste Water Outlet: 1-1/4” O.D. tubeDANGER– Indicates death or serious injury will result if proper precautions are not taken.WARNING – Indicates death, serious injury or property damage can result if proper precautions are not taken.CAUTION – Indicates some injury or property damage may result if proper precautions are not taken.DefinitionsAuthorized Service Personnel – Factory trained personnel or personnel having working knowledge of electrical, plumbing andmachine (appliance) maintenance procedures.SafetyDANGER• Please read these instructions completely before starting the installation or performing any service. Failure to follow the instructions andsafety precautions in this manual can result in serious injury or death.• After installation, keep these instructions in a safe location for future reference.• Electric supply must be identical in voltage, cycle, and phase to that specified on nameplate.• Electrical supply must have Ground Fault Circuit Interrupter (GFCI) protection.• A means for disconnecting electrical supply to the unit must be incorporated in the fixed wiring in accordance with wiring rules. This is toallow electrical disconnection of the unit from electrical supply after installation.WARNING• For use with clean, clear potable drinking water only. Do not use with water that is microbiologically unsafe or of unknown quality without adequate disinfection before the system.• Installation and connection to water and electrical mains must be in compliance with local and national laws.• All Installation and Service work must be performed by an authorized service personnel.CAUTION• This appliance can be used by children aged from 8 years and above and persons with reduced physical, sensory, or mental capabilities or lack of experience and knowledge if they have been given supervision or instructions concerning use of the appliance in a safe way andunderstand the hazards involved. Children shall not play with the appliance. Cleaning and user maintenance shall not be made by children without supervision.• To prevent a metallic taste or increased metal content in the water due to an electrolysis process caused by electrical feedback from thegrounding of electrical equipment to water supply and water waste mains, connect to these mains using non-conductive materials. Theprovided non-metallic In-line Strainer meets this requirement.InstallationFor correct and safe installation, please read these instructions completely.• All Installation work must be performed by an authorized service personnel.• Disconnect electrical supply serving the Installation area to reduce risk of electrocution. • Unit not suitable for installations where water jets could be used.DANGERWARNING• Shut off water supply serving the Installation area to reduce risk of water damage.• Ensure proper ventilation by maintaining clearance from cabinet louvers to wall on each side of Cooler as specified in Rough-In. • Never wire compressor directly to electrical supply.• Do not solder tubes inserted into the In-line Strainer as damage to the o-rings may result. • Thoroughly flush all water lines and fittings of all foreign matter before connecting to Cooler.• Warranty is void if the plumbing kit or glass filler is not specified for use by the Manufacturer for this particular model. • Warranty is void if Installation is not made in accordance with current Manufacturing instructions.CAUTION• Hose-sets are not to be used for connecting to water mains.• If inlet pressure is above 100 psig (0.69 MPa), a pressure regulator must be installed in water supply line. Any damage caused by reason of connecting this product to water supply line pressure outside its rated pressure, is not covered by warranty.• This cooler is manufactured in such a manner that it does not in any way cause taste, odor, color, or sediment problems. If a taste, odor or sediment problem is prevalent, try installing our water filter on the supply line. • Tools/Items required but not provided.o Water Shut-off Valve with 3/8” (9.5mm) compression outlet. o 1-1/4" (31.8mm) Waste Trap (non-metallic) o Safety Glasses o Protective Gloveso 5/16" (7.9mm) Hex Driver or Flathead Screwdriver o C-13 Modular International Power Cord SetInstallation: Cooler Mounting1. Select installation location. Installation location must be a flat surface. Installation location should ensure proper ventilation by maintaining 4"(102mm) minimum clearance from cabinet louvers to wall.2. Remove front panel by unscrewing (2) 5/16" (7.9mm) Hex Head screws. Set panel aside.3. Installation area must also include water supply, electrical supply and suitable drain. Water, drain and electrical supply systems must complywith local code requirements.Installation: Water Line connection1. Ensure Mains Water Supply has Water Shut-off Valve with 3/8” (9.5mm) compression outlet.2. Connect loose end of supplied 3/8” (9.5mm) unplated copper tube to Water Shut-off Valve. See Figure 1.• NOTE: If 3/8” (9.5mm) copper tube must be cut for proper fit, remove all burrs from the outside of tube and re-flush before use.3. Install waste trap. Remove the slip nut and gasket from the waste trap and install them on the Cooler waste line making sure that the end of thewaste line fits into the waste trap. Assemble the slip nut and gasket to the trap and tighten securely.4. Turn on building water supply and open Water Shut-off Valve. Check all connections for leaks and correct any found.Installation: Electrical connection1. Rotate fan to insure proper clearance and free fan action.2. Connect modular (C-13) end of International Power Cord Set (sold separately) into Power Inlet on unit and ensure plug-end reaches electricaloutlet. Do not plug into electrical outlet!NOTE: WATER FLOWDIRECTIONBUILDING WATER SUPPLYWATER SHUT-OFF VALVE(NOT PROVIDED)1/4" O.D. TUBE WATER INLET3/8" (9.5mm) O.D.UNPLATED COPPER TUBEIN-LINE STRAINER (PROVIDED)Figure 1Figure 2A = White (Neutral)B = Black (230Vac)C = Ground (Earth)D = FanE = Freeze Control (when provided)F = Cold Control (Water)G = Hot Tank Switch (When Provided)H = Hot Tank (when provided)I = Capacitor (when provided)POWER INLETOperation: Start-Up1. Turn on the building water supply and check all connections for leaks.2. Purge air from all water lines by activating pushbutton with your hand.3. Recheck all water and drain connections with water flowing through system.4. Rotate fan to ensure proper clearance and free fan action.5. Connect plug-end of International Power Cord Set (sold separately) into electrical outlet.6.After verifying that the water cooler is properly connected and operational, replace and reattach cooler front panel by tightening (2) screws.Water Mains Supply, 3/8” (9.5mm) O.D. compression outlet of Shut-off Valve (not provided) to be 1-1/2” (38mm) from Wall Waste Outlet, 1-1/4” (31.8mm) O.D. Drain Tube 1-1/4” (31.8mm) Trap (not provided)Electrical Mains Supply Duplex Outled, 3-wire in Recessed Box. Must have Ground Fault Circuit Interrupter (GFCI) protection Ensure proper ventilation by maintaining 4” (102mm) minimum clearance from cabinet louvers to wall Power Inlet LocationPlumbing rough in may be located anywhere within this areaServiceFor proper and safe servicing, please read these instructions completely.• All Service and Maintenance must be performed by an authorized service personnel.• Disconnect electrical supply to the unit before any service work to reduce risk of electrocution. • Shut off water supply serving the unit before any service work to reduce risk of water damage.DANGERCAUTION• Tools/Items required but not provided, for Servicing: o Safety Glasses o Protective gloveso 5/16" (7.9mm) Hex Driver or Flathead ScrewdriverService: Adjustments1. Temperature Control: Factory set for 50ºF ± 5º (10ºC ±2.8º) water under normal conditions. To adjust water temperature, remove front panel byunscrewing (2) 5/16" (7.9mm) Hex Head screws. Set panel aside. Turn screw on cold control (Item 13) clockwise for colder, counter clockwise for warmer. See Figure 9.2. Water Stream Height: Stream height is factory set at 35 psig (0.24MPa). If supply varies greatly from this, remove items 1 and 2 and adjustscrew on item 4. Clockwise adjustmentwill raise stream height and counter-clockwise adjustment will lower stream. For best adjustment, stream should hit basin approximately 6-1/2" (165mm) from bubbler. See Figure 5.3. Water coming out of Bubbler continuously: When this occurs at the end of the compressor cycle, turn the cold control warmer (Item 13) counter-clockwise 1/4 of a turn. See Figure 9.FService: Inspection/Cleaning• Inspect Cooler twice each year for proper operation and performance.• Inspection of the unit will require disconnecting electrical supply, removal of panels, etc. and reassembly and return to service practices.1. Cleaning: Warm, soapy water or mild household cleaning products can be used to clean the exterior panels. Extra caution should be used to clean the mirror finished stainless steel panels. They can be easily scratched and should only be cleaned with mild soap and water or Windex glass cleaner and a clean, soft cloth. Use of harsh chemicals or petroleum based or abrasive cleaners will void the warranty.2. Bubbler : Mineral deposits on the orifice can cause water flow to spurt or not regulate. Mineral deposits may be removed from the orifice with a small round file not over 1/8” (3 mm) diameter or small diameter wire.• CAUTION : DO NOT file or cut orifice material. Care must be taken not to damage the orifice(s)3. Condenser Fan Motor : Confirm condenser fan turns freely. If the condenser fan does not spin freely, have an authorized service personnel replace.4. Ventilation : Cabinet louvers and condenser fins should be periodically cleaned with a brush, air hose or vacuum cleaner. Cleaning should be done twice each year or more frequently if needed due to environment. Excess dirt or poor ventilation can cause no cold water and compressor cycling on the compressor overload protector.5. Water Flow : Confirm proper water flow. If water flow is slow, inspect filter or inline strainer for restriction. Replace filter cartridge if required. Disassemble inline strainer and clean if required See Figure6.6. Lubrication: Motors are lifetime lubricated.7.Actuation of Quick Connect Water Fittings: Cooler is provided with lead-free connectors which utilize o-ring water seal. To remove tubing from the fitting, relieve water pressure, push in on the gray collar before pulling on the tubing. To insert tubing, push tube straight into fitting until it reaches a positive stop, approximately 3/4” (19mm). See Figure 7.Service: Inspection/Replacement• Inspect Cooler twice each year for proper operation and performance.• Inspection of the unit will require disconnecting electrical supply, removal of panels, etc. and reassembly and return to service practices.1. Bubbler : To remove the bubbler, first disconnect the electrical supply. Remove the Front Panel by removing (2) screws. To remove the bubbler,loosen locknut from the underside of the basin and remove the tubing from the quick connect fitting (see Figure 7 for actuation of Quick Connect Fittings). When installing replacement bubbler, tighten nut only to hold parts snug in position. Do Not Overtighten. After servicing, replace the front panel and two (2) screws.2. Cleaning Strainer : Restricted water flow may be caused by clogged screen. Remove plug and screen. Clean screen and replace. LubricateO-Ring with food grade pharmaceutical mineral oil. Do not overtighten plug or fittings. See Figure 6.A = Plug with 7/8" (22.2mm) HexB = O-ringC = ScreenD = Strainer Body with 1" (25.4mm) HexFigure 6Figure 7Figure 4Figure 5Assy-Filter & Bracket includes Fltr Filter DetailCover Button Regulator Retaining Nut Regulator Hex Nut Regulator Holder Basin Bubbler Assy Orifice Assy Housing Assy Pedestal Bubbler Locknut Cold Control Power Cord Condenser Fan Shroud Fan Motor Fan Blade Fan Bracket Fan Blade Nut Drier Compressor Service Pack Kit - Compr Electrical/Relay/Overload/Cover Receptor Drain Bracket - Strain Relief Strainer Precooler Assy Heat Exchanger Evaporator Nipple-Bubbler (GF)Gasket (GF)Poly Tubing (Cut to Length)Gasket - Drain Power Inlet40089C 40048C 15005C 61313C 40169C 50986C 20776C 56073C 40322C 56011C 55997C 75580C 35839C 36024C 66743C 56237C 31430C 30664C 20282C 70018C 66703C 100000214798715C 50368C 27962C 55996C 45678C 66576C 66810C 15009C 10032274056056092C 50005C 35826C 123456789101112131415161718192021*22232425262728293031323334Item No.Part No.DescriptionReplacement Parts: 230V-50Hz Parts List*Includes Relay & Overload. If under Warranty, replace with same Compressor used in original assembly.NOTE: All correspondence pertaining to any of the above water cooler or orders for repair parts MUST include Model number and Serial number of cooler, name and part number of replacement part.Replacement Parts: Color TableGray Beige Almond Stainless Steel Sandalwood Granite Light GrayPANEL COLOR Right Panel (w/ hole)Right Panel (w/ohole)Left PanelCOLOR TABLE 20623C 21461C 20625C 21459C 27168C N/A27653C 27655C 27652C 27656C 27654C 27657C20622C 21460C 20624C 21458C 27165C 27166CFor Replacement Parts, contact your local distributor or call 1.800.834.4816Elkay Manufacturing Co. 2222 Camden Court – Oak Brook, IL 60523 U.S.A – 630.574.8484Front Panel20657C 20658C 20654C 21450C 27147C 27148CFigure 934。
泉来直饮水机使用说明书
泉来直饮⽔机使⽤说明书产品命名:A2 产品型号:SK-C-1-BJ2 产品命名:A3 产品型号:SK-C-1-BJ3 产品命名:A4 产品型号:SK-C-1-BJ4 产品命名:A5 产品型号:SK-C-1-BJ5 产品命名:A6 产品型号:SK-C-1-BJ6中国发明专利号:ZL201510446682.3(泉来产品长期由保险公司承担责任保险)感谢您选购泉来直饮⽔机系列产品,泉来将为您提供⾼品质、安全便捷的饮水生活服务,本使用说明书帮助指导您了解本产品的安装使用和功能特性。
装箱清单A2、A3、A4、A5、A6装箱清单明细1、主机1台5、保修卡1份2、说明书1份6、排水管1条3、滤芯3支7、滤壳扳手1个4、PE管1条8、活络连体三通阀1个安全注意事项1. 本产品必须安装在室内阴凉干燥的地方,避免阳光照射或靠近发热器具,否则容易造成机体变色,滋生细菌。
北方地区切勿装在室外,以防室外温度过低而造成冻裂。
2. 为确保您的安全,请特别注意机器的安装供电要求:A2、A3使用220V供电安装,安装需要用大于4mm²的电源总线,安装防漏电保护开关(220V),在额定电流的1.5倍(20A电流)范围内,电源必须可靠接地,电源的零线(蓝色)、地线(黄、绿花色)、火线(棕色)必须正确连接。
;A4、A5、A6采用380V三相五线供电安装,且单相主线要求大于4mm²,安装防漏电保护开关(380V),在额定电流的1.5倍(30A电流)范围内,电源必须可靠接地,电源的零线(蓝色)、地线(黄绿花色)、A相线(黄色)、B相线(绿色)、C相线(红色)必须正确连接。
;3.在安装直饮水机前请仔细阅读此说明书,如有不明确之处,请拨打我司售后安装指导电话400-611-1175.4.长时间不用水时,应将直饮水水箱和管道内的水排空,排空方法参照“维护和保养”项;5.本产品一旦出现漏水或者漏电情况,请立即关闭电源,并请通知当地经销商服务部门或本公司售后服务部,由专业服务人员处理,请勿自行维修。
洞庭山饮水机使用说明书
洞庭山饮水机使用说明书洞庭山饮水机使用说明书1. 概述洞庭山饮水机是一款智能化饮水设备,可以提供新鲜的过滤水,适用于家庭、办公室和商业场所使用。
2. 安装准备在安装饮水机之前,请确保符合以下需求:- 电源:确保饮水机周围有电源插座。
- 水源:准备好供饮水机使用的自来水源。
- 空间:确保饮水机有足够的空间安装和操作。
3. 安装步骤a. 将饮水机放置在水平坚固的台面上,并找到合适的位置。
b. 连接饮水机的进水管道到自来水源。
确保接头紧固并无漏水。
c. 连接饮水机的电源线到电源插座。
确认电源正常工作。
d. 打开自来水源,允许水流通过饮水机。
e. 运行饮水机,直到水流变清澈,以确保系统正常工作。
4. 使用方法a. 按下饮水机上的开关按钮,水泵将开始工作。
b. 下方出水口将提供过滤后的清洁饮用水。
使用杯子或瓶子接住水流。
c. 如需冷水,将杯子放在冷水出口下方,并按下冷水按钮。
稍等片刻即可得到冷饮用水。
d. 如需热水,将杯子放在热水出口下方,并按下热水按钮。
稍等片刻即可得到热饮用水。
e. 使用完毕后,关闭饮水机的开关按钮,并清洁出水口。
5. 维护与清洁a. 定期更换过滤器,以保证水质的洁净和无菌。
b. 清洁外部壳体及出水口,可以使用温和的肥皂水或专用清洁剂擦拭。
c. 定期检查水源连接和电源线是否安全可靠,避免漏水和电路故障。
6. 注意事项- 使用前请仔细阅读使用说明书,并按照说明正确操作。
- 请勿将热水直接接触皮肤,以免烫伤。
- 请勿将饮水机用于非饮用水的用途。
- 如发现饮水机出现故障或异常情况,请立即停止使用并联系售后服务。
希望以上说明书可以帮助您正确使用洞庭山饮水机。
如还有其他问题,请咨询您的销售商或联系售后服务。
贝尔斯顿饮水机说明书
贝尔斯顿饮水机说明书(原创实用版)目录1.贝尔斯顿饮水机的概述2.饮水机的安装3.饮水机的使用4.饮水机的维护与清洁5.安全注意事项6.售后服务与联系方式正文【贝尔斯顿饮水机的概述】贝尔斯顿饮水机是一款设计精美、性能卓越的饮水设备,适用于家庭、办公室等多种场景。
它能够为用户提供安全、卫生、方便的饮用水,满足人们日常饮水需求。
【饮水机的安装】在安装贝尔斯顿饮水机之前,请确保您已经仔细阅读了本说明书。
安装过程可以分为以下几个步骤:1.选择合适的位置:确保饮水机放置在稳固、水平的地面上,同时要方便接水、排水和搬运水桶。
2.拆卸包装:将饮水机从包装箱中取出,并去掉所有包装材料。
3.安装水桶:将水桶放在饮水机底部,确保水桶与饮水机底部的卡槽对齐。
4.连接水管:将水桶出水口的水管与饮水机的进水口连接,并确保连接处密封牢固。
5.接通电源:将饮水机的电源线接入电源插座,确保电源线牢固无松动。
【饮水机的使用】在使用贝尔斯顿饮水机时,请遵循以下步骤:1.打开饮水机开关:按下水桶上的开关,开启饮水机。
2.取水:将杯子放在出水口下方,等待水杯被自动填满。
3.关闭饮水机:用完水后,按下水桶上的开关,关闭饮水机。
【饮水机的维护与清洁】为了确保饮水机的正常运行和饮用水的卫生,需要定期对饮水机进行维护和清洁。
以下是一些建议:1.定期更换滤芯:根据水质情况和使用频率,每 3-6 个月更换一次滤芯。
2.清洁水桶:建议每季度对水桶进行一次清洗,确保水质卫生。
3.清洁饮水机:用湿布擦拭饮水机表面,避免使用有刺激性的清洁剂。
【安全注意事项】在使用贝尔斯顿饮水机时,请注意以下几点:1.确保饮水机放置在稳固的地面上,防止因摇晃导致的意外损坏。
2.不要让未成年儿童单独操作饮水机,避免触电等安全事故。
3.若发现饮水机异常,请立即切断电源,并联系售后服务。
【售后服务与联系方式】贝尔斯顿饮水机为您提供优质的售后服务,如果您在使用过程中遇到任何问题,请拨打我们的客服电话:400-XXX-XXXX。
博乐宝b16 说明书
博乐宝b16 说明书
博乐宝b16饮水机操作说明步骤如下:
1、短按一下旋钮按键出水量约为250ml。
2、长按旋钮按键2秒以上为自由杯模式,最大出水量约为500ml。
3、每次断电再通电开机后,按下旋钮按键,会出常温水量约100ml。
4、在待机状态下,长按旋钮2秒即为唤醒机器
新买的饮水机要特别注意:先加水再通电源,步骤如下第一步:
先将净水桶放到饮水机上; 第二步:又称排空,即按住热水出水开关,
待水流出; 第三步:接上电源! 否则,会造成饮水机干烧,引起内胆损坏.
博乐宝b16饮水机有两个开关一边热水一边凉水,插上电源开关控制
使用过程中,益达也发现了,存在一个问题,虽然确实能够3秒完成加热,但是净饮机每次使用完毕后加热管到出水嘴会有少量冷水存在,所以使用时最好先稍等片刻,等存水流完,再去接水,虽然不影响饮用,但是在泡茶和冲泡饮品时会有些影响。
- 1、下载文档前请自行甄别文档内容的完整性,平台不提供额外的编辑、内容补充、找答案等附加服务。
- 2、"仅部分预览"的文档,不可在线预览部分如存在完整性等问题,可反馈申请退款(可完整预览的文档不适用该条件!)。
- 3、如文档侵犯您的权益,请联系客服反馈,我们会尽快为您处理(人工客服工作时间:9:00-18:30)。
饮水机说明书
饮水机说明书
1. 引言
饮水机是一种用于提供饮用水的设备,广泛应用于家庭、办公室、学校和公共场所等各种环境。
本说明书旨在帮助用户了解饮水机的使用方法,确保正常使用和维护饮水机。
2. 基本功能
饮水机提供以下基本功能:
- 提供冷水和热水供用户饮用
- 过滤水质,去除杂质和异味
- 具备保温和制冷功能,保持水温恒定
- 操作简单,提供方便的用水方式
- 具备防漏电和过热保护功能,确保用户安全
3. 饮水机类型
饮水机主要分为台式饮水机和挂壁式饮水机两种常见类型。
3.1 台式饮水机
台式饮水机通常放置在桌面或地面上,具有较大的水箱容量和存水量。
其特点包括:
- 安装便捷,不需要墙壁支架
- 配有水龙头和冷热开关按钮
- 可调节的水温和供水量
- 适用于家庭、办公室等场所使用
3.2 挂壁式饮水机
挂壁式饮水机需要安装在墙壁上,具有较小的外形尺寸和水箱容量。
其特点包括:
- 省空间,适用于狭小的环境
- 设有壁挂支架,可调节高度和角度
- 配有水龙头和冷热开关按钮
- 适用于学校、公共场所等使用
4. 使用方法
以下是饮水机的基本使用方法:
1. 接通电源,确保饮水机正常运行。
2. 打开冷水开关,等待一段时间,直到冷水供应正常。
3. 打开热水开关,等待一段时间,直到热水供应正常。
4. 使用水龙头取水,根据需要选择冷水或热水,并调节出水量。
5. 使用完毕后,关闭冷水和热水开关,确保关闭状态。
6. 定期清洁饮水机,保持水质清洁和设备卫生。
5. 维护与保养
为了确保饮水机的正常运行和延长使用寿命,建议用户进行以下维护与保养:- 定期清洁过滤器和水箱,避免水质受到污染。
- 如果长时间不使用饮水机,建议关闭电源并排空水箱。
- 定期检查电源线和插头,确保无损坏情况。
- 避免将其他物品放置在饮水机上,以免影响正常散热。
- 如发现异常情况,如漏水或故障,请立即停止使用并联系售后服务。
6. 安全注意事项
在使用饮水机时,请遵循以下安全注意事项:
- 请使用正确的电压和电流,不要私自改装电源线或插头。
- 在清洁和维护饮水机之前,务必关闭电源并拔掉插头。
- 使用热水时请小心烫伤,避免接触热水出水口。
- 饮水机发生漏水或其他故障时,应立即停止使用并联系专业人员进行维修。
7. 常见问题解答
7.1 饮水机无法供水怎么办?
- 请检查是否已打开冷水和热水开关。
- 检查水箱是否有足够的水量,如水箱缺水,请及时加水。
- 如以上方法无效,请联系售后服务。
7.2 饮水机漏水怎么办?
- 请检查饮水机是否处于水平状态,如不平请调整水平。
- 检查水箱和水管是否连接紧密,如发现松动请重新安装。
- 如以上方法无效,请联系售后服务。
8. 总结
本文对饮水机的基本功能、使用方法、维护与保养以及安全注意事项进行了介绍。
希望用户能够通过本说明书了解和正确使用饮水机,享受健康便捷的饮水体验。
如有任何问题或需要更多帮助,请随时联系售后服务。