食品中心温度计说明书
食品中心温度计安全操作及保养规程

食品中心温度计安全操作及保养规程在食品行业中,温度控制是非常重要的一项任务。
温度计作为重要的检测设备,用于监测食品中心的温度,保障食品的质量和安全。
本文将介绍食品中心温度计的安全操作及保养规程。
一、食品中心温度计安全操作规程1. 温度计购买前在购买食品中心温度计前,应仔细查阅生产厂商的产品技术说明书及使用说明书。
需确保温度计符合国家标准,同时,也要注意区分不同类型的温度计及其使用范围。
2. 温度计操作前在对温度计操作前,应进行“开机自检”,以检测温度计的正常工作状态。
同时保障所使用的热电阻传感器、温敏电阻及热电偶的使用期限和使用状况。
3. 温度计操作中在使用过程中,应当保障温度计处于稳定状态下,不受温差干扰。
操作人员应严格按照产品使用说明手册进行正确操作。
4. 温度计保存及保养温度计存储应避免高温(不超过50℃)、阳光直射及硬物挤压,尤其注意保护温敏电阻或热电偶的探头部分。
定期检测温度计的准确性,如发现温度计出现问题应及时处理。
二、食品中心温度计保养规程1. 正确保养温度计正确保养食品中心温度计有利于延长设备使用寿命及提高其使用精度。
日常保养措施包括:保护温敏电阻及热电偶探头、定期检测温度计、清洁温度计外部分及存放时避免严重碰撞及湿度过高等。
2. 温度计保养方法2.1 温度计通电前,应检查外壳是否完整,内部线路是否损坏或老化。
2.2 温度计的探头应保持清洁,一旦出现异物应立即清除。
探头的保护套不能被遮挡。
2.3 温度计的接头应保持清洁,不得有油污或杂物等。
2.4 温度计安装时,应注意固定,尽量使其放置在不受外力干扰的地方。
2.5 温度计与被测体之间应补充保护隔离结构,以保证测量温度的准确性。
2.6 温度计在长时间不用时,应分别把探头清洗、晾干、贴好保护套后,置于温度室中以避免湿度和探头受损。
3. 温度计定期检查3.1 温度计的使用期限一般为两年左右,如果使用时间超过两年,应更换传感器及电路板等重要部件。
食物温度计安全操作及保养规程
食物温度计安全操作及保养规程前言使用食物温度计是确保食品安全的重要手段。
在日常生活中,食品温度计被广泛应用于家庭、餐饮和食品生产领域。
确保食物温度计的正确使用和维护对于保证食品安全至关重要。
本文将介绍食品温度计的安全使用和保养规程。
温度计的选择在使用食物温度计之前,应首先选择一个合适的产品。
如何选择一个合适的食品温度计?以下是选择食品温度计的几个重要因素:1.使用情况:家庭、餐饮或食品生产领域。
2.测温范围:温度计应满足应用领域的温度范围要求。
3.准确度:温度计应具有足够的准确度,以便在正确的温度范围内进行测量。
4.操作性:温度计应有易于操作的界面,易于清洁和维护。
安全操作正确使用食物温度计是确保食品安全的重要方法。
以下是正确使用食品温度计的几点建议:1. 选择一个合适的测量位置在使用食品温度计之前,必须选择一个合适的测量位置。
在测量内部温度时,应将温度计插入最厚的部位。
例如,在测量家禽食品的温度时,应将温度计插入鸟胸或鸡腿的最厚部位。
2. 维护卫生维护食品温度计的卫生状况至关重要。
在每次使用之前和之后都应对温度计进行消毒处理。
在消毒温度计之前,请务必查看生产商的指令。
3. 避免交叉污染在使用一个食品温度计时,务必避免交叉污染食品。
在测量完一个食品的温度之后,务必消毒温度计并在清洁后再使用。
4. 注重安全在使用食品温度计时,务必确保操作人员的安全。
在将温度计插入热食品之前,请确保已经停止加热。
同时,使用耐热手套和其他安全装备。
5. 记录温度在使用食品温度计之后,务必记录测得的温度。
这可以帮助您跟踪食品的温度变化,从而确保食品不受污染,并且可以管理食品的保质期。
温度计的保养保养食品温度计至关重要,因为它可以帮助您确保温度计的准确度,并保证温度计的使用寿命。
以下是保养食品温度计的几个关键要点:1. 温度计的清洁在每次使用食品温度计之后,务必使用温水和中性清洁剂清洗它。
确保彻底冲洗温度计,以防留下任何残留物。
玻璃温度计使用说明书

玻璃温度计使用说明书使用说明书一、产品概述玻璃温度计是一种常见的温度测量工具,它使用了热胀冷缩原理来测量物体的温度。
本说明书将详细介绍玻璃温度计的使用方法,帮助用户正确、安全地操作并获取准确的温度测量结果。
二、产品特点1. 高精度:玻璃温度计采用优质玻璃材料制造,具有较高的测量精度,可满足各种场景下的温度监测需求。
2. 耐用可靠:经过精心设计和加工,玻璃温度计具有良好的耐用性和可靠性,能够长时间稳定地工作。
3. 易于读取:温度刻度清晰可见,使用者可以准确读取温度数值,方便实时监测。
4. 安全环保:玻璃温度计无需电池或其他外部电源,使用安全可靠,且对环境无污染。
三、使用方法1. 温度测量范围:玻璃温度计适用于测量常温范围内的物体温度,温度范围为-10摄氏度至100摄氏度。
超出此范围的温度不得使用本产品进行测量。
2. 确保准确性:使用前,请检查玻璃温度计是否完好无损,如有损坏应立即更换,并进行校准操作。
3. 测量方法:将玻璃温度计完全浸入待测物体中,待读数稳定后即可记录温度数值。
如需连续监测温度,请等待温度计恢复到室温后再进行下一次测量。
4. 注意事项:a. 避免将玻璃温度计暴露在高温、酸碱等腐蚀性环境下,以免损坏温度计;b. 使用时请勿将玻璃温度计弯曲或撞击,以免引起精度降低或破损;c. 在使用过程中,应避免接触金属或其他物体,以免产生读数误差。
四、操作示例为了更好地帮助用户理解和运用玻璃温度计,下面以测量室内温度为例,给出一个操作示例:1. 将玻璃温度计完全浸入室内空气中,并等待温度数值稳定;2. 观察温度刻度,读取温度数值并记录;3. 如需连续监测室内温度变化,务必等待温度计恢复到室温后再进行下一次测量;4. 完成测量后,将玻璃温度计清洗干净并储存在防尘、防潮的环境中。
五、维护保养1. 温度计存放:使用完毕后,请将玻璃温度计存放在干燥、通风的地方,并避免阳光直接照射。
2. 温度计清洁:如需清洗,可使用柔软的湿布轻拭温度计表面。
温度计说明书
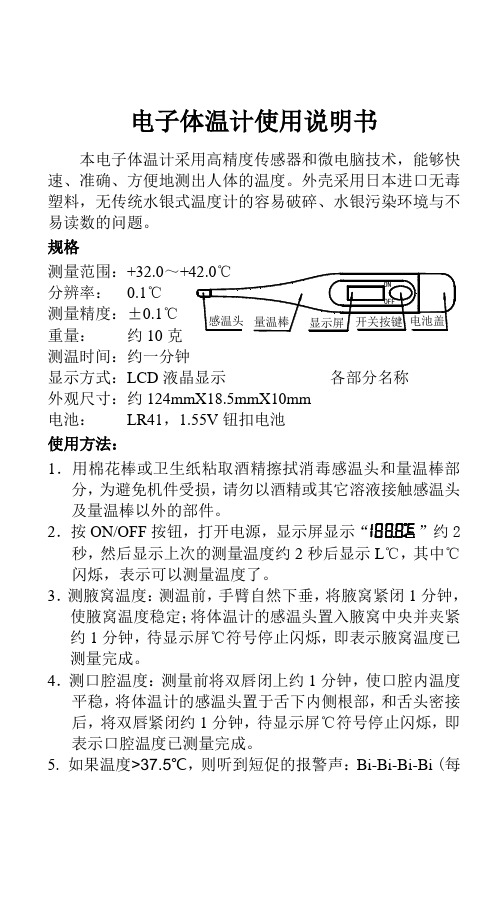
电子体温计使用说明书本电子体温计采用高精度传感器和微电脑技术,能够快速、准确、方便地测出人体的温度。
外壳采用日本进口无毒规格测量范围:分辨率: 0.1测量精度:±重量: 约显示方式:外观尺寸:约电池: 使用方法:1.用棉花棒或卫生纸粘取酒精擦拭消毒感温头和量温棒部分,为避免机件受损,请勿以酒精或其它溶液接触感温头及量温棒以外的部件。
2.按ON/OFF2秒,然后显示上次的测量温度约2闪烁,表示可以测量温度了。
3.测腋窝温度:测温前,手臂自然下垂,将腋窝紧闭1分钟,使腋窝温度稳定;将体温计的感温头置入腋窝中央并夹紧约1分钟,待显示屏℃符号停止闪烁,即表示腋窝温度已测量完成。
4.测口腔温度:测量前将双唇闭上约1分钟,使口腔内温度平稳,将体温计的感温头置于舌下内侧根部,和舌头密接后,将双唇紧闭约1分钟,待显示屏℃符号停止闪烁,即表示口腔温度已测量完成。
5. 如果温度>37.5℃,则听到短促的报警声:Bi-Bi-Bi-Bi (每0.125秒响一次),表示测量完成并警示已发烧了。
如果温度≤37.5℃,则听到较慢的声音:Bi-Bi-Bi-Bi (每0.5秒响一次),表示测量完成并且体温正常。
6. 如果测量温度小于32.0℃,则显示L℃;大于等于42.0℃,则显示H℃。
7. 按ON/OFF按钮,关闭电源,否则,体温计会在8分40秒后自动切断电源。
电池更换1力不足必须尽快更换电池,以确保测量之准确性。
2.更换电池时,把体温计的显示屏朝下,拉出电池盖,再轻轻地拉出体温计机芯约5-15mm(切勿用力过猛、拉出过多,以免损坏元器件),将旧电池取出,负极朝上装入一颗新电池,把机芯推回原位,装上电池盖即可。
注意事项:电子体温计属精密电子产品,故请注意:1.请勿从高处掉下及扭曲机体。
2.感温头至显示屏前端可以用酒精消毒,显示屏及以后部分因无防水装置,只可用干布擦拭,切不可放入水中或在热水中煮沸消毒。
3.除更换电池外请勿打开任何部件。
温度计使用方法和注意事项

温度计使用方法和注意事项
温度计是一种用来测量温度的仪器,通常用于家庭、医院、实验室等场所。
以下是温度计的使用方法和注意事项:
1. 使用方法:
a. 插入式电子温度计:将温度计的探头插入被测物体中,等待一段时间直到显示屏稳定显示出温度。
b. 食品温度计:将温度计的探头插入食物中心最厚的部位,等待一段时间直到显示屏稳定显示出温度。
c. 咽部温度计:将温度计的尖端放置在患者口腔下舌根的舌下横溝内,注意不要咬温度计,等待一段时间直到显示屏稳定显示出温度。
d. 腋下温度计:将温度计的探头插入患者腋下,适当用手臂抱紧患者,等待一段时间直到显示屏稳定显示出温度。
e. 耳温计:将温度计的探头轻轻插入患者耳道,确保探头完全贴合耳道,等待一段时间直到显示屏稳定显示出温度。
2. 注意事项:
a. 使用前要确保温度计的探头是清洁的,并且没有损坏。
b. 在使用过程中应根据不同温度计的使用方法来进行操作,避免不当使用导致误差。
c. 使用完毕后及时清洁和消毒温度计,尤其是医用温度计。
d. 温度计的存放要避免高温、阳光直射和潮湿环境,以免影响温度计的准确
性和使用寿命。
e. 当测量人体温度时,要注意不要将温度计探头插入太深,避免伤害。
综上所述,正确的使用和存放温度计,以及注意事项的遵守,可以保证温度计的准确性和可靠性,确保所测量的温度数据有效。
食品检测仪器作业指导书31台仪器

食品检测仪器作业指导书31台仪器食品中心温度计作业指导书1 目的本作业指导书规定了食品中心温度计的使用操作与维护程序,确保检测结果准确可靠。
2 适用范围适用于食品中心温度计的使用。
规格型号:WT-1 3 依据食品中心温度计操作手册。
4 职责4.1操作人员按照本规程使用仪器,对仪器进行日常维护,作使用记录。
4.2保管人员负责监督仪器使用是否符合规程,对仪器进行定期维护、保养。
4.3科室负责人监督上述人员履行有关职责。
5 技术特性5.1细菌生长最适宜的温度在10~60℃范围之内。
因此,食品的储存温度应控制在10℃以下。
食品加工应当烧熟煮透其中心温度应在70℃以上并保持一定的时间才可杀灭细菌。
5.2在烹饪后至食用前超过2小时的食品,应当在高于60℃或低于10℃的条件下存放。
需要冷藏的熟制品,应当放凉后在0~10℃之间冷藏。
5.3煎炸食品时,油温最高不得大于250℃,一般不得超过190℃。
6 操作步骤开启温度计,将探针插入待测固态、半固态食品中心部位或液态食品中,待温度显示稳定后读取测量温度。
7 仪器维护7.1 仪器使用人员应做好仪器的日常维护并认真填写使用记录。
7.2 仪器出现故障应联系相关部门,不可擅自拆微型激光测温仪作业指导书1 目的本作业指导书规定了微型激光测温仪的使用操作与维护程序,确保检测结果准确可靠。
2 适用范围适用于微型激光测温仪的使用。
仪器编号:30183244,规格型号:testo830-T1 3 依据微型激光测温仪操作手册。
4 职责4.1操作人员按照本规程使用仪器,对仪器进行日常维护,作使用记录。
4.2保管人员负责监督仪器使用是否符合规程,对仪器进行定期维护、保养。
4.3科室负责人监督上述人员履行有关职责。
5 技术特性技术特点 testo 830-T1 参数测量范围红外线分辨率精确度辐射率测量速率温度传感器 - 温度传感器的-测量范围温度传感器的-分辨率温度传感器的-精确度(±1位)温度传感器的-测量速度光学系数10:12×激光-20至+50℃ -40至+70℃ 9V电池板 15h ABS 190×75×38 89/336/EEC年2testo 830-T2 ℃/℉ -18至+400℃0.5℃1±读数的1.5℃或1.5%(0.1至+400℃);±读数的2℃或2%(-18至0℃)10.2至1.0可调节0.5sK型热电偶(可附加) -18至+500℃ 0.1℃1.75s激光类型1×激光工作温度运输/贮藏温度电源电池寿命外壳20h尺寸(L×H×B)(mm) CE准则保修期6 操作步骤!请注意红外线测量/接触测量的信息打开仪器红外线测量1、开始测量:按住△或测量按钮。
温度计使用说明书
Core 97.5° - 100.0°F 36.4° - 37.8°C
97.5° - 100.0°F 98.2° - 100.2°F 36.4° - 37.8°C 36.8° - 37.9°C
96.6° - 98.8°F 35.9° - 37பைடு நூலகம்1°C
Rectal 97.9° - 100.4°F 36.6° - 38°C
3
6. When loading probe covers into base unit, do not touch plastic film on the distal tip of the probe cover.
7. If the patient has recently been exposed to extreme ambient temperature (<10min), wait 10 minutes
COVIDIEN, COVIDIEN with logo and TM marked brands are trademarks of Covidien AG or an affiliate.
©2009 Covidien. All rights reserved. H6437 5M 05/09
15 Hampshire Street Mansfield, MA 02048
Scan Button Won’t Work?
1. Ensure that probe cover is properly loaded.
1
2. Thermometer may have entered the power-saving “sleep” mode. Eject probe cover and reload a new cover.
烘焙温度计的使用方法
烘焙温度计是烘焙过程中常用的工具,用于测量烤箱内部的温度,以确保烘焙食品的口感和质量。
以下是使用烘焙温度计的方法:
1. 在使用烘焙温度计之前,需要先对其进行消毒处理,可以使用酒精或其他消毒液进行擦拭,以确保食品的卫生安全。
2. 将温度计插入烤箱中,通常建议将其插入烤箱的中心位置,以便获取最准确的温度读数。
3. 根据所烤食品的要求,设定烤箱的温度。
然后,观察温度计的读数,等待一段时间以确保温度计稳定显示温度。
4. 在烘焙过程中,需要不断观察温度计的读数,以便及时调整烤箱的温度,确保食品烘焙的效果。
需要注意的是,不同类型的烘焙温度计使用方法可能略有不同,因此在使用前最好先仔细阅读说明书,了解其具体使用方法和注意事项。
此外,为了确保烘焙食品的质量和口感,还需要注意烤箱的预热时间、食品的摆放位置等因素。
温度计说明书
Technical specifications(4)All the accuracies indicated in this technical datasheet were stated in laboratory conditions, and can be guaranteed for measurements carried out in the same conditions, or carried out with calibration compensation.Features• RCR relay output 3A/240 Vac(NC), power supply 24 Vac/Vdc • ABS V0 IP65 housing (remote model) or IP20 (ambient model)• “¼ turn” system mounting withwall-mount plate• Housing with simplified mounting systemVisual and audible alarm, red led in frontRange from 0 to 50°C (1), from -20 to +80°C (2) and from -100 to 400°C (3)Part numberExample: TST -AI-100Thermostat with stainless steel duct probe of 100 mm length *Stainless steel probe technical specifications(duct model): Ø6 mm contact tip; available lengths: 100 mm, 150 mm, 200 mm, 250 mm or 300 mm.Type of housing B : Terminal block A : Duct S: AmbientType of probe I : stainless steel probe (only for duct models)*Probe length*100: 100 mm 150: 150 mm 200: 200 mm 250: 250 mm 300: 300 mmStainless steel probe diameter*6: Ø6 mmConnectionsElectrical connections as per NFC15-100 standardNO COM NC 1234567-+Power supply 24 VdcN L N L~~~~67Power supply 24 Vac Class IIThis connection must be performed by a qualified and trained technician. To make the connection, the transmitter must not be energized.NO: normally opened COM: common NC: normally closed1. Switch2. Terminal block (only on model with terminal block)3. LCC-S software connection4. Alarm led5. Button for settings6. Relay terminal block7. Power supply terminal block 8. Cable glandDimensions*Different probes available as option. Stainless steel probe technical specifications (duct model): Ø6 mm contact tip; available lengths: 100 mm, 150 mm, 200 mm, 250 mm or 300 mm.Connection of a Pt100 probe on terminal block:1 2 2’Measuring probeSymbols usedFor your safety and in order to avoid any damage of the device, please follow the procedure described in this document and read carefully the notes preceded by the following symbol:The following symbol will also be used in this document, please read carefully the information notes indicated after this symbol:2345678Inside the front housing Removable front face Fixed back housing1245678Ambient modelDuct model, stainless steel probe*Model with terminal block*Duct model*• Activate or deactivate an alarm- Press the button for 3 seconds, “CONF” is displayed then “NEG”, meaning that the relay is in negative security, it is excited during an alarm condition.- If needed, press quickly the button to switch the relay in positive security, the relay is de-energized during an alarm condition or a current breaking, “POS” is displayed.- Press 3 seconds the button, “Buzz” screen is displayed with “ON” or “OFF” blinking. Briefly press on the button to activate (“ON”) or deactivate (“OFF”) (according to the last saved configuration) the buzzer during an alarm condition.- Press the button for 3 seconds, “Alarm” screen is displayed with “On” or “Off” blinking (according to the last saved configuration).- Press quickly the button, the display changes from “On” (activated alarm) to “Off” (deactivated alarm).- Press the button for 3 seconds to confirm the setting. If the alarm is deactivated, the instrument displays the measurement; if the alarm is activated, the instrument displays the following setting.• Thresholds configurationThe button allows to activate or not an alarm (threshold), to set the action of the alarm (edge), to set the threshold(s) value, to set the time-delay and to acknowledge the alarm.• Set the threshold(s) valueThe first digit blinks, it corresponds to the positive (0) or negative (-) setting of the threshold value. Press briefly the button to select the sign for the threshold value. Press the button more than 3 seconds to validate.The second digit blinks, press briefly the button to scroll the numbers. Press the button more than 3 seconds to validate.Repeat the process until the last digit to configure the threshold value, validate the threshold and go to the following setting.If the monitoring edge has been selected, the transmitter displays the setting of the second threshold.Working principle:- By pressing the button more than 3 seconds, you can validate the setting and go to the next setting.- By pressing quickly the button, you can increment a value and scroll down the different option or values.- Press briefly the button to select the trespassing direction then press the button more than 3 seconds to validate this direction and set the thresholds.• Units settingTo set a unit of measurement, put the on-off switch 4 of the units as shown beside.Measurement (m) > Threshold (S) during the time-delay T1: alarm activation.Measurement (m) < Threshold (S) - Hysteresis (H) during the time-delay T2: alarm deactivation.Measurement (m) < Threshold (S) during the time-delay T1: alarm activation.Measurement (m) > Threshold (S) + Hysteresis (H) during time-delay T2: alarm deactivation.The alarm goes off when the measurement is outside the low and high thresholds.Rising edgeFalling edgeMonitoringModeMode Mode • Set the action of the alarm (rising edge or falling edge)The edge determines the action of the alarm according to the trespassing direction of the threshold(s).Rising edge (1 threshold): the alarm goes off when the measurement exceeds the threshold and stops when it is below the threshold.Falling edge (1 threshold): the alarm goes off when the measurement is below the threshold and stops when itexceeds the threshold.Monitoring (2 thresholds): the alarm goes off when the measurement is outside the defined low and high thresholds.Settings and use of the transmitterCAUTION: to configure the transmitter, it must not be energized. Then, you can make the settings required, with the DIP switches (as shown on the drawing below). When the transmitter is configured, you can power it up.• ConfigurationTo configure the transmitter, unscrew the 4 screws of the casing then open it. The switches allowing the different settings are accessible.Only the accessories supplied with the device must be used.• Set the hysteresisThe hysteresis only concerns the rising edge and the falling edge modes.In rising edge mode, the hysteresis allows to the transmitter to stay in alarm when the measurement is between the threshold and the threshold minus the hysteresis.Example: for a 70°C threshold and a 10°C hysteresis, the instrument will stay in alarm when the measurement will be between 70 and 60°C. In falling edge mode, the hysteresis allows to the transmitter to stay in alarm when the measurement is between the threshold and the threshold plus the hysteresis.Example: for a 70°C threshold and a 10°C hysteresis, the instrument will stay in alarm when the measurement will be between 70 and 80°C. The first digit blinks, set it by pressing the button briefly several times then press on the button more than 3 seconds to set the following digit.Once the hysteresis is set, press the button more than 3 seconds to validate and set the time-delays. • Set the time-delay 1 and the time-delay 2 (600 seconds maximum)- In rising edge mode, the time-delay 1 corresponds to the time lag before the alarm goes off when the threshold has been reached. The time-delay 2 corresponds to the time lag before the alarm stops when the measurement is lower than the threshold minus the hysteresis.Setting procedure: “Time 1” for the time-delay 1 is displayed then the time in second. The first digit blinks, press briefly on the button and scroll the figures. Press on the button more than 3 seconds to validate. Repeat the process until the last digit to set the time-delay 1 value (from 0 to 600 s) and validate. “Time 2” is displayed the time in second. Repeat the process to set the time-delay 2.- In falling edge mode, the time-delay 1 corresponds to the time lag before the alarm goes off when the threshold has been reached. The time-delay 2, corresponds to the time lag before the alarm stops when the measurement is lower than the threshold plus the hysteresis.The setting procedure is the same as the rising edge procedure.- In monitoring mode, the alarm of the transmitter goes off when the measurement is below the lower threshold and higher the high threshold. The time-delay 1 corresponds to the time lag before the alarm goes off when the measurement is below the lower threshold and higher the high threshold. The time-delay 2 corresponds to the time lag before the alarm stops when the measurement is between the lower and higher thresholds.The setting procedure is the same as the rising edge procedure. The setting of time delays is done, the measurement is displayed.F T _E N – T S T – 21/04/2020 – N o n -c o n t r a c t u a l d o c u m e n t – W e r e s e r v e t h e r i g h t t o m o d i f y t h e c h a r a c t e r i s t i c s o f o u r p r o d u c t s w i t h o u t p r i o r n o t i c e .Precautions for use: please always use the device in accordance with its intended use and within parametersdescribed in the technical features in order not to compromise the protection ensured by the device.No fixing plate is available for ambient model.4 fixing holes are inside the back housing.Configuration via LCC-S software (optional)The software allows to set the alarms, the thresholds, and the time-delay of the transmitter.• To access the configuration via software:- Set the DIP switches as shown beside.- Connect the cable of the LCC-S to the connection of the transmitter. Please refer to the user manual of the LCC-S software to make the configuration.• Please refer to the user manual of the LCC-S software tomake the configuration. The configuration of the parameters can be done either with the DIP switch or the software (combining both solutions is not possible). SWITCH OFF THE SENSOR before settings process.Active switch。
防水探针食品温度计安全操作及保养规程
防水探针食品温度计安全操作及保养规程食品温度计作为保障食品安全的主要监测仪器,在食品加工、存储、运输、销售等环节中起到至关重要的作用。
而防水探针食品温度计,则可以在更广泛的应用场景下进行检测,能够同时测量温度和湿度,可以满足一些特殊环境下的需求,如:冰箱、冷库、水族箱、温室等。
然而,食品温度计的使用和保养是至关重要的,不当的使用可能会对食品安全产生严重影响。
本文将分享关于防水探针食品温度计的安全操作和保养规程。
1.安全操作在食品温度计的安全操作方面,需要从以下几个方面进行考虑:1.1 适宜应用环境防水探针食品温度计适用于室内和室外温度检测,能够承受一定程度的水淋和沾湿,不能在水中使用。
在使用时需要特别注意避免探头遭受高温和极低温度。
若温度过高或过低,不仅会导致检测结果不准确,更会影响探头的使用寿命,甚至损坏探头。
1.2 使用方法在使用温度计的过程中,要根据使用说明进行操作,不要自行组装或拆卸。
在使用过程中,要保持温度探头平稳,不要将探头捅入过深,避免在使用过程中受损。
使用后也要注意将温度探头轻轻拨出,避免弯折损坏。
1.3 操作人员安全在使用食品温度计时,需要注意人员的操作安全问题。
温度探头尖锐,应该避免触碰探头,避免划伤皮肤。
同时,避免温度计在使用时随意抛掷、撞击等,防止造成温度探头和温度计机身的损坏。
1.4 精准校准为了保证食品温度计的读数准确,需要定期使用标准校准设备对食品温度计进行校准,保证温度探针读数准确可靠。
在进行校准时,应该按照使用说明书的步骤进行操作,校准设备应该是有资质的专业人士进行操作。
2. 保养规程食品温度计在长期使用中,需要根据以下保养规程进行维护:2.1 温度探针保护在使用食品温度计时,要注意保护温度探头,不要碰撞或用力扯动,避免损坏。
操作人员需要在使用完后,使用清水、酒精等清洗液将温度探头部分做全面清洁,尤其是在未使用的情况下,探针港口应当封闭避免灰尘和锈垢的进入。
2.2 清洁和消毒食品温度计是直接与食物接触的仪器,需要定期进行清洁和消毒。
- 1、下载文档前请自行甄别文档内容的完整性,平台不提供额外的编辑、内容补充、找答案等附加服务。
- 2、"仅部分预览"的文档,不可在线预览部分如存在完整性等问题,可反馈申请退款(可完整预览的文档不适用该条件!)。
- 3、如文档侵犯您的权益,请联系客服反馈,我们会尽快为您处理(人工客服工作时间:9:00-18:30)。
产品名称:食品中心温度计
型号:PT-3
检测项目:食品中心温度测定
检测样品:各类食品
产品简介:
食品中心温度计适用于熟制加工的固态、半固态或液态食品,以及需要监测食品中心温度食品的现场快速检测。
技术参数:
●测温范围:-50℃~+300℃(-58℉~+572℉)
●分辩率:0.1℃
●精度:±1℃(-20℃~+80℃);±5℃(其他范围)
●电源:DC 1.5V
注意事项:
●电量不足报警:当电量低于1.3V时,液晶屏上显示“LOW”报警;
●当断路或测量温度低于测量范围时温度计显示“E00”;
●当短路或测量温度高于测量范围时温度计显示“E11”;
●温度计的探针插入的深度必须达到其感应区的长度(通常是5到8厘米)以
确保读数准确。
如果测量的是薄片食物的温度,比如碎牛肉饼或去骨鸡脯肉,探针必须从食物的侧面插入以保证整个感应区置于食物的中心部分;
●绝不能使用内充水银或酒精的玻璃温度计来测量食物的温度;
●测量食物的内部温度时,要把探头插入食物最厚的部分,离开骨头、脂肪或
软骨;
●待温度显示稳定后读取测量温度;
●保持温度计及其存放点的清洁。
品牌:天迈生物产地:杭州。