飞行器使用说明
畅天游faith 2飞行器使用说明书

06 产品概述
飞行模式
智能定点模式 飞行器处于智能定点模式时,使用GPS模块以实现飞行器精确悬停,在GPS卫星信号差,飞行器将进入 姿态或视觉定位模式。
定高模式 飞行器在定高模式下,满足视觉定位条件时,飞行器将自动进入视觉定位模式;飞行器在视觉定位模 式,依靠视觉定位系统,能使飞行器稳定悬停。 飞行器在定高模式下,不满足视觉定位条件时,仅为姿态的增稳定高,无法实现飞行器的精确悬停定 位,要求操作者需具备飞行器的操控基础。姿态的增稳定高,飞行器会在水平方向将会产生漂移。
准备飞行器
● 展开机臂 飞行器出厂时处于收纳状态,请按照如下步骤展开飞行器。
1. 向外展开机臂
2. 向外展开螺旋桨
3. 分别展开剩下的机臂
Copyright C 2020 畅天游 版权所有
4. 完成
● 安装飞行器电池
产品概述 03
1. 将电池从底部插入电池仓位置
提示
● 请确保电池安装到位,否则很有可能导 致飞行器空中断电坠落事故。 ● 请使用双手安装电池,单手安装电池可 能导致电池安装不良。
飞行器电池
飞行器电池
Copyright C 2020 畅天游 版权所有
平衡充电器
红灯闪烁,充电中 绿灯常亮,充电完成
充电 每次使用飞行器电池前,请务必充满电。飞行器电池必须使用官方提供的专用电源适配器进行充电, 使用5V 2A的USB充电器进行充电,时间约270分钟。 请参照上图所示,按如下步骤给电池充电: (1). 用USB线连接USB电源适配器和飞行电池充电器; (2). 将电源线连接到充电器后,将另一头插入家用电源插座上; (3). 将飞行电池插入充电器,请确保连接牢靠。
Copyright C 2020 畅天游 版权所有
飞行器使用说明书
飞行器使用说明书尊敬的用户,感谢您选择我们的飞行器产品。
为了确保您能正确、安全地使用该产品,我们特地为您提供本使用说明书。
请您在使用之前仔细阅读说明书,并按照其中的指导进行操作。
一、产品概述飞行器是一种先进的空中交通工具,具备快速、高效的特性。
我们的产品采用最新的航空技术,拥有稳定、安全的飞行性能,适用于各类空中作业和旅行需求。
二、安全须知1. 在使用飞行器前,请确保您已经熟悉并遵守国家和地区的法律法规,特别是飞行器操作的相关规定。
2. 使用飞行器时,请选择宽阔、平坦、无明显障碍物的空地,确保周围没有人员或动物活动。
3. 飞行器仅适用于室外飞行,请勿在室内或人员密集场所使用。
4. 飞行器在飞行时可能产生一定的噪音,请尽量避免在靠近居民区或噪音敏感场所使用。
5. 飞行器可能会干扰无线通信设备,请勿将飞行器靠近无线电、通信塔等敏感设备。
6. 飞行器不适用于恶劣天气(如大风、雨雪等)下的飞行,操作前请确保天气状况适宜。
7. 请勿在夜间使用飞行器,以防造成安全隐患。
三、使用步骤1. 开箱检查打开包装,确保飞行器及其配件完整,并检查是否有异常状况。
如有损坏或缺失,请及时联系售后服务。
2. 组装飞行器按照说明书提供的步骤,将飞行器的各个部件正确组装,并确保固定牢靠。
3. 设备连接将遥控器电池安装至遥控器,确保电池电量充足并连接稳定。
4. 开机准备将飞行器电池安装至飞行器主体,确保电池电量充足。
打开遥控器电源,然后打开飞行器电源。
5. 校准飞行器在开启飞行器前,请进行飞行器的校准操作。
具体的校准方法请参考附带的校准说明。
6. 飞行操作按照遥控器的指令进行飞行操作。
请勿进行剧烈的操控,以免飞行器失控。
7. 返航与降落当飞行器电池电量过低或信号不稳定时,遥控器将提示您进行返航操作。
请按照指示操作,并让飞行器平稳降落。
8. 关机及清理在飞行操作完成后,请先关闭遥控器电源,再关闭飞行器电源。
将飞行器进行清洁,并妥善收存至包装盒中。
极翼 P3 飞控使用手册说明书
P3飞控使用手册V1.1.12021/9/17首先感谢您购买本产品!请您严格按照使用手册要求将本产品安装在您的飞行器上,祝您使用愉快。
注意:p3飞控支持植保功能,默认发货是不含有植保功能的,如需要开通植保功能,本说明书有开通流程;如不需要使用植保功能,关于植保功能的调试可以忽略。
如果您在使用过程中遇到无法解决的问题,请联系极翼机器人(上海)有限公司技术支持或售后人员。
联系电话:187****8648;微信视频号:极翼机器人;QQ群:458942467。
免责声明温馨提示:极翼P3飞控不是玩具,请在使用之前,认真阅读本声明,即表示您认可并接受本声明,本产品不适合18周岁以下的用户使用。
本产品为极翼推出的一款为行业应用而研发的专业级飞控,满足用户植保、测绘、航拍、培训等用途。
极翼将对高品质产品的追求融入到本飞控的开发中,以使其更加稳定可靠,不过为了您和他人的安全,强烈建议您在使用调参软件时卸下螺旋桨,在飞行体验时确保接线正确、供电正常并远离人群、易损及危险品。
您使用本产品时,因以下任何原因(包括并不仅限如下原因)导致您及他人财产损失甚至人身伤害(包括直接或间接),极翼仅承担因本飞控产品问题原因导致的飞控损失、将不予承担其他任何责任及赔偿:1.用户在使用时未按照本手册的正确引导;2.飞行器本身强度过低及结构受损;3.用户使用的第三方产品出问题引起飞行器运行不良;4.用户主观判断失误或操控不当;5.用户主观故意针对他人;6.用户在明知本产品处于非正常工作状态仍然冒险飞行;7.用户在强磁干扰、无线电干扰和政府禁止的区域或视线受到遮挡无法判断飞行器姿态的状况飞行;8.用户在恶劣的不适合飞行的气象条件下飞行;9.用户私自拆卸及改装极翼公司生产的产品及配件致使飞行器运转不良;10.用户在饮酒、吸毒等主观行为引起的精神状态不良或自身健康出问题的客观因素条件下飞行;11.其它非极翼产品本身问题导致的不属于极翼责任范围的损失。
飞行器使用说明书正确操控遥控飞机的方法

飞行器使用说明书正确操控遥控飞机的方法飞行器使用说明书:正确操控遥控飞机的方法飞行器是一种充满魅力的玩具,它可以带给人们无尽的乐趣和刺激。
然而,正确地操作遥控飞机需要一些技巧和指导,这就需要我们详细了解飞行器使用说明书,掌握正确操控的方法。
第一步是熟悉遥控器。
飞行器使用说明书中会介绍遥控器的各个按钮和功能。
在开始操作之前,我们应该仔细阅读使用说明书,了解每个按钮的作用和使用方法。
接下来是校准飞行器。
在飞行器使用说明书中,通常会有校准飞行器的指导。
校准是非常重要的,因为只有当飞行器得到准确的设定,它才能够稳定地飞行。
因此,在使用飞行器之前,务必按照使用说明书的指示进行校准。
在开始飞行之前,还需要选择一个合适的场地。
宽敞的开阔地或操场是理想的选择,因为这些场地没有太多的障碍物,可以确保飞行器有足够的空间进行飞行。
在飞行器使用说明书中,通常也会建议避免飞行在人群密集的地方,以避免造成意外伤害。
飞行器的起飞和降落需要一些技巧。
在飞行器使用说明书中,通常会介绍正确的起飞和降落方法。
我们应该在起飞之前确保飞行器与遥控器连接稳定,并将飞行器放在平滑的地面上。
起飞时,应逐渐加速,而不是突然拉起。
降落时,应该提前减速,并逐渐降低高度,使飞行器平稳着陆。
在飞行过程中,遥控器的操作要稳定而准确。
遥控器使用说明书中通常会介绍如何控制飞行器的上升、下降、左转和右转。
我们应该将手放在遥控器的平稳位置上,避免猛烈的晃动,以免影响飞行器的稳定性。
此外,在使用飞行器的过程中,要时刻注意飞行器的电量。
在飞行器使用说明书中,通常会提供电池寿命的估计值,我们应该合理安排使用时间,避免电量耗尽导致飞行器失控。
最后,飞行结束后,我们应该按照飞行器使用说明书中的指引进行安全关闭。
关掉飞行器和遥控器的电源,并保持飞行器和遥控器在关闭状态下放置在安全的地方。
总而言之,正确操控遥控飞机需要仔细阅读飞行器使用说明书,并按照说明书中的指导进行操作。
从熟悉遥控器、校准飞行器,到选择场地、起飞和降落,再到飞行操作的稳定与准确,每一步都非常关键。
滑行小飞机说明书
滑行小飞机说明书滑行小飞机操作手册第一章概况一、产品介绍滑行小飞机是一种迷你型的飞行器,采用电动滑翔装置,适用于短距离滑行飞行和初级飞行训练。
该小飞机外形小巧,结构简单,易于操作,是初学者学习飞行技巧的理想选择。
二、技术参数整机长度:120厘米翼展:100厘米飞行重量:约200克控制方式:遥控操作续航时间:约20分钟充电时间:约60分钟第二章外观部件一、机身外壳滑行小飞机的机身外壳采用轻质材料制成,具有良好的耐用性和防撞保护功能。
机身外壳上配备了专用的滑行翅膀和升降舵,确保飞行的稳定性和敏捷性。
二、机翼和翼尖滑行小飞机的翼展为100厘米,翼面采用高强度材料制成,具有良好的飞行稳定性和抗风性能。
翼尖设计为圆形,减少飞行时的阻力,提高滑行速度和飞行距离。
三、控制舵和动力装置滑行小飞机配备了专用的升降舵和方向舵,通过遥控器来实现机身的上下、左右运动。
动力装置采用电动机和螺旋桨组合,提供足够的动力和推力,实现滑行飞行和姿态调整。
四、电池和充电器滑行小飞机采用可充电的锂电池供电,容量为2000毫安时,充电时间约为60分钟。
充电器的输入电压为220伏特,输出电压为3.7伏特,具有充电过流和过电压保护功能,确保安全使用。
第三章操作说明一、开机与关机1. 在使用滑行小飞机之前,确保电池已充电完毕。
2. 将滑行小飞机放在平坦的地面上,打开滑行小飞机背部的电源开关,此时电源指示灯亮起。
3. 滑行小飞机开机后,遥控器启动,将遥控器的电源开关打开,此时遥控器的指示灯也亮起。
4. 当需要关闭滑行小飞机时,先关闭遥控器的电源开关,然后关闭滑行小飞机背部的电源开关。
二、起飞与降落1. 将滑行小飞机放在飞行场地上,确保飞行场地空旷且无障碍物。
2. 打开滑行小飞机背部的电源开关,然后将滑行小飞机放在地面上,等待电机启动。
3. 在电机启动后,将滑行小飞机快速推离地面,同时使用遥控器的升降摇杆控制滑行角度。
4. 当需要降落时,将滑行小飞机调整到下滑状态,逐渐减小油门,使滑行小飞机缓缓降落到地面上。
四轴飞行器使用说明书

四轴飞行器使用说明书第一章概述第二章飞行器组装1.将四轴飞行器的主体组件和螺旋桨紧密连接。
确保连接牢固并正确插入。
2.连接电池。
将电池安装在飞行器上,并在正确的极性方向安装。
3.开关启动。
找到开关并将其打开,确保飞行器处于待机状态。
第三章飞行前准备1.检查环境。
确保飞行场地无障碍物,空旷且没有人群出现。
2.自检。
检查飞行器的每个部件是否正常,包括电池电量、遥控器信号等。
3.调校飞行器。
根据需要进行飞行器的调校,以确保飞行器稳定飞行。
第四章飞行操作1.手持遥控器。
将遥控器握在手中,确保握持舒适且稳定。
2.连接遥控器和飞行器。
按照飞行器和遥控器的配对操作,将其成功连接。
3.起飞。
将油门推至50%以上,飞行器将开始起飞。
需要注意的是,在起飞时要稳定和缓慢地推动油门,以防止飞行器突然上升或下降。
4.飞行控制。
通过遥控器上的摇杆控制飞行器的上升、下降、前进、后退、转向等操作。
5.悬停。
通过调整遥控器上的摇杆,将飞行器稳定在空中悬停。
6.降落。
将油门缓慢推至最低位置,飞行器将开始降落。
同样需要稳定和缓慢地操作油门。
第五章技巧与注意事项1.熟练操作。
在飞行前建议进行一些预备练习,熟练掌握遥控器的使用方法以及飞行器的操控方式。
2.飞行器的重量。
请注意,本款四轴飞行器的重量可能较轻,容易受到风等外部因素的影响,在飞行时请注意风力状况,避免因风力较大导致飞行器无法控制。
3.距离限制。
在操作飞行器时,请遵守当地相关法规和规定,确保飞行器的远离建筑物、人群和飞行限制区域。
4.遥控器电池。
为了确保飞行器的稳定和遥控器的正常操作,定期检查并更换遥控器的电池。
第六章常见问题及解决方法1.飞行器不能起飞。
请检查电池是否安装正确,电量是否充足,是否成功连接遥控器。
2.飞行器不稳定。
需进行飞行器的调校操作,确保各个部件的运作正常。
3.飞行器操作不灵敏。
请检查遥控器的信号是否正常,电池是否充足。
4.飞行器无法连接遥控器。
重新按照配对操作连接飞行器和遥控器,确保不受其他无线信号的干扰。
多旋翼飞行器 F4飞控+4合1电调说明书
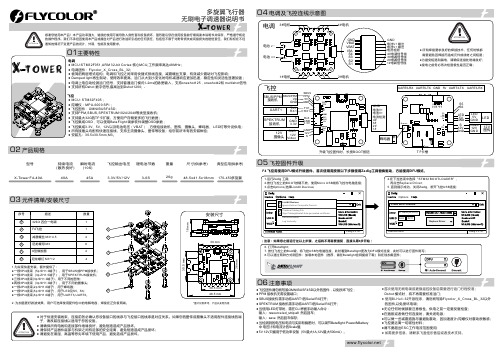
*图片仅供参考,产品以实物为准1.为实现快速安装,额外提供了:●一根5Pin线束(5p SH1.0端子),用于SBUS或PPM接收机;●一根3Pin线束(3p ZH1.5端子),用于SPEKTRUM接收机;●三根3Pin线束(3p SH1.0端子),用于不同的图传;●两根3Pin线束(3p SH1.0端子),用于不同的摄像头;●一根2Pin线束(2p SH1.0端子),用于蜂鸣器;●一根5Pin线束(5p SH1.0端子),用于LED及S5,S6;●一根6Pin线束(6p SH1.0端子),用于UART3,UART6。
2. 为加强更好滤波效果,用户可选择使用配件包中的电解电容,焊接在正负极两端。
持续电流(散热良好)瞬时电流(10S)飞控输出电压尺寸(供参考)重量锂电池节数型号典型应用(供参考)X-Tower F4-40A 40A45A3-6S170-450多旋翼3.3V/5V/12VF4 飞控需使用DFU模式升级固件。
首次使用需按照以下步骤使用Zadig工具替换驱动,方能使用DFU模式。
(注意:如果您之前运行过以上步骤,之后将不再需要重复,直接从第6步开始)● 飞控固件请勿刷写除OMNIBUSF4SD以外的固件,以免损坏飞控;● PPM 接收机无需设置端口;SBUS接收机需手动将UART1的Serial RX打开;●SPEKTRUM 接收机需手动将UART3的Serial RX打开;●当使用LED灯带时,需在CLI界面手动输入命令:●输入:resource led_strip a8 然后回车;输入:save 然后回车保存;当检测到的电压和电流与实际有偏差时,可以调节Betaflight-Power&Battery●中 电压计和电流计的Scale值;●只能用于低功率设备(最大,最大)。
5V12V5V1A12V500mA●首次使用无刷电调或更换遥控设备后需要进行油门行程校准;Dshot 模式时,将不再需要校准油门;● 使用BLHeli-开源程序,32请勿刷写除Flycolor_X_Cross_BL_32以外的固件,以免损坏电调;●无论任何时候都要注意极性,供电之前一定要反复检查;●在插拔或者做任何连接时,请关闭电源;●可以做一些减震措施尽量避免震动,因加速度计/陀螺仪对震动很敏感;●飞控要远离一切磁性材料;●请不要超出工作电流范围使用ESC;● 如需更多信息,请联系飞盈佳乐售后或者技术支持。
IRIS+个人无人遥控飞行器操作手册说明书
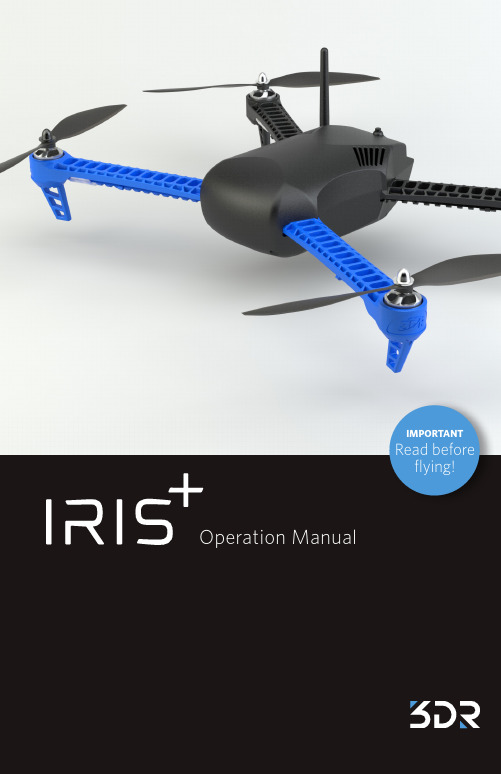
IMPORTANTRead beforeflying!Operation ManualContents01 Meet IRIS03 Parts04 Charging the Battery06 Attaching Propellers07 Safety and Failsafes08 Learn to Fly11 Flight Modes13 Return to Launch13 Geofence14 First Flight19 Planning Missions20 Flying Missions21 Specifications and Resources22 Learn More and SupportMeet IRIS+.Thank you for purchasing IRIS+.IRIS is a personal aerial imaging platform powered by open-source hardware, software, and firmware. Please read this manual carefully before your first flight and pay close attention to safety information. Happy flying!Important note: When using a GoPro with IRIS, alwaysensure that the WiFi on the GoPro is turned OFF.01Frontantennasafety button front arms (blue)Rearstatus LEDcompartmentrear arms (black)0203PartsControlleryour direct link to IRISGround station radiowith USB and Android adaptersSlide out the leg to remove it, and replace with the tall leg. Tighten the set screw until it sits flush with the surface. Do not tighten the screw beyond this point.Use the small (1.5 mm) hex key to loosen the set screw in the bottom of the leg.Battery kitbattery, guard bag, and charger with international travel adaptersPropellers and tool kitfour propellers with propeller tool and small, medium, and large hex keys (1.5 mm, 2 mm, and 3 mm)Tall legsSwitch to tall legs to use IRIS with the TarotGimbal or for extra clearance on landing.04Charging the BatteryIRIS is powered by a rechargeable lithium polymer (LiPo) battery. Store the battery at half charge then charge fully before flying. Batteries must ship at half charge, so please charge before your first flight. Each full battery provides up to 22 minutes of flight time without a gimbal and up to 16 minutes when using a Tarot Gimbal.*Connect charger to the power adapter cable and a wall outlet.Connect the red cable to the + port and the black cable to the - port.Set the charger to LiPo and 3A .Connect the whiteconnector to the 3S port. Join the two yellow connectors together.12+–3S305Battery SafetySecure battery inside the guard bag while charging. Charge until the statusindicator displays green.Charging Complete4Protect the battery from extreme heat, extreme cold, puncturing, and flammable surfaces. Always transport, charge, and store the battery in the guard bag.Charge the battery using a designated LiPo balance charger only. Always monitor the battery while charging.Flying with a low battery is a safety risk and can render the battery unusable. Always discontinue use when you receive a low battery notification, and always fly with a fully charged battery.Inspect the battery for damage before takeoff and after landing. If you observe any swelling of the package or the battery ceases to function, locate your local battery recycling center to dispose of the battery. In the US and Canada, visit to finda location. Do not dispose of the battery in the trash.*Flight time varies with payload, wind conditions, altitude,temperature, humidity, flying style, and pilot skill. See the Flight Checklist for instructions on managing battery levels during flight.For propellers with black nuts:Spin clockwise to attach.Spin counterclockwiseto remove.For propellers with silver nuts:Spin counterclockwiseto attach.Spin clockwise toremove.Each propeller has locking and unlocking direction symbols. To attach, spin the propeller in the direction of the locking symbol. The propellers will automatically tighten onto the motors when you arm IRIS before takeoff.To remove, hold the motor in place withthe propeller tool, and spin the propellerin the direction of the unlocking symbol.06Maneuver IRIS in flight usingthe controller sticks.left stick:throttle right stick:pitch & rollLearn to FlyLeft Stick Left Stickhover ft Yawhover ft YawPitch and RollThe right stick allows you to control IRIS’ position in the air. Move the right stick to tell IRIS to move in that direction: forward (toward the blue arms), back (toward the black arms), left (toward the left arms), or right (towardsStandard (altitude hold mode)STD fly manuallyStart your flight in standard to select altitude hold mode, and fly IRIS manually using the controller.Loiter modeLTR hoverSelect loiter to set IRIS to hover in place automatically. Use the controller to adjust IRIS’ position then release the sticks to hold that position. Loiter is a great way for beginners to learn how to fly! If you’re new to flying, start your first flight in loiter instead of standard.Flight ModesIRIS includes three flight modes: manual flight (STD-altitude hold), hover mode (LTR-loiter), and mission flight (AUTO). Use the switch on the right side of the controller to select a flight mode.To avoid sudden changes in altitude, set the throttle stick to center position before switching modes, including in the event of a GPS failsafe.Advanced Operator Note produce unexpected behavior.Select auto mode to fly an autonomous mission. IRIS willGimbal controlTILTConnect a Tarot Gimbal (sold separately), and use the TILT knob to/iris/info forSet the CH 7 switch to ON to end your flight and land IRIS at its current position. Once you activate land, set the throttle stick fully down, and IRIS will automatically disarm after landing. IRIS will notSet the RTL switch to ON to end your flight and return115 meters1A safety fence restricts IRIS to within 300 meters (980 feet) of the launch point and under 100 meters (320 feet) in altitude. If IRIS reaches the edge of the geofence, it will initiate an automatic return to launch.launch point100 m300 m GeofenceFirst FlightSelect an open area for flying, away from people and buildings, and remember to bring the Flight Checklist and a fully charged battery. Determine the boundaries of your flying area before takeoff, and select a level, unobstructed space as a launch point. Follow these preflight and postflight steps in the order shown here and on the Flight Checklist every time you fly.1PreflightCheck IRIS.Ensure that the RTL switch 23Connect battery.Press the sides of the battery compartment together and rotate the door down.Insert battery, and attach the yellow connectors. To close, squeeze the door, and rotate up until it clicks into place, ensuring that the battery cables do not interfere with the LED cables.Place IRIS at the launch point with the black arms facing towards you and the blue arms facing away from you.Connect the radio to your ground station, and select Connect.A ground station (recommended) lets you view live data in flight and unlock IRIS’ advanced autonomous features. To download a ground station app for you laptop or Android device, visit /iris/info.Press and hold the DN button on the controller to view flight data from IRIS. See the Flight Checklist for more information about controller flight data.Keep IRIS still and level while it powers on and initializes the sensors.Autopilot ready, GPS lockedAcquiring GPS, please wait.Initializing, please wait. 5Check LED.Check the LED to view the status of IRIS. Wait to proceed until you see the blinking green light indicating that IRIS has acquired GPS lock.Pre-arm safety check failure. Connect to a ground station and see the trouble-shooting guide at /iris/info.6To activate the motors,hold the left stick down-right until the motors spin. Now you’re ready for takeoff!Arm motors.IRIS will spin its propellers when armed. Ensure that the launch point is clear ofobstructions before arming. Always disarm the motors before approaching IRIS.Motors inactive, safe to handleMotors active, deactivate before handlingGPS lock requires a clear view of the sky. IRIS may take a few minutes to acquire GPS lock depending on your flying location. Always fly in an open area to improve GPS signal strength, and review the GPS failsafe information on page 7.Left StickTake off and gain altitude by raising the left stick slightly above center.Left StickFly forward, backward, left, or right by moving the right stick in the direction you want to fly.Left Stick Release the right stick to level IRIS.Left StickLower the left stick below center to descend.Set the left stick to center to maintain the current altitude.Rotate counter-clockwise and clockwise by moving the left stick left and right.IRIS is a powerful and agile flier. Move the sticks in small increments until you feel comfortable with how IRIS responds to controls.Left StickSet the left stick fully down to land once IRIS is a few inches above the ground.!Postflight1Disarm motors.3Disconnect battery.4Power off controller.Your first flight is now complete!Follow the steps shown here and on the Flight Checklist every time you fly.Planning Missions1Power IRIS, connect the radio to your laptopor Android device, and select Connect.2Configure waypoints.To plan a mission, download a ground station application from/iris/info, and install onto your laptop or Android device.DroidPlanner 2 for AndroidMission Planner for WindowsWhen flying missions, we recommend changing the GPSfailsafe behavior to set IRIS to land in the event of a loss ofGPS signal. For instructions, visit /iris/info.Connect the blue end of theAndroid adapter to your deviceand the black end to the radio.Select Connect.Select Edit and tap to addwaypoints, or select the brushtool and draw a path for IRISto follow.Select Flight Plan, and click toadd waypoints. Select the greenarrows at the bottom of thescreen to configure altitude andchange waypoint types.3Save the mission to IRIS.Select Write WPs.Select the option menu inthe top-right corner, andselect Send Mission.Connect the USB adapter to theradio and your laptop. SelectAUTO, 57600, and Connect.APM Planner for OS X193AUTO.4before disarming.2in standard.SpecificationsAutopilot: Pixhawk v2.4.5Firmware: ArduCopter 3.2GPS: 3DR uBlox GPS with Compass (LEA-6H module, 5 Hz update) Telemetry radio: 3DR Radio Telemetry v2 (915 mHz or 433 mHz)Motors: 920 kVFrame type: VPropellers: 9.5 x 4.5 T-Motor multirotor self-tightening counterclockwise (2)9.5 x 4.5 T-Motor multirotor self-tightening clockwise (2)Battery: 3S 5.1 Ah 8C lithium polymerLow battery voltage: 10.5 VMaximum voltage: 12.6 VBattery cell limit: 3SIRIS is compatible with 3S lithium polymer batteries only.Using a 4S battery can cause permanent damage to the gimbal electronics and will void the warranty.Payload capacity: 400 g (.8 lbs)Radio range: up to 1 km (.6 miles)Flight time: 16-22 minutes**Flight time varies with payload, wind conditions, elevation, temperature,humidity, flying style, and pilot skill. Listed flight time applies to elevationsless than 2,000 ft above sea level.ResourcesHardware: /iris/infoFirmware: Software: and 3DR Store: Community: Happy flying!21SupportLearn MoreVisit /iris/info to learn about: »3PV™ Follow Me and DroidPlanner »Opening the shell »Replacing the arms and motors »Installing software »Planning a mission »Updating firmware »LED meanings and tonesVisit to learn about: »Additional flight modes »Configuring parameters, including yaw behavior during autonomous flight, descent speed during RTL, and more Visit (Mission Planner) and (APM Planner) to learn about: »Planning a mission with waypoints and events »Using a ground station to command IRIS in flight »Downloading and analyzing flight logs Join the community and share your experience at .Follow us on Facebook and Twitter @3drobotics .For customer support, contact us at ************ or call our support line at +1 (858) 225-1414 Monday through Friday, from 8 am to 5 pm, PST.IRIS+ Operation Manual vF | ©3D Robotics, Inc. | 11 December 2014。
- 1、下载文档前请自行甄别文档内容的完整性,平台不提供额外的编辑、内容补充、找答案等附加服务。
- 2、"仅部分预览"的文档,不可在线预览部分如存在完整性等问题,可反馈申请退款(可完整预览的文档不适用该条件!)。
- 3、如文档侵犯您的权益,请联系客服反馈,我们会尽快为您处理(人工客服工作时间:9:00-18:30)。
多旋翼飞行器使用说明
1,三种飞行方式说明:
左上方,该通道用于飞行器的三种飞行模式选择。
1,定点向前飞行。
10cm/s
2,定点飞行
3,自由飞行(无光流作用,完全由油门和pithch和rol控制)
建议:首先在自由飞行情况下,熟悉飞行器响应和调节能力。
并且实现在无光流情况下漂移速度较慢(这样有利于定点飞行)。
然后将飞行模式调到2模式,定点以后调至3模式。
飞行器就可以往前飞行了。
注意:第一次飞行务必在平整且光线充足的开阔地带飞行(光流传感器对于光线有一定要求)。
如果1,2模式下飞行器姿态出现问题,可以调回3模式挽救飞行器。
有危险务必直接将油门拉到最低,锁定飞行器。