ADSP-BF592手册
Keysight产品附件说明书

DCA 附件N1027A 套件和通用部件使用合适的附件更有助于数字通信分析仪(DCA) 实现高精度测试。
本文列出了建议86100D/N1000A DCA-X 主机及其模块、N109XX DCA-M 和 N107XX 时钟恢复模块使用的附件,包括:•衰减器、直流阻断器•校准套件、负载、短路件、端子•适配器和连接器保护器•相位匹配电缆套件、均衡器•功率分配器/功分器、传感器•机架安装套件、收纳与防护附件•力矩扳手和其他工具除非另有说明,所有附件均与主产品分开销售。
目录N1027A 套件和通用部件 (1)用于电气通道的附件套件 (4)用于 N1045A 和 N1046B 远程探头前端模块的 N1027A-45A 演示套件 (4)用于 N1046A 远程探头前端模块的 N1027A-46A 演示套件 (5)N1027A-AxF 附件套件,随 N1046A 模块一同发货 (5)N1060-60005 附件套件,随 N1060A 模块一同发货 (6)用于 TDR/TDT 模块的附件套件 (7)N1027A-34F/34M/54F/54M TDR/TDT 附件套件 (7)电子校准件 (8)机械校准套件 (9)时钟恢复仪器的附件套件 (10)N1076A-CR1(再次订货编号:N1027A-76A) (10)N1076B-CR1(再次订货编号:N1027A-76B) (11)N1077A-CR1(再次订货编号:N1027A-77A) (11)N1078A-CR1(再次订货编号:N1027A-78A) (12)射频/微波部件 (13)适配器 (13)衰减器 (14)线缆 (15)输入保护帽 (15)直流阻断器 (15)均衡器 (15)相位微调器 (16)传感器 (16)功率分配器/功分器 (16)端子 (16)机械附件 (17)挡板 (17)机架安装套件 (17)远程探头前端附件夹 (17)储存 (17)工具 (18)其他附件 (18)演示和培训器件 (18)防静电(ESD) (19)USB 器件 (19)附录 (20)DCA 输入连接器 (20)光接口 (21)射频/微波连接器 (22)NMD 连接器 (22)3.5 mm 连接器 (22)2.92 mm 连接器 (22)2.4 mm 连接器 (22)1.85 mm 连接器 (22)1.0 mm 连接器 (23)连接器汇总 (23)参考文献 (24)网络资源 (24)用于电气通道的附件套件用于 N1045A 和 N1046B 远程探头前端模块的 N1027A-45A 演示套件N1027A-45A用于 N1046A 远程探头前端模块的 N1027A-46A 演示套件N1027A-AxF 附件套件,随 N1046A 模块一同发货N1027A-A4FN1060-60005 附件套件,随 N1060A 模块一同发货N1060A 模块配有 1.0 mm 阳头加固型连接器。
西盟冻干机用户手册及说明

冻干机系列用户手册,版本1.0不阅读,不理解,没有遵循手册中的说明,机器会受损,操作人员会受伤并且机器的运转效果受影响目录1. 型号的尺寸1.1. FD5505——FD55251.2. FD5505s—— FD5525s1.3. MCFD5505——MCFD55251.4. SF0020——SF00101.5. TD5070A——TD5070RPS1.6. TFD55051.7. 尺寸2. 安装2.1. 安装的地点2.2. 安装的程序3. 电源和接地线3.1. 电源3.2. 接地线4. 部件和功能的参数4.1 FD5505-FD5525 的部件的参数4.2 控制面板和及其功能的参数5. 操作流程5.1. 手动模式5.2. 自动模式5.3. 预冷装置的操作5.3.1. 控制面板和及其功能的参数5.3.2. 预冷装置的操作流程6. 附件6.1. 真空泵6.1.1. 部件的参数(型号:VP8951,VP8920)6.1.2. 换油频率和如何换油6.1.3. 如何换排气过滤器的元件和换的周期6.2. 干燥腔室6.2.1. 干燥腔室部件的参数6.2.2. 如何连接各附件6.3. 密封焊枪6.3.1. 部件的参数6.3.2. 操作7. 冻干机的一般操作8. 维修服务8.1. 故障检修服务8.2. 维修服务登记8.3. 制冷简图8.4. 真空循环图8.5. 电子示意图8.6. 控制面板的电子示意图9. 保修1. 型号的尺寸1.7. 尺寸2. 安装2.1. 安装的地点1. 置于背光处2. 空气流通好3. 避免过多的灰尘4. 避免机械震动或摇动5. 工作温度:+5℃ to +33℃6. 工作高度:2.000m 以下7. 工作湿度:80%以下(倘若当工作温度达到最大值+33℃,湿度可以是低于57%)8. 电压可变的范围:低于+/- 10%*如果您在上述提到的场合下安装机器,机器不能正常运转。
2.2 安装程序1. 机器的后部和墙应保持30cm或更远的距离2. 在平稳的地方安装3. 滑地板要用螺丝钉固定4. 通风要流畅3. 电源和接地线3.1. 电源1. 确定连接是否安全,插头是否插入电源插座。
EE352 Soldering Considerations for Exposed-Pad Packages (Rev 1, 05.2012)

Engineer-to-Engineer NoteEE-352Technical notes on using Analog Devices DSPs, processors and development toolsVisit our Web resources /ee-notes and /processors or e-mail processor.support@ or processor.tools.support@ for technical support.Soldering Considerations for Exposed-Pad PackagesContributed by Chirag Patel and Ramdas CharyRev 1 – May 17, 2012Copyright 2012, Analog Devices, Inc. All rights reserved. Analog Devices assumes no responsibility for customer product design or the use or application of customers’ products or for any infringements of patents or rights of others which may result from Analog Devices assistance. All trademarks and logos are property of IntroductionThis Engineer-to-Engineer Note is comprised of two main sections. The first section discusses general soldering guidelines for Analog Devices Inc. (ADI) DSP and processor boards, while the second section discusses specifically some commonly asked questions regarding Exposed pad (or EPAD) packages, requiring special considerations for soldering onto Printed Circuit Boards (PCBs). Special attention needs to be paid in order to ensure that electrical and thermal requirements are satisfied. This will ensureoptimum performance of the device.Determining the Temperature Profile for BoardsThe process of determining thetemperature profile for soldering components onto a custom board is determined by several factors, such as thickness and form factor of the board, the number and type of components, as well as the type of solder paste that is used (aero/mil or commercial/industrial). Solder paste vendors typically provide a reference document containing useful information, such as the recommended temperature profile for their paste. Based on this recommended profile for the type of solder paste used, it is advisable to populate a bare custom board with sufficient number of thermocouples, then pass it through the oven, and ensure that the appropriate temperature zones and times are reached.Figure 1 Recommended Heating Profile from Solder Paste vendorFigure 2 Heating Profile for typical ADI EZ-KitsAs a reference, Figure 1 and Figure 2 show the recommended temperature profile from the solder paste vendor, and the temperature profile followed in the oven for our EZ-KIT® boards. The attachment accompanying this EE-Note contains the datasheet from the solder paste vendor, as well as the temperature profile information used for most Analog Devices, Inc. EZ-KIT boards.arelight in density. customers boards toraw populated consideration. EZ-KIT boards anPackages Q1.Q2.keep them underPCBall and AND * noreliability. Q7.previousEPAD.Q8.problem?Lastly, technique.References[1] JESD No. 22-B102E Standard on Solderability , JEDEC Solid State Technology Association, 2007.[2] ADSP- 21483/21487/21488/21489 SHARC Embedded Processor Data Sheet. Rev A, April 2012. Analog Devices, Inc. [3] ADSP- BF592 Blackfin Embedded Processor Data Sheet. Rev A, August 2011. Analog Devices, Inc.Document History。
ADSP-BF531_cn

每个 MAC 每周期可完成一个 16 位乘 16 位的乘法运 算,并把结果累加到 40 位的累加器中。支持符号型和无符
-2-
对于某些指令,两个 16 位 ALU 操作可以同时在寄存 器对(运算寄存器的高 16 位和低 16 位)中执行,也可以 使用第二个 ALU,进行四个 16 位运算。
40 位的移位器可以执行移位和循环移位,可以用于标 准化、提取和存储等操作。
任务。这些指令包括位操作(例如域提取和计算总数)、模 232 乘法、除法、饱和与舍入、符号/指数检测等;专用的一 套视频指令包括字节对准和压缩操作,16 位和 8 位截断加,
程序控制器控制指令执行的顺序,包括指令对准和译 码。对于程序流程,程序控制器支持相对于 PC 和间接条 件跳转(支持静态分支预测)。硬件提供对零耗循环的支持。 这种结构是完全互锁的,这就意味着,当有数据相关的指 令时,不存在可见的流水线影响。
地址算术单元能够提供两套地址,用于从存储器中同 时进行双存取。一个多端口寄存器组由 4 套 32 位的索引、 修改、长度、基地址(用于循环缓冲)寄存器和 8 个另外 的 32 位指针寄存器(用于 C 风格的索引堆栈操作)组成。
开发板精品网www.mcu361.com为您提供各种开发板和电子技术资料
2003年3月
初步技术数据
ADSP-BF53x
号型数据格式,舍入与饱和等操作。
ALU 除执行一套传统的 16 位或 32 位数据的算术和逻 辑运算外,还包含许多特殊指令用于加速不同的信号处理 8 位平均操作,8 位减法/绝对值/累加(SAA)操作等;还提 供有比较/选择和矢量搜索指令。
ADS-B发现双频接收机安装和用户手册

ADS-B Discovery Dual Band Receiver Installation and User ManualRevision AApril 2021GRT Avionics, Inc.3133 Madison Avenue SEWyoming, MI 49548616-245-7700***********************1FOREWORDThank you for choosing the ADS-B Discovery Dual Band Receiver!This manual describes the installation and operation of this receiver, using the software version shown in the Record of Revisions. Some differences may be observed when comparing the information in this manual to other software versions. GRT Avionics is not responsible for unintentional errors or omissions in the manual or their consequences. The builder of the aircraft and the pilot have the final authority on the airworthiness of the aircraft.Information in this document is subject to change without notice. GRT Avionics, Inc. reserves the right to change or improve their products and to make changes in the content of this material without obligation to notify any person or organization of such changes or improvements.Copyright ©2021 GRT Avionics, Inc. or its subsidiaries. All rights reserved.1.1Important Safety Information*CAUTION*:When used with a tablet or phone application, the attitude, air data, and GPS position data transmitted via wi-fi is provided to the receiver by the EFIS. Thus, it is not an independent source of data. It should not be used to cross-check the data from the EFIS that supplies this data to the receiver, since it is the same data.1.2Warranty and Return PolicyAll GRT products include a 2-year warranty, starting on the day the instrument is put into service (or three years after purchase, whichever comes first), against manufacturer defect.Contact Tech Support before returning a component to GRT for repair or warranty work. Many issues are installation-related and can be resolved over the phone, saving time and expense.All returns for repair or upgrade must be accompanied by a Service Request Form, downloadable from the GRT website.1.3Technical SupportOur tech support staff has real-world experience installing, flying, and troubleshooting GRT equipment in many different types of aircraft. We are here to help you.Please visit our website for up-to-date contact information for tech support via email. Check the home page of the GRT website often for new manual updates, video tutorials, and other instructional materials as we release them.1.4Record of RevisionsContents1FOREWORD (I)1.1Important Safety Information (I)1.2Warranty and Return Policy (I)1.3Technical Support (II)1.4Record of Revisions (II)2INTRODUCTION (1)2.1Warnings, Cautions, and Notes (1)2.2Electronic Manuals and Internet Links (1)2.3Feedback and Corrections (1)2.4The Discovery ADS-B Receiver (1)2.5General Specifications (2)2.6Compatible Antennae (2)3INSTALLATION (3)3.1Choosing an Antenna Location (3)3.2Mounting the Antenna (4)3.3Choosing a Receiver Location (4)3.4Mounting the Receiver (4)3.5Antenna Wiring (5)3.6Receiver Wiring to a GRT Avionics EFIS (5)3.6.1RS-232 Wiring (6)3.6.2USB Wiring (7)3.7Required GRT EFIS Settings for connecting via RS-232 (8)3.8Required GRT EFIS Settings for connecting via USB (8)3.9Other Applicable EFIS Settings (8)3.10Dimensional Drawing (9)2INTRODUCTIONThis manual was written to help both builders and pilots learn how to install, use, and maintain this receiver. The receiver may be used in certified aircraft when operated as a portable electronic device per FAA guidance. This guidance allows the receiver to be wired to the aircraft wiring for electrical power.2.1Warnings, Cautions, and NotesThroughout this manual, you will see notes punctuated with the following bold type:!WARNING!:A special notice that could lead to injury or death if not followed.*CAUTION*: A notice that could lead to damage of equipment if not followed. NOTE:An item of special interest that is not immediately apparent through normal usage.2.2Electronic Manuals and Internet LinksMany customers now choose to store electronic copies of the manuals on a tablet computer or phone for easy access to the newest material. It is easy to carry a lot of written materials aboard the aircraft without the added weight and bulk of paper. Because of this, we have added links to videos and other aids to the manual text. Simply touch or click on the link to access interactive materials and tutorials.2.3Feedback and CorrectionsIf you notice any errors or would like a better explanation of something that relates to this product, please contact GRT tech support. We are always striving to make our customers’ lives easier.2.4The Discovery ADS-B ReceiverThis receiver accepts the following:∙ADS-B weather and traffic data from 978 MHz ADS-B ground stations∙Airplane-to-airplane traffic data from other ADS-B OUT equipped airplanes∙Traffic data from airplanes with 1090 MHz mode S transponders with extended squitterThis data is provided to the EFIS via an RS-232 or USB serial data connection and via Wi-Fi to phone/tablet apps.2.5General SpecificationsDual-frequency ADS-B UAT (978 MHz), Extended Squitter (1090 MHz) Receiver∙Physical Dimensions: 8.0” x 2.5” x 1.3” (203 x 63 x 33 mm)∙Weight (W/O Wiring): 0.7 lbs (0.32 kg)∙Power Input: 7-35V DC, 8W∙Temperature Range: -10° F to 158° F (-25° C to 70° C)∙Operating Altitude: No limit∙Cooling Input: Not required∙Interfaces: -RS-232-USB-Wi-Fi2.6Compatible AntennasFor maximum sensitivity, an external antenna is recommended. Although an antenna is included with the receiver, any external antenna designed for ADS-B may be used.3INSTALLATIONInstallation consists of the following steps:∙Mount the Receiver∙Connect Power and Data Wiring∙Install and Wire the Antenna∙Configure the EFIS and Apps to Use the DataThe location of the antenna often dictates the location of the receiver.3.1Choosing an Antenna LocationThe main considerations for the location of the antenna are:∙3’ away from the transponder, ADS-B OUT (if equipped), and VHF communication antennae.∙6’ away from other transmitting antennae, such as DME.∙Preferably within 6’ of the receiver location (this can be extended to 12’ or more by supplying your own RG-58 coax cable).∙Mounting the antenna on the bottom side of the airplane reduces the probability of water intrusion.∙ A ground plane is required. For an aluminum airplane, the skin of the airplane functions as a ground plane. For a composite (or tube and fabric) airplane, aground plane should be incorporated. The ground plane can be a sheet ofaluminum, at least 5” in width and length. The thickness of the aluminum is not important. Increasing the size of the ground plane, up to 25” on each side,improves the sensitivity of the receiver. Minimal improvement can be expectedbeyond this size. The antenna should mount through the ground plane, so that its mounting hardware makes electrical connection with the ground plane.∙The antenna must be mounted vertically.∙The antenna must be mounted away from major protrusions, such as engine nacelles, landing gear legs, etc.Typically, the transponder and its antenna are located near the front of the airplane (to minimize the cable length between the two). In order to achieve the 3’ spacing required, it is common to locate the ADS-B receiver antenna aft of the transponder antenna, onthe opposite side of the airplane’s center line. However, if this placement isn’t feasible, any location more than 3’ from another transmitting antenna is acceptable.3.2Mounting the AntennaUsing the included hardware, the antenna can be mounted as follows:∙Drill a ½” mounting hole using a stepped drill.∙Install the rubber gasket on the antenna.∙Place the antenna in the mounting hole.∙Secure the antenna with the lock washer and nut.Further guidance is provided by AC43.12-2A, Chapter 3.3.3Choosing a Receiver LocationThe main considerations for the location of the ADS-B receiver are as follows:∙The aluminum base plate of the receiver is used to passively cool the receiver.This base plate should not be mounted in a way that thermally insulates it. When mounting to thermally insulating materials, such as on a composite airplane, use ½” standoffs to allow for airflow around the base plate.∙The receiver must be accessible for installation and maintenance purposes.Physical access to the receiver is not required for software updates when it’swired to a GRT EFIS.∙The receiver must be within 12’ of the antenna. Receiver sensitivity diminishes due to signal losses in longer coaxial cables.∙The location should not expose the receiver to heat or water.∙Position the receiver so that the D-Sub remains accessible for wiring purposes.Similarly, if a backup GPS is going to be connected to the receiver, maintainspace for this connection.3.4Mounting the ReceiverThe receiver is mounted with four #6 screws put through the holes in its aluminum base plate. For ease of installation and removal, select a location (or fabricate a tray) that allows for the use of #6 nut plates.3.5Antenna WiringRG-58 or RG-400 coaxial cable (50 Ω characteristic impedance) are acceptable wiring choices. RG-400 is recommended for cable lengths greater than 6’ (2m).3.6Receiver Wiring to a GRT Avionics EFISThe receiver may be connected to a GRT EFIS via RS-232 or USB connections. An RS-232 connection is preferred, as the d-sub connector is a proven technology in airplane applications and includes hardware to keep the connector in place. In installations that lack a spare serial input, the USB output can be used.3.6.1RS-232 WiringThe following diagram illustrates the wiring to a GRT EFIS using RS-232. While the “Serial Out” connection from the EFIS display unit to the receiver is optional, it provides the receiver with AHRS and GPS data that it can then output to tablet/phone apps via Wi-Fi. This connection also allows for updates to the receiver’s software.The receiver provides3.6.2USB WiringThe following diagram illustrates the wiring to a GRT EFIS using the USB port. The USB port provides the receiver with AHRS and GPS data that it can then output totablet/phone apps via Wi-Fi. This connection also allows for updates to the receiver’s software.3.7Required GRT EFIS Settings for connecting via RS-232On the Set Menu > General Setup page, configure the serial input and output ports (if wired) to “GRT Discovery ADS-B In,” at 115,200 baud.3.8Required GRT EFIS Settings for connecting via USBOn the Set Menu > General Setup page, configure the USB ADS-B to ON.3.9Other Applicable EFIS SettingsIf a USB GPS is connected to the USB Type A port (on the side next to the mounting holes) and is going to be used as a GPS source for the EFIS, configure it as GPS1 or GPS2 on the Set Menu > General Setup > GPS from ADS-B Receiver page.3.10 Dimensional Drawing。
ADS设计定向耦合器讲解

<<ADS>>课程设计——分支线耦合器目录1概述 (1)1.1 微波技术产生的背景及发展趋势 (1)1.2 微波电路仿真软件ADS简介 (2)1.3定向耦合概念及分类 (3)1.3.1概念 (3)1.3.2分类 (4)1.3.3 主要技术指标 (6)2工作原理 (7)2.1 传输线理论 (7)2.2 输入阻抗 (8)2.3 特性及测量 (9)2.3.1网络特性 (9)2.3.2测量方法(定向耦合器的特性参量) (10)2.4 定向耦合器的用途 (11)3.微带分支电路的分析与设计 (12)3.1 分支线耦合器 (12)3.2 分支线耦合器的奇偶模分析 (13)4设计过程 (17)4.1 建立工程 (17)4.2 原理图的设计 (18)4.3微带线参数的设置 (19)4.4 VAR控件的设置 (20)4.5 S参数仿真设计 (20)4.6 参数的优化 (22)4.7分支线耦合器版图的生成 (23)5.总结与展望 (25)1概述1.1 微波技术产生的背景及发展趋势微波技术是无线电电子学的一个重要分支,已成为现代通信、雷达、导航和遥感等领域最为敏感的课题之一,发展至今已经有比较久的历史了,无论在理论上还是在实践上,微波科学技术逐渐成熟,并拥有很多的从业人员。
微波波段的电磁波能穿透电离层,因而卫星通信与卫星电视广播、宇宙通信及射电天文学的研究等均需利用微波来实现,在通信、雷达、导航、遥感、天气、气象、工业、农业、医疗以及科学研究等方面得到越来越广泛的应用,成为了无线电电子学的一个重要的分支趋向。
随着通信技术的迅速发展,为了便于携带和移动,无线电设备的小型化是未来的发展趋势,而移动通信所使用频段处于微波范围,因此实现微波电路的更高频率化, 小型化,固体化,不仅在实用方面,而且在学术方面均有重要的研究价值。
定向耦合器通常有两种实现方式: Lange耦合器和带线耦合器。
Lange耦合器具有结构紧凑,便于集成的优点,但一般使用陶瓷基板, 电路制作要求较高,加工工艺和成本限制了它的应用。
ADS设计实验教程

关闭优化控件后的原理图
观察仿真曲线
点击工具栏中的Simulate 会出现图形显示窗口。
按钮进行仿真,仿真结束后
观察仿真曲线(续)
点击图形显示窗口左侧工具栏中的 按钮,放置一个方 框到图形窗口中,这时会弹出一个设置窗口(见下页图), 在窗口左侧的列表里选择S(1,1)即S11参数,点击Add按钮 会弹出一个窗口设置单位(这里选择dB),点击两次OK 后,图形窗口中显示出S11随频率变化的曲线。
由于原理图仿真和实际情况会有一定的偏差, 在设定优化参数时,可以适当增加通带宽度。 对于其它的参数,也可以根据优化的结果进行 一定的调整。
优化目标的设置(续)
进行参数优化
设置完优化目标后最好先把原理图存储一下,然后就可 以进行参数优化了。
点击工具栏中的Simulate 按钮就开始进行优化仿真 了。在优化过程中会打开一个状态窗口显示优化的结果 (见下页图),其中的CurrentEF表示与优化目标的偏差, 数值越小表示越接近优化目标,0表示达到了优化目标, 下面还列出了各优化变量的值,当优化结束时还会打开 图形显示窗口。
设置微带电路的基本参数 (续)
修改微带线参数窗口(左图),也可以点击MSUB下面 的文字直接进行修改(右图),但要注意数字与单位 之间有一个空格.
微带线计算工具
滤波器两边的引出线是特性阻抗为50欧姆的微带线,它的宽 度W可由微带线计算工具得到,具体方法是点击菜单栏Tools -> LineCalc -> Start Linecalc,出现一个新的窗口(如下页 图)。
设置微带器件的参数
双击两边的引出线TL1、TL2,分别将其宽与长设为1.52 mm和2.5 mm(其中线长只是暂定,以后制作版图时还会修ห้องสมุดไป่ตู้改)。
ADSP-BF533简介
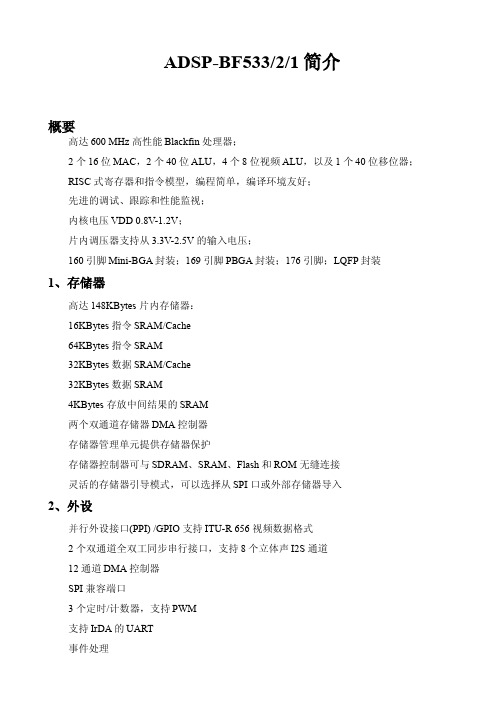
ADSP-BF533/2/1简介概要高达600 MHz 高性能Blackfin 处理器;2 个16 位MAC,2 个40 位ALU,4 个8 位视频ALU,以及1 个40 位移位器;RISC 式寄存器和指令模型,编程简单,编译环境友好;先进的调试、跟踪和性能监视;内核电压VDD 0.8V-1.2V;片内调压器支持从3.3V-2.5V 的输入电压;160 引脚Mini-BGA 封装;169 引脚PBGA 封装;176 引脚;LQFP 封装1、存储器高达148KBytes 片内存储器:16KBytes 指令SRAM/Cache64KBytes 指令SRAM32KBytes 数据SRAM/Cache32KBytes 数据SRAM4KBytes 存放中间结果的SRAM两个双通道存储器DMA 控制器存储器管理单元提供存储器保护存储器控制器可与SDRAM、SRAM、Flash 和ROM 无缝连接灵活的存储器引导模式,可以选择从SPI 口或外部存储器导入2、外设并行外设接口(PPI) /GPIO 支持ITU-R 656 视频数据格式2 个双通道全双工同步串行接口,支持8 个立体声I2S 通道12 通道DMA 控制器SPI 兼容端口3 个定时/计数器,支持PWM支持IrDA 的UART事件处理实时时钟“看门狗”定时器调试 /JTAG 接口1x-63x 倍频的片内PLL内核定时器图1. 功能框图3、概述处理器比较ADSP-BF531/2/3 处理器是Blackfin 系列产品的成员,融合了Analog Devices/Intel 的微信号结构(Micro Signal Architecture) (MSA)。
Blackfin 处理器这种体系结构将艺术级的dual-MAC 信号处理引擎,简洁的RISC 式微处理器指令集的优点,以及单指令多数据(SIMD)多媒体能力结合起来,形成了一套独特的指令集结构。
ADSP-BF531/2/3 处理器的代码和管脚完全兼容,它们之间的差别仅仅在于具有不同的性能和片内存储器容量。
- 1、下载文档前请自行甄别文档内容的完整性,平台不提供额外的编辑、内容补充、找答案等附加服务。
- 2、"仅部分预览"的文档,不可在线预览部分如存在完整性等问题,可反馈申请退款(可完整预览的文档不适用该条件!)。
- 3、如文档侵犯您的权益,请联系客服反馈,我们会尽快为您处理(人工客服工作时间:9:00-18:30)。
REVISION HISTORY
Rev. 0 to Rev. A Added 200 MHz model to Electrical Characteristics ....... 17 Added 200 MHz model to Ordering Guide ................... 43
PERIPHERALS
Four 32-bit timers/counters, three with PWM support 2 dual-channel, full-duplex synchronous serial ports (SPORT), supporting eight stereo I2S channels 2 serial peripheral interface (SPI) compatible ports 1 UART with IrDA support Parallel peripheral interface (PPI), supporting ITU-R 656 video data formats 2-wire interface (TWI) controller 9 peripheral DMAs 2 memory-to-memory DMA channels Event handler with 28 interrupt inputs 32 general-purpose I/Os (GPIOs), with programmable hysteresis Debug/JTAG interface On-chip PLL capable of frequency multiplication
UART INTERRUPT CONTROLLER SPI0 SPORT0 DMA CONTROLLER DCB DEB BOOT ROM
GPIO
PORT G DMA ACCESS BUS SPI1 TWI
Figure 1. Processor Block Diagram
Blackfห้องสมุดไป่ตู้n and the Blackfin logo are registered trademarks of Analog Devices, Inc.
Blackfin Embedded Processor ADSP-BF592
FEATURES
Up to 400 MHz high performance Blackfin processor Two 16-bit MACs, two 40-bit ALUs, four 8-bit video ALUs, 40-bit shifter RISC-like register and instruction model for ease of programming and compiler-friendly support Advanced debug, trace, and performance monitoring Accepts a wide range of supply voltages for internal and I/O operations, see Operating Conditions on Page 15 Off-chip voltage regulator interface 64-lead (9 mm × 9 mm) LFCSP package
One Technology Way, P.O. Box 9106, Norwood, MA 02062-9106 U.S.A. Tel: 781.329.4700 Fax: 781.461.3113 © 2011 Analog Devices, Inc. All rights reserved.
MEMORY
68K bytes of core-accessible memory (See Table 1 on Page 3 for L1 and L3 memory size details) 64K byte L1 instruction ROM Flexible booting options from internal L1 ROM and SPI memory or from host devices including SPI, PPI, and UART Memory management unit providing memory protection
ADSP-BF592
TABLE OF CONTENTS
Features ................................................................. 1 Memory ................................................................ 1 Peripherals ............................................................. 1 General Description ................................................. 3 Portable Low Power Architecture ............................. 3 System Integration ................................................ 3 Blackfin Processor Core .......................................... 3 Memory Architecture ............................................ 5 Event Handling .................................................... 5 DMA Controllers .................................................. 6 Processor Peripherals ............................................. 6 Dynamic Power Management .................................. 8 Voltage Regulation ................................................ 9 Clock Signals ....................................................... 9 Booting Modes ................................................... 11 Instruction Set Description ................................... 12 Development Tools ............................................. 12 Designing an Emulator-Compatible Processor Board (Target) ................................... 12 Related Documents .............................................. 12 Related Signal Chains ........................................... 12 Signal Descriptions ................................................. 13 Specifications ........................................................ 15 Operating Conditions ........................................... 15 Electrical Characteristics ....................................... 17 Absolute Maximum Ratings ................................... 19 ESD Sensitivity ................................................... 19 Package Information ............................................ 20 Timing Specifications ........................................... 21 Output Drive Currents ......................................... 35 Test Conditions .................................................. 36 Environmental Conditions .................................... 39 64-Lead LFCSP Lead Assignment ............................... 40 Outline Dimensions ................................................ 42 Automotive Products .............................................. 42 Ordering Guide ..................................................... 42