AW-3-Topic selection
TOSHIBA AW-DUK1300K 全自动洗衣机用户手册说明书

OWNER’S MANUALFully Automatic Washing Machine Read This ManualRead and Keep the operation instructions handy forfuture use .follow the instructions carefully.Model:AW-DUK1300K SeriesCONTENTS SAFETY INSTRUCTIONSSafety instructions .......................................................................INSTALLATIONProduct description .............................................................................................Unpacking the washing machine .........................................Levelling the washing machine .....................................................................Connection of inlet hose, tap and washing machine......Preparation before washing.....................................................Washing...........................................................................................After washing.................................................................................Washing matters needing attention .....................................The usage of detergent and washing powder...................Control pan ...........................................................el......................Option...............................................................................................Personalized setting of washing ...............course................Operations of washing process...............................................Washing table ......................................course...........................MaintenanceCleaning and care ........................................................................Cleaning the cabinet...................................................................Trouble hooting.......................................................s.....................Technical ..............................................s pecifications...............28991011111212121313141516161719192021 OPERATIONCleaning inlet filter ......................................the (19)18 Recommended detergent amount.............................Installation of the cabinet base cover (9)Lid lock open/close (17)For your safety, the information in this manual must be followed to minimize the risk of fire or explosion, electric shock, or to prevent property damage, personal injury or loss of life.• This appliance is not intended for use by persons (including children) with reduced physical, sensory or mental capabilities or lack of experience and knowledge unless they have been given supervision or instruction concerning use of the appliance by a person responsible for their safety.• Children should be supervised to ensure that they do not play with the appliance.• If the supply cord is damaged, it must be replaced by the manufacturer, its service agent or similarly qualified persons in order to avoid a hazard.• The new hose-sets supplied with the appliance are to be used and that old hose-sets should not be reused.• The openings must not be obstructed by a carpet.• This appliance is intended to be used in household .Explanation of the symbols:The electric shock!• • Do not put washing machine humid place.• Hands not be inserted into .• Before maintenance the , unplug the appliance from the • Always unplug the machine and turn off the water supply after use. Be aware of the maximum and minimum inlet water pressure which is in megapascals (M a)• To ensure your safety, power plug must be inserted into an earthed three-pole socket. Check carefully and make sure that your socket is properly and reliably earthed.• Make sure that the water and electrical devices are connected by a qualified technician in accordance with the manufacturer's instructions and local safety regulations ・This product is used only domestic.This is for indoor use only.washing machine this in a should the rotating drum doing any unit electrical source.provisions P• he appliance used by children with reduced physical sensory or mental capabilities or lack of experience and knowledge if they have been given supervision or instruction concerning use of the appliance in a safe way and understand the hazards involved.Cleaning and user maintenance shall not be by children without supervision.• Animals and children climb into the machine. Check the machine before every operation.• should be supervised that they do not play with the appliance.• Keep children and far away from the machine during operation.T done can can not be not Children animals and persons Risk of explosion!• washed in, soaked in, or dabbed with combustible or explosive substances( such as wax, oil, paint, gasoline, degreasers , dry-cleaning solvents, kerosene, etc.)• This may result in fire or explosion.• Rinse the clothes or wash articles thoroughly by hand putting them in the appliance .Do not wash or dry articles that have been cleaned in, . before Risk to children!• This washing machine is for indoor use only.• built-in using.It is not intended for • The openings must not be obstructed by a carpet.• ashing machine shall not be installed in bath room or very wet rooms as well as in the rooms with explosive The w s or caustic gases.• Remove all before using Otherwise, serious damage may result.packaging materials the appliance. • The washing machine with single inlet valve may only connected to a cold water supply.be • The plug must be accessible after installation.• • Avoid place where the machine is exposed to direct sunlight .Plastic parts may become deformed or discolored . Avoid place where the machine may become frozen during cold weather.This appliance is intended to be used in household.Installing the product!Operating the appliance!• Before washing the clothes first time, the product for the shall be operated without clothes using tub clean as the displayed program on the control panel.• Flammable and explosive or toxic solvents are forbidden. Gasoline and alcohol etc. Shall not be used as detergents. Please only select the detergents suitable for machine washing, especially for top-loading fully automatic washing machines.• Make sure that all pockets are emptied. Sharp and rigid items such as coins, may cause serious to this machine. brooches, nails, screws or ston s etc.damage e • Never refill the water by hand during washing.Risk of damaging appliance!• Your product is only for home use and is only designed fo extiles suitable for machine washing.• Do not climb up and sit on of the machine.• Cautions during Machine Handling and transport: 1.The accumulated water shall be drained out of the machine. 2.Handle the machine carefully. Never hold part the machine while lifting. • Please do not close • It is forbidden to wash carpets.r t the protruding s of t with excessive force. glass lid 3.This appliance is heavy, it should be transported carefully. he glass lidProduct descriptionInstallation AreaBefore installing the machine, the location characterizedas follows shall be selected:1.Rigid, dry, and level surface2.Avoid direct sunlight3.Sufficient ventilation4.Room temperature is above 0 C5.Keep far away from fuel sources such as coal or gas Unpacking The Washing Machine1. Remove the cardboard box and styrofoam packing.2. Lift the washing machine and remove the base packing.3. Remove the tape securing the power supply cord anddrain hose.4. Pick up the inlet hose from the drum.Installation of the cabinet base coverLay the washing machine backward on the soft fabric .Then Insert the cabinet base cover into washing machine base trough, push into the end and tighten screw at oneposition.The way to place the end of drain hose:1. Check if the are properly attached the cabinet. If not, please rotate them to their original position and tighten the nuts.2. Check alignment of the product with a leveler and do the succeeding steps if necessary.3. Loosen the lock nut and feet to4. rotate the foot either clockwise or counter clockwise , until it closely contacts with the floor. Assure that the lock is secure and then alternately press the four top corners of the machine, to check if the proper adjustment has been done .Levelling the washing machine2:Connection between screw tap and inlet hose.Selection of tapPlease select tap.appropriate Connection of inlet hose, tap and washing machineto show 5mm groove 2.Loosen four screws3.Set connecting base on tap and tighten screws evenly4.Tighten clamp nut5.Press slide bushing, insert inlet hose into connecting base6.onnection finished C7.After connection and installation, check if there is water leakageT ap with threads and inlet hose S pecial tap for washing machineScrew tapSpecial washing machine tapOrdinary tapBefore washing, please make sure installed properly. Before washing first time, the washing machine shall be operated • • • that the unit is for the without clothes using tub clean as the recommended course. Do not use water with temperatures over 50 °C After WashingWashingPower on Start up1The buzzer will beep after washing finished and the power supply will be cut off automatically . unload the laundry.A t this point , you may 3Preparation Before WashingA complete cycle is as shown below2• Water level can be selected manually .Select course • In the case of Liquid det rgent , t is used by this case .e i Liquid detargent CaseOpen tapPlug in Add detergent 1234Put clothes in the drumClose lid5Caution!Note!Note!Tie tassels into Knot, fasten• Before washing ,lease check the clothes labels and the detergent usage instructions. se low-density detergent before wash suitable for washing machines . p U Take items out of the pockets Put small clothes into a laundry netCheck the labelWashing matters needing attentionTurn the following clothes inside out those that easily form fiber on its surface and those with long strands of fiberSegregate clothes with varying textures or materials• As for powder detergent that can form into clusters or masses, it is suggested to dilute the detergent some water ,before pouring into the detergent box, this will prevent the inlet of the detergent box from clogging and water from over flowing during the filling process• Choose the suitable type of detergent for the various washing temperature to get the best washing effect with less water and energy consumption.with .The usage of detergent and ashing powderwThe display shows the settings, estimatedremaining time , options, and statusmessages for your washer. The display will remain on throughout the cycle.8Lid lockLid lock refer to page 17.Note! Note!Optionselect water level according to clothing categories, degree of soiling and washing habits of the userswashing time, number of rinses , spinning time and other settings can be selectedFunctionTo select one of the following functions, Soaking , washing, rinsing or spinningOnly for having these .models functions Water levelWash /Rinse /SpinStart The GREAT WAVES litOn CHILD PROOFPreset1. Select a course2.Press the button to choose the time before operation starts Preset start3.Press [Start/] to commence the operationHold Preset time Press the [] button repeatedly , to see time choices ,he time should be set before starting the . If you want to set the time , after the has already started, the on/off button should be pressed to Preset Preset Preset Preset t course course GREATWAVES is able to shorten wash time by special rhythm and water flow.OnWater Level Choose the coursePersonalized setting of washing courseThe user can select washing according to the actual need, and set washing time, number of rinses, spinning time, water volume and course start time.course The user can set a single process or combinations of washing , rinsing andspinning freely according to the need. Detailed operations are as follows for different models:Operations of washing processWashStartOnSet soak/washing/spinning time ,rinsing timesStartPresetSoakOnPress the PROCESS buttonStartRinseStartPress the SET buttonSet soaking timePress the PROCESS buttonPress the SET button Set washing timePress the PROCESS buttonPress the SET button Set times of rinsesSpinStartPress the PROCESS buttonPress the SET button Set spinning timeWashing Table CourseCourses are available according to the laundry type.Only for having these models functions:Lid lock open/closeDuring operation, the lid lock light is on,but the door cover cannot be opened;when the lid lock light is off.During operation, the lid lock light is on,when the power cord is pulled out directly, or the power is off, the lid lock light is off, and the door cover cannot be opened.During operation, the lid lock light is on,press the pause button, the door lock light is off,and the door cover can be opened.Recommended Detergent AmountR a t e d c a p a c i t y (k g )Manual Water Level SettingDetergentsSoftenerPowder LiquidNormal typeConcentrated type12kg6kg3kg1kg73L 62L 48L 29L Approx. 11gBlanket12kg Approx. 10mLApprox. 50mL Approx. 75mL Approx. 18mLApprox. 18m -36mL L Approx. 9mLApprox. 9-14mL mL Approx. 25mL(2gear)(4gear)(6gear)(8gear)Approx. 10m -20mL L Approx. 11-33g g Approx. 33-55g g Approx. 55-100g g Approx. 20m -35mL L Approx. 35m -50mL L Approx. 36m -55mL L Approx. 55m -75mL L Approx. 12-18mL mL Approx. 18-25mL mLWashing the filter in washing machine:1.Screw off the inlet pipe from the of themachine.2.Pull out the filter with ong nose pliers and reinstall it back after being washed.e to clean the filter.4.Reconnect the inlet .the back a pair of l a brush hose 1.There is a built-in lint filter in your washer. It can help to collect lint during washing cycle.2.It is suggested to clean the lint filter every 10 cycles.3.Take it out and clean the filter with water. Then place it back into the washer.Lint filter cleaningMAINTENANCETrouble ShootingIf the appliance does not start or it stops during the operation,initially try to find a solutionTechnical Specifications。
EN586-2-1994-锻造机械性能

EN586-2-1994-锻造机械性能EUROPEAN STANDARD NORME EUROPéENNE EUROP?ISCHE NORMEN 586-2June 1994UDC 669.71:669.715.018.26:620.17Descriptors: Aluminium, aluminium alloys, forgings, specifications, characteristics, mechanical properties, resistivity, corrosion,resistance, stress corrosion, tests, tables (data)English versionAluminium and aluminium alloys — Forgings —Part 2: Mechanical properties and additional propertyrequirementsAluminium et alliages d’aluminium — Pièces forgées —Partie 2:Caractéristiques mécaniques et autres caractéristiques exigées Aluminium und Aluminiumlegierungen —Schmiedestücke —Teil 2: Mechanische Eigenschaften und zus?tzliche EigenschaftsanforderungenThis European Standard was approved by CEN on 1994-06-16. CEN members are bound to comply with theCEN/CENELEC Internal Regulations which stipulate the conditions for giving this European Standard the status of a national standard without any alteration.Up-to-date lists and bibliographical references concerning such national standards may be obtained on application to the Central Secretariat or to any CEN member.This European Standard exists in three official versions (English, French,German). A version in any other language made by translation under the responsibility of a CEN member into its own language and notified to the Central Secretariat has the same status as the official versions.CEN members are the national standards bodies of Austria, Belgium,Denmark, Finland, France, Germany, Greece, Iceland, Ireland, Italy,Luxembourg, Netherlands, Norway, Portugal, Spain, Sweden, Switzerland and United Kingdom.CENCentral Secretariat: rue de Stassart 36, B-1050 Brussels1994 Copyright reserved to CEN membersRef. No. EN 586-2:1994 EEN 586-2:19942ForewordThis European Standard has been drawn up by CEN/TC 132, Aluminium and aluminium alloys, whose secretariat is held by the Association Fran?aise de Normalisation (AFNOR).Committee CEN/TC 132 entrustedEN 586-2, Aluminium and aluminium alloys — Forgings — Part 2: Mechanical properties and additional properties.This standard is part of a set of three standards. The other standards deal with:EN 586-1, Aluminium and aluminium alloys — Forgings — Part 1: Technical conditions for inspection and delivery.EN 586-3, Aluminium and aluminium alloys — Forgings — Part 3: Tolerances on dimensions and form.This European Standard has been prepared under a mandate given to CEN by the Commission of the European Communities and the European Free Trade Association, and supports essential requirements of EC Directive(s).This European Standard shall be given the status of a national standard, either by publication of an identical text or by endorsement, at the latest by December 1994, and conflicting national standards shall be withdrawn at the latest by December 1994.In accordance with the CEN/CENELEC Internal Regulations, the following countries are bound to implement this European Standard: Austria, Belgium, Denmark, Finland, France, Germany, Greece, Iceland, Ireland, Italy, Luxembourg, Netherlands, Norway, Portugal, Spain, Sweden, Switzerland and United Kingdom.ContentsPageForeword 21Scope 32Normative references 33Definitions 34Tensile testing 35Mechanical properties 36Electrical conductivity 37Stress corrosion resistance 68Additional properties7Annex A (normative) Rules for rounding 8Table 1 — Alloy EN AW-2014 [A1 Cu4SiMg]4Table 2 — Alloy EN AW-2024 [A1 Cu4Mg1]4Table 3 — Alloy EN AW-5083[A1 Mg4,5Mn0,7]4Table 4 — Alloy EN AW-5754 [A1 Mg3]5Table 5 — Alloy EN AW-6082[A1 Si1MgMn]5Table 6 — Alloy EN AW-7075[A1 Zn5,5MgCu]5Table 7 — Inspection lot acceptance criteria for alloy EN AW-7075-T73 and T7352 forgings6Table 8 — Typical electrical conductivity and hardness values6EN 586-2:199431 ScopeThis part of EN 586 specifies the mechanicalproperties and additional properties of forgings in aluminium and aluminium alloys for generalengineering applications. The chemical composition and temper designations for these alloys are specified in EN 573-3 and EN 515 respectively.2 Normative referencesThis European Standard incorporates by dated or undated reference, provisions from otherpublications. These normative references are cited at the appropriate places in the text and the publications are listed hereafter. For datedreferences, subsequent amendments to or revisions of any of these publications apply to this European Standard only when incorporated in it byamendment or revision. For undated references the latest edition of the publication referred to applies.EN 515, Aluminiumand aluminium alloys — Wrought products — Temper designations.EN 573-3, Aluminium and aluminium alloys — Chemical composition and form of wrought products — Part 3: Chemical composition.EN 586-1, Aluminium and aluminium alloys —Forgings — Part 1: Technical conditions for inspection and delivery.EN 2004-1, Aerospace series — Test methods for aluminium and aluminium alloy, products — Part 1: Determination of electrical conductivity of wrought aluminium alloys.EN 10002-1, Metallic materials — Tensile testing — Part 1: Method of test (at ambient temperature).ISO 6506:1981, Metallic materials — Hardness test — Brinell test.ISO 6507-1:1982, Metallic materials — Hardness test — Vickers test — Part 1: HV 5 to HV 100.ISO 6508:1986, Metallic materials — Hardness test — Rockwell test (scales A-B-C-D-E-F-G-H-K).ISO 9591:1992, Corrosion of aluminium alloys —Determination of resistance to stress corrosion cracking.3 DefinitionsFor the definition of the terms forging, inspection lot and test, see EN 586-1For the purposes of this standard the following definitions apply.3.1longitudinal directiondirection parallel to the primary grainflow, designated L3.2transverse direction (die forgings)any direction not parallel to the primary grainflow, designated T3.3long transverse direction (hand forgings)direction parallel to the major sectional dimension (width), designated LT3.4short transverse direction (hand forgings)direction parallel to the minor sectional dimension (thickness), usually the direction of forging, designated ST 3.5section sizediameter of the largest sphere which can be inscribed within the forging, designated t4 Tensile testingFor the selection of specimens and orientation and preparation of test pieces, see EN 586-1. Tensile testing shall be carried out in accordance with EN 10002-1.5 Mechanical propertiesThe mechanical properties of class A aluminium alloys are given in Table 1 to Table 6. Test results shall be rounded in accordance with the rules given in annex A.6 Electrical ConductivityThe electrical conductivity of forgings produced in EN AW-7075 material in the T73 and T7352 temper conditions shall be determined in accordance with EN 2004-1 as part of the inspection lot acceptance by testing the surface of the previously selected tensile test specimens to the criteria shown in Table 7.EN586-2:19944Table 1 — Alloy EN AW-2014 [A1 Cu4SiMg]Table 2 — Alloy EN AW-2024 [A1 Cu4Mg1] Table 3 — Alloy EN AW-5083 [A1 Mg4,5Mn0,7]Product Temper Section size Test direction Tensile strengthProof stress Elongationt R m R p0,2Amm MPa MPa%min.min.min. All forgings T4t# 100L4202608 Product Temper Section size Test direction Tensile strengthProof stress Elongationt min.R m R p0,2Amm MPa MPa%min.min.min. All forgings H112t# 150L27012012 or T26011010EN 586-2:19945Table 4 — Alloy EN AW-5754 [A1 Mg3] Table 5 — Alloy EN AW-6082 [A1 Si1MgMn] Table 6 — Alloy EN AW-7075 [A1 Zn5,5MgCu] ProductTemperSection sizeTest directionTensile strengthProof stressElongationt min.R m R p0,2A mmMPa MPa %min.min.min.All forgingsH112t # 150L1808015ProductTemperSection sizeTest directionTensile strengthProof stressElongationt R m R p0,2A mmMPa MPa %min.min.min.All forgings T6t # 100L 3102606or T 2902505EN586-2:19946Table 7 — Inspection lot acceptance criteria for alloy EN AW-7075-T73 and T7352 forgings Table 8 — Typical electrical conductivity and hardness values7 Stress corrosion resistanceForgings produced in EN AW-7075 material in the T73 and T7352 temper conditions shall be capable of exhibiting no evidence of stress corrosion cracking when subjected to ISO 9591:1992 accelerated stress corrosion cracking test.For the purposes of this standard, the following provisions apply:— a minimum of three adjacent replicate test pieces shall be taken from each specimen and submitted for test;— exposure shall be carried out by alternate immersion in a 3,5% by mass sodium chloride solution;— test pieces shall be stressed in the short transverse direction with a stress level of 75% of the specified proof stress;— no stress corrosion related rupture shall be observed after a minimum exposure timeof20days.The method of stressing (bending, uniaxial loading, C-ring, etc.), the shape and dimensions of the test pieces and the frequency of the test are left to the discretion of the supplier, who shall maintain records of all lots so tested and make them available for examination at the supplier’s facility for not less than five years.Alloy designation Temper Electrical conductivity a Hardness aH BMS/m MS/mEN AW-2014 [A1 Cu4SiMg]T417 – 21100T621 – 25125EN AW-2024 [A1 Cu4Mg1]T416 – 20120EN AW-5083 [A1 Mg4,5Mn0,7]H11265EN AW-5754 [A1 Mg3]H11250EN AW-6082 [A1 Si1MgMn]T625 – 3090EN AW-7075 [A1 Zn5,5MgCu]T617 – 21135T73see Table 7120T7352see Table 7120a Due to variation in applied thermal processing and treatment of forgings, the values stated in Table 8 except forEN AW-7075-T73 and EN AW-7075-T7352 are offered for guidance purposes only. Failure to comply with the stated values does not constitute a cause for rejection.EN 586-2:199478 Additional properties8.1 In addition to or in substitution for thedetermination of mechanical properties, testing to establish the electrical conductivity and hardness properties of forgings shall be performed whenagreed between the purchaser and the supplier and stated on the order or drawing.8.2 Such testing shall be carried out as a measure of batch uniformity and shall be applied to forgings on completion of all processing and prior to delivery to the purchaser.8.3 Batch uniformity testing shall be undertaken using one of the following methods selected by the supplier:a) each forging in the inspection lot shall be electrical conductivity tested. A forging of the lowest and highest electrical conductivity value shall be hardness tested;b) each forging in the inspection lot shall be hardness tested. A forging of the lowest and highest hardness value shall be electrical conductivity tested.8.4 Electrical conductivity measurement shall be in accordance with EN 2004-1. The values obtained shall not exceed the following limits of variation:a) #1,5 MS/m per forging;b) #2,5 MS/m per inspection lot.Actual readings obtained on electrical conductivity testing shall normally meet the values stated in Table 8. Unless otherwise indicated on thedrawing, measurements for electrical conductivity shall be carried out at a minimum of two locations selected by the supplier.8.5 Hardness testing shall be in accordance with ISO 6506:1981 (Brinell test). Alternative methods for hardness testing e.g. Vickers hardness testing in accordance with ISO 6507-1:1982 or Rockwellhardness testing in accordance with ISO 6508:1986 may be utilized subject to agreement betweenpurchaser and supplier. The values obtained shall demonstrate that forgings have been processed in a uniform manner. Actual readings obtained on Brinell hardness testing shall normally meet the values stated in Table 8. Unless otherwise indicated on the drawing the location(s) for hardness test shall be selected by the supplier.EN 586-2:19948Annex A (normative) Rules for roundingIn recording test results, the number representing the result of a test to determine a given property shall be expressed to the same number of decimal standard.a) When the figure immediately after the last figure to be retained is less than 5, the last figure to be retained remains unchanged;b) When the figure immediately after the last figure to be retained is greater than 5, or equal to 5 and followed by at least one figure other than zero, the last figure to be retained is increased by one;c) When the figure immediately after the last figure to be retained is equal to 5 and followed by zeros only, the last figure to be retained remains unchanged if even and is increased by one if odd.。
超实用高考英语复习:专题05 阅读理解七选五题

【例】 [2021·浙江卷1月]If there are three lines in the store,delays will happen randomly at different registers. Think about the probability: __33__ So it's not just in your mind:Another line probably is moving
养成良好的答题习惯,是决定高考英语成败的决定性因素之一。做题前, 要认真阅读题目要求、题干和选项,并对答案内容作出合理预测;答题时,切忌 跟着感觉走,最好按照题目序号来做,不会的或存在疑问的,要做好标记,要 善于发现,找到题目的题眼所在,规范答题,书写工整;答题完毕时,要认真检 查,查漏补缺,纠正错误。总之,在最后的复习阶段,学生们不要加大练习量。 在这个时候,学生要尽快找到适合自己的答题方式,最重要的是以平常心去面 对考试。英语最后的复习要树立信心,考试的时候遇到难题要想“别人也难”, 遇到容易的则要想“细心审题”。越到最后,考生越要回归基础,单词最好再 梳理一遍,这样有利于提高阅读理解的效率。另附高考复习方法和考前30天冲 刺复习方法。
Part 02
解题技巧详解
考法1 :原词重复信息
原词复现是指一个句子中的关键词(常为动词、名词、形容词)会 反复出现在文中的其他句子中。这些词会以不同词类、词性、数、 格、时态、语态等形式出现。如:“looks”与 “looking”“looked”;“go”与“going”“went”等。根据 语言习惯,第一句的宾语往往是第二句的主语,或者前后句有相 同、重叠的词语。因此,要学会寻找空格前后句句中的相同关键 词。
HDMI 音频嵌入与提取器 HDAW-203 用户手册说明书

The device can switch 1 HDMI Inputs to one HDMI Output. It also can support audio extract mode and audio embed mode. Audio Embed mode can let the audio input by the Toslink Port, Coax Port and LR Port and output by the HDMI Output port; Audio extract mode supports 2.0CH,5.1CH and Pass Three audio EDID set; Audio embed mode can choose the Toslink, Coax or LR Audio input by pressing the switch button. Audio ports can be used as input/output, this design can save the cost/space to let the device become simple at ouar Panel Showing
abb工业机器人协同动作应用手册

Robotics Products Se-721 68 Västerås
瑞典
目表
目表
手册概述 ............................................................................................................................................. 7 产品文档,IRC5 ................................................................................................................................. 9 安全 .................................................................................................................................................... 11
应用手册 MultiMove
Trace back information: Workspace R15-2 version a20 Checked in 2015-10-22 Skribenta version 4.6.176
应用手册 MultiMove
RobotWare 6.02 文档编号: 3HAC050961-010
3.2.1 Controller参数域集合 ................................................................................ 30 3.2.2 Motion参数域集合 .................................................................................... 32 3.2.3 I/O参数域集合 ......................................................................................... 33 3.3 配置示例 .......................................................................................................... 34 3.3.1 “UnsyncArc”的配置示例 ............................................................................ 34 3.3.2 “SyncArc”的配置示例 ............................................................................... 36 3.3.3 输入/输出配置示例 ................................................................................... 38
rostopic用法
rostopic用法rostopic是ROS中的一个命令行工具,可以用于查看、发布和订阅ROS系统中的主题(topics)。
主题是ROS中实现通信的基本单位,它允许节点之间以异步的方式传输消息。
下面将详细介绍rostopic的用法。
1. rostopic list/turtle1/cmd_vel/turtle1/pose/scan/odom2. rostopic info [topic]rostopic info命令用于显示指定主题的详细信息,包括该主题的数据类型、发布者和订阅者等。
输入命令rostopic info [topic],其中topic是要查询的主题名称。
例如,输入rostopic info /scan,输出如下所示:Type: sensor_msgs/LaserScanPublishers:Subscribers:3. rostopic echo [topic]rostopic echo命令用于在命令行窗口实时打印指定主题的消息内容。
输入命令rostopic echo [topic],其中topic是要监听的主题名称。
例如,输入rostopic echo /turtle1/pose,就可以看到机器人坐标的实时更新。
4. rostopic pub [topic] [msg_type] [args]rostopic pub命令用于在终端中发布指定主题的消息。
输入命令rostopic pub [topic] [msg_type] [args],其中topic是要发布的主题名称,msg_type是主题的消息类型,args是消息的具体内容。
例如,输入rostopic pub /turtle1/cmd_vel geometry_msgs/Twist "{'linear': {'x': 1.0, 'y': 0.0, 'z': 0.0},'angular': {'x': 0.0, 'y': 0.0, 'z': 0.0}}”,就可以向机器人发送一个速度为1的线速度指令。
Datasheet MLX90614 中文 数据手册 rev008
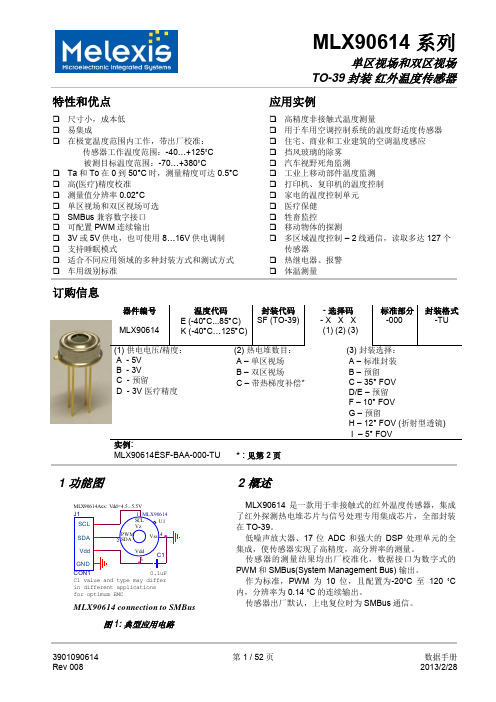
10-位 PWM 输出模式是连续输出所测物体温度的标准配置,测量物体的温度范围为-20…120 °C,分辨 率为 0.14 °C。PWM 通过修改 EEPROM 内 2 个单元的值,实际上可以根据需求调整至任何温度范围,而这对 出厂校准结果并无影响。
传感器的测量结果均出厂校准化,数据接口为数字式的 PWM 和 SMBus(System Management Bus) 输出。
作为标准,PWM 为 10 位,且配置为-20˚C 至 120 ˚C 内,分辨率为 0.14 ˚C 的连续输出。
传感器出厂默认,上电复位时为 SMBus 通信。
3901090614 Rev 008
PWM 引脚也可配置为热继电器(输入是 To),这样可以实现简单且性价比高的恒温控制器或温度报警(冰 点/沸点)应用,其中的温度临界值是用户可编程的。在 SMBus 系统里,这个功能可以作为处理器的中断信号, 以此触发读取主线上从动器的值,并确定精度条件。
传感器有两种供电电压选择:5V 或 3V(电池供电)。其中,5V 也可简便的从更高供电电压(例如 8 至 16V)上通过外接元件调制。(具体请参考“应用信息”)
MLX90614 connection to SMBus
图 1: 典型应用电路
2 概述
MLX90614 是一款用于非接触式的红外温度传感器,集成 了红外探测热电堆芯片与信号处理专用集成芯片,全部封装 在 TO-39。
低噪声放大器、17 位 ADC 和强大的 DSP 处理单元的全 集成,使传感器实现了高精度,高分辨率的测量。
rostopic echo 用法 -回复
rostopic echo 用法-回复rostopic echo 用法:一个ROS命令行工具,用于监听和显示ROS系统中特定主题的消息。
它可以让开发人员实时查看和分析ROS节点之间传输的消息数据,以帮助调试和故障排除。
在本文中,我们将一步一步地介绍rostopic echo的用法,并深入探讨其功能和用途。
第一步:安装ROS和rostopic首先,您需要安装ROS(机器人操作系统)以及其相关工具包。
ROS有许多版本,本文将基于ROS Melodic进行介绍。
在安装完ROS后,您将拥有rostopic命令行工具。
第二步:了解ROS主题在深入研究rostopic echo之前,让我们先了解一下ROS主题。
ROS 中的主题是一种消息传递机制,通过它可以在不同的ROS节点之间进行通信。
节点可以发布(发布者)和订阅(订阅者)特定主题的消息。
发布者可以向主题发布消息,而订阅者则可以从主题接收消息。
第三步:查看可用主题使用以下命令可以查看当前ROS系统中所有可用的主题:rostopic list这将显示一个主题列表,每个主题都以斜杠“/”开头,并根据其名称进行分类。
rostopic list命令将显示主题名称、类型以及与之相关的ROS 节点信息。
第四步:使用rostopic echo现在让我们使用rostopic echo命令来监听和显示特定ROS主题的消息。
语法如下:rostopic echo [topic_name]以下是rostopic echo的一些常见用法:1. 监听并显示特定主题的最新消息:rostopic echo /topic_name2. 显示消息的完整内容:rostopic echo -p /topic_name3. 仅显示消息的某些字段:rostopic echo /topic_name.field_name4. 使用正则表达式匹配主题:rostopic echo /topic_name_pattern此外,还可以通过添加参数来自定义输出格式:-一次显示多个主题:rostopic echo /topic1 /topic2 ...-以详情方式显示消息:rostopic echo verbose /topic_name-显示时间戳:rostopic echo nostr /topic_name-将输入以十六进制格式显示:rostopic echo hex /topic_name-显示有效性校验和错误信息:rostopic echo validate /topic_name-使用特定的数据查看器来解析和显示消息:rostopic echo acType sensor_msgs/Imu /topic_name-忽略长度超出一定数量的长字符串:rostopic echo filter 100 /topic_name第五步:使用示例让我们通过一个简单的示例来演示rostopic echo的用法。
- 1、下载文档前请自行甄别文档内容的完整性,平台不提供额外的编辑、内容补充、找答案等附加服务。
- 2、"仅部分预览"的文档,不可在线预览部分如存在完整性等问题,可反馈申请退款(可完整预览的文档不适用该条件!)。
- 3、如文档侵犯您的权益,请联系客服反馈,我们会尽快为您处理(人工客服工作时间:9:00-18:30)。
Your topic then must be one which allows you to demonstrate original thinking.
Another suggestion is to look for gaps in the literature of your chosen field. If your research can throw some light on that gap, chances are good that you will, with some slight modification, have a worthwhile, even published paper. You have picked a good topic if it is: interesting to both you and your audience broad enough to find several, diverse references
3.3.2 Avoiding a topic that is too narrow
The opposite inappropriateness in writing an academic paper is to choose a topic that is too narrow. A topic that is too narrow will yield inadequate information, limiting your ability to reach a valid conclusion. A too narrow topic is often trivial. It is uninteresting, except to the most limited and specialized audience.
Environment Environmental Pollution Air Pollution: Waste gas produced by car
Water Treatment Disinfecting Waste Water Disinfecting Waste Water with Ozone
3.2 Asking questions while planning a paper
One of the effective ways of choosing a topic while planning a research is to ask yourself some questions for generating ideas.
3.3 Strategies for choosing a topic Once you have decided to focus on a subject matter, it should be noted that the tentatively chosen topic will have to go through a process: from broad to narrow, from general to specific.
But if you choose a topic that is too narrow, you will not give sufficient direction to research and probably will necessitate superficial treatment of the subject.
Whether you can avoid choosing too broad a topic depends on the following four aspects: the amount of information available the size of the writing time available intended audience. There are a few strategies for narrowing a topic. Periodical indexes can be especially helpful, since the subcategories provide useful suggestions for narrowing the topic.
3.4 Choosing an interesting topic
Choose a topic in which you are interested. It would be advisable that the subject you choose may fascinate both the audience and yourself. Topic selection for a leading academic journal is a little more demanding. The overriding criterion is a topic which will meet the requirements of the journal you choose and satisfy their requirements.
Asking questions forces you to approach a topic from several different perspectives. The questions suggested are as follows: 1. Is this topic worth studying or researchable? 2. What do I know about what I am writing? What else do I need to know?
Unit 3
Topic Selection
Introduction
Paper writing begins with choosing a subject or topic. Choice of subject, particularly of topic is the first or perhaps the greatest problem in writing. One often begins with the vague idea of one of the general areas of science and technology. The most important thing to do at the very beginning is to focus on a topic or subject.
3.1 Focusing on a topic
To choose a topic calls for using good judgment and making sound decisions. First and foremost is to read the subject classifications provided by a library. There are many subjects there. Look for gaps. Experienced writers know that the quality of their writing depends much on how they handle a topic.
3. Will the results of the study be of interest to people in the same field? 4. Will the study fill a void or the gaps of specific aspect to our discipline? 5. Will the study be likely to extend or develop? 6. Will there be enough data or hard evidence to support the study?
The real challenge in dealing with topics comes when you choose or are assigned a subject that is very broad. 3.3.1 Avoiding a topic that is too broad Generally speaking, any researcher can not avoid choosing a topic that is too broad. If you choose a topic that is too broad, you have to narrow the subject. Otherwise, you will not handle it.
narrow enough to be covered in the available space and time an area to be further explored, and of theoretical or practical value Another strategy for choosing a good topic is that you should follow the following three principles: significant, single, and supportable. For science students, the most important aspect is to learn how to express properly and appropriately in writing a title or topic.