HP295性能优化工艺实践-3页word资料
NDT2955 PDF规格书

RDS(ON), NORMALIZED DRAIN-SOURCE ON-RESISTANCE
12 VGS = -10V -7.0V
9
-6.0V
-5.0V
6 -4.5V
3 -4.0V
0
0
1
2
3
4
5
-VDS, DRAIN TO SOURCE VOLTAGE (V)
Figure 1. On-Region Characteristics.
■ Absolute Maximum Ratings Ta = 25℃
Parameter
Drain-Source Voltage
Gate-Source Voltage
Continuous Drain Current
(Note.1)
Pulsed Drain Current
(Note.1)
Power Dissipation
Symbol VDSS IDSS IGSS VGS(th)
RDS(On)
ID(ON) gFS Ciss Coss Crss Qg Qgs Qgd td(on) tr td(off)
tf trr Qrr WDSS IS VSD
Test Conditions ID=-250μA, VGS=0V VDS=-60V, VGS=0V VDS=0V, VGS=±20V VDS=VGS ID=-250μA VGS=-10V, ID=-2.5A VGS=-4.5V, ID=-2A VGS=-10V, ID=-2.5A TJ=125℃ VGS=-10V, VDS=-5V VDS=-10V, ID=-2.5A
2 VGS=-4.5V
1.8
1.6 -5.0V
1.4
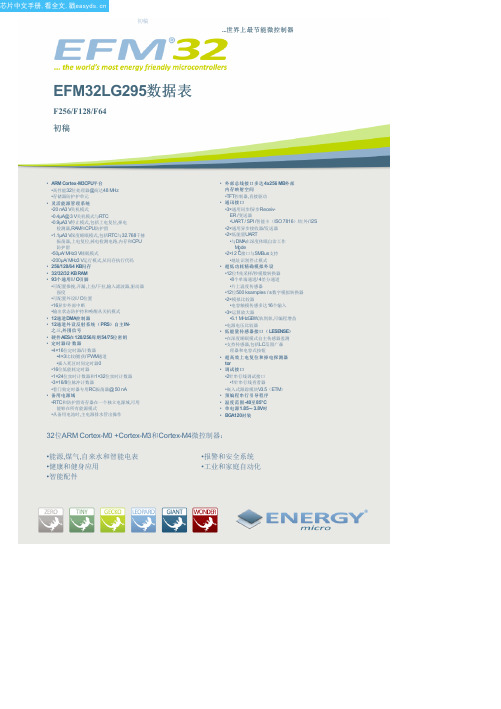
EFM32LG295F256中文资料(Energy Micro)中文数据手册「EasyDatasheet - 矽搜」
2.1.8看门狗(WDOG)
看门狗定时器目是生成情况下系统故障复位,以增加应用程序可靠性.发生这种情况可能例如可以由 外部事件引起,例如ESD脉冲,或由一个软件故障.
ARM科特前 ™M3处理器
Flash
规划
纪念品ORY
RAM 纪念品ORY
Debug
接口
w/ ETM
Mem ory Prot ect ion Unit
DMA
续滚子
High Freq. Cryst al Oscillat or
Low Freq. Cryst al Oscillat or
High Freq RC Oscillat or
•4×3比较/捕获/ PWM通道 •插入死区时间定时器0 •16位低能耗定时器 •1×24位实时计数器和1×32位实时计数器 •3×16/8位脉冲计数器 •看门狗定时器专用RC振荡器@ 50 nA • 备用电源域 •RTC和防护留寄存器在一个独立电源域,可用
能够在所有能源模式
•从备用电池时,主电源排水管出操作
2.1.18实时计数器(RTC)
实时计数器(RTC)包含一个24位计数器,由32.768 kHz晶振或32.768 kHzRC振荡器时钟两种.除 能源模式EM0和EM1,RTC是,可以在EM2可用.这使得它非常适合,因为RTC是EM2大多数设备断电时使 防护持时间跟踪.
2.1.19备份实时计数器(BURTC)
外部总线接口提供对外部并行接口设备,如SRAM,FLASH, ADC和液晶显示器.该接口是内存映射到Cortex-M3地址总线.这样,从软件无缝访问,而不读或 写操作每次执行手动操纵IO设置.数据和地址线被多路复用以减少所需接口外部设备管脚数.定时 是可调,以满足外部设备规格.
BSP295资料

-20
20
60
100 °C 160
Tj
Semiconductor Group
8
Sep-12-1996
BSP 295
Package outlines SOT-223 Dimensions in mm
Semiconductor Group
9
Sep-12-1996
Electrical Characteristics, at Tj = 25°C, unless otherwise specified
Parameter
Symbol min.
Values
typ.
max.
Static Characteristics Drain- source breakdown voltage VGS = 0 V, ID = 0.25 mA, Tj = 25 °C Gate threshold voltage VGS=VDS, ID = 1 mA Zero gate voltage drain current VDS = 50 V, VGS = 0 V, Tj = 25 °C VDS = 50 V, VGS = 0 V, Tj = 125 °C VDS = 30 V, VGS = 0 V, Tj = 25 °C Gate-source leakage current VGS = 20 V, VDS = 0 V Drain-Source on-state resistance VGS = 10 V, ID = 1.8 A VGS = 4.5 V, ID = 1.8 A
Symbol
Tj Tstg RthJA RthJS
Values
Unit
-55 ... + 150 °C
HP机种导入品质改善报告PPT课件

4.4.SATA PIN脱PIN
原因分析 改善对策
SATA不到位经分析为端压时,端子前铆脚较高; 组装员工在组装时有推到位,但未完全做到回拉动作, 但由于前铆脚的高度的原因,将孔座前弹片顶起未卡 住端子;品检员在检验时较难看出,故未完全挑选出, 导致有退PIN现象。
➢每周品质会议上,要求生产部各负责人检讨相关问题点及 制定改善及预防措施。
增强QC判定标准的能力
➢召集所有线检员进行品质意识培训,讲解品质接收标 准,每月进行一次。
➢根据部品问题点取不良实物进行对QC教导,每周品 质例会进行。
➢根据本厂制定的产品检验标准及客户的品质标准,对
QC进行培训,每月进行6 一次。
三.出货品质控管
加严抽检方案
➢OQC出货检验水准ML-STD105E级。 ➢OQC对客户投诉的部品采用Ⅲ级抽检方案。 ➢OQC对尾数箱及补货部品采取全检出货。 ➢否O一Q致C。出货盖章前必须每箱核对标签与实物是
➢OQC对康舒及康展客人的所有产品,做一份
产品履历表,包括制程及客诉异常做登录并注
出
明注意事项,供后续检验依据。
货
控
制
➢OQC定期对各机种成品送实验室做可靠性测 试,对于HP机种则每批做测试,测试项目包含
成品插拔力测试,插拔寿命测试,金属件的盐
环保及可靠度管理
雾测试等。
➢ OQC对产线使用的锡类及化学品每天送实验
室进行环保测试 。
➢OQC对产线成品定期(同机种每周两次)送 实验室进行XRF测试。
7
四.康展客诉改善统计
1:根据端子在胶壳内活动空间较大现象,我司会修改端子穿入
Housing内四条柱条尺寸,将防呆尺寸增长,减少端子在Housing
HP Latex Plus Cutting Solutions 产品说明书

For more information, please visit /go/latex-cutting-solutionsJoin the community, find tools, and talk to experts. Visit the HP Latex Knowledge Center at /communities/LKCHP Latex Plus Cutting SolutionsGrow your business by enhancing your HP Latex printer with our unique print AND cut workflow 1Complete HP solution—outstanding print and cut• Cut full bleed stickers that don’t curl when printed with HP Latex Technology.• Enjoy fast, accurate cutting and downforce up to 600 grams.• HP FlexiPRINT and CUT RIP includes True Shape Nesting—automatically save up to 50% more media.2• HP Applications Center design tools are included, for easy creation of new applications in just 3 steps.3Up to 50% time savings with true print AND cut 4• Print AND cut at the same time—versus print OR cut integrated devices—with our reliable, dual-device solution.• Cut right away when printing with HP Latex Technology—with no degas time, you can deliver same day.• Quickly deliver short-term print and cut jobs, with no need to laminate scratch-resistant HP Latex prints.5Easy and reliable workflow• Print/cut in a few steps—add cut lines from the RIP, select cutting presets, and easily send to production.• Accurate job recognition and error-freecutting with HP Barcode and Optical Position System configurations.• Easy-to-use cutter with a simpletouchscreen interface and media basket.1 Each HP Latex Plus Cutting Solution can be directly connected to HP Latex 100, 300, 500 and 700 Printer Series. In order to connect with HP Latex 800 Printer Series an upgrade of HP FlexiPRINT and CUT RIP is needed.2Compared to printing without nesting. Based on performance demonstration by HP, September 2020.3Requires an HP Applications Center account, Internet connection, and connected Internet-capable device. For more information, see .4Based on internal HP testing, September 2020, comparing the HP Latex Print and Cut Plus Solution with integrated print and cut solutions at a comparable cost. An integrated printer/cutter device is a large-format printer that has a contour cutter embedded in the same printer that prints the media, then moves the media backwards to cut the printed output. 5Scratch-resistance comparison based on testing third-generation HP Latex Inks and representative hard-solvent inks on self-adhesive vinyl and PVC banner. HP image permanence estimates by HP Image Permanence Lab. Outdoor display permanence tested according to SAE J2527 on a range of media, including HP media; in a vertical display orientation in simulated nominal outdoor display conditions for select high and low climates,including exposure to direct sunlight and water; performance may vary as environmental conditions change.HP FlexiPRINT and CUT RIPH P L a t ex 54 B asi c P l u sC u t t i n g S o l u t i o n HP Latex 54 Plus Cutting SolutionH P L a t ex 64 P l us C u t t i ng S o l u t io n©Copyright 2018, 2021 HP Development Company, L.P. The information contained herein is subject to change without notice.The only warranties for HP products and services are set forth in the express warranty statements accompanying such products and services. Nothing herein should be construedas constituting an additional warranty. HP shall not be liable for technical or editorial errors or omissions contained herein.4AA7-1558ENA, May 2021ApplicationsLABELS AND STICKERS CUSTOMIZABLE CLOTHING FLOOR GRAPHICSWALLS DECALS WINDOW GRAPHICS VEHICLE GRAPHICSHelp me choose。
EVGA GeForce GTX 295 Quick Start Guide

Quick Start GuideGeForce GTX 295M i n i m u m S y s t e mR e q u i r e m e n t sM o t h e r b o a r d :▪ P C I E x p r e s s ®o r P C I E x p r e s s 2.0-c o m p l i a n t m o t h e r b o a r dw i t h o n e d u a l -w i d t h x 16 g r a p h i c s s l o t . F o r Q u a d S L Ic o n f i g u r a t i o n , y o u n e ed a n S L I -re a d y m o t h e r b o a r d w i t h o n ed u a l -w i d t h x 16 g r a p h i c s s l o t f o re a c h g r a p h i c s c a r d .S y s t e m P o w e r S u p p l y : ▪ O n e 6-p i n P C I E x p r e s s p o w e r c o n n e c t o r o r t w o a v a i l a b l eh a r d d i s k p o w e r c o n n e c t o r s a n d o n e P C I E x p r e s s 8-p i nc o n n e c t o r o r t w o a v a i l a b l e 6-p i n P C I E x p r e s s p o w e rc o n n e c t o r s .F o r p o w e r s u p p l y r e c o m m e n d a t i o n s f o r S L I c o n f i g u r a t i o n s ,v i s i t w w w .s l i z o n e .c o m a n d c h e c k t h e C e r t i f i e d P r o d u c t s s e c t i o n .O p e r a t i n g S y s t e m :▪ M i c r o s o f t W i n d o w s V i s t a , 32-b i t o r 64-b i t (64-b i t r e c o m m e n d e d )▪ M i c r o s o f t W i n d o w s X P , 32-b i t o r 64-b i t6-p i n P o w e r C o n n e c t o r8-p i n P o w e r C o n n e c t o rS P D I F C o n n e c t o rS L I C o n n e c t o r H D M I C o n n e c t o rD V I -I C o n n e c t o r s I n c l u d e dE q u i p m e n t▪ E V G A G e F o r c e G T X 295 G r a p h i c C a r d ▪ Q u i c k S t a r t G u i d e a n d P r i n t e d M a n u a l▪ S P D I F A u d i o -I n C a b l e ▪ D V I -t o -V G A A d a p t e r▪ D r i v e r I n s t a l l a t i o n C D F e a t u r e s :- F e a t u r e s W i n d o w s X P a n d V i s t a (32/64-b i t ) d r i v e r s- E V G A P r e c i s i o n S p e c i a l E d i t i o nI n s t a l l i n g t h e E V G AG e F o r c e G T X 2951 R e m o v e t h e c u r r e n t g r a p h i c s d r i v e r i n s t a l l e d o n y o u r c o m p u t e r . I n W i n d o w s V i s t a , g o t o S t a r t > C o n t r o l P a n e l > P r o g r a m s >U n i n s t a l l a P r o g r a m .2 T u r n o f f y o u r c o m p u t e r a n d d i s c o n n e c t t h e p o w e r c o r d .I t i s i m p o r t a n t t h a t a l l p o w e r t o t h e c o m p u t e r b e r e m o v e d(u n p l u g g e d ) b e f o r e y o u i n s t a l l t h e g r a p h i c c a r d .Driver InstallationWith the hardware installed, it is now time to install the graphics driver.1 Power up your computer.2 Insert the driver installation CD or double click on the GeForce driverexecutable file that can be downloaded at /support/drivers. The Setup program takes over and will walk you through the driver installation process.3 You may need to reboot your PC once the driver installation is complete. Enabling SLIIf you have installed multiple graphics cards in your system for SLI, you can set your SLI configuration in the NVIDIA Control Panel:4 In Windows Vista, go to Start > Control Panel > Additional Options and select the NVIDIA Control Panel icon.5 Click on Set SLI and PhysX Configuration in the left task pane and select Enable SLI and click Apply .6 Click Yes on the Applications Shutdown Required window.Note: Quad SLI is only supported under the Windows Vista operating system.SL SPDIF GND213 Remove any existing graphics card(s).4 Install the graphics card into the Primary PCI Express x16 slot.If you are installing an additional GeForce GTX 295 graphics card for Quad SLI configuration, continue with step 5. If you are only installing one GeForce card, go on to step 6.Power Status LEDGREEN: Both power connectors are correctly connectedRED: One or both power connectors are incorrect or not plugged correctlyPrimary Graphics Card LEDIn a Quad SLI configuration running in Quad SLI mode, only one graphics card will have active displays. The blue LED indicates the Primary card with the active displays. Make sure to plug your displays into this card.DVI-I Connectors1. Primary DVI Connector2. Secondary DVI Connector5 For Quad SLI, install the second GeForce card into the outer most PCI Express x16 slot on the motherboard.Connect the two cards together using the dual SLI bridge connector that came with your SLI-ready motherboard.6 Connect BOTH a 6-pin AND an 8-pin PCI Express auxiliary power connector from the computer power supply to the connectors on the top edge of the GeForce GTX 295 graphics card.Attention: If your system has been running for a period of time prior to opening the panels, it is very important that you wait until the graphics cardin yoursystem has cooled before taking the card out of the system. Graphics cards can get hot when they have been operating for any length of time.Note: All of the graphic cards in Quad SLI configuration must be identical.Therefore, both graphics cards must be GeForce GTX 295.Primary PCI Express x16 slotDual SLI Bridge ConnectorHDMI Connector7 If you are going to be using your graphics card to output audio over an HDMI connection, connect the SPDIF cable as shown in the diagram to your primary graphics card:8 Reinstall the cover on your computer and reconnect any cables that you removed earlier in the installation.The GeForce GTX 295 graphics card can be connected to PC monitors or TVs that support DVI, VGA, or HDMI inputs. Supported multi-display configurations vary based on the operating mode of the graphics card that is set in the NVIDIA Control Panel:▪ Multi-display mode: Allows user to output to up to three displays per graphics card. The user can connect to any combination of display outputs on the graphics card.▪ Multi-GPU mode: In this mode, the GPUs work together toincrease rendering performance and image quality. The user can output to up to two displays (only one display supported forWindows XP), but must connect to the displays using the two DVI connectors on the primary graphics card (the primary graphics card is indicated by the blue LED on the bracket).Connect your computer monitor(s) or TV(s) to the GeForce graphics card.Connect this end of the SPDIF cable into the SPDIF header on the motherboard, making sure to match the SPDIF and GND pins on the cable to the correct pins on the motherboard. Consult your motherboard documentation for information on the SPDIF pins on the motherboard.Attention: Make sure to plug the 8-pin PCI Express power connector ( ), NOT the 8-pin motherboard connector ( X ), into your graphics card.Note: When two or more displays are connected, only the one connected to the primary connector of the primary card will POST . The other monitor will not come up until Windows loads.。
TM-U295 U295P 用户手册说明书

TM-U295/U295PUser’s Manual / Bedienungsanleitung Gebruikershandleiding / Manuel d’utilisation Manual do utilizador / Manual del usuarioManuale dell’utente/使用说明书/使用說明書4048988032Printer PartsDIP Switch TablesTM-U295/U295P Specifications312Serial interfaceSW FunctionON OFF 1Data receive error Ignored Prints “?”2Receive buffer 35 bytes 512 bytes 3Handshaking XON/XOFF DTR/DSR 4Data word length 7 bits 8 bits 5Parity check Yes No 6Parity selectionEvenOdd7, 8Transmission speed(See Serial transmision speed table.)9Pin 6 reset Used Not used 10Pin 25 resetUsedNot usedSerial transmission speed87Transmission speed ON ON 1200 bps ON OFF 2400 bps OFF ON4800 bpsOFFOFF 9600 bpsParallel interfaceSW FunctionONOFF 1Auto line feed Enabled Disabled 2Receive buffer 35 bytes512 bytes 3~9Undefined——10Internal useFixed to ONPrinting method Impact dot matrix, 7-pin shuttle type Printing direction UnidirectionalCharacters per line (default)5 × 7 font: 35; 7 × 7 font: 42Character matrix 5 × 7 with 1-dot spacing (normal dots)7 × 7 with 3-dot spacing (half dots)Character size 5 × 7 font: 1.6 × 2.9 mm {0.063 × 0.114"}7 × 7 font: 1.3 × 2.9 mm {0.051 × 0.114"}Number of characters Alphanumeric characters: 95; International characters: 32Extended graphics: 128 × 4Print speed 1.9 to 2.3/lines/sec. (both 5 × 7 and 7 × 7 fonts)Paper feed speed Approx. 12.5 lines/second (52.9 mm/second {2.1"/second})Line spacing (default) 4.23 mm {1/6"}Paper types Normal, pressure-sensitive, and carbon-copyPaper size80 × 69 mm {3.15 × 2.72"} (W × L) to 182 × 257 mm {7.17 × 10.12"} (W × L)*1: Be sure to use a safety-standards-applied power source that meets the following specifications.Rated output: 24 V/2.0 A or more, Maximum output: 240 VA or lessStandards and ApprovalsThe following standards are applied only to the printers that are so labeled. (EMC is tested using the Epson power supplies.)Europe:CE markingNorth America:FCC/ICES-003 Class AOceania: AS/NZS CISPR Class AWARNINGThis is a Class A product. In a domestic environment this product may cause radio interference in which case the user may be required to take adequate measures.The connection of a non-shielded printer interface cable to this printer will invalidate the EMC standards of this device. You are cautioned that changes or modifications not expressly approved by Seiko Epson Corporation could void your authority to operate the equipment. CE MarkingThe printer conforms to the following Directives and Norms:Directive 2004/108/ECEN 55022 Class AEN 55024IEC 61000-4-2IEC 61000-4-5IEC 61000-4-3IEC 61000-4-6IEC 61000-4-4IEC 61000-4-11 Directive 90/384/EECEN 45501FCC Compliance Statement For American UsersThis equipment has been tested and found to comply with the limits for a Class A digital device, pursuant to Part 15 of the FCC Rules. These limits are designed to provide reasonable protection against harmful interference when the equipment is operated in a commercial environment.This equipment generates, uses, and can radiate radio frequency energy and, if not installed and used in accordance with the instruction manual, may cause harmful interference to radio communications. Operation of this equipment in a residential area is likely to cause harmful interference, in which case the user will be required to correct the interference at his own expense. For Canadian UsersThis Class A digital apparatus complies with Canadian ICES-003.À l'intention des utilisateurs canadiensCet appareil numérique de la classe A est conforme à la norme NMB-003 du Canada.Total thickness Single-ply: 0.09 to 0.25 mm {0.0035 to 0.0098"}Copy paper: 0.09 to 0.35 mm {0.0035 to 0.0138"} Number of copies Original + 1 or 2 copies at 5 to 40°C {41 to 104°F} Ribbon cassette ERC-27Interface (compatible)RS-232 serial or IEEE 1284 parallelReceive buffer512 bytes or 35 bytesDKD Function 2 drivesPower supply*1+ 24 VDC ± 10%Current consumption (at 24V)Operating:Mean: Approx. 600 mA Peak: Approx. 5.5 A Standby:Approx 100 mALife Mechanism:3,000,000 linesPrint head:150 million characters (at 2 dots/wire per character)Ribbon: 1.5 million characters (using a 5 × 7 font)MTBF180,000 hoursMCBF7,000,000 linesTemperature Operating: 5 to 40°C {41 to 104°F}Storage:–10 to 50°C {14 to 122°F}, except ribbon and paper Humidity Operating:30 to 85% RHStorage:30 to 90% RH, except ribbon and paperOverall dimensions101.5 × 180 × 190.5 mm {4.0× 7.09× 7.5"}(H × W × D)Weight (mass)Approximately 1.6 kg {3.52 lb}3All rights reserved. No part of this publication may be reproduced, stored in a retrieval system, or transmitted in any form or by any means, electronic, mechanical, photocopying, recording, or otherwise, without the prior written permission of Seiko Epson Corporation. No patent liability is assumed with respect to the use of the information contained herein. While every precaution has been taken in the preparation of this book, Seiko Epson Corporation assumes no responsibility for errors or omissions. Neither is any liability assumed for damages resulting from the use of the information contained herein.Neither Seiko Epson Corporation nor its affiliates shall be liable to the purchaser of this product or third parties for damages, losses, costs, or expenses incurred by purchaser or third parties as a result of: accident, misuse, or abuse of this product or unauthorized modifications, repairs, or alterations to this product, or (excluding the U.S.) failure to strictly comply with Seiko Epson Corporation’s operating and maintenance instructions.Seiko Epson Corporation shall not be liable against any damages or problems arising from the use of any options or any consumable products other than those designated as Original Epson Products or Epson Approved Products by Seiko Epson Corporation.EPSON is a registered trademark of Seiko Epson Corporation in Japan and other countries/regions. NOTICE: The contents of this manual are subject to change without notice.Copyright ©2004 by Seiko Epson Corporation, Nagano, Japan.Safety PrecautionsThis section presents important information intended to ensure safeand effective use of this product. Please read this section carefully and store it in an accessible location.WARNING:Shut down your equipment immediately if it produces smoke, a strange odor, or unusual noise. Continued use may lead to fire. Immediatelyunplug the equipment and contact your dealer or a Seiko Epson service center for advice.Never attempt to repair this product yourself. Improper repair work can be dangerous.Never disassemble or modify this product. Tampering with this product may result in injury or fire.Be sure to use the specified power source. Connection to an improper power source may cause fire.Do not allow foreign matter to fall into the equipment. Penetration by foreign objects may lead to fire.If water or other liquid spills into this equipment, unplug the power cord immediately, and then contact your dealer or a Seiko Epson servicecenter for advice. Continued usage may lead to fire.Do not use aerosol sprayers containing flammable gas inside or around this product. Doing so may cause fire.CAUTION:Do not connect cables in ways other than those mentioned in thismanual. Different connections may cause equipment damage andburning.Be sure to set this equipment on a firm, stable, horizontal surface. Theproduct may break or cause injury if it falls.Do not use in locations subject to high humidity or dust levels. Excessive humidity and dust may cause equipment damage or fire.4 TM-U295/U295P User’s ManualDo not place heavy objects on top of this product. Never stand or lean on this product. Equipment may fall or collapse, causing breakage and possible injury.To ensure safety, unplug this product before leaving it unused for anextended period.Safety LabelThe caution label on the product indicates the following precaution.WARNING:Do not connect a telephone line to the drawer kick-out connector;otherwise, the printer and the telephone line may be damaged. Restriction of UseWhen this product is used for applications requiring high reliability/ safety, such as transportation devices related to aviation, rail, marine, automotive, etc.; disaster prevention devices; various safety devices, etc.; or functional/precision devices, etc.; you should use this product only after giving consideration to including fail-safes andredundancies into your design to maintain safety and total systemreliability. Because this product was not intended for use inapplications requiring extremely high reliability/safety, such asaerospace equipment, main communication equipment, nuclear power control equipment, or medical equipment related to direct medicalcare, etc., please make your own judgment on this product’s suitability after a full evaluation.Downloading Drivers, Utilities, and ManualsDrivers, utilities, and manuals can be downloaded from one of thefollowing URLs.For customers in North America, go to the following web site:/ and follow the on-screen instructions.For customers in other countries, go to the following web site:/UnpackingThe following items are included with the standard specificationprinter. If any item is damaged, contact your dealer.❏Printer❏Damper❏Ribbon cassette❏User’s Manual (this manual)TM-U295/U295P User’s Manual 5Control PanelRELEASE buttonPress this button to insert or remove paper.REVERSE buttonFeeds paper backward.FORWARD buttonFeeds paper forward.POWER LEDON when the printer is on.RELEASE LEDON when the printer is in release mode (to insert or remove paper).OFF when the printer is in clamp mode (to hold paper).FLASHES to indicate an error.PAPER OUT LEDON when paper is not inserted or is not inserted correctly. Removing the Transportation DamperThe printer is protected during Array shipping by a transportation damperthat you must remove before you turnon the printer.Pull the damper out and remove thestrip of tape from the top of the printer,as shown in illustration 1.Note:Prepare the printer to ship or store with these steps: turn on the printer, press the RELEASE button, press the FORWARD button, turn off theprinter, and reinstall the transportation damper.Installing a RibbonUse the Epson ERC-27 ribbon cassette. The use of any ribbon cassettes other than those approved by Epson may damage the printer and will void the warranty.1.Turn the printer on using the power switch on the left side.2.Press the RELEASE button (the RELEASE LED lights). This putsthe printer in the paper release mode.3.Turn the printer off.CAUTION:Perform the steps above to make sure the printer is in the paperrelease mode before you install or remove a ribbon cassette.6 TM-U295/U295P User’s Manual4.forward, as shown inillustration 2.5.If there is a used ribbon,in illustration 3.6.Before installing the new7.Carefully insert the ribboncassette in the printer asshown in illustration 4.Notice exactly where theribbon must go.8.Push firmly on the rightside and then the left side ofthe ribbon cartridge untileach side clicks into place.9.To put the cover back on theprinter, first align the left side of the cover; then insert the tabon the top; then press the bottom until it clicks into place (seeillustration 2).Inserting PaperNote:Do not use wrinkled or curled paper. Be sure to use roll paper that meets the specifications.1.Make sure a ribbon cassette is installed in the printer.2.Turn on the printer. The POWER light comes on.3.Press the RELEASE button. The RELEASE light comes on to showthat the printer is in release mode. In this mode, paper can beinserted and removed.TM-U295/U295P User’s Manual 74.Insert the paper from eitherthe front or the side, asshown in illustration 5the form stopper stops it.Use the markings on theside of the printer to judgehow far to insert paper.5.Check the PAPER OUTWhen you insert the paper correctly, the PAPER OUT light goesout. If the PAPER OUT light is still on, remove the paper andreinsert it.TroubleshootingNo lights on the control panelCheck that power supply cables are plugged into the printer correctly, the power unit, and power outlet.Make sure power is supplied to the power outlet. If the outlet iscontrolled by a switch or timer, use another outlet.The PAPER OUT light is on, and nothing is printingPaper is not inserted or is not inserted correctly.The RELEASE light is flashing, and nothing is printedIndicates an error. Turn off the printer, be sure no paper is jammed,and turn it back on. If the RELEASE light still flashes, contact a qualified service person.8 TM-U295/U295P User’s Manual。
压缩机QAz295FYDy规格书

用途 Application
冷媒 Refrigerant 最大冷媒充注量 Refrigerant charge limit 控制器输入端额定电压/频率/相数 Inverter Input Rated Voltage /Frequency/Phase 压缩机运行机械频率 Compressor Operation Frequency
排气管内径 Discharge pipe I.D.
全封闭型电动机压缩机 Hermetic motor compressor
旋转式 Rotary 双缸 twin cylinders
29.5
cm3
RB68EP or equivalent
650
ml
18.3
kg
Φ16.2±0.05
mm
Φ9.7±0.06
mm
>15
MPa
>30
MΩ
≤0.1
Ω
测试工况 TESTING CONDITION
测试电源(输入控制器) Testing power supply (Input driver) 蒸发温度 Evaporating Temp. 冷凝温度 Condensing Temp. 液体温度 Liquid Temp. 吸气温度 Suction Temp. 环境温度 Ambient Temp. 测试风速 Testing air flow
气缸名义工作容积 Cylinder nominal volume
冷冻油牌号 Brand of refrigerant oil
冷冻油充注量 Refrigerant oil charge
重量(含冷冻油) Weight(Refrigerant oil included)
吸气管内径 Suction pipe I.D.
- 1、下载文档前请自行甄别文档内容的完整性,平台不提供额外的编辑、内容补充、找答案等附加服务。
- 2、"仅部分预览"的文档,不可在线预览部分如存在完整性等问题,可反馈申请退款(可完整预览的文档不适用该条件!)。
- 3、如文档侵犯您的权益,请联系客服反馈,我们会尽快为您处理(人工客服工作时间:9:00-18:30)。
HP295性能优化工艺实践
1 概述
焊接气瓶钢板是指厚度为2.5~6.0mm的优质碳素结构铜和低合金结构热轧钢板,焊接气瓶要求具有一定的塑性和强度,加工时先进行一次冷冲压成型,然后利用焊接成型。
液化石油气瓶产品规格为50kg、30kg、15kg、10kg、5kg和2kg级,在钢瓶的总生产量中,家庭型15kg级钢瓶的生产量占98%~99%,15kg级钢瓶年产1500~1600万只,30kg级钢瓶年产20万只。
HP295是一种常用的气瓶用钢,主要用于家用煤气的存储,随着我国石油天然气工业的发展,该产品得到了比较广泛的使用。
济钢焊瓶钢产品自开发之后,一段时间出现产品质量波动大的问题,用户使用过程中出现变形不均、冲压开裂的现象,为此针对产量最大的焊瓶钢――HP295采取了一系列工艺措施,提高焊瓶钢屈强比、延伸率等主要性能指标,满足了用户的使用要求。
2 性能优化措施制定
性能存在的问题主要为屈强比和延伸余量小、屈服强度偏高,因此将性能提升的方向确定为降低屈强比、提高延伸率。
2.1 温度优化
2.1.1 加热温度优化。
板坯经过加热、冷却过程,其中的奥氏体经过再结晶过程,因而组织晶粒尺寸更小,并且分布更为均匀。
加热温度和加热时间工艺参数制定时,既要考虑到节约能源,防止由于过热或加热时间过长导致出现异常组织,又要保证加热充分、组织均匀。
综合考虑组织和成本因素,将出钢温度由1220℃调整为1180℃。
冷料加热最小时间由
140min调整为100min。
2.1.2 终轧温度优化。
终轧温度也是带钢轧制的一个重要工艺参数。
终轧温度越高,带钢内部组织再结晶越充分,分布也更均匀;终轧温度越低,再结晶的部分将增加,同时缺陷组织增多,强度有所降低。
在满足强度要求的前提下,终轧温度适当提高时可提高带钢的击韧性,对降低屈强比也有利。
综合考虑上述因素,将终轧温度由860℃调整为870℃。
2.2 负荷分配优化
精轧负荷分配主要是确定各道次的压下量,在满足个机架轧制力满足轧机能力的前提下,保证轧制稳定和性能要求。
因带钢存在温降,前面机架温度高、变形抗力小,后面机架温度低、变形抗力大,一般负荷分配制定时遵循前大后小的原则。
一般情况下,变形量越大,组织发生再结晶越充分,组织尺寸越小。
为了保证焊瓶钢轧制的稳定性,为了保证精轧压下率、改善屈强比,将中间坯厚度增加1mm,同时对压下负荷分配系数进行了调整,F0~F6负荷分配系数调整为53、45、38、32、20、16、12。
2.3 层流冷却模式优化
屈强比是焊瓶钢一个重要的加工性能指标,国标要求不大于0.8,屈强比数值越小,越有利于加工变形。
HP295各个指标中,屈强比是最难控制的指标,且屈强比余量很小,因此将屈强比作为性能优化的首要原则。
研究实验表明,通过两段冷却能显著降低屈强比,因此焊瓶钢层流冷却均采用两段冷却。
由式(1)和式(2)可以看出,晶粒尺寸对屈服强度的影响要高于对抗拉强度的影响,从这个角度分析,如果要降低HP295的屈强比,可以通
过粗化晶粒尺寸来实现,在宏观上即是要降低屈服强度,把晶粒度控制在合适的范围内,因此,两段冷却模式进一步优化的原则为:在满足屈服和抗拉要求的条件下,适当增大铁素体晶粒度尺寸。
具体实施时,就是减小前段冷却强度,使铁素体在较高温度下经过充分空冷,然后再进行第二次水冷,增大铁素体晶粒尺寸。
通过逐步调整优化,将前段冷却模式由第2组开6优化为第2组开3、第3组开3。
2.4 层流侧喷优化
带钢层流冷却过程是决定产品性能的重要环节,带钢表面残留水对带钢性能的均匀性影响较大,故需要对层流侧喷进行优化,带钢残余冷却水。
层流侧喷的目的是吹扫掉带钢上表面的层流水,使带钢沿宽度方向上的冷却速度尽量均匀。
侧喷的力度取决于带钢表面的水受到的沿带钢宽度方向冲击力的大小,在层流侧喷压力不变的条件下,提高侧喷效果的措施就是设置合理的侧喷参数,使喷出的水都打到带钢上,并且能均匀覆盖整个带钢宽度。
层流侧喷优化的关键为喷嘴在竖直面喷射角,
希望以上资料对你有所帮助,附励志名言3条:
1、生命对某些人来说是美丽的,这些人的一生都为某个目标而奋斗。
2、推销产品要针对顾客的心,不要针对顾客的头。
3、不同的信念,决定不同的命运。