EASY 操作说明书
officeeasy使用手册

officeeasy使用手册
以下是OfficeEasy的使用手册:
1.安装OfficeEasy:根据您的操作系统和需求,选择适合的OfficeEasy
安装程序并按照提示进行安装。
2.打开OfficeEasy:安装完成后,双击桌面上的OfficeEasy图标或在
开始菜单中找到OfficeEasy并打开它。
3.创建文档:在OfficeEasy中,您可以创建各种类型的文档,如Word
文档、Excel电子表格、PowerPoint演示文稿等。
4.编辑文档:使用OfficeEasy的编辑功能,您可以对文档进行修改、
添加内容、删除内容等操作。
5.保存文档:完成编辑后,您需要将文档保存到指定的位置或文件
夹中。
6.打印文档:如果您需要将文档打印出来,可以使用OfficeEasy的
打印功能。
7.分享文档:您可以将文档分享给其他人或通过电子邮件发送给其
他人。
8.退出OfficeEasy:完成所有操作后,请退出OfficeEasy以释放系统
资源。
需要注意的是,以上使用手册仅供参考,具体的使用手册可能因版本和功能的不同而有所差异。
如有任何疑问或需要更详细的指导,请参考OfficeEasy的官方文档或联系客服支持。
EASY 时间继电器操作说明

EASY 时间继电器操作说明1. EASY412-AC-RC操作面板如下图所示(见其说明书第10、11页):图1EASY412通电后初始界面见上图(见其说明书第11页),其右下角RUN表示内部程序处于运行状态;2. 当按下OK 键时,显示屏进入1级菜单,如下图所示;2各菜单字母含义如下:PROGRAM…编程(画电路图)STOP 程序停止运行PARAMETER 设置参数SET CLOCK…设置内部基准时钟EASY内部程序均已编制完毕,所以在以后的使用中不需编程,其内基准时钟也已设置完毕,除非长时间断电,其内部基准时钟不需调整。
3. 在路灯箱变的使用中,需要调整的项目只有各路灯的点亮与熄灭时间,当需要调整路灯的点亮与熄灭时间时,可以进入PARAMETER选项,通过改动原来设置的时间参数来实现,并依照以下步骤进行:1.按下OK键,进入1级菜单;2.只有在程序停止运行时,才能改动时间参数,因此需要按下∨键,使STOP处于闪烁状态(闪烁表示选中),按下OK键,字母变为RUN,此时EASY内部程序实际为停止运行状态;3.再次按下∨键,使PARAMETER处于闪烁状态(闪烁表示选中),按下OK键,则进入路灯点亮与熄灭的时间设置界面,如下图所示(见说明书第32页):半夜灯时钟参数景观灯时钟参数全夜灯时钟参数4.该路灯箱变使用三个时钟,如上图所示,分别控制半夜灯、景观灯和全夜灯,并均使用A通道(右下角有字母A显示)。
调整半夜灯时,按∧键直至进入图4,利用大圆键,由﹤﹥键改变光标位置,用∧∨键改变设置参数。
当一个时钟设置完成后,按下OK键,光标会返回到A字母处,再按∧键直到出现图5,仍然依照上述方法调整景观灯时钟,调整完成后,按照同样方法调整全夜灯控制时钟。
调整完毕后,按ESC键直至退回到1级菜单(见图2),按∧键到RUN位置,再按下OK键激活内部设置的程序,再按ESC退回到初始状态,此时右下角字母应为RUN。
5.EASY时间继电器即可正常运行。
easybcd中文使用手册
easybcd中文使用手册
EasyBCD是一款用于管理Windows启动菜单的工具。
以下是EasyBCD的中文使用手册:
1. 打开EasyBCD:在Windows系统中,打开EasyBCD软件。
2. 启动菜单管理:在EasyBCD的主界面中,可以看到当前系统的启动菜单项。
可以通过点击“编辑”按钮来修改启动菜单项。
在编辑过程中,可以设置启动菜单的名称、选择启动文件、设置启动延迟时间等。
3. 添加新条目:在EasyBCD中,可以通过点击“添加新条目”按钮来添加新的启动菜单项。
在添加新条目窗口中,可以选择启动文件、设置启动名称和延迟时间等。
4. 删除条目:在EasyBCD中,可以通过点击“删除”按钮来删除不需要的启动菜单项。
5. 高级设置:在EasyBCD中,可以通过点击“高级设置”按钮来进行更高级的配置。
例如,可以选择默认操作系统、设置多重启动选项等。
6. BCD备份/修复:在EasyBCD中,可以通过点击“BCD备份/修复”按钮来备份或修复系统启动菜单。
在备份或修复过程中,需要谨慎操作,以免造成不必要的损失。
7. 退出EasyBCD:在完成启动菜单的管理后,可以点击“保存设置”按钮来保存更改。
然后,可以点击“关闭”按钮退出EasyBCD软件。
以上是EasyBCD的中文使用手册,希望能对您有所帮助。
在使用过程中,如有任何问题,可以参考官方文档或联系技术支持获取帮助。
easy变频器使用说明书

easy变频器使用说明书
1、先进行变频器的空载试运行:
首先检查变频器的所有接线是否正确无误,变频器的输出端先不要接电动机,对变频器先进行空载试验。
通电前认真阅读变频器用户手册,熟悉相关功能及设定、操作方法,在此基础上通电。
查看外接端子的信号、控制动作是否正常,如顺时针旋转电位器或改变频率给定电流时,变频器的输出频率的改变是否与给定信号同时变化。
2、变频器带电动机空载试运行:变频器空载试运行正常后,可接上电动机进行空载试运行。
在接电动机前,一定要确认电动机的各项技术指标是合格的。
电动机不要带负载。
然后让变频器驱动电动机转动,观察是否正常。
超小型可编程序控制器easy的使用
超小型可编程序控制器easy的使用摘要:本文介绍了超小型可编程序控制器easy的主要资源、编程方法以及在中小型市政工程机械自动控制中的应用举例。
关键词:超小型可编程序控制器、编程示例、电机调速1 前目easy是德国穆勒(MOELLER)公司新推出的一种超小型可编程序控制器,也称控制继电器。
它可广泛应用在市政工程机械和水泥制品机械中,如商品混凝土搅拌站的自动控制,水泥制管机的调速控制等。
它小巧灵活,编程简单,性能价格比较高,适用于中小型设备。
与传统的可编程序控制器(PLC)相比,easy的突出优点是不需专用编程器。
easy面板自带编程按键和液晶显示屏,可以在面板上直接编程,使用非常方便。
easy有多种功能,如常规的继电器控制和时间继电器、计数器、实时时钟、定时器、脉冲信号发生器、掉电保持等。
有些型号的easy还有通信、文本显示、模拟量比较、扩展输入输出口等功能。
easy输出继电器的负载能力为:阻性负载8A,感性负载3A,可直接接交流接触器或电磁阀等小型负载。
easy基本型分为两个系列:easy 4系列主要特征为8路输入、4路输出;easy 6系列主要特征为12路输入、6路继电器或8路晶体管输出。
由于该器件问世不久,应用资料很少,译成中文的说明书又很简单。
本文以“easy619-AC-RC”为例,简要介绍easy的使用方法。
型号中AC表示电源及输入开关信号接交流110V~220V,R表示继电器输出,C表示带实时时钟。
文中所列程序,均经笔者验证。
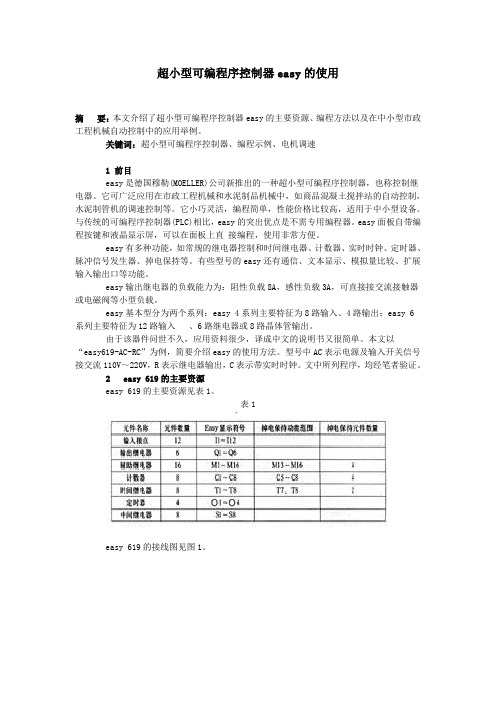
2 easy 619的主要资源easy 619的主要资源见表1。
表1easy 619的接线图见图1。
图1注意:接线时接至easy输入端的均为常开触点。
原继电器控制电气原理图中的常闭触点可在easy编程时在开关符号处加上划线表示。
如easy的l号输人开关闭合,编程时11表示常开触点闭合,/1 1表示常闭触点断开(本文中“/I”即表示“i”,余类推)。
3.使用电路图编程easy的编程直接使用电路图,与常规的继电器控制原理图接近。
easy-HC10 使用手册说明书

The easy-HC10 handheld disinfectant maker and sprayerUser ManualOriginal date: 14/04/2021This revision: Release revision 2.2 (2nd September 2021)CONTENTS1)Product description 42)Items in the box 43)Product specification and features 4 - 63.a.Specifications3.b.Features4)Safety instructions 6 - 94.a. General safety instructions4.b. Hazards and corrective actions4.c. Symbol meanings5)Instructions 9 - 135.a.Function overview5.b.Operation instructions5.c.Salt solution instructions5.d.micro-Ion replacement instructions5.e.Troubleshooting6)Frequently Asked Questions 147)One year warranty 148)Disclaimer 151PRODUCT DESCRIPTIONThe easy-HC10 is an innovative handheld portable disinfectant manufacturing and spraying unit. Simply add a small amount of salt mixed with tap water and start spraying anti-microbial disinfectant onto surfaces instantly. 5 litres of high-quality disinfectant are dispensed per hour at a cost of less than 80 pence.2ITEMS IN THE BOX1– easy-HC102– 2 litre reservoir3– 18 V 4 Ah battery4– Battery charger5– micro-Ion electrochemical reactor6– Adjustable shoulder strap7– Inlet tube and filter8– User manual9– 10x 5g sachets of salt3PRODUCT SPECIFICATION AND FEATURESa)SPECIFICATIONSb)FEATURESRuntimeThe easy-HC10 disinfectant sprayer has an extended runtime due to its Li-ion battery, meaning it can run continuously for 90 minutes and can dispense 7.2 litres of disinfectant in that time. Disinfectant strengthsDue to the easy-HC10’s unique micro-Ion electrochemical reactor it has selectable disinfectant strengths to suit the user’s application. 45 ppm for food contact surfaces, 100 ppm for everyday disinfecting and 150 ppm for deep cleans.Large ReservoirThe easy-HC10 has a large 2 litre reservoir meaning it can spray disinfectant continuously for 25 minutes without needing a refill.Front LEDWhilst spraying the easy-HC10 has a bright LED on the front designed to enable the user to see the spray therefore increasing coverage efficiency and reducing time spent disinfecting. Replaceable micro-Ion electrochemical reactorThe micro-Ion electrochemical reactor can manufacture approximately 1000 litres of disinfectant at a concentration of 150 ppm and even more at lower concentrations. This micro-Ion electrochemical reactor can be easily and cheaply replaced by the user in under 5 minutes.4SAFETY INSTRUCTIONSa)GENERAL SAFETY INSTRUCTIONS•Read all instructions before using the easy-HC10 sprayer.•Do not touch or block any moving parts.•To avoid damage and electrical shock do not place or submerge sprayer into water.•Only use the charger supplied and approved by easy-HC10 for charging the battery.•Use the charger on an elevated surface i.e., a desk or table to avoid risk of tripping.•Only use salt concentrations stated by easy-HC10 to avoid inaccurate disinfecting strengths.•Do not spray disinfectant directly at or onto people.•Only use this with salt and water solutions, no other chemical or disinfectant should be put through the sprayer.•Use appropriate PPE during usage of the easy-HC10 disinfectant sprayer•The easy-HC10 should not be used in explosive environments under any circumstances as the device is not ATEX rated.•Children shall not play or use the easy-HC10 disinfectant sprayer•If the power supply cord is damaged it must be replaced by the manufacturerb)HAZARDS AND CORECTIVE ACTIONSc)PRODUCT LABEL SYMBOLS AND MEANINGS5INSTRUCTIONSa)FUNCTION OVERVIEWTo release reservoir:•Press the button on the off side of the product and gently pull down on the reservoir to release it for cleaning or refilling.To install reservoir:•Place reservoir on flat surface and then slide the sprayer down onto the top of the reservoir pushing down firmly until you hear a click form the reservoir lock button. To remove the battery:•Press down the big grey button on the back of the battery and pull away from the sprayer firmly.To install the battery:•Line up the battery to the back of the sprayer and push firmly inwards towards the handle until a click is heard and the battery is secured.•To check the battery is in properly perform a quick press of the trigger, this will cause the membrane keypad to light up if the battery is installed correctly.Membrane keypad usage:•The three different disinfectant strengths are selectable by using the orange button to cycle through them, a blue LED will be lit when a specific strength is selected. 45 ppm is for food surfaces and sensitive areas. 100 ppm is for everyday disinfecting and cleaning. 150 ppm for deep cleans. If no lamps are illuminated the electrochemical reactor will be OFF and therefore inactive.•The battery icon displays the battery level using 3 green LEDs. If all 3 are lit the battery is fully charged. If 1 LED is lit the battery needs to be charged.Trigger usage•Press and hold the trigger for the sprayer to function. The sprayer has an orange button next to the trigger that will lock the sprayer on if pressed when the trigger is fully engaged. This is to make large-area disinfecting easier and efficient. To disengage the trigger lock firmly press the trigger down and the lock button will click out and the sprayer will turn off.• A quick press of the trigger will engage the membrane keypad for battery level check and pre-spray disinfectant strength selection.b)OPERATION INSTRUCTIONS1.Firstly, make sure the 18 V 4 Ah battery is fully charged using the charger supplied2.Now fill the reservoir with 2 litres of tap water and add the 5 g sachet of sodium chloride(salt) and shake well. DO NOT USE ANY OTHER STARTING SOLUTIONS EXCEPT THE RECOMMENDED QUANTITY OF SALT.3.Next, install the fully charged battery and reservoir onto the sprayer making sure bothare secured properly.4.Now quickly press the trigger in and out to engage the membrane keypad then selectyour desired disinfectant strength using the orange button on the keypad.5.Finally, hold down the trigger and within seconds you will be spraying high-qualitydisinfectant (hypochlorous acid)c)SALT SOLUTION INSTRUCTIONS1.Per litre of tap water (at room temperature)2.5 grams of sodium chloride needs to beadded for the easy-HC10 to function correctly and accurately.2.The reservoir supplied with the easy-HC10 is a 2-litre reservoir therefore the sodiumchloride sachets supplied by easy-HC10 are 5-gram sachets. This means only one sachet is needed per reservoir.3.After the sodium chloride sachet has been added into the water screw the cap on andshake well before use.4.We recommend the use of easy-HC10 supplied sodium chloride sachets as it is moreconvenient, and they are premeasured to have the correct amount of salt for a full reservoir. The easy-HC10 sachets also have a small amount of additive to reduce limescale build up in hard water areas.d)micro-Ion REPLACEMENT INSTRUCTIONSThe micro-Ion electrochemical reactor is a consumable item with a finite life. It will produce at least 1000 litres of disinfectant (hypochlorous acid) at the highest strength level before it needs replacing. 1000 litres of disinfectant will equate to over 200 hours of continuous disinfecting. When the micro-Ion needs replacing an LED will be lit on the membrane keypad.e)TROUBLESHOOTING6FREQUENTLY ASKED QUESTIONSQ)What is the required time for the hypochlorous acid biocide to have an effect?A)Our Independent lab testing shows that with just 5 minutes contact time withhypochlorous acid 99.9% of bacteria, viruses and yeast will be killed.Q)How long should I leave between applications of the biocidal product?A)There is no set time before an area can be disinfected again. We recommenddisinfecting areas at least once a day, but an area might need more disinfectingdepending on the turnover of people.Q)How long should an area be left after disinfecting before being accessed by humans?A)The area can be accessed as soon as the disinfecting has been completed.Q)Does the area that has been disinfected need to be left to ventilate?A)No ventilation is required after an area has been disinfected.Q)Does the easy-HC10 need cleaning or maintenance?A)It is best to pump a small amount of tap water through the easy-HC10 and then emptythe reservoir and run the easy-HC10 dry to make sure no residual liquid is left in thesystem. This is best to do after every use.Q)How frequently should I be disinfecting?A)At least once daily but it is dependent on the user’s application.7ONE YEAR WARRANTYThe easy-HC10 has a one-year warranty against any disfunction during that period. The device will either be replaced or fixed within the terms of warranty for manufacturing defects. Any damage caused by the following issues will not be covered by the warranty: •Not using the product in accordance with the instructions indicated in this manual •Damage resulting from user error, such as dropping•Incorrect use of charger for the battery•Use of parts not provided by manufacturer•micro-Ion electrochemical reactor. This is warrantied for 1000 litres of hypochlorous acid generation only8DISCLAIMERSince in aqueous solution active chlorine is generated from sodium chloride by electrolysis to give an equilibrium of chlorine, hypochlorous acid and hypochlorite anion, which is pH and temperature dependent, classification for active chlorine is not feasible.。
EasyCVR 视频融合云服务 用户使用手册说明书

EasyCVR视频融合云服务用户使用手册安徽旭帆信息科技有限公司2022年4月版权声明本文档版权属安徽旭帆信息科技有限公司所有,未经安徽旭帆信息科技有限公司书面许可,任何单位或个人不得以任何形式或任何手段复制或传播本文档的一部分或全部。
目录一、使用准备 (4)1.1 运行环境配置 (4)1.2 安装包下载解压 (4)二、系统启动 (6)2.1 Windows (6)2.2 Linux (6)三、系统使用指南(管理员) (6)3.1 用户登录 (6)3.2 设备接入EasyCVR说明 (7)3.2.1 手动添加设备 (7)3.2.2 主动注册设备的配置 (16)3.3 视频调阅功能 (20)3.4 录像回放 (23)3.5 级联管理 (24)3.6 用户管理 (27)3.6.1 如何创建角色 (27)3.6.2 如何创建用户 (28)3.6.3 如何删除用户 (31)3.6.4 如何删除角色 (32)3.7 录像计划 (32)3.8 版本信息 (33)四、授权的使用方法 (34)4.1 加密机授权 (34)4.2 加密狗授权 (34)4.3 Pem授权 (35)五、高级配置(仅限开发运维人员使用) (35)六、视频广场返回错误码 (35)七、技术支持 (36)一、使用准备1.1 运行环境配置标准版支持X86架构的64位Linux/Windows操作系统理论1Mbps*存储7天计算公式如下:1Mbps*1024Kbps/8*3600秒*24小时*7天*16通道/1024/1024/1024≈1.16T理论1Mbps下行带宽计算公式如下:10000并发用户数(各个通道观看用户总数)*1Mbps≈10000M1.2 安装包下载解压下载安装包并解压到服务器,解压路径不要包含中文字符⚫Windows版本:⚫Linux版本:[www] 前端页面资源[easycvr.ini] 配置文件[start.sh] Linux下启动脚本[stop.sh] Linux下停止脚本二、系统启动2.1 Windows⚫安装:双击ServiceInstall-EasyCVR.exe⚫卸载:双击ServiceUninstall-EasyCVR.exe2.2 Linux⚫安装:执行./start.sh,启动EasyCVR服务⚫卸载:执行./stop.sh,停止EasyCVR服务三、系统使用指南(管理员)3.1 用户登录启动服务后,在浏览器中打开测试页面,http://IP:18000(IP为部署EasyCVR服务的服务器IP地址,可根据实际情况自行修改IP地址)默认初始管理员用户名密码为easycvr/easycvr,登录成功如下图:3.2.1 手动添加设备手动添加的设备协议包含:RTSP拉流协议、RTMP推流协议、海康SDK协议、DAHUA协议。
EASY 3D手册

Easy 3D 使用手册目 录1. 简介 (3)2. 安装 (3)3. Easy3D指南 (4)3.1 任务 (4)3.2 处理和创建3D物体 (6)4.主菜单 (10)4.1 文件 (10)4.2 视图-工具 (10)4.3 任务 (15)4.4 报告 (15)4.5 滤波 (16)4.6 选项 (16)1. 简介EASY 3D是WINDOWS下的雷达数据成图软件,由MALA公司研制。
EASY 3D采用一系列由RAMAC雷达采集的剖面进行成图。
EASY 3D包括数据视图,数据滤波,断面或时间切片自动回放,缩放功能,它有报告编辑器用来将物体插入3D立方体中作为辅助解释工具。
它可以将直线,曲线,双曲线,圆形和3D物体插入3D雷达剖面中,用来表示确定的物体及埋藏体等。
雷达剖面将物体和层加到立方体中产生地下的3维图像EASY 3D软件给雷达用户一个快速简单的方法在3维空间中观看数据。
因此它对计算机的配置要求不高,实际上它可以让用户在采集完数据后直接将剖面放到3D软件中。
由于多数用户用笔记本采集数据,而笔记本通常速度太慢,因此我们建议计算机配置应达到:WIN95,98,2000或NT300MHz奔腾II处理器128MB内存2. 安装安装软件:a) 运行“Easy_3D_Setup.exe”文件来安装软件b) 安装时输入名称,单位和产品密码。
你可以在CD盘上和手册中发现密码。
3. Easy3D指南EASY 3D指南可以指导你产生3D任务和观看地下水管。
开始运行程序时可以在屏幕上看到:1.不同视图的主屏幕(主屏幕,前面,侧面,顶部和布局)(第4.2.8到4.2.12)2.任务管理器,产生剖面信息,物体(报告)和滤波(第4.2.4)3.特性编辑器,用于改变不同特性设置(第4.2.5)4.主菜单(第4章)5.工具条(第4.2.1)6.报告条(第4.2.3)7.状态条,剖面和X、Y坐标的信息等(第4.2.2)用于任务管理器的工具也可在主菜单中找到。
- 1、下载文档前请自行甄别文档内容的完整性,平台不提供额外的编辑、内容补充、找答案等附加服务。
- 2、"仅部分预览"的文档,不可在线预览部分如存在完整性等问题,可反馈申请退款(可完整预览的文档不适用该条件!)。
- 3、如文档侵犯您的权益,请联系客服反馈,我们会尽快为您处理(人工客服工作时间:9:00-18:30)。
6 执行Loop2d\Execute.这样程序就形成三角形单元(如果此时你的模型有两片或两片以上相连 的膜材,应该继续执行Putz\Execute,这样就把几片膜,形成一个整体) 7 执行Laggen\Execute.这样程序就在边界处加入T单元(如果前面是跳过Rangen没有执行, 这时就应执行"start up",把菜单中的第二项"EIN=RANGEN"修改一下,双击它并选中"FRONT", 然后执行Start) 8 执行Zus\Execute.把固定点位从平面上拉到它的实际点的坐标. 9 执行Fofin\Execute.完成膜的成型. 10 此时如果你的模型有两片或两片以上相连的膜材,应该再执行Utilities\Elimin\Execute, 把不同膜材相连处的重复单元删去,并把剩下单元刚度相加. 11 接下来要定义模型不同部分的刚度: 11.1 执行Utilities\Gedein\Execute,进入Getin编辑界面,在File\open\ EIN-FILE,导入Elimin 11.2 执行Mark\Link Status,在specific stiffness中输入"2000"(即经度)后,在Edit\Marklinks \Chang attibutes菜单中的Input field值改为"900",然后执行Mark\All\Unmark. 11.3 执行Mark\Link Status,在specific stiffness中输入"1000"(即纬度)后,在Edit\Marklinks \Chang attibutes菜单中的Input field值改为"900",然后执行Mark\All\Unmark. 11.4 执行Mark\Link Status,在specific stiffness中输入"5000"(即边界)后,在Edit\Marklinks \Chang attibutes菜单中的stiffness值改为"38000"(钢索)或"1000000"(钢构), 然后执行Mark\All\Unmark. 11.5 最后File\Save\Ein_file as,赋名保存,例如:E.EIN
静力分析 12 Menus\Statical analysis\Dismen,对单元的节点重新编号,执行Start up,在其菜单中的第二 行"EIN=GEDEIN",由于刚才我们已经定义过刚度,例如:E.EIN所以要改掉它,双击它选中e.ein. (如果你的模型有两片或两片以上相连的膜材,执行Putz\Execute,那么现在要把第三行"ECKEN= LOOP2D",双击它选中Putz)最后执行Start. 13 执行Materi\Execute. 14 执行Klseil\Execute. 15 现在要建一个荷载的子目录,通过File\Select project path\Greate new direction,在弹出 的对话框中输入子目录名字,例如:"WL",然后按"OK",此时路径变为e;\TesT\WL. 在Menus\Statical analysis,执行Load\LoadEdit,进入LoadEdit菜单,在LOAD.STA中第二行的 "EIN="后面写入"..\KLSEIL";在第三行的"DRET"后面写入"..\LOOP2D",(如果你的模型有两片 或两片以上相连的膜材,执行过Putz\Execute,那么现在要把这"..\LOOP2D"改为"..\PUTZ") 在INP FILE中的TYPE选择Dreiecke,然后选择"Add group"按钮,输入荷载组号"1",然后双击 Eigengewicht,在Load factor per square meter 后面输入膜的单位自重数值:例如:0.0103 (单位KN/m2),并在 Z direction 后输入"-1",它表示自重方向向下.双击Normal在Load factor normal to surface后面输入风荷载的单位荷重:(例如:1.32)(单位KN/m2),并在Z value inner point后输入"-1000",它表示指向曲面法向的起始点,对于风荷载来讲正值表示"风压"↓;负值 表示"风吸"↑.最后执行Start.
16 执行Statik\Start up,第二行中"EIN="改为"EIN=..\KLSEIL",并且回车ENTER,然后执行Start. 17 执行Pspann\Start up,第二行中"ECKEN="改为"ECKEN=..\LOOP2D",(如果你的模型有两片 或两片以上相连的膜材,执行过Putz\Execute,那么现在要把这"..\LOOP2D"改为"..\PUTZ"), 然后执行Start. 18 现在基本上一个简单的模型作完了,如果想看节点力可以查s;想了解膜和钢索的受力 情况,可执行Utilities\Stressvu\Execute察看;想了解膜的变形情况,可执行Utilities\ Bild\Execute察看.1.File\Load data\Easy\Fofin;2.File\Load deflection\WL(LL)\Psp 3.Mode\Deflection 19 可以把膜的图形导成dxf档. 19.1 生成link单元(即膜单元为单线),File\Easydxf\Paramater,在Entity 19.2 在Type中输入"1",执行"OK".再执行File\Export\Esaydxf\Startup,在Startup菜单第二行中 修改 "EIN=..\Fofin" , "Drei=..\Loop2d" (如果你的模型有两片或两片以上相连的膜材 ,执行过Putz\Execute,那么现在要把这"Drei=..\LOOP2D"改为"Drei=..\PUTZ"),执行Startup, 即可在当前目录中生成Easydxf档. 19.3 生成膜的三角形单元.在File\Esaydxf\Paramater,在Entity type中输入"2",执行"OK". 再执行File\Export\Esaydxf\Startup,在Startup菜单第二行中修改双击 "EIN=..\Fofin" , 双击"Drei=..\Loop2d" (如果你的模型有两片或两片以上相连的膜材,执行过Putz\Execute, 那么现在要把这"Drei=..\LOOP2D"改为"Drei=..\PUTZ"),执行Startup,即可在当前目录中 生成Easydxf档.
EASY
操作手册
1 在AUTOCAD建立模型,生成dxf文件档.(注意:节点处须打断,弧线要用短直线代替)例:e:\Test. 2.1 打开EASY,在File\select project path,把路径改为刚生成的dxf文件档. 如果模型是3D的,在导入dxf之前,先到File\Import\Dxfeasy\Parameters中, 把Entity type的初始值"1"改为"3D FACE". 2.2 到File\Import\Dxfeasy\Start up中,找到菜单中的"DXF=DXFEASY"双击它, 并到目录中去找这次需要的dxf文件,选中它,然后执行"start". 2.3 打开Utilities\Gedein(Getin)中的execute执行,进入Getin编辑界面,在 File\Import EIN-FILE,导入Dxfeasy文件,这时模型中的一些固定点位可以现在 编辑它的属性,在Mark\Point\选中要编辑的点,Edit\Mark points\Change attributes, 在Change attributes菜单的clamp status中选"Fix all",然后"Update"(在这里还可以 对点位的座标作修改) 2.4 然后存盘File\Save\Primary structure as,赋名保存,例如:A.EIN,退出Getin. 3.1 执行Front\Execute,进入Front编辑界面,执行Front\Import\EIN-FILE,导入步骤2.4刚 保存的EIN文件:A.EIN。 3.2 选中所有的曲线,Mark\Curves\All\Mark,然后做Edit\Convert lines to curves. (这一步骤一定要做) 3.3 对膜的边界进行编辑,选中需要编辑的曲线,Mark\Curves\Curve,然后在Edit\Curves\ Change marked curves,进入boundary attributes菜单,先选"defaults"按钮,然后做 一定的编辑:a.如果膜的边界是钢构,那么要选"Fix all";poቤተ መጻሕፍቲ ባይዱnt 表示定义边界曲线的点数 b.sag in % , rabius , sag三个定义是相关的,改动其中的任何一个,程序 都会自动计算,sag表示平面内边界曲线的矢高;Elevation表示曲线与 水平面的夹角.当编辑完所需的定义后,按"Update",退出. c.用同样的方法编辑所有的边界. (注意:如果模型中有边界定义为钢构,那么虽然钢构边界上已有固定点,但是这里还是要像 步骤3.3的方法,一样重新定义钢构边界.) 3.4 当完成对膜的边界进行编辑后,进入Edit\Net parameters菜单,先选defaults按钮,在 Warp angle to globe和Weft angle to Warp选项中可以改变膜的Warp与Weft的夹角; 通过"Coarser"和"Finer"可以调节Warp与Weft的长度,这时length和force选项是相关的, 改动其中的任何一个,程序都会自动计算自动修改;stress选项表示加到Warp与Weft中的 预力值,一般我们会把stress中的值与Estimated stress的值设为相同. 3.5 做完所有的编辑后,存盘File\Save\date,退出Front. 4 执行Rangen\Execute.(如果你的模型在边界编辑中Elevation不设为"0",表示边界曲线与 水平面有夹角,这时在Menus\Formfinding中的Rangen应该跳过.) 如果角度是90度,则这一步骤就不做了. 5 执行Netgen\Execute.这样程序就先在平面中形成网格(如果前面是跳过Rangen没有执行, 这时就应执行"start up",把菜单中的第二项"EIN=RANGEN"修改一下,双击它并选中"FRONT", 然后执行Start)