戴尔 灵越 Dell Inspiron 15R-5520 15R-7520 简体中文说明书
戴尔电脑产品用户手册说明书

291st Revised Page 1CANCELS 290th Revised Page 1(This page filed under Transmittal No. 311 ) ACCESS SERVICERATES, RULES AND CHARGESTitle Page and Pages 1 to 22-45, inclusive of this tariff are effective as of the date shown. Original and revised pages as named below and Supplement No. 7 contains all changes from the original tariff that are in effect on the date hereof.CHECK SHEETNumber of Number of Revision Revision Except as Except asPageIndicated Page IndicatedTitle 4th 22.3 6th 1 291st*22.4 7th 1.1 26th 23O riginal 1.2 122nd* 24 O riginal 1.2.1 2nd 25 1st 1.3 11th 26 1st 1.4 37th 27O riginal 1.5 70th*28 1st 1.5.1 15th 29 1st 1.6 28th 30 2nd 1.7 12th 31 1st 1.7.1 3rd 1-1O riginal 1.8 18th 1-2 3rd 1.9 62nd 2-1 2nd 1.10 17th 2-2 2nd 1.11 26th 2-3 3rd 1.12 36th 2-4 5th 1.13 22nd 2-5 3rd 1.14 15th 2-5.1 1st 1.15 4th 2-6 1st 1.16 1st 2-7Original 2 4th 2-8Original 3 2nd 2-9Original 4 3rd 2-10Original 5 2nd 2-11Original 6 3rd 2-12 1st 7 4th 2-13Original 8 3rd 2-14 6th 9 1st 2-15 5th 10 7th 2-15.1 4th 11 2nd 2-16Original 12 1st 2-17 4th 13 2nd 2-18Original 14 1st 2-19Original 15 3rd 2-20Original 16 5th 2-21Original 17 6th 2-22Original 18 2nd 2-23Original 19 5th 2-24Original 20 2nd 2-25Original 21 6th 2-26 1st 22 7th 2-27Original 22.1 2nd 2-28Original 22.2 44th 2-29O riginal* New or Revised PageIssuing Officer: Kristen E. Shore, Assistant Vice President - RegulatoryRATES, RULES AND CHARGESCHECK SHEET (Cont’d)Number of Number ofRevision RevisionExcept as Except asPage Indicated Page Indicated3-13 2nd 5-11.2Original3-14 2nd 5-11.3Original3-15 2nd 5-12 1st3-16 1st 5-13 4th3-17 1st 5-14 4th3-18 1st 5-14.1Original3-19 Original 5-15 7th3-20 Original 5-16 3rd3-21 1st 5-17 11th3-22 1st 5-17.1 8th3-23 1st 5-17.1.1 6th3-24 2nd 5-17.2 7th3-25 1st 5-18 6th3-26 2nd 5-19 6th3-27 2nd 5-19.15th3-28 1st 5-19.2 4th3-29 2nd 5-19.3 4th3-30 1st 5-19.4 4th4-1 2nd 5-19.54th4-2 2nd 5-19.6 4th4-3 Original 5-19.74th4-4 4th 5-20 6th4-5 2nd 5-21Original4-6 1st 5-22Original4-7 1st 5-23Original4-8 2nd 5-24Original4th 5-25Original 4-8.14-9 67th*5-26 1st4-10 29th*5-27Original4-10.1 7th5-28Original4-11 72nd*6-1 3rd5-1 5th 6-2 1st5-2 2nd 6-31st5-3 7th 6-4 1st5-3.1 6th 6-5Original5-3.2 3rd 6-6Original5-3.3 3rd 6-7Original5-3.4 7th 6-8Original5-4 1st 6-9 1st5-5 1st 6-10 1st3rd 6-11Original 5-62nd 6-12Original 5-75-8 Original 6-13Original1st 6-14Original 5-93rd 6-15Original 5-105-11 2nd 6-16Original5-11.11st* New or Revised Page(This page filed under Transmittal No. 311 )ACCESS SERVICERATES, RULES AND CHARGESCHECK SHEET (Cont’d)Number of Revision Number of Revision Page Except as Indicated Page Except as Indicated7-26 Original 7-812nd 7-27 3rd 7-81.15th7-28 1st 7-81.24th7-29 Original 7-81.32nd 7-30 Original 7-81.49th 7-31 Original 7-81.56th7-32 Original 7-81.64th 7-33 3rd 7-81.6.1Original7-33.1 2nd 7-81.75th7-34 1st 7-81.8Original7-35 Original 7-8227th 7-36 Original 7-8311th 7-37 Original 7-8419th 7-38 Original 7-84.19th* 7-39 1st 7-852nd7-40 Original 7-85.11st 7-41 2nd 7-85.24th7-42 2nd 7-865th7-43 Original 7-875th 7-44 1st 7-87.15th7-45 Original 7-87.25th7-46 Original 7-87.34th 7-47 Original 7-87.44th 7-48 Original 7-882nd 7-49 2nd 7-892nd7-50 Original 7-903rd 7-51 Original 7-913rd 7-52 1st 7-91.15th7-53 1st 7-91.25th7-54 Original 7-91.2.12nd7-55 Original 7-91.32nd 7-56 10th 7-91.42nd7-57 Original 7-91.52nd 7-58 1st 7-91.62nd7-59 Original 7-91.72nd 7-60 Original 7-91.82nd 7-61 2nd 7-91.92nd7-62 3rd 7-91.102nd7-63 1st 7-926th7-64 3rd 7-935th7-65 1st 7-93.13rd7-66 5th 7-94Original7-66.1 2nd 8-13rd7-67 1st 8-24th7-68 Original 8-35th 7-69 3rd 8-3.13rd7-69.1 2nd 8-43rd7-69.2 2nd 8-53rd7-70 Original 8-62nd 7-71 Original 8-74th 7-72 Original 8-84th 7-73 10th 8-94th7-74 Original 8-104th 7-75 1st 8-114th7-76 Original 8-122nd 7-77 1st 8-132nd7-78 1st 8-142nd7-78.1 Original 8-155th 7-79 6th 8-163rd7-79.1 Original 8-175th 7-80 4th 8-184th8-193rd* New or Revised(This page filed under Transmittal No. 311 ) ACCESS SERVICE4. End User Access Service (Cont’d)4.6 Rate Regulations (Cont’d) 4.6.1 End User Common Line Rate Elements (Cont’d) (H) Federal Universal Service Fund (FUSF) Surcharge (Cont’d)(3) Other Non-recurring FUSF SurchargesIn addition to the applicable charges above, when a customer is assessed interstate end user chargesidentified in the table below, a FUSF Surcharge will also apply as set forth in Section 4.7(I) following. For example, customers assessed the PIC changecharge as specified in Section 13.3.3.(b)(5)(e)(ii) will also be assessed the PIC change FUSF Surcharge as set forth in Section 4.7(I) following.To the extent an IC is assessed a PIC Change Charge, the Non-recurring FUSF Surcharge will also apply to the IC.(4) Other FUSF SurchargesA percentage surcharge factor is assessed monthly on billed recurring and non-recurring charges of end user services other than surcharges described in Section 4.FUSF Surcharge factor: 0.201Tariff Reference Rate Element13.3.3(A)PIC Change Charge(I)(This page filed under Transmittal No. 311 ) ACCESS SERVICE4. End User Access Service (Cont’d)4.7 Rates and ChargesThe rates for End User Access are:(A) End User Common Line (EUCL) - Primary Residence SubscriberUSOC Rates Per Month - Individual lineor trunk, each 9ZEU1 $4.72(B) End User Common Line (EUCL) Non-Primary Residence Subscriber USOC Rates Per Month - Individual lineor trunk, each 9ZEU2 $4.72- BRI ISDN Facility, each wire pair 9ZEU5 4.72(C) End User Common Line (EUCL) -Single Line BusinessUSOC Rates Per Month - Individual lineor trunk, each 9ZEU3 $4.72(D) End User Common Line (EUCL) - Multiline Business SubscriberUSOC Rates Per Month - Individual lineor trunk, each 9ZEU4 $4.72- Public Telephone Access line, each 9ZEU4 4.72 - PRI ISDN Facility, each 9ZEU6 23.60(E) End User Common Line (EUCL) - Centrex CO and CO-like (Installedor on order prior to July 28, 1983)USOC Rates Per Month- Individual lineor trunk, each 9ZEU4 4.72(R) (R) (R) (R) (R) (R) (R) (R)ACCESS SERVICE4. End User Access Service (Cont’d)4.7 Rates and Charges (Cont’d)(G) Presubscribed Interexchange Carrier ChargesUSOC Rate Per Month(A) Multi-Line Business 9PCC4 0.00(B)ISDN-PRI-per service 9PCC6 0.00(C) Centrex CO andCentrexCO-Like-Nine or more lines, per line 9PCC7 0.00-Eight or less lines, per service 9PCC9 0.00(H) End User Port Charge USOC Rate Per Month(1) BRI ISDN Port- Per Port 9SDN1 $3.90(2) PRI ISDN Port- Per Port 9SDN2 $36.29(I)Basic FUSF Surcharge:USOC Rate Per Month(1) Residential 9PZRS $ 0.94(2) Single-Line Business 9PZBU $ 0.94(3) ISDN BRI 9PZL1 $ 1.73(4) Multiline Business 9PZLM $ 2.34(5) PRI ISDN 9PZP1 $18.99(6) PBX 9PZPX $ 2.34(7) Centrex CO and CO-Like 9PZCX $ 0.26(8) Other FUSF Surcharges USOC Rate Per Occurrence PIC Change Charge(a) Per Manual Change 9PZGM $ 0.78(b) Per Mechanized Change 9PZGE $ 0.32 (I) (I) (I) (I) (I) (I) (I) (I) (I)(This page filed under Transmittal No. 311 )(This page filed under Transmittal No. 311 ) ACCESS SERVICE7. Special Access Service (Cont'd)7.11 High Capacity Service 7.11.5 Rates and Charges General Description (Cont'd) 7.11.5.3 Rates and Charges (Cont'd)(F) DS1 Term Payment PlanRates and Charges for the DS1 Term Payment Plan (1)(1)Channel Termination - Per Point of TerminationUSOC1 Year2 Year3 Year 5 Year 7 Year TMECS $122.50 $120.00 $115.00 $104.00(R) $98.50(2) Channel Mileage- Channel Mileage Termination (per termination)- Channel Mileage Facility (per mile)USOC 1 Year 2 Year 3 Year 5 Year 7 Year 1L5XX$ 9.00$ 9.00$ 8.70$ 8.40$ 8.25(3) Central Office Multiplexing DS1 to DS0 voice/digital-Per arrangementUSOC1 Year2 Year3 Year 5 Year 7 Year MQ1, MQ1++,QMU, QMUA1, QMU++$180.00 $170.00 $170.00 $ 160.00 $150.00(4) Collocation Transport-Channel Mileage - FixedUSOC 1 Year 2 Year 3 Year 5 Year 7 Year 1H48S$ 51.00 $ 45.00 $ 40.00 $ 35.00 $ 32.50– Per Mile USOC 1 Year2 Year3 Year 5 Year 7 Year 1H48S$ 9.25$ 9.00$ 8.75$ 8.50$ 8.25(5) Nonrecurring Charges-One Time Charges- Per point of channel termination USOC DESCRIPTION RATE TMECS Channel Termination NonrecurringCharge$ 900.001H48S Collocation Transport NonrecurringChargeNOTE: Channel Termination Nonrecurring Charges and Collocation Transport Nonrecurring Chargesare waived on new installations of DS1 High Capacity Service with a 2, 3, 5, or 7 year DS1 TPP.(1) Effective on September 13, 2017, DS1 TPP 5- and 7-year Payment Plans are no longer available,including for any otherwise available conversions. Circuits already subject to a DS1 TPP 5- or 7-year Payment Plan, as of September 13, 2017, will continue to be provided under the then-current DS1 TPP 5- and 7-year Payment Plan term for the remainder of that term.USOC 1 Year 2 Year 3 Year 5 Year 7 Year 1L5XX$ 51.00$ 45.00$ 40.00$ 35.00$ 32.50。
戴尔电脑使用说明书.pdf_1700878216.8561718

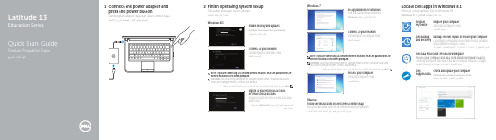
Locate Dell apps in Windows 8.1 Mencari Lokasi aplikasi Dell di Windows 8.1 Windows 8.1 يف Dell تاقيبطت ناكم ددحRegister My Device Register your computer Daftarkan komputer Anda رتويبمكلا ليجستDell Backup and Recovery Backup, recover, repair, or restore your computer Cadangkan, kembalikan ke kondisi normal, perbaiki, atau pulihkan komputer Andaكب صاخلا رتويبمكلل ةداعتسلاا وأ حلاصلإا وأ دادرتسلاا وأ يطايتحلاا خسنلاDell Data Protection | Protected WorkspaceProtect your computer and data from advanced malware attacksLindungi komputer dan data Anda dari serangan malware canggihةمدقتملا ةراضلا جماربلا تامجه نم تانايبلاو رتويبمكلا ةيامحDellSupportAssistCheck and update your computerPeriksa dan perbarui komputer Andaهثيدحتو كب صاخلا رتويبمكلا نم ققحتلا1Connect the power adapter andpress the power buttonSambungkan adaptor daya dan tekan tombol dayaليغشتلا رز ىلع طغضلاو رايتلا ئياهم ليصوت2Finish operating system setupTuntaskan penataan sistem operasiليغشتلا ماظن دادعإ ءاهنإEnable security and updatesAktifkan keamanan dan pembaruanتاثيدحتلاو ناملأا نيكمتConnect to your networkSambungkan ke jaringan Andaةكبشلاب ليصوتلاNOTE: If you are connecting to a secured wireless network, enter the password for thewireless network access when prompted.CATATAN: Jika Anda menghubungkan ke jaringan nirkabel aman, masukkan kata sandiuntuk akses jaringan nirkabel tersebut saat diminta..كتبلاطم دنع ةيكلسلالا ةكبشلا لوصول رورملا ةملك لخدأ ،ةنمؤم ةيكلسلا ةكبشب كلاصتا ةلاح يفSign in to your Microsoft accountor create a local accountMasuk ke akun Microsoft Anda atau buatakun lokalءاشنإب مق وأ Microsoft باسح ىلإ لوخدلا ليجست بمقيلحم باسحWindows 8.1Set up password for WindowsAtur kata sandi untuk WindowsWindows ماظنل رورملا ةملك دادعإConnect to your networkSambungkan ke jaringan Andaةكبشلاب ليصوتلاwireless network access when prompted.Jika Anda menghubungkan ke jaringan nirkabel aman, masukkan kata sandiuntuk akses jaringan nirkabel tersebut saat diminta..كتبلاطم دنع ةيكلسلالا ةكبشلا لوصول رورملا ةملك لخدأ ،ةنمؤم ةيكلسلا ةكبشب كلاصتا ةلاح يفProtect your computerLindungi komputer Andaرتويبمكلا ةيامحWindows 7UbuntuFollow the instructions on the screen to finish setup.Ikuti petunjuk pada layar untuk menyelesaikan pengaturan..دادعلإا ةيلمع ءاهنلإ ةشاشلا ىلع رهظت يتلا تاداشرلإا عبتاFeaturesFitur | تازيملا1. Microphone2. Camera3. Camera-status light4. Microphone5. Security-cable slot6. Power button7. USB 3.0 connector8. Power-status light9. Wireless-status light 10. Battery-status light 11. Hard-drive activity light 12. Headset connector 13. SD-card reader14. Speakers15. Touchpad16. USB 3.0 connector 17. Mini DisplayPort connector 18. HDMI connector 19. RJ45 connector 20. Power connector 21. Network-status Light1. Mikrofon2. Kamera3. Lampu status kamera4. Mikrofon5. Slot kabel pengaman6. Tombol daya7. Konektor USB 3.08. Lampu status daya9. Lampu status nirkabel 10. Lampu status baterai 11. Lampu aktivitas hard disk 12. Konektor headset 13. Pembaca kartu SD 14. Speaker15. Panel sentuh 16. Konektor USB 3.017. Konektor mini DisplayPort 18. Konektor HDMI 19. Konektor RJ4520. Konektor daya 21. Lampu status jaringan1 .نوفوركيملا2.اريماكلا3.اريماكلا ةلاح حابصم4 .نوفوركيملا5 .ناملأا لبك ةحتف6 .ليغشتلا رز7 .USB 3.0 لصوم8.ةقاطلا ةلاح حابصم9.يكلسلالا لاصتلاا ةلاح حابصم10.ةيراطبلا ةلاح حابصم11.ةتباثلا صارقلأا كرحم طاشن حابصم12 .سأرلا ةعامس لصوم13.SD ةقاطب ئراق14.تاعامسلا15 .سمللا ةحول16.USB 3.0 لصوم17.رغصملا DisplayPort لصوم18 .HDMI لصوم19 .RJ45 لصوم20 .رايتلا لصوم21.ةكبشلا ةلاح حابصمPrinted in China.2015-08Product support and manuals Manual dan dukungan produk لئلادلاو جتنملا معد/support/support/manuals /support/windows /support/linuxContact DellH ubungi Dell | D ell ـب لاصتلاا/contactdellRegulatory and safetyRegulasi dan keselamatan | ةيميظنتلا تاسرامملاو ناملأا تاسرامم/regulatory_compliance Regulatory modelModel regulatori | يميظنتلا ليدوملاP47G Regulatory typeJenis regulatori | يميظنتلا عونلاP47G002Computer modelModel komputer | رتويبمكلا ليدومLatitude -3350© 2015 Microsoft Corporation.© 2015 Canonical Ltd.。
戴尔 Dell Pair 用户指南

Dell Pair 用户指南提醒、注意和警告提醒:“提醒”表示可以帮助您更好地使用计算机的重要信息。
注意:“注意”表示如果不遵循说明,就有可能损坏硬件或导致数据丢失。
警告:“警告”表示可能会导致财产损失、人身伤害甚至死亡。
版权所有 © 2022-2023 Dell Inc. 或其子公司。
保留所有权利Dell、EMC 和其他商标均是 Dell Inc. 或其子公司的商标。
其他商标可能是其各自所有者的商标。
2023–04修订版A03目录概览 (4)可支持性 (5)下载和安装 (7)用户界面 (11)一般功能 (12)故障排除 (14)概览Dell Pair 支持以下功能:•可在戴尔外围设备(如鼠标和键盘)位于检测范围内时检测到它们,以通过蓝牙进行配对•通过蓝牙无缝配对设备。
注:Dell Pair 用户指南适用于所有受支持的戴尔外围设备。
有关特定于设备的功能,请参阅产品用户指南。
可支持性Dell Pair 预安装在以下戴尔系统上。
如果您手动卸载 Dell Pair,并希望再次重新安装,请按照本用户指南的下载和安装部分中提到的说明进行操作。
Dell Pair 在具有 BLE 5.0 配置和 BLE 支持的戴尔外围设备的戴尔 PC 上受支持。
支持的平台:Inspiron 灵越:Inspiron 灵越 5320Inspiron 灵越 5420Inspiron 灵越 5430Inspiron 灵越 5620Inspiron 灵越 5630Inspiron 灵越 7430Inspiron 灵越 7430 二合一笔记本Inspiron 灵越 7630Inspiron 灵越 7630 二合一笔记本Inspiron 灵越 13 5330Inspiron 灵越 14 7420Inspiron 灵越 16 7620Latitude:Latitude 3330Latitude 3340Latitude 3440Latitude 3540Latitude 5320Latitude 5340Latitude 5431Latitude 5440Latitude 5531Latitude 5540Latitude 7320Latitude 7330Latitude 7420Latitude 7430Latitude 7530Latitude 9330Latitude 9430Latitude 9440 Precision:Precision 3480Precision 3571Precision 3580Precision 3581Precision 5470Precision 5570Precision 5770Precision 7670Precision 7680Precision 7770Precision 7780 Vostro 成就:Vostro 成就 5320Vostro 成就 5620Vostro 成就 5630Vostro 成就 7620 XPS 笔记本:XPS 9315XPS 9530XPS 9730XPS 13 9315 二合一笔记本XPS 13 9320XPS 15 9520XPS 17 9720支持的操作系统:Windows 10,内部版本 10.0.19041 及更高版本Windows 11下载和安装Dell Pair 预安装在戴尔系统上。
戴尔平板电脑快速入门指南说明书

Connect the power adapter连接电源适配器電源アダプタを接続する1Turn on your tablet开启平板电脑タブレットの電源を入れる3Dock the tablet对接平板电脑タブレットをドッキングする2Printed in China.2013-08© 2013 Dell Inc.Features功能部件 | 外観Product support and manuals 产品支持和手册製品サポートとマニュアル/support/support/manuals /windows8Contact Dell 与 Dell 联络デルへのお問い合わせ/contactdellRegulatory and safety 管制和安全認可と安全性/regulatory_complianceRegulatory model and type 管制型号和类型認可モデルと認可タイプK10A K10A001Información para NOM, o Norma Oficial MexicanaLa información que se proporciona a continuación se mostrará en los dispositivos que se describen en este documento, en conformidad con los requisitos de la Norma Oficial Mexicana (NOM):Importador:Dell México S.A. de C.V.Paseo de la Reforma 2620 - Piso 11.° Col. Lomas Altas 11950 México, D.F.Número de modelo reglamentario:K10AVoltaje de entrada:100 V CA–240 V CA Corriente de entrada (máxima):1,30 AFrecuencia de entrada:50 Hz–60 Hz Corriente de salida:2,31 A Voltaje de salida:19,5 VCC1. USB 3.0 connector2. audio connector3. power status light4. docking connector5. power connector6. USB 3.0 connectors7. network connector8. HDMI connector9. DisplayPort connector1. USB 3.0 连接器2. 音频连接器3. 电源状态指示灯4. 对接连接器5. 电源连接器6. USB 3.0 连接器7. 网络连接器8. HDMI 连接器9. DisplayPort 连接器1. USB 3.0 コネクタ2. オーディオコネクタ3. 電源ステータスライト4. ドッキングコネクタ5. 電源コネクタ6. USB 3.0 コネクタ7. ネットワークコネクタ8. HDMI コネクタ9. DisplayPort コネクタ。
戴尔灵越 5100 笔记本电脑用户指南说明书

'HOO ,QVSLURQ 6HULHV,167$//,1*'5,9(56$1'87,/,7,(6ZZZ GHOO FRP1RWHV 1RWLFHV DQG&DXWLRQVThroughout this guide, blocks of text may be accompanied by an icon and printed in bold type or in italic type. These blocks are notes, notices, and cautions, and they are used as follows: NOTE: A NOTE indicates important information that helps youmake better use of your computer system.127,&( $127,&(LQGLFDWHV HLWKHU SRWHQWLDO GDPDJH WR KDUGZDUH RU ORVV RI GDWD DQG WHOOV\RX KRZ WR DYRLG WKH SUREOHP&$87,21 $&$87,21LQGLFDWHV D SRWHQWLDOO\KD]DUGRXVVLWXDWLRQ ZKLFK LI QRW DYRLGHG PD\UHVXOW LQ PLQRU RU PRGHUDWH LQMXU\___________________Information in this document is subject to change without notice.© 1999 Dell Computer Corporation. All rights reserved.T rademarks used in this text: Dell, Inspiron, and the DELL logo are trademarks of Dell Computer Corporation; MS-DOS, Microsoft, DirectX, and Windows are registered trademarks of Microsoft Corporation.Other trademarks and trade names may be used in this document to refer to either the entities claiming the marks and names or their products. Dell Computer Corporation disclaims any proprietary interest in trademarks and trade names other than its own.June 1999 P/N 7186C Rev. A05iii4390398Installing Windows 98 . . . . . . . . . . . . . . . . . . . . . .1-2Installing the Audio Driver . . . . . . . . . . . . . . . . . . . .1-3Installing the Video Driver . . . . . . . . . . . . . . . . . . . .1-6Installing the Touchpad Driver . . . . . . . . . . . . . . . .1-7Installing the Internal Modem Driver (Optional) . . .1-9Installing DVD Decoder Drivers . . . . . . . . . . . . . .1-11Installing the Hardware DVDDecoder Driver . . . . . . . . . . . . . . . . . . . . . . .1-12Installing Softex BayManager Software . . . . . . . .1-14Creating the Save-to-Disk Suspend File . . . . . . . .1-15Installing the System Help . . . . . . . . . . . . . . . . . .1-17Installing Help From the CD . . . . . . . . . . . . .1-18Downloading Help From the SupportWeb Site . . . . . . . . . . . . . . . . . . . . . . . . . . . .1-20Contacting Dell . . . . . . . . . . . . . . . . . . . . . . . . . . .1-21ivDell Inspiron 7000 Series — Installing Drivers and Utilities1-1HOO ,QVSLURQ 6HULHV ,QVWDOOLQJ 'ULYHUV DQG 8WLOLWLHVThis document explains how to install/reinstall Dell device drivers and utilities on your Dell Inspiron 7000 portable computer running the Microsoft ® Windows ® 98 operating system. Y ou may need to use this document under the following conditions:WY ou are reinstalling the version of the Windows ® 98 oper-ating system that came with your computer, and you need to reinstall the drivers and utilities that Dell provides.WY ou have a new hard-disk drive and you need to install all of the system software.To install the system software, you need the following items:W Dell Inspiron 7000 Series System Software CDW CD-ROM or DVD-ROM drive installed in the media bay of the computerW Microsoft Windows 98 CDW Microsoft Boot Disk Windows 98 Series diskette,QVWDOOLQJ:LQGRZVY ou must install Windows 98 on the hard-disk drive before install-ing a driver.To install Windows 98, perform the following steps:1.Insert the Microsoft Boot Disk Windows 98 Series disketteinto the diskette drive.2.Restart the system.3.When the Microsoft Windows 98 Startup menu appears,insert the Microsoft Windows 98 CD into the CD-ROM orDVD-ROM drive.4.Select Start Windows 98 Setup from CD-ROM and press<Enter>.The Setup program runs ScanDisk to check your hard-diskdrive.1-2Dell Inspiron 7000 Series — Installing Drivers and Utilities5.When the hard-disk drive check is completed, type to exitScanDisk.6.Follow the prompts on your screen to continue with theinstallation.7.When prompted to create a start-up diskette, remove theMicrosoft Boot Disk Windows 98 Series diskette, and click Next>.bel a blank, high-density diskette as instructed, insert thediskette into the diskette drive, and then click OK.9.Follow the prompts on your screen to complete theinstallation.,QVWDOOLQJ WKH$XGLR'ULYHUThe audio driver allows you to customize the sound features of your computer.Dell Inspiron 7000 Series — Installing Drivers and Utilities1-3To install the audio driver, perform the following steps:1.Save your work in all open application programs.2.Insert the Dell Inspiron 7000 Series System Software CDinto the CD-ROM or DVD-ROM drive.3.If the Welcome to Windows 98 screen appears, click thex in the upper-right corner of the screen to close it andcontinue with the installation.4.Click the Start button, and then click Run.5.In the Run dialog box, type [ ?DXGLR?VHWXS H[H,where is the CD-ROM or DVD-ROM drive letter.The CD-ROM or DVD-ROM drive letter is usually D.6.Click OK.7.At the Welcome screen, click Next>.8.At the Main Menu, the Upgrade Drivers radio button isselected. Click Next>.The audio files are copied to your hard-disk drive.1-4Dell Inspiron 7000 Series — Installing Drivers and Utilities9.When prompted, be sure that the Y es, I want to restartmy computer now radio button is selected, and then click Finish.After Windows 98 restarts, the Add New HardwareWizard window appears.10.Click Next>.11.At the next screen, be sure that the Search for the bestdriver for your device (Recommended) radio button isselected, and then click Next>.12.When the Add New Hardware Wizard window appears,deselect Floppy Disk Drives and select Specify aLocation.13.Type G ?DXGLR in the Path Location field and then clickNext>.14.When the driver has been detected, click Next>.Messages that indicate that files are being copied anddriver information is being built appear on your screen.Dell Inspiron 7000 Series — Installing Drivers and Utilities1-515.When prompted, click Finish.The New Hardware Found window appears, the driver isinstalled, and the installation is completed.,QVWDOOLQJ WKH9LGHR'ULYHUThe video driver controls features such as video resolution andcolor palette.NOTE: If you need to use extended video modes, check the Array documentation that accompanied the application program todetermine if the driver is provided. If it is not, contact thesoftware manufacturer to get the necessary driver.To install the video driver, perform the following steps:1.Save your work in all open application programs.2.Insert the Dell Inspiron 7000 Series System Software CDinto the CD-ROM or DVD-ROM drive.3.If the Welcome to Windows 98 screen appears, click thex in the upper-right corner of the screen to close it andcontinue with the installation.1-6Dell Inspiron 7000 Series — Installing Drivers and Utilities4.Click the Start button, and then click Run.5.In the Run dialog box, type ,where is the CD-ROM or DVD-ROM drive.The CD-ROM or DVD-ROM drive letter is usually D.6.Click OK.The system restarts automatically.NOTE: After the system restarts, you may change the video Arrayresolution.,QVWDOOLQJ WKH7RXFKSD G'ULYHUThe touchpad driver controls features such as touchpad and mouse functions, scrolling, touch features, and sensitivity.To install the touchpad driver, perform the following steps:1.Save your work in all open application programs.2.Insert the Dell Inspiron 7000 Series System Software CDinto the CD-ROM or DVD-ROM drive.Dell Inspiron 7000 Series — Installing Drivers and Utilities1-73.If the Welcome to Windows 98 screen appears, click thex in the upper-right corner of the screen to close it andcontinue with the installation.4.Click the Start button, and then click Run.5.In the Run dialog box, type [ ?WRXFKSDG?VHWXS H[H,where is the CD-ROM or DVD-ROM drive letter.The CD-ROM or DVD-ROM drive letter is usually D.6.Click OK.7.At the Welcome screen, click Next>.At the Choose Destination Location window, clickNext>.8.At the Start Copying Files window, click Next>.The touchpad files are copied to your hard-disk drive.1-8Dell Inspiron 7000 Series — Installing Drivers and Utilities9.At the Setup Complete window, be sure that the Y es, Iwant to restart my computer now radio button isselected, and then click Finish.The Information about your T ouchPad window appears.If you do no want this window to appear each time youstart the computer, uncheck the box that says Show this message the next time Windows starts. Then clickClose.,QVWDOOLQJ WKH,QWHUQDO0RGHP'ULYHU 2SWLRQDO NOTE: The internal modem is not available in some regions. ArrayThe modem driver allows you to customize the operation of the optional internal modem.If your computer has an internal modem, perform the following steps to install the driver:1.Save your work in all open application programs.2.Insert the Dell Inspiron 7000 Series System Software CDinto the CD-ROM or DVD-ROM drive.Dell Inspiron 7000 Series — Installing Drivers and Utilities1-93.If the Welcome to Windows 98 screen appears, click thex in the upper-right corner of the screen to close it andcontinue with the installation.4.Click the Start button, and then click Run.5.In the Run dialog box, type ,where is the CD-ROM or DVD-ROM drive letter.The CD-ROM or DVD-ROM drive letter is usually D.6.Click OK.7.At the Welcome Screen, click Next>.The internal modem files are copied to your hard-disk drive.8.At the Setup Complete window, be sure that the Y es, Iwant to restart my computer now radio button isselected, and then click Finish.1-10Dell Inspiron 7000 Series — Installing Drivers and Utilities,QVWDOOLQJ'9''HFRGHU'ULYHUVThe DVD decoder driver allows you to play DVD movies on the computer.If you use a DVD-ROM drive in your computer, perform the fol-lowing steps to determine which driver to install.NOTE: Do not install a DVD decoder driver if you do not have a ArrayDVD-ROM drive.1.Save and close all open files, shut down the computer, andinstall a DVD-ROM drive in the media bay of the computer.2.Restart your computer.3.Press <F2> at the Dell logo screen.The Main menu of the Setup program appears.4.Press the right-arrow key to select the System Devicesmenu.If the Internal MPEG II option appears on the SystemDevices menu, make sure the option is enabled. Thenpress <F10> to exit the Setup program. Proceed to theDell Inspiron 7000 Series — Installing Drivers and Utilities1-11next subsection, “Installing the Hardware DVD DecoderDriver.”If the Internal MPEG II option does not appear on theSystem Devices menu, see the section on installing thesoftware DVD decoder driver in the document titledInstalling a DVD-ROM Drive and Software DVD DecoderDriver that accompanied your Dell Inspiron 7000 SeriesSystem Software CD.,QVWDOOLQJ WKH+DUGZDUH'9''HFRGHU'ULYHUTo install the hardware DVD decoder driver, perform the followingsteps:1.If the Welcome to Windows 98 screen appears, click thex in the upper-right corner of the screen to close it andcontinue with the installation.2.Insert the Dell Inspiron 7000 Series System Software CDinto the DVD-ROM drive.3.Click the Start button, and then click Run.1-12Dell Inspiron 7000 Series — Installing Drivers and UtilitiesDell Inspiron 7000 Series — Installing Drivers and Utilities 1-134.In the Run dialog box, type [ ?KZGYG?VHWXS H[H , where is the DVD-ROM drive letter.The DVD-ROM drive letter is usually D.5.Click OK .6.The Welcome window appears. Click Next>.7.The Software License Agreement window appears. Click Y es to accept the terms of the agreement.8.At the Choose Destination Location screen, click Next>.9.At the Start Copying Files screen, click Next>.10.At the Setup Complete screen, be sure that the Y es, Iwant to restart my computer now radio button isselected, and then click Finish .The first time you play a DVD after installing this driver, you may be prompted to change the region setting.NOTE: To play Movie Pictures Experts Group (MPEG)-2 clips, you must install Microsoft DirectX ® 6.X and MediaPlayer 6.X. Y ou can download this file at/directx and/windows/mediaplayer.,QVWDOOLQJ6RIWH[%D\0DQDJHU6RIWZDUHThe Softex BayManager software allows you to remove and installdevices without turning off your system. T o install BayManager,perform the following steps:1.Insert the Dell Inspiron 7000 Series System Software CDinto the CD-ROM or DVD-ROM drive.2.Double-click the My Computer icon, and then double-clickthe CD-ROM or DVD-ROM icon.3.Double-click the BayMgr folder.4.Double-click setup.exe.5.At the Welcome screen, click Next.An InstallShield message indicates that the files are beingcopied.1-14Dell Inspiron 7000 Series — Installing Drivers and Utilities6.At the Setup Complete window, click Y es, I want torestart my computer now, and click Finish.The system restarts.7.Remove the Dell Inspiron 7000 Series System SoftwareCD from the drive.After your computer restarts, a BayManager icon appears in the icon tray at the right of the taskbar.&UHDWLQJ WKH6DYH WR 'LVN6XVSHQG)LOHAfter you have installed a new hard-disk drive or rebuilt a hard-disk drive that had corrupted software, use the phdisk.exe utility to create a save-to-disk suspend file. When save-to-disk suspend mode is activated, all system data is stored in this file.To create the save-to-disk suspend file, perform the following steps:1.Save and exit any open application programs and restartthe computer.Dell Inspiron 7000 Series — Installing Drivers and Utilities1-152.Insert the Microsoft Boot Disk Windows 98 Series disketteinto the diskette drive.3.When the Microsoft Windows 98 Startup Menu appears,press the down-arrow key to select 2. Start computerwith CD-ROM support and press <Enter>.4.When the $ ?!prompt appears on the screen, insert theDell Inspiron 7000 Series System Software CD into yourCD-ROM or DVD-ROM drive.5.At the $ ?! prompt, type where is the drive letterfor your CD-ROM or DVD-ROM drive, and press <Enter>.The CD-ROM or DVD-ROM drive letter is usually D.6.Type FG?XWLOLW\?SKGLVN and press <Enter>.7.Type SKGLVN FUHDWH ILOH and press <Enter>.NOTE: Make sure you insert a space before the slashes. Array The utility calculates the size of the file in kilobytes (KB),based on the amount of system memory in your computer,and adds 2 megabytes (MB) to handle video memory andadditional system requirements.1-16Dell Inspiron 7000 Series — Installing Drivers and Utilities8.Follow the instructions on your screen to create thesave-to-disk suspend file.To check the size of the save-to-disk suspend file, typeat the MS-DOS® prompt and press <Enter>.To delete the save-to-disk suspend file, typeand press <Enter>.9.Remove the Microsoft Boot Disk Windows 98 Seriesdiskette, and press <Ctrl><Alt><Del> to restart thesystem.,QVWDOOLQJ WKH6\VWHP+HOSThe Dell Inspiron system Help is available on the Dell Inspiron 7000 Series System Software CD. Y ou can also access it from Dell’s support Web site ().Dell Inspiron 7000 Series — Installing Drivers and Utilities1-171-18 Dell Inspiron 7000 Series — Installing Drivers and Utilities,QVWDOOLQJ +HOS )URP WKH &'To install the system Help file from the Dell Inspiron 7000 Series System Software CD, perform the following steps.NOTE: Y ou must copy the popup.ocx file into the Windows registry; otherwise, error messages may appear.1.Insert the CD into the CD-ROM or DVD-ROM drive. 2.Double-click the My Computer icon, and then double-click the CD-ROM or DVD-ROM drive icon. 3.Double-click the Utility folder, and then double-click the Guide folder.4.Right-click the popup.ocx file, and then right-click Copy .5.Double-click the My Computer icon, and then double-click the C: drive icon. 6.Double-click the Windows folder, then double-click the System folder, and then right-click Paste .7.Click Start , and then click Run .8.Typeand then press <Enter>.Dell Inspiron 7000 Series — Installing Drivers and Utilities 1-199.Click OK when a window indicates the file was success-fully registered.10.Double-click the My Computer icon, and then double-clickthe CD-ROM or DVD-ROM icon.11.Double-click the Utility folder, and then double-click theGuide folder.12.Right-click and hold Help_eng and drag it to the Windowsdesktop.NOTE: Select the appropriate language.13.Release the right mouse button.14.Left-click Copy Here .15.Double-click the Help_eng icon to access the system Help.'RZQORDGLQJ+HOS)URP WKH6XSSRUW:HE6LWHTo download the system Help from ,perform the following steps:1.Click Support Y our Dell.2.Type your system service tag sequence, if available, clickSubmit, and go to step 5.If the service tag is not available, go to step 3.3.Click Inspiron Notebooks.4.Click 7000.5.Under T echnical Information, click Documentation.Follow the instructions on the page to save the file to yourhard-disk drive.6.Click System Help.7.When prompted, you can save the Help file to your hard-disk drive.1-20Dell Inspiron 7000 Series — Installing Drivers and Utilities&RQWDFWLQJ'HOODell’s technical assistance Web site () provides driver and utility updates, as well as technical assistance with questions about your computer. In addition, if you have access to a computer with a modem and/or fax capabilities, you can access Dell’s T echConnect bulletin board service (BBS), Auto-Tech service, and T echFax service. Dell’s Web site also contains links to some of these services.Dell regularly tests and officially releases new drivers and utilities for Inspiron computers. A list of the latest drivers and utilities is available at .Dell Inspiron 7000 Series — Installing Drivers and Utilities1-211-22Dell Inspiron 7000 Series — Installing Drivers and UtilitiesZZZ GHOO FRP3 1 &5HY $。
戴尔电脑使用说明书.pdf_1700873770.5107439
Locate Dell apps in Windows 8.1 Mencari Lokasi aplikasi Dell di Windows 8.1 Windows 8.1 يف Dell تاقيبطت ناكم ددحRegister My Device Register your computer Daftarkan komputer Anda رتويبمكلا ليجستDell Backup and Recovery Backup, recover, repair, or restore your computer Cadangkan, kembalikan ke kondisi normal, perbaiki, atau pulihkan komputer Andaكب صاخلا رتويبمكلل ةداعتسلاا وأ حلاصلإا وأ دادرتسلاا وأ يطايتحلاا خسنلاDell Data Protection | Protected WorkspaceProtect your computer and data from advanced malware attacksLindungi komputer dan data Anda dari serangan malware canggihةمدقتملا ةراضلا جماربلا تامجه نم تانايبلاو رتويبمكلا ةيامحDellSupportAssistCheck and update your computerPeriksa dan perbarui komputer Andaهثيدحتو كب صاخلا رتويبمكلا نم ققحتلا1Connect the power adapter andpress the power buttonSambungkan adaptor daya dan tekan tombol dayaليغشتلا رز ىلع طغضلاو رايتلا ئياهم ليصوت2Finish operating system setupTuntaskan penataan sistem operasiليغشتلا ماظن دادعإ ءاهنإEnable security and updatesAktifkan keamanan dan pembaruanتاثيدحتلاو ناملأا نيكمتConnect to your networkSambungkan ke jaringan Andaةكبشلاب ليصوتلاNOTE: If you are connecting to a secured wireless network, enter the password for thewireless network access when prompted.CATATAN: Jika Anda menghubungkan ke jaringan nirkabel aman, masukkan kata sandiuntuk akses jaringan nirkabel tersebut saat diminta..كتبلاطم دنع ةيكلسلالا ةكبشلا لوصول رورملا ةملك لخدأ ،ةنمؤم ةيكلسلا ةكبشب كلاصتا ةلاح يفSign in to your Microsoft accountor create a local accountMasuk ke akun Microsoft Anda atau buatakun lokalءاشنإب مق وأ Microsoft باسح ىلإ لوخدلا ليجست بمقيلحم باسحWindows 8.1Set up password for WindowsAtur kata sandi untuk WindowsWindows ماظنل رورملا ةملك دادعإConnect to your networkSambungkan ke jaringan Andaةكبشلاب ليصوتلاwireless network access when prompted.Jika Anda menghubungkan ke jaringan nirkabel aman, masukkan kata sandiuntuk akses jaringan nirkabel tersebut saat diminta..كتبلاطم دنع ةيكلسلالا ةكبشلا لوصول رورملا ةملك لخدأ ،ةنمؤم ةيكلسلا ةكبشب كلاصتا ةلاح يفProtect your computerLindungi komputer Andaرتويبمكلا ةيامحWindows 7UbuntuFollow the instructions on the screen to finish setup.Ikuti petunjuk pada layar untuk menyelesaikan pengaturan..دادعلإا ةيلمع ءاهنلإ ةشاشلا ىلع رهظت يتلا تاداشرلإا عبتاFeaturesFitur | تازيملا1. Microphone2. Camera3. Camera-status light4. Microphone5. Security-cable slot6. Power button7. USB 3.0 connector8. Power-status light9. Wireless-status light 10. Battery-status light 11. Hard-drive activity light 12. Headset connector 13. SD-card reader14. Speakers15. Touchpad16. USB 3.0 connector 17. Mini DisplayPort connector 18. HDMI connector 19. RJ45 connector 20. Power connector 21. Network-status Light1. Mikrofon2. Kamera3. Lampu status kamera4. Mikrofon5. Slot kabel pengaman6. Tombol daya7. Konektor USB 3.08. Lampu status daya9. Lampu status nirkabel 10. Lampu status baterai 11. Lampu aktivitas hard disk 12. Konektor headset 13. Pembaca kartu SD 14. Speaker15. Panel sentuh 16. Konektor USB 3.017. Konektor mini DisplayPort 18. Konektor HDMI 19. Konektor RJ4520. Konektor daya 21. Lampu status jaringan1 .نوفوركيملا2.اريماكلا3.اريماكلا ةلاح حابصم4 .نوفوركيملا5 .ناملأا لبك ةحتف6 .ليغشتلا رز7 .USB 3.0 لصوم8.ةقاطلا ةلاح حابصم9.يكلسلالا لاصتلاا ةلاح حابصم10.ةيراطبلا ةلاح حابصم11.ةتباثلا صارقلأا كرحم طاشن حابصم12 .سأرلا ةعامس لصوم13.SD ةقاطب ئراق14.تاعامسلا15 .سمللا ةحول16.USB 3.0 لصوم17.رغصملا DisplayPort لصوم18 .HDMI لصوم19 .RJ45 لصوم20 .رايتلا لصوم21.ةكبشلا ةلاح حابصمPrinted in China.2015-08Product support and manuals Manual dan dukungan produk لئلادلاو جتنملا معد/support/support/manuals /support/windows /support/linuxContact DellH ubungi Dell | D ell ـب لاصتلاا/contactdellRegulatory and safetyRegulasi dan keselamatan | ةيميظنتلا تاسرامملاو ناملأا تاسرامم/regulatory_compliance Regulatory modelModel regulatori | يميظنتلا ليدوملاP47G Regulatory typeJenis regulatori | يميظنتلا عونلاP47G002Computer modelModel komputer | رتويبمكلا ليدومLatitude -3350© 2015 Microsoft Corporation.© 2015 Canonical Ltd.。
戴尔电脑说明书.pdf_1700419794.0447388
PS/2
3
USB
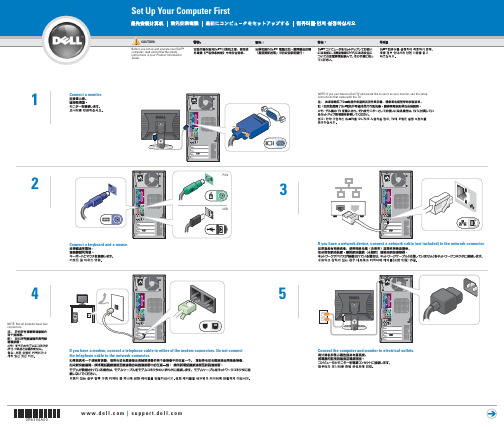
If you have a network device, connect a network cable (not included) to the network connector.
4
NOTE: Not all modems have two connectors.
If you have a modem, connect a telephone cable to either of the modem connectors. Do not connect the telephone cable to the network connector.
For additional information about your computer, click the Start button and click Help and Support:
• To access the Dimension™ Help file, click User and system guides, click User's guides, and then click Dell Dimension Help.
If your integrated sound connectors are covered by a cap, connect your speakers to the optional sound-card connectors. Do not remove the cap.
integrated sound
• For help with the Windows operating system, click Microsoft Windows XP Tips.
戴尔笔记本电脑说明书.pdf_1701115644.4817057
正面视图左侧视图右侧视图背面视图底部视图1 显示屏7 扬声器(2)2 电源按钮8 定点杆/触摸板按钮3 设备状态指示灯9 定点杆4 键盘10 音量控制按钮5 触摸板11 静音按钮6 显示屏闩锁12 键盘和无线状态指示灯在计算机打开时亮起,在计算机处于电源管理模式时闪烁。
在计算机读取或写入数据时亮起。
注意:为避免数据丢失,切勿在 指示灯闪烁时关闭计算机电源。
如果计算机已连接至电源插座,则 指示灯的状态包括:如果计算机使用电池电量运行,则 指示灯的状态包括:键盘上方的绿色指示灯表示以下信息:启用数字小键盘时亮起。
启用无线设备时亮起。
启用大写字母功能时亮起。
蓝牙无线技术是计算机上的可选功能,因此仅当您随计算机一起订购了蓝牙无线技术,系统才会显示 图标。
有关详情,请参阅蓝牙无线技术附带的说明文件。
1 安全缆线孔 4 PC 卡插槽2 音频连接器(2) 5 智能卡插槽3 红外线传感器注:计算机在变热时会打开风扇。
风扇噪音是正常现象,并不表示风扇或计算机有问题。
连接器用于连接耳机或扬声器。
连接器用于连接麦克风。
右侧视图1 网络连接器 (RJ-45) 6 串行连接器视频连接器交流适配器将交流电源转换为计算机所需的直流电源。
无论计算机处于打开或关闭状态,您均可以连接交流适配器。
警告:此交流适配器可以与世界各地的电源插座配合使用。
但是,电源连接器和配电电盘或电源插座可能会引起火灾或损坏设备。
注意:从计算机上断开交流适配器电缆的连接时,请握住连接器(而不是电缆本身),并稳而轻地将其拔出,以免损坏电缆。
1 内存模块护盖 5 对接设备插槽2 电池槽释放闩锁 6 风扇3 电池电量表7 小型 PCI 卡/调制解调器护盖4 电池8 硬盘驱动器内存模块护盖—用于保护安装内存模块的凹槽。
请参阅“添加和更换部件返回目录页面附录Dell Precision™ M20 移动工作站用户指南Macrovision 产品通告Macrovision 产品通告本产品采用了版权保护技术,它通过申请属于 Macrovision Corporation 和其他产权所有者的美国专利权以及其它知识产权来进行保护。
- 1、下载文档前请自行甄别文档内容的完整性,平台不提供额外的编辑、内容补充、找答案等附加服务。
- 2、"仅部分预览"的文档,不可在线预览部分如存在完整性等问题,可反馈申请退款(可完整预览的文档不适用该条件!)。
- 3、如文档侵犯您的权益,请联系客服反馈,我们会尽快为您处理(人工客服工作时间:9:00-18:30)。
取出电池. . . . . . . . . . . . . . . . . . . . . . . . . . . . . . 13 装回电池. . . . . . . . . . . . . . . . . . . . . . . . . . . . . . 13
Dell Inspiron 15R 用户手册
计算机型号:Inspiron 5520/7520 管制型号:P25F 管制类型:P25F001
注、小心和警告
注:“注”表示可以帮助您更好地使用计算机的重要信息。 小心:“小心”表示如果不遵循说明,就有可能损坏硬件或导致数据丢失。 警告:“警告”表示可能会造成财产损失、人身伤害甚至死亡。
5 键盘 15 . . . . . . . . . .. . . . .
卸下键盘. . . . . . . . . . . . . . . . . . . . . . . . . . . . . . 15 装回键盘. . . . . . . . . . . . . . . . . . . . . . . . . . . . . . 16
17 币形电池 . . . . . . . . . . . . . . . . . . . . . . . . . . . . . . 57
取出币形电池. . . . . . . . . . . . . . . . . . . . . . . . . . . 57 装回币形电池. . . . . . . . . . . . . . . . . . . . . . . . . . . 59
20 子板 67 . . . . . . . . . . . . . . . . . . . . . . . . . . . . . . . . . .
卸下子板. . . . . . . . . . . . . . . . . . . . . . . . . . . . . . 67 装回子板. . . . . . . . . . . . . . . . . . . . . . . . . . . . . . 69
6 基座盖 17 . . . . . . . . . . . . . . . . . . . . . . . . . . . . . . . .
卸下基座盖 . . . . . . . . . . . . . . . . . . . . . . . . . . . . 17 装回基座盖 . . . . . . . . . . . . . . . . . . . . . . . . . . . . 18
4 | 目录
18 扬声器 61 . . . . . . . . . . . . . . . . . . . . . . . . . . . . . . . .
卸下扬声器 . . . . . . . . . . . . . . . . . . . . . . . . . . . . 61 装回扬声器 . . . . . . . . . . . . . . . . . . . . . . . . . . . . 62
19 读卡器 63 . . . . . . . . . . . . . . . . . . . . . . . . . . . . . . . .
卸下读卡器 . . . . . . . . . . . . . . . . . . . . . . . . . . . . 63 装回读卡器 . . . . . . . . . . . . . . . . . . . . . . . . . . . . 65
21 小型插卡 . . . . . . . . . . . . . . . . . . . . . . . . . . . . . . 71
卸下小型插卡. . . . . . . . . . . . . . . . . . . . . . . . . . . 71 装回小型插卡. . . . . . . . . . . . . . . . . . . . . . . . . . . 72
11 电源适配器端口 . . . . . . . . . . . . . . . . . . . . . . . . . 29
卸下电源适配器端口 . . . . . . . . . . . . . . . . . . . . . . 29 装回电源适配器端口 . . . . . . . . . . . . . . . . . . . . . . 30
9 光盘驱动器 23 . . . . . . . . . . . . . . . . . . . . . . . . . . . . .
卸下光盘驱动器 . . . . . . . . . . . . . . . . . . . . . . . . . 23 装回光盘驱动器 . . . . . . . . . . . . . . . . . . . . . . . . . 24
2 拆装计算机内部组件之后 . . . . . . . . . . . . . . . . . . . 9 3 SWITCH . . . . . . . . . . . . . . . . . . . . . . . . . . . . . . . 11
卸下 SWITCH . . . . . . . . . . . . . . . . . . . . . . . . . . 11 装回 SWITCH . . . . . . . . . . . . . . . . . . . . . . . . . . 12
12 显示屏部件 . . . . . . . . . . . . . . . . . . . . . . . . . . . . . 31
卸下显示屏部件 . . . . . . . . . . . . . . . . . . . . . . . . . 31 装回显示屏部件 . . . . . . . . . . . . . . . . . . . . . . . . . 33 卸下显示屏挡板 . . . . . . . . . . . . . . . . . . . . . . . . . 33 装回显示屏挡板 . . . . . . . . . . . . . . . . . . . . . . . . . 34 卸下铰接帽 . . . . . . . . . . . . . . . . . . . . . . . . . . . . 35 装回铰接帽 . . . . . . . . . . . . . . . . . . . . . . . . . . . . 36 卸下显示屏面板 . . . . . . . . . . . . . . . . . . . . . . . . . 36 装回显示屏面板 . . . . . . . . . . . . . . . . . . . . . . . . . 39
13 摄像头模块 . . . . . . . . . . . . . . . . . . . . . . . . . . . . . 41
卸下摄像头模块 . . . . . . . . . . . . . . . . . . . . . . . . . 41 装回摄像头模块 . . . . . . . . . . . . . . . . . . . . . . . . . 43
16 处理器 53 . . . . . . . . . . . . . . . . . . . . . . . . . . . . . . . .
卸下处理器 . . . . . . . . . . . . . . . . . . . . . . . . . . . . 53 装回处理器 . . . . . . . . . . . . . . . . . . . . . . . . . . . . 55
关闭计算机及其连接的设备 . . . . . . . . . . . . . . . . . . 7 安全说明. . . . . . . . . . . . . . . . . . . . . . . . . . . . . . . 7 建议工具. . . . . . . . . . . . . . . . . . . . . . . . . . . . . . . 8
8 硬盘驱动器 21 . . . . . . . . . . . . . . . . . . . . . . . . . . . . .
卸下硬盘驱动器 . . . . . . . . . . . . . . . . . . . . . . . . . 21 装回硬盘驱动器 . . . . . . . . . . . . . . . . . . . . . . . . . 22
本说明文件中可能使用其他商标和商品名称来指拥有相应标记和名称的公司或其产品。 Dell Inc. 对不属于自己的商标和商品名称不拥有任何所有权。
2012 年 4 月
Rev. A01
目录
1 开始之前 7 . . . . . . . . . . . . . . . . . . . . . . . . . . . . . . .
目录 | 3
10 掌垫 25 . . . . . . . . . . . . . . . . . . . . . . . . . . . . . . . . . .
卸下掌垫. . . . . . . . . . . . . . . . . . . . . . . . . . . . . . 25 装回掌垫. . . . . . . . . . . . . . . . . . . . . . . . . . . . . . 28
14 系统板 45 . . . . . . . . . . . . . . . . . . . . . . . . . . . . . . . .
卸下系统板 . . . . . . . . . . . . . . . . . . . . . . . . . . . . 45 装回系统板 . . . . . . . . . . . . . . . . . . . . . . . . . . . . 48 在 BIOS 中输入服务标签 . . . . . . . . . . . . . . . . . . . 49