奔驰G clasd儿童电动车说明书
奔驰GL350中文使用手册

奔驰GL350中文使用手册符号*选装装备G警告H环保说明!可能损坏车辆i提示̈操作要求̈操作顺序(数个̈)୴୴续页符号୴୴警告信息续页符号୴页参考页->技术术语表中的术语Display多功能显示器中的显示内容Internal use only仅供内部使用感谢您选择了梅赛德斯-奔驰。
在第一次驾驶前,请先熟悉您的车辆,并仔细阅读本用户手册。
这样做不仅可以确保获得最大的驾驶乐趣,而且也有利于您与他人的安全。
本手册中的选装装备均以星号*标出。
您的车辆的装备可能会由于车型、国家规范以及适用性等原因而与手册描述有所不同。
梅赛德斯-奔驰一直致力于制造技术最先进的汽车,因此我们将保留随时更改设计、装备及技术工艺的权利。
所以,任何以本用户手册中的数据、图示或文字描述为依据的索赔要求将不予接受。
用户手册、保养小册及特许服务中心名录也是汽车的组成部分。
为此,这些资料应随车携带,在出售此车时,请将它们一同转让。
如有问题,请咨询梅赛德斯-奔驰特许服务中心。
戴姆勒·克莱斯勒技术资料组预祝您旅途安全、愉快。
i 您还可以访问以下网页,通过交互式用户手册(德文或英文)在互联网上体验GL级的主要功能:www.mercedes-benz.de/betriebsanleitungInternal use only仅供内部使用i 请参见索引(୴第487Internal use only 仅供内部使用环境保护H 环保说明戴姆勒·克莱斯勒的公开政策是一种综合性环境保护。
在人类赖以生存的地球上,自然资源是有限的,而戴姆勒·克莱斯勒环保政策的目标便是尽可能地节约使用这些资源,同时顾及大自然和人类的需求。
如果能够以对环保负责的态度驾驶梅赛德斯-奔驰汽车,您同样也可以为保护环境作出贡献:燃油消耗量和发动机、变速箱、制动器及轮胎的磨损速度均取决于以下两个因素:ț车辆的工作状态ț个人驾驶方式作为驾驶员,您可以控制这两个因素。
iZi Go Modular 宝宝车座用户手册说明书
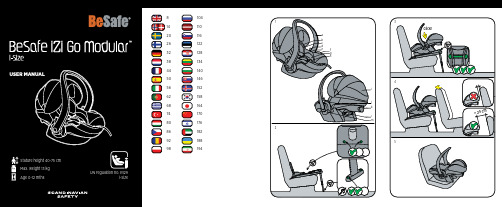
• The harness straps must always be locked when the child is in the seat.
• Do not use any aggressive cleaning products; these may harm the construction material of the seat.
• BeSafe advises that child seats should not be bought or sold second-hand.
when the child is older than 3 months or if the head is not fitting anymore. These reducers can be removed by opening the velcro on the back of the head rests. • Remove the baby cushion (bottom part) when the child is taller then 60 cm, or over 4 months. • Remove the baby cushion (bottom part) and body hugger (upper part) when the child is taller than 65 cm, or over 6 months. • After an accident, the seat must be replaced. Although it may look undamaged, if you were to have another accident, the seat may not be able to protect your child to the level to which it was designed. • Prevent the seat from becoming trapped or weighed down by luggage, seats and/or slamming doors. • Make sure you can fit no more than one finger between the harness and your child (1 cm). • DO NOT attempt to dismantle, modify or add any part to the seat. Warranty will be void if non-original parts or accessories are used. • Never leave your child unattended in the seat. • Make sure all passengers are informed about how to release your child in case of emergency.
Advocate_70_G3中文说明书

保护您的孩子............................................................................33
座椅部件...........................................................................................................10
座椅功能...........................................................................................................12 Click & Safe® 安全带技术.......................................................................12 HUGS™ 吸能式缝纫.12 调整儿童安全座椅安全带高度..................................................................13 调节儿童安全座椅安全带锁扣的位置.13 扣紧儿童安全座椅安全带锁扣..................................................................14 松开儿童安全座椅安全带锁扣.14 胸部搭扣的使用 ...........................................................................................14 Lock-Offs锁扣的使用.14 初生儿衬枕.15 倾斜角度.15 连接锁扣和锚点栓绳的使用(LATCH系统) .....................................16 LATCH 连接锁扣的使用.............................................................................17 关于Versa-Tether技术®的吸能式锚点栓绳.......................................17
好来好来喜帕加尼儿童电动车功能说明

好来好来喜帕加尼儿童电动车功能说明好来好来喜帕加尼儿童电动车是一款专为儿童设计的电动车,具有多种功能,能够满足孩子们的各种需求。
以下将详细介绍好来好来喜帕加尼儿童电动车的功能说明。
外观设计好来好来喜帕加尼儿童电动车采用了时尚、简约、可爱的外观设计,车身造型仿照了著名跑车品牌Pagani的经典款式,颜色鲜艳,线条流畅。
整个车身采用高强度ABS塑料材质制作而成,坚固耐用,不易损坏。
驾驶方式好来好来喜帕加尼儿童电动车可以通过踏板控制前进和倒退,也可以通过遥控器进行遥控操作。
遥控器拥有前进、后退、左转、右转等多种功能按钮,可以方便地对车辆进行遥控操作。
当孩子自己驾驶时,家长也可以通过遥控器对其进行监管和干预。
安全保障好来好来喜帕加尼儿童电动车配备了多项安全保障措施,保证孩子的行车安全。
首先是电子刹车系统,当孩子松开踏板时,车辆会自动停止前进。
其次是安全带,可以将孩子固定在座位上,防止意外摔落。
另外还配备了防侧翻系统和防撞杆,保护孩子的人身安全。
音乐娱乐好来好来喜帕加尼儿童电动车内置多种音乐和故事资源,可以通过按键或遥控器进行选择和播放。
音乐和故事资源丰富多彩,可以让孩子在驾驶过程中享受到更多的乐趣。
灯光效果好来好来喜帕加尼儿童电动车配备了多种灯光效果,包括前大灯、后尾灯、转向灯等。
这些灯光效果不仅美观实用,还能提高行车安全性。
电池续航好来好来喜帕加尼儿童电动车采用高品质锂电池供电,续航能力强。
一次充电可以支持长时间使用,并且充电时间较短。
适用年龄好来好来喜帕加尼儿童电动车适用于3-8岁的儿童,最大承载重量为30公斤。
车辆大小适中,可以满足孩子们的驾驶需求。
总结好来好来喜帕加尼儿童电动车是一款功能丰富、安全可靠、外观时尚的电动车,适合3-8岁的儿童使用。
它采用高品质材料制作而成,具有多种驾驶方式和安全保障措施,可以让孩子在驾驶过程中享受到更多的乐趣。
同时,它还配备了多种音乐和故事资源以及灯光效果,能够提高孩子们的娱乐体验。
梅赛德斯-奔驰CLA 200 Urban车型说明书

Driver Passenger SIDE IMPACT CAR8 ptsCarPole3,3 ptsSIDE IMPACT POLE6,5 ptsREAR IMPACT (WHIPLASH)Mercedes-Benz CLA-ClassMercedes-Benz CLA 200 “Urban”91%75%74%81% FRONTAL IMPACT15,2 pts FRONTAL IMPACTHEADDriver airbag contact stablePassenger airbag contact stableHead protection airbag YesChest protection airbag YesSIDE IMPACTPassenger compartment stableWindscreen Pillar rearward noneCHESTSteering wheel rearward noneSteering wheel upward noneChest contact with steeringwheelnoneStiff structures in dashboard noneConcentrated loads on knees noneUPPER LEGS, KNEES AND PELVISLOWER LEGS AND FEETRearward pedal movement Brake - 9.8mmUpward pedal movement noneFootwell Collapse noneSeat description Standard (Artico), 6 way manualHead restraint type PassiveWHIPLASHGeometric assessment 1 ptsTESTS- High severity2,3 pts- Medium severity2,4 pts- Low severity2,5 ptsGOODADEQUATEMARGINALWEAKPOORFRONTAL IMPACT18 MONTH OLD CHILD3 YEAR OLD CHILDRestraint Facing InstallationRömer BabySafe Plus rearward facing Adult seatbeltRestraint Facing InstallationRömer Duo Plus forward facing ISOFIX and TopTetherPERFORMANCEPERFORMANCE12 pts9,8 ptsHead forward movement protected Head acceleration good Chest loadgoodHead containment protected Head accelerationgoodSIDE IMPACTFRONTAL IMPACTHead forward movement protected Head acceleration good Chest loadfairHead containment protected Head accelerationgoodSIDE IMPACTCRASH TEST PERFORMANCECHILD SAFETY FEATURES AND CRS INSTALLATION CHECKIsofixSafety features score 4 pts Installation check score 11 ptsFail Safety critical problem Pass Install without problem Partial Fail Install with care ExemptInstallation not allowedSpeed Assistance (Manual)PassSpeed InformationNOT ASSESSED 1,3 pts3 pts3 ptsSPEED ASSISTANCE SYSTEMELECTRONIC STABILITY CONTROL (ESC)- driver and passenger Pass - rearPassSEATBELT REMINDERHEAD 17 pts PELVIS 4 pts LEG6 pts- ESPStandardPass GOOD ADEQUATE MARGINAL WEAK POORLateral displacement (1.07s)3,12m Yaw rate ratio (1.75s)3,52%Yaw rate ratio (1.00s)11,63%Electronic stability control is standard on the CLA, and met Euro NCAP's test requirements. A seatbelt remindersystem covers the front and rear seats while a driver-set speed limitation met the test requirements for such devices.PedestrianSafety assistThe CLA is equipped with an active bonnet. Sensors detect when a pedestrian has been struck and automatically raise the bonnet to provide greater clearance to the hard structures beneath. Mercedes-Benz showed that thesystem triggered robustly over a range of speeds and for different statures of pedestrians, so the car was tested with the system deployed. As a result, protection of the head is good over most of the bonnet surface. The protection of pedestrians' legs by the bumper is also good. The front edge of the bonnet also provided predominantly goodprotection to the pelvis region.Adult occupantChild occupantBased on dummy readings in the dynamic tests, the CLA scored maximum points for its protection of the 1½ year infant. Forward movement of the 3 year dummy, sat in a forward-facing restraint, was not excessive but deceleration of the chest showed that protection of that dummy's chest was fair. Mercedes-Benz's 'CPOD' system is available as an option. The system automatically deactivates the front passenger airbag to allow suitably equipped Mercedes-Benz child seats to be used rearward-facing in that seating position. The system does not work with other child restraints and was not rewarded by Euro NCAP. The dangers of using a rearward-facing restraint in that seating position without first disabling the airbag were clearly explained in the vehicle. Mercedes will update the manual for the CLA to make clear which categories of child restraints are suitable for which seating positions, and the scorereflects this updated information. Earlier cars would have received the same star rating as the changes in the manual have only a small influence on the score.The passenger compartment remained stable in the frontal impact. Dummy data indicated good protection of the knees and femurs of both the driver and the front seat passenger. Mercedes-Benz provided data which showed that a similar level of protection would be provided to occupants of different sizes and to those sat in different positions. The CLA scored maximum points in the side impact barrier test, showing good protection of all body regions. In the more severe side pole impact, dummy readings of rib compression showed that protection of the chest was marginal. The front seats and head restraints provided good protection against whiplash injury in the event of a rear-end collision.SPECIFICATIONSMercedes-Benz CLA 200 “Urban”Tested model Body type4 door coupéYear of publication 2013VIN from which rating applies applies to all CLA-Class of thespecification tested1430kgKerb weightSAFETY EQUIPMENToutboard seatsFront seatbelt pretensioners Front seatbelt load limiters Driver frontal airbagSide body airbags Side head airbags Front passenger frontal airbag Driver knee airbagElectronic Stability Control Seatbelt ReminderSpeed Limitation Assistance。
孩智堡儿童电动车说明书
孩智堡儿童电动车说明书一、产品简介孩智堡儿童电动车是一款专为儿童设计的电动交通工具,适用于3岁以上的儿童。
它采用环保材料制造,外观可爱,操作简单,安全可靠,是孩子们出行、游玩的好伴侣。
二、产品特点1. 安全性能:孩智堡儿童电动车采用高强度材料制造,结构稳固,能够承受一定程度的碰撞。
同时,它配备了安全带和防护把手,有效保护孩子在行驶过程中的安全。
2. 电池续航:该电动车使用锂电池作为动力源,容量较大,续航能力强。
充满电后,能够行驶多达20公里,满足孩子们的日常使用需求。
3. 灵活操控:孩智堡儿童电动车配备了方向盘和脚踏板,方便孩子们进行转向和加速。
操作简单,孩子们能够轻松掌握。
4. 多功能设计:该电动车还具备多种功能设计,例如音乐播放和LED灯光效果,为孩子们的驾驶过程增添乐趣。
三、使用方法1. 充电:使用配套充电器将电动车连接电源插座,待充电灯亮起后,即可开始充电。
充电时间约为8小时,充满电后可进行使用。
2. 启动:将电源开关拨至ON档,踩下脚踏板,即可启动电动车。
在行驶过程中,通过方向盘控制转向。
3. 停止:将电源开关拨至OFF档,电动车即可停止。
停止后,及时断开充电器与电动车的连接,避免电池损坏。
4. 注意事项:a. 使用前,请确保电动车已充满电。
b. 在使用过程中,请勿超载,以免影响电动车的性能。
c. 在停放时,请将电源开关拨至OFF档,避免电池耗电。
d. 请勿在雨天或者潮湿环境下使用电动车,以免发生意外。
四、维护保养1. 定期检查:使用电动车前,请检查车身和轮胎是否完好,如有破损或异常情况,请及时修复或更换。
2. 清洁保养:定期清洁电动车的车身和轮胎,保持车辆清洁。
使用软布擦拭,避免使用腐蚀性物质。
3. 充电注意事项:请使用原配充电器进行充电,避免使用不当的充电器,以免引发安全隐患。
4. 存放方式:在长时间不使用电动车时,请将电源开关拨至OFF档,并将电动车存放在干燥通风的地方,避免阳光直射和潮湿环境。
奔驰GL350中文使用手册
奔驰GL350中文使用手册符号*选装装备G警告H环保说明!可能损坏车辆i提示̈操作要求̈操作顺序(数个̈)୴୴续页符号୴୴警告信息续页符号୴页参考页->技术术语表中的术语Display多功能显示器中的显示内容Internal use only仅供内部使用感谢您选择了梅赛德斯-奔驰。
在第一次驾驶前,请先熟悉您的车辆,并仔细阅读本用户手册。
这样做不仅可以确保获得最大的驾驶乐趣,而且也有利于您与他人的安全。
本手册中的选装装备均以星号*标出。
您的车辆的装备可能会由于车型、国家规范以及适用性等原因而与手册描述有所不同。
梅赛德斯-奔驰一直致力于制造技术最先进的汽车,因此我们将保留随时更改设计、装备及技术工艺的权利。
所以,任何以本用户手册中的数据、图示或文字描述为依据的索赔要求将不予接受。
用户手册、保养小册及特许服务中心名录也是汽车的组成部分。
为此,这些资料应随车携带,在出售此车时,请将它们一同转让。
如有问题,请咨询梅赛德斯-奔驰特许服务中心。
戴姆勒·克莱斯勒技术资料组预祝您旅途安全、愉快。
i 您还可以访问以下网页,通过交互式用户手册(德文或英文)在互联网上体验GL级的主要功能:www.mercedes-benz.de/betriebsanleitungInternal use only仅供内部使用i 请参见索引(୴第487Internal use only 仅供内部使用环境保护H 环保说明戴姆勒·克莱斯勒的公开政策是一种综合性环境保护。
在人类赖以生存的地球上,自然资源是有限的,而戴姆勒·克莱斯勒环保政策的目标便是尽可能地节约使用这些资源,同时顾及大自然和人类的需求。
如果能够以对环保负责的态度驾驶梅赛德斯-奔驰汽车,您同样也可以为保护环境作出贡献:燃油消耗量和发动机、变速箱、制动器及轮胎的磨损速度均取决于以下两个因素:ț车辆的工作状态ț个人驾驶方式作为驾驶员,您可以控制这两个因素。
Clam 114628 幼儿车舱说明书

Part #s : 114628Center Height: 82 inchesFoot Print: 96" x 168"Hub-to-Hub: 100 x 170 inchesWeight: 50 lbsInstruction #: 106339Please contact customer service directly at the E-mail or phone number listed below for any quality issues.ONCE USED THIS PRODUCT CANNOT BE RETURNED TO STORE.** Warranty cannot be honored without an original, dated receipt. **Customer Service Hours: Monday – Friday 9am – 4pm Central Standard TimePhone: 763-231-4120Email: ****************************IMPORTANT! Please read: This product is warrantied to the original retail purchaser (not transferable) to be free from manufacturer’s defects for one (1) year from the date of the original purchase. Warranty does not cover screen tears, tent tears, or broken or bent poles due to high wind, weather conditions or unattended use. The part will be replaced or repaired (manufacturer’s option) if found defective within the one (1) year time frame. Warranty will be void if product has been subject to neglect, misuse, improper installation, misapplication, alteration, or accident including, but not limited to, improper maintenance or use of unauthorized parts or attachments. Please read this entire owner’s manual to ensure proper installation, use, storage and care for your Clam shelter.To submit a warranty request , please use one of the following methods:∙Preferred Method - Visit under the “Customer Support” tab fill out the warrantyform.∙Email: ****************************∙Write: Clam Outdoors - Warranty Department12135 Brockton Lane N.Rogers, MN 55369Information needed to submit a warranty claim: Please include your full name, address, phone number, a copy of your receipt, a brief description of the problem, and pictures to clearly show the area(s) of concern. Clam’s warranty department will review your request and a Clam representative will contact you regarding your claim status. If instructed by the warranty department, all returns must be returned with postage prepaid.It is expressly understood that Clam Corporation ’s liability for its products, whether due to breach of warranty, negligence, strict liability, or otherwise, is limited to the repair of the product as stated above. Clam Corporation is not liable for any injury, loss, damage, or expense, whether direct or consequential, including but not limited to loss of use, income, profit, or damage to material arising in connection with the sale, installation, use of, inability to use, or the repair or replacement of Clam Corporation products. Clam Corporation reserves the right to make alterations or modifications in its products at any time, which in its opinion, may improve the performance and efficiency of the product. Clam shall not be obligated to make such alterations or modifications to products already in service.WARRANTY INFORMATIONLIMITATION OF LIABILITYCabin Screen TentPlease fully understand and follow all safetyinstructions outlined in this booklet. Failure todo so could result in severe injury .•Do not use open flame heatersin your screen tent.•Tent fabric will melt when contact ismade with hot surfaces (i.e.,heaters).•Use all external anchors duringexcessive wind conditions(15+mph)WARNING WARNING: KEEP ALL FLAME AND HEAT SOURCES AWAY FROM THIS TENT FABRIC MISE EN GARDE: TENIR LE TISSU DE CETTE TENTE LOIN DE TOUTE FLAMME ET DE TOUTE SOURCE DE CHALEUR This tent meets the flammability requirements of CPAI-84. This tent is made of flame-resistant fabric. It is not fireproof. The fabric will burn if left in continuous contact with a flame source. Cette tente répond aux exigences d'inflammabilité du CPAI-84. Cettetente est fabriquée d’un tissue resistant au fue, mais qui n’est pasinflammable. Ce tissue brûlera s'il est laissé en contact continu avecune source d’inflammation . Replacement parts can be ordered on-line at .IMPORTANT: When you first open your shelter, you will see the poles on the OUTSIDE of the shelter. Once set up, the poles should be on the INSIDE of the tent. Your screen tent is folded in half for storage. Only pull outward on the hub pull (loops) on the exterior of the tent. IMPORTANT: When setting up your shelter, poles should be on the INSIDE of the tent. Only pull outward on the hub pull (loops) on the exterior of the tent. No tools are needed for the setup of your screen tent.Please follow the directions carefully for proper set up and take down.Item #Qty. Part # Description 17105153Hub & Pole Kit 21 106357Removable Floor 32 104815 Door Support Pole 41 104671 Carry Bag 55 104173 Stake, Screen Hub 65 106340External anchor strap, Quickset 7 1 106339Instructions/Owner’s ManualSAFETY INSTRUCTIONSPARTS LISTSET UP INSTRUCTIONSStep 1: Unzip the storage bag completely and removethe shelter. Use care not to misplace the instructionsand the stake pouch. It is advised to store your stakesand pouch in the carry bag until they are needed.Step 2: Pick the tent up directly from the carry bag andlay it on the ground . (Photo 2)Step 3: With the screen tent lying down, grab a cornerof the tent on the opposite end from neoprene hubcovers that say "Quickset" and pull it back over the tenttowards the neoprene hub covers. This will expose oneor two of the outer walls and the webbed strap loop onthe hub assembly in the center of the side wall panel.(Photo 3 and 4)Step 4: With the poles on the inside, reach for thewebbed strap loop at the center of one wall and pulluntil the section pops out. Hold the roof line with theopposite hand. (Photo s 5 and 6)Step 5: Continue around the shelter repeating theprevious step until all wall panels are erect. This is a 6sided shelter. So there will be 5 walls that need to be"popped" open. The last wall is the door wall whichdoesn't have a hub or poles on it.Once all the walls are deployed, simply walk inside andpush up on the two roof hubs so they are popped up.(Photos 7 and 8)Photo 2Photo 3Photo 4Photo 5Photo 6Photo 7Photo 8SET UP INSTRUCTIONS CONTINUEDStep 6 (optional):Insert the vertical rods on eitherside of the screen tent’s door. Remove the Velcroretaining loop securing the pole to the adjacent wall.Once freed, install one end of the rod into theother’s end to make it one long rod. Place thebottom of the rod in the pocket located at thebottom of the panel directly below where the rodsare mounted. Secure the rod with the Velcro loop.Repeat on the other side. It is recommended to usethese if any wind is present. (Photos 9 and 10)Step 7: Install securing stakes on the tent. The stakesare designed to be used with the built in externalanchor straps found in the pockets under each wall'shub assembly. If there is little to no wind, only acouple stakes should suffice. In windier conditions, aperson should stake the entire shelter down bypushing an anchor into the ground roughly 3 feetfrom the outside wall, attaching the loop end of thestrap around it, and cinching the strap snug betweenthe eye bolt on the hub and the stake, itself. (Anchorstraps are shown in photos 11 and 12)Using the built in Wind Panels:Step 1: Locate the tie strings mounted on each endof the wind panels. Untie and let the panel fall down.Step 2: Locate the hub strap on the center of thewall and pull it through the grommet on the windpanel.Step 3: Zip down the zippers located on each side ofthe wind panels. Finish with securing the Velcro tabson the outside of the zipper.Step 4: To store the wind panels, simply detach theVelcro tabs and unzip the wind panels. Roll the panelback up and tie with tie strings. (Photos 13 and 14)Photo 9Photo 10Photo 11Photo 12Photo 13Photo 141.Attach the Velcro on each corner (6x) sothat the toggle T is on the outside bottom ofthe floor assembly. This needs to be done ineach corner to form a "tray" that will preventwater or mud from coming into your tent.2.Once the floor "tray" is assembled,locate one of the hoops sewn into the bottomcorners (doesn't matter whichone you start with) and install the toggleT through the hoop to hold its position.NOTE: WHILE THERE ARE TOGGLE T'S ANDHOOPS IN EVERY CORNER, IT'S NOTNECESSARY TO CONNECT THEM ALL FORPOSITIONING. ONE OR TWO WILL SUFFICE3.Next, separate the protective cover from theVelcro strip that runs around the entireperimeter of the inside of the screen tent andtuck the ends of each strip up behind the hubpoles to keep them out of the way.4.Attach the Velcro from the backside top ofthe floor to the strip on the inside of the tentand work your way around the perimeter ofthe screen tent. Once it's all secured, yourinstallation is complete.NOTE: WHILE IT IS POSSIBLE TO LEAVE YOUR FLOOR CONNECTED TO THE SCREEN TENT WHILE YOU COLLAPSE IT FOR TRANSPORT, IT SHOULD BE REMOVED TO PREVENT ANY UNNECESSARY DAMAGE FROM THE HUB ASSEMBLIES1.Locate the divider found in the carry bagand take it out. Find the top of the panel-the top is the side that the zipper does not go all the way to the end.2. Install the barrel located on the divider panel through the loop on the inside of the tent at the midpoint. Once you have one installed, continue around the divider paneluntil all 7 barrels are installed into the corresponding hoops. Access and privacy are attained by simply zipping the panel open or closed.Note: The privacy divider should always be removed when taking down your shelter after use. Due to the way the panels collapse and fold for storage, damage could occur to the panel or tent if it's left in.Step 1: Remove all the stakes from around the exterior of the tent and tuck the external anchors back in the pockets on the side panels. Place the stakes back in the pouch and put that back in the carry bag.Step 2: If used, remove the vertical door support rods from pockets at the bottom of the panel, pull apart, and refasten them with the Velcro straps located diagonally on the panels next to each side of the door.Step 3: From the inside of the tent, pull down the two roof hubs holding the roof up. Or push down from the outside of the tent if you can reach them.Step 4: Push in the side wall panels from the outside of the screen tent until all the hubs are collapsed.Step 5: Once the shelter is completely collapsed grab one corner of the tent and fold it in half on itself. Once in half, you can now condense the shelter to fit into the carry bag.Step 6: Carefully lift and insert into the carry bag. Pay close attention not to twist or distort the hubs or fabric while inserting into bag. Fold the floor and divider panel, if necessary, and place those int he carry bag too.Please fully understand and follow all safety instructions as outlined. Failure to do so could result in severe injury or death.Do NOT use open flame heaters in your screen tent. Injury or death may result from fire if tent fabric is exposed to open flame. The tent is not fireproof, but the fabric is treated with a fire retardant that meets CPAI-84 specifications. Application of any foreign substance may render the flame retardant properties ineffective. Fabric will melt when contact is made with hot surfaces (i.e., heaters, propane stoves, etc.)WARNINGInjury or death may result from fire if tent fabric isexposed to open flame.Tent fabric is not fireproof. Fabric will burn withextended exposure to open flame. Do not use openflame products inside tent. Tent fabric is treated withfire retardant. Application of any foreign substancemay render the flame retardant propertiesineffective.Night time: exterior reflectors must be visible toreduce risk of collisions.This tent is made with flame resistant fabric whichmeets CPAI-84 specifications.*For replacement parts, frequently asked questions, shelter information, videos, and all of your ice fishing or screen tent needs visit our web site at .。
- 1、下载文档前请自行甄别文档内容的完整性,平台不提供额外的编辑、内容补充、找答案等附加服务。
- 2、"仅部分预览"的文档,不可在线预览部分如存在完整性等问题,可反馈申请退款(可完整预览的文档不适用该条件!)。
- 3、如文档侵犯您的权益,请联系客服反馈,我们会尽快为您处理(人工客服工作时间:9:00-18:30)。
奔驰G clasd儿童电动车说明书
使用说明:
1、遥控车当把开关打开的位置观看玩具车轮在转动时是否速度均匀,有否突然倒转或突然停止的现象。
2、若一切均检查正常,则仍把玩具拿在左手,用右手揿动发声器,观看玩具车轮是否会突然改变转动方向,检查切换动作的灵敏度。
3、检查玩具的抗干扰能力,把玩具放在1米左右距离的位置,轻轻吹口哨或讲话,观察玩具是否会误动作。
4、遥控汽车控制动作较多,在挑选时一个动作一个动作地检查控制的灵敏度。
特别注意在开始检查时要将发射器的天线拉至最长,待一切检查正常后,再将天线慢慢缩短,观察控制距离的缩短情况。
一般当天线缩至全长的一半,而控制距离缩短三分之一均属正常。
5、对于6周岁以下的儿童,只要挑选单通道遥控玩具即可。
它的动作比较简单,发射器也只有一个按扭,只能控制玩具变换一个动作,如从前进变为后退。
对于6周岁以上的孩子则可以选择多通道遥控玩具,让孩子掌握较复杂的操纵技能。