Sherlock7.1软件编程手册-教程-实例
傻瓜手册
ORACLE傻瓜手册T o be DBA or not to be, that is NOT the question. ---- Arron作者允许自由散发此文档,但对其进行的任何修改应通知作者,以便于维护版本。
作者email:zhou_arron@Oracle8以8.1.5为界分为普通版本和internet版本。
普通版版本号8.0.x,接触较多的是8.0.5;internet版版本号包括8.1.5(Release 1),8.1.6(Release 2),8.1.7(Release 3)。
普通版简称Oracle 8,internet版简称Oracle 8i。
如果不作特别说明,文中凡出现Oracle 8i均指8.1.7版。
Oracle9i目前出到第二版,版本号为9.2,简称Oracle 9i。
如果不作特别说明,文中凡出现Oracle 9i均指9.2版。
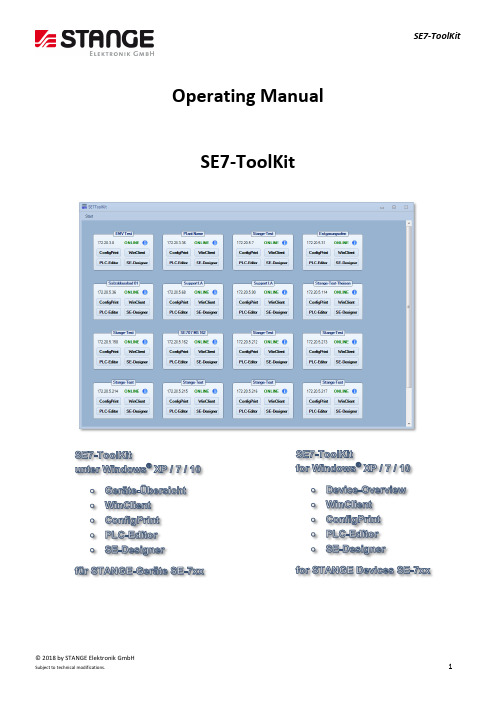
本手册介绍Oracle配置的基本方法,描述的是“所然”而不是“所以然”。
全部操作以命令行方式出现,不涉及GUI(只有白刃战才是真正的战斗)。
鉴于大家对Windows已经十分熟悉,同时为了避免Windows和Unix两种截然不同的使用和开发风格给描述带来的复杂性,所以本手册不介绍在Windows上的Oracle(上帝的归上帝,恺撒的归恺撒)。
文中所有例子以oradb作为数据库实例名,数据库用户dbuser,口令oracle。
如果不作特别说明,关于Oracle 8i所有的例子都在Solaris 8 Intel Platform+Oracle 8iR3上通过,关于Oracle 9i所有的例子都在RedHat Linux 7.3+Oracle 9iR2上通过。
附录文件sample.tar包含全部示例,简称附录。
大量使用表emp作为例子(参见附录08_proc/proc/single/emp.sql):create table emp(no number(12) not null,name char(20) not null,age number(6) not null,duty char(1) not null,salary number(12) not null,upd_ts date not null,primary key (no));开发中对应emp表结构,定义其宿主结构(参见附录08_proc/proc/single/db.h):typedef struct{double no;char name[21];int age;char duty[2];double salary;char upd_ts[15];} emp_t;修改历史:2000/07 版本1.02000/09 版本1.1增加Linux安装,export,import使用,数据库监控及优化(utlbstat,utlestat,分析session),语言时间环境变量设置,Oracle8.0.5手工建库脚本(wei_dick提供,稍加修改)2000/10 版本1.2修改Linux安装中RedHat 6.x+Oracle 8.1.6、数据库优化中配置文件和session分析、常用技巧中下载上传文本数据和访问他机数据库;增加创建数据库实例中数据字典参考、常用技巧中删除冗余记录、应用开发,常见错误感谢liu_freeman,jiao_julian,huang_miles等人对开发工具所作的努力2001/03 版本1.3修改安装部分、init.ora配置、常用技巧、应用开发;增加手工建库、MTS配置;重写开发工具感谢li_bo的大力帮助2001/09 版本1.4修改数据库优化,使之较系统化;增加应用开发中多线程下的数据库连接2002/04 版本1.5修改数据库优化、多线程条件下数据库编程;分离附录的程序范例2002/12 版本2.0重新安排内容,增加Oracle 9i安装配置、OCI开发、mysql安装配置开发,补充数据库优化、PROC开发ORACLE傻瓜手册 (1)1安装 (6)1.1通用设置 (6)1.2UnixWare7 (7)1.2.1Oracle 8 (7)1.3HP-UX (8)1.3.1Oracle 8 (8)1.4Linux (9)1.4.1kernel 2.0 & glibc 2.0 (9)1.4.2kernel 2.2 & glibc 2.1 (9)1.4.3kernel 2.4 & glibc 2.2 (10)1.5Solaris (11)2创建 (13)2.1Oracle 8 & 8i (13)2.1.1工具创建 (13)2.1.2手工创建 (13)2.1.3MTS(multi-threaded server) (14)2.1.4调整临时表空间 (15)2.1.5调整回滚表空间 (15)2.1.6调整日志 (15)2.1.7调整用户表空间 (16)2.1.8创建用户 (17)2.1.9创建数据对象 (17)2.1.10创建只读用户 (18)2.1.11启动及关闭数据库实例 (19)2.1.12网络配置 (19)2.2Oracle 9i (21)2.2.1手工创建 (21)2.2.2创建用户表空间 (22)3初始化文件配置 (23)3.1Oracle 8 & 8i (23)3.2Oracle 9i (25)4工具 (26)4.1sqlldr (26)4.2exp (27)4.3imp (28)4.4.1命令行参数 (29)4.4.2提示符命令 (29)4.4.3SET选项 (30)4.4.4例子 (30)5备份及恢复 (32)5.1export与import方式 (32)5.2冷备份 (32)5.3联机全备份+日志备份 (32)5.3.1设置 (32)5.3.2步骤 (33)5.3.3恢复 (33)5.4注意要点 (34)6数据库优化 (35)6.1通用设置 (35)6.1.1硬件配置 (35)6.1.2应用配置 (35)6.1.3日常性能监控 (36)6.2实战分析 (36)6.2.1总体分析 (37)6.2.2详细分析 (37)6.3专题分析 (39)6.3.1巨表查询 (39)6.3.2对比测试 (41)6.3.3上下载数据 (44)6.3.4回滚空间快照陈旧(snapshot too old) (46)7常用技巧 (48)7.1增加、更改和删除域 (48)7.2删除冗余记录 (49)7.3更改字符集 (49)7.4表数据迁移 (50)7.5成批生成数据 (50)7.6注意要点 (51)8嵌入式SQL(C) (53)8.1编译 (53)8.2SQL语句 (54)8.2.1内部类型与宿主类型对应 (54)8.2.3事务 (55)8.2.4标准SQL语句 (55)8.2.5动态SQL语句 (55)8.2.6数组操作 (56)8.3编程框架 (58)8.3.1总体原则 (58)8.3.2单线程和多线程 (59)8.3.3开发工具 (60)9OCI—Oracle Call Interface (61)9.1连接和断开 (61)9.1.1句柄层次 (61)9.1.2连接流程 (61)9.1.3断开流程 (62)9.2SQL语句 (62)9.2.1事务 (62)9.2.2无结果集的sql语句 (63)9.2.3有结果集的sql语句 (63)9.2.4LOB (65)9.3编程框架 (67)9.3.1总体原则 (67)9.3.2sql语句 (68)9.3.3函数 (69)10附录—MYSQL (72)10.1安装配置 (72)10.2管理 (72)10.2.1初始调整 (72)10.2.2建立用户对象 (73)10.3开发 (73)10.3.1连接和断开 (73)10.3.2无结果集的sql语句 (74)10.3.3有结果集的sql (74)10.3.4错误处理 (75)1安装所有参见内容都在附件01_install_02_create_03_init/下。
Flowmaster V7 中文技术手册
Flowmaster V7中文技术手册第一章Flowmaster的图形用户界面 (1)1.1启动Flowmaster (1)1.1.1数据库管理概述 (2)1.2工程视图 (4)1.2.1网络模型 (5)1.2.2目录选项卡 (6)1.2.3用户选项卡 (7)1.2.4共享选项卡 (8)1.3组件网络模型 (8)1.3.1单击,拖拽和释放 (8)1.3.2连接 (9)1.3.3工具栏功能 (9)1.3.4过滤器 (10)1.3.5调色板 (10)实例1 (10)1.4网络模型视图 (11)1.4.1数据收集 (11)1.4.2数据输入 (13)1.4.3数据复制 (14)1.4.4选择单位设置 (15)1.4.5曲线数据 (16)实例2 (18)实例3 (19)1.4.6曲面数据 (19)1.4.7方程编辑器 (19)实例4 (20)1.4.8模拟类型过滤器 (20)1.5运行模拟计算 (21)1.5.1模拟类型和选项 (21)实例5 (22)1.5.2错误和警告 (23)1.6查看模拟结果 (23)1.6.1查看组件和节点模拟结果 (23)1.6.2结果绘制表格 (24)1.6.3结果绘图 (25)1.6.4生成报告 (26)第二章稳态分析 (27)2.1每个组件家族信息内容 (27)2.1.1管道类 (27)2.1.2弯头类 (28)2.1.3控制阀类 (29)2.1.4单向阀 (29)2.1.5方向控制阀 (30)2.1.7接头类 (30)2.1.8过渡接头类 (30)2.1.9节流孔类 (31)2.1.10泵类 (31)2.1.11发动机 (31)2.1.12蓄水箱类 (32)2.1.13稳压器类 (32)2.1.14边界源类 (33)2.1.15控制器类 (33)2.1.16汽缸类 (34)2.1.17负载类 (34)第三章稳态分析算例 (35)3.1稳态分析算例1 (35)3.2稳态分析算例2 (36)3.3稳态分析算例3 (39)3.4稳态分析算例4(飞机燃油系统) (41)第四章瞬态分析 (44)4.1引起剧烈压力波动的原因 (44)4.2流体瞬态特性的抑制 (44)4.3波的传递和最大压力变化估计 (44)4.4流动的“快速”,“缓慢”和“极慢”变化 (45)4.5压力波传播速度 (45)4.6水管中的波速 (46)4.7瞬态管道模型 (47)4.7.1刚性管道模型 (47)4.7.2弹性管道模型 (47)算例6 (47)4.8瞬态阀门模型 (49)4.9瞬态水泵模型 (49)4.10控制器的使用 (51)第五章瞬态分析算例 (52)5.1瞬态算例1 (52)5.2瞬态算例2――压力波分析 (54)5.3瞬态算例3——Rising Main (56)5.4瞬态算例4――PID控件 (60)5.5瞬态算例5——水力瞬态特性 (62)5.6瞬态算例6——水力瞬态特性 (64)第六章自定义目录基础操作 (66)6.1材料 (66)6.1.1利用模板创建新材料 (66)6.2子系统和子网络 (67)6.3符号和符号设置 (68)6.4自定义目录 (71)6.4.1快捷目录 (72)6.4.2复制组件到目录 (72)第七章附加功能 (73)7.1示意图配置和背景 (73)7.1.1添加背景图片 (74)7.2目录搜索功能 (74)7.3动态着色 (75)7.4图层 (77)算例7 (78)7.5压缩与解压缩 (80)第八章GUI高级功能 (83)8.1添加/替换组件 (83)8.2说明子窗体 (84)算例8 (84)8.3添加用户帮助 (86)8.4组件模板 (89)8.5复合组件 (97)算例9 (97)8.6逐步追踪 (103)8.7可变参数 (106)8.7分析模型——简要介绍 (108)第九章服务和支持 (111)其他课程 (112)附录——算例结果 (114)第一章Flowmaster的图形用户界面Flowmaster的图形用户界面(GUI)使用户能够快捷有效地进行系统设计和测试工作。
Sherlock7
Sherlock7概述本文档是Sherlock7.1软件编程手册的指南部分,旨在提供一些实际案例展示,以帮助开发人员更好地理解和应用Sherlock7.1软件编程。
案例一:数据处理在Sherlock7.1软件编程中,数据处理是非常重要的一部分。
假设我们有一个包含学生考试成绩的数据集,现在需要计算每个学生的平均分,并输出结果。
以下是一个简单的示例代码:导入必要的库import pandas as pd读取数据集data = pd.read_csv("exam_scores.csv")计算每个学生的平均分data["平均分"] = data.mean(axis=1)输出结果print(data)该代码通过使用pandas库读取考试成绩数据集,并利用mean()函数计算每个学生的平均分。
最后,将结果输出到控制台。
案例二:用户界面设计Sherlock7.1软件编程还支持用户界面设计,使得开发人员可以创建交互式的应用程序。
假设我们需要设计一个简单的计算器应用程序,以下是一个示例代码:from tkinter import Tk, Button, Entry创建主窗口window = Tk()window.title("简易计算器")创建显示结果的文本框result_entry = Entry(window, width=30)result_entry.grid(row=0, column=0, columnspan=4)定义计算函数def calculate():expression = result_entry.get()result = eval(expression)result_entry.delete(0, "end")result_entry.insert("end", result)创建按钮button_1.grid(row=1, column=0)创建其他按钮...创建等于按钮button_equals.grid(row=5, column=3)进入主事件循环window.mainloop()该代码使用tkinter库创建一个简单的计算器应用程序窗口。
第七章STEP7编程软件的使用方法7.1用户程序的基本结构7.2STEP7
OB1的程序
4 编辑FC1 在【S7 程 序 (1)】下的【块】中单击右键,插入功能并命名为FC1
FC1的参数表及程序如图
5 编辑FB1 用同样的方法插入FB1并编辑,如图
图7-29 IN参数 图7-30 OUT参数 图7-31 STAT参数
FB1程序
6 编 辑 DB1、DB2 在【S7 程序(1)】下的【块】中单击右键,插入FB1的背景数据块并命名为DB1,如图7-33所示。用同样的方法插入DB2。
图7-7 接口属性设 置
7.3 硬件组态
1 创建项目 打开【SIMATIC Manager】,系统会自动弹出“新建项目”向导(图7-8),同时,也可以通过选择菜单【文件】|【新建项目”向导】打开。这里,我们 使用“新建项目”向导。通过单击按钮【取消】关闭该向导。
在工具栏中单击按钮 或 在 【文件】菜单下单击【新建】,可以直接创建一个新项目。在弹出的对话框中输入项目名称及路径,单击确定完成(如图7-9)。这里 建立了一个名为example7-1的项目。
2 创建项目 在STEP7中建立一个名为example7-2的项目,通过插入菜单加入一个S7程序
3 编辑符号表 符号表可以为绝对地址(如I0.0、Q4.0等)提供一个符号名(如“启动”、“输出”等),以方便编程及程序阅读。 在【S7 程序(1)】目录下,双击【符号】图标,打开符号表,对其进行编辑并保存
2、模块化编程 程序被分为不同的逻辑块,每个块包含了完成部分控制任务的逻辑指令。组织 块OB1(主程序)中的指令决定在什么情况下调用哪一个块,功能和功能快(子 程序)用来完成不同的过程任务。被调用的块执行完后,返回到OB的调用点, 继续执行OB1。 模块化编程的程序被分为若干块,易于实现多人同时对一个项目编程。由于只 在需要时执行相关的指令,因此提高了CPU的执行效率。
SE7-ToolKit 操作手册说明书
© 2018 by STANGE Elektronik GmbHSubject to technical modifications.1Operating ManualSE7-ToolKit© 2018 by STANGE Elektronik GmbH2Subject to technical modifications.The present manual has been prepared with all possible care.STANGE Elektronik GmbH can nonetheless not accept any liability for the essential correctness of foreign language terms and texts, if evidently their translation has been done by an expert translator who does not belong to our company.The content of the present manual is, as well as appurtenant software products, ownership of the company STANGE Elektronik and protected by copyright. Reproduction is - entirely or in part - not permitted without express approval by the STANGE Elektronik company.© STANGE Elektronik GmbHGutenbergstraße 3 D-51645 Gummersbach Tel: (02261) 9579-0 Fax: (02261) 55212 Software version: v0.0.0.61 Documentation: July 2018Registered trademarks:Windows™ and Windows NT™ by Microsoft Corp., InTouch™ by Wonderware Corp.TELEPHONE SUPPORT: +49 / 2261 / 9579-39© 2018 by STANGE Elektronik GmbHSubject to technical modifications.3CopyrightKeep documentation for future use!This documentation is the intellectual property of STANGE Elektronik GmbH, which also has the exclusive copyright. Any modification of the content, duplication or reprinting of this documentation, as well as any distribution to third parties can only be made with the express permission of STANGE Elektronik GmbH.STANGE Elektronik GmbH does not accept any liability for damages arising from the use of any incorrect or incomplete information contained in this documentation or any information missing there from.STANGE Elektronik GmbH reserves the right to make complete or partial modifications to this document.All brand and product names are trademarks or registered trademarks of the owner concerned.© 2018 by STANGE Elektronik GmbH4Subject to technical modifications.Table of ContentsSE7-TOOLKIT .......................................................................................................................................................................... 5 T HE FUNCTIONS OF THE SE7-T OOL K IT .......................................................................................................................................... 5 INSTALLATION PREPARATIONS .............................................................................................................................................. 5 S YSTEM R EQUIREMENTS ........................................................................................................................................................... 6 SE7-T OOL K IT I NSTALLATION ...................................................................................................................................................... 7 SE7-TOOLKIT OVERVIEW ........................................................................................................................................................ 9 S TART M ENU ....................................................................................................................................................................... 10 SE7-T OOL K IT TILE ................................................................................................................................................................. 11 D OWNLOAD IN CASE OF NOT AVAILABLE SUBPROGRAM ................................................................................................................... 12 U PDATE IN CASE OF AGED SUBPROGRAM VERSION .......................................................................................................................... 12 U NINSTALL PROCESS OF THE SE7-T OOL K IT .................................................................................................................................. 13 INSTALLATION INSTRUCTIONS OF THE SUBPROGRAMS ....................................................................................................... 14 I NSTALLATION : SE7-C ONFIG -P RINT ........................................................................................................................................... 15 I NSTALLATION : SE7-W IN C LIENT ............................................................................................................................................... 18 I NSTALLATION : SE7-PLC-E DITOR .............................................................................................................................................. 21 I NSTALLATION : SE-D ESIGNER ................................................................................................................................................... 25 FAQ – QUESTIONS / ANSWERS / SOURCES ........................................................................................................................... 30 W HY ARE NO TILES DISPLAYED ? ................................................................................................................................................. 30 W HY CAN THE SE-D ESIGNER NOT BE EXECUTED UNDER W INDOWS XP? .............................................................................................. 30 W HY IS THE INFO BUTTON NOT DISPLAYED IN THE DEVICE TILE ? ......................................................................................................... 30 W HY ARE THE BUTTONS SHOWN GREYED OUT IN THE DEVICE TILE ? ..................................................................................................... 31 W HY IS ONLY THE W IN C LIENT DISPLAYED IN THE DEVICE TILE ? . (31)© 2018 by STANGE Elektronik GmbHSubject to technical modifications.5SE7-ToolKitIn this chapter you find an overview of the important software functions. Further information is described in the individual chapters of the manual.The functions of the SE7-ToolKitWith the SE7-ToolKit you can let display you all available SE-7xx devices in your network and execute different functions:- Display device info- Open ConfigPrint, WinClient, PLC-Editor & SE-Designer with the actual and compatible version - Updating the device overview - Add device manually - Set display options- Call information about SE7-ToolKit version - Search and install SE7-ToolKit update - Call the operating manualInstallation preparationsBefore you can work with the program the following preparations should be checked:1. Check system requirements ( General – System Requirements)2. Computer logon always as administrator or with administrator rights until the completion of work© 2018 by STANGE Elektronik GmbH6Subject to technical modifications.System RequirementsSystem requirements: HardwareMinimumProcessor Core 2 Duo, ab 2,0 GHz Main memory 2 GB RAMHard disk space 500 MB, recommended 1 GB Drive DVD-ROMGraphic board 1024 * 768 Pixel 16 Bit colour depthEthernet interface for the communication with STANGE devices of the SE-7xx series SoftwareMinimumOperating systemsMS Windows XP-Professional SP2, Windows Vista, Windows 7, 32 Bit / 64 Bit, starting Home Edition (no Starter-Edition); In case of using foreign languages Ultimate Edition is recommended; Windows 10 incl. Framework 3.5 (Framework installation via Internet during ToolKit installation possible.The SE-Designer is not compatible with MS Windows XP.© 2018 by STANGE Elektronik GmbHSubject to technical modifications.7SE7-ToolKit InstallationExecute the SE7-Toolkit-Setup.exe file on the delivered installation CD in order to install the SE7-ToolKit. Follow the instructions of the setup program.Figure 1: Start of the installationFigure 2: Licensing agreement. Read the agreement and if you agree, set a hook and continue the installation by clicking …N ext >“.© 2018 by STANGE Elektronik GmbH8Subject to technical modifications.Figure 3: Installation assistant. Click the “Next >” button in order to start the installationFigure 4: Installation completion© 2018 by STANGE Elektronik GmbHSubject to technical modifications.9SE7-ToolKit overviewAfter the installation you can start the SE7-ToolKit. Therefor execute the SE7-ToolKit.exe which is located either in the program directory (All Programs/STANGE SE7-ToolKit/SE7-ToolKit) or on the desktop as link.Figure 5: SE7-ToolKit overview© 2018 by STANGE Elektronik GmbH10Subject to technical modifications.Start MenuA “Start” button is located in the upper part of the SE7-ToolKit that calls the following sub menu:Figure 6: Open start menuIn this sub menu the following actions can be executed (from left to right).-The device list below is refreshed by clicking the blue arrows.-Clicking the “i” calls information about the SE7-ToolKit. Here you can open the Eventviewer or check for updates.Figure 7.1: SE7-ToolKit information- The operating manual is called by clicking “?”.- The following 3 buttons open the programs, SE7-ConfigPrint, SE7-PLC-Editor or SE-Designer. - A click to “Config …” enables the manual adding of devices and modification of display options.Figure 7.2: SE7-ToolKit Config ...The start menu is displayed continuously by double click on the “Start” menu.© 2018 by STANGE Elektronik GmbHSubject to technical modifications.11SE7-ToolKit tileThe SE-7xx device list is located in the lower part of the SE7-ToolKit. All SE7 devices are displayed which are available in your network (blue tiles) and the manually added devices (yellow tiles). Each device has an own IP address and is displayed by a separate tile:Figure 8.1: Device tileFigure 8.2: Device tile manually addedThe tiles are built up from top to bottom like follows (see figure 8.1 and 8.2):- Device designation - Associated IP - Online state - Info-Tooltip-4 buttons to open the corresponding programs (ConfigPring, WinClient, PLC-Editor & SE-Designer)Holding the mouse on theicon a tooltip opens which displays the device information.Figure 9: Display of the device information according to IP addressFour different buttons are available below the corresponding unit name (see figure 8) which offers the main functions of the SE7-ToolKit. The compatible and actual programs (ConfigPrint, WinClient, PLC-Editor & SE-Designer) can be opened by operation the corresponding button of the desired device.This saves a lot of time because different parameters of the SE-7xx device are also transferred by opening the programs. This has the advantage that the SE-7xx compatible program can be opened directly and you can continue working further without making changes (like IP input) or find and install a compatible device version.© 2018 by STANGE Elektronik GmbH12Subject to technical modifications.Download in case of not available subprogramThe SE7-ToolKit automatically recognizes whether the compatible versions of the subprograms ConfigPrint, WinClient, PLC-Editor or SE-Designer are already installed or not.If one of those programs is not installed on your computer then the SE7-ToolKit recommends a download with following installation.The SE7-ToolKit searches for an installation at different places:1. If a suitable installation file is deposited in the SE7-ToolKit directory?2. If a suitable installation file is deposited on the corresponding device? A dialog window …Download available” appears if one of the two points is fulfilled:Figure 10: Download & installation in case of not available subprogram (ConfigPrint, WinClient, PLC-Editor or SE-Designer)Simply confirm with “Yes” and the download is executed and the installation started.Update in case of aged subprogram versionIf you already have installed a compatible subprogram (ConfigPrint, WinClient, PLC-Editor or SE-Designer) then the SE7-ToolKit automatically recognizes whether this subprogram is aged and searches for a compatible update. The SE7-ToolKit searches for an update at different places:1. Is a suitable installation file deposited in the SE7-ToolKit directory?2. Is a suitable installation file deposited on the corresponding device?© 2018 by STANGE Elektronik GmbHSubject to technical modifications.13An “Update Available!” dialogue appears if one of the two points is fulfilled:Figure 11: Update & installation in case of aged subprogram (ConfigPrint, WinClient, PLC-Editor or SE-Designer)Simply confirm with “Yes” and the download of the update is executed and afterwards the installation is started.Uninstall process of the SE7-ToolKitProceed like follows if you want to uninstall the SE7-ToolKit:1. Either open the “Uninstall SE7-ToolKit.exe” file which is located under “All Programs/STANGE SE7-ToolKit/UninstallSE7-ToolKit” or open the program manager under “Control Panel/All Control Panel Icons/Programs and Features”. 2. Simply follow the uninstall steps:Figure 12: Uninstall process for SE7-ToolKit, continue by clicking on "Next >"© 2018 by STANGE Elektronik GmbH14Subject to technical modifications.Figure 13: Confirm uninstall succeeded with "Finish"Installation instructions of the subprogramsThe following chapter explains the installation of the subprograms (ConfigPrint, WinClient, PLC-Editor & SE-Designer). The SE7-ToolKit automatically recognizes if a compatible version of the subprogram is already installed on the computer or not and offers an update function.If you want to install the subprograms manually, then you can find them either on the installation DVD, in the SE7-ToolKit installation folder in the subfolder “ToolSetups” or on our homepage: ( /en/downloads.html ).Please use the corresponding operating manual or send an E-Mail to our support (mailto:****************************).if you have questions concerning the operation or the uninstall process of subprograms.© 2018 by STANGE Elektronik GmbHSubject to technical modifications.15Installation: SE7-Config-PrintFollow the installation instructions:Figure 14: Choose installation language.Figure 15: Welcome to the installation wizard. The installation is continued by clicking the "Next >"button© 2018 by STANGE Elektronik GmbH16Subject to technical modifications.Figure 16: Licensing agreement. Read the agreement and if you agree, set a hook and continue the installation by clicking …Next >“..Figure 17: Select your program group or indicate your own.© 2018 by STANGE Elektronik GmbHSubject to technical modifications.17Figure 18: Start the installation by clicking on the “Next >” button.Figure 19: With a click on “Finish” the installation is completed and you can start the SE7-Config-Print program.SE7-ToolKit© 2018 by STANGE Elektronik GmbH18Subject to technical modifications.Figure 20: Surface of the SE7-Config-PrintInstallation: SE7-WinClientPlease follow the installation instructions:Figure 21: Choose installation language.© 2018 by STANGE Elektronik GmbHSubject to technical modifications.19Figure 22: Welcome to the installation wizard. The installation continues by clicking "Next >"Figure 23: Licensing agreement. Read the agreement and if you agree, set a hook and continue the installation by clicking …Next >“.© 2018 by STANGE Elektronik GmbH20Subject to technical modifications.Figure 24: Start the installation by clicking “Next >”.Figure 25: The installation is competed by clicking on “Finish” and the SE7-WinClient can be started.SE7-ToolKit© 2018 by STANGE Elektronik GmbHSubject to technical modifications.21Figure 26: Surface of the SE7-WinClientInstallation: SE7-PLC-EditorPlease follow the installation instructions:Figure 27: Choose installation language.© 2018 by STANGE Elektronik GmbH22Subject to technical modifications.Figure 28: Welcome to the installation wizard. The installation continues by clicking the "Next >" buttonFigure 29: License agreement. Read the agreement and if you agree, set a hook and continue the installation by clicking “Next >”.© 2018 by STANGE Elektronik GmbHSubject to technical modifications.23Figure 30: Select installation folder. We recommend not changing the target folder because the SE7-ToolKit will not find the PLC-Editor and might lead to problems!Figure 31: Select a program group or indicate an own.© 2018 by STANGE Elektronik GmbH24Subject to technical modifications.Figure 32: Start the installation process with “Next >”.Figure 33: Installation is completed by clicking “Finish” and the SE7-PLC-Editor can be started.SE7-ToolKit© 2018 by STANGE Elektronik GmbHSubject to technical modifications.25Figure 34: Surface of the SE7-PLC-EditorInstallation: SE-DesignerThe SE-Designer is not compatible with MS Windows XP. Follow the installation instructions:Figure 35: Choose installation language.© 2018 by STANGE Elektronik GmbH26Subject to technical modifications.Figure 36: Welcome to the installation wizard. The installation is continued by operating the "Next >" buttonFigure 37: Licensing agreement. Read the agreement and if you agree, set a hook and continue the installation by clicking “Next >”.© 2018 by STANGE Elektronik GmbHSubject to technical modifications.27Figure 38: Select a destination folder. We recommend not changing the target folder because the SE7-ToolKit will not find the PLC-Editor and might lead to problems!Figure 39: Select the setup type of the application. We recommend you to choose the “Complete” setup type.© 2018 by STANGE Elektronik GmbH28Subject to technical modifications.Figure 40: Select a program group or indicate an own.Figure 41: Start the installation by clicking “Next >”.© 2018 by STANGE Elektronik GmbHSubject to technical modifications.29Figure 42: Complete the installation by clicking “Finish” and start the SE-DesignerFigure 43: Surface of the SE-DesignerSE7-ToolKit© 2018 by STANGE Elektronik GmbH30Subject to technical modifications.FAQ – Questions / Answers / SourcesThis part of the operating manual answers your questions about frequently asked questions.Why are no tiles displayed?-Check whether the VM network adapter is available in case of Broadcast malfunction; if yes deactivate it.o Please proceed as follows:1. Open the control panel (click on “Start” and “Control Panel”)2. Navigate to the “Network and Sharing Center”(Control Panel\Network and Internet\Network and Sharing Center)3. Open the adapter settings by clicking on “Change adapter settings” in the left column4. In the window “Network Connections” you find active and inactive adapters. Deactivate the “VMwareNetwork Adapter VMnet1”Figure 44: Network Settings – Network Adapter. Deactivate the VMware Network Adapter VMnet1Why can the SE-Designer not be executed under Windows XP?- The SE-Designer is not compatible to Windows XP. Please use a later Windows version than XP.Why is the info button not displayed in the device tile?- This only happens if devices are OFFLINE. Device information can only be called and displayed for online devices. - Make sure that the device is switched on, connected to the network and correctly configured.SE7-ToolKit© 2018 by STANGE Elektronik GmbHSubject to technical modifications.31 Why are the buttons shown greyed out in the device tile?- This only happens if devices are OFFLINE. Devise information can be called only in case of switched on device, because the function version must be requested in order to open a compatible version of the sub programs. - Make sure that the device is switched on, connected to the network and correctly configured. Why is only the WinClient displayed in the device tile?- The standard display options of the ToolKit define that only the WinClient is displayed as button at start. - You can adjust the display options of the ToolKit under …Start/Settings …“.。
Python程序设计案例教程课件第7章
Python程序设计案例教程
1. 在指定区间随机生成一个整数,设定猜测次数; 2. 玩家输入猜测的数; 3. 进行异常检测与处理;
4. 玩家猜的数与随机生成的数不相等时,使用抛 出异常的语句给出提示信息;
5. 猜对或次数用完,结束游戏。
案例分析
Python程序设计案例教程
问题
在程序中,如何实现由程序员主动抛出 异常?
3. tr y…except…finally
Python程序设计案例教程
try:
f = open(“test.txt”) # 已存在该文件
print(f.read())
sum1 = 5 + "6"
except:
一定
print("出错啦~")
执行
finally:
f.close()
print("关闭文件")
案例实现
Python程序设计案例教程
案例实现
Python程序设计案例教程
7.2
Python程序设计案例教程
限定范围的猜数-抛出异常
案例描述 案例分析 相关知识-raise语句
assert语句 案例实现
案例描述
Python程序设计案例教程
模拟猜数游戏:实现限定任意范围的猜数功能。
思路
案例分析
1)NameError 尝试访问一个未声明的变量,会引发NameError异常。例如:
>>> print(a)
2)ZeroDivisionError 若除数为零时,会引发ZeroDivisionError异常。例如:
>>> a=15/0
常见异常
STEP7编程软件的使用方法

STEP7编程软件的使用方法编程软件是指用于编写、修改、测试和执行计算机程序的工具。
它们提供了一种图形化界面,使程序员能够更轻松地编写和管理他们的代码。
本文将介绍使用编程软件的方法。
2.创建新项目:一旦安装完成,你可以打开软件并创建一个新的项目。
这将成为你编写代码的地方。
通常,可以选择项目类型和位置。
选择与你正在开发的应用程序或网站相匹配的类型,并将项目保存到合适的位置。
4.理解编程语法:编程语言都有自己的语法规则和关键字。
在编程软件中编写代码时,确保遵循正确的语法。
语法错误会导致代码无法编译或运行。
有时编程软件会提供自动纠错功能,可以帮助你找到和修复语法错误。
5.调试代码:编程软件通常提供调试工具来帮助你检查和修复代码中的错误。
调试器允许你逐行执行代码并监视变量的值。
你可以设置断点,以便在特定位置停下来检查代码执行情况。
使用调试工具可以更轻松地找到和解决程序中的错误。
6.运行程序:当你完成编写代码后,可以通过编程软件来运行程序。
点击“运行”按钮或按下特定的快捷键,编程软件会编译和执行你的代码。
控制台窗口将显示程序输出的结果。
当程序出现错误时,你可以根据控制台中的错误信息进行调试。
7.调优和测试:一旦程序可以正常运行,你可能希望进行性能调优和测试。
编程软件通常提供一些性能分析工具,可以帮助你找出代码中的性能瓶颈,并针对性地优化。
编程软件还可以支持单元测试、集成测试和性能测试等功能,以确保代码的正确性和可靠性。
8. 版本控制和团队合作:在使用编程软件时,你可以将你的代码存储在版本控制系统中,例如Git。
这样可以跟踪代码变更,并允许多个人对同一代码库进行协作。
编程软件通常集成了版本控制功能,以方便团队之间的代码管理和合作。
9.学习资源:使用编程软件时,你可能需要参考相关的学习资源。
编程软件通常提供文档和教程,以帮助你了解软件的功能和用法。
此外,网上还有许多编程教程和论坛,可以帮助你解决遇到的问题。
总结:使用编程软件,你可以更轻松地编写、管理和测试你的代码。
Sherlock7培训讲义
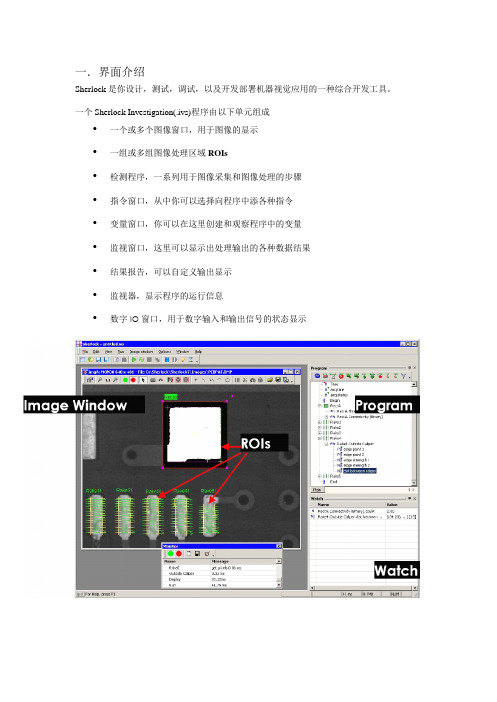
Sherlock是你设计,测试,调试,以及开发部署机器视觉应用的一种综合开发工具。
一个SherlockInvestigation(.ivs)程序由以下单元组成
•一个或多个图像窗口,用于图像的显示
•一组或多组图像处理区域ROIs
•检测程序,一系列用于图像采集和图像处理的步骤
•指令窗口,从中你可以选择向程序中添各种指令
•变量窗口,你可以在这里创建和观察程序中的变量
•监视窗口,这里可以显示出处理输出的各种数据结果
•结果报告,可以自定义输出显示
•监视器,显示程序的运行信息
•数字IO窗口具栏
创建一个新的程序
ivs程序由以下单元组成一组或多组图像处理区域rois数字io窗口用于数字输入和输出信号的状态显示主工具栏创建一个新的程序保存或另存当前的程序单步连续运行程序调试打开一个已经存在的程序粘贴复制程序模块停止中断程序主菜单打开和关闭各种图形窗口程序窗口监视窗口等控制图像窗口的版面分布控制并执行图像窗口所显示的内容控制sherlock应用程序的外观及通讯设置文件编辑和运行菜单工具栏上的按钮分别表示打开和保存应用程序拷贝程序模块运行应用程序
- 1、下载文档前请自行甄别文档内容的完整性,平台不提供额外的编辑、内容补充、找答案等附加服务。
- 2、"仅部分预览"的文档,不可在线预览部分如存在完整性等问题,可反馈申请退款(可完整预览的文档不适用该条件!)。
- 3、如文档侵犯您的权益,请联系客服反馈,我们会尽快为您处理(人工客服工作时间:9:00-18:30)。
Sherlock 使用手册程序设置1.SHERLOCK 程序设置软件安装用户可以通过光驱把Sherlock软件安装在Windows2000或Windows XP下。
如果光驱不能自动开始安装,请点击Windows的“开始”按钮,选择“运行”并进入到setup. exe开始安装。
或使用Windows视图器来导航至光驱并在根目录下双击setup.exe文件。
点击“安装软件”。
按照屏幕上的指示,一个程序组将会被添加到“开始”菜单列表。
安装Sherlock软件的同时,也安装了Intel Processing Primitives(IPP)运行库(版本号5.1)。
Sherlock的安装需要一个许可证,这个许可证保存在插到用户电脑的硬件狗内,或保存在DALSA公司的采集卡里。
许可证与版本号须对应,Sherlock7在Sherlock6.x的许可证下不能运行。
点击开始查看许可证否已经安装。
如果未安装,Sherlock会按演示模式(Demo mode)运行。
演示模式支持除了从相机或采集卡采集图像和OCRplus外的所有产品功能。
联系DALSA IPD,以获得一个永久的许可证号。
用户可以使用Sherlock提供的许可证管理器(License Manager) 来安装Sherlock软件许可。
Start-—>Program—>ipd—> Sherlock—>License Manager开始-—>程序—>ipd—> Sherlock—>许可号管理器Sherlock软件应按照以下顺序安装:1.Sherlock(安装Sherlock之前先安装IPP52).Sherlock7120的安装需要IPP52.2.Sentinel(只有使用一个外部USB或平行接口硬件狗)。
3.采集支持软件:以下3中产品的任意一个或组合:a. Sapera LTRuntime6.10.0及其更高的版本(Sherlock7120的安装需要Sapera LT6.10.0).b. IFC Runtime (5.9.0或更新版本)。
c. FireWire相机需要的CI1394.4.如果使用Sapera LT Runtime,需要支持Sapera采集硬件的软件驱动。
注意:为了成功安装Sapera驱动,必须先安装采集卡。
注意:IFC和Sapera都支持PC2--Vision和PC2-CamLink采集卡。
不需要在IFC和Sapera 环境下为这两款采集卡安装支持软件。
推荐使用IFC。
版本号:7140;2008年9月17日 1程序设置403-00007-00 Windows配置如果你使用定制的Windows,在使用Sherlock时可能会遇到一些问题。
请谨记以下要求:1. Sherlock所需的显示分辨率为1024*768(或更高)。
2. 在机器视觉检测过程不要使用屏幕保护。
如果程序连续检测而无人看管的话,屏幕保护就会中断检测,并极大地降低处理速度。
3. 如果你正在把图像存到硬盘中,那么关闭硬盘驱动器(节电模式)也许会导致一些图像的丢失。
4. 由于显示卡的不同,一些视频模式也许会比其它的要快。
如果显示速度影响到你的应用,如果显示速度对你的应用来说很关键,请尝试改变颜色深度设置。
试用8位、16位、24位和32位的颜色模式并找出哪个更快。
现有的颜色设置根据Windows操作程序和显示卡的不同而不同。
Sherlock监控窗口显示指令时间。
状态栏显示总的检测时间。
在8位显示模式下,色彩不能被正确地显示出来。
5. 带圆角的Windows,在默认的“Windows XP"状态下,需要非常高的处理力,并且可能会降低机器视觉检测软件的效率。
软件选项SentinelSentinel软件能够监控软件许可,并定义软件如何运行(完全模式或演示模式)。
你可以使用许可管理器来安装许可号或视图许可选项。
如果你要用已发行的光盘来安装Sherlock,就必须在安装完Sherlock之后,单独安装Sentinel。
如果你从FTP网址上下载Sherlock软件并想使用硬件狗来取得许可,也必须下载Sentinel,并在安装完Sherlock之后,单独安装它。
运行库Sapera和IFC TM库和它们的相机配置工具是不包含在Sherlock软件里的。
为了能够更好地支持第三方软件和采集卡,没有这些运行库,Sherlock也是可以运行的。
为了正确地运行Sapera和IFC,Sherlock必须采用其中之一的运行库或完全的运行库。
运行库和驱动都包含在Sherlock的光盘中,你可以在安装完Sherlock后,单独安装任何一个或两个。
Sherlock软件需要Sapera或IFC的支持才能使用DALSA公司采集卡里采集到的图片。
2版本号:7140;2008年9月17日Sherlock使用手册程序设置如果你是从FTP网址上下载的Sherlock软件,你就必须同时下载运行库,并且在安装完Sherlock后,单独安装运行库。
要安装SDK库,需要一个Sapera或IFC许可。
IFC的安装包含硬件驱动。
而Sapera驱动是分开打包和安装的。
请确认你下载的Sapera驱动正是你所需要的。
注意:不要在这两个运行库下为特定的采集卡安装支持软件,这些驱动会相互冲突,可能会导致两个运行库都不能正常运行。
CI1394CI1394是IFC运行库的一个子集,它支持火线相机的采集功能。
即使不安装IFC运行库(运行或SDK),只安装CI1394,也不影响相机的使用。
但是如果不安装CI1394,IFC运行库就不能支持火线相机。
Sherlock许可证选项从7.0.0版本开始,OCRplus是在Sherlock下的唯一分离的许可选项。
用户可以在线参考Sherlock数据表(),或联系DALSA IPD了解详情。
任何版本的Sherlock 都要得到许可。
这可以通过使用并口或USB加密狗,或由DALSA公司许可的采集卡来实现。
你可以使用许可管理器来安装或视图许可证选项。
要采集图像必需先获得许可。
您如有任何关于许可的问题,请参考软件发行注意事项。
与Sherlock-Professional6.x相比,Sherlock包含了所有的功能。
OCRplus升级版为Sherlock (Professional) 许可添加了OCRplus算法。
相机配置DALSA公司在配置多相机采集功能上具有业界领先的灵活性。
Sapera CamExpert工具或IFCCamera Configurator®工具可以用来创建一个配置文件来定义并设置采集卡和相机。
这些工具也可以用来在运行Sherlock之前测试和校验你的采集参数。
在Sapera下,Camexpert创建一个CCF文件,Sherlock的Sapera驱动会使用这个文件。
使用开始(Start)—> 程序(Progarms)—> Dalsa Coreco—> Sapera LT—> CamExpert来设置智能检测程序V A50,V A51和NetSightII-DCL;以及X64, PC2-Vision, PC2-CamLink采集卡。
版本号:7140;2008年9月17日 3程序设置403-00007-00在IFC下,Camera Configurator创建一个文本文件(*.txt),Sherlock的IFC驱动会使用这个文件。
使用开始(Start)—>程序(Programs)—> IFC (Runtime) —>Camera Configurator 来配置智能检测程序V A4x,V A21,V A31和NetSightII-MCA;以及PC2-Vision, PC2-CamLink 的采集卡。
注意:PC2-Vision和PC2-CamLink在Sapera和IFC运行库下都受到支持。
然而,这两个库的驱动是相互冲突的,不要同时为PC2-Vision和PC2-CamLink安装这两个运行库。
Sapera和IFC的运行库和驱动都包含在Sherlock光盘里。
Sherlock图像采集设置Sherlock的初始化文件“Drivers,ini"指定其所使用的运行库和驱动:Sapera LT和SapaeraLTDrv.dll或IFC和IFCDrv.dll。
每一个运行库驱动都有自己的初始化文件,SaperaLTDrv.ini和IFCDrv.ini,每个运行库指定的初始化文件必须正确地定义至相机文件的所有路径,和在Sapera下头三个输入和输出的配置。
运行库驱动驱动初始化文件Sapera LT SaperaLTDrv.dll SaperaLTDrv.iniIFCI fcDrv.dllI fcDrv.ini你可以使用Sherlock的采集选项来编辑初始化文档,或者你可以使用Notepad或其它文档编辑器。
在Sherlock菜单栏,选择选项(Options)-采集(Acquisition) 来打开配置硬件对话框。
这是一个编辑Drivers.ini文件的界面。
在窗口的上方是采集卡硬件的输出结果。
当Sherlock启动时,你可以设置输出结果的初始状态。
在这个窗口的中间是驱动的列表。
下方是目前已下载驱动的配置。
启动你要使用的运行库的驱动,并禁用其它的驱动。
默认状态是Camera Simulator启用,其它为禁用。
当你改变驱动的选择时,此窗口的下方不能立刻做出改变。
只有在你打开Sherlock时才能下载驱动器。
如果你改变了选择的驱动器,那就先关闭Sherlock再重新打开。
再次打开设置硬件对话框(选项Options-采集Acquistion)并滑到窗口底部。
点击“驱动配置”按钮。
这个会打开Notepad,并打开驱动初始化文档。
编辑文档来修改至相机配置文件的所有路径。
4版本号:7140;2008年9月17日Sherlock 用户参照表程序设置版本号:7140;2008年9月17日 5程序设置403-00007-00如果你需要帮助如何配置相机和程序,请联系DALSA IPD的技术支持。
如果你在采集卡和相机配置上有任何疑问,请参考Sherlock光盘里的采集设置注意事项(Acquisition Setup note)。
注意:如果在SaperaLTDrv.ini文件里没有正确指定相机文件和输出,Sherlock软件也许就不能打开,因为驱动不能被正确下载。
如果你在选择完SaperaLT驱动之后不能打开,就用Windows Notepad编辑SaperaLTDrv.ini文件。
详细说明至相机配置文件的全部路径。
使用Sapera LT采集向导来获得正确值。
Sapera采集向导由版本7.1.2.0开始,Sherlock包含了“SaperaLT采集向导”,这个向导位于Windows 开始菜单。