东芝fanfun.petit 831T
东芝1.0L 1.8L电饭煲 保温盒说明书(中英版)

Model 1.0L Type1.8L TypeToshiba Mechanical Rice Cooker / WarmerInstruction ManualFor household usePlease read the instruction manual and use it correctly for your own safety.Before using, please read “Safeguards” and “Please follow the instructions”.After reading, please keep the instruction manual at a place where any personwho is going to use this cooker can find and see it.Thank you for purchasing Toshiba rice cooker.All pictures in this manual aresubject to material objects,and are only used for function display reference.ContentsIMPORTANT SAFEGUARDS..............1PRODUCT SPECIFICATION ..............2GETTING STARTED...........................3OPERATION INSTRUCTIONS............4PRECAUTIONS ..................................5TROUBLE SHOOTING.. (6)RC-10JRNHRC-18JRNHWhen using electrical appliances, basic safetyprecautions should be followed including the following:CautionIMPORTANT SAFEGUARDSI M P O R T A N T S A F E G U A R D SPRODUCT SPECIFICATIONThank you for purchasing the TOSHIBA rice cooker, please read this instruction manual carefully before using. Keep it cautiously after reading for future reference.At first use, there might be an odor from plastic, etc. This odor will disappear after using .P R O D U C T S P E C I F I C A T I O NCautionAll pictures in this manual are subject to material objects,and are only used for function display reference.GETTING STARTED1. Before using the appliance for the first time, clean the parts of the rice cooker thoroughly. Make sure all the parts are completely dry before you start using the appliance.2. To prevent the damage of the non-stick coating in the inner pot, use a separate container to wash the rice.3. Measure the rice using the measuring cup provided. Do not exceed the quantities indicated on the inside of the inner pot.4. Place the washed rice into the inner pot.5. Add water to the level indicated on the scale inside the inner pot that corresponds to the number of cups of rice used.6. Dry the outside of the inner pot.7. Place the inner pot in the rice cooker.8. Close the lid of the rice cooker until a ‘click’ sound is heard.9. Plug in the power cord into the rice cooker and to the wall socket and switch on the mains.G E T T I N G S T A R T E DOPERATION INSTRUCTIONSRice measuring and washing• The measuring cup is mainly used to measure the amount of rice. A flat cup of rice is 0.18L (approx.150g).• Do not wash rice directly with the inner pot to avoid scratching its non-stick layer, distortion it due to collision or result in a lower heat efficiency due to poor contact with the electric heating plate.1Put washed rice into the inner pot and add water to thecorresponding level (e.g.,add water to high level “3” if 3 cups of rice are to be cooked), add or reduce the amount of water depending on your personal taste highest level.2Mop up the interior and exterior of the inner pot with dry cloth, place it into the cooker body. Turn the inner pot gently for several times to allow its bottom come into contact with the electric heating plate.• No foreign matter can be allowed between inner pot and electric heating plate.• Make sure the cover is properly closed, otherwise the cooking effect may be affected.3If necessary, put the steam case into the inner pot when cooking, then put the food into the steam case directly or in a tray.4Press down the cover until it snaps in place.5CookingThe “WARM” lamp is illuminated after plugging into the outlet. The Rice Cooker are entering the cooking process until you have pressed the “COOK”. Otherwise, the Rice Cooker will still in warming process (Please be sure that you have pressed the “Cooking” Otherwise, the Rice Cooker will still in warming process).O P E R A T I O N I N S T R U C T I O N S6When cooking is finished, the cooking switch will pop up and a “Click” will be heard. At the same time, the cooking light will go out and keep warm light will go on.Special Hint:Rice is best served 15 minutes after cooking.7When filling bowl with rice, the attached spoon, not metal spoon, should be used to avoid scuffing the non-stickycoating of inner pot and causing exfoliation of coating at the same time, dry grain of cooked rice should be removed.8In order to keep cleanness and sanitation, please clean up the rice water in water holder after cooking.9STEAM FUNCTION (MANUAL CONTROL)Add appropriate amount of water into the inner pot.The amount of water varies according to the quantity of food to be steamed.Ensure that the water level does not exceed the height of the steam case. Insert the steam case into the inner pot and place the food on the plate or on the steam case.Press “COOK” button to start the cooking. The light indicator will switch to “COOK”If steam food together with rice cooking, "WARM" indicator will light up after rice cooking finished123If steam food without rice cooking (use steam function only), when steam food is fully cooked, please press "WARM" button manually, otherwise the rice cooker won't change to "WARM" automatically.NOTE: To ensure even steaming, the food should be spread out evenly and should not be piled up.4PRECAUTIONSSAFE NOTECLEANTake the inner pot out of the electric rice cooker, wash it with domestic liquefied detergent and rinse with fresh water and then wipe it dry with soft cloth.* Do not use metal brush or other harsh tools to wash inner pot to avoid damaging the non- stick coating on its surface.Take the water holder down and spill over water or soup and then install it after washing clean.The grain of cooked rice or other sundries may attach to electric hot tray, the fine sand paper can be used for grind them away and wipe it with soft cloth to keep the dully contact between inner pot and electric heating plate.The inner pot cannot be heated on any other furnace, otherwise it can be deformed easily .The cooked rice start to keep warm, it is not suitable for eating immediately and it will more soft and delicious if let it stewing for 15 minutes.The time of keeping warm don’t exceed 12 hours in order to avoid the cooked rice off flavor.The earthed wall socket should be used and the plug must be insertedreliably. Do not use multipurpose socket while using other electric appliance at the same time.When do not use it, please pull the power cord out of the socket.Please make sure the power plug is fully inserted into socket. otherwise the element may be burnt out by poor connection.The electric rice cooker can not be placed on unstable, wet place; fully otherwise it will be damaged or go wrong.When cooking, the steam port is extraordinary hot, do not close face or hands to avoid scald.The body and cover of electric rice cooker cannot be washed water or in water, otherwise the insulator will be damaged become dangerous.If the power cord is damaged, it must be changed with new power cord produced by the manufacturer.Do not let a child operate the product alone. Put it out of the reach of children to avoid electric shock, scald and other dangerous accident.12312312345678P R E C A U T I O N ST R O U B L E S H O O T I N G型號1.0L 型1.8L 型東芝機械電飯煲/保溫鍋使用說明書供家庭使用目錄重要安全措施...........................................1產品規格.................................................2開始使用.................................................3操作說明.................................................4注意事項.................................................5故障排除. (6)● 感謝您購買東芝電飯煲。
常用替换运放型号对比

常⽤替换运放型号对⽐常⽤替换运放型号对⽐CA3130 ⾼输⼊阻抗运算放⼤器 Intersil[DATA] CA3140 ⾼输⼊阻抗运算放⼤器 CD4573 四可编程运算放⼤器 MC14573ICL7650 斩波稳零放⼤器 LF347(NS[DATA]) 带宽四运算放⼤器 KA347 LF351 BI-FET单运算放⼤器 NS[DATA] LF353 BI-FET双运算放⼤器 NS[DATA] LF356 BI-FET单运算放⼤器 NS[DATA] LF357 BI-FET单运算放⼤器 NS[DATA] LF398 采样保持放⼤器 NS[DATA] LF411 BI-FET单运算放⼤器 NS[DATA] LF412 BI-FET双运放⼤器 NS[DATA] LM124 低功耗四运算放⼤器(军⽤档) NS[DATA]/TI[DATA] LM1458 双运算放⼤器 NS[DATA] LM148 四运算放⼤器 NS[DATA] LM224J 低功耗四运算放⼤器(⼯业档)NS[DATA]/TI[DATA] LM2902 四运算放⼤器 NS[DATA]/TI[DATA] LM2904 双运放⼤器 NS[DATA]/TI[DATA] LM301 运算放⼤器 NS[DATA] LM308 运算放⼤器 NS[DATA] LM308H 运算放⼤器(⾦属封装) NS[DATA] LM318 ⾼速运算放⼤器NS[DATA] LM324(NS[DATA]) 四运算放⼤器 HA17324,/LM324N(TI) LM348 四运算放⼤器 NS[DATA] LM358 NS[DATA] 通⽤型双运算放⼤器 HA17358/LM358P(TI) LM380 ⾳频功率放⼤器NS[DATA] LM386-1 NS[DATA] ⾳频放⼤器NJM386D,UTC386 LM386-3 ⾳频放⼤器 NS[DATA] LM386-4 ⾳频放⼤器 NS[DATA] LM3886 ⾳频⼤功率放⼤器 NS[DATA] LM3900 四运算放⼤器 LM725 ⾼精度运算放⼤器NS[DATA] LM733 带宽运算放⼤器 LM741 NS[DATA] 通⽤型运算放⼤器HA17741 MC34119 ⼩功率⾳频放⼤器 NE5532 ⾼速低噪声双运算放⼤器 TI[DATA] NE5534 ⾼速低噪声单运算放⼤器TI[DATA] NE592 视频放⼤器 OP07-CP 精密运算放⼤器 TI[DATA] OP07-DP 精密运算放⼤器 TI[DATA] TBA820M ⼩功率⾳频放⼤器 ST[DATA] TL061 BI-FET单运算放⼤器 TI[DATA] TL062 BI-FET双运算放⼤器 TI[DATA] TL064 BI-FET 四运算放⼤器 TI[DATA] TL072 BI-FET双运算放⼤器 TI[DATA] TL074 BI-FET四运算放⼤器 TI[DATA] TL081 BI-FET单运算放⼤器TI[DATA] TL082 BI-FET双运算放⼤器 TI[DATA] TL084 BI-FET四运算放⼤器 TI[DATA] AD824 JFET输⼊,单电源,低电压,低功耗,精密四运算放⼤器 MC33171 单电源,低电压,低功耗运算放⼤器 AD826 低功耗,宽带,⾼速双运算放⼤器 MC33172 单电源,低电压,低功耗双运算放⼤器AD827 低功耗,⾼速双运算放⼤器 MC33174 单电源,低电压,低功耗四运算放⼤器 AD828 低功耗,宽带,⾼速双运算放⼤器 MC33178 ⼤电流,低功耗,低噪⾳双运算放⼤器 AD844 电流反馈型,宽带,⾼速运算放⼤器 MC33179 ⼤电流,低功耗,低噪⾳四运算放⼤器 AD846 电流反馈型,⾼速,精密运算放⼤器 MC33181 JFET输⼊,低功耗运算放⼤器 AD847 低功耗,⾼速运算放⼤器 MC33182 JFET输⼊,低功耗双运算放⼤器AD8531 COMS单电源,低功耗,⾼速运算放⼤器 MC33184 JFET 输⼊,低功耗四运算放⼤器 AD8532 COMS单电源,低功耗,⾼速双运算放⼤器 MC33201 单电源,⼤电流,低电压运算放⼤器AD8534 COMS单电源,低功耗,⾼速四运算放⼤器 MC33202 单电源,⼤电流,低电压双运算放⼤器 AD9617 低失真,电流反馈型,宽带,⾼速,精密运算放⼤器 MC33204 单电源,⼤电流,低电压四运算放⼤器 AD9631 低失真,宽带,⾼速运算放⼤器MC33272 单电源,低电压,⾼速双运算放⼤器 AD9632 低失真,宽带,⾼速运算放⼤器 MC33274 单电源,低电压,⾼速四运算放⼤器 AN6550 低电压双运算放⼤器 MC33282 JFET输⼊,宽带,⾼速双运算放⼤器AN6567 ⼤电流,单电源双运算放⼤器 MC33284 JFET输⼊,宽带,⾼速四运算放⼤器 AN6568 ⼤电流,单电源双运算放⼤器 MC33502 BIMOS,单电源,⼤电流,低电压,双运算放⼤器 BA718 单电源,低功耗双运算放⼤器MC34071A 单电源,⾼速运算放⼤器 BA728 单电源,低功耗双运算放⼤器 MC34072A 单电源,⾼速双运算放⼤器 CA5160 BIMOS,单电源,低功耗运算放⼤器 MC34074A 单电源,⾼速四运算放⼤器 CA5260 BIMOS,单电源双运算放⼤器 MC34081 JFET输⼊,宽带,⾼速运算放⼤器 CA5420 BIMOS,单电源,低电压,低功耗运算放⼤器 MC34082 JFET输⼊,宽带,⾼速双运算放⼤器 CA5470 BIMOS单电源四运算放⼤器 MC34084 JFET输⼊,宽带,⾼速四运算放⼤器CLC400 电流反馈型,宽带,⾼速运算放⼤器 MC34181 JFET输⼊,低功耗运算放⼤器 CLC406 电流反馈型,低功耗,宽带,⾼速运算放⼤器 MC34182 JFET输⼊,低功耗双运算放⼤器 CLC410 电流反馈型,⾼速运算放⼤器 MC34184 JFET输⼊,低功耗四运算放⼤器 CLC415 电流反馈型,宽带,⾼速四运算放⼤器 MC35071A 单电源,⾼速运算放⼤器 CLC449 电流反馈型,宽带,⾼速运算放⼤器 MC35072A 单电源,⾼速双运算放⼤器 CLC450 电流反馈型,单电源,低功耗,宽带,⾼速运算放⼤器 MC35074A 单电源,⾼速四运算放⼤器 CLC452 单电源,电流反馈型,⼤电流,低功耗,宽带,⾼速运算放⼤器 MC35081 JFET输⼊,宽带,⾼速运算放⼤器CLC505 电流反馈型,⾼速运算放⼤器 MC35082 JFET输⼊,宽带,⾼速双运算放⼤器 EL2030 电流反馈型,宽带,⾼速运算放⼤器 MC35084 JFET输⼊,宽带,⾼速四运算放⼤器 EL2030C 电流反馈型,宽带,⾼速运算放⼤器 MC35171 单电源,低电压,低功耗运算放⼤器 EL2044C 单电源,低功耗,⾼速运算放⼤器 MC35172 单电源,低电压,低功耗双运算放⼤器 EL2070 电流反馈型,宽带,⾼速运算放⼤器 MC35174 单电源,低电压,低功耗四运算放⼤器 EL2070C 电流反馈型,宽带,⾼速运算放⼤器 MC35181 JFET输⼊,低功耗运算放⼤器 EL2071C 电流反馈型,宽带,⾼速运算放⼤器 MC35182 JFET输⼊,低功耗双运算放⼤器 EL2073 宽带,⾼速运算放⼤器 MC35184 JFET输⼊,低功耗四运算放⼤器 EL2073C 宽带,⾼速运算放⼤器 MM6558 低电压,低失调电压,精密双运算放⼤器 EL2130C 电流反馈型,宽带,⾼速运算放⼤器MM6559 低电压,低失调电压,精密双运算放⼤器 EL2150C 单电源,宽带,⾼速运算放⼤器 MM6560 低电压,低失调电压,精密双运算放⼤器 EL2160C电流反馈型,宽带,⾼速运算放⼤器 MM6561 低功耗,低电压,低失调电压,精密双运算放⼤器 EL2165C 电流反馈型,宽带,⾼速,精密运算放⼤器 MM6564 单电源,低电压,低功耗,低失调电压,精密双运算放⼤器 EL2170C 单电源,电流反馈型,低功耗,宽带,⾼速运算放⼤器MM6572 低噪⾳,低电压,低失调电压,精密双运算放⼤器 EL2175C 电流反馈型,宽带,⾼速,精密运算放⼤器 NE5230单电源,低电压运算放⼤器 EL2180C 单电源,电流反馈型,低功耗,宽带,⾼速运算放⼤器NE5512 通⽤双运算放⼤器 EL2224 宽带,⾼速双运算放⼤器 NE5514 通⽤四运算放⼤器 EL2224C 宽带,⾼速双运算放⼤器NE5532 低噪⾳,⾼速双运算放⼤器 EL2232 电流反馈型,宽带,⾼速双运算放⼤器NE5534 低噪⾳,⾼速运算放⼤器 EL2232C 电流反馈型,宽带,⾼速双运算放⼤器 NJM2059 通⽤四运算放⼤器 EL2250C 单电源,宽带,⾼速双运算放⼤器 NJM2082 JFET输⼊,⾼速双运算放⼤器 EL2260C 电流反馈型,宽带,⾼速双运算放⼤器 NJM2107低电压,通⽤运算放⼤器 EL2270C 单电源,电流反馈型,低功耗,宽带,⾼速双运算放⼤器 NJM2112 低电压,通⽤四运算放⼤器EL2280C 单电源,电流反馈型,低功耗,宽带,⾼速双运算放⼤器 NJM2114 低噪⾳双运算放⼤器 EL2424 宽带,⾼速四运算放⼤器NJM2115 低电压,通⽤双运算放⼤器 EL2424C 宽带,⾼速四运算放⼤器 NJM2119 单电源,精密双运算放⼤器 EL2444C 单电源,低功耗,⾼速四运算放⼤器 NJM2122 低电压,低噪⾳双运算放⼤器 EL2450C 单电源,宽带,⾼速四运算放⼤器 NJM2130F 低功耗运算放⼤器 EL2460C 电流反馈型,宽带,⾼速四运算放⼤器 NJM2132 单电源,低电压,低功耗双运算放⼤器 EL2470C 单电源,电流反馈型,低功耗,宽带,⾼速四运算放⼤器 NJM2136 低电压,低功耗,宽带,⾼速运算放⼤器 EL2480C 单电源,电流反馈型,低功耗,宽带,⾼速四运算放⼤器NJM2137 低电压,低功耗,宽带,⾼速双运算放⼤器 HA-2640 ⾼耐压运算放⼤器 NJM2138 低电压,低功耗,宽带,⾼速四运算放⼤器 HA-2645 ⾼耐压运算放⼤器 NJM2140 低电压双运算放⼤器 HA-2839 宽带,⾼速运算放⼤器NJM2141 ⼤电流,低电压双运算放⼤器 HA-2840 宽带,⾼速运算放⼤器 NJM2147 ⾼耐压,低功耗双运算放⼤器 HA-2841 宽带,⾼速运算放⼤器 NJM2162 JFET输⼊,低功耗,⾼速双运算放⼤器HA-2842 宽带,⾼速运算放⼤器 NJM2164 JFET输⼊,低功耗,⾼速四运算放⼤器 HA-4741 通⽤四运算放⼤器 NJM3404A 单电源,通⽤双运算放⼤器 HA-5020 电流反馈型,宽带,⾼速运算放⼤器 NJM3414 单电源,⼤电流双运算放⼤器 HA-5127 低噪⾳,低失调电压,精密运算放⼤器 NJM3415 单电源,⼤电流双运算放⼤器 HA-5134 低失调电压,精密四运算放⼤器 NJM3416 单电源,⼤电流双运算放⼤器 HA-5137 低噪⾳,低失调电压,⾼速,精密运算放⼤器 NJM4556A ⼤电流双运算放⼤器 HA-5142 单电源,低功耗双运算放⼤器NJM4580 低噪⾳双运算放⼤器 HA-5144 单电源,低功耗四运算放⼤器 NJU7051 CMOS单电源,低功耗,低电压,低失调电压运算放⼤器 HA-5177 低失调电压,精密运算放⼤器 NJU7052 CMOS单电源,低功耗,低电压,低失调电压双运算放⼤器 HA-5221 低噪⾳,精密运算放⼤器 NJU7054 CMOS单电源,低功耗,低电压,低失调电压四运算放⼤器 HA-5222 低噪⾳,精密双运算放⼤器 NJU7061 CMOS单电源,低功耗,低电压,低失调电压运算放⼤器 HA-7712 BIMOS,单电源,低功耗,精密运算放⼤器NJU7062 CMOS单电源,低功耗,低电压,低失调电压双运算放⼤器 HA-7713 BIMOS,单电源,低功耗,精密运算放⼤器 NJU7064 CMOS单电源,低功耗,低电压,低失调电压四运算放⼤器 HA16118 CMOS单电源,低电压,低功耗双运算放⼤器 NJU7071 CMOS 单电源,低功耗,低电压,低失调电压运算放⼤器 AD704 低偏置电流,低功耗,低失调电压,精密四运算放⼤器 MAX430 CMOS单电源运算放⼤器 AD705 低偏置电流,低功耗,低失调电压,精密运算放⼤器 MAX432 CMOS 单电源运算放⼤器 AD706 低偏置电流,低功耗,低失调电压,精密双运算放⼤器 MAX4330 单电源,低电压,低功耗运算放⼤器 AD707 低失调电压,精密运算放⼤器MAX4332 单电源,低电压,低功耗双运算放⼤器AD708 低失调电压,精密双运算放⼤器 MAX4334 单电源,低电压,低功耗四运算放⼤器 AD711 JFET输⼊,⾼速,精密运算放⼤器 MAX473 单电源,低电压,宽带,⾼速运算放⼤器 AD712 JFET输⼊,⾼速,精密双运算放⼤器 MAX474 单电源,低电压,宽带,⾼速双运算放⼤器 AD713 JFET输⼊,⾼速,精密四运算放⼤器MAX475 单电源,低电压,宽带,⾼速四运算放⼤器AD744 JFET输⼊,⾼速,精密运算放⼤器 MAX477 宽带,⾼速运算放⼤器 AD745 JFET输⼊,低噪⾳,⾼速运算放⼤器 MAX478 单电源,低功耗,精密双运算放⼤器AD746 JFET输⼊,⾼速,精密双运算放⼤器 MAX478A 单电源,低功耗,精密双运算放⼤器 AD795 JFET输⼊,低噪⾳,低功耗,精密运算放⼤器 MAX479 单电源,低功耗,精密四运算放⼤器 AD797 低噪⾳运算放⼤器MAX479A 单电源,低功耗,精密四运算放⼤器 AD8002 电流反馈型,低功耗,宽带,⾼速双运算放⼤器MAX480 单电源,低功耗,低电压,低失调电压,精密运算放⼤器 AD8005 电流反馈型,低功耗,宽带,⾼速双运算放⼤器 MAX492C 单电源,低功耗,低电压,精密双运算放⼤器AD8011 电流反馈型,低功耗,宽带,⾼速运算放⼤器 MAX492E 单电源,低功耗,低电压,精密双运算放⼤器 AD8031 单电源,低功耗,⾼速运算放⼤器 MAX492M 单电源,低功耗,低电压,精密双运算放⼤器 AD8032 单电源,低功耗,⾼速双运算放⼤器MAX494C 单电源,低功耗,低电压,精密四运算放⼤器 AD8041 单电源,宽带,⾼速运算放⼤器 MAX494E 单电源,低功耗,低电压,精密四运算放⼤器 AD8042 单电源,宽带,⾼速双运算放⼤器 MAX494M 单电源,低功耗,低电压,精密四运算放⼤器 AD8044 单电源,宽带,⾼速四运算放⼤器 MAX495C 单电源,低功耗,低电压,精密运算放⼤器 AD8047 宽带,⾼速运算放⼤器 MAX495E 单电源,低功耗,低电压,精密运算放⼤器AD8055 低功耗,宽带,⾼速运算放⼤器 MAX495M 单电源,低功耗,低电压,精密运算放⼤器 AD8056 低功耗,宽带,⾼速双运算放⼤器 MC1458 通⽤双运算放⼤器 AD8072 电流反馈型,宽带,⾼速双运算放⼤器MC1458C 通⽤双运算放⼤器 AD812 电流反馈型,低电压,低功耗,⾼速双运算放⼤器 MC33071A 单电源,⾼速运算放⼤器AD817 低功耗,宽带,⾼速运算放⼤器 MC33072A 单电源,⾼速双运算放⼤器 AD818 低功耗,宽带,⾼速运算放⼤器 MC33074A 单电源,⾼速四运算放⼤器 AD820 JFET输⼊,单电源,低电压,低功耗,精密运算放⼤器 MC33078 低噪⾳双运算放⼤器 AD822 JFET输⼊,单电源,低电压,低功耗,精密双运算放⼤器MC33079 低噪⾳四运算放⼤器 AD823 JFET输⼊,单电源,低电压,低功耗,精密,⾼速双运算放⼤器 MC33102 低功耗双运算放⼤器 HA16119 CMOS单电源,低电压,低功耗双运算放⼤器 NJU7072 CMOS单电源,低功耗,低电压,低失调电压双运算放⼤器 HFA1100 电流反馈型,宽带,⾼速运算放⼤器 NJU7074 CMOS单电源,低功耗,低电压,低失调电压四运算放⼤器 HFA1120 电流反馈型,宽带,⾼速运算放⼤器 OP-07 低漂移,精密运算放⼤器 HFA1205电流反馈型,低功耗,宽带,⾼速双运算放⼤器 OP-113 BICMOS单电源,低噪⾳,低失调电压,精密运算放⼤器 HFA1245 电流反馈型,低功耗,宽带,⾼速双运算放⼤器 OP-150 COMS,单电源,低电压,低功耗 ICL7611 CMOS低电压,低功耗运算放⼤器 OP-160 电流反馈型,⾼速运算放⼤器 ICL7612 CMOS低电压,低功耗运算放⼤器 OP-162 单电源,低电压,低功耗,⾼速,精密运算放⼤器ICL7621 CMOS低电压,低功耗双运算放⼤器 OP-177 低失调电压,精密运算放⼤器 ICL7641 CMOS低电压四运算放⼤器OP-183 单电源,宽带运算放⼤器 ICL7642 CMOS低电压,低功耗四运算放⼤器 OP-184 单电源,低电压,⾼速,精密运算放⼤器ICL7650S 稳压器 OP-191 单电源,低电压,低功耗运算放⼤器 LA6500 单电源,功率OP 放⼤器 OP-193 单电源,低电压,低功耗,精密运算放⼤器 LA6501 单电源,功率OP放⼤器 OP-196 单电源,低电压,低功耗运算放⼤器 LA6510 2回路单电源功率OP放⼤器 OP-200 低功耗,低失调电压,精密双运算放⼤器" LA6512 ⾼压,功率OP放⼤器双运算放⼤器 OP-213 BICMOS单电源,低噪⾳,低失调电压,精密双运算放⼤器 LA6513 ⾼压,功率OP放⼤器双运算放⼤器 OP-250 COMS,单电源,低电压,低功耗双运算放⼤器LA6520 单电源,功率OP放⼤器三运算放⼤器 OP-260 电流反馈型,⾼速双运算放⼤器 LF356 JFET输⼊,⾼速运算放⼤器 OP-262 单电源,低电压,低功耗,⾼速,精密双运算放⼤器 LF356A JFET输⼊,⾼速运算放⼤器 OP-27 低噪⾳,低失调电压,精密运算放⼤器 LF411 JFET输⼊,⾼速运算放⼤器 OP-270 低噪声,低失调电压,精密双运算放⼤器 LF411A JFET输⼊,⾼速运算放⼤器 OP-271 精密双运算放⼤器 LF412 JFET输⼊,⾼速双运算放⼤器 OP-275 ⾼速双运算放⼤器 LF412A JFET输⼊,⾼速双运算放⼤器 OP-279 单电源,⼤电流双运算放⼤器 LF441 低功耗,JFET输⼊运算放⼤器 OP-282 JFET输⼊,低功耗双运算放⼤器 LF441A 低功耗,JFET输⼊运算放⼤器 OP-283 单电源,宽带双运算放⼤器 LF442 低功耗,JFET输⼊双运算放⼤器 OP-284 单电源,低电压,⾼速,精密双运算放⼤器 LF442A 低功耗,JFET输⼊双运算放⼤器OP-290 单电源,低功耗,精密双运算放⼤器 LF444 低功耗,JFET输⼊四运算放⼤器 OP-291 单电源,低电压,低功耗双运算放⼤器 LF444A 低功耗,JFET输⼊四运算放⼤器 OP-292 BICMOS单电源,通⽤双运算放⼤器 LM2902 单电源四运算放⼤器 OP-293 单电源,低电压,低功耗,精密双运算放⼤器 LM2904 单电源双运算放⼤器 OP-295 BICMOS低功耗,精密双运算放⼤器 LM324 单电源四运算放⼤器 OP-296 单电源,低电压,低功耗双运算放⼤器 LM358 单电源双运算放⼤器 OP-297 低电压,低功耗,低漂移,精密双运算放⼤器LM4250 单程控、低功耗运算放⼤器 OP-37 低噪⾳,低失调电压,⾼速,精密运算放⼤器 LM607 低失调电压,精密运算放⼤器 OP-400 低功耗,低失调电压,精密四运算放⼤器 LM6118 宽带,⾼速双运算放⼤器OP-413 BICMOS单电源,低噪⾳,低失调电压,精密四运算放⼤器。
东芝电器有限公司电子洗衣机指南说明书

E n g l i s hDISHWASHERINSTRUCTION MANUALModel:DW-10F1CIS(W)-UA DW-10F1CIS(S)-UARead these instructions carefully before using your DISHWASHER, and keep it carefully.SAFETY INSTRUCIONSAll instructions described should be carefully read and followed.These instructions are precautions to prevent the risks of serious injury or death of the user, and any damages to property.(*1) Serious injury - injury which requires hospitalization, lengthy treatment, or blindness, hot and cold skin burn, electric shock, broken bones or poisoning.(*2) Injury - injury, skin burn or electric shock which does not require hospitalization or lengthy treatment.(*3) Property loss - extended loss of houses, furniture, domestic animals or pets.02E n g l i s h03040506Handle the package of the dishwasher with extreme care.All packages are recyclables.Plastic parts are marked with abbreviation of international standard;TreatmentsPE Polyethylene, e.g., tableted package material Polystyrene, e.g., packing material Polymethyl, e.g., plastic clip Polymer, e.g., control panel Polypropylene, e.g., inner wallPS POM ABS PPE n g l i s hSuch warning sign is used to prevent dangers to you and others.Please follow it strictly.After reading, please store it properly for use just in case.07Start upCleaning and care Filter cleaning Spray arms cleaning Care and maintenanceRecognize the dishwasher Dishwasher features Control panel Use the dishwasher Water softenerAdding salt to the softener Adding rinse aid to the dispenser 10111301020304Rinse aid and detergent 1617182627281914Please carefully read the instruction manual before using the dishwasher,and this is helpful for the use and maintenance of the product.ContentsProgram Setting Washing program 08Changing the program mid-cycle Put additional dishes in End of washing programBasket used tipsInstall dishwasher bowl basket 2021Adding rinse aid to the dispenser 24141515TroubleshootingBefore connecting customer service center Error code Installation Product dimension Power connection 052930323435Specification06Water connection Connection of drain hoses303109Recognize the dishwasherDishwasher featuresImportant:Before using the dishwasher for the first time, read following instructions to ensure the best results.Salt containerFilterLower spray armDispenserCutlery basket Lower basketUpper basket Upper spray arm Cutlery rackCup rackControl panelE n g l i s hFollowing table shows best cleaning procedures and amount of dishwashing powder required according to the dirty level of the dishes, as well as the Washing programDishwashing powder (g)Highest Water Temperature65℃Time (min)Power (K wh)Water (L)ProgramAUTO1503/221 piece 0.9-1.39.5~1362℃2050.749GLASS60℃1340.811265℃90251 piece1.1511.5RAPID55℃300.71020HYGIENE70℃170 1.2715.5Program SettingE n g l i s h3/221 piece 3/221 piece 3/221 pieceStart upChanging the program mid-cycle1. The plug shall be firstly plugged into the socket. Power supply shall be of 220-240V AC 50Hz type, with socket of 10 A 220-240V AC.2. Make sure that the water supply is turned on to full pressure.3. Close the door, press "ON/OFF" button turn on the dishwasher.4. Press the button of desired program, the corresponding indicator will light up.5. Then, pass”Start/Pause”button to start.A wash cycle can only be changed if it has been running for a short time otherwise, the detergent may have already been released and the dishwasher may have already drained the wash water. If this is the case, the dishwasher needs to be reset and the detergent dispenser must be refilled. To reset the dishwasher, follow the instructions below:1. Press the Start/Pause button to pause the washing.2. Press the Program button for more than 3 seconds, the dishwasher will enter standby mode.3. Press the Program button to select the desired program.4. Press the Start/Pause button, the dishwasher will run after 10 seconds.3 secondsPut dishes inadditional Additional dishes can be placed in at any time before dishwasher program start. If you want to reload dishes in the process of washing, please follow instructions below:1. Press “Start/Pause” button to pause washing program;2. Wait for 5 seconds to open the door;3. Put the additional dishes in;4. Close the door;5. Press “Start/Pause” button and after 10 seconds, the dishwasher will start again.End of washing programAfter the program finishes, the machine show "End" after the buzzer beeps for 8 seconds. Turn off the machinePress ON/OFF button to turn off the dishwasher.Hot dishes are more likely to be damaged. The dishes shall be cool for about 15 minutes and then taken out from the dishwasher.Open the door carefullyClear the dishwasherIt is normal that the dishwasher still remains wet inside.E n g l i s hThe dishwasher is designed to allow for adjustment in the amount of salt consumed based on the hardness of the water used. This is intended to optimise and customise the level of salt consumption.Please follow the steps below for adjustment in salt consumption.0 - 56 - 1112 - 1718 - 2223 - 3435 - 55German dH Salt consumption(gram/cycle)0 - 910 - 2021 - 3031 - 4041 - 6061 - 980 - 67 - 1415 - 2122 - 2829 - 4243 - 690 - 0.941.0 - 2.02.1 - 3.03.1 - 4.04.1 - 6.06.1 - 9.80912203060FrenchfH Mmol/l Water softener level British Clarke WATER HARDNESSH1H2H3H4H5H6dH=1.25Clarke=1.78fH=0.178mmol/l°°°1The water softener must be set manually, using the water hardness dial.The water softener is designed to remove minerals and salts from the water, which would have a detrimental or adverse effect on the operation of the appliance. The more minerals there are, the harder your water is.The softener should be adjusted according to the hardness of the water in your area. Your local Water Authority can advise you on the hardness of the water in your area.1. Close the door and s witch on the appliance .2. Press the Start/Pause button for more than 5 seconds ,when the salt indicator flashes means entering the water softener settings.set model within 60 seconds after the appliance was switched on .3. Press the Start/Pause button to select the proper set according to your local environment, the sets will change in the following sequence: H1->H2->H3->H4->H5->H6.4. Without any operation in five seconds, the machine will exit from set mode, the machine is into standby status.Use the dishwasherWater softenerAdjusting salt consumptionThe manufactory setting: H3Contact your local water board for information on the hardness of your water supply.1. Remove the lower basket and unscrew the reservoir cap.2. Place the end of the funnel (supplied) into the hole and pour in about 1.5kg of dishwasher salt.3. Fill the salt container to its maximum limit with water, It is normal for a small amount of water to come out of the salt container.4. After filling the container, screw back the cap tightly.5. The salt warning light will stop being after the salt container has been filled with salt.6. Immediately after filling the salt into the salt container, a washing program should be started (We suggest to use a short program). Otherwise the filter system, pump or other important parts of the machine may be damaged by salty water. This is out of warranty.Please follow the steps below for adding dishwasher salt:Adding salt to the softenerE n g l i s hFunction of the rinse aid and detergentThe rinse aid is released during the final rinse to prevent water from forming droplets on your dishes, which can leave spots and streaks. It also improves drying by allowing water to roll off the dishes. Your dishwasher is designed to use liquid rinse aids.When to refill the rinse aidThe regularity of the dispenser needing to be refilled depends on how often dishes are washed and the rinse aid setting used.The Low Rinse Aid indicator ( ) will appear in the display when more rinse aid is needed.Do not overfill the rinse aid dispenser.Function of detergentThe chemical ingredients that compose the detergent are necessary to remove, crush and dispense all dirt out of the dishwasher. Most of the commercial quality detergents are suitable for this purpose.To achieve a better drying performance with limited rinse aid, the dishwasher is designed to adjust the consumption by user. Follow the below steps.1. .Close the door and s witch on the appliance 2. Within 60 seconds after step 1, press the Start/Pause button more than 5 seconds, and then press the Delay button to enter the set model, the rinse aid indication blinks as 1 Hz frequency.3. Press the Start/Pause button to select the proper set according to your using habits , the sets will change in the following sequence: D1->D2->D3->D4->D5->D1. The higher the number, the more rinse aid the dishwasher uses.4. Without operation in 5 seconds or press the Power button to exit the set model, the set success.Adjusting the rinse aid reservoirAdding rinse aid to the dispenserE n g l i s h1. Open the cap by sliding the release catch.2. Open the cap by pressing down the release catch.For better cleaning result, especially if you have very dirt items, pour a small amount of detergent onto the door. The additional detergent will activate during the pre-wash phase.Adding detergent to the dispenser20Dishes and knives should not be placed in other utensils, and they can’t overlaid each other.Do not place glass close to each other to avoid damage.For long knives, placing upright is very dangerous.Precautions before and after the bowl basket is placedInstall dishwasher bowl basketSuggestionUse the dishwashing machine rationallyPurchase dishes suitable for dishwasher.Use a suitable mild dishwashing powder. If necessary, consult the manufacturer for more information.For special appliances, try to select a washing program that with a lower temperature.Do not take out the glass dishes immediately after the program ends to prevent damage.Limited use:Not for:Wooden, ivory, porcelain or pearl shank tool Non heat-resistant plastic products Cohesive knives or dishes Tin or copper vessels Crystal glass Rusty steel products Wooden utensils Synthetic fiber productsStale non heat-resistant cutters with glue adhesive partAfter several cleanings, some glassware will become dullColor of smooth dishes may fade out if often washedSilver or aluminum products tend to change color during cleaning(For the best use of dishwasher, follow the instructions below. For different models, the characteristics and appearance of the basket will be different) Clear larger food residues.Soften the residue of burnt food left on the pan. It is not necessary to rinse dishes with water first. Place the dishes in the dishwasher as follows:Cups, glasses, pots and so on are placed face down.For curved or concave and convex vessels, place them diagonally so that the water flows out. All utensils should be placed safely and must not be overturned.All utensils should be placed that the arms can rotate freely during washing.The open of hollow tablewares (such as cups, glasses, pots, etc.) should face downward so that water does not easily remain in the container or grooves.Long or sharp knives (eg. meat cleavers) should be placed horizontally in the basket.Do not use the dishwasher overloaded so that you can get better cleaning performance.E l i 21Loading the lower basketUse the upper rack for small or delicate items such as small plates,cups, saucers, glasses, and dishwasher-safe plastic items.Place items so that the open end faces down for cleaning and drying. Do not stack items on top of each other.The lower rack is recommended for dinner plates, soup bowls, dishes, pots, pans, lids, and grill trays. Plates should be positioned vertically and facing the center of the rack.Make sure that large items do not interfere with the rotation of the spray arms, and do not prevent the detergent dispenser from opening.2289810711977The cutlery rack is best suited for washing flatware and most cooking or serving utensils. The separators on the cutlery racks help keep flatware separated to avoid damage and improve cleaning.E n g l i s h231111111111444874444444Adjusting the upper basketThe height of the upper basket can be easily adjusted to accommodate taller dishes in either the upper or lower basket. We recommend adjust the height of the upper basket before loading dishes.To adjust the height of the upper rack, follow these steps:each side until the basket locks into place in the upper position. It is not necessary to lift the adjuster handle.release the basket and lower it to the lower position.Basket used tips24Folding back the cup shelvesTo make room for taller items in the upper basket, raise the cup rack upwards. You can then lean the tall glasses against it. You can also remove it when it is not required for use.raise upwardsfold backwardsFolding back the rack shelvesThe spikes of the lower basket are used for holding plates and a platter. They can be lowered to make more room for large items.E n g l i s h25Cleaning and careThe filtering system in the base of the wash cabinet retains coarse debris from the washing cycle. The collected coarse debris may cause the filters to clog. Check the condition of the filters regularly and clean them if necessary under running water.Follow the steps below to clean the filters in the wash cabinet.Filter cleaningLift the filter upwards and out of the dishwasher.The coarse filter can be detached from the main filter by gently squeezing thetabs at the top and pulling it away.For a more thorough clean, use a softcleaning brush.filter insert, and rotate clockwise tothe close arrow.26the jets. Replace them after rinsing them thoroughly.It is necessary to clean the spray arms regularly for hard water chemicals will clog the spray arm jets and bearings.To clean the spray arms, follow the instructions below:rotate the spray arm counterclockwise to remove it.Spray arms cleaningE n g l i s h27Care and maintenanceThe door and the door sealClean the door seals regularly with a soft damp cloth to remove food deposits.When the dishwasher is being loaded, food and drink residues may drip onto the sides of the dishwasher door. These surfaces are outside the wash cabinet and are not accessed by water from the spray arms. Any deposits should be wiped off before the door is closed. The control panelControl panel can be wiped with a slightly wet cloth. After cleaning, make sure it iscompletely dry.Do not use Sharp tools, Scratch sponge, or Rough detergent anywhere in the machine.28Height (H)Width (W)Depth (D1)Depth (D2)845mm 448mm600mm (with the door closed)1175mm (with the door opened 90°)InstallationProduct dimensionE n g l i s h29Power connectionPower requirementsPlease check the label of rated value of power supply system for knowing rated voltage and connect the machine to appropriate power supply. 10A fuse is required and time-delay fuse or circuit breaker is recommended. Only separate circuit is suitable for this machine. Machine connectionMake sure that supplied voltage and frequency correspond to those on rating plate. Plug can only be connected to a properly grounded socket. If the socket that the machine must be connected to is not suitable for the plug, replace the socket, and do not use a power adapter that may cause overheating and burning.Water connectionConnect the cold water supply hose to a threaded 3/4(inch) connector and make sure that it is fastened tightly in place.If the water pipes are new or have not been used for an extended period of time, let the water run to make sure that the water is clear. This precaution is needed to avoid the risk of the water inlet to be blocked and damage the appliance.Please securely fix the drain hose in either position A or position BInsert the drain hose into a drain pipe with a minimum diameter of 4 cm, or let it run into the sink, making sure to avoid bending or crimping it. The height of drain pipe must be less than 1000mm. The free end of the hose must not be immersed in water to avoid the back flow of it.Extension hoseWater outletHow to drain excess water from hosesSyphon connectionIf the sink is 1000 higher from the floor, the excess water in hoses cannot be drained directly into the sink. It will be necessary to drain excess water from hoses into a bowl or suitable container that is held outside and lower than the sink.Connect the water drain hose. The drain hose must be correctly fitted to avoid water leaks. Ensure that the water drain hose is not kinked or squashed.The waste connection must be at a height less than 100 cm (maximum) from the bottom of the dish. The water drain hose should be fixed .If you need a drain hose extension, make sure to use a similar drain hose.It must be no longer than 4 meters; otherwise the cleaning effect of the dishwasher could be reduced.Connection of drain hosesE n g l i s hTroubleshootingBefore connecting customer service center Please check the chart below before connecting customer service centerE n g l i s hError codeWhen failure occurs, error code will appear to remind you:SpecificationE n g l i s h。
东芝数码复印机之代码解鼓
东芝数码复印机之代码解鼓toshiba新增加部份08代码08-340 鼓寿命计数值设定(当08-689设为“1”时有效)接受值0---99999;默认值168S/208S =27000 258s=33000注:当08-355中的数值(鼓计数显示)达到设置值(08-340鼓寿命设置值)的10倍时,更换鼓”将显示在LCD上当08-340中鼓寿命设置值为0,就不会显示“更换鼓”08-673 鼓想关计数器值清零(当08-689设为“1”时有效)进行08-673的操作后,下列计数值将被清零;08-355 鼓计数显示08-401 鼓寿命计数理光FT5840/5627/5827调整代码1-001 功能:调整先端对位设置:0-32 预设值=16 每级0.5MM1-003 功能:调节每个纸路在对位处的供纸时序设置:0-32 预设值=16 每级1MM1-008 功能:卡纸检测,忽略传感器信号以检测为目的设置:0:OFF 1:ON1-103 功能:定影空转2分钟设置:0:OFF 1:ON1-104 功能:选择定影灯温度控制方式设置:0:ON/OFF 1:相位控制1-105-1 功能:定影温度控制设置:170-190 预设值=1801-105-2 功能:节能定影温度控制设置:0-5 预设值=01-105-3 功能:定影温度调整(副定影灯)设置:160-190 预设值=1751-106 功能:定影灯显示1-108 功能:选择是否强制启动设置:0:OFF 1:ON1-902 功能:调节双面器齐纸侧挡板的停止位置设置:0-32 预设值=16 每级0.5MM1-905 功能:调节双面器齐纸后挡板的停止位置设置:0-32 预设值=16 每级0.52-001 功能:鼓充电电压调整,每级30V,设置:0-32 预设值=162-002-1 功能:鼓充电压显示,实际值为显示值102-002-2 功能:鼓充电压显示,VSP图样2-003 功能:鼓充电压调整,每级10V设置:0-32 预设值=162-101-1 功能:调节前端删边空白设置:0-32 预设值=16 每级0.52-101-2 功能:调节后端删边空白设置:0-32 预设值=16 每级0.52-201-1 功能:调节复印的显影偏压,每级20V设置:1-9 预设值=5 1:最深9:最浅2-201-2 功能:调节手动ID第7级的显影偏压设置:1:-40V 2:+(-)0V 3:-80V 4:-120V2-203 功能:显影偏压调整,用于VSP图样,每级20V设置:1-10 预设值=62-206-1 功能:显示显影偏压,显示值102-206-2 功能:显示用于制作VSP样本的显影偏压2-207 功能:强制补粉30秒,复印键开始,清除键中断2-208-1 功能:补粉方式选择设置:1:TD传感器补粉方式2:定量补粉方式3:检测补粉方式(预设值)2-208-2 功能:TD传感器补粉方式的补粉率,预设值=7%设置:1:7% 2:15% 3:30% 4:60%2-208-3 功能:定量补粉方式的补粉率,预设值=6%设置:1:2% 2:4% 3:6% 4:11%2-214 功能:TD传感器的初期设定,按下复印键2.5分钟自动停止,输出为2.5V [只有加入新显影剂后使用次方式]2-215-1 功能:显示当前TD传感器的输出2-215-2 功能:显示TD传感器参考输出2-220 功能:显示TD传感器初期设定输出,显示2.5V(执行SP2-214后)2-222 功能:选择检测补粉方式的补粉率,预设值=7%设置:1:7% 2:15% 3:30% 4:60%2-301 功能:转印电流调整设置:0-32 预设值=142-801 功能:搅拌显影剂“START”开始“CLEAR STOP”结束2-802 功能:显示鼓充电辊温度[0-60度]2-812 功能:鼓反转调整设置:0-32 预设值=162-901 功能:鼓充电辊清洁间隔设置:0:每1000张1:每500张2:每200张3:每100张2-902 功能:不是用3-001 功能:ID传感器初期设定,调节至4.0V3-002 功能:显示ID传感器初期设定值3-103-1 功能:显示ID传感器输出(VSP)3-103-2 功能:显示ID传感器输出(VSG)设置:VSP=0.01-2.50 VSG=4.0 VSP/VSG=0.13-105 功能:VL强制检测3-106 功能:检测由SP3-105 检测到的初期VLP/VLG值3-107 功能:显示当前VLP/VLG的值3-111 功能:显示当前VRP/VRG的值3-112 功能:VR强制检测“START”检测开始3-123 功能:鼓的初始化(只有安装新鼓后必须执行)3-801 功能:自动过程控制方式选择设置:0:OFF 1:ON3-901 功能:执行暴光灯熄灭的空运转,显影器必须取出3-902 功能:强制过程控制4-001 功能:暴光灯电压调整设置:50-75 预设值=63 每级0.54-002 功能:显示当前的暴光灯电压设置:50-854-008 功能:垂直倍率调整(送纸方向的倍率)设置:0-32 预设值=16 每级0.1%4-001-1 功能:镜头水平原位调整,01:第一纸盘02:第二纸盘03:第三纸盘04:第四纸盘至05:第五纸盘06:手送纸07:LCT 08:基准调整09:ADF4-001-9 设置:0-32 预设值=16 每级0.2MM4-013 功能:扫描架空运转4-101 功能:水平倍率调整(垂直于送纸方向的倍率)设置:0-32 预设值=16 每级0.2%4-102 功能:镜头误差较正设置:0-16 预设值=8 每级0.1%4-103 功能:聚焦调整,调节第三反光镜的位置设置:0-150 预设值=75 每级0.054-201 功能:自动ADS增益调整,输出2.7V4-202 功能:ADS初期增益显示4-203 功能:ADS实际增益显示4-301 功能:APS传感器功能检查4-302 功能:安装了选购件APS传感器后将其设置为1设置:0:没有安装1:已经安装4-303 功能:APS A5/HL T检测,选择是否强制检测设置:0:NO 1:YES4-901 功能:APS尺寸优先设置:0:81/213 1:813 2:81/4134-902 功能:APS 8K/16K检测设置:0:NO 1:YES5-001 功能:点亮操作面板上的全部显示5-002 功能:优先纸路选择设置:1:第一纸盘2:第二纸盘3:第三纸盘4:第四纸盘5:第五纸盘6:LCT 5-003 功能:APS优先选择设置:1:APS 2:手动5-004 功能:ADS优先选择设置:1:ADS 2:手动5-013 功能:计数器递增或递减设置:1:递增2:递减5-017 功能:最大复印数量设置:1-999 预设值=9995-019 功能:各纸路纸尺寸设定5-101 功能:自动复位时间设定设置:0-999 预设值=605-102 功能:自动节能时间设定设置:0-999 预设值=605-103 功能:自动纸盘切换设置:0:关1:开5-104 功能:A3/DL T加倍计数设置:0:关1:开5-106 功能:选择图象浓度等级较正设置:0:浓1:通常2:浅5-107-1 功能:用于控制左,右白边移动的白边宽度调整量至5-107-2 设置:A4机型0-15,预设值=5 L T机型0-0.60,预设值=0.205-108 功能:调节边框删除方式下的边框删除白边宽度设置:1:5MM 2:10MM5-110 功能:中央删除白边调整设置:8-25 预设值=205-113 功能:投币锁安装设置:0:不安装1:安装5-115 功能:指定是否使用双面图象移动(背面白边)设置:0:NO 1:YES5-121 功能:T/C(总数计数器)计数时序设置:0:供纸1:出纸5-305 功能:自动关机时间设定设置:0-999 预设值=0(不是用)每级1分钟5-401 功能:用户代码方式设置:0:钥匙计数器1:用户代码5-402 功能:拥护代码计数器检查设置:按住“.”键显示,用“+”和“-”键检查各用户代码5-404-1 功能:对显示在缩/放指示出的用户代码计数器复位,按R/#号键5-404-2 功能:复位所有UC计数器5-405 功能:用户代码号码设定,最大3位数设置:1-999 最多输入50个代码,用“+”和“-”检查输入代码5-407-1 功能:删除个别用户代码5-407-2 功能:删除所有用户代码5-408 功能:已登记用户代码号码显示5-501-1 功能:PM周期设定设置:1-9995-501-2 功能:PM周期报警方式设定设置:0:OFF 1:ON5-504 功能:卡纸的RDS/CSS报警等级5-505 功能:SC的RDS/CSS报警等级5-507 功能:消耗品的RDS/CSS报警等级5-801 功能:内存全清5-802-1 功能:连续空运转5-802-2 功能:一次空运转5-803 功能:输入检查方式,显示各传感器数拒5-804 功能:输出检查方式,开启个别电器部件5-810 功能:SC复位5-811 功能:机号输入5-812 功能:输入维修电话号码5-816 功能:RDS/CSS功能设定5-817 功能:修理时间传送5-905 功能:APSA4/L T横送优先设置:0:OFF 1:ON5-906 功能:手动装订复位时间设定设置:1-999 预设值=205-907 功能:封页方式选择设置:1:封面/封底1:封面5-908 功能:图象移动/删除选择设置:1:删除方式2:移动方式5-909 功能:数字键缩放/尺寸倍率设置:1:尺寸倍率2:数字键缩放功能5-910 功能:操作面板的选择语言设置:1:英语2:法语3:德语4:意大利语5:西班牙语6:瑞典语7:葡萄牙语8:丹麦语9:挪威语10:芬兰语11:荷兰语6-001 功能:SADF自动复位时间设定设置:1-99 预设值=56-002 功能:ADF自由尺寸设定设置:0:OFF 1:ON6-003 功能:自动分页选择设置:0:OFF 2:ON6-005 功能:双面复印时,是否在最后的奇数原稿后添加一张空白复印品设置:0:不增加1:增加6-006-1 功能:单面原稿DF对位调节设置:0-32 预设值=166-006-2 功能:双面原稿DF对位调节设置:0-32 预设值=166-009 功能:ARDF空运转6-010 功能:选择ARDF时是否自动选择APS方式6-011 功能:厚/薄原稿方式选择设置:0:厚纸方式1:薄纸方式6-101 功能:指定用何种分页器设置:0:无分页器1:装用A557 2:装用A556 3:不使用4:只A568分页器适配6-102 功能:选择使用何种分页堆叠限制设置:0:OFF 1:ON6-104 功能:装订张数限制设置:0:OFF 1:ON6-107 功能:分页器空运转7-001 功能:总运转时间显示(小时)7-002 功能:显示已扫描原稿的总数7-003 功能:收费计数器显示7-004 功能:计数器初期设定7-101-1至功能:显示各种尺寸的复印总数7-101-57-203 功能:转鼓计数器显示7-204-1至功能:显示各纸盘的供纸总数7-204-87-205 功能:ARDF供纸计数显示7-206 功能:显示装订计数器7-301-1 功能:等倍方式计数显示7-301-2 功能:缩小方式计数显示7-301-3 功能:放大方式计数显示7-401 功能:显示发生的保修总数7-402 功能:显示各维修代码的报修计数器7-501 功能:显示卡纸总数7-502 功能:显示卡纸总数7-503 功能:显示原稿卡纸总数7-504-1至功能:显示各卡纸部位卡纸总数7-504-67-505-1 功能:显示ARDF输入部卡纸总数7-505-2 功能:显示ARDF输出部卡纸总数7-801-1至功能:主ROM版本显示7-801-47-803 功能:PM计数器检查7-804 功能:PM 计数器复位,按R/#键7-807-1 功能:SC计数器清除及各类维修代码7-807-2 功能:复印纸卡纸计数器复位7-807-3 功能:原稿卡纸计数器复位7-808 功能:计数器全部清除7-810 功能:复印计数器清除7-811 功能:DF计数器清除。
东芝 4818-T10 用户手册说明书

Toshiba Global Commerce Solutions 使用手册4818-T10目录目录 (2)安全讯息 (3)1.硬件配置 (4)1.1.包装内容 (4)1.2.快速一览 (5)1.3.基本接口设备安装 (6)1.4.更换 M.2 固态硬盘 (SSD) (14)1.5.更换内存模块 (15)1.6.调整倾斜角度 (16)1.7.启动设备 (16)2.输入/输出定义 (17)2.1.串行端口 (17)2.2.电子钱柜端口 (18)3.设备用于壁挂 (20)3.1.挂前准备 (20)3.2.安全信息 (20)3.3.在拆卸立座支架之前 (20)3.4.拆卸立座支架 (21)3.5.安装壁挂支架(VESA) (24)4.重新安装设备回立座支架 (25)4.1.准备 (25)4.2.安全信息 (25)4.3.在拆卸壁挂支架之前 (25)4.4.拆卸壁挂支架 (26)5.规格 (30)5.1.基本规格 (30)5.2.选购项目 (31)6.尺寸 (33)版权声明 (34)非无线产品声明 (34)2安全讯息Before installing this product, read Safety Information.Antes de instalar este produto, leia as Informações de Segurança.Pred instalací tohoto produktu si prectete prírucku bezpecnostních instrukcí.Læs sikkerhedsforskrifterne, før du installerer dette produkt.Lees voordat u dit product installeert eerst de veiligheidsvoorschriften.Ennen kuin asennat tämän tuotteen, lue turvaohjeet kohdasta SafetyInformation. Avant d'installer ce produit, lisez les consignes de sécurité.Vor der Installation dieses Produkts die Sicherheitshinweise lesen.Prima di installare questo prodotto, leggere le Informazioni sulla Sicurezza.Les sikkerhetsinformasjonen (Safety Information) før du installerer dette produktet.Antes de instalar este produto, leia as Informações sobre Segurança.Antes de instalar este producto, lea la información de seguridad.Läs säkerhetsinformationen innan du installerar den här produkten.341. 1.硬件配置1.1. 包装内容1. 设备一台2. RJ50转DB9 COM 的串行端口转接器缆线两条3. 电源整流器一台4. 手册指南DVD 一片1.2. 快速一览正视图LED指示灯:当电源打开时,电源指示灯呈现绿色。
东芝180,VF3,150,100故障代码
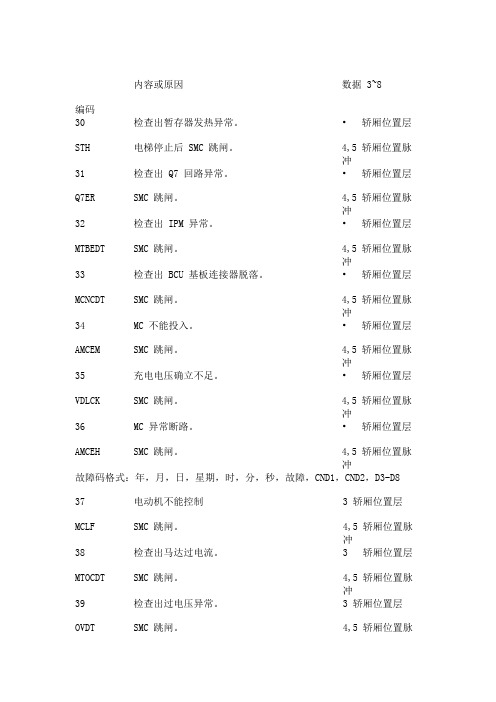
故障码格式:年,月,日,星期,时,分,秒,故障,CND1,CND2,D3-D837 MCLF 电动机不能控制SMC 跳闸。
3 轿厢位置层4,5 轿厢位置脉冲38 MTOCDT 检查出马达过电流。
SMC 跳闸。
3 轿厢位置层4,5 轿厢位置脉冲39 OVDT 检查出过电压异常。
SMC 跳闸。
3 轿厢位置层4,5 轿厢位置脉编码内容或原因数据 3~830 STH 检查出暂存器发热异常。
电梯停止后 SMC 跳闸。
•轿厢位置层4,5 轿厢位置脉冲31 Q7ER 检查出 Q7 回路异常。
SMC 跳闸。
•轿厢位置层4,5 轿厢位置脉冲32 MTBEDT 检查出 IPM 异常。
SMC 跳闸。
•轿厢位置层4,5 轿厢位置脉冲33 MCNCDT 检查出 BCU 基板连接器脱落。
SMC 跳闸。
•轿厢位置层4,5 轿厢位置脉冲34 AMCEM MC 不能投入。
SMC 跳闸。
•轿厢位置层4,5 轿厢位置脉冲35 VDLCK 充电电压确立不足。
SMC 跳闸。
•轿厢位置层4,5 轿厢位置脉冲36 AMCEH MC 异常断路。
SMC 跳闸。
•轿厢位置层4,5 轿厢位置脉冲冲3A AMCER 正常运行方向改变或点检停止时接触器不能断开XMC不良或AMC2不良DA TA6 1 0XMCA MCA3B MCCER 停止时主回路电流信号(MCC)无法断开,SMC 跳闸XMC 和互感器不良3 轿厢位置层4,5 轿厢位置脉冲3C LZNONER 检测出LZN粘连异常SMC 跳闸3 轿厢位置层4,5 轿厢位置脉冲3DLZNOFFERLZN断线异常 3 轿厢位置层4,5 轿厢位置脉冲3ESCER检测出SC粘连异常 3 轿厢位置层4,5 轿厢位置脉冲3FDCRER检测出DCR匹配性异常,SMC 跳闸 3 轿厢位置层4,5 轿厢位置脉冲40 LSERR 检查出着床限位开关的匹配性异常。
SMC 跳闸。
•轿厢位置层4,5 轿厢位置脉冲bit7 06 LSC LSB LSA41 MTH 检查出马达发热异常。
光耦_东芝_TLP781F

Individual Electrical Characteristics (Ta = 25°C)
LED
Characteristic
Forward voltage Reverse current Capacitance Collector−emitter breakdown voltage Emitter−collector breakdown voltage
(Note 3): 100μs pulse, 100Hz frequency
(Note 4): AC, 1 min., R.H.≤ 60%. Apply voltage to LED pin and detector pin together.
2
2007-12-05
Recommended Operating Conditions
(Note 3)
IFP
1
A
Power dissipation
PD
100
mW
Power dissipation derating
ΔPD / °C
−1.0
mW / °C
Reverse voltage
VR
5
V
Junction temperature
Tj
125
°C
Collector−emitter voltage
• TLP781 : 7.62mm pitch type DIP4 • TLP781F : 10.16mm pitch type DIP4 • Collector-emitter voltage: 80V (min.) • Current transfer ratio: 50% (min.)
Rank GB: 100% (min.) • Isolation voltage: 5000Vrms (min.) • UL recognized: UL1577, file No. E67349 • BSI approved: BS EN60065:2002
东芝 ET-TD7080电烤箱说明书

东芝电烤箱说明书ET-TD7080使用说明书使用前请仔细阅读本说明书,并妥善保管安全警示使用方面注意事项维修保养注意事项清洁保养注意事项3 4 4摆放注意事项5首次使用6使用说明结构说明附件说明控制面板介绍使用流程烘烤标准7 7 8 9 10清洁保养清洁注意事项11服务指南产品参数中国RoHS食品接触材料信息维修服务规定售后服务故障处理12 13 14 15 15 16目录菜单食谱烤彩椒鸡肉串鲜虾培根披萨蜜汁烤肋排新奥尔良烤翅培根金针菇卷香烤羊排日式盐烤秋刀鱼鸡蛋芝士烤吐司熔岩乳酪吐司蔓越莓曲奇葡式蛋挞日式炸虾天妇罗18 19 20 21 22 23 24 25 26 27 28 29●●●●●●●●●●●●使用前,必须将包装材料全部取下如果不取下包装,工作过程中会导致打火,火灾,烧伤等。
应正确使用厂家提供的配套附件,不要使用非厂家提供的附件,避免人为的操作而造成火灾或伤害。
由于工作电流大,请使用专用插座请不要与其他耗电量大的电器(特别是空调、取暖器等)共用插座,以免造成电路过载,引起火灾。
插座不易插或太松若电源线,电源插头损伤请立即停止使用。
松动的插座不要使用,否则将可能导致火灾、触电、受伤。
电源插头从插座拔出时,应拿着电源插头拔如果拿着电源线拔,破损的电源线会引起漏电、火灾的情况发生。
长时间不使用的时候,应拔下电源插座上的插头,避免因绝缘橡胶线老化而引起漏电、火灾的情况发生 。
在插入电源插头前,请用干布将插头刀片上附着的灰尘擦去。
使用前请仔细阅读“服务指南”并妥善保管以备日后参考之用。
禁止将金属或异物,如铁丝、手指等伸入烤箱的吸气口、排气口、百叶窗否则可能导致触电,受伤。
假如不慎有异物插入产品,请拔掉电源插头,联系我司维修客服中心。
禁止电源线从烤箱底部穿过。
本产品器具不能在外接定时器或独立遥控控制系统的方式下运行。
请不要用作烹饪以外的目的。
请勿放置在有阳光直射或对着空调、暖气设备吹出暖风的场所,以免导致变形、变色,无法调节温度。
- 1、下载文档前请自行甄别文档内容的完整性,平台不提供额外的编辑、内容补充、找答案等附加服务。
- 2、"仅部分预览"的文档,不可在线预览部分如存在完整性等问题,可反馈申请退款(可完整预览的文档不适用该条件!)。
- 3、如文档侵犯您的权益,请联系客服反馈,我们会尽快为您处理(人工客服工作时间:9:00-18:30)。
等组 合 起 来 , 可 以达 到 2 亿多种不 同的外观 。 并且 , 该机 还
曾推 出 过 裴 勇俊 的 限 量版 。 基 本 E , 在 目前总 人 口 增长不 大
的情况 下 , 绝 对能够满足 女 性用 户不
撞 机 “
”
的需要 。
但比
较 让 ^ 不 爽 的就 是 , 该 饥的屏 幕 只 有 2 4 亨耄寸 , 在 日 系 手 机 中
咖 英寸、 臣 x 1刮象素、 0 LED 1967/t~ CfvlOS
存储
支}寺『r加 s oll C{争睹卡扩民 默 可l扩展至8GB
铃声
和弦MP3 等格式
蓝牙 上市时问
银色、 粉红色 2 。0B年11月
东~ _
fa
n fu
n
p. e t it
83 1T
东~
fa n fu n
p e ti t
8
3
蚓 T却 多 了 G P 蹋 兰1芏环 推 毽 泼 送 功 能 , 可 以在 用 户 紧急 或 迷 路 的 时候 发送 信 息求 救 。 这 也最
这 款 手 机 i 殳{十的初 衷— — 专 门针 对未 成 年 人设 计 , 它 内置 了
滤程序 。 以确保未 成年 ^ 健 康地 使 用手 机 。 而在外 形风 格上 , 两者都 采用 了可 更 换外壳设
计 。 不 过机{ 身主体 颜 色_fa n fUn p e tit 8 3 1T只有两 种 , 银色和 粉 红 色 。
2 8 22 2008
、
网络制式 G 孙^90们 800H90晴帅 、 Wc [)MM l s DPA
尺寸 重量 待机时问 通话 时 问 主屏幕
副屏幕
摄像头
10 钿T n ~ ×, r nm × 15m m 109g 约蝈叫、时 (WCDMA )
约250分钟 (WOOMA ) 越 英寸、 2 cIo x 400悔嗉、 267/色TFT
就稍 榴匾!{笔挥弱i 了 — 些 。
或 许正 是 基 于 该 款 机l子十分 受 欢迎 的 情况 , S o fl b a n l,再 度
联手东芝推出 了其升级版本_
n fUn 2 .
830T,
将屏 幕提 高到
了2 8 英寸 、 W QVGA 分辨率的规格 。 不 过 , 在色系的选择 E
就不 再 如 以往 那 么丰富 了 , 机 身只 有5 种颜色款式 。 当然 ,
东芝If a n f u
n
2
.
830T
不
年 推 出 I~J f a n fu n 8 15 T还 有 没 有
印象? 这 款 来 自于
不上强大 , 但
它 绝 对 足 够 时 尚 不 单机 身 颜 色 具 备 12 种 款 式 外 壳 面 板 更
是 高达3 0 0 多款 , 而 且 电池 后 盖也有2 0 多种不 图 案的后 盖
1
-
i
J):j
~
和8 3 0 卜 致 , 采用 了2
宽屏显 示 ,
内置 19 6 万 像 素 摄 像头 目 支 持 自动 对 焦 。
同 J ~ B-
-
,
fa n fu n p e t it 8 3 1~
G PS 、 红
外 线 等 传输功 能 , 歧 持 H s D PA 高 速 网 络 , 可 支 持 最 大 8 G 啪 m ic n 巧 DHC 存 储 卡 扩 展 。 但是
机 身正 面 的彩 壳 和 电池 后 盖是 可 以嘧 断 黼 壳 的 。 其 他功
能 方 面 , 该 机 就 采 用 了 中 f氐端 手 机 的 配 置 , 没 什 么可 值 得 一
提的了。
网络制式 尺寸 n 待机时问 通话时闻 主屏幕 剐屏幕
摄 像头 存储 铃声 蓝牙 上市时问
~
80lY l g60tVN z 、 WCDM/Cr .IS ~ A
10Grn m x 5gra m X l 5m m
11 1g
约49叫、时 (WCDMA )
约签吩 钟 【VVCDMA )
2 B 英寸、 240 x 4(I)~ 、 2 B万色T阿 a 6英寸、 62 x 14倡濠、 { 湖 且
1瓣 素CM0 s 支j轩加 s DHc 削制÷扩展. 最大可扩展至8BB 和弦M ]3 等格式 粉红色、 黑色、 白色、 亮粉红色和金色 2 0 0B年11月