Arcgis安装说明
arcgis安装方法与步骤

ARCGIS9.0安装方法1. 运行“regedit”进注册表,把arcgis或者esri相关的所有文件手动删除。
如果是第一次安装可以跳过。
2. 在“我的电脑-属性-高级-启动-编辑”里将"=optin"改为“=alwaysoff”,确定,重启电脑。
3. lincense manager 安装:3.1 Select "I received the license by fax" then click on CREATE & EDITEnter "CATTLE WE LOVE YOU" & click on OK (ignore the following errors)click next and finishthe installation此时别重启电脑3.2 将破解文件中的Licence.dat打开,并将“hostname”换成你自己的计算机名,例如:SERVER w2w ANY 27000,其中的w2w就是我的计算机名,切记,这里是计算机名,不是用户名。
保存3.3 将破解文件夹中的arcgis.exe & license.dat(该文件刚才已经编辑过)拷贝到License Manager的安装目录(如c:\program files\ESRI\license\arcgis9x) 覆盖原文件3.4 启动并配置Licence manager。
打开“开始菜单\程序\ArcGIS\License Manager (9.x)\License Manager Tools”,选择“Configuration using Services”,接着选"ArgGIS license manager",然后点“ Configure Services ”并设置license文件路径:“如c:\program files\esri\license\arcgis9x\license.dat” “path to lmgrd.exe file”不用修改“path to license file”处点“browse”,文件类型选“*.dat”,然后选择license.dat即可;“path to debug log file”可以随便指定一个.log文件,不过最好在License Manager 目录下!选择“start server at power up & ues services”,点“save service”,最后,切换到Start/Stop/Reread 并“start server”在server diagnostics里点perform,如果显示“....can bechecked out”表示安装成功。
ArcGIS 10安装指导及安装过程中遇到的部分问题解决方法

ArcGIS 10.0 安装指导及安装中遇到的部分问题解决
方法
ArcGIS 10.0的安装总起来说比较智能。
相对于其前的版本可以认为是傻瓜式安装,但仍有些问题会比较棘手,尤其对新手来说,所以,现在汇总一下。
希望对大家有帮助。
一、安装步骤
1、第一步,运行安装文件。
检查版本冲突及卸载旧版本。
2、第二步,安装DESKTOP。
新手可以根据提示,一路next
下去,专业人员可以进行自定义设置。
安装过程截图如下:
3、第三步,安装
4、第四步,激活。
从开始——所有程序——ArcGIS——选择ArcGIS Administrator,进入如下对话框,点击“Desktop”将路径改为LOCALHOST,如下图所示:
二、安装遇到的问题及解决方法
1、error1935问题,在安装快完成时,发生。
解决方法:
(1)、开始——运行——regedit,进入注册表编辑器。
修改注册表:
HKEY_LOCAL_MACHINE\System\CurrentControlSet\Control Key: RegistrySizeLimit
Type: REG_DWORD
Value: 0xffffffff (4294967295)
截图如下:
双击,会出来对话框,改正该值
(2)、重启电脑
(3)、再次进行安装即可。
ArcGIS10.4软件安装教程

ArcGIS10.4软件安装教程ArcGIS是一款可伸缩的、全面的GIS平台,包含了大量的可编程组件,从细粒度的对象到粗粒度的对象涉及面极广,这些对象为开发者集成了全面的GIS功能,每一个使用ArcObjects建成的ArcGIS产品都为开发者提供了一个应用开发的容器,包括桌面GIS,嵌入式GIS 以及服务GIS。
安装步骤1.鼠标右击软件压缩包,选择解压到【ArcGIS10.4】。
2.双击打开【ArcGIS10.4】。
3.双击打开【安装包】。
4.找到并选中【License Manager】然后鼠标右击选择【以管理员身份运行】。
5.点击【Browse】更改软件安装路径:建议安装到除C盘以外的磁盘,可在D盘或其它盘里面新建一个文件夹【ArcGIS10.4】然后点击【Next】。
6.点击【Close】。
7.点击【Next】。
8.勾选【I accept the license agreement】然后点击【Next】。
9.点击【Change】更改软件安装路径,选择第5步中新建的文件夹【ArcGIS10.4】然后点击【Next】。
10.点击【Install】。
11.点击【Finish】。
12.点击【Cancel】。
13.在解压出的文件夹中,找到并打开【破解文件】。
14.选中【ARCGIS】和【service】两个文件后,鼠标右击选择【复制】。
15.将【ARCGIS】和【service】两个文件粘贴至【D:\ArcGIS10.4\License10.4\bin】文件夹中,在空白处鼠标右击选择【粘贴】即可。
16.点击【替换目标中的文件】。
17.在解压出的文件夹中,找到并打开【安装包】。
18.选中【Desktop】后,鼠标右击选择【以管理员身份运行】。
19.点击【Browse】更改软件安装路径,选择第5步中新建的文件夹【ArcGIS10.4】然后点击【Next】。
20.点击【Close】。
21.点击【Next】。
ArcGIS10.2安装教程

ArcGIS10.2安装教程安装步骤:[安装环境]:Win7/Win8/Win101.鼠标右击软件压缩包,选择解压到【ArcGIS10.2】。
2.双击打开【ArcGIS10.2】。
3.双击打开【安装包】。
4.双击打开【Desktop】。
5.选中【setup】然后鼠标右击选择【以管理员身份运行】。
6.点击【Next】。
7.勾选【I accept the license agreement】然后点击【Next】。
8.点击【Next】。
9.点击【Change】更改软件安装路径:建议安装到除C盘以外的磁盘,可在D盘或其它盘里面新建一个文件夹【ArcGIS10.2】然后点击【Next】。
10.点击【Change】更改软件安装路径,选择第9步中新建的文件夹【ArcGIS10.2】然后点击【Next】。
11.点击【Install】。
12.安装中(大约需要10分钟左右)13.点击【Finish】。
14.点击【Cancel】。
15.在解压出的文件夹中找到并打开【安装包】。
16.在文件夹中找到并打开【LicenseManager】。
17.双击打开【windows】。
18.选中【Setup】后,鼠标右击选择【以管理员身份运行】。
19.点击【Next】。
20.勾选【I accept the license agreement】然后点击【Next】。
21.点击【Change】更改软件安装路径,选择第9步中新建的文件夹【ArcGIS10.2】然后点击【Next】。
22.点击【Install】。
23.点击【Finish】。
24.点击【Cancel】。
25.选择【Start/Stop License Service】然后点击【Stop】。
26.在解压出的文件夹中找到并打开【破解文件】。
27.选中【ARCGIS】和【service】两个文件,然后鼠标右击选择【复制】。
28.将【ARCGIS】和【service】两个文件粘贴至【D:\\ArcGIS10.2\\License10.2\\bin】文件夹中,然后在空白处鼠标右击选择【粘贴】29.点击【替换目标中的文件】。
ARCGIS安装教程

打开ESRI,先安装license。
进入license Manager10.2安装步骤,如图安装license Manager10.2完成后,【停止】服务,(如果是服务默认停止的就跳过此步骤)。
如图:然后,复制破解文件夹里边的破解文件:【Service.txt和ArcGIS.exe】替换Lic ense10.2目录bin下的相同文件,如图重点注意:将T X T中画圈处改为自己计算机名字二、安装ArcGIS Desktop10.2(自选版本)进入Arcgis10.2软件安装步骤,如图愿意改就改不愿意就默认1. 3软件安装时间漫长,约半个小时以上,具体看计算机性能!2. 4【注意】:安装完成后,点击完成会弹出一个ArcGIS Administrator窗口,不用管它,直接关闭!!!关闭了待会再破解!!!点击完成,随后弹出继续中文包安装,点击安装即可三、Arcgis10.2破解其实该步骤也不能确切的说为破解,因为第一步,安装license Ma nager10.2已经把license破解了。
打开license Manager如图1. 2点击启动,重新获取许可(本质就是或者第一步刚才复制替换的service.txt),如图如果无法启动请看service.txt中是否将上文画圈位置中改为自己计算机名字3重新获取成功后,打开ArcGIS Administrator,选择【Arcinfo浮动版】,下边输入loc alhost,如图红色框出部分!【破解成功表现】:破解成功即可看到如图所以界面(ArcGIS Administrator)5在安装过程中如果出现了错误如这个:arcgis visual Fortran runtime errorforrtl: severe (38): error during write, unit 0, file CONOUT$可将dforrt.dll文件用文件中解决ArcGIS的forrtl severe (38) error中的dforrt.dll替换原来的文件(如不知原文件位置可用搜索功能找到)尽量将原文件也备份一下。
Arcgis9.3详细安装步骤图解(一定能行)
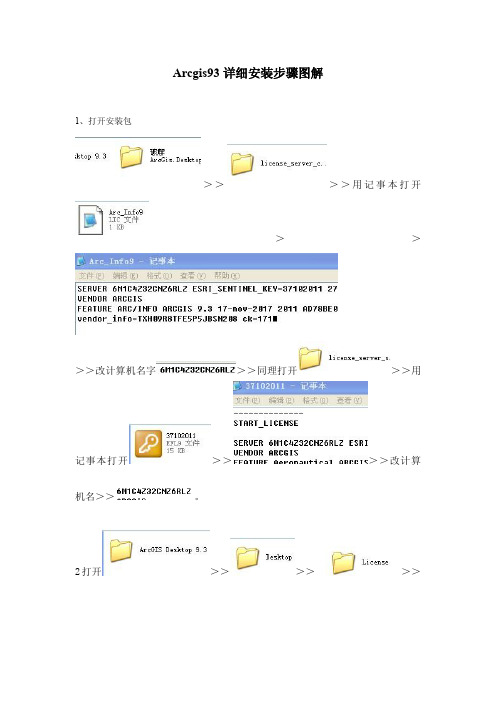
Arcgis93详细安装步骤图解1、打开安装包>>>>用记事本打开>>>>改计算机名字>>同理打开>>用记事本打开>>>>改计算机名>>。
2打开>>>>>>双击>>从里面打开一直NEXT到>>>3依次打开C盘>>>>>>>>把破解包中文件夹下全部文件复制到>>选择全部,在中找到把中的以开头的文件全部复制到其中,并且要替换---(也就是除第一二行,和最后一行外全部复制并在中替换开头的文件,这样做最后一步打开Arcmap—Tools--Extensions所出现的对话框的所有选项前才能打上钩,有些功能才能用)在保存,关闭重起计算机。
4重起后开始—ARCgis—lincese manager 9X--—lincese manager tools选中-------(左下角显示为正确的)---(左下角显示为正确的)再选择选项卡上--(上面哪个)--双击)(LMGRD)--点下面的---双击再点--选择是,关闭即可。
(注:我们可以点几如果下面的筐中显示的是说明正确)5 再打开安装包(我把arcgis直接放在D盘中的所以是这样的路径)双击-----------(选第一个)--再NEXT---(选第三个)再NEXT----(选第二个)再NEXT出现此界面我们可以选Browse把Arcgis安装在自己需要的目录下,否则自动默认安装在C盘,一般情况下因为太大不支持安装在C盘。
(我本次安装将Arcgis在D盘)再点NEXT—next—next(大约两三个)出现界面这时我们不要不管他让计算机自己安装Arcgis大概需要几分钟到半小时左右,出现以下界面,此过程中千万不能点cancel键再按FINISH即可出现这个界面不要管他,自动安装完成后,我们就打开Arcmap,选择TOOLS—选择Extensions…在所出现的窗口中全部打上钩,(这样就是防止以后有些功能不能用)如下图:这样我们就把Arcgis9.3装好了。
本步骤中括号内的为注释,是用来帮助大家理解的。
ArcGIS10.2安装教程- 图文

------------------------------精选公文范文-----------------------------
ArcGIS10.2安装教程- 图文
各位读友大家好!你有你的木棉,我有我的文章,为了你的木棉,应读我的文章!若为比翼双飞鸟,定是人间有情人!若读此篇优秀文,必成天上比翼鸟!
ArcGIS10.2安装教程- 图文方法/步骤1:打开下载的安装包文件夹,根据途中标注的顺序依次安装。
方法/步骤2:首先,打开“1”文件夹下的exe安装程序。
方法/步骤3:然后,安装“2”文件夹下的许可程序。
方法/步骤4:紧接着,把“3”文件下的两个文件复制到“2”安装文件夹下。
方法/步骤5:再然后,打开txt文件,把标记的地方改为localhost、this_host或者本机计算机名称。
方法/步骤6:启动许可,并重读许可,点击确定。
方法/步骤7:最后,将许可附给本机。
各位读友大家好!你有你的木棉,我有我的文章,为了你的木棉,应读我的文章!若为比翼双飞鸟,定是人间有情人!若读此篇优秀文,必成天上比翼鸟!
----------------精选公文范文---------------- 1。
ArcGIS 10.4.1 安装指南说明书

ArcGIS 10.4.1Installation GuideArcGIS for DesktopArcGIS for ServerPortal for ArcGISArcGIS for Desktop InstallationArcGIS for Desktop is available as Basic, Standard, or Advanced and all the downloads from My Esri. To install a component, sign into My Esri and click the download link on the site. This link will download a self-extracting executable file for installation. After the download completes, you have the option of starting the setup immediately or running it manually. To run the setup manually, browse to the downloaded folder containing the setup and run setup.exe.How to prepare to install ArcGIS for Desktop1.Verify that your computer meets the system requirements.2.Navigate to the contents of the disc in the CD-ROM and double-click on DesktopSetup/Icon to extract to a folder of your choice or let it default to My Documents. How to install ArcGIS for Desktop3.One the extraction is complete to allow Auto-Run of ArcGIS for Desktop setup.exefiles to installation/run.4.Accept the License Agreement option to continue5.The setup program provides an option for a Complete installation, which installs theapplications, style files, templates, and optionally licensed extensions. The Custominstallation option allows you to choose specific installation6.The installation location will be identified in this dialog box or in the custom dialog box,if a custom option was selected. An upgrade will not allow you to select or change the installation location. The parent location of an upgrade installation is retained and the software is installed to <parent folder>\Desktop10.3. For example, if ArcGIS 10.2 for Desktop was installed to D:\MyGIS\ArcGIS\Desktop10.2, the 10.3.1 installation folder will be D:\MyGIS\ArcGIS\Desktop10.3. If you need to install to a different location, manually remove your existing installation before starting the 10.3.1 installation.7.If Python is selected for installation, you must choose the installation location or selectthe default. The previous Python installation location will also be retained during the upgrade. See Python requirements for more information8.When the setup is complete the ArcGIS Administrator Wizard is displayed, allowing you toconfigure a Concurrent or Single Use authorization. Refer to The ArcGIS Administrator for detailsUpon opening the Software Authorization Wizard, you will be provided with three authorization options:1.I have installed my software and need to authorize it.Select this option to proceed with the authorization process by entering the authorization code you received from Esri Customer Service.2.I have already authorized the software and need to authorize additional extensions. This option is used if you have already authorized the core ArcGIS for Desktop and now want to authorize any extensions. Authorizing additional extensions acquired after authorizing core ArcGIS for Desktop can be done by starting ArcGIS Administrator from Start > All Programs > ArcGIS. Once in the ArcGIS Administrator utility, select the Desktop folder and select Authorize Now.3.I have received an authorization file from Esri and am now ready to finish theauthorization process.Select this option if you have a provisioning file created from the Esri Customer Care portal. Select the appropriate option and click Next.Here you have the options to select online or offline methods of authorization, or authorize your Single Use product from a local license server.4.Provide your contact information and details in the next two dialog boxes. If you are usinga provisioning file (online authorization only), this information will be automaticallypopulated from the file.5.Enter your ArcGIS for Desktop authorization code starting with ESU or EVA, followed bynine digits.6.Next, you will have the option to authorize any extensions.If you choose to authorize any extensions, the Software Authorization Wizard will prompt you to enter the authorization codes for the extensions. If you choose not to authorize, the Software Authorization Wizard provides the option to evaluate any extension in the next step.OptionalIn this step, you may choose to evaluate any extensions for which you have not provided an authorization code in the previous step.Use the online authorization and click Next to connect to the Esri Activation Site. Upon completion, you will receive a message that authorization is successful and the applications will be ready for use.Offline authorizationThe remaining steps are applicable only to offline authorization.1.You will be requested to save your authorization information to disk as a file namedauthorize.txt. You can then upload the authorization text file or send an email with the file attached.2.If uploading the text file, an authorization response file will be generated to download. When sending an email with the text file attached, you will receive a return email from Esri with the authorization response file.3.After receiving the response file, start ArcGIS Administrator from Start > All Programs> ArcGIS to complete the authorization process.4.In the ArcGIS Administrator, click the Desktop folder, select the appropriate Single Useproduct, and click Authorize Now.5.Select I have received an authorization file from Esri and browse to the (*.respc) file.Click Next so the applications will be authorized and ready for use.Additional information on DesktopSingle-use licenseFor single use, authorization is required for each machine. Once the ArcGIS for Desktop installation is complete, you will be provided with the opportunity to authorize your single-use product. You will need the authorization codes sent from Esri Customer Service to the contact email address referenced in the sales order during the authorization process.This email includes the authorization codes issued for each license in the order. In addition to finding the information in the email, if you already have an Esri Global Account, you can log in to the Esri Customer Care site, click on Authorization & Provisioning, then click on a product name to obtain its authorization code. If you do not yet have an Esri Global Account, you can create one at My Esri.You will receive an email confirmation and have access to Authorization & Provisioning on the Customer Care site. For ArcGIS for Desktop Single Use, the authorization code starts with the letters ESU or EVA, followed by nine numeric digits, for example, ESU123456789. Follow these steps to complete the Single Use product authorization.(Contact information can be found at /about-esri/contact. )Once the Desktop has been installed then you will need to open ArcGIS Administrator (Start---All Programs---ArcGIS).1.Select one of the three Single Use products.2.Click Authorize Now to launch the Software Authorization Wizard. The wizard will walk youthrough the online or offline authorization process.Online authorizationWith online authorization, the Software Authorization Wizard connects directly to the Esri authorization site using secure sockets layer (SSL) from the deployed machine. Online authorization can be used if the machine on which the software has been installed is connected to the Internet and can connect to https://. Online authorization can be performed by directly entering the authorization code in the Software Authorization by creating a provisioning file (.prvc) at My Esri. Offline authorizationOffline authorization is used if the machine where ArcGIS for Desktop is installed does not have Internet connectivity. In this case, the authorization process creates a text file which can be uploaded to the Esri authorization server from an Internet-connected machine or can be sent in an email to Esri Customer Service to obtain an authorization response file (.respc). This authorization response file can be copied to the machine where ArcGIS for Desktop is installed and used to authorize ArcGIS for Desktop without a direct Internet connection.ArcGIS for Server Installation1.The setup program should launch automatically after the download has completed.If the setup program does not launch automatically, browse to the location of thedownloaded setup files and double-click Setup.exe.2.During the installation, read the license agreement and accept it, or exit if you do notagree with the terms.3.The setup program displays the features that will be installed, click Next4.If Python 2.7.10 or Numerical Python 1.9.2 is not installed on your machine, thesetup automatically installs them for you. The default installation location isC:\Python27\.5.Specify the account to be used by ArcGIS Server to perform a variety of functions insupport of the geographic information system (GIS) Server. The first option Specify the account name and password6.If you enter a domain account, it must already exist on the domain and must beentered using the following format:From here ArcGIS server will be installed following the directions on the screen.After the installation completes, the Software Authorization Wizard is launched. To launch Software Authorization Wizard at a later stage Click Start > Program Files > ArcGIS > Software Authorization.To successfully authorize your ArcGIS for Server installation, do the following:Choose your authorization optionThere are three authorization options:1. I have installed my software and need to authorize it: Select this option if you do notalready have an authorization file. There are two methods to provide yourauthorization information:2.I have already authorized the software and need to authorize additional options orextensions: Select this option if you've already authorized ArcGIS for Server for use, but you want to authorize additional options or extensions (if available). There aretwo methods to provide your authorization information:3.I have received an authorization file from Esri and am now ready to finish theregistration process: Select this option if you've already received your authorization file from Esri Customer Service. If you select this option, you can either browse tothe location of the file (if you received the file by email) or manually enter theauthorization information.Authorization Method:Authorize with Esri now using the Internet enables you to receive the authorization fileimmediately. It requires an Internet connection.Authorize at ESRI’s website or by email to receive your authorization file: Methods *********************************************************************************************************************.After completing authorization, ArcGIS Server Manager should already be open. You can now log in to Manager and create a new site. The URL to open Manager in abrowser is :6080/arcgis/manager1.Click Create New Site2.To create a new site, you are required to define a user name and password asthe primary site administrator. The default name for the account is siteadminbut you can enter a different name if you want.3.Type the paths where you want the default server directories and configurationstore to be created. These folders hold information essential to your site. If you'llhave multiple machines in your site, enter UNC paths to two shared folders thatyou've previously prepared. This will allow all machines in the site to see thedirectories and click Next.4.Examine the details about the site you're going to create. When you're ready tocreate the site, click Finish.About the ArcGIS Web AdaptorArcGIS Web Adaptor allows ArcGIS for Server to integrate with your existing web server. It is compatible with IIS and Java EE servers such as WebSphere and WebLogic.Benefits of using Web Adaptor:•Allows you to integrate ArcGIS for Server with your organization's existing web server. By including a web server in your site, you gain the ability to host webapplications that use your GIS services.•Allows you to provide a single endpoint that distributes incoming requests to the GIS servers in your site.•Allows you to expose your GIS server through your organization's standard website and port. Use the Web Adaptor if you don't want users to see the default port 6080or the default site name arcgis.•Allows you to block the ArcGIS Server Administrator Directory and ArcGIS Server Manager from the view of external users.•Allows you to block ArcGIS for Desktop users from establishing administrative or publisher connections to ArcGIS Server.•Allows you to use your organization's identity store and security policies at the web-tier level.Configuring Web Adaptor1.Web Adaptor can be accessible by opening the URLhttp://gisserver.domain/arcgis/webadaptor, choose ArcGIS for Server and then Next2.Enter fully qualified domain name of the computer together with the port (6443) andthen enter ArcGIS server siteadmin credentials and then click ConfigurePortal for ArcGIS Installation1.Open the disk contents to view files and ensure that you run setup withadministrative privileges.2.Click Next3.Accept license agreement and click Next4.Leave default settings on next dialog and click Next on two following dialogs (unless you want tochange location where the content will be saved5.Enter username of the user to start up portal and enter password and passwordconfirmation again and thereafter click Next6.Click Next on the Portal for ArcGIS Configuration dialog and thereafter install to installthe application.7.Click installAuthorization:When the installation completes, click Finish. The Software Authorization Wizard dialog box displays.1. If the authorization file has been received from the customer care you can choose “Ihave received an authorization file from ESRI and now ready to finish the authorization process”, click Browse, select the file and click Next to complete the process.2.Authorize with Esri now using the Internet enables you to receive the authorization fileimmediately. It requires an Internet connection.3.Authorize at ESRI’s website or by email to receive your authorization file: Methods*********************************************************************************************************************.Create a single machine portalAfter the Portal for ArcGIS installation completes, you are prompted to create a new portal or join an existing one.To create a portal, follow these steps.1. Click Create New Portal.2. On the Create a New Portal page, specify the first name, last name, user name,password, email, and identity question and answer of the initial administratoraccount. The initial administrator account is required to register your portal withArcGIS Web Adaptor.Benefits of the Web AdaptorThe Web Adaptor provides the following benefits:1.Allows you to integrate Portal for ArcGIS with your organization's existing web server. Byincluding a web server in your site, you gain the ability to host web applications that use your GIS services.2.Allows you to use your organization's identity store and security policies at the web-tierlevel. For example, if you're using IIS, you can use Integrated Windows Authentication to restrict who enters the portal. You can also use Public Key Infrastructure (PKI) or anyother identity store for which the web server has built-in or extensible support. Thisallows you to provide a single sign-on or other custom authentication experience when logging in to use services, web applications, and Portal for ArcGIS.3.Allows you to expose Portal for ArcGIS through a site name other than the default arcgis.4.Allows you to expose Portal for ArcGIS through port 80 or 443Configuring Web AdaptorWeb Adaptor can be accessible by opening the URL http://gisserver.domain/portal/webadaptor choose Portal for ArcGIS and then NextEnter fully qualified domain name of the computer together with the port (7443) and then enter ArcGIS server siteadmin credentials and then click ConfigureFor any Technical queries during the installation:Email:****************************Phone:+27 11 238 6300Fax:+27 11 238 6310Address:International Business Gateway,Cnr New Road & 6th Road,MidrandWebsite:ArcGIS for DesktopArcGIS for ServerPortal for ArcGIS。
- 1、下载文档前请自行甄别文档内容的完整性,平台不提供额外的编辑、内容补充、找答案等附加服务。
- 2、"仅部分预览"的文档,不可在线预览部分如存在完整性等问题,可反馈申请退款(可完整预览的文档不适用该条件!)。
- 3、如文档侵犯您的权益,请联系客服反馈,我们会尽快为您处理(人工客服工作时间:9:00-18:30)。
Arcgis10安装三个内容和顺序
安装要求:
1、windows操作系统xp sp3版本以上
2、操作系统需要安装 .net 3.5 sp1 补丁
一、LicenseManager程序
1.安装完毕后,复制"service.txt"到
C:\Program Files\ArcGIS\License10.0\bin\文件下覆盖许可安装目录下的同名文件
同时注意:把第一行的
SERVER yk ANY 27000
Yk修改成自己的计算名
2.在“开始”菜单打开License Server Administrator程序,点击启动\停止许可服务,再点击“停止”以停止服务,然后再点击“启动”以启动服务,如下图
二、arcgis Desktop程序
安装结束后,自动打开ArcGIS Administrator,选浮动Arcinfo将license manager改成自己的计算名,如图片所示(点击更改输入)。
选择ArcInfo (浮动使用)
点击可用性就可以看到许可模块了
三、Data Interoperability扩展模块
具体看arcgis10安装视屏.exe
打开文件夹ArcGISDesktop10SP3_SimplifiedChinese
双击Setup安装程序
完成后关闭安装程序。
如何老师控制所有电脑方法:
1、打开极域电子教室——js——teacher(双击)安装完成后—单击破解(文件夹所有东
西全部复制))-----C:\Program Files\TopDomain\e-Learning Class文件夹下
最后重启一下就OK了
注:安装学员软件单击student,安装完就ok了。
如果同传出现不能运行
1C:\Program Files\ArcGIS\License10.0\bin文件夹下打开文本文档service
SERVER YF-201208270903 ANY 27000 文件改成当前计算机名
2.在“开始”菜单arcgis—License Manager后打开License Server Administrator程序,点击启动\停止许可服务,再点击“停止”以停止服务,然后再点击“启动”以启动服务,如下图
名)——单击确定,完成。