
DPA51 series 3-phase failure relay (DPA51 三相电源监视器)
Phase Failure Relay
3-phase sequence,phase loss
and voltage unbalance monitoring
Type DPA51
• 3-phase monitoring relay for Array phase sequence and phase loss
• Detects when all phases are present and have
the correct sequence
• Measures its own power supply
• Power supply range:200 to 690 VAC(±15%)
• Output: 5A SPDT relay normally energized
• For mounting on DIN-rail in accordance
with DIN/EN 50 022
• 17.5 mm DIN-rail housing (DIN 43880)
• LED indication for relay and power supply ON
• N-Line auto protection function.
Rated Voltage Specifications:
200 to 480VAC±15%(Ph-Ph) Type: DPA51CM44 / DPA51CM44B
500 to 690VAC±15%(Ph-Ph) Type: DPA51CM69
115 to 277VAC±15%(Ph-N) Type: DPA51AM44N
288 to 398VAC±15%(Ph-N) Type: DPA51AM69N
Option list(●-yes,○-no):
Specifications:
Situation of certification
Product standard EN 60947-5-1
Approvals UL, CCC
(GB14048.5-2008,A037133)
CE Marking L. V. Directive 2006/95/EC EMC Directive 2004/108/EC
EMC
Immunity Emissions According to EN 61000-6-2 According to EN 61000-6-3
ROHS Instruction 2011/65/EU Indication for
Power supply ON LED green ON Relay ON LED yellow ON Phase failure and reverse LED yellow OFF N-Line broken LED all OFF Output Specifications
Output SPDT\SPNO Action principle Closed circuit Contact ratings AgSnO
Rated voltage 24VDC,250VAC
Rated current DC12 24V5A AC15 250V 2.5A DC13 24V 2.5A
Mechanical life ≥107operations
Electrical life ≥105operations (at 5 A, 250 V, cos ψ = 1)
General Specifications
Housing
Dimensions 17.5 x 81x 67.2 mm
Material PA66 or PC
Weight Approx.
75g
Screw terminals
Tightening torque Wire section Max.0.5 Nm(acc. to IEC 60947) 2.5mm2(AWG13)stranded wire
Application area anywhere
Mounting DIN-rail(DIN
43880) Degree of protection IP20
Pollution degree 3
Operating temperature @ Max.voltage,50Hz-20…+60℃,R.H. < 95%
Storage temperature -30…+80℃,R.H. < 95%
Dielectric strength
Dielectric voltage ≥ 2kVAC (rms)
Rated impulse withstand volt. 4 kV (1.2/50 µs)
Mode of operation:
DPA51 series monitors its own 3-phase power supply voltage. The relay operates when all the phases are present and the phase sequence is correct.
The relay releases when one phase-phase voltage drops below 85% of the other phase-phase voltages or when the phase sequence is wrong.
N-Line protection: DPA51AM44N and DPA51AM69N are suitable for 3-phase 4-line system, the relay is OFF when the N-Line is broken.
Operation Diagram:
Wiring Diagrams:
The relay monitors that the power supply has the correct phase sequence and that all phases are present.
The relay releases in case of interruption of one or more phases, provided that the regenerated voltage does not exceed 85% of the phase-phase voltage.
three-phase three-wire system——example 1three-phase four-wire system——example 2
Dimensions:。
海信直流压缩机失步故障检修
海信直流压缩机失步故障检修近年来,随着中国制造业的崛起,海信作为电器行业重要的代表之一,在质量、技术等方面有了巨大的进步和提升。
然而,在使用海信直流压缩机的时候,我们可能会遇到直流压缩机失步的故障。
那么,如何进行检修呢?一、检查电源电压和线路连接首先,我们应该检查电源电压和线路连接是否有问题。
如果电源电压不稳定或线路连接不牢靠,就会导致压缩机的电流不稳定,从而引发失步故障。
如果发现问题,应及时采取措施进行修复或更换。
二、检查压缩机内部部件如果电源电压和线路连接良好,但压缩机仍然出现失步情况,那么我们需要检查压缩机内部的部件是否有松动、损坏等问题。
需要特别注意的是,直流压缩机的转子和定子之间的间隙必须精密匹配,如果有过大或过小的间隙,也会导致失步故障。
因此,我们需要对部件进行检查和维护,确保其正常运转。
三、调整电路参数在检查部件后,如果仍然无法解决失步问题,那么我们就需要考虑调整直流电路参数。
包括电源电压、电流、转矩等参数调整,这需要根据具体压缩机的型号和使用环境来进行调整,以达到最佳的使用效果。
四、调整控制程序除此之外,我们还可以考虑调整压缩机的控制程序,以提高控制的精度和稳定性,减小失步的概率。
在对控制程序进行调整时,需要先去了解压缩机的工作原理和相关的控制流程,然后有针对性地进行优化。
综上所述,排查海信直流压缩机失步故障需要逐一排查可能引起失步的各个环节,确定具体的故障点后,再有针对性地采取措施进行修复或调整。
同时,我们还需要不断学习新的技术和信息,以提高自己的维修技能,对相关领域有更深入的了解和认知,以为压缩机故障的解决提供更加有力的支持和保障。
汽车常用术语缩写 实用版
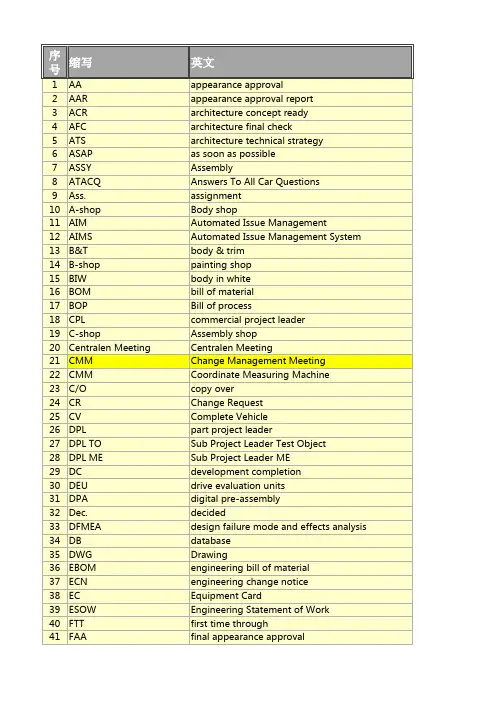
feasibility checkpoint feasibility checkpoint final data judgement final engineering completion functional evaluation process final status report final technical input failure mode and effects analysis Launch and Engineering Cost For Your Information Field Evaluation Units global production development system Geometric Dimensioning and Tolerancing / / / hybrid electrical vehicle / Handling of Part Deviations Human Resources Human Resources Business Partner hardware implementation information JOB1 / Jobs Per Hour Jobs Per Day / Key Performance Indicator launch quality operating system Launch Management Meeting launch readiness launch sign-off left hand drive material required date manufacturing manufacturing engineering manufacturing bill of material mass production material required date A/B shop material required date E0 machine try out Model Year
SINAMICS DCM V1.4 SP1 HF5 故障 ID 说明说明书

SIEMENS SINAMICS DCM V1.4 SP1 HF5STARTER V4.4 HF3 General conditions and function restrictions as well as notes on configuration and operation.These notes have a higher priority than statements made in other documents.Please read the notes carefully as they contain important information for installation and use of the system.SINAMICS DCM V1.4 SP1 HF5Fault ID Brief description Technical content Workaround From version STARTERTFS 44715 TFS 195319 The power supply of theSINAMICS DCM for pulseencoders is 15 V and not 24 V asshown in the STARTER encoderscreen form.The internal encoder evaluationsupplies 15 V as supply voltage,and not 24 V, as specified in theSTARTER screen form.A workaround is not requiredThe voltage lies within the HTLlevel specification (high level =13.5 V to 30 V). As aconsequence, commerciallyavailable pulse encoders can besimply supplied. The option ofselecting 5V/24V has no effect.All STARTERversionsTFS 39453 Under certain circumstances, thehorizontal scrollbar is missing inthe Wizard screen form “Drive -additional data”. Without the horizontal scrollbars,not all of the information can beseen in the screen form.If this problem occurs, then it canbe resolved by restarting theWizard.All STARTERversionsFirmwareTFS 322515 Uneven current distribution for12-pulse series circuits withparallel devices For 12-pulse series circuits, whereadditional devices are connected inparallel to the 12-pulse master andthe 12-pulse slave, sporadically(every 5 min.) in individual currentcusps, the current is very unevenlydistributed between the 12-pulsemaster and the devices connectedin parallel if additional process data(PZDs) or BICOs are transferredvia the parallel interface.Do not use the parallel interfaceto transfer BICOs (set p51801 =0).NOTES:1. This workaround is onlyeffective from V1.4 HF4 andhigher.2. The OA application OALINK isavailable to transfer BICOs.From V1.1TFS 356252 Parameter p2000 is not visible atthe BOP20 in the "Quickcommissioning" state (p0010 =1). For DCM, this parameter defines100% speed, and it is absolutelyessential that it is set whencommissioning the system.However, during quickcommissioning with the BOP20,this parameter is not listed.To set p2000 during quickcommissioning, set p0010 to 0,to be able to access p2000. Aftersetting p2000, set p0010 back to1 and complete quickcommissioning.From V1.1TFS 376135 Know-how protection with copyprotection has not been activated Fault F13101 fault value 1 isgenerated when activating know-how protection with copyprotection. The function cannot beactivated with SINAMICS DCM SDmemory cards (black) with the label"SW version" less than"01.40.19.00". The green MMCmemory cards are not affected.1) Transfer the complete cardcontent to a SINAMICS DCMMMC memory card (green) or2) Transfer the complete cardcontent to a SINAMICS G120 SDmemory card (black)3) Replace the SINAMICS DCMSD memory card with a card withthe label “SW version01.40.19.00” or higher.From V1.4TFS 377614 When loading standard telegram390 in the drive, fault F1042 isoutput. When downloading the offlineconfiguration with standardtelegram 390 activated in the drive,fault message 1042 is output withfault information P2081, Index 8,fault cause 20.Remove the configuration of thestandard telegram 390 from theoffline configuration (setp0922=999). Carry out to thedownload Activate theparameterization of telegram 390after going online as described inthe function diagram 2420 bysetting p922=390.From V1.3Fault ID Brief descriptionTechnical contentWorkaround From version TFS 339925An overcurrent condition is signaled in the armature circuit for inverter commutation faults without CCPThis function is not described in the operating instructions. Proceed as follows for example, to use a fast circuit breaker to interrupt the overcurrent:1) Set p50774=51579.0 to connect the CCP command bit 00 (trigger quenching thyristors) with the digital output DO3.2) Copy from RAM to ROM and restart the device to activate the calculation of DO3 in the fast 250µs time slice.3) The duration of the output pulse can be set using p50778. (the minimum pulse duration is about 400µs)4) The polarity of the output pulse can be set using p50770[3].4) Connect the trigger input for the fast circuit breaker atDO3 (X177.22 and X177.24). Comment: With this functionality, not all criteria to identify a commutation fault of the commutation monitoring are evaluated, but only criteria 3 (magnitude of the current actual value). The setting value atparameter p51580 (commutation monitoring control word) is only effective if parameter p50790=6 communication with a SIMOREG CCP (if one is being used) is selected.From V1.4 SP1TFS 41373In offline projects in STARTER, the settings of the PROFIdrive telegram 220 are incorrect and incomplete.In the drive software, the settings of PROFIdrive telegram 220 have been corrected, however not in STARTER.The offline project must be loaded to the device and then back to the PG in order that the settings are also corrected in STARTER.From V1.3TFS 37899Deleting an OA application with inserted memory cardWhen deleting an OA application in the drive using STARTER, only the OA application saved in the flash memory is deleted. Otherapplications on the memory card remain unchanged. At the next power cycle, the OA application is copied from the memory card back to the flash.After deleting the OA, before the next power cycle, the directory of the OA application (OEM/OA name) must be deleted on the memory card (at a PC).From V1.1TFS 46619If two CUDs are connected via DRIVE_CLiQ, then the CUDs do not power upOnly connect the two CUDs via DRIVE_CLiQ, if the "TPOALINK" technology package was previously loaded to the drive.1) Disconnect the DRIVE_CLiQ connection2) Load the "TPOALINK" package to the CUDs to be connected.From V1.3TFS 382613Parameter r0032 (actual active power) indicates an invalid value. The display value of parameter r0032 (actual active power) is not valid.Instead, use parameter r0081[1].From V1.4 SP1TFS 44150 If, in HW Config, in theSINAMICS device, a module "DO without PZD" is inserted, then it is possible that the diagnostics view (HW Config online) does not correctly display the module.If, in HW Config, in the SINAMICS device, a module "DO without PZD" is inserted, then it is possible that the diagnostics view (HW Config online) does not correctly display the module.None. From V1.1Fault ID Brief description Technical content Workaround From version- Using a SIMATIC S7-1500 inconjunction with the standardGSD-file, data sent to individualDOs on SINAMICS DCM may bereceived by only the first DO. Using a SIMATIC S7-1500 inconjunction with the standard GSD-file and TIA-Portal, it is necessaryto separate the DOs on SINAMICSDCM using an "Axis separator" inorder for the data to be receivedand transmitted from and to thecorrect DO (see also SINAMICSDCM operating instructions forfurther details).Since this behavior applies toPROFIBUS only, as analternative PROFINET can beused for communication betweenSIMATIC S7-1500 andSINAMICS DCM (if a CBE20 isinstalled).From V1.1TFS 669428 The STARTER command "Loadto file system" doesn’t work withSINAMICS DCM. The data saved to a memory cardusing "Load to file system" will notbe loaded into the drive duringstartup.Load the project directly into thedrive using "Download to targetsystem" rather than "Load to filesystem".From V1.4 SP1DocumentationTFS 382014 Supplement to the description for"Quick stop" 1) In chapter 10.9.3 (Quick stop) ofthe operating instructions, there isno explanation regarding the effectof p50174, and there is noexplanation of the effect of OFF3 incurrent controlled operation.2) In function diagram 6840,column 4, the labels of switchpositions 0 and 1 must beinterchanged for the switch that iscontrolled by p50174.3) The description of OFF3 must becorrected in Chapter 4.1.1 of theList Manual.1) In Chapter 10.9.3 (Quick stop),the text of the last bullet pointshould be as follows:To ensure that "Quick stop"functions even after rewiring,current or torque lower limits arespecified, or when additionalsetpoints are supplied, certainfunctions are disabledautomatically when "Quick stop"is entered.- All torque limits are inactivewhile braking down to n < nmin.This function can be deactivatedusing p50174. See functiondiagram 6840, column 4.- Of the current limits, only thesystem current limit (p50171 andp50172), the speed-dependentcurrent limit and the current limitresulting from the I2t monitoringof the power units are active.- In current controlled operation(p50084 = 2 or thefollowing/slave drive selected),when entering “Quick stop,”closed-loop speed control isautomatically selected (withspeed setpoint = 0). See functiondiagram 6830, column 4.Note:When using the STARTERcontrol panel, when the inputfocus is lost, the "Quick stop"command is entered, andtherefore closed-loop speedcontrol is automatically selected.2) In function diagram 6840,column 4, the labels of switchpositions 0 and 1 must beinterchanged for the switch thatis controlled by p50174.3) In Chapter 4.1.1 of the ListManual, the description of OFF3must be corrected as follows:For torque control (p50084 = 2)- Closed-loop speed control isautomatically selected. As aconsequence, the response isthe same as for closed-loopspeed control (p50081 = 1).From V1.1Fault ID Brief descriptionTechnical contentWorkaround From version TFS 384026Important supplements to parameter p51780 in the List Manual1) In the List Manual, for thedescription of parameter p51780, "Fault message response" must be replaced by "Fault response". 2) In the List Manual, for thedescription of parameter p51780, the following texts are missing: i) Note: The fault responses are described in Chapter 4.1.1"General information on faults and alarms".ii) Alarm: When using theparameter, the fault responses of ALL fault messages are involved. Take into account this behavior when considering the safetysituation in your plant or system. If in any doubt, leave the parameter at the value 0.iii) Note: If the cause of the fault message disappears during the delay time, the fault response is still realized after this time expires. iv) Note: If the cause of the fault message disappears during the delay time, and is acknowledged before the delay time expires, the fault message disappears, and a fault response is not initiated. Not necessary.From V1.4 SP1TFS 384634"6-pulse/12-pulse mixed operation" applicationA chapter about the "6-pulse/12-pulse mixed operation" application is missing in the applicationdocument for 12-pulse applications. Please contact CustomerSupport if you wish to use such an application.From V1.4 SP1AOP30 B340Parameter p400 shows too many encoder types.Parameter p400 shows too many encoder types. Also encoders that are not supported by the encoder evaluation of the DCM.With the numerical input of 3000 you can quickly jump to the beginning of the supported encoders.From DCM V1.2B340 Optimization run does not offer a "next" option to exit the screen.All the previous screens of the wizard have a "next" option at the end of them for navigation. For the optimization runs the screen has to be exited with "0: no optimization run".Exit screen with "0: no optimization run".From DCM V1.2TFS 378029Without memory card, the texts of the technology parameters in Chinese are not displayedFor technology parameters(p21000 up to p21499), instead of Chinese characters, questionmarks are displayed on the AOP30. All other texts are not involved. Option 1: If a memory card is available, keep this permanently inserted.Option 2: Switchover the AOP30 language to English.From DCM V1.1TFS 386070 Alarm time stampsIn the drive, as factory setting(p3100=2), the number of days for the operating hours counter is increased by 10986 days. Thisnumber of days is also displayed in the AOP.If this is seen as being disturbing, then p3100 can be set to 0. This means that the state up to V1.4 has been restored.From DCM V1.4 SP1。
Drivecon XR变频器说明书
danger. 7. High voltages are present in this device. Do not make any inspections
Drivecon Inc. reserves the right to alter or amend the above information without notice
Drivecon Inc.
3.7.1998 • DAHSM31
Service Manual
Page 2
CONTENTS
1 DESCRIPTION OF XR Series ..................................................................................................... 4 1.1 Functional description ......................................................................................................... 6 1.2 Motor control modes ........................................................................................................... 8 1.3 Control methods (= command modes) ................................................................................. 9 1.4 Mechanical brake control .................................................................................................. 14
51单片机与A-D接口设计详解

51单片机与A/D接口设计详解
A/D 转换器用于实现模拟量数字量的转换,按转换原理可分为4 种,即:
计数式A/D 转换器、双积分式A/D 转换器、逐次逼近式A/D 转换器和并行式
A/D 转换器。
目前最常用的是双积分式A/D 转换器和逐次逼近式A/D 转换器。
双积分式
A/D 转换器的主要优点是转换精度高,抗干扰性能好,价格便宜。
其缺点是转
换速度较慢,因此,这种转换器主要用于速度要求不高的场合。
另一种常用的A/D 转换器是逐次逼近式的,逐次逼近式A/D 转换器是一种
速度较快,精度较高的转换器,其转换时间大约在几μs 到几百μs 之间。
通常使用的逐次逼近式典型A/D 转换器芯片有:
(1)ADC0801~ADC0805 型8 位MOS 型A/D 转换器(美国国家半导体公司产品)。
(2)ADC0808 / 0809 型8 位MOS 型A/D 转换器。
(3) ADC0816 / 0817。
这类产品除输入通道数增加至16 个以外,其它性能与ADC0808 /0809 型基本相同。
典型A/D 转换器芯片ADC0809
ADC0809 是典型的8 位8 通道逐次逼近式A/D 转换器,CMOS 工艺。
1. ADC0809 的内部逻辑结构
ADC0809 内部逻辑结构如图所示。
图中,多路开关可选通8 个模拟通道,允许8 路模拟量分时输入,共用一个
A/D 转换器进行转换。
地址锁存与译码电路完成对A、B、C 三个地址位进行
锁存和译码,其译码输出用于通道选择。
对ADC0809 主要信号引脚的功能说明如下:。
DPA51控制继电器
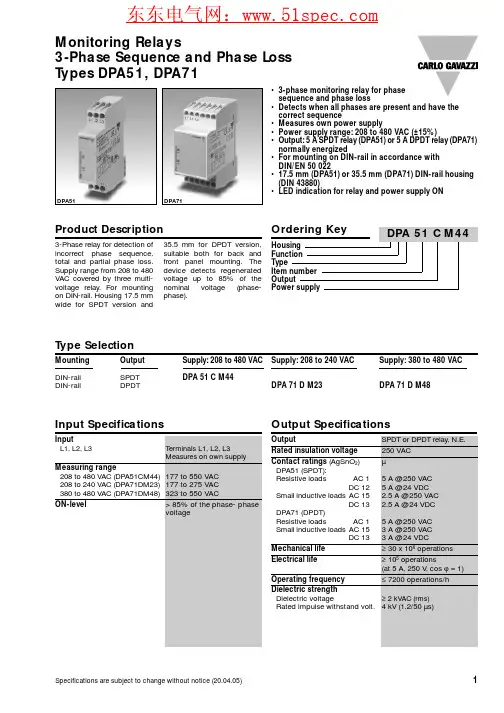
Specifications are subject to change without notice (20.04.05)1Monitoring RelaysProduct Description•3-phase monitoring relay for phase sequence and phase loss•Detects when all phases are present and have the correct sequence•Measures own power supply•Power supply range: 208 to 480 VAC (±15%)•Output: 5 A SPDT relay (DPA51) or 5 A DPDT relay (DPA71)normally energized•For mounting on DIN-rail in accordance with DIN/EN 50 022•17.5 mm (DPA51) or 35.5 mm (DPA71)DIN-rail housing (DIN 43880)•LED indication for relay and power supply ONType SelectionMounting Output Supply: 208 to 480 VAC Supply: 208 to 240 VACSupply: 380 to 480 VACDIN-rail SPDT DPA 51 C M44DIN-railDPDTDPA 71 D M23DPA 71 D M483-Phase Sequence and Phase Loss Types DPA51, DPA71Input SpecificationsOutput Specifications3-Phase relay for detection of incorrect phase sequence,total and partial phase loss.Supply range from 208 to 480VAC covered by three multi-voltage relay. For mounting on DIN-rail. Housing 17.5 mm wide for SPDT version and35.5 mm for DPDT version,suitable both for back and front panel mounting. The device detects regenerated voltage up to 85% of the nominal voltage (phase-phase).DPA51DPA712Specifications are subject to change without notice (20.04.05)Wiring DiagramsDPA51, DPA71Mode of OperationDPA51 and DPA71 monitor their own 3-phase power supply voltage.The relays operate when all the phases are present and the phase sequence is correct.The relays release when one phase-phase voltage dropsbelow 85% of the other phase-phase voltages or when the phase sequence is wrong.Example 1The relay monitors that the power supply has the correct phase sequence and that all phases are present.Example 2The relay releases in case of interruption of one or more phases, provided that the regenerated voltage does not exceed 85% of the phase-phase voltage.Specifications are subject to change without notice (20.04.05)3Operation DiagramDimensionsDPA51, DPA71。
MD1501 series_X_Instruction Manual_EN_Domestic General_X_R1.02_(EN_CZXL1501.0086.0003)
Copyright
Version: R1.02 P/N: EN_CZXL1501.0086.0003 Copyright © NR 2013. All rights reserved
NR ELECTRIC CO., LTD. 69 Suyuan Avenue. Jiangning, Nanjing 211102, China Tel: +86-25-87178185, Fax: +86-25-87178208 Website: , Email: NR_TechSupport@
Documentation for equipment ordered from NR is dispatched separately from manufactured goods and may not be received at the same time. Therefore, this guide is provided to ensure that printed information normally present on equipment is fully understood by the recipient.
MD1501 Series Auxiliary Relay Instruction Manual
DPA51CM44-Carlo-Gavazzi
Specifications are subject to change without notice (17.03.05)1Monitoring RelaysProduct Description•3-phase monitoring relays for phase sequence and phase loss•Detect when all 3 phases are present and have the correct sequence•Measure on own power supply•Power supply range: 208 to 690 VAC (+10 -15%)•Output: 8 A SPDT relay or 8 A DPDT normally energized •For mounting on DIN-rail in accordance with DIN/EN 50 022 (DPA01) or plug-in module (PPA01)•22.5 mm Euronorm housing (DPA01) or 36 mm plug-in module (PPA01)•LED indication for relay and power supply ONType SelectionMounting Output 208 to 480 VAC 208 to 240 VAC380 to 480 VAC380 to 600 VAC 600 to 690 VAC DIN-rail SPDT DPA 01 C M44DPA 01 C M60DPA 01 C M69DIN-rail DPDT DPA 01 D M23DPA 01 D M48Mounting Output 208 to 415 VAC 208 to 240 VAC380 to 415 VACPlug-in SPDT PPA 01 C M44Plug-inDPDTPPA 01 D M23PPA 01 D M483-Phase Sequence and Phase Loss Types DPA01, PPA01Input SpecificationsOutput Specifications3-phase relay for detection of incorrect phase sequence,total and partial phase loss.Supply range from 208 to 690VAC covered by two multi-voltage relays.For mounting on DIN-rail or plug-in module. The device detects regenerated voltages up to 85% of the nominal voltage (phase-phase).DPA01PPA012Specifications are subject to change without notice (17.03.05)DPA01, PPA01Mode of OperationDPA01 and PPA01 monitor their own 3-phase power supply. The relay operates when all the phases are pre-sent and the phase sequence is correct. The relay releases when onephase-phase voltage drops below 85% of the other phase-phase voltages.Example 1The relay monitors that the power supply has the correct phase sequence and that all phase voltages are present.Example 2The relay releases in case of interruption of one or more phases, provided that the regenerated voltage does not exceed 85% of the phase-phase voltage.Supply SpecificationsWiring DiagramsSpecifications are subject to change without notice (17.03.05)3DPA01, PPA01Wiring Diagrams (cont.)Operation DiagramDimensions。
NOVUS AUTOMATION 1 5 N323R 温度控制器用户指南说明书
N323RTEMPERATURE CONTROLLER – USER GUIDE – V1.8x M1.SAFETY ALERTSThe following symbols are used on the equipment and throughout this manual to draw the user's attention to important information related to the safety and use of the equipment.CAUTION:Read the manual completely before installing and operating theequipment.CAUTION OR HAZARD: Risk of electric shock.All safety recommendations appearing in this manual must be followed to ensure personal safety and prevent damage to the instrument or system. If the instrument is used in a manner other than that specified in this manual, the device safety protections may not be effective.2.SUMMARY1.SAFETY ALERTS (1)2.SUMMARY (1)3.INTRODUCTION (1)4.SPECIFICATIONS (1)5.ELECTRICAL CONNECTIONS (2)5.1INSTALLATION RECOMMENDATIONS (2)6.OPERATION (2)6.1LEVEL 1 – SETPOINT ADJUSTMENT LEVEL (2)6.2LEVEL 2 – OPERATION LEVEL (2)6.3LEVEL 3 – CALIBRATION LEVEL (3)7.WORKING WITH THE CONTROLLER (4)7.1.DEFROST PROCESS (4)8.CONFIGURATION PROTECTION (4)9.MASTER PASSWORD (4)9.1HOW TO USE YOUR MASTER PASSWORD (4)10.ERROR INDICATION (5)11.WARRANTY (5)3.INTRODUCTIONN323R is a temperature controller suitable for refrigeration. It has functions specially designed for temperature control and defrost optimization applications.The equipment has two input channels for temperature sensors (NTC thermistor type) that measure the temperature of the monitored environment and the evaporator module. In addition, it has three independent outputs for controlling the compressor (refrigeration output), the defrost module and the fan.The features of each controller are identified on the identification label, attached to the equipment, and are in accordance with the purchase order. 4.SPECIFICATIONSPROBE INPUT:2 Thermistor NTCType 10 kΩ@ 25 °CRange: -50 to 120 °C (-58 to 248°F)Accuracy: 0.6 °C (1.1 °F)Note: The sensors come with the equipment.Its operating range is limited to -30 to +105 °C (–222 to +221 °F). It has cable of 3 m in length, 2 x 0.5 mm², and can be extended up to 200 meters.Maximum error in the interchangeability of original NTC sensors: 0.75 °C (33.35 °F). This error can be eliminated through the Offset parameter of the equipment.Measurement resolution:........................... 0,1° from -19.9 to 119.9° ......................................................................................... 1° elsewhere Note: The equipment keeps its precision all over the range, despite the lack of display resolution in a part of the range does not allow its visualization.OUTPUT1:Relay SPDT; 1 HP 250 Vac / 1/3 HP 125 Vac (16 A Resistive)Optionally: Pulse, 5 Vdc, 25 mA max.OUTPUT2:Relay SPST-NO, 3 A / 250 VacOUTPUT3:SPST-NO, 3 A / 250 VacPOWER SUPPLY:Voltage: 100 to 240 Vac/dc ±10 %Optionally: 24 V (12 to 30 Vdc)Mains frequency: 50~60 HzPower consumption: 5 VADIMENSIONS:Width x Height x Depth: 75 x 33 x 75 mmPanel cut-out: 70 x 29 mmWeight: 100 gENVIRONMENT:Operating temperature: 0 to 40 °C (32 to 104 °F)Storage temperature: -20 to 60 °C (-4 to 140 °F)Relative humidity: 20 to 85 %RHHousing: Polycarbonate UL94 V-2.Protection: Front panel: IP65, Box: IP42.Suitable wiring: Up to 4.0 mm². RS485 digital communication, RTU MODBUS protocol (optional).Serial interface not isolated from input circuitry. Serial interface isolated from input circuitry, except in 24 Vpowered model.5. ELECTRICAL CONNECTIONSThe figure below indicates the connection terminals for the sensor, power, and controller output:Figure 1 –Electrical connections* Serial communication feature is not always available in the controller.5.1 INSTALLATION RECOMMENDATIONS• Input signal conductors must run through the plant separatelyfrom the supply and output conductors. If possible, in grounded conduits. • The power supply for the electronic instruments must come froma proper instrumentation network. • It is recommended to use RC FILTERS (noise suppressors) atcontactor coils, solenoids, etc. • In control applications, it is essential to consider what can happenwhen any part of the system fails. The internal devices of the equipment do not guarantee full protection.6. OPERATIONBefore use, you must configure the controller. To configure it, you must set values for the parameters that determine how the equipment operates.These configuration parameters are organized in groups or Levels, called Parameter Levels.LEVEL RELATED FUNCTIONS 0Temperature measurement 1Setpoint Adjustment 2Operation Mode 3CalibrationTable 1 – Parameter levelsWhen you turn on the controller, the display will quickly show the internal software version. This information is important for eventual consultations with the manufacturer. The controller will then enter operation and start displaying the ambient temperature value, measured by sensor 1. This is level 0 or the Temperature Measurement level.1 second , until the parameter SP isdisplayed. Release1 second , until the parameter Untis displayed. After the last parameter, the To change the parameter values, use the and keys. Notes:1. When switching from one parameter to another, the settingwill be saved automatically and only then considered valid. Even during a power outage, the configuration will be saved in permanent memory.2. When in configuration, if the keys are not used for a periodlonger than 20 seconds, the controller will return to the Measurement Level, ending and saving the configuration done so far.3. When in Temperature Measurement mode, by giving a shorttouch on thekey, the controller will temporarily show the temperature value measured by sensor 2 − Evaporator temperature. 6.1 LEVEL 1 – SETPOINT ADJUSTMENT LEVELThis level displays the Setpoint (SP) parameter only. It defines the desired temperature value for the controlled environment. The current SP value is shown alternately.To program the desired value, use the and keys.SPSetpointAdjustment of the desired environment temperature. This adjustment is limited to the values programmed in SP.L and SP.H (see below).6.2 LEVEL 2 – GENERAL CONFIGURATION LEVELDisplays the sequence of parameters to be set by the user. The parameters are shown alternately with their respective values. To program the desired value, use the and keys.unt UnitTemperature unit. It allows you to define thetemperature unit for all parameters.0 Temperature in Celsius degrees. 1 Temperature in Fahrenheit degrees.Of1 Offset 1 Correction value for the temperature measured by sensor 1.It allows you to make small adjustments to the environment temperature, seeking to correct measurement errors that appear, for example, when replacing a temperature sensor.In degrees. Adjustable between -10.0 and 10.0 degrees.Of2 Offset 2 Correction value for the temperature measured by sensor 2.It allows you to make small adjustments to the environment temperature, seeking to correct measurement errors that appear, for example, when replacing a temperature sensor.In degrees. Adjustable between -10.0 and 10.0 degrees.Sp.L SP Low LimitSetpoint lower limit. It allows you to set a minimum value to adjust theSetpoint.Sp.H SP High Limit Setpoint upper limit.It allows you to set a maximum value to adjust theSetpoint.Hys Hysteresis Control hysteresis. Differential between the on and offpoint of the refrigeration output relay. In degrees. Adjustable between 0.1 and 50.0 degrees.Cnt It allows you to define a position for the refrigerationoutput (compressor).0 Refrigeration in OUTPUT1 / Defrost inOUTPUT 2 (Standard). 1 Refrigeration in OUTPUT2 / Defrost inOUTPUT1.of.t Off time It allows you to set the minimum off time for the refrigeration output. Once the refrigeration output isturned on, it will stay in this condition for at least the time programmed in this parameter.Typically used to increase the lifespan of the compressor in a refrigeration system. Value in seconds (0 to 1999 seconds).on.t on time It allows you to set the minimum on time for the refrigeration output. Once the refrigeration output isturned on, it will stay in this condition for at least thetime programmed in this parameter.Typically used to increase the lifespan of the compressor in a refrigeration system. Value in seconds (0 to 1999 seconds).DLy DelayDelay time for the control start. After the controller isturned on, the refrigeration output will only be turned on after the time programmed in this parameter has elapsed.Used in large refrigeration systems to prevent simultaneous compressor starts when returning from a power failure.Value in seconds (0 to 250 seconds). Di.b Defrost Interval BaseTime base for df.i :0 Minutes. 1 Hours. Dt.b Defrost Time BaseTime base for df.t :0 Minutes. 1 Hours.Df.i Defrost i ntervalInterval between defrosts.Adjustable between 0 and 1999 minutes/hours, in which the defrost output will remain off.If set to 0 (zero), determines that no stops will happen for defrost.Df.t Defrost timeDefrost duration.Time interval that the defrost output will stay on.If set to 0 (zero), determines that no defrost stops occur.Adjustable between 1 and 1999 minutes.Df.C Refrigeration output behavior during defrost.0 The refrigeration output is turned off duringdefrost. 1 The refrigeration output is kept on duringdefrost. 2 The refrigeration output acts normally. Itswitches on and off as needed to maintain the temperature.Df.s Temperature to end defrost.Value of temperature measured in the evaporator by the S2 sensor that, when reached, determines the end of the defrost cycle, even if the defrost duration interval has not finished.Adjustable between -50 and 120 degrees.Important note: The defrost cycle does not start if the evaporator temperature is above the value defined in this parameter.Df.H Defrost holdIt allows you to keep the temperature indicationunchanged during the defrost time plus the time set in this parameter.It keeps the indication unchanged only during the defrosting process. 1 to250Time interval beyond defrost in which the temperature indication will remain unchanged.dd.tDraining time.After defrost, it will still be necessary a time interval with the outputs turned off, since there can be accumulated water on the evaporator.This interval must be dimensioned so that the water drops are eliminated.Adjustable between 0 and 1999 minutes.Fa.s Fan SetpointFan blocking temperature.To prevent heated air from being blown into the refrigerated room, the system fan (OUTPUT3) will beturned off when the temperature in the evaporator(Sensor 2) rises to the value set in FA.S .Situations with heated evaporator are common, for example, after defrost and draining processes.With the fall of evaporator temperature, the fan returns to enabled condition.Fa.tMaximum time necessary for fan return after draining.For the safety of the stored products, if the temperature in the evaporator does not reach the adjusted value in Fa.s , the fan return will happen at the end of the time interval adjusted in this parameter. Adjustable between 0 and 1999 minutes.Fa.CFan behavior during refrigeration.0 The fan stays on only as long as the compressor is on.1 The fan stays on during the entirerefrigeration cycle, even at times when the compressor shuts down.Fa.dFan behavior during defrost.0 The fan stays off during defrost. 1 The fan stays on during defrost.Cp.P Compressor ProtectIt allows you to define the behavior of the ControlOutput when the controller identifies a failure in the Temperature Sensor (Process Compressor).0 Compressor turns off when sensor 1malfunctions. 1 Compressor turns on when sensor 1malfunctions.Add AddressAllows you to define an address to use the controllerin a communication network.The communication address must be set between 1 and 247.Exclusive for controllers that have the RS485 serial communication interface.6.3 LEVEL 3 – RESTRICTED CONFIGURATION LEVEL The equipment leaves the factory already calibrated. When a recalibration is necessary, it must be performed by a specialized professional.controller.If you access this level by accident, step through all the parameters without changing them, until the controller returns to the Measurement Level.PssPasswordIt allows you to enter the Access Password. By entering it, you can change the configuration of the controller.PrtProtectionIt allows you to define the levels of parameters to be protected.1 Only the Restricted Configuration level isprotected. 2 The Restricted and General Configurationlevels are protected. 3 The Restricted and General Configurationlevels are protected. The General Configuration level is not displayed. 4 The Restricted and General Configurationand Setpoint levels are protected. The General Configuration level is not displayed. 5 All levels are protected and displayed.dF.E Defrost EnableAllows you to enable the Defrost function. Wheneverit is enabled, its parameters will be displayed at the General Configuration level. 0 Defrost function disabled. The parameters will not be displayed.1Defrost function enabled. The parameters will be displayed.PS.C Password ChangeIt allows you to change the current password. Youcan set the password to a number between 1 and 999.CA.e Calibration EnableIt allows you to recalibrate the Temperature Sensorinput.If enabled, the controller will display the respective parameters (CA.L , CA.H ).CL1Calibration LowDeclaration of the applied lower range calibration signal from the Temperature Sensor input 1. CH1Calibration Hi 1Declaration of the applied upper range calibration signal from the Temperature Sensor input 1. CL2 Calibration Low 2Declaration of the applied lower range calibration signal from the Temperature Sensor input 2. CH2Calibration Hi 2Declaration of the applied upper range calibration signal from the Temperature Sensor input 2. Ca.H CalibrationHiDeclaration of the applied upper range calibration signal from the Temperature Sensor input.Ca.F Calibration FactoryIt allows you to return to the original calibration of thecontroller.If you change this parameter from 0 to 1, the original calibration will be restored and any changes you have made to the calibration will be disregarded.Sn.2 Serial Number 2It displays the first 2 digits of the electronic serial number of the controller. Sn.1 Serial Number 1It displays the middle 3 digits of the electronic serialnumber of the controller.Sn.0 Serial Number 0It displays the last 3 digits of the electronic serialnumber of the controller.7. WORKING WITH THE CONTROLLERThe controller turns the refrigeration output on or off to bring the system temperature to the value set by the user in the Setpoint parameter.On the controller front panel, the flag will light up when the refrigeration output is turned on. 7.1. DEFROST PROCESSThe defrost process has the objective of melting the ice accumulated on the evaporator, making the refrigeration process more efficient. The defrost happens periodically and has a defined duration. However, its execution can be prevented, and its end can be anticipated in function of the temperature measured directly on the evaporator (See df.s parameter).The defrost can occur because of a compressor stop, resistance heating or compressor cycle inversion:1. In defrost by compressor stop , the refrigeration output willbe switched off at the beginning of the defrost cycle. The defrost of the evaporator will happen naturally.2. In defrost by resistance heating , the defrost output will beused to turn on an electrical resistance, that will heat the evaporator to melt the accumulated ice.In this mode, the refrigeration output will also be switched off.3. In defrost by compressor cycle inversion , the refrigerationoutput will not be turned off. The defrost output will be used to perform the compressor cycle inversion.The parameters df.i and df.t define, respectively, the interval between defrosts and the duration of this process.the controller is in defrosting process.Manual Defrost: When pressed, the key allows you to start or stop the defrosting process. By pressing this key for 1 second, the controller will be forced into defrost. If it is already in progress, the process will be stopped immediately.Set the evaporator temperature for defrost process: • Wait for ice formation on the evaporator. • Trigger a manual defrost.• Monitor visually the evaporator until all ice disappears.• Check the temperature measured by the sensor 2 at thismoment (touch short on). This is the value used in parameter Temperature for End Defrost df.s .8. CONFIGURATION PROTECTIONThe configuration protection system is intended to prevent undue changes to the parameters of the controller. Protection consists of limiting access to the parameter levels.The Calibration level is always protected. To change its parameters, you must enter the Access Password in the PSS parameter, which is the first parameter of the Calibration level. Without the correct password, you can see the other parameters of the level, but not change them.PSs Parameter to enter the Access Password.PrT It allows you to define the degree of protection to beadopted by the controller.PA.C It allows you to change the Access Password. You canset the password to a number between 0 and 1999. Important notes:1. The controller is supplied with the Access Password set to 111.In PA.C (Password Change) parameter, you can change it.2. The factory password is not sensitive information. You must seta new password to protect the controller configuration.3. If you enter the incorrect password for 5 consecutive attempts,the controller will prevent further attempts for the next 10 minutes.4. When you can't remember the Access Password, you can entera Master Password, which will only allow you to set a new password. See MASTER PASSWORD section.9. MASTER PASSWORDThe master password, which allows you to define a new password for the controller, is based in the serial number of the equipment (Sn2, Sn1 and sn0) and calculated as following:[ 1 ] + [ higher digit of SN2 ] + [ higher digit of SN1 ] +[ higher digit of SN0 ] For example, the master password for a device with serial number 97123465 is: 1936As follows: sn2 = 97; sn1 = 123; sn0 = 465 = 1 + 9 + 3 + 6 9.1 HOW TO USE YOUR MASTER PASSWORD1. In the PSS parameter, enter the master password.2. In the PA.C parameter, enter a new password, which must notbe zero (0).3. Use this new password.10.ERROR INDICATIONOn the display, the controller shows messages that correspond to problems related to the temperature measurement. Whenever they are displayed, the control output relay will be turned off.Table 2 –Error indications11.WARRANTYWarranty conditions are available on our website /warranty.。
#(原创技术资料)电动自行车智能三阶段充电器的工作原理和实用技术资料
电动自行车智能三阶段充电器的工作原理及实用技术资料王赟2010.12.28.我国电动自行车产业的飞速发展为电器维修行业提供了新的利润增长点。
充电器作为电动自行车的易损配套设备,其维修市场潜力巨大。
虽然目前的主流充电器都采用了开关电源式设计,但其控制过程与彩电、彩显等设备的开关电源有着明显的不同。
从电动自行车充电器的维修实际以及国内众多电子技术论坛的会员求助情况来看,很多维修人员对电动车充电器的工作过程和三阶段充电原理不明白,而且目前现有的技术资料对此鲜有论述,读者难以理解,因此在检修中缺少必要的理论指导,遇到简单的故障尚能排除,一旦遇到稍具难度的故障或者比较复杂的故障,检修便难以进行,而且存在很大的盲目性。
本文从电动车充电器的维修实际出发,围绕目前电动车市场上的主流充电器电路,用浅显易懂的语言,详尽地剖析2种典型的智能式三阶段充电器的工作原理和检修方法,并提供8个有实用价值的维修实例和13张代表性图纸以及6种典型充电器的三阶段充电过程中的实测数据等相关技术资料,供维修中参考。
一、电动自行车智能三阶段充电器的工作原理当今的电动自行车充电器,大量地采用了以PWM脉宽调制集成电路TL494N或者KA3842(UC3842)为核心控制电路,组成智能式开关电源,分三个阶段为蓄电池提供充电电压和电流。
由于目前我国的电动自行车普遍采用了36V/12AH的铅酸蓄电池,所以这里以适合于这种蓄电池的36V充电器为例,对采用TL494N和KA3842的电动自行车三阶段充电器的工作原理进行介绍。
1、以TL494N为核心的充电器工作原理。
参照型号为天津“彪”牌电动自行车采用的SP2000三阶段充电器。
预备知识:首先说一下什么是三阶段充电器。
三阶段充电器属于智能控制的能自动转换充电模式的充电器,所谓三阶段是指恒流充电阶段、恒压充电阶段、涓流充电阶段(又叫浮充阶段)。
在恒流充电阶段,充电电流是不变的,但输出电压在变。
电路根据充电电流的情况自动调整输出电压才能使电流保持在恒定的状态,一方面表现在当充电电流增大时,电路能自动降低输出电压,使电流减小,维持恒定;另一方面,随着蓄电池充进电量的增多,蓄电池两端电压会不断上升,为了防止充电电流变小,因此开关电源的输出端电压必须随着充电过程而逐渐上升。