OpenGL学习入门之VS2010环境配置
VS2010 开发环境设置
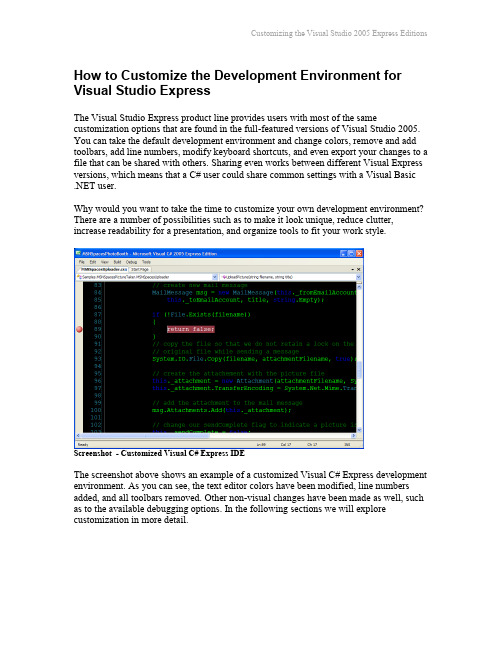
How to Customize the Development Environment for Visual Studio ExpressThe Visual Studio Express product line provides users with most of the same customization options that are found in the full-featured versions of Visual Studio 2005. You can take the default development environment and change colors, remove and add toolbars, add line numbers, modify keyboard shortcuts, and even export your changes to a file that can be shared with others. Sharing even works between different Visual Express versions, which means that a C# user could share common settings with a Visual Basic .NET user.Why would you want to take the time to customize your own development environment? There are a number of possibilities such as to make it look unique, reduce clutter, increase readability for a presentation, and organize tools to fit your work style.Screenshot - Customized Visual C# Express IDEThe screenshot above shows an example of a customized Visual C# Express development environment. As you can see, the text editor colors have been modified, line numbers added, and all toolbars removed. Other non-visual changes have been made as well, such as to the available debugging options. In the following sections we will explore customization in more detail.ContentsCustomizing optionsCustomizing Toolbars and CommandsKeyboard shortcutsImporting and exporting settingsHow to reset settings from the command lineAdditional resourcesCustomizing optionsOptions can be viewed and modified in any Express product by selecting Tools | Options from the main menu. The Express product line provides a streamlined view of options by default, with some differences between each version.Although each version of Visual Studio Express has some variation in the default options, layout, and toolbars, there are still many similarities. To see all of the available options, select the Show All Settings checkbox at the bottom of the Options window.Screenshot - Options window for Visual Basic Express showing all options and settingsHere is a table of some select settings that can be modified using the Options window:Customizing Toolbars and CommandsNow let’s take a look at how you can customize the toolbars, menus, and commands that are made available within the development environment. Available commands can be placed in a menu, a toolbar, or even both at the same time. To start customizing, select Tools | Customize from the main menu. Alternatively, you can select View | Toolbars | Customize from the main menu.Screenshot - Customize window allows you to customize Toolbars and CommandsOnce the Customize window is open, tabs for customizing Toolbars and Commands are made available. In addition, the actual toolbars and main menu are now in a design mode that allows adding and deleting commands, moving commands, changing command images, and more. For example, the screenshot below shows that I can delete the Properties Window command from the View menu by simply right-clicking on it andselecting Delete from the context menu that appears.Screenshot - Deleting a command from a menuThe Toolbars tab of the Customize window allows you to enable or disable any of the default toolbars by selecting or de-selecting the associated checkbox. Keep in mind that toolbar changes take effect immediately. You can even create your own toolbar and put only the commands that you want on it.The Commands tab of the Customize window lists all available commands for categories such as Build, Data, Debug, Tools, and so on. This tab is your toolbox for customizing your main menu or toolbars. To add a command to the menu or a toolbar, simply drag the command to the desire location.Keyboard shortcutsShortcuts exist to make your development life easier and more productive. Most would associate keyboard shortcuts with experienced users, but even beginners can benefit from learning the shortcuts to commonly used commands.Every command that is available to Visual Studio can be assigned a shortcut. To view and/or change these shortcuts, select Tools | Options from the main menu and navigateto Environment | Keyboard.Screenshot - Options window provides access Keyboard shortcut settingsIn the screenshot above, you can see that the Community.CodezoneCommunity command has been selected and that Ctrl+Alt+H has been assigned as the shortcut key combination. By default, new shortcuts will work in a global context, but it is possible to make them only work in a specific context such as in the Windows Forms Designer. If the shortcut keys that you select are already in use an additional drop-down box will become active and show you the conflicting command.Importing and exporting settingsEach version of Express corresponds to a specific language and includes default settings for its integrated development environment (IDE). Visual Studio settings include window layout, fonts and colors, keyboard shortcuts, debugging options, text editing options, and more. Virtually anything that is customizable within the IDE is saved to the current settings file for the current Windows user. For example, the current settings for VB Express would be saved to a file named CurrentSettings.vssettings within your My Documents\Visual Studio 2005\Settings\VB Express folder.Visual Studio makes it very easy to import and export your settings file for backup and sharing purposes by providing a wizard. Start the Import and Export Settings wizard by selecting Tools | Import and Export Settings from the main menu.The Settings wizard allows you to do a number of tasks, including the following: ∙Export selected settings.∙Import selected settings.∙Reset settings to their original version.Having the ability to import or export selected settings enables a number of useful scenarios. For example, let’s say that you have customized the color scheme for your text editor and wish to share if with your friends. Using the settings wizard, you can exportjust the settings that modify the text editor and post them on your website or blog.Screenshot - You can choose which settings you want to exportWhen other developers import your custom settings file, only the settings that youoriginally exported can be transferred to their Express installation. Even if you had donea wholesale export of all settings, the import process would still prompt the user to selectwhich settings they want to import, preventing an automatic overwrite of settings that the user does not wish to change.How to reset settings from the command lineIf you get yourself into a big mess or simply want to return to a default state quickly, select Tools | Import and Export Settings from the main menu. Next, select Reset all Settings from the wizard and click the Next button. You will be prompted to save your current settings by default, but you can also choose to abandon all current changes and select the Next button once again. After the reset has completed, restart the IDE. Alternatively, you can also perform a reset via the command line using the“/resetsettings” command line switch. For a default installation of Visual Basic Express, the full command would be:C:\Program Files\Microsoft Visual Studio 8\Common7\IDE>VBExpress /resetsettingsAdditional resourcesMSDN Visual C# 2005 Express Tour - Customization/vstudio/express/visualcsharp/features/customize/default.aspx MSDN - Customizing the Development Environment/en-us/library/hthab0h8.aspxShared Visual St udio Settings Files @ Scott Hanselman’s Blog/blog/ChangingYourColorsInVisualStudioNETBlackVersus White.aspxNote: see the comments at the bottom of the page.。
VS2010安装及配置

实验一VS2010安装及配置
一. 安装
下载一个ISO镜像文件。
ISO文件截图:
可烧录成光盘,也可用虚拟光驱软件安装,也可直接解压它,然后运行里面的setup.exe进行安装。
通过虚拟光驱加载ISO镜像:
在弹出的对话框中选择下载好的ISO文件。
虚拟光驱里面已经打开了ISO文件,有的机器可能会自动弹出安装提示,有的不会。
如果自动弹出安装提示,那么直接通过即可,如果没有弹出,那么用资源管理器方式进入虚拟光驱点击Setup.exe即可开始安装。
当弹出VS2010安装程序之后点下一步,选择安装VS2010.
选择同意。
然后安装包会开始搜集信息:
开始安装。
注意安装过程中可能需要重启一两次。
二. 配置
通过开始菜单来启动VS2010。
如果是第一次开始,会让你选择默认的环境设置,选择VC的配置:
出现下面的起始页面表示已经成功安装和运行了。
常见的设置
通过菜单工具->选项调出配置对话框,下面是一些常见的设置:
⏹调出行号:选择文本编辑器->所有语言,把行号打成勾。
⏹调整字体或者颜色: 选择环境->字体和颜色。
⏹设置工具栏:单击工具栏的空白区域,把生成工具栏调出来。
可直接在工具栏上面选择编译项目、编译整个解决方案、运行程序和调试程序了。
选择生成工具栏旁边的小三角形可进行自定义,还可以添加一些按钮:
单击自定义界面下面的添加按钮就可以添加新的按钮了,现在我们把开始执行(不调试)添加工具栏中:。
VS2010下配置Openmesh+openGL

VS2010下配置Openmesh+openGL一.配置OpenGL1首先,下载glut.rar文件,这个网上搜一下都能够找到,亦可以从opengl官网下载,/resources/libraries/glut/glutdlls37beta.zip。
2.解压后可以得到5个文件:glut.h、glut.dll、glut.lib、glut32.lib、glut32.dll。
然后,○1把glut.h文件放在C:\Program Files\Microsoft SDKs\Windows\v7.0A\Include\gl文件夹下面;○2把glut.lib、glut32.lib两个文件放在静态函数库所在的文件夹中,也就是说这两个文件要放到自己的VS2010安装目录下的VC\lib文件中。
我的vs2010安装目录是E:\vs2010\VC\lib;○3最后把glut.dll、glut32.dll文件放在C:\windows\system32文件夹下面.三步做完openGL的文件配置就完成了。
二.配置Openmesh1. 在网站上下载了 OpenMesh-2.0-RC4(这个谷歌下,网上很多,最好下载最新版本的)。
2.安装openmesh后,openmesh安装目录下的lib文件夹里面会有两个库文件OpenMeshCore.lib 和OpenMeshTools.lib。
3.为了不设置依赖的编译目录,将这两个文件放到VS的库文件里E:\VS2010\VC\lib中。
4.打开VS2010,新建一个工程,命名如test1,然后设置test1工程的依赖项,工程属性->连接器->输入-》附加依赖项-》加入如上两个lib就可以了。
在这里要说明一下,如果从VS2010的工具—属性里面设置附加依赖属性是不行的,所以我们要自己建一个工程,然后设置这个工程的附加依赖属性,设置的地方有两处,如下:○1项目—test1属性—VC++目录主要设置的是包含目录和库目录,文件路径设置如图,lib和include文件夹都在自己的openmesh安装目录下。
VS2010编程环境介绍
第一章:编程环境介绍1.1 visual studio 2010介绍Visual Studio 2010(vs2010)是微软公司于2010年推出的集成开发环境,相比visual C++6.0而言,其界面被重新设计和组织,项目管理更加简单明了。
Visual Studio 2010同时带来了NET Framework 4.0、Microsoft Visual Studio 2010 CTP( Community Technology Preview--CTP),并且支持开发面向Windows 7的应用程序。
除了Microsoft SQL Server,它还支持IBM DB2和Oracle数据库。
Visual studio 2010也是一个多语言集成开发环境,其支持visual C++、visual basic、C#和ASP等应用系统开发。
Visual studio系列集成开发环境仍然在不断发展完善,到写本书为止,微软已经发布了visual studio 2015。
对于学习C++程序设计,Visual studio 2010完全是一个足够好的编程环境,也是目前流行的C++程序开发环境之一。
Visual studion 2010有多个不同版本,分别是:专业版:专业版(professional)面向个人开发人员,提供集成开发环境、开发平台支持、测试工具等,是商业版本。
高级版高级版(Premium):创建可扩展、高质量程序的完整工具包,相比专业版增加了数据库开发、T eam Foundation Server(TFS)、调试与诊断、MSDN订阅、程序生命周期管理(ALM),是商业版本。
旗舰版旗舰版(Ultimate):面向开发团队的综合性ALM工具,相比高级版增加了架构与建模、实验室管理等,是商业版本。
学习版学习版(Express)是一个免费工具集成开发环境。
从本质上讲,Visual Studio 2010 Express是轻量级版本的集成开发环境,可在Microsoft DreamSpark获得,但你必须有微软dreamspark,也可以通过邮箱等方式验证你的学生身份来获取该版本。
visual_studio_2010_OpenGL开发环境配置
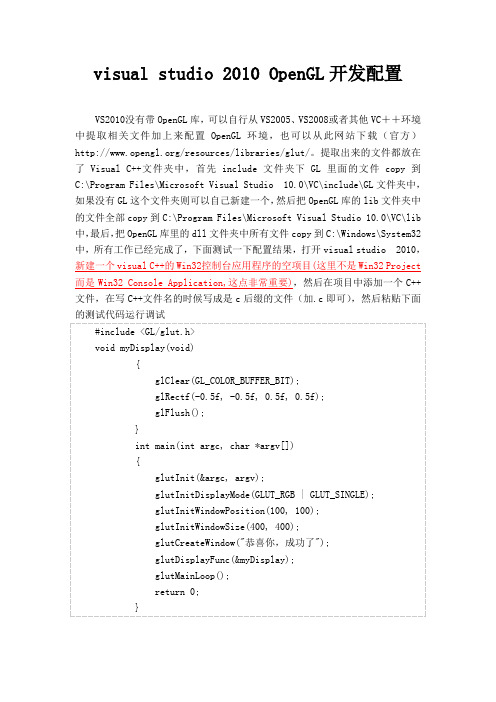
visual studio 2010 OpenGL 开发配置VS2010没有带 OpenGL 库, 可以自行从 VS2005、 VS2008或者其他 VC++环境 中提取相关文件加上来 配置 OpenGL 环境 ,也可以从此网站下载 (官方) /resources/libraries/glut/。
提取出来的文件都放在 了 Visual C++文件夹中,首先 include 文件夹下 GL 里面的文件 copy 到 C:\Program Files\Microsoft Visual Studio 10.0\VC\include\GL 文件夹中, 如果没有 GL 这个文件夹则可以自己新建一个, 然后把 OpenGL 库的 lib 文件夹中 的文件全部 copy 到 C:\Program Files\Microsoft Visual Studio 10.0\VC\lib 中, 最后, OpenGL 库里的 dll 文件夹中所有文件 copy 到 C:\Windows\System32 把 中,所有工作已经完成了,下面测试一下配置结果,打开 visual studio 2010, 新建一个 visual C++的 Win32控制台应用程序的空项目(这里不是 Win32 Project 而是 Win32 Console Application,这点非常重要),然后在项目中添加一个 C++ 文件,在写 C++文件名的时候写成是 c 后缀的文件(加.c 即可) ,然后粘贴下面 的测试代码运行调试 #include <GL/glut.h> void myDisplay(void) { glClear(GL_COLOR_BUFFER_BIT); glRectf(-0.5f, -0.5f, 0.5f, 0.5f); glFlush(); } int main(int argc, char *argv[]) { glutInit(&argc, argv); glutInitDisplayMode(GLUT_RGB | GLUT_SINGLE); glutInitWindowPosition(100, 100); glutInitWindowSize(400, 400); glutCreateWindow("恭喜你,成功了"); glutDisplayFunc(&myDisplay); glutMainLoop(); return 0; }运行成功表明配置 OpenGL 环境成功!!!。
vs2010 解决方案配置
vs2010 解决方案配置
《使用VS2010解决方案配置进行快速开发》
Visual Studio 2010是微软推出的一款集成开发环境,为开发人员提供了丰富的工具和功能。
在使用VS2010进行软件开发时,解决方案配置是非常重要的一环。
通过正确的配置,开发人员可以更快速地搭建项目结构,调试代码并进行部署。
首先,通过解决方案资源管理器可以创建、添加、删除项目和解决方案的组织结构。
在解决方案资源管理器中,开发人员可以方便地对项目进行管理,包括设置编译属性、引用引用项、以及调整项目的层次结构。
其次,解决方案配置可以用于设置编译时的参数和选项。
在项目属性中,开发人员可以设置编译器参数、链接器参数、预处理器参数等,以便在编译时对代码进行优化、调试和部署。
另外,在解决方案配置中也可以对调试器进行配置。
开发人员可以设置断点、查看变量、监视表达式等,来帮助调试和排错。
此外,还可以设置远程调试、内存管理选项等高级调试功能。
最后,解决方案配置还可以用于发布项目。
通过发布管理器,开发人员可以创建发布文件、设置发布路径、以及对发布项目进行各种属性设置,以实现项目的快速部署。
总的来说,通过合理的解决方案配置,开发人员可以更快速地搭建项目结构、调试代码和部署项目。
VS2010提供了丰富的
解决方案配置选项,使开发人员能够更加高效地进行软件开发工作。
visusl C++ 2008 2010 opengl和vbo环境配置
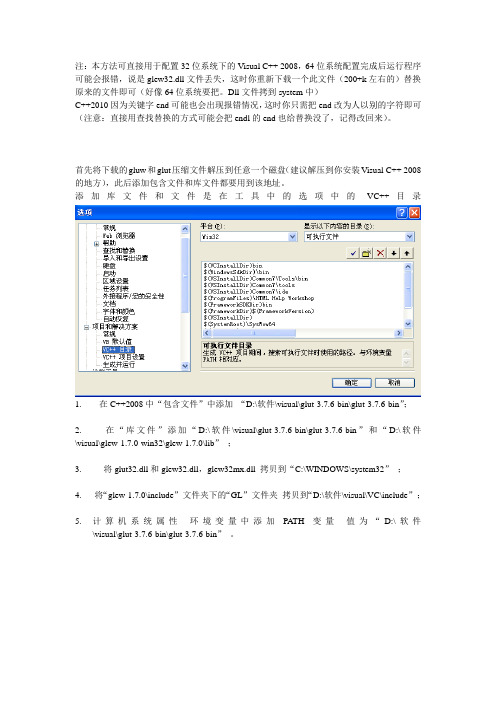
注:本方法可直接用于配置32位系统下的Visual C++ 2008,64位系统配置完成后运行程序可能会报错,说是glew32.dll文件丢失,这时你重新下载一个此文件(200+k左右的)替换原来的文件即可(好像64位系统要把。
Dll文件拷到system中)
C++2010因为关键字end可能也会出现报错情况,这时你只需把end改为人以别的字符即可(注意:直接用查找替换的方式可能会把endl的end也给替换没了,记得改回来)。
首先将下载的gluw和glut压缩文件解压到任意一个磁盘(建议解压到你安装Visual C++ 2008 的地方),此后添加包含文件和库文件都要用到该地址。
添加库文件和文件是在工具中的选项中的VC++目录
1. 在C++2008中“包含文件”中添加“D:\软件\visual\glut-3.7.6-bin\glut-3.7.6-bin”;
2. 在“库文件”添加“D:\软件\visual\glut-
3.7.6-bin\glut-3.7.6-bin”和“D:\软件\visual\glew-1.7.0-win32\glew-1.7.0\lib”;
3. 将glut32.dll和glew32.dll,glew32mx.dll 拷贝到“C:\WINDOWS\system32”;
4. 将“glew-1.7.0\include”文件夹下的“GL”文件夹拷贝到“D:\软件\visual\VC\include”;
5.计算机系统属性环境变量中添加PATH变量值为“D:\软件
\visual\glut-3.7.6-bin\glut-3.7.6-bin”。
如何在VS2010 中运行 Nehe OpenGL例子程序
如何在VS2010中文版中运行Nehe教程的OpenGL例子程序图文在网上找了一些,但是是英文版的解释,最后还有一些问题。
我问了我的朋友JWQ(秦姐)。
她细致的解答帮我成功运行出来了,在此和大家分享一下。
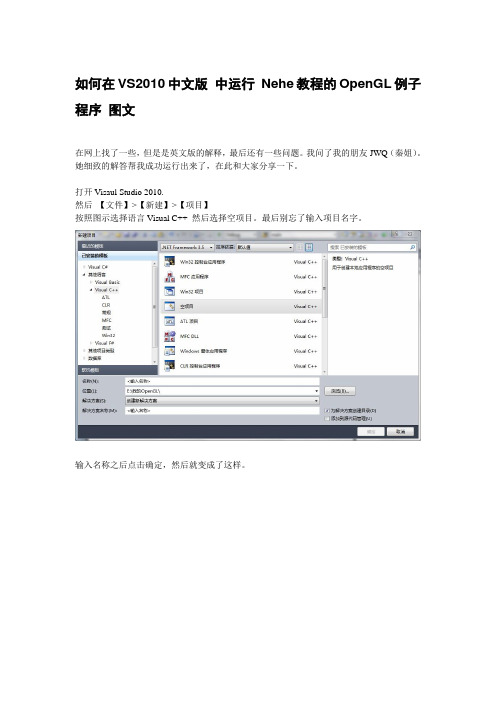
打开Visaul Studio 2010.然后【文件】>【新建】>【项目】按照图示选择语言Visual C++ 然后选择空项目。
最后别忘了输入项目名字。
输入名称之后点击确定,然后就变成了这样。
如果你看不到解决方案资源管理器。
可以点击菜单栏中的【视图】》【解决方案资源管理器】。
在解决方案资源管理器中的“源文件”上右击鼠标,选择【添加】》【新建项】。
将会弹出如图所示对话框,选择C++文件。
最后别忘了给这个文件起一个名字,点击【添加】按钮。
【项目】》【Lesson1属性】。
如果你起的项目名称是别的,自然这个项目属性就不叫Lesson1了。
点击后弹出如下对话框。
【配置属性】》【链接器】》【输入】找到【附加依赖项】点击【附加依赖项】这一行有内容的部分,会出来一个下拉小三角,点击【<编辑>】,将以下内容粘贴进去,注意,只能用单击鼠标右键然后粘贴的方法。
效果如图。
点击确定。
opengl32.libglu32.libglaux.libodbc32.libodbccp32.lib现在就可以将代码贴入了,然后快捷键Ctrl+F5运行。
/** This Code Was Created By Jeff Molofee 2000* A HUGE Thanks To Fredric Echols For Cleaning Up* And Optimizing This Code, Making It More Flexible!* If You've Found This Code Useful, Please Let Me Know.* Visit My Site At */#include <windows.h> // Header File For Windows#include <gl\gl.h> // Header File For The OpenGL32 Library#include <gl\glu.h> // Header File For The GLu32 Library#include <gl\glaux.h> // Header File For The Glaux LibraryHDC hDC=NULL; // Private GDI Device Context HGLRC hRC=NULL; // Permanent Rendering ContextHWND hWnd=NULL; // Holds Our Window Handle HINSTANCE hInstance; // Holds The Instance Of The Applicationbool keys[256]; // Array Used For The Keyboard Routinebool active=TRUE; // Window Active Flag Set To TRUE By Default bool fullscreen=TRUE; // Fullscreen Flag Set To Fullscreen Mode By DefaultLRESULT CALLBACK WndProc(HWND, UINT, WPARAM, LPARAM); // Declaration For WndProcGLvoid ReSizeGLScene(GLsizei width, GLsizei height) // Resize And Initialize The GL Window{if (height==0) // PreventA Divide By Zero By{height=1; //Making Height Equal One}glViewport(0,0,width,height); // Reset The CurrentViewportglMatrixMode(GL_PROJECTION); // Select The ProjectionMatrixglLoadIdentity(); // ResetThe Projection Matrix// Calculate The Aspect Ratio Of The WindowgluPerspective(45.0f,(GLfloat)width/(GLfloat)height,0.1f,100.0f);glMatrixMode(GL_MODELVIEW); // Select TheModelview MatrixglLoadIdentity(); // ResetThe Modelview Matrix}int InitGL(GLvoid) // AllSetup For OpenGL Goes Here{glShadeModel(GL_SMOOTH); // Enable SmoothShadingglClearColor(0.0f, 0.0f, 0.0f, 0.5f); // Black BackgroundglClearDepth(1.0f); // DepthBuffer SetupglEnable(GL_DEPTH_TEST); // Enables DepthTestingglDepthFunc(GL_LEQUAL); // The Type OfDepth Testing To DoglHint(GL_PERSPECTIVE_CORRECTION_HINT, GL_NICEST); // Really Nice Perspective Calculationsreturn TRUE; //Initialization Went OK}int DrawGLScene(GLvoid) // Here's Where WeDo All The Drawing{glClear(GL_COLOR_BUFFER_BIT | GL_DEPTH_BUFFER_BIT); // Clear Screen And Depth BufferglLoadIdentity(); // ResetThe Current Modelview Matrixreturn TRUE; //Everything Went OK}GLvoid KillGLWindow(GLvoid) // Properly KillThe Window{if (fullscreen) // Are WeIn Fullscreen Mode?{ChangeDisplaySettings(NULL,0); // If So Switch Back ToThe DesktopShowCursor(TRUE); // ShowMouse Pointer}if (hRC) //Do We Have A Rendering Context?{if (!wglMakeCurrent(NULL,NULL)) // Are We Able To ReleaseThe DC And RC Contexts?{MessageBox(NULL,"Release Of DC And RC Failed.","SHUTDOWN ERROR",MB_OK |MB_ICONINFORMA TION);}if (!wglDeleteContext(hRC)) // Are We Able ToDelete The RC?{MessageBox(NULL,"Release Rendering Context Failed.","SHUTDOWN ERROR",MB_OK |MB_ICONINFORMA TION);}hRC=NULL; //Set RC To NULL}if (hDC && !ReleaseDC(hWnd,hDC)) // Are We Able To ReleaseThe DC{MessageBox(NULL,"Release Device Context Failed.","SHUTDOWN ERROR",MB_OK |MB_ICONINFORMA TION);hDC=NULL; //Set DC To NULL}if (hWnd && !DestroyWindow(hWnd)) // Are We Able To DestroyThe Window?{MessageBox(NULL,"Could Not Release hWnd.","SHUTDOWN ERROR",MB_OK | MB_ICONINFORMA TION);hWnd=NULL; //Set hWnd To NULL}if (!UnregisterClass("OpenGL",hInstance)) // Are We Able To Unregister Class {MessageBox(NULL,"Could Not Unregister Class.","SHUTDOWN ERROR",MB_OK |MB_ICONINFORMA TION);hInstance=NULL; // SethInstance To NULL}}/* This Code Creates Our OpenGL Window. Parameters Are: ** title - Title To Appear At The Top Of The Window ** width - Width Of The GL Window Or Fullscreen Mode ** height - Height Of The GL Window Or Fullscreen Mode ** bits - Number Of Bits To Use For Color (8/16/24/32) ** fullscreenflag - Use Fullscreen Mode (TRUE) Or Windowed Mode (FALSE) */BOOL CreateGLWindow(char* title, int width, int height, int bits, bool fullscreenflag){GLuint PixelFormat; // Holds The Results After Searching For A Match WNDCLASS wc; // Windows Class StructureDWORD dwExStyle; // Window Extended StyleDWORD dwStyle; // Window StyleRECT WindowRect; // Grabs Rectangle Upper Left / LowerRight ValuesWindowRect.left=(long)0; // Set Left Value To 0WindowRect.right=(long)width; // Set Right Value To Requested WidthWindowRect.top=(long)0; // Set Top Value To 0WindowRect.bottom=(long)height; // Set Bottom Value To Requested Heightfullscreen=fullscreenflag; // Set The Global Fullscreen FlaghInstance = GetModuleHandle(NULL); // Grab AnInstance For Our Windowwc.style = CS_HREDRAW | CS_VREDRAW | CS_OWNDC; // Redraw On Size, And OwnDC For Window.wc.lpfnWndProc = (WNDPROC) WndProc; // WndProc HandlesMessageswc.cbClsExtra = 0; //No Extra Window Datawc.cbWndExtra = 0; //No Extra Window Datawc.hInstance = hInstance; // Set TheInstancewc.hIcon = LoadIcon(NULL, IDI_WINLOGO); // Load TheDefault Iconwc.hCursor = LoadCursor(NULL, IDC_ARROW); // Load The ArrowPointerwc.hbrBackground = NULL; //No Background Required For GLwc.lpszMenuName = NULL; //We Don't Want A Menuwc.lpszClassName = "OpenGL"; //Set The Class Nameif (!RegisterClass(&wc)) //Attempt To Register The Window Class{MessageBox(NULL,"Failed To Register The Window Class.","ERROR",MB_OK|MB_ICONEXCLAMA TION);return FALSE;// Return FALSE}if (fullscreen)// Attempt Fullscreen Mode?{DEVMODE dmScreenSettings; //Device Modememset(&dmScreenSettings,0,sizeof(dmScreenSettings)); // Makes Sure Memory's CleareddmScreenSettings.dmSize=sizeof(dmScreenSettings); // Size Of The DevmodeStructuredmScreenSettings.dmPelsWidth = width; // Selected ScreenWidthdmScreenSettings.dmPelsHeight = height; // Selected ScreenHeightdmScreenSettings.dmBitsPerPel = bits; // Selected BitsPer PixeldmScreenSettings.dmFields=DM_BITSPERPEL|DM_PELSWIDTH|DM_PELSHEIGHT;// Try To Set Selected Mode And Get Results. NOTE: CDS_FULLSCREEN Gets Rid Of Start Bar.if(ChangeDisplaySettings(&dmScreenSettings,CDS_FULLSCREEN)!=DISP_CHANGE_SUCCES SFUL){// If The Mode Fails, Offer Two Options. Quit Or Use Windowed Mode.if (MessageBox(NULL,"The Requested Fullscreen Mode Is Not Supported By\nYour VideoCard. Use Windowed Mode Instead?","NeHe GL",MB_YESNO|MB_ICONEXCLAMATION)==IDYES){fullscreen=FALSE; // Windowed Mode Selected. Fullscreen =FALSE}else{// Pop Up A Message Box Letting User Know The Program Is Closing.MessageBox(NULL,"Program Will Now Close.","ERROR",MB_OK|MB_ICONSTOP);return FALSE;// Return FALSE}}}if (fullscreen)// Are We Still In Fullscreen Mode?{dwExStyle=WS_EX_APPWINDOW; //Window Extended StyledwStyle=WS_POPUP;// Windows StyleShowCursor(FALSE);// Hide Mouse Pointer}else{dwExStyle=WS_EX_APPWINDOW | WS_EX_WINDOWEDGE; // Window Extended StyledwStyle=WS_OVERLAPPEDWINDOW; // WindowsStyle}AdjustWindowRectEx(&WindowRect, dwStyle, FALSE, dwExStyle); // Adjust Window To TrueRequested Size// Create The Windowif (!(hWnd=CreateWindowEx( dwExStyle, //Extended Style For The Window"OpenGL",// Class Nametitle,// Window TitledwStyle |// Defined Window StyleWS_CLIPSIBLINGS |// Required Window StyleWS_CLIPCHILDREN,// Required Window Style0, 0,// Window PositionWindowRect.right-WindowRect.left, //Calculate Window WidthWindowRect.bottom-WindowRect.top, //Calculate Window HeightNULL,// No Parent WindowNULL,// No MenuhInstance,// InstanceNULL)))// Dont Pass Anything To WM_CREATE{KillGLWindow(); // Reset TheDisplayMessageBox(NULL,"Window Creation Error.","ERROR",MB_OK|MB_ICONEXCLAMA TION);return FALSE; // Return FALSE}static PIXELFORMATDESCRIPTOR pfd= // pfd Tells Windows How We WantThings To Be{sizeof(PIXELFORMA TDESCRIPTOR), // Size Of This Pixel FormatDescriptor1, //Version NumberPFD_DRAW_TO_WINDOW | // Format Must SupportWindowPFD_SUPPORT_OPENGL | // Format Must SupportOpenGLPFD_DOUBLEBUFFER, // Must SupportDouble BufferingPFD_TYPE_RGBA, // Request An RGBAFormatbits, // SelectOur Color Depth0, 0, 0, 0, 0, 0, // Color BitsIgnored0, //No Alpha Buffer0, //Shift Bit Ignored0, //No Accumulation Buffer0, 0, 0, 0, //Accumulation Bits Ignored16, //16Bit Z-Buffer (Depth Buffer)0, //No Stencil Buffer0, //No Auxiliary BufferPFD_MAIN_PLANE, // Main DrawingLayer0, //Reserved0, 0, 0 // LayerMasks Ignored};if (!(hDC=GetDC(hWnd))) // Did We Get A DeviceContext?{KillGLWindow(); // Reset TheDisplayMessageBox(NULL,"Can't Create A GL Device Context.","ERROR",MB_OK|MB_ICONEXCLAMA TION);return FALSE; // Return FALSE}if (!(PixelFormat=ChoosePixelFormat(hDC,&pfd))) // Did Windows Find A Matching Pixel Format?{KillGLWindow(); // Reset TheDisplayMessageBox(NULL,"Can't Find A Suitable PixelFormat.","ERROR",MB_OK|MB_ICONEXCLAMATION);return FALSE; // Return FALSE}if(!SetPixelFormat(hDC,PixelFormat,&pfd)) // Are We Able To Set The Pixel Format?{KillGLWindow(); // Reset TheDisplayMessageBox(NULL,"Can't Set The PixelFormat.","ERROR",MB_OK|MB_ICONEXCLAMATION);return FALSE; // Return FALSE}if (!(hRC=wglCreateContext(hDC))) // Are We Able To Get A RenderingContext?{KillGLWindow(); // Reset TheDisplayMessageBox(NULL,"Can't Create A GL Rendering Context.","ERROR",MB_OK|MB_ICONEXCLAMA TION);return FALSE; // Return FALSE}if(!wglMakeCurrent(hDC,hRC)) // Try To Activate The RenderingContext{KillGLWindow(); // Reset TheDisplayMessageBox(NULL,"Can't Activate The GL Rendering Context.","ERROR",MB_OK|MB_ICONEXCLAMA TION);return FALSE; // Return FALSE}ShowWindow(hWnd,SW_SHOW); // Show The WindowSetForegroundWindow(hWnd); // Slightly HigherPrioritySetFocus(hWnd); // Sets KeyboardFocus To The WindowReSizeGLScene(width, height); // Set Up Our Perspective GL Screenif (!InitGL()) // Initialize OurNewly Created GL Window{KillGLWindow(); // Reset TheDisplayMessageBox(NULL,"InitializationFailed.","ERROR",MB_OK|MB_ICONEXCLAMA TION);return FALSE; // Return FALSE}return TRUE; // Success}LRESULT CALLBACK WndProc( HWND hWnd, // Handle For This WindowUINT uMsg, // Message ForThis WindowWPARAM wParam, // AdditionalMessage InformationLPARAM lParam) // AdditionalMessage Information{switch (uMsg) // Check ForWindows Messages{case WM_ACTIV A TE: // Watch ForWindow Activate Message{if (!HIWORD(wParam)) // Check MinimizationState{active=TRUE; // Program IsActive}else{active=FALSE; // Program Is NoLonger Active}return 0; // ReturnTo The Message Loop}case WM_SYSCOMMAND: // InterceptSystem Commands{switch (wParam) // Check SystemCalls{case SC_SCREENSA VE: // ScreensaverTrying To Start?case SC_MONITORPOWER: // Monitor Trying To EnterPowersave?return 0; // PreventFrom Happening}break; // Exit}case WM_CLOSE: // Did We ReceiveA Close Message?{PostQuitMessage(0); // Send A QuitMessagereturn 0; // JumpBack}case WM_KEYDOWN: // Is A Key BeingHeld Down?{keys[wParam] = TRUE; // If So, Mark It As TRUEreturn 0; // JumpBack}case WM_KEYUP: // Has A Key BeenReleased?{keys[wParam] = FALSE; // If So, Mark It As FALSEreturn 0; // JumpBack}case WM_SIZE: // Resize TheOpenGL Window{ReSizeGLScene(LOWORD(lParam),HIWORD(lParam)); // LoWord=Width, HiWord=Heightreturn 0; // JumpBack}}// Pass All Unhandled Messages To DefWindowProcreturn DefWindowProc(hWnd,uMsg,wParam,lParam);}int WINAPI WinMain( HINSTANCE hInstance, // InstanceHINSTANCE hPrevInstance, // Previous InstanceLPSTR lpCmdLine, // Command LineParametersint nCmdShow) // WindowShow State{MSG msg; // WindowsMessage StructureBOOL done=FALSE; // Bool VariableTo Exit Loop// Ask The User Which Screen Mode They Preferif (MessageBox(NULL,"Would You Like To Run In Fullscreen Mode?", "Start FullScreen?",MB_YESNO|MB_ICONQUESTION)==IDNO){fullscreen=FALSE; // Windowed Mode }// Create Our OpenGL Windowif (!CreateGLWindow("NeHe's OpenGL Framework",640,480,16,fullscreen)){return 0; // Quit IfWindow Was Not Created}while(!done) // Loop That RunsWhile done=FALSE{if (PeekMessage(&msg,NULL,0,0,PM_REMOVE)) // Is There A Message Waiting?{if (msg.message==WM_QUIT) // Have We Received A QuitMessage?{done=TRUE; // If Sodone=TRUE}else // If Not,Deal With Window Messages{TranslateMessage(&msg); // Translate The MessageDispatchMessage(&msg); // Dispatch The Message}}else // IfThere Are No Messages{// Draw The Scene. Watch For ESC Key And Quit Messages From DrawGLScene()if (active) // ProgramActive?{if (keys[VK_ESCAPE]) // Was ESC Pressed?{done=TRUE; // ESCSignalled A Quit}else // NotTime To Quit, Update Screen{DrawGLScene(); // Draw The SceneSwapBuffers(hDC); // Swap Buffers(Double Buffering)}}if (keys[VK_F1]) // Is F1 BeingPressed?{keys[VK_F1]=FALSE; // If So Make KeyFALSEKillGLWindow(); // Kill OurCurrent Windowfullscreen=!fullscreen; // Toggle Fullscreen /Windowed Mode// Recreate Our OpenGL Windowif (!CreateGLWindow("NeHe's OpenGL Framework",640,480,16,fullscreen)){return 0; // Quit IfWindow Was Not Created}}}}// ShutdownKillGLWindow(); // Kill The Window return (msg.wParam); // Exit The Program}这是Nehe教程第一课的代码。
- 1、下载文档前请自行甄别文档内容的完整性,平台不提供额外的编辑、内容补充、找答案等附加服务。
- 2、"仅部分预览"的文档,不可在线预览部分如存在完整性等问题,可反馈申请退款(可完整预览的文档不适用该条件!)。
- 3、如文档侵犯您的权益,请联系客服反馈,我们会尽快为您处理(人工客服工作时间:9:00-18:30)。
OpenGL学习入门之VS2010环境配置OpenGL开发环境简介
基于OpenGL标准开发的应用程序运行时需有动态链接库OpenGL32.DLL、Glu32.DLL,这两个文件在安装Windows NT时已自动装载到C:\WINDOWS\SYSTEM32目录下(这里假定用户将Windows NT安装在C盘上)。
OpenGL的图形库函数封装在动态链接库OpenGL32.DLL中,开发基于OpenGL的应用程序,必须先了解OpenGL的库函数。
OpenGL 函数命令方式十分有规律,每个库函数均有前缀gl、glu、aux,分别表示该函数属于OpenGL 基本库、实用库或辅助库。
Windows NT下的OpenGL包含了100多个核心函数,均以gl 作为前缀,同时还支持另外四类函数:
OpenGL实用库函数:43个,以glu作为前缀;
OpenGL辅助库函数:31个,以aux作为前缀;
Windows专用库函数(WGL):6个,以wgl作为前缀;
Win32API函数(WGL):5个,无前缀。
安装GLUT工具包
GLUT不是OpenGL所必须的,但它会给我们的学习带来一定的方便,推荐安装。
Windows环境下的GLUT下载地址:(大小约为150k)
/resources/libraries/glut/glutdlls37beta.zip
VS环境配置
将下载的压缩包解开,将得到5个文件(glut.dll, glut32.dll, glut.lib, glut32.lib,glut.h)
(1)把glut.h复制到x:\Program Files\Microsoft\Visual Studio 10.0\VC\include\GL文件夹中,如果没有GL这个文件夹则可以自己新建一个。
(x是你安装VS的盘符号)(2)把解压得到的glut.lib和glut32.lib放到静态函数库所在文件夹(即与include并排的lib文件夹下)。
(3)把解压得到的glut.dll和glut32.dll放到操作系统目录下面的system32文件夹内。
(典型的位置为:C:\Windows\System32)
(注:如在开发应用程序时用到OpenGL辅助库函数,则还需下载相应动态链接库,包含glaux.dll, glaux.lib, glaux.h,相应步骤同上)
第一个OpenGL程序
首先创建工程,其步骤如下:
(1)创建一个Win32 Console Application。
(2)链接OpenGL libraries。
在Visual C++中先单击Projec / Settings,找到Link标签,最后在Object/library modules 中加上OpenGL32.lib;GLu32.lib;glut.lib;glut32.lib 。
(3)单击Project / Settings中的C/C++标签,将Preprocessor definitions 中的_CONSOLE 改为__WINDOWS。
(4)单击Project / Settings中的General标签,将Character Set属性值改变为Not Set,最后单击OK。
现在你可以把下面的例子拷贝到工程中去,编译运行。
你可以看到一个彩色的三角形,如图1所示。
图1 程序运行结果图
#include<stdlib.h>
#include<GL/glut.h>
void background(void)
{
glClearColor(0.0,0.0,0.0,0.0);
}
void myDisplay(void)
{
glClear(GL_COLOR_BUFFER_BIT);
glBegin(GL_TRIANGLES);
glShadeModel(GL_SMOOTH);
glColor3f(1.0,0.0,0.0);
glVertex2f(-1.0,-1.0);
glColor3f(0.0,1.0,0.0);
glVertex2f(0.0,-1.0);
glColor3f(0.0,0.0,1.0);
glVertex2f(-0.5,1.0);
glEnd();
glFlush();
}
void myReshape(GLsizei w,GLsizei h)
{
glViewport(0,0,w,h);
glMatrixMode(GL_PROJECTION);
glLoadIdentity();
if(w <= h)
gluOrtho2D(-1.0,1.5,-1.5,1.5*(GLfloat)h/(GLfloat)w);
else
gluOrtho2D(-1.0,1.5*(GLfloat)w/(GLfloat)h,-1.5,1.5);
glMatrixMode(GL_MODELVIEW);
}
int main(int argc, char* argv[])
{
/*初始化*/
glutInit(&argc,argv);
glutInitDisplayMode(GLUT_SINGLE|GLUT_RGB);
glutInitWindowSize(400,400);
glutInitWindowPosition(200,200);
/*创建窗口¨²*/
glutCreateWindow("Triangle");
/*绘制与显示*/
background();
glutReshapeFunc(myReshape);
glutDisplayFunc(myDisplay);
glutMainLoop();
return 0;
}
main函数中以glut开头的函数都包含在glut.h中。
GLUT库的函数主要执行如处理多窗口绘制、处理回调驱动事件、生成层叠式弹出菜单、绘制位图字体和笔画字体,以及各种窗口管理等任务。
glutInit用来初始化GLUT库并同窗口系统对话协商。
glutInitDisplayMode用来确定所创建窗口的显示模式。
本例中的参数
GLUT_SINGLE 指定单缓存窗口,这也是缺省模式,对应的模式为GLUT_DOUBLE 双缓存窗口。
参数GLUT_RGB指定颜色RGBA模式,这也是缺省模式,对应的模式为GLUT_INDEX 颜色索引模式窗口。
glutInitWindowSize 初始化窗口的大小,第一个参数为窗口的宽度,第二个参数为窗口的高度,以像素为单位。
glutInitWindowPosition 设置初始窗口的位置,第一个参数为窗口左上角x的坐标,第二个参数为窗口左上角y的坐标,以像素为单位。
屏幕的左上角的坐标为(0,0),横坐标向右逐渐增加,纵坐标向下逐渐增加。
glutCreateWindow 创建顶层窗口,窗口的名字为扩号中的参数。
background() 这是自己写的函数,设置背景。
其实这个函数中的语句可以写在display函数中,但为了使功能块更加清晰,所以把背景这一部分单独提出来。
glutReshapeFunc 注册当前窗口的形状变化回调函数。
当改变窗口大小时,该窗口的形状改变回调函数将被调用。
在此例中就是myReshape指定形状变化函数。
glutDisplayFunc 注册当前窗口的显示回调函数。
当一个窗口的图像层需要重新绘制时,GLUT将调用该窗口的的显示回调函数。
在此例中的mydisplay就是显示回调函数,显示回调函数不带任何参数,它负责整个图像层的绘制。
我们的大部分工作将集中在这个函数中。
glutMainLoop 进入GLUT事件处理循环。
glutMainLoop函数在GLUT程序中最多只能调用一次,它一旦被调用就不再返回,并且调用注册过的回调函数。
所以这个函数必须放在注册回调函数的后面,此例中为glutReshapeFunc,glutDisplayFunc 。