Intel傲腾内存安装教程
英特尔Optane傲腾内存启动或禁用方法及问题总汇
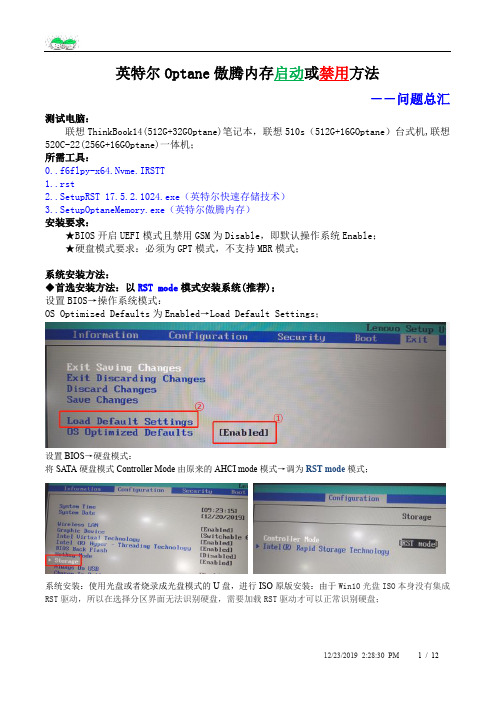
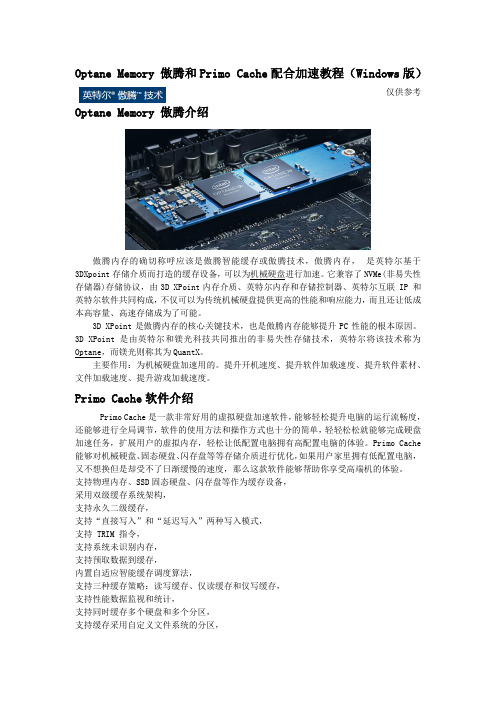
英特尔Optane傲腾内存启动或禁用方法--问题总汇测试电脑:联想ThinkBook14(512G+32GOptane)笔记本,联想510s(512G+16GOptane)台式机,联想520C-22(256G+16GOptane)一体机;所需工具:0..f6flpy-x64.Nvme.IRSTT1..rst2..SetupRST 17.5.2.1024.exe(英特尔快速存储技术)3..SetupOptaneMemory.exe(英特尔傲腾内存)安装要求:★BIOS开启UEFI模式且禁用GSM为Disable,即默认操作系统Enable;★硬盘模式要求:必须为GPT模式,不支持MBR模式;系统安装方法:◆首选安装方法:以RST mode模式安装系统(推荐);设置BIOS→操作系统模式:OS Optimized Defaults为Enabled→Load Default Settings;设置BIOS→硬盘模式:将SATA硬盘模式Controller Mode由原来的AHCI mode模式→调为RST mode模式;系统安装:使用光盘或者烧录成光盘模式的U盘,进行ISO原版安装:由于Win10光盘ISO本身没有集成RST驱动,所以在选择分区界面无法识别硬盘,需要加载RST驱动才可以正常识别硬盘;点击“加载驱动程序”→浏览→0..f6flpy-x64.Nvme.IRSTT;选择:iaStorAC.inf正常系统安装及解压系统完成后→安装傲腾驱动程序:3..SetupOptaneMemory.exe(英特尔傲腾内存)或者2..SetupRST 17.5.2.1024.exe(英特尔快速存储技术),根据提示,启用加速即可(会清空傲腾磁盘上的数据);到此英特尔Optane傲腾内存技术已经启动完毕!相关问题请往下看!◆备选安装方法:以AHCI mode模式安装系统(这种安装方法最多,也是一大堆困扰问题);AHCI模式下系统安装,方法有很多,相信很多人都会;比如:Win PE下安装Win10.iso 原版镜像,或者光盘安装;由于这种方法很常见,系统安装方法就忽略了!系统建议安装不含驱动纯净版ISO原版,当系统安装完成后,不建议安装任何驱动!唛唛这里使用的是:冰封PE网络版v17.5→进入Win10 PE→将rst文件夹及rst.bat复制到C盘根目录(请确保C盘为系统盘!)→运行rst.bat导入RST驱动;也可以考虑在安装好的Win10系统下,打开rst文件夹中的驱动文件,右击安装:iaAHCIC.inf,iaStorAC.inf,iaStorSW.inf,iaStorSwExt.inf四个驱动文件;BIOS设置,再将SATA硬盘模式Controller Mode由原来的AHCI mode调为RST mode模式,保存退出!启动正常进入系统!→再安装:2..SetupRST 17.5.2.1024.exe(英特尔快速存储技术)或者3..SetupOptaneMemory.exe(英特尔傲腾内存),根据提示操作,最后重启!到此傲腾内存已经成功开启!Optane傲腾内存技术启动成功或失败截图:联想ThinkBook14(512G+32GOptane)笔记本、台式机、一体机成功启动傲腾内存技术截图:成功开启傲腾后,Status变成了:Cache;设备管理器中只显示一块硬盘,磁盘管理也只显示一块硬盘;联想ThinkBook14(512G+32GOptane)笔记本未能成功启动傲腾内存技术截图:Status为:Non-RAID,傲腾内存启动失败;联想510s(512G+16GOptane)台式机未能成功启动傲腾内存技术BIOS截图:Status为Offline;硬盘也显示为两项硬盘:476.9GB和27.2GB;◆禁用英特尔傲腾内存技术方法:Win10系统下禁用傲腾方法:打开3..SetupOptaneMemory.exe(英特尔傲腾内存)或者2..SetupRST 17.5.2.1024.exe (英特尔快速存储技术),应用程序的控制面板,选择“禁用”;此方法很简单,没什么技术难度,忽略!(毕竟很多情况下,Win10系统是坏的呢!那就凉凉了!)BIOS下禁用傲腾方法:联想ThinkBook14(512G+32GOptane)笔记本BIOS禁用Optane傲腾方法:BIOS→Configuration→Storage;→Intel(R) Rapid Storage Technology;→Intel Optane , 476.9GB;→Disable;→Preserve user data:[X]→Are you sure you want to disable?→Yes;→Disable,按下回车键,BIOS会无响应几十秒,禁用成功后自动返回,或者按一下Esc键返回;→成功禁用傲腾后,BIOS两张区别截图:左边图已禁用,右边图未禁用;到此,联想ThinkBook14(512G+32GOptane)笔记本已成功禁用英特尔傲腾内存技术。
傲腾和PrimoCache配合加速教程
Optane Memory 傲腾和Primo Cache配合加速教程(Windows版)仅供参考Optane Memory 傲腾介绍傲腾内存的确切称呼应该是傲腾智能缓存或傲腾技术,傲腾内存,是英特尔基于3DXpoint存储介质而打造的缓存设备,可以为机械硬盘进行加速。
它兼容了NVMe(非易失性存储器)存储协议,由3D XPoint内存介质、英特尔内存和存储控制器、英特尔互联 IP 和英特尔软件共同构成,不仅可以为传统机械硬盘提供更高的性能和响应能力,而且还让低成本高容量、高速存储成为了可能。
3D XPoint是傲腾内存的核心关键技术,也是傲腾内存能够提升PC性能的根本原因。
3D XPoint是由英特尔和镁光科技共同推出的非易失性存储技术,英特尔将该技术称为Optane,而镁光则称其为QuantX。
主要作用:为机械硬盘加速用的。
提升开机速度、提升软件加载速度、提升软件素材、文件加载速度、提升游戏加载速度。
Primo Cache软件介绍Primo Cache是一款非常好用的虚拟硬盘加速软件,能够轻松提升电脑的运行流畅度,还能够进行全局调节,软件的使用方法和操作方式也十分的简单,轻轻松松就能够完成硬盘加速任务,扩展用户的虚拟内存,轻松让低配置电脑拥有高配置电脑的体验。
Primo Cache 能够对机械硬盘、固态硬盘、闪存盘等等存储介质进行优化,如果用户家里拥有低配置电脑,又不想换但是却受不了日渐缓慢的速度,那么这款软件能够帮助你享受高端机的体验。
支持物理内存、SSD固态硬盘、闪存盘等作为缓存设备,采用双级缓存系统架构,支持永久二级缓存,支持“直接写入”和“延迟写入”两种写入模式,支持 TRIM 指令,支持系统未识别内存,支持预取数据到缓存,内置自适应智能缓存调度算法,支持三种缓存策略:读写缓存、仅读缓存和仅写缓存,支持性能数据监视和统计,支持同时缓存多个硬盘和多个分区,支持缓存采用自定义文件系统的分区,支持缓存动态硬盘的分区,支持即插即用,支持命令行接口。
华硕主板傲腾安装教程

一、能正常进系统1、打开傲腾。
2、打开设置、选择禁用傲腾。
3、禁用成功后选择重新启动。
4、重启后傲腾便被禁用了,这是用您准备好的系统安装盘开始重新安装系统吧,注意启动时选择UEFI的启动安装方式哟。
等待安装结束后便可以安装傲腾了。
5、到inter官网下载傲腾的安装驱动文件,双击运行。
安装结束后选择重启。
安装过程会重启多次。
6、重启后稍微等待一会,待出现完成后续操作的页面时点击“是”。
7、进入设置页面选择启动,勾选擦除英特尔“傲腾”内存组件上的所有数据,点击继续。
8、安装结束后点击重新启动,重启后您便看到您的傲腾设备已经安装成功了。
二、不能进系统1、开机按住delete键进入bios页面。
如果是下面的页面请按F7,进入普通页面。
2、进入高级页面(Advanced),找到PCH存储设置(PCH Storage Configuration),回车。
3、进去后找到SATA模式选择(SATA Mode Selection),将模式更改为AHCI模式,更改后按F10保存退出。
4、重启后傲腾便被禁用了,这是用您准备好的系统安装盘开始重新安装系统吧,注意启动时选择UEFI的启动安装方式哟。
等待安装结束后便可以安装傲腾了。
5、到inter官网下载傲腾的安装驱动文件,双击运行。
安装结束后选择重启。
安装过程会重启多次。
6、重启后稍微等待一会,待出现完成后续操作的页面时点击“是”。
7、进入设置页面选择启动,勾选擦除英特尔“傲腾”内存组件上的所有数据,点击继续。
8、安装结束后点击重新启动,重启后您便看到您的傲腾设备已经安装成功了。
三、安装过程异常情况(傲腾无法启用)。
1、驱动安装结束后,启用时提示BIOS版本不支持?解决方案:(1)、到对应主板官网下载最新的BIOS文件对主板刷新bios。
(2)、刷完bios后若还是提示同样错误,请检查是否为在安装系统时选择了传统模式安装而非Uefi安装。
2、驱动安装结束后,启用时提示与另一快速存储设备不兼容?解决方案:(1)、是否在安装驱动时将主板的快速存储驱动安装了,若是,请在控制面板卸载主板的快速存储驱动后重启电脑再启用傲腾。
V2416快速安装指南说明书
P/N: 1802024160011V2416 Quick Installation GuideSecond Edition, April 2014OverviewThe V2416 Series embedded computers are based on the Intel Atom N270 x86 processor and feature 4 RS-232/422/485 serial ports, dual LAN ports, and 3 USB 2.0 hosts. In addition, the V2416 computers provide VGA and DVI-I outputs and are EN 50155 certified to confirm their robustness for railway and industrialapplications. 2 hot-swappable and removable storage trays are also provided for convenient, fast and easy storage expansion. The V2416 also features user-defined programmable LEDs and an associated API for storage management, supporting storageplug/unplug functionality, automatic storage removal, and storage status display. An API Library is included for easy development and storage capacity notification.Package ChecklistBefore installing, verify that the package contains the following items:• V2416 embedded computer. • Wall mounting kit• PS2 to KB/MS Y-type cable• Documentation and Software CD or DVD • Quick installation guide (printed)• Product Warranty Statement (printed)NOTE: Please notify your sales representative if any of the above items are missing or damaged.V2416 Panel LayoutV2416 Front & Rear ViewsLED IndicatorsThe following table describes the LED indicators located on the front and rear panels of the V2416. LED Name LED Color LED FunctionPower Green Power is on and functioning normally OffPower is off, or power error exists Storage Yellow CF/HDD card is detectedOff CF/HDD card is not detected LAN (1, 2)Green 100 Mbps Ethernet mode Yellow1000 Mbps Ethernet mode Off 10 Mbps or no activityTx (P1-P4)Green Serial ports P1-P4 transmitting data Off Serial ports P1-P4 not transmitting dataRx (P1-P4) Yellow Serial ports P1-P4 receiving data Off Serial ports P1-P4 not receiving data X2 (Disk 1, Disk 2)Yellow User-programmable OffUser-programmableInstalling the V2416The V2416 can be DIN-rail mounted, wall mounted, and VESA mounted. Some mounting kits may need to be purchased separately. Refer to the Hardware User’s Manual for detailed installation instructions.Connector DescriptionPower ConnectorConnect the 12 to 48 VDC power line with M12 connectors to the V2416 computer. If the power is supplied properly, the Power LED will light up. The OS is ready when the Ready LED glows a solid green.Grounding the V2416Grounding and wire routing help limit the effects of noise due to electromagnetic interference (EMI). Run the ground connection from the ground screw to the grounding surface prior to connecting the power.V2416SG: The Shielded Ground (sometimes called Protected Ground) contact is the central pin of the power input connector. Connect the SG wire to an appropriate grounded metal surface.VGA and DVI OutputsThe V2416 comes with a D-Sub 15-pin female connector for a VGA monitor; it also comes with a DVI-I connector for the DVI display. These output interfaces are all located on the front panel. Use the proper cable to connect. PS/2 PortThe V2416 embedded computer comes with a PS/2 mini-DINconnector to connect to a PS/2 keyboard and PS/2 mouse. Use the Y-type cable to convert the mini-DIN connector into two 6-pin mini-DIN connectors to connect both a PS/2 keyboard and PS/2 mouse at the same time. You may also use the USB ports to connect your USB-based keyboard and mouse. Please note that without a Y-type cable, the PS/2 connector on the V2416 can only work with a PS/2 keyboard. A PS/2 mouse will not function when directly connected to the PS/2 connector on the V2416 embedded computer.CompactFlash SlotThe V2416 has a CompactFlash slot located on the front panel for storage expansion. It supports CF Type-I/II with DMA mode. To install a CompactFlash card, remove the outer cover, and then insert the CF card in the socket. When finished, push the cover into the socket and fasten the screws. USB HostsThe V2416 has one USB port with a M12 connector on the front panel, and two USB ports with type A connectors on the rear panel. These USB ports can be used to connect flash disks for storing large amounts of data. Ethernet PortsTwo 10/100/1000 Mbps Ethernet ports using M12 connectors are located on the front panel. See the following pin assignments./supportThe Americas: +1-714-528-6777 (toll-free: 1-888-669-2872)Europe: +49-89-3 70 03 99-0 Asia-Pacific: +886-2-8919-1230China: +86-21-5258-9955 (toll-free: 800-820-5036)2014 Moxa Inc., All Rights Reserved10/100 Mbps1000 MBps 1 -- TRD3+ 2 -- TRD4+ 3 -- TRD4- 4 ERx- TRD1- 5 ETx+ TRD2+ 6 ERx+ TRD1+ 7 -- TRD3- 8 ETx-TRD2-Serial PortsThe serial ports use DB9 connectors. Each port can be configured by software for RS-232, RS-422, or RS-485. The pin assignments for the ports are shown in the following table: Pin RS-232 RS-422 RS-485 (4-wire) RS-485 (2-wire) 1 DCD TxDA(-) TxDA(-) --- 2RxD TxDB(+) TxDB(+) ---3 TxD RxDB(+) RxDB(+) DataB(+)4 DTR RxDA(-) RxDA(-) DataA(-)5 GND GND GND GND6 DSR --- --- ---7 RTS --- --- --- 8CTS---------Audio InterfaceThe V2416 comes with an audio input and an audio output, allowing users to connect a speaker or an earphone. DI/DOThe V2416 comes with a 6-ch digital input and 2-ch digital output in the terminal block connectors.Hot-swappable and removable Storage TraysThe V2416 computers come with 2 removable slots for inserting additional storage media; it also supports hot swapping forconvenient, fast, and easy storage expansion. The user-defined programmable LEDs and the associated API for storagemanagement support storage plug/unplug functionality, automatic storage removal, and storage status display. Refer to the Hardware User's Manual for detailed storage installation. Reset ButtonPress the “Reset Button” on the rear panel of the V2416 to reboot the system automatically. The Ready LED will blink on and off for the first 5 seconds, and then maintain a steady glow once the system has rebooted.Real-time ClockThe V2416’s real-time clock is powered by a lithium battery. We strongly recommend that you do not replace the lithium battery without help from a qualified Moxa support engineer. If you need to change the battery, contact the Moxa RMA service team.Powering on the V2416To power on the V2416, connect the power cable to the V2416’s M12 power connector (located at the rear panel). Press the power button to turn on the computer. Note that the Shielded Ground wire should be connected to the central pin of the connector. It takes about 30 seconds for the system to boot up. Once the system is ready, the Power LED will light up.Configuring the Ethernet InterfacePower on the V2416 computer after connecting a monitor,keyboard, and mouse, and verifying that the power source is ready. Once the operating system boots up, the first step is to configure the Ethernet interface. The factory default settings for the V2416 LANs are show below. (Please note that the XPE and W7E models use DHCP settings.)Default IP Address NetmaskLAN1 192.168.3.127 255.255.255.0 LAN2 192.168.4.127255.255.255.0Linux users should follow these steps:If you are using the console cable for first-time configuration of the network settings, enter the following commands to edit the interfaces file:#ifdown –a//Disable LAN1/LAN2 interface first, before youreconfigure the LAN settings. LAN 1 = eth0, LAN 2= eth1,#vi /etc/network/interfaces//check the LAN interface first// After the boot settings of the LAN interface have been modified, use the following command to activate the LAN settings immediately:#sync; ifup –aXPE users should follow these steps:1. Go to Start Network Connections .2. Right-click Network Connections , click Properties . Next,select Internet Protocol (TCP/IP), and then click Properties .3. Click OK after inputting the proper IP address and netmask.W7E users should follow these steps:1. Go to Start -> Control Panel-> Network and Internet ->View network status and tasks -> Change adapter setting .2. In the screen of Local Area Connection Properties, clickInternet Protocol (TCP/IP) and then select Properties . Select Internet Protocol Version 4, and then click Properties .3. Click OK after inputting the proper IP address and netmask. NOTE: Refer to the User’s Manual for other configuration information.。
微星主板傲腾设置安装

微星主板 BIOS
两种模式切换
BIOS简易模式 (切换方式按F7)
BIOS高级模式 (切换方式按F7)
Optan主板 BIOS设置
微星的有些区别,它的傲腾设置 在“高级”里面 的“整合周边设备”里面 1.sata模式更改为 AHCI
Optan主板 BIOS设置
确认引导方式为UEFI引导
安装操作系统
在PE下面正常的删除机械硬盘分区,重新分区并且安装系统,如果需要硬盘内数据,在PE下复制到U 盘或者移动硬盘内。
安装操作系统
傲腾对操作系统的要求: windows10 /64位不能关闭自动更新、系统文件不完整,都会安装失败。
支持U盘PE安装,请未清除数据需清除傲腾数据,否则安装傲腾驱动后会提示未检测到兼容的内存,类似这样 的提示
下一步
Optane安装
点击左侧我接受,接着下一步
Optane安装
下一步
Optane安装
下一步
Optane安装
下一步
Optane安装
1、选“是,我要现在就重新动计算机” 2、完成 ,重启计算机。
Optane安装
Optane安装
Optane安装
点击此处右下角选intel图标
Optane首次安装
本次培训主题:微星主板傲腾安装与设置
微星主板
1.首先更改傲腾设置
更 改 S ATA M O D E
2.AHCI模式
以AHCI模式下进行安装
3.安装系统
系统需使用win10原版、开启系统更新
4.安装傲腾驱动
傲腾安装 步骤
可直接安装傲腾驱动,直接启用 次安装需清除元数据
5.安装傲腾驱动启用
傲腾首安装驱动,自动更改BIOS RST为允许
Intel傲腾内存和普通内存的区别

Intel傲腾内存和普通内存的区别Intel傲腾内存和普通内存的区别导语:Intel傲腾内存虽然被称为内存,但它并不是传统意义上普通内存,那么Intel傲腾内存和普通内存有什么区别?这里为大家科普下。
主要区别表现在以下几个方面。
1、技术不同傲腾内存基于Inten全新3DXpoint技术,而普通的DDR3/DDR4内存基于Flash NAND技术。
如果说Flash NAND是自行车的话,那么3D XPoint就是汽车。
3D XPoint与NAND Flash完全不同,它接近于内存的性能(但是可以掉电保存,也就是非易失性存储,而不是内存的易失性存储),延迟、耐擦写性、介质速度等几个关键指标也大大优于NAND Flash。
傲腾内存,实际上就是系统加速而独立划分出来的“缓存盘”,目前上市在售的`傲腾内存有16GB、32GB两个容量版本( 电脑百事网)。
其主要特点如下:1.响应速度快;2.系统加速;3.可以做到高速度、大容量结合。
2、接口不同傲腾内存外观与普通的M.2固态硬盘一样,采用M.2接口,连接在主板M.2插槽上使用,对CPU和主板都有更高的要求,比如处理器必须是Intel七代酷睿i3以上,主板必须是200系列主板或后续的更新一代的主板。
3、傲腾内存不能单独使用Intel傲腾内存简单来说,相当于是机械硬盘的缓存盘,它无法取代传统的内存,不能单独使用,必须结合普通内存和硬盘使用,局限性相对较大。
简单来说,电脑上配了傲腾内存,普通内存和硬盘也必须有。
傲腾内存对于电脑来说,可有可无,但普通的内存是必须要有的,简单来说,傲腾内存不能替代普通内存使用。
此外,傲腾内存目前只支持Intel平台,AMD电脑无法使用。
下载全文。
Inspiron 3670 设置和规格说明书
Inspiron 3670设置和规格注、小心和警告注: “注”表示帮助您更好地使用该产品的重要信息。
小心: “小心”表示可能会损坏硬件或导致数据丢失,并说明如何避免此类问题。
警告: “警告”表示可能会造成财产损失、人身伤害甚至死亡。
© 2018-2019 Dell Inc. 或其子公司。
保留所有权利。
Dell、EMC 和其他商标是 Dell Inc. 或其附属机构的商标。
其他商标可能是其各自所有者的商标。
2019 - 04Rev. A011 设置您的计算机 (4)2 创建适用于 Windows 的 USB 恢复驱动器 (7)3 Inspiron 3670 的视图 (8)正面 (8)背面 (9)背面板 (10)4 Inspiron 3670 的规格 (12)计算机型号 (12)系统信息 (12)尺寸和重量: (12)操作系统 (12)内存 (13)端口和接口 (13)通信 (14)无线 (14)音频 (14)存储 (14)英特尔傲腾内存 (15)介质卡读取器 (15)电源额定值 (15)显卡 (16)计算机环境 (16)5 Intel Optane 内存 (18)启用 Intel Optane 内存 (18)禁用英特尔傲腾内存 (18)6 获取帮助和联系 Dell (19)自助资源 (19)联系 Dell (19)目录3设置您的计算机1连接键盘和鼠标。
注:有关设置说明,请参阅键盘和鼠标随附的说明文件。
2 连接网络电缆 —可选。
3连接显示屏。
注:如果您订购的是配有独立显卡的计算机,将显示器连接到独立显卡。
4 连接电源电缆。
14设置您的计算机5 按下电源按钮。
6 完成操作系统设置。
对于 Ubuntu:按照屏幕上的说明完成设置。
有关配置 Ubuntu 安装的更多信息,请参阅知识库文章SLN151664,网址:/support。
对于 Windows:按照屏幕上的说明完成设置。
设置时,Dell 建议您执行以下操作:•连接到网络以进行 Windows 更新。
Inspiron 7391 二合一 服务手册说明书

Inspiron 7391 二合一服务手册注、小心和警告: “注”表示帮助您更好地使用该产品的重要信息。
: “小心”表示可能会损坏硬件或导致数据丢失,并说明如何避免此类问题。
: “警告”表示可能会造成财产损失、人身伤害甚至死亡。
© 2018 - 2019 Dell Inc. 或其子公司。
保留所有权利Dell、EMC 和其他商标均是 Dell Inc. 或其子公司的商标。
其他商标可能是其各自所有者的商标。
2019 - 07Rev. A001 拆装计算机内部组件 (5)安全说明 (5)拆装计算机内部组件之前 (5)开始之前 (5)静电放电— ESD 保护 (6)ESD 现场服务套件 (6)运输敏感组件 (7)拆装计算机内部组件之后 (7)2 卸下和安装组件 (8)建议工具 (8)螺钉列表 (8)拆卸和重新组装 (9)基座护盖 (9)电池 (12)无线网卡 (15)电源适配器端口 (18)I/O 板 (20)风扇 (22)固态驱动器 (24)币形电池 (27)触摸板 (29)扬声器 (31)散热器 (33)显示屏部件 (35)系统板 (38)键盘 (43)带指纹读取器的电源按钮 (47)掌垫和天线部件 (49)3 设备驱动程序 (52)Intel 芯片组软件安装公用程序 (52)视频驱动程序 (52)Intel 串行 IO 驱动程序 (52)Intel 受信任执行引擎接口 (52)Intel 虚拟按钮驱动程序 (52)无线和蓝牙驱动程序 (52)4 系统设置程序 (53)系统设置程序 (53)进入 BIOS 设置程序 (53)导航键 (53)Boot Sequence(引导顺序) (53)目录3系统设置选项 (54)系统和管理员密码 (61)分配系统设置密码 (61)删除或更改现有的系统/管理员密码 (61)清除 CMOS 设置 (62)清除 BIOS(系统设置)和系统密码 (62)5 故障排除 (63)增强型预引导系统评估 (ePSA) 诊断程序 (63)运行 ePSA 诊断程序 (63)系统诊断指示灯 (63)恢复操作系统 (64)刷新 BIOS(USB 闪存盘) (64)刷新 BIOS (65)启用英特尔傲腾内存 (65)禁用英特尔傲腾内存 (65)WiFi 重启 (65)弱电释放 (66)4目录拆装计算机内部组件安全说明遵循以下安全原则可防止您的计算机受到潜在损坏并确保您的人身安全。
- 1、下载文档前请自行甄别文档内容的完整性,平台不提供额外的编辑、内容补充、找答案等附加服务。
- 2、"仅部分预览"的文档,不可在线预览部分如存在完整性等问题,可反馈申请退款(可完整预览的文档不适用该条件!)。
- 3、如文档侵犯您的权益,请联系客服反馈,我们会尽快为您处理(人工客服工作时间:9:00-18:30)。
1、七代酷睿处理器(注意,只有酷睿处理器支持,不包括赛扬、奔腾)
2、200系主板
3、需要重新安装系统
如果你的电脑不符合以上要求,或者你有重要数据不能重装系统,请无视傲腾内存。
另外,Intel傲腾内存推荐机械硬盘用户使用,已经拥有大容量SSD的玩家,也无需购买傲腾内存,因为傲腾内存对SSD的加速效果并不明显。
本次演示我们使用的是16GB版本傲腾内存和2TB机械硬盘。
在安装系统之前,需要先进入BIOS将磁盘工作模式从AHCI改成RAID,有些较新的主板可以直接选择Intel RST模式。
切记一定要先设置BIOS再安装系统,先安装系统再更改硬盘模式将导致系统崩溃。
开始安装系统:
可以看到16GB傲腾内存实际可用容容量仅有13.4GB。
大家要注意安装系统时必须选择UEFI启动模式。
安装完成后进入系统,下载Intel傲腾内存驱动。
这里可能会出现BIOS不兼容的提示,大家不要慌张,将主板BIOS升至最新即可。
驱动装好后重启电脑,进入傲腾内存驱动程序,默认状态是关闭的,点击一下启用。
提示将格式后傲腾内存,不用管它直接点击“是”即可。
等待片刻,再次重启电脑,傲腾内存就可以使用啦!虽然安装步骤比SSD多了不少,但还是很简单的,大家安装时多点耐心,一定会成功的。