三洋、日立、优派投影机遥控器英文全解
日本三洋PDG DSU30 投影仪说明书②

■ Warning-
■ Warning■ Warning■ Warning-
2
English
Usage Notice
■ WarningAllowing the proper amount of space on the top, sides, and rear of the projector cabinet is critical for proper air circulation and cooling of the unit. The dimensions shown here indicate the minimum space required. If the projector is to be built into a compartment or similarly enclosed, these minimum distances must be maintained. SIDE and TOP
■ Warning■ Warning■ Warning■ Warning■ Warning■ Warning■ WarningThis apparatus must be earthed. Do not look into the projector’s lens when the lamp is on. The bright light may hurt your eyes. To reduce the risk of fire or electric shock, do not expose this projector to rain or moisture. Please do not open or disassemble the projector as this may cause electric shock. When replacing the lamp, please allow unit to cool down, and follow all replacement instructions.. This projector will detect the life of the lamp itself. Please be sure to change the lamp when it shows warning messages. Reset the “Lamp Counter Reset” function from the on-screen display “Options|Lamp Settings” menu after replacing the lamp module (refer to page 32). When switching the projector off, please ensure the cooling cycle has been completed before disconnecting power. Allow 120 seconds for the projector to cool down. Do not use lens cap when projector is powered on. Turn on the projector first and then the signal sources. When the lamp reaches the end of its life, it will burn out and may make a loud popping sound. If this happens, the projector will not turn back on until the lamp module has been replaced. To replace the lamp, follow the procedures listed under “Replacing the Lamp”.
各品牌投影机清零方法投影机灯泡计时重置

投影机清零方法LUXEON(丽讯)投影机清零方法一般是在菜单里清。
部分机型还有操作提示(LV2)。
清零很方便。
ASK(美投神)投影机清零方法一般是在菜单里清,选择重设灯泡时间选YES就可以。
SHARP(夏普) 投影机清零方法夏普视频机(PN200/300/500/C10等)灯泡时间清零,待机下按住“音量减”+“选择下”,后开机;夏普100S/00X/200/220等多媒体投影机灯泡清零方法,待机下按住—、+、AUTOSYNC 三个键,后开机;300S,300X的是同时按下遥控器上的ENTER、下箭头、左箭头然后按下ON开机sharp DLP投影机的清零: 待机状态时同时按“right”+“down”+“enter”+“power”即可夏普200/220等,投影机灯泡清零方法,待机下按住—、+、AUTOSYNC三个键,后开机; CN450S CN450X CN500X 清零方法:在待机的状态下(不要开机)同时按投影机的;INPUT ENTER UNDO ON 3秒以上他自己就能开机。
如果显示;灯泡100%就表明以清零;AN100S AN100X AN120S 按住(在待机的状态下)投影机上的+和AUTO SYNC同时,按投影机上的ON和-钮如果显示LAMP0000H表明灯炮已经复位SHARP NV21系列清零方式:不接电下,按方向的右,下,确定,一直按住接电后5秒;夏普XR11按电源键和下键和确定CTX投影机清零方法在菜单里选重设灯泡时另外菜单里还有一个《关闭灯泡警讯》的选项,把这项设置为OFF(关)就不会再提示灯泡时间了Philips(飞利浦) 投影机清零方法开机中,菜单中选择灯泡时间栏,按投影机上的OK键3秒Hitachi(日立) 投影机清零方法开机中,按RESET健3秒,出现时间对话,选择0就OK了日立HS800/CP-210的小机器清零方式是:把菜单移到时间栏,按住右健3秒;晨星投影机清零方法晨星是由夏普和丽讯代工。
投影机常见英文缩写知识学习
投影机常见英文缩写知识学习更新时间:2010-01-27 来源:零度电脑知识网经过笔者前几天对投影机应用中一些常见的英文缩写进行解释后,吸引了大量读者的兴趣。
同时,也有很多读者朋友向笔者反应,希望能够提供更多的相关知识介绍,方便日常进行操作。
本期我们要进行介绍的是在投影机的遥控器中较为常见的一些按键。
现在投影机的按键大部分都是英文标注,给不熟悉英语或者对投影机不了解的用户带来了一些使用上的障碍,下面,笔者就对这些英文按键所代表的含义以及所能实现的功能向大家进行介绍。
形式多样的遥控器ZOOM:电子变焦(缩放)。
在遥控器上拥有这个功能的投影机并不是特别多,我们平时更多的是通过投影机镜头上方的ZOOM旋钮来对投影机画面进行变焦。
利用这个功能可以将投影机的画面进行放大或者缩小,从而达到突出重点部位的效果。
APA:自动像素调整。
索尼的独有技术,在索尼投影机中较为常见。
在投影显示的画面图像不清晰的时候,使用APA功能则可以使得投影显示的画面变得清晰。
另外,APA功能仅仅对来自于电脑的信号能起到一定的左右,对于其他的信号源不适用。
FREEZE:图像静止。
现在市面上很多投影机都具备了图像静止功能,在进行视频演示的时候,可以使用“freeze”按键使得投影显示的画面趋于静止状态,方便演示者对特定图像进行重点介绍。
KEYSTONE:梯形校正。
因为画面调节的需要,梯形校正使用较多。
有的遥控器将KEYSTONE梯形校正功能列举出来方便用户的操作,有的则需要在菜单中的“图像设定”等选项中来寻找这一选项。
使用KEYSTONE功能可以对画面的梯形变形进行调整,从而显示正常的画面。
看了以上的介绍,可能很多朋友对某些功能仍然不熟悉,那么下面我们就来继续看看投影机遥控器还有哪些常用的按键,它们都有何作用。
常见投影机遥控器BLANK:空白屏幕。
在演示的时候,使用BLANK按键可以使投影的画面为空白,使得观众的注意力转移到演讲者的身上,提高演讲的效果。
投影机灯泡清零方法(比较全)
LUXEON(丽讯)投影机清零方法
一般是在菜单里清。部分机型还有操作提示(LV2)。清零很方便。
ASK(美投神)投影机清零方法
一般是在菜单里清,选择重设灯泡时间选YES就可以。
SHARP(夏普)投影机清零方法
夏普视频机(PN200/300/500/C10等)灯泡时间清零,待机下按住“音量减”+“选择下”,后开机;
AVIO(百变宝)投影机国内市场占有量不大,这里只有在国内销售的机型的清零方法
按住菜单(MENU)和灯泡键再打开总电源
这也是老机型的清零方法,新机型的还不知道。
ViewSonic(优派)投影机清零方法
ViewSonic(优派)部分由日立代工,清零方法参照日立
开机中,按RESET健3秒,出现时间对话,选择0就OK了
夏普200/220等,投影机灯泡清零方法,待机下按住—、+、AUTOSYNC三个键,后开机;
CN450S CN450X CN500X 清零方法:在待机的状态下(不要开机)同时按投影机的;INPUT ENTER UNDO ON 3秒以上他自己就能开机。如果显示;灯泡100%就表明以清零;
BENQ(明基)投影机清零方法
明基投影机清零(经过证实)
开机后,按EXIT键几秒,出现对话栏后,按左或右就清零.8和6,7系列督这样
Epson (爱普生)投影机清零方法
老机型:只适用灯架处有电阻的机器:在灯架处有一个小电阻(清零用的),只要把机器中相对应的4个小针短路一下就行了,这个会烦一点,且短路弄不好还会可能引起其他问题。
RESES+左+右+确定(适用索尼大部分机型),面板按键不够的用遥控器也可以。
三洋 投影机 说明书
Turning On the Projector
Байду номын сангаас
23
Turning Off the Projector
24
How to Operate the On-Screen Menu
25
Menu Bar
26
Operating with Projector Control
27
Operating with Remote Control
16
Installation . . . . . . . . . . . . . . . . . . . . . . . 17
Lens Installation
17
Positioning Projector
17
Lens Shift Adjustment
18
44
Setting . . . . . . . . . . . . . . . . . . . . . . . . . . 47
Setting
47
Maintenance and Care . . . . . . . . . . . . . 55
◆ Functionally Rich
This projector has many useful functions such as lens shifting, ceiling and rear projection, variety of lens options, etc.
◆ Simple Computer System Setting
The projector has the Multi-scan system to conform to almost all computer output signals quickly (p.33). Up to UXGA resolution can be accepted.
遥控器复制机英文版说明书
A Brief Duplicator User's GuideA.NORMAL COPY1.please sturn on the power and press the 5th key once------remote copy2.press the 1st key once----------input 1 key3.begin to input the client's 1st key(press the key until the frequency displayed )------- ISN data4.press the 5th key once-------input 1 key again5.input the client's1st key again--------ISN data6.press the 5th key once------input 2 key7.input the client's 2nd key------ISN data8.press the 5th key once--------input 3 key9.input the client's 3rd key------ISN data10.The rest deduced ,having finished the inputingprocess,press the 5th key twicees -----use NO.''x'' remote11.having inserted No.''x'' remote,press the 5th key twice------write ok12.pull out the remote,press the duplicator 4th key---------FREQ MHz13.put the copied remote on the duplicator,press any key once-----appearing frequency14.put the new remote on the duplicator,use ceramic aligner tool to turn round white capacitance until the digtal reach the copied remote15.having finished the adjustment,press the 1st and 2rd once at the same time . the light flash once,then press any key ,the light -light-,overB.SINGKEY COPY1.turn on the power,press the 5th key twice-----normal copy2.press the 3rd once-------singkey copy3.press the 5th once------input 1 key4.input the 1st key once------input 1key 0035.input the 1st key the 2nd time ------input 1key 0136.input the 1st key the 3rd time-------input 1key 0237.go on inputing until--------input 2key 0138.input the 2nd key once-----input 2key 0239.all key inputted,press the duplicator 5th key twice-----use No.''x''remot e10.the other steps like the ''normal copy''C.Reread/recopy(SCP)this function is used to recopy the having copied remote1.turn on the power ,press the 5th key once ------remote copy2.press the 2nd key once------inline remote3.insert the client's having copied remote,press the 5th key once-----write to remot4.pull out the client's remote, press the 5th key once------input NO.''X'' remote5.insert the new blank No''x'' remote,press the 5th key twice-----write ok6.pull out the new remote,begin to adjust the frequency,like the ''normal copy''7.press the 1st and 2nd key of the new remote at the same time ,then press any key the light light,ok ,over.D.No.3 remote copy(rolling code series)1.turn on the power,input all key of the client's remote,like the ''normal copy''2.Notice : some of the client's remotes are two key,even one key,you must input five key(any key is ok)3.after you finish inputing, press the 5th key twice ,the duplicator begin to scan,if the decode scaning is succcessful,---------completely copy;if failed ,the scaning can't be stopped ,or the duplicator displayes--------input 1key4.if display(completely copy),press the 5th key twice-----input No.3 remote5.insert the new blank remote(No.3),press the 4th key(+1),then press the 5th key ------write ok6.pull out the new copiedremote,begin to adjust the frequency,like the ''normal copy''7.if the new coplied remote is 5 keyes,please press it's 5th key;if theremote 5 keyes,press the 1st and 2nd key once at the same time,then press any key ,the light lights. endNotice:Please intercopy with the client's old remote ,or it can't be usedOther question please visit 。
各式遥控器中英文对照
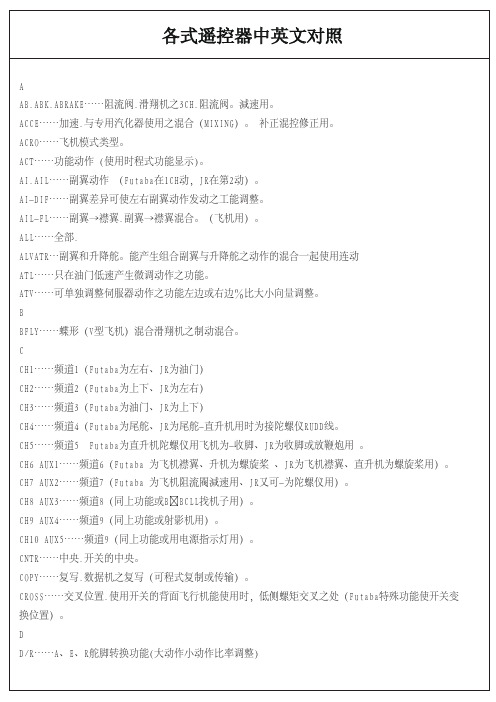
各式遥控器中英文对照
ON……程式功能 功能OFF沒开或电源开关ON。 P PARA……参数.参数功能。 PCM……PULSM CODEMODUL-ATION的略称。脉波电码调节(变调电波之信号型式) PI-PIT……螺距.6CH。(直升机第五伺服机螺旋桨动作使用)。 PI-CRV……螺距曲线.以五个螺距点之动作所作之曲线调整。 PI-TRM……螺距微调.(可做飞行中的修正调整)。 PMIX……任意频道间之混合。(伺服机的混合连动的意思)。 POS……位置场所(所设定的开关位置可任意的变换位置Futaba才有的功能) POSI……POSITIVE.程式功能画面之微调显示是以白底点黑线的方式呈现目前所在执行的程式指示。 PPM……脉波位置调节之略称(变调之信号型式)。 R R/D……右下.快速转动方向转换补正调整。 R/U……右上.快速转动方向转换补正调整。 REVERS,REV……正反向。伺服器之动作方向变换功能调整。 REVOLU……抑制主旋翼之反动旋转的混合尾舵功能力补正使得上升或下降时直升机不会产生旋转偏移现像。 RU,RUD……方向舵.第4CH。(接陀螺仪控制尾部)。 S SAFE……安全裝置开关。 SEL……选择.模型之选择。(切换显示功能)。 SEL……设定.決定。(切换设定功能通用字語)。 SNAP,SNP……快速滾动。以开关操作快速滾动的功能。 SPEED……速度.速度混合。 START……爬升功能。爬升混合。 STEP……步近.微调的不进量(整大小量)。 STICK,STK……杆. SUBTRM……程式內伺服机个別之中心点调整功能.(內中心点微调,IDL-1、IDL2可再做调整)。 SW……开机.(电源开关)。 T TH,THR……油门.(Futaba第3CH、JR为第1CH)。
பைடு நூலகம்
各式遥控器中英对照表
WARNING ------警告顯示。(異常指示時請小心檢查)。
WARNING AIR-BRAK---阻流筏的開關在ON的狀態下。(飛機減速板向下或襟翼用)。
WARNING BUTTRFLY --蝶型或V型飛行機開關在ON的狀態下。飛機。
Aileron
副翼 控制直升机左右倾斜的方向。
Aux
辅助的 英文auxiliary的缩写。五动以上的接收机,其第六以上的频道名称会以Aux 1、Aux 2来命名。
ATV
行程量 伺服机的左右最大转动角度。一般而言ATV为100%时,伺服机约可转动50°,120%时约可转动60°。
Carburetor
INVERT,INVR --INVERTED。使用開關,背面飛行機能。(倒飛和正飛飛行操控方向同。(3D飛行則操控相反)。
L/D --------LEFT/DOWN快速翻滾方向切換向下。
L/U --------LEFT/UP快速翻滾方向切換向上。
LIN --------LINEAR。直線的。以油門遙桿操作混合之方向。
化油器 控制进气口的节气阀开口大小,调节燃油与空气的混合比。
Channel
频道 频道的解释有两种,一为发射机与接收机所使用的无线电波频率,国内目前只开放72MHz波段为飞行器合法频道。二为发射机与接收机所能控制的动作数。
Crystal
晶体 石英振荡器,用来控制发射机与接收机之无线电波频率。
SPEED -------速度。速度混合。
START -------爬昇功能。爬昇混合。
STEP --------步近。微調的不進量。(數皇娇烧{整大小量)。
- 1、下载文档前请自行甄别文档内容的完整性,平台不提供额外的编辑、内容补充、找答案等附加服务。
- 2、"仅部分预览"的文档,不可在线预览部分如存在完整性等问题,可反馈申请退款(可完整预览的文档不适用该条件!)。
- 3、如文档侵犯您的权益,请联系客服反馈,我们会尽快为您处理(人工客服工作时间:9:00-18:30)。
日立遥控器
Video 按钮选择视频
信号的输入端口
Search
按遥控器上的search按钮,投影
机便开始
检测输入端口,以便发现输入号
RGB 选择RGB信号
的输入端口,
每按
一次按钮,投
影机依次切换
如下RGB输
口
RGB 1
RGB In 2
Aspect 每按一次,投影
机依次切换高
宽比模式。
Rgb信号时
标准4:3
16:9
视频信号时,S 视频信号或分量视频信号时
4:3 16:9 14:9
小
没有信号时4:3(固定)
标准模式将保持信号的原始宽高比
执行自动调节,将初始化宽高比设置
Auto 对于RGB信号
将自动调节垂直
位置,水平位置,
水平相位,宽高比
和水平尺寸。
同时
将自动选择宽高
比。
请确保使用此
功能前将应用程
序窗口设置为最
大尺寸。
较暗的图
像可能无法进行
正常调节。
因此调
节时请使用明亮
的图像。
对于视频信
号或S-视频
信号
将自动选择相应的输入信号的最佳视频格式
对于视频信号,S-视频信号或分量视频信号
将自动调节垂直位置,水平位置,同时将自动调节宽高比。
对于分量视频信号
将自动调节水平相位
Blank 暂时清屏,将以空白画面代替输入画面。
Magnify on 放大功能,使用光
标上下调节变
焦级别。
如需移动放大区
域,在扩大模
式下按
position按钮,使
用光标上下左
右移动,确
认放大,再次按
position.退出
按magnify off
键
Volume 调节音量使用光标上下调节关闭再次按volume Mute 暂时静音如需恢复按mute或volume
Position 调节位置,按光标上下左右调节,如需复位按reset。
结束操作按position.
Keystone 梯形校正按光标上下左右调节
Freeze 静止图像,返回按freeze。
Menu 菜单功能。
按光标上下左右调节。
关闭按menu Esc 退出
Reset 菜单操作时的复位按钮
Enter 菜单操作时的继续按钮
三洋遥控器(红色字体为左边独有的)
1.ON/STAND-BY:投影机开关机键
2.AUTO SET:自动设置/自动建立
PUTER1/2键:选择COMPUTER1或者是COMPUTER2输入源,信号切换
时用这个键
4.VIDEO:选择VIDEO(视频)输入
5.S-VIDEO:选择S-VIDEO输入
PONENT: 选择COMPONENT输入
(复合视频切换)
7.SELECT:菜单选项中的确定键
8.▲▼▶◀键:用于选择菜单的中项目或者
是调整数据的大小9.MENU:菜单键
10:SCREEN:选择屏幕模式11:KEYSTONE :校正梯形失真INFO.:使用信息功能(用于检测投影信号和投影机操作状态)FREEZE: 是投影图像静止NO SHOW:暂时关闭屏幕上的图像
P-TIMER:投影进行的记时功能LAMP:选择灯泡模式,改变灯泡亮度
D.ZOOM:放大或者缩小图像VOLUME: 调节音量IMAGE: 选择图像模式MUTE: 静音选项
优派投影机
1.ON-STANDBY 待机键
打开或关闭
投影机
PUTER 电脑选择键
选择VGA1
或VGA2 输
入源3.VIDEO 视频键选择视
频输入源4.S-VIDEO S端子键
选择S端子
输入源
5.KEYSTONE 梯形校正键
矫正梯形失真6.S.MENU 快捷菜单键
打开/关闭快捷
菜单
7. ▲▼◀▶指示键在屏幕菜单中选择
项目或调整数据在“数据调焦”
模式中选取图像的显示区域
8.FREEZE 静止键使
投影图像静
止
9.AUTO SET 自动设置键更正垂直梯形失真和调整细微同步。
总点数和画面位置等电脑显示参数
10.TIME 计时键使用计
时器功能11.MUTE 静音键关闭
声音
12.ZOOM. ▲▼缩放键进行
放大或缩小
图像
13.VOLUME 音量+/-键调
节音量
14.PATTERN 测视图键显
示内置信号PONENT 色差分量键
选择“色差分
量”输入源16.DISPLAY 显示键显
示当前输入
源
17.F.MENU 全菜单键打
开或关闭全
菜单
18.SELECT 选择键在快捷
菜单中进入
菜单操作
执行选中项目在
数码调焦模
式中扩展或
压缩图像19.BLANK 无显示键
暂时关闭屏
幕上的图像
MP 灯泡模式键
选择灯泡模
式。
