雪佛兰潜客管理笔记使用说明
Chevrolet 汽车仪表板和驾驶信息界面用户指南说明书
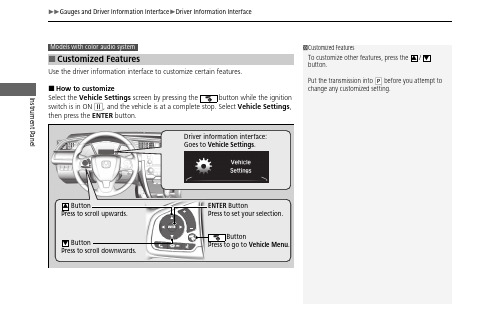
uu Gauges and Driver Information Interface u Driver Information InterfaceInstrument Panel Use the driver information interface to customize certain features.■How to customizeSelect the Vehicle Settings screen by pressing the button while the ignitionswitch is in ON w, and the vehicle is at a complete stop. Select Vehicle Settings,then press the ENTER button.■Customized Features1Customized FeaturesTo customize other features, press the /button.Put the transmission into P before you attempt tochange any customized setting.34ENTER ButtonPress to set your selection.Press to go toButtonPress to scroll upwards.3ButtonPress to scroll downwards.4Driver information interface:Goes to Vehicle Settings.uu Gauges and Driver Information Interface u Driver Information InterfaceInstrument Panel■Customization flowPress thebutton.ENTER34ENTER3434ENTER343434ENTERuu Gauges and Driver Information Interface u Driver Information InterfaceInstrument Panel34343434ENTER 34343434ENTERENTERuu Gauges and Driver Information Interface u Driver Information InterfaceInstrument Panel■Example of customization settingsThe steps for changing the “Trip A” Reset Timing setting to When Refueled are shown below. The default setting for“Trip A” Reset Timing is Manually Reset .1.Press thebutton to select Vehicle Settings , then press the ENTER button.2.Press the / button until Meter Setup appears on the display.3.Press the ENTER button.u Language Selection appears first in the display.34uu Gauges and Driver Information Interface u Driver Information InterfaceInstrument Panel 4.Press the / button until “Trip A”Reset Timing appears on the display, then press theENTER button.u The display switches to thecustomization setup screen, where youcan select When Refueled, IGN OFF,Manually Reset, or Exit.5.Press the /button and select When Refueled, then press the ENTER button. u The When Refueled Setup screen appears, then the display returns to thecustomization menu screen.6.Press the / button until Exit appears on the display, then press the ENTER button.7.Repeat Step 6 until you return to the normal screen.343434FeaturesUse the audio/information screen to customize certain features.■How to customizeWhile the vehicle is at a complete stop with the ignition switch in ON w *1, press the button, and select Settings , then select a setting item.*1: Models with the smart entry system have an ENGINE START/STOP button instead of an ignition switch.1Customized FeaturesWhen you customize settings:•Make sure that the vehicle is at a complete stop.•Shift to P .•Set the parking brake.To customize features detail, refer to the following.Continuously variable transmission modelsManual transmission modelsAudio/Information Screenuu Customized Features uFeatures ■Customization flowSelect Settings.OthersClock FormatClock DisplayOverlay Clock LocationClock ResetInfo Screen PreferenceClockWallpaperClock/Wallpaper Type*1/Clock Type*2Clock AdjustmentClock FormatClockAuto Time Zone*Manual Time ZoneAuto Daylight Saving TimeClock DisplayOverlay Clock LocationClock ResetInfoHondaLink Diagnostic & Location Data*1:Does not appear when you change the screen interface design.*2:Appears only when you change the screen interface design.Defaultuu Customized Features uFeaturesuu Customized Features u Featuresuu Customized Features uFeatures*1:Does not appear when you change the screen interface design.*2:Appears only when you change the screen interface design.Features*1:Does not appear when you change the screen interface design.*2:Appears only when you change the screen interface design.Features *1:Does not appear when you change the screen interface design.FeaturesFeatures。
雪佛兰赛欧 用户手册说明书

忠告《用户手册》和《保修及保养手册》明确了上海通用汽车有限公司与用户之间就有关产品的质量保证责任、售后服务方面权利与义务设立和终止的约定。
请务必在使用本公司产品前认真阅读《用户手册》与《保修及保养手册》。
雪佛兰赛欧用户手册感谢您选择了由上海通用汽车为您精心制造的汽车。
该车采用了高新科技,性能优良,久经考验。
选择赛欧,证明您对汽车的性能和款式都有极高的要求。
请通读本手册,因为其中的信息可让您了解如何正确操控汽车,并从中获得最大程度的驾乘享受。
本车辆产品执行企业标准:Q/0601SDY 020 - 2011;Q/0601SDY028 - 2012上海通用汽车有限公司2013年5月目录 1 目录引言 (3)简介 (5)钥匙,车门和车窗 (15)座椅,保护装置 (27)储物 (39)仪表和控制装置 (43)照明 (59)音响娱乐系统 (63)温度控制系统 (81)驾驶和操控 (91)车辆养护 (105)保养规程 (143)技术数据 (149)2 目录引言 3引言本车集先进技术、安全性、环保及经济性于一体。
本《用户手册》为您提供了所有必要的信息,让您安全有效地驾驶您的爱车。
请驾驶员时刻注意:如果车辆操作不当,有可能带来事故和伤害的风险。
您还必须时刻遵守所在国家的具体法律和规章要求,这些要求可能与本《用户手册》的要求有出入。
如果本《用户手册》中提到送维修站维修保养,我们建议您到上汽通用汽车销售有限公司雪佛兰特约售后服务中心。
这些特约售后服务中心都能以合理的价格提供一流的服务。
经过培训的熟练技工将按照特定的操作规范进行工作。
请通读本手册,了解车辆的特点和操控方法。
请确保您的乘客了解对车辆的不恰当操作有可能带来事故和伤害的风险。
除在本手册中有明确说明拆装步骤的零部件外,用户不得自行对车辆进行改装、调整和拆卸。
请将本手册放置在您的汽车内,以便随时查阅。
如果您要转卖汽车,请将本手册随车交给新买主,以便新买主需要时使用。
2022年 Chevrolet Corvette 用户手册说明书
1Headlamps2 panel dimmer control3 ambient ligHting (if equipped)4 interior trunk release5 multi-function lever6 tilt /telescope steering wHeel7 steering wHeel controls8 message center9 navigation system(if equipped)10 Heated and cooled driver/passenger seats 11 Hazard flasHer12 advancetrac ® stability enHancement system13 passenger airbag offservice engine soon ligHt Illuminates briefly when the ignition is turned on. If it remains on or is blinking after the engine is started, the On Board Diagnostics System (OBD-II) has detected a malfunction. Drive in a moderate fashion and contact your authorized dealer as soon as possible.abs (anti-lock brake system) ligHtIlluminates briefly when the ignition is turned on. If the light remains on or continues to flash, a malfunction has been detected. Contact your authorized dealer as soon as possible and have the system serviced. Normal braking (less ABS) is still functional unless the brake warning light is also illuminated.advance trac ®/traction control tm ligHtIlluminates when AdvanceTrac ®/TractionControl TM is active. If the light remains on, contact your authorized dealer as soon as possible.air bag readiness ligHtIlluminates briefly when the ignition is turned on. If this light fails to illuminate, remains on or continues to flash after the engine is started, contact yourauthorized dealer for service as soon as possible. A chime will also sound if there is a malfunction in the indicator light.tHrottle control/ transmission ligHtIlluminates when a powertrain or AWD fault is detected. If the light remains on or continues to come on, contact your authorized dealer for service as soon as possible.low tire pressure warning Illuminates when your tire pressure is low. If the light remains on, the tirepressure should be checked. If the light does not turn on or begins to flash when the ignition is first turned on or while driving, contact your authorized dealer as soon as possible.instrument Clustervol/pusH – Push to turn the system on/off. Turn to increase/decrease the volume.cd – Press to enter CD/MP3 mode. If a disc is already present in the system, CD play will begin where it last ended. am/fm – Press repeatedly to cycle through AM, FM1 or FM2 frequency bands.sirius – Press repeatedly to cyclethrough SAT1, SAT2 and SAT3 (satellite radio modes, if equipped). Press MENU when active and then OK to enter the satellite radio menu and access more options. Refer to your Owner’s Guide for more information.sound – Press repeatedly to access: Bass, Treble, Balance, Fade, Speed compensated volume and All seats (Occupancy mode, if equipped) menu options. Press I t SEEK u I to make adjustments.clock – To set the time, press CLOCK. Use the memory preset numbers (0-9) to enter the desired time.tune/scan – Turn to go to the next/previous satellite radio channel, or to go up/down the radio band frequency in individual increments.direct – Press DIRECT and then, using the memory presets (0-9), enter in the desired radio station, track number, MP3 folder number (if in MP3 mode), or satellite radio channel.SIRIUS ® satellite radio broadcastsmusic, sports, news and entertainment programming. For more information and a complete list of SIRIUS ® satellite radio channels, visit in the United States, www.sirius-canada.ca in Canada, or call SIRIUS ® at1–888–539–7474. Satellite radio is only available with a valid SIRIUS ® radio subscription.for more information on this system, please refer to your owner’s guide.AuDiO Systemin-DAsh CD6/mP3 sAtellite COmPAtible sOunD system 24567811112931013instrument PanelUse extreme caution when using any device or feature that may take your attention off the road. Your primary responsibility is the safe operation of the vehicle. Only use non-essential features and devices when it is safe to do so.note: The system illustrated here is the navigation based audio system.Please refer to your navigation supplement for complete information on this system.driver side temperature Turn to increase/decrease thevents. Can be used to clear thin ice or fog from the windshield.down the interior of the vehicle and may Press to activate and clear the rear window and side heated mirrors of thin ice and fog. Press again to deactivate.essentiAl Informationintegrated keyHead transmitter (ikt)reverse sensing system (if equipped)moon roof (if equipped)securicode™ keyless entry systemawd (all wHeel drive, if equipped) easy fuel™ ‘no cap’ fuel system With this system, you simply open the fuel filler door, insert the nozzle and begin fueling. It is self-sealing and therefore protected against dust, dirt, water, snow and ice. To use a portable fuel container, slowly insert the fuelfunnel (attached to the underside of the spare tire cover or included with the tire changing tools), and pour the fuel into the funnel. Wait five seconds from the time the refueling nozzle is shut-off until the nozzle is pulled back out of the fill pipe to allow residual fuel in the nozzle to drain into the tank. When done, clean the funnel or properly dispose of it. Extra funnels can be purchased from your authorized dealer. Do not use aftermarket funnels as they will not work with the Easy Fuel™ system and may cause damage.fuel tank capacity/fuel info All wheel drive vehicles have a fuel tank capacity of 16.5 gallons (62.4L) while front wheel drive vehicles have a fuel tank capacity of 17.5 gallons (66.2L). Use only “Regular” gasoline with an octane rating of 87. Do not use E85 fuels because your vehicle was not designed to run on fuels with more than 10% ethanol.location of spare tire and toolsYour spare tire and tools are located in the trunk, under the floor panel. The spare tire is designed for emergency use only and should be replaced as soon as possible. For complete details on how to change your tire, refer to the Roadside Emergencies chapter in your Owner’s Guide.tire pressureCheck your tire pressure at least once a month and before long trips (including spare, if equipped). The recommended specifications are on the SafetyCompliance Certification Label or Tire Label located on the B-Pillar or the edge of the driver’s door. As an added safety feature, your vehicle has been equipped with a tire pressure monitoringsystem (tpms) that illuminates a low tire pressure warning light when one or more of your tires is significantly under-inflated. Refer to the Tires, Wheels and Loading chapter in your Owner’s Guide for more information.roadside assistanceYour new Lincoln MKZ comes with the assurance and support of24-hour emergency roadside assistance. Roadside assistance includes such services as: lockout assistance, limited fuel delivery, battery jump starts,changing a flat tire, towing, and winch out. To receive roadside assistance in the United States, call 1 (800) 241-3673. In Canada, call 1 (800) 665-2006. s.o.s. post crasH alertThis system provides audible and visual alarms when a crash causes the deployment of airbags or the activation of the safety beltpretensioners. The turn signals will flash and the horn will sound. To deactivate, press the hazard flasher control, or on your remote transmitter.linCOln MKZQuick Reference GuideAH6J 19G217 AAnote: The system illustrated here is the navigation based climate system. Please refer to your Owner’s Guide for complete information on this system.。
5.DOSS工具的使用和演练教程

1.1 战败及低意向客户
练习题目 生成销售意向
数量 针对现有客户(公司和个人类型)生成两个销售意向
1.2 CEM下发客户
客户来源
• 总部下发销售线索
• CEM客户活动开展过程中发现客户有购车意向
操作步骤
CEM系统下 分配CEM销售线索
发销售线索
(销售经理)
记录CEM销售线索反馈 (DCC)
【拜访方式】选择“邀约到店”,该字段方可填写,如果客户第一
*是否再回展 厅
是
次来展厅择选择“否”,第二次来展厅选择“是”,选择是以后下 次跟进该字段将无法更改,最终对关键KPI指标的再回展厅率和二次
进店率产生影响
2.2 记录意向跟进结果
(续上页)
字段名称
示例
市场活动名称 季度促销活动
*执行内容 *执行结果
B.系统自动将选中的记录明细以只读方式带出,同时可查看到首次跟进结果与 跟进时间,根据活动完成情况,在【处理结果】字段中选择处理结果(选项 包含已参加/拒绝参加/未参加),如果客户有购买意向的,选择【预购车系】, 点击【确认】结束操作
1.2 CEM下发客户
系统自动将处理结果发至CEM系统,在完成截止时间后登记处理结果,系统不 会向CEM系统反馈 登记过的处理结果将不允许更改 如果填写了预购车系,系统自动将该条客户活动转化为常规销售线索,由销售经 理在分配CEM销售线索功能中重新分配销售线索跟进负责人
1.1 战败及低意向客户
2.生成意向 A.查询客户资料:点击【管理客户资料】菜单,进入客户查询界面
B.生成销售意向:可对查询到的客户生成新销售意向
1.1 战败及低意向客户
C.填写意向基本信息:根据回访实际情况填写相应字段(注:带*为必填项)
iHRV6 C车主指南说明书
Safety Instructions (1)Product Overview.............................................2-7 Setting Up............................................................8-9 How to Use.......................................................10-13 Maintenance....................................................14-18 Troubleshooting............................................19-20 FCC Info. (21)Questions? Contact Customer Service Web: Email:*************************** Phone: 877-370-4580 Check out our helpful setup videosFor support content and the latest digital version of this manual scan the QR code below or visit/novavideos1Before using this product, please read the following safety instructions and follow all safety precautions. Any operation inconsistent with this instruction manual may cause damage to this product.Warnings:• Do not use products in environments with open flames or fragile objects.• Do not allow human hair, clothes, fingers and other parts to approach the opening and operate parts of the product.• Do not allow the Nova to pick up objects such as stones and waste paper that may clog product.• Do not allow the Nova to pick up flammable substances such as oil, printer toner and photocopier toner.• Do not allow the Nova to pick up any burning articles, such as cigarettes, matches, ashes and other articles that may cause fire.• Do not place objects near the suction port. Do not use the product when the suction port is blocked. Clean up thegarbage dust, wool, hair, etc to ensure smooth air circulation at the suction port.• Use the power cord carefully to avoid damage. Do not use the power cord to drag or pull the product and the chargingbase. Do not use the power cord as a handle.• Only authorized technicians can disassemble this product. Users are not recommended to disassemble this product bythemselves. Doing so will void warranty.• Only use the included power adapter. Third part adapters may damage the Nova .• Do not touch wires, sockets or power adapters when your hands are wet.• Do not place this product near cigarette butts, lighters and other materials with smoldering fire• Please clean Dustbin and brushes regularly.• Do not place any object, pets or people on top of the Nova.• This product is an indoor household product. Do not use outdoors.• Do not use this product in wet environment i.e, bathroom• Before using this product, please clear the floor of all objects other than furniture as some small objects may obstruct,get caught in, or damage the Nova.• Please use and store Nova in room temperature environments only.21234567891011123Charging contactsBin release buttonDust collection port2-in-1 Dustbin/Mop tankInfrared auxiliary recharge sensor REARfill capDust collection portDust collection duct coverAir outletPower interfaceDust bag handleDust bag NOTE:1:One dustbag already pre-installed in Auto Empty Base2: Dust bag may appear “deflated”. This is normal.3: Dustbag handle must be fully lowered as shown in order for debris to enter properly.85About your Auto Empty BaseThe Auto Empty Base is designed to automatically empty and charge the iHome Autovac Nova. Plug the power cable into the back panel of the Base and plug the other end in a functioning wall outlet. Place on a flat, hard surface at least 2.5 inches away from the wall. Ensure that there is aclear space in front and both sides so that your Autovac Nova can return to Base to re-charge and empty. 2.5 inches from the wallHow to place your Auto Empty BaseNOTE: The Auto Empty Base must always remain connectedto power. Avoid using a power source that may inadvertent-ly be switched off (e.g. power strip, outlet controlled by alight switch, GFCI)9Step 1Position the Nova on the floor near your Auto Empty Base. Press andhold the Power button until the indicator turns blue. You will heara welcome message.NOTE: Voice prompt volume can be adjusted later in the iHome CleanApp or muted using the remote control.Step 2Press the Home button to pair Nova to your Auto Empty Base.Nova will navigate and dock to the base. Allow Nova to fully chargebefore first use.NOTE: Dust collection may activate during initial docking. Do not bealarmed. Dust collection frequency can be adjusted later in the iHomeClean App.10Understanding your iHome Autovac NovaThe iHome Autovac Nova is designed to automatically andintelligently clean your home. Nova uses advanced laser scanningtechnology and multiple sensors to form a navigational map sothat Nova can avoid obstructions and cliffs. Nova will continue toclean until it has determined that the addressable floor area hasbeen covered. The navigational map is available to view in theiHome Clean app and is updated during each clean cycle to ensurethat Nova takes any changes (moved furniture or otherobstructions) into account.Once cleaning is finished or the battery is low, the Nova willautomatically return to the Auto Empty Base to charge andautomatically empty the contents of the dustbin.NOTE: Connecting Nova to Wi-Fi is not required but highlyrecommended. Using the iHome Clean app, you can follow thesteps below to connect your Nova. The app will let you manageNova from anywhere, set cleaning schedules, view intelligent roommaps, set virtual boundaries, view cleaning history and more!1: Download the iHome Clean AppSearch “iHome Clean” in the App Store or use the QR code below:2: Get started with this helpful videoUse the QR code below or go to /novavideos1: Make sure your mobile device is connected to Wi-Fi• Make sure that the Wi-Fi network is not 5G (the app only supports 2.4G network)• The name & password of the Wi-Fi network cannot contain any special characters115: Go to Wi-Fi settings on your device and select “Autovac Nova”6: Re-open the iHome Clean App & wait for the connection to complete2:Open the iHome Clean App, select “Add device” and select Nova4:Select your 2.4G Wi-Fi network and enter the password3:Press & hold & simultaneously for 5 seconds to enter networkconfig modeNOTE: Ensure that you have a strong Wi-Fi signal in the location of your setup/charging baseBefore using this product, please clear the floor of all objects other than furniture as some small objects may obstruct, get caught in, or damage the iHome Autovac Nova.First Cleaning and Home MappingAfte r the first Auto-clea n cycle Nova will create a virtual map of your home, viewable in the iHome Clean app. Using that map you can define Areas and set Virtual Boundaries. Those Areas and Boundaries can then be used in any of your cleaning cycles and schedules (eg avoid the “Baby Room” during a daytime clean, mop ONLY the “Kitchen”).Use the included remote control, or the iHome Clean APP to control your preferred cleaning method. Once you have chosen your preferred cleaning method, the Nova will start cleaning and will continue until it has covered the entire cleaning area, or until the battery is low and needs to be re-charged. Once cleaning is finished, the Nova will automatically return back to the Auto Empty Base to empty the dustbin. If a cleaning session was interrupted due to low battery, Nova will automatically resume cleaning once the power has been sufficiently restored..Cleaning ModesAuto Clean - The Nova will automatically clean your floor until it has covered the entire surface. Once cleaning is finished or the battery needs to be re-charged, the Nova will automatically return back to the Auto Empty Base to empty the Nova's dustbin and charge or resume cleaningArea Clean -Create customizable areas on your floor-plan within the iHome Clean App for your Nova to specifically clean or avoid.Spot Clean -The Nova will focus on a specific spot you desire to have cleaned thoroughly. First, use the manual navigation control on the remote (or in the app) to guide the Nova to the desired area. Then, choose Spot Clean mode.Powermop - Attach the water tank attachment to the dustbin from the rear of the Nova. Choose Powermop in the iHome Clean App or the included remote and the Nova will automatically mop the surface and return to the Auto Empty Base once complete.Manual Control - Using the iHome Clean App or the included remote, you can manually control where the Nova goes.10 - 20 FTNOTE :1: It is recommended to point the remote to the front of the Nova for best results.Home ButtonPowermop Spot CleaningDecrease Suction PowerManual Navigation Directional Keys Start/Pause ButtonMuteIncrease Suction PowerHyperdrive Mode21 141: Place the mop pad onto the mop attach-ment and secure it to the Velcro strips. Slip corners of the mop pad over the plastic tabs at the rear of the mop attachment.3: Remove the dustbin from the iHome Novawith the mop attachment still installed.5: Install the dustbin with the mopattachment still installed into the Nova according to the figure below.6: Activate Powermop mode in the appor using the remote control.4: Open the water fill cap on the dustbinand fill with water, then close cap.2: Slide mop attachment onto dustbin asshown in the figure below until you hear a clickconfirming that it is locked in place.Your Autovac Nova comes equipped with a 2-in-1 Dustbin and water tank. All Nova cleaning modes activate dry vacuuming by default. The wetmopping feature adds an additional cleaning element whenever necessary. Follow these steps to use the Powermop feature.• To avoid carpet while mopping, set up virtual boundaries within the iHome Clean App • To avoid leakage, install the mop attachment onto the dustbin before filling with water • Make sure to empty any left over water from the tank after moppingNOTES15Main Brush CoverMain BrushYour Nova is designed to be used regularly. As with most floor care devices, regular use may cause build-up around brushes, in debris compartments and near filters. We recommend performing regular maintenance, as outlined in the following pages, to keep your iHome Autovac Nova running at optimal performance.1: Pinch the left and right tabs on the main brush cover. Lift and remove the cover.2: Remove the main brush and clean with included cleaning tool as seen in the figure below.3: Replace the main brush and snap the cover back into place.NOTE: It is recommended to replace the main brush every 6-12 months depending on use.Main Brush Once a month Once a yearOnce a month Once a yearEvery 2 weeks Every 3 monthsEvery 2 weeks Twice a yearSide BrushesHEPA FilterMain FilterPART CARE FREQUENCY REPLACEMENT FREQUENCYMAINTENANCE SCHEDULE1: Use a Philips screwdriver to unscrew the side brush screw and remove the side brush. 2: Remove dirt and debris and reinstall using Philips screwdriver.NOTE: It is recommended to replace the side brush every 3-6 months depending on use.Auto Empty Base Dust BagThe Auto Empty Base will indicate when the dust bag is full on the smart LED display panel (Dust bag indicator will be green). Discard of dust bag once full and replace dust bag with a new one. NOTE: Extend the dust bag handle to seal the debris hole.Open Cover Pull up the dust bagfrom handleDiscard the old dust bagReplace with new dust bag & fully lower cardboard handleClose coverflashes or the is solid green, and the dust ba g Filter MaintenanceIf the Auto Empty Base indicator light is not full, it is time to clean the filter.1: Unplug the Auto Empty Base and turn it over. Use a Philips screwdriver to remove the screwsas shown in the figure to the right. Open the dust duct cover to clean out any dirt and debris.2: Open the exhaust at the rear of the Auto Empty Base, clean the filter, and reinstall.Dust Cover Filter""'U!IJl19Unable to power onPlease charge before use. This is commonly caused due to low battery.Abnormal behaviorPower down and restart.Unable to start cleaningPlease charge before use. This is commonly caused due to low battery.Unable to return to Auto Empty Base • There are too many obstacles near the Auto Empty Base. Please make sure there is a clear area2 FT of space on either side and 5 FT in front of the Auto Empty Base.• The Nova is out of range of the Auto Empty Base. Move the Nova closer to the Auto EmptyBase to re-establish connection.Decrease in cleaning ability or dust falling outfrom dustbin.• The dustbin is full, please empty the dustbin. • Check and clean the HEPA filter.• Check that the brush is clear from obstruction.Nova is not returning to the Auto EmptyBase after spot cleaning or after moving it farfrom the Auto Empty Base.After spot cleaning or moving the Nova far from the Auto Empty Base the Nova will re-generate the map. If the Nova is far from the Auto Empty Base it may not be able to locate it. Please manually dock the Nova to the Auto Empty Base to recharge.Abnormal noise during cleaning Main brush, side brush or left/right wheel may be obstruction, Check underneath the Nova tomake sure it is clear from any obstruction. If there is an obstruction clear it and restart the Nova.Unable to connect to Wi-Fi Wi-Fi signal is not good , please check that there is a strong Wi-Fi connection while paring. Makesure the network is 2.4G and not 5G or dual band.Unable to charge after docking Make sure there is no obstruction or heavy dust on both the Nova and Auto Empty Basecharging contacts.Scheduled cleaning not working Please confirm that the Nova is connected to your Wi-Fi network. If the Nova is not connectedto the network you cannot synchronize the scheduled cleaning task.PROBLEMSOLUTION20Flashing red • Fan error• Overheating• Dust collection port is blocked• The cover is not closed properly1. Frequent dust collection leads to fan overheating protection or fanmalfunction. It is recommended to try to collect dust after 30 minutes;2. Clean up the debris in the dust collection port at the bottom of the robot andin the dust collector;3. Unplug the dust collector, turn the dust collector over, check whether thereis any foreign matter in the dust duct cover on the bottom, use a screwdriver toremove the screw and open the dust duct cover to clean the foreign matter.INDICATOR DEFINITION SOLUTION• The dust bag is not installed• The dust bag not installed properly • The Auto Empty Base cover is open 1. Replace with a new dust bag;2. Check whether the dust bag is installed, if not, please install the dust bag.3. Check if the dust bag is installed correctly and in place.4. Make sure that the Auto Empty Base cover is completely closed and sealed and that the Nova is docked on the Auto Empty Base to charge and auto empty.5. To manually send the Nova to empty at the Auto Empty Base:Press the power button on the Nova. After the Nova leaves the Auto Empty Base press any button on the Nova to pause and then press and hold Home Button for three seconds, the Nova will return to the Auto Empty Base to empty. The Nova will charge automatically after auto emptying.Flashing red211: This device complies with Part 15 of the FCC Rules. Operation is subject to the following two conditions: (1) This device may not cause harmful interference, and (2) This device must accept any interference received, including interference that may cause undesired operation.2: Changes or modifications not expressly approved by the party responsible for compliance could void the user's authority to operate the equipment.NOTE: This equipment has been tested and found to comply with the limits for a Class B digital device, pursuant to Part 15 of the FCC Rules. These limits are designed to provide reasonable protection against harmful interference in a residential installation.This equipment generates uses and can radiate radio frequency energy and, if not installed and used in accordance with the instructions, may cause harmful interference to radio communications. However, there is no guarantee that interference will not occur in a particular installation. If this equipment does cause harmful interference to radio or television reception, which can be determined by turning the equipment off and on, the user is encouraged to try to correct the interference by one or more of the following measures: Reorient or relocate the receiving antenna. Increase the separation between the equipment and receiver.Connect the equipment into an outlet on a circuit different from that to which the receiver is connected. Consult the dealer or an experienced radio/TV technician for help.FCC Radiation Exposure StatementThis equipment complies with FCC radiation exposure limits set forth for an uncontrolled environment.This equipment should be installed and operated with minimum distance 20cm between the radiator & your body.。
雪佛兰售后服务接待规范讲师手册

3. 熟悉电脑操作, 具有办公自动化 软件操作的合格 证书
4. 很强的与人沟通 交谈的能力
12
预约
预约的好处 合理地安排维修作业 节省客户的维修等待时间 提高特约售后服务中心的快速服务水平 体现“温馨亲切、物有所值”售后服务品牌
的服务主线 提高客户满意度
13
接到客户的预约维修电话
顾客基本情况 联系电话
公里数
上次进站日期 预约情况
月 日 点分 听诊内容
所需配件(零件号):
业务接待 姓名: .
15
维修时间
客户信息 姓名 电话 车型
维修内容
预约排班表
业务接待 维修技工 备注
16
预约
根据特约售后服务中心作业容量受理预约 特约售后服务中心应设置电话,并公开、公告 预约客户数量,在考虑未预约客户余量的前提
业务接待接车与预检服务规范
根据具体现象判断其正常或异常,向客户耐心细致地询问真实情况 通过诊断结果,推测发生故障的原因
27
业务接待接车与预检服务规范
估价解释填写维修工单和客户签收
将费用一览表置于客户容易看到的位置 根据对故障原因的判断,具体开列作业内容和所需零部件的名称、
数量,并填入工单 查询配件库存状态 若发现有配件库存短缺,应立即同客户联系,决定是否通过调拨或
填写维修工单内容
客户车辆信息: 车辆识别号、里程数、车牌号、车型等 客户信息: 车主名字、联系人姓名、地址、电话、传真号等 维修信息: 交修原因、故障原因、维修措施、维修操作代码、维修工时、
诊断工时等 配件信息: 配件号、配件名称、配件数量、配件价格等 车辆外观与所带件等的检查结果 预计交车时间 估算的价格
Banks Monster排气系统 雪佛兰GMC 6.6L Duramax Turbo柴油皮卡说明书

cA 917024-1743Product Information & Sales: (800) 438-769309/15/08 PN 96408 v.9.01. Before starting work, familiarize yourself with the installation procedure by reading all of the instructions.2. The exploded view (Figure 1) provides only general guidance. Refer to each step and section diagram in this manual for proper instruction.3. Throughout this manual, theleft side of the vehicle refers to the driver’s side, and the right side to the passenger’s side.4. Disconnect the negative (ground) cable from the battery (or batteries, if there are two) before beginning work.5. Route and tie wires and hoses a minimum of 6” away from exhaust heat, moving parts and sharp edges. clearance of 8” or more is recommended where possible.6. When raising the vehicle, support it on properly weight-rated safety stands, ramps or a commercial hoist. Follow the manufacturer’s safety precautions. Take care to balance the vehicle to prevent it from slipping or falling. When using ramps, be sure the front wheels are centered squarely on the topsides; put the transmission in park; set the hand brake; and place blocks behind the rear wheels. Caution! Do not use floor jacks to support the vehicle while working under it. Do not raise the vehicle onto concrete blocks, masonryor any other item not intended specifically for this use.7. During installation, keep the work area clean. Do not allow anything to be dropped into intake, exhaust, or lubrication system components while performing the installation, as foreign objects will cause immediate engine damage upon start-up.Tools Required:• 1⁄2” and 3⁄8” drive ratchets with standard and metric sockets and 1⁄2” and 3⁄8” drive extension• Standard and metric combination or open-end wrenches• Standard screwdriver• Clean shop towels or rags• Pry-barHighly recommended tools and supplies:• Foot-pound torque wrench• Penetrating oil or light lubricant sprayGeneral Installation Practices 296408 v.9.01 2001-2007 I n t e r m e d i a t e p i p e (1)*1a 2006-07 I n t e r m e d i a t e p i p e (1)2 F l a n g e p i p e (1)*3 T a i l p i p e (1)4 M o n s t e r m u f f l e r (1)5 4” E x h a u s t c l a m p s (s a d d l e t y p e ) (2) S y s t e m s 48630 a n d 48634 o n l y o n e (1)6 4” E x h a u s t h a n g e r /c l a m p (1) I n c l u d e d o n l y w i t h s y s t e m s 48630 a n d 486347 4” B a n d c l a m p (1)*8 E x h a u s t g a s k e t (1)*9 P o l i s h e d 5-i n c h e x h a u s t t i p w i t h c l a m p (1) .10 H e a d p i p e a s s e m b l y (1) S y s t e m s 48628, 48629 a n d 48630 o n l y (n o n -c a t m o d e l s ) 11 7⁄16-20 x 1.5” B o l t s (4) S y s t e m s 48628, 48629 a n d 48630 o n l y (n o n -c a t m o d e l s )*12 7⁄16-20 c r i m p l o c k n u t s (4) S y s t e m s 48628, 48629 a n d 48630 o n l y (n o n -c a t m o d e l s )* 13 7⁄16 A N w a s h e r s (8) S y s t e m s 48628, 48629 a n d 48630 o n l y (n o n -c a t m o d e l s )*14 3.5” e x h a u s t c l a m p (s a d d l e t y p e )15 B a n k s d e c a l (2) O w n e r ’s m a n u a l (1) W a r r a n t y s t a t e m e n t (1) *E x c l u d e s 2006-2007 m o d e l s96408 v.9.0 3Exhaust System Installation1. As a precaution, disconnect the ground of the battery (if there is more than one battery, disconnect both).2. Raise the vehicle and support it with properly weight rated safety stands, ramps or a commercial hoist. Follow the manufacturer’s safety precautions. Take care to balance the vehicle to prevent it from slipping or falling. When using ramps, be sure the front wheels are centered squarely on the topsides; place the transmission in park; set the parking brake and place blocks behind the rear wheels. CAUTION: DO NOT WORK UNDER ANY VEHICLE SUPPORTED ONLY BY A JACK. SEVERE INJURY MAY RESULT.3. Removal of the factory exhaust can be simplified by cutting the factory exhaust pipe behind the muffler. This will allow the tailpipe to be removed as a separate piece.4.For 2006-07 models, removethe clamp located on the catalytic converter outlet.5. For 2001-05 models, remove the four (4) nuts from the factory exhaust flange located at the back side of the factory head pipe (retain for re-use).6. Remove the factory tailpipe from the vehicle by disengaging the exhaust system hanger pins from the rubber hangers using a large screw-driver or pry bar.Note: Lubricating the rubber hangers with WD-40 or similar lubricant will ease removal of the hanger pins.7. Remove the factory muffler from the vehicle by disengaging the hanger pins from the rubber hangers using a large screwdriver or pry bar. NOTE: If Banks Headpipe (system 48670, 48671 or 48672) is being installed, perform steps 8 thru 11 below. Otherwise continue installation with step 12.8. On the front of the exhaust, spray penetrating oil such as WD-40 on the T-bolt of the factory v-band clamp to prevent galling. Remove factory v-band clamp and save for re-use.9. Remove factory head pipe from the vehicle by disengaging the exhaust system hanger pins from the rubber grommets using a large screwdriver or pry bar.10. Install Banks head pipe in vehicle and insert the hanger pin in the rubber exhaust grommet.NOTE: Be sure to install the hanger pin in the same location as the previously removed factory head pipe.11. Loosely install the v-band clamp on head pipe flange and only tighten the T-bolt on the clamp to the point that the pipe is snug but can still be rotated in the clamp for adjustment/ alignment.NOTE: Do not completely tighten theV-band clamp at this point.NOTE: proceed to step 14 for 2006-07 models installation instructions CAUTION: The following step involves cutting a stainless steel tube. Safety glasses should be worn during any cutting operation and care should be taken to avoid injury due to sharp edges and burrs.12.For Extended Cab Long Bed and Extended Cab Short Bed models only: cut the Banks Flanged intermediate pipe (53717) based on the following configurations. See Table 1. cut the Non-flanged end of the intermediate pipe. See Figure 2.496408 v.9.0Figure 296408 v.9.05Note: On extended-cab long-bed and crew-cab long-bed vehicles, the clamp that is used between the intermediate pipe and muffler is a combination hanger/clamp. When this hanger clamp is installed the hanger pin should be inserted into the factory rubber hanger and the clamp should be rotated until the hanger pin is parallel with the frame mounted pin before being torqued. 17. Install the muffler onto the end of the intermediate pipe outlet. Be sure that the inlet side of the muffler (see markings on muffler body)is facing toward the front of the vehicle. Orient the muffler such that the “Banks Monster” logo is facing towards the frame and is level with the ground. verify that the muffler and intermediate pipe are completely engaged.18. Slide one (1) of the supplied4” exhaust clamps onto the Banks Monster muffler outlet.19. Install the tailpipe into the outlet of the muffler. Be sure that the two pipes are completely engaged. Insert the front and rear tailpipe hanger pins into the factory rubber hangers. Rotate the tailpipe until the hanger pins are parallel with the frame mounted pin. NOTE: Minimum distance between exhaust tip and body is one (1) inch. 20. Tighten the head pipe v-band clamp to 12 ft-lbs (if previously loosened).21. Adjust each of the pipes to ensure that all of the hanger pins are parallel with the frame mounted pins and that the rubber hangers are all positioned slightly forward (See Figure 3). The amount of forward angle on the rubber hangers should increase the farther downstream the hanger is positioned. This allows the hangers to be properly positioned once the exhaust system reaches operating temperature. 22. Install the exhaust clamp ateach of the three (3) joints. Figure4 illustrates the proper location ofan exhaust clamp on a tubing joint.Torque the nuts on each of the 696408 v.9.0Figure 496408 v.9.07Gale Banks Engineering546 Duggan Avenue • Azusa, cA 91702 (626) 969-9600 • Fax (626) 334-1743 Product Information & Sales: (800) 438-7693 。
雪佛兰汽车产品参数及配置说明书

本产品手册尽可能在现有资料基础上做到全面详实,考虑到上汽通用汽车有限公司可能随时对产品参数、配置、材料、色彩等车型信息进行修改和调整,因此本产品手册仅作参考使用,具体车型的外观、配置及颜色等信息以销售的实车为准。
上汽通用汽车有限公司有权合法使用雪佛兰(CHEVROLET)产品商标名称,未经许可使用上述商标者,将被追究法律责任。
地址:中国上海浦东金桥申江路1500号 邮编:201206 网址: 雪佛兰咨询热线:400-820-1912,800-820-1912(免费)或************声明䒓ಸऺ⼝݈䚤RS 䚤݈䚤RS 䚤Pro݈䚤RS 䚤Max䒓䏘࣯䪬Ꮣ(mm)4270ცᏓ(mm)1791倅Ꮣ(mm)16101627䒡䌊(mm)2570䒛䌊(ݺ/ऻ)(mm)1547/1551᪡ิ䉕䛼(kg)13001335䒛⃯17स䨊व䛾䒛⃯䒛㗻ᮛݖथ䕇BRIDGESTONE 215/55R17ݺऻ䒛㗻ᣕ㡽ࢸ߈(kPa)240/240ิ㗻T115/70R16 92M⇦マღ⼜(L)40㵹ᱻマღ⼜(L)390ߕ߈࣯ࣾߕᱧEcotec すژАڕ1.5T ఈ㑥Ⱑ⋎䒛ࢸࣾߕᱧࣾߕᱧᱽ䉕ڕ䨊ᢿ䛼(ml)1498ᰭ๔䷊Ⴧߌ⢴(kW/rpm) 135/5500ᰭ๔រⴖ(N .m/rpm)250/1500-5000अ䕌マCVT ᮧ㘪ᬍ㏔अ䕌マ侞ߕᒏᐼݺ侞ᰭ倅䒓䕌(km/h)205⛰⇦92तᝃВ̷ᬍ䧲↪⇦ᢿᩫᴴ۳పɍ㐩वጒۢ⇦㕄 (L/100km)(WLTC ጒۢ) 6.35ᏂⰅᗙ᳣(ݺ/ऻ)叓ᑄ䔷ᐼ⠙⿸ᗙ᳣/រᱳᶮᐼ䲋⠙⿸ᗙ᳣ݣߕ㈨㐌 (ݺ/ऻ)䕇䷻Ⰵᐼ/Ⰵᐼ̭Аࢇ̓EPS ⩢ၽߖ߈䒙ा㈨㐌S S S ࣾߕᱧड़։㈨㐌S S S ใ㻯䙺ิᮧ㘪LED ๔▜S S S LED ᑜ䖀䒲ߖ⚔ᬻS S S 㜗ߕݺ๔▜(ѡఋუߌ㘪)S S S LED ᬒ㵹▜S S S ٰࣹ㉍LED ᅫ▜S S S 倅Ѻݦ䒓▜S S S ใऻ㻳䪉⩢ߕ䄰㞯S S S 䒓ಸऺ⼝݈䚤RS 䚤݈䚤ڲ亝䙺ิݺᢿ͚๛ឣ(ፓו➖マ)S ऻᢿ͚๛ឣ-ऻᢿᏔḲज4/6ܳៅऍS す̭ᢿ䶣㶙LED ⚔ᬻ▜S ऻᢿ䶣㶙LED ⚔ᬻ▜-ݺᢿ12V ⩢⎽ऐS ႶڕឭESC ⩢ၽ䒓䒳⽠ჇᣔݣS ABS 䭟₨ݣߕS EBD ⩢ၽݣߕ߈ܳ䙺S HSA ಎ䖀䊤ₒ䒲ߖS TCS ➢ᑂ߈ᣔݣS CBC ᑜ䖀ݣߕᣔݣS PBA ㉔ᕒݣߕ䒲ߖS EBW ㉔ᕒݣߕ䶱䂓S TPMS ఈ䒛⠙⿸᭫㗻ࢸ⯾≸S AEB ⷝ㑀㼐ݣߕ-FCA ݺⷝ䶱䂓-PCM 㵹ϧⷝ㑀㼐-FDI 䌌䒓䌊⻨-LKA 䒓䖀Ԋᠮ䒲ߖ-LDW 䒓䖀ռ⻨䶱䂓-Կ䒓䰤䓫S Կ䒓ᒞ㈨㐌S ݺᢿ䶱㉔䭽߈ႶڕፓS ݺᢿႶڕፓ᱗㈨䚿S ݺᢿࣹႶڕ⅁௷S ݺᢿӔႶڕ⅁௷S ݺऻ̭ҀᐼӔႶڕ⅁ፅ-ऻᢿISOFIX ٬〒ႶڕᏔḲᣒऐS ऻᢿ䒓䬕٬〒Ⴖڕ䨮S ऻ⿄䮑䰫ߌ㘪S ࣾߕᱧ䭟Ⰴ䨮S 㵹䒓㜗ߕ㥪䨮S ڲऻ㻳䪉㜗ߕ䭟ⱖⰛ-ᮧ㖁ឭ雪佛兰创酷RS 参数配置表印刷日期:2023年9月备注:“S”为标准配备,“-”为未配备,“O ”为选装配备梦 创 未 来创一波 颜值炸场的酷沿袭雪佛兰FNR-CarryAll车身经典设计理念,骨子里的硬核,始终未变。
- 1、下载文档前请自行甄别文档内容的完整性,平台不提供额外的编辑、内容补充、找答案等附加服务。
- 2、"仅部分预览"的文档,不可在线预览部分如存在完整性等问题,可反馈申请退款(可完整预览的文档不适用该条件!)。
- 3、如文档侵犯您的权益,请联系客服反馈,我们会尽快为您处理(人工客服工作时间:9:00-18:30)。
跟进内容
级别确认
纳入重 点客户 纳入重 点客户
主管/经理审核
v 3
12345-
纳入重 点客户
纳入重 点客户 纳入重 点客户 纳入重 点客户 纳入重 点客户 战败车型:
客户姓名:
DOSS编号:
下次跟进日期:
反面简介
《潜客管理笔记》反面,共3个功能模块;
反面
模块4——车主资料(选填) 模块5——车辆信息(选填)
正在进行市场 考察,寻找备 选车型 计划用车时间 通常在1个月 左右 资金有来源, 但处于准备阶 段 决策者未能全 部到场 没有明确的重 点关注车型 没有明确的重 点关注车型
购买 标准
用车 时间 资金 准备 到场 角色 关注 重点 展厅 表现 合计
已经明确了要 购买的车型
市 场 活 动 名
·、
·、
计划用车时间 在1周内
未能确定下次 约见时间
未能确定下次 约见时间
既没有问题也 没有异议
协助处理旧车 是、 否
计划跟进时间
计划跟进理由
实际跟进方式
展厅 电话 其他 展厅 电话 其他 展厅 电话 其他 展厅 电话 其他 展厅 电话 其他 展厅 电话 其他 展厅 电话 其他
跟进内容
客户信息采集(必填) 用车人 来展厅、 来电话、 DCC 网络、 随机来店、 来电查询、 基盘客户、 售后转介、 活动邀约 电台电视、 报纸/杂志广告、 户外/楼宇广告、 厂家转介、 其它 按揭、 非按揭
B级 C级 N级 7日内跟进 15日内跟进 30日内跟进
《雪佛兰潜客管理笔记 v1.0》 使用说明
前言 《雪佛兰潜客管理笔记》的异议
对销售顾问来说,它是帮助我们有效进行潜客管理的工具,帮助我们实时采集 客户的需求和重要信息,促进DOSS的使用质量。用好潜客管理笔记也是一位合 格的雪弗兰销售顾问应有的专业素养和工作习惯 对管理者来说,它帮助我们有效了解销售顾问的DOSS客户信息质量及客户跟进 的规范性,保证客户资源的及时转化和有效流动 对客服工作来讲,“潜客管理笔记”将销售部和客户服进行了无缝链接,可以 从信息记录了解到每一位客户的接待阶段情况和需求,为客户回访做好了准备
4
v5
模块6——客户关爱回访(选填)
6 v
填写说明
填写说明——正面
1
H
模块1——需求分析与级别判断
• 说明:根据对客户的需求分析,帮助销售顾问进行准
√ √
• •
确的客户级别判定;
要求:必填项 填写方法: 1. 在与客户沟通时,根据客户的需求,在“购买标 准、用车时间、资金准备、到场角色、关注重点、 展厅表现”进行勾选(√); 2. 统计“合计” 2
称 :
简单询问了一 些车辆的基本 知识
既没有问题也 没有异议
协助处理旧车 是、 否
跟进方式
跟进内容
级别确认
纳入重 点客户 纳入重 点客户
主管/经理审核
2. 每一选项都为必填项目
3. 在“信息来源”中“活动邀约”需要将活动名称填写在 右侧灰色处;
电话 其他
电话 其他
电话 其他
需求分析与级别判断(必填)
H级 2日内跟进 A级 4日内跟进
正在进行2-3 款备选车型的 深度对比 计划用车时间 在2周左右
装订孔 •
v1.0
客户级别:
高质量 基盘:
级
客户电话 流量类型
客户信息采集(必填) 用车人 来展厅、 来电话、 DCC 网络、 随机来店、 来电查询、 基盘客户、 售后转介、 活动邀约 电台电视、 报纸/杂志广告、 户外/楼宇广告、 厂家转介、 其它 按揭、 非按揭 首次接待日期
预购车型 迈锐宝· 科鲁兹两厢· 关注竞品车型 客户跟进管理(必填)
·、
·、
爱唯欧·
科帕奇· · 、 科鲁兹三厢· 当前使用车型
·、
·、
景程·
创酷 · · 、 其他·
·、
· ·、
称 :
价格优惠、服务、 竞品比较 保险、装潢、上 牌等问题
车型的配置参 数收集
在本店有哪些 车型,哪些车 型卖得好
•
客户姓名:
DOSS编号:
下次跟进日期:
1-
2-
3-
4-
5-
战败车型:
当客户战败时撕 下右下角的“战 败”标签
填写DOSS系统自动生成的编 号
填写说明——反面
4
模块4——车主资料(选填)
• • • 说明:客户成交后,销售顾问更新车主资料; 要求:选填项 填写方法: 1.将车主信息更新在模块4中;
结构说明
结构说明
《潜客管理笔记》正反面,共6个功能模块;
意向客户阶段——正面
雪佛兰潜客管理笔记
需求分析与级别判断(必填)
H级 2日内跟进 A级 4日内跟进
正在进行2-3 款备选车型的 深度对比 计划用车时间 在2周左右
成交客户阶段——反面
高质量 基盘:
首次接待日期
v1.0
客户级别:
级
客户电话 流量类型
没有明确的重 点关注车型
没有明确的计 划用车时间
信息来源
网络、 随机来店、 来电查询、 基盘客户、 售后转介、 活动邀约 电台电视、 报纸/杂志广告、 户外/楼宇广告、 厂家转介、 其它 按揭、 非按揭
购车资金还未 准备
决策者未能全 部到场
付款方式
高质量 基盘:
客户信息采集(必填) 用车人 首次接待日期
v1.0
客户级别:
级
客户电话 流量类型
B级 C级 N级 7日内跟进 15日内跟进 30日内跟进
正在进行市场 考察,寻找备 选车型 计划用车时间 通常在1个月 左右 资金有来源, 但处于准备阶 段 决策者未能全 部到场 没有明确的重 点关注车型 没有明确的重 点关注车型
简单询问了一 些车辆的基本 知识
主动询问
容易约定下次 约见时间
未能确定下次 约见时间
未能确定下次 约见时间
既没有问题也 没有异议
协助处理旧车 是、 否
计划跟进时间
计划跟进理由
实际跟进方式
展厅 电话 其他 展厅 电话 其他 展厅 电话 其他 展厅 电话 其他 展厅 电话 其他 展厅 电话 其他 展厅 电话 其他
填写说明——反面
5
模块5——车辆信息(选填)
• • • 说明:详细记录车辆信息; 要求:选填项 填写方法: 1.将车辆信息更新在模块5中;
填写说明——反面
模块6——客户关爱回访(选填)
客户关爱回访
基本原则:执行完当前回访计划后应当立即填写下一次的回访计划,以此循环。
模块2——客户信息采集(新增意向客户必填)
市 场 活 动 名 称 :
购买 标准
用车 时间 资金 准备 到场 角色 关注 重点 展厅 表现 合计
已经明确了要 购买的车型
来展厅、 来电话、 DCC 网络、 随机来店、 来电查询、 基盘客户、 售后转介、 活动邀约 电台电视、 报纸/杂志广告、 户外/楼宇广告、 厂家转介、 其它 按揭、 非按揭
别确认”框内记录客户的最新级别
3
4. 销售主 3. 执行完首次跟
进后立即填写第 二次跟进计划, 往后依次循环。
管需每日 审核客户 跟进情况 并签字, 销售经理 每周抽查
4.每制定好下一次跟进计划,把计划的跟进日期一并
填写在卡的最下边的标签栏内,方便快速查阅
填写说明——正面
其他关键细节说明
雪佛兰潜客管理笔记
简单询问了一 些车辆的基本 知识
主动询问
容易约定下次 约见时间
未能确定下次 约见时间
未能确定下次 约见时间
既没有问题也 没有异议
协助处理旧车 是、 否
•
计划跟进时间
计划跟进理由
实际跟进方式
展厅 电话 其他 展厅 电话 其他 展厅 电话 其他 展厅 电话 其他 展厅 电话 其他 展厅 电话 其他 展厅 电话 其他
计划用车时间 在1周内
购车资金准备 妥当
购车资金准备 妥当
1
计划用车时间 通常在1个月 以上 资金有来源, 但处于准备阶 段 决策者未能全 部到场
没有明确的计 划用车时间
信息来源
购车资金还未 准备
决策者全部到 场
决策者全部到 场
决策者未能全 部到场
付款方式
2v
模块3——客户跟进管理(客户跟进必填)
赛欧·
跟进内容
级别确认
纳入重 点客户 纳入重 点客户
主管/经理审核
当客户成交时撕 下右上角的“成 交”标签 如销售顾问希望 自己维系此客户, 则勾选“高质量 基盘”,并自己 保存 如不勾选,则将 此客户卡转交客 户管理部
纳入重 点客户
纳入重 点客户 纳入重 点客户 纳入重 点客户 纳入重 点客户
√ √ √
4
√
3. 将合计中结果最高的级别,填写在右上方中;
填写说明——正面
2
高质量 基盘:
模块2——客户信息采集(必填)
客户信息采集(必填)
级
客户电话 流量类型
N级 0日内跟进
用车人 来展厅、 来电话、 DCC
首次接待日期
•
市 场 活 动 名
说明:此部分所填字段与DOSS系统完全匹配,新增意向客 户首次建档时必须填写
预购车型 迈锐宝· 科鲁兹两厢· 关注竞品车型 客户跟进管理(必填)
·、
·、
爱唯欧·
科帕奇· · 、 科鲁兹三厢· 当前使用车型