Lab1_Install and Configure BIEE Client
ABB Ability ODM zenon 8.20快速安装指南说明书

—APPLICATION NOTEABB Ability ODM zenon 8.20Quick Installation GuideBefore installing ABB zenon 8.20:1.All current operating system updates must be installedNote: If you always use the latest version (Service Pack) of your operating system, you not only avoid compatibility issues but also security problems.2.There must not be a restart pending.3.The system requirements are checked before installation. If the requirements are not met, you areshown these on a separate page with notices on how to rectify this.4.Automatic Windows updates influence the installation. If an update of the Windows operatingsystem is carried out while the zenon setup is running, it can cause problems during the zenon installation.To prevent this: Deactivate the automatic Windows update during the time of installation and carry out the Windows update before starting the zenon installation5.With Windows 7 Embedded Standard, zenon is installed using the normal installation routine. Youcan find the hardware requirements in the Runtime under Windows Embedded Standard chapter.6.During the installation of zenon, the ABB Multiple Network Protocol Driver (cdprotdrv.sys) isinstalled. To start the driver, the operating system must be restarted after installation.7.Activate Windows feature - .NET framework 3.5 before installation.Frequent sources of error during installation:1.The virus scanner is active and blocks the installtion because the scanner thinks it´s a virus.Solution: Seperate the system from the network, disable the virus scanner, execute the installation again.2.The firewall was not configured correctly. Solution: Seperate the system from the network, disablethe firewall, execute the installation again.3.Erroneous SQL-installation on the system. Solution: Create project backups; if possible, deinstallSQL server, rename the SQL folder, and restart installation.Get started with download:1.Download ABB zenon 8.20 setup from ABB website (use direct link as mentioned below):ABB zenon 8.20 download link2.Run installer as administrator.3.Select the language for the installation.4.Read and agree to the license terms. Print button will print the EULA and previous button go back tothe language selection page.5.Select options for download:a.Main Release – ABB zenon editor and runtime standard packageb.Zenon PDF Help Files - Besides the Online Help which is installed with zenon software bydefault, the same help content in PDF format can be downloaded and installed.c.ZEE600 - ABB zenon Electrification Edition for seamless integrator of diverse devices such asABB and 3rd party make protection relays, meters, substation equipment condition monitoring units, Programmable Logic Controllers (PLC) and Remote Terminal Units (RTUs),6.Download in progress.7.Downloaded package will be saved in selected target folder.Get started with installation:1.You can start installation on the same machine or download setup can be copied to anothermachine for installation.2.Right click on Start.exe and run as administrator.3.Select language again for installation:4.Also accept license terms again.5.Select options for installation (We suggest youto select all options during download and later youcan choose desired options for installation).a.Zenon 8.20 – You can select Editor (complete development package withruntime), or standalone runtime option. Additionally zenon web sevrer and clientcan be selected for installation.b.Zenon PDF Help Files – in English and German.c.ZEE600 package.6.You will get installation successful message once all selected components are installed properly.7.In case of failed installation please click Show logs link to collect logs and contact us via*********************.。
BIEE知识点

一.技巧部分[仪表盘]修改页面图片路径\OracleBI\oc4j_bi\j2ee\home\applications\analytics\analytics\res\s_oracle10\portal[仪表盘]修改下垃菜单(1) 要展示成Drop-Down之Dashboard必須是同一個Group Folder.(2) 修改instanceconfig.xml新增一行:<DashboardMaxBeforeMenu>2</DashboardMaxBeforeMenu>/OracleBIData/web/config/instanceconfig.xml[答复]静态文本<span style="background-color:#000000;">静态文本的背景色</span>[提示]日期排序SELECT "biee_d_新号段189号码监控"."日期" FROM "数据自助提取" ORDER BY "biee_d_新号段189号码监控"."日期" DESC[提示]第十行SELECT "biee_d_新号段189号码监控"."日期" FROM "数据自助提取" WHERE RCOUNT("biee_d_新号段189号码监控"."日期" )=10 ORDER BY "biee_d_新号段189号码监控"."日期" DESC最大值SELECT max("- 市场占有率地区表"."月份" ) FROM JYBIEE[仪表盘]部分背景与CSS设置OracleBI\oc4j_bi\j2ee\home\applications\analytics\analytics\res\s_oracle10\b_mozilla_4[系统配置]几个重要的配置文件:安装后的目录很干净,就两:OracleBI, OracleBIData。
LabWindows CVI实时模块入门指南说明书
October 2008374686A-01Getting Started with theLabWindows /CVIReal-Time ModuleThis document provides an introduction to the LabWindows ™/CVI ™ Real-Time Module. Refer to this document for installation and configuration instructions and information about creating a real-time (RT) project.Installing the Real-Time Module Software on a Host ComputerYou must first install the Real-Time Module software on a host computer. Then you can configure and install software on the RT target.To install and use the Real-Time Module software, you must have the following:•Free Disk Space —In addition to the minimum system requirements for LabWindows/CVI, you must have at least 250 MB of free disk space for the Real-Time Module software. Refer to the LabWindows/CVI Release Notes for minimum system requirements.•RT Target —The LabWindows/CVI Real-Time Module supports NI RT Series PXI controllers and desktop PCs converted to RT targets. Refer to the Using Desktop PCs as RT Targets with the LabWindows/CVI Real-Time Module document for more information about converting a desktop computer to an RT target.Complete the following steps to install the LabWindows/CVI Real-Time Module on a host computer.1.Install LabWindows/CVI. Refer to the LabWindows/CVI Release Notes for information about installing LabWindows/CVI.Note Do not install the device driver software when you are prompted to do so during the LabWindows/CVI installation. Instead, install the device driver software when you are prompted during the LabWindows/CVI Real-Time Module installation.™™2.Insert the LabWindows/CVI Real-Time Module CD into the CD drive. Ifthe CD does not run automatically, open Windows Explorer, right-click the CD drive icon, and select AutoPlay.3.Select Install LabWindows/CVI Real-Time Module on the NationalInstruments LabWindows/CVI screen.4.Follow the instructions on the screen.5.During the installation, use the NI Device Drivers media to install thedevice drivers that you need.Configuring the RT TargetAfter you install LabWindows/CVI and the RT module, you must useNI Measurement & Automation Explorer (MAX) to configure the RT target and to install software and drivers on the RT target. MAX provides access to NI devices and systems and can communicate with networked RT targets, or remote systems, located on the same subnet as the computer running MAX. Complete the following steps to configure the RT target. The following sections describe these steps in more detail.1.Boot the RT target into LabVIEW RT.2.Configure network settings.3.Install software on the RT target.4.Configure system settings.5.Configure I/O.Refer to the Measurement & Automation Explorer Help for a complete tutorial about configuring the RT target. Select Help»MAX Help to access this help file, and then refer to the MAX Remote Systems Help section.LabVIEW Real-Time Module. However, you can apply the sameconcepts when you use the LabWindows/CVI Real-Time Module. Booting the RT Target into LabVIEW RTIf the RT target has only LabVIEW RT installed on its hard drive, the system is already set up to boot into LabVIEW RT, and you can continue to the Installing Software on the RT Target section of this document. If the RT target has LabVIEW RT and Windows installed on its hard drive, your system may have DIP switches or BIOS settings for booting into LabVIEW RT.If the RT target is a PXI system that does not have LabVIEW RT installedand has a floppy disk drive, you can create a boot disk to boot the system intoLabVIEW RT.Getting Started with LabWindows/CVI © National Instruments Corporation 3Getting Started with LabWindows/CVI Real-Time 1.Select Tools»RT Disk Utilities»Create PXI Boot Disk in MAX tocreate a boot disk from the host computer.2.Click Yes in the Measurement & Automation Explorer dialog box andfollow the instructions on the screen to create the boot disk.3.When you finish creating the boot disk, remove the floppy disk from thehost computer and insert it into the floppy drive of the PXI controller you are using as an RT target.4.Power on or reset the controller to boot it into LabVIEW RT.If you are converting a desktop computer to an RT target, refer to the Using Desktop PCs as RT Targets with the LabWindows/CVI Real-Time Module document for information about booting into LabVIEW RT.Configuring Network SettingsNoteTo perform the initial configuration, you must connectunconfigured RT targets to the same network subnet as the host computer from which you launch MAX. Unconfigured targets outside of the subnet do not appear under the Remote Systems item in the MAX configuration tree.1.Connect the RT target to the network and power on the target.unch MAX and expand the Remote Systems item in the MAXconfiguration tree.3.Select the RT target from the Remote Systems item and click theNetwork Settings tab. The RT target appears as 0.0.0.0 under the Remote Systems item.4.Assign an IP address in the Network Settings tab using one of thefollowing options:•Select the Edit the IP settings option and specify an IP address.You also can click Suggest Values to select an IP address suggested by MAX.•Select Obtain IP address from DHCP server to obtain an addressautomatically.5.Click Apply to commit the changes.6.Click Yes to reboot the RT target.If your previously configured RT target is on another subnet and does not appear under the Remote Systems item, you must add the target manually. Complete the following steps to add the RT target:1.Right-click the Remote Systems item and select Create New .2.Select the target type and click Next.Getting Started with LabWindows/CVI Real-Time 3.Enter the host name or IP address of the device. You can obtain the hostname or IP address of the RT target by running MAX from a computer on the same subnet as the target or by connecting a monitor to the target and viewing the information displayed when the target boots.4.Click Finish . MAX adds the device to the Remote Systems list.Installing Software on the RT TargetUse the LabVIEW Real-Time Software Wizard to install software on the RT target. With the LabVIEW Real-Time Software Wizard, you can view the software that is already installed on the target, view the software that is available to install on the target, and change the software that is installed on the target. Click Help in the wizard for more information about installing and uninstalling software on the RT target.1.Expand the RT target under the Remote Systems item in the MAXconfiguration tree, right-click Software , and select Add/Remove Software .2.Select the software you want to install on the RT target.Note If you have multiple software versions installed on the host computer, the most recent version is selected by default. You can choose to install another version.•Ethernet Drivers —MAX automatically selects the appropriate Ethernet driver(s) for the RT target when you install theLabWindows/CVI Run-Time Engine for RT component.•LabVIEW Real Time —MAX selects this item automatically when you install the LabWindows/CVI Run-Time Engine for RTcomponent.•NI RT Extensions for SMP (MultiCore Support)—Install this item to take advantage of parallel processing on a multiple-CPU system.Note Single-CPU systems perform best without the NI RTExtensions for SMP . Also, some applications, such as those that consist mainly of single-point I/O, can achieve lower latency on a multicore system by using a single CPU without the NI RTExtensions for SMP .•LabWindows/CVI Network Variable for RT —Install this item only if your application uses functions from the Network VariableLibrary.•LabWindows/CVI Run-Time Engine for RT—Install this item to add support for LabWindows/CVI RT applications on the RT target.This component is required for all LabWindows/CVI RTapplications.•Language Support for LabVIEW RT—Install this item if you are using strings in your RT application containing ASCII charactersabove 127 or multibyte characters. After installing this item on theRT target, you can configure the locale in MAX by selecting thetarget in the Remote Systems item in the MAX configuration tree,selecting the System Settings tab, and modifying the Locale option.•NI Hardware Drivers—Install the appropriate drivers for any other hardware libraries that you use in your application. For example,install the NI-DAQmx component if your application uses functionsfrom the NI-DAQmx Library.•Network Variable Engine—MAX automatically selects this item when you install the LabWindows/CVI Network Variable for RTcomponent.•USB Support—Install this item to enable support for accessing USB thumbdrives.•Variable Client Support for LabVIEW RT—MAX automatically selects this item when you install the LabWindows/CVI NetworkVariable for RT component.Configuring System Settings1.Select the System Settings tab to configure system-level settings for theRT target.e the Timezone option to configure time zone and daylight savingsettings for the RT target. You can use this setting with time and date functions to provide accurate time information, relative to the time zone setting.3.Configure the Locale option to match the language you use for strings inyour RT application. This option is available only when you install the Language Support for LabVIEW RT component on the RT target.This option determines the code page that LabWindows/CVI uses when processing strings containing ASCII characters above 127 or multibyte characters.Configuring I/OYou must configure any National Instruments I/O devices before you can target them from a LabWindows/CVI RT application. For information about how to correctly configure I/O devices, refer to the documentation for that hardware.© National Instruments Corporation5Getting Started with LabWindows/CVI Real-TimeConfiguring an RT ProjectAfter you configure the RT target, you can create an RT application on the host computer and then run the application on an RT target. The applications that you create with the LabWindows/CVI Real-Time Module are DLLs. Complete the following steps to create a DLL and specify an RT target directly from LabWindows/CVI.1.Create a project in LabWindows/CVI using RTmain instead of main asthe entry point function for the program. Select Edit»Insert Construct»RTmain to insert the RTmain code into the program source.2.Select Build»Configuration»Debug or Build»Configuration»Releaseto specify the active configuration for the project.3.Select Build»Target Type»Dynamic Link Library to configure theproject to generate a DLL.4.Select Build»Target Settings to open the Target Settings dialog box.Select Real-time only in the Run-time support option. If you specify this option, LabWindows/CVI does not link to the entire set ofLabWindows/CVI libraries but instead links to only those librariessupported on an RT system.5.Configure other options in the Target Settings dialog box and click OKto exit the dialog box.6.Select Build»Create Debuggable Dynamic Link Library or Build»Create Release Dynamic Link Library to create the DLL.You also can use a project template to create an RT DLL. The project template includes basic settings for RT projects described in the preceding section. To select a project template, select File»New»Project from Template. In the New Project from Template dialog box, select Real-Time Target Application.Specifying an RT TargetComplete the following steps to select the RT target on which to run your RT application.1.Select Run»Select Execution Target for Debugging to view a list ofpreviously configured RT targets. Select the RT target you want to use from the list, if it is available.2.To configure a new RT target, select Run»Select Execution Target forDebugging»New Execution Target.3.In the New Real-Time Execution Target dialog box, enter the computername or IP address of the RT target in the Hostname/IP Address option and click OK to exit the dialog box.Getting Started with LabWindows/CVI © National Instruments Corporation 7Getting Started with LabWindows/CVI Real-Time Running an RT ApplicationSelect Run»Debug Project to run your RT application.NoteIf you select Run»Configuration»Release ,LabWindows/CVI displays a warning message. Click Continue to download and run the release DLL on the RT target. LabWindows/CVI automatically builds the DLL and downloads the DLL and any DLLs that are statically linked to it onto the specified RT target. LabWindows/CVI places the files that it automatically downloads in the NI-RT\CVI\temp folder. LabWindows/CVI empties the folder when you reset the RT device.While you run your RT application, LabWindows/CVI displays a <<Running on target >> menu in the upper left corner of theLabWindows/CVI environment. The menu contains the following options, which you can use for debugging and for shutting down the RT application:•Toggle Breakpoint —Turn on or turn off a breakpoint on the selected line.•Break Execution —Suspend execution of the program.•Simulate RT Shutting Down —End program execution. This option causes the RTIsShuttingDown function to return 1, giving the RT application an opportunity to run any necessary cleanup code and exit. The RT target does not reboot.•Abort Execution and Reboot Target —End program execution and reboot the RT target. The application cleanup code is not guaranteed to finish running before the RT target reboots.•Disconnect from RT target —Disconnect LabWindows/CVI from the RT target while the RT application continues running on the target. Once you disconnect from the RT target, you cannot reconnect LabWindows/CVI to the RT application that is running.Debugging an RT ApplicationIf you select Build»Configuration»Debug , you can debug the DLL from the LabWindows/CVI environment as you would debug any other application. For example, you can set breakpoints and watch expressions, step through code, view and edit variable values, and so on. For more information about debugging in LabWindows/CVI, refer to the Using LabWindows/CVI»Debugging Tools section of the LabWindows/CVI Help.Using the Real-Time Execution Trace ToolkitThis version of the LabWindows/CVI Real-Time Module includes a 30-day full-featured evaluation of the Real-Time Execution Trace Toolkit.Use the Real-Time Execution Trace Toolkit to analyze the timing and execution of an RT application. Use the Execution Trace functions in the Real-Time Utility Library to capture the timing and execution data of functions and threads in applications running on an RT target. The Real-Time Execution Trace Tool displays the timing and event data, or trace session, on the host computer.In LabWindows/CVI, select Tools»Real-Time Execution Trace Tool to launch the Real-Time Execution Trace Tool. Refer to the LabWindows/CVI Help for more information about using the Real-Time Execution Trace Toolkit to analyze RT applications.Deploying an RT ApplicationWhen you finish developing your RT application, you can deploy it to an RT target. After you deploy the RT application, the RT application runs automatically every time the RT target reboots.Select Run»Install Program to Real-Time Execution Target to deploy your RT application. This option performs the following actions:•Checks that the release configuration of the DLL has been built; if not, LabWindows/CVI prompts you to build the DLL or cancel.•Deploys the release DLL and any statically linked DLLs to the NI-RT\CVI folder on the RT target.•Sets the release DLL as a startup DLL.•Displays a dialog box indicating that the DLL was copied and prompting you to reboot the RT target.If you have additional support files that you need to deploy, complete the following steps:1.Select Run»Manage Files on Real-Time Execution Target to launchthe LabWindows/CVI Real-Time File Copy Utility.2.Click Add Files and browse to any support files that your applicationrequires. The utility immediately copies the files to the NI-RT\CVIfolder on the RT target.3.Click Done when you finish adding support files.Getting Started with LabWindows/CVI Where to Go from HereRefer to the following resources for more information about the LabWindows/CVI Real-Time Module:•The LabWindows/CVI Real-Time Module Help section of the LabWindows/CVI Help includes conceptual information about real-time programming techniques, application architectures, and Real-TimeModule software features you can use to create real-time applications.Select Help»Contents in LabWindows/CVI to access theLabWindows/CVI Help.•Use the NI Example Finder, available by selecting Help»Find Examples in LabWindows/CVI, to browse or search for example programs. You also can access the example programs from the samples\CVIsamples\realtime directory.© National Instruments Corporation9Getting Started with LabWindows/CVI Real-TimeNational Instruments, NI, , and LabVIEW are trademarks of National Instruments Corporation. Refer to the Terms of Use section on /legal for more information about National Instruments trademarks. The mark LabWindows is used under a license from Microsoft Corporation. Windows is a registered trademark of Microsoft Corporation in the United States and other countries. Reliance™ is a trademark of Datalight, Inc. Copyright 1989-2008 Datalight, Inc., All Rights Reserved. Datalight® is a registered trademark of Datalight, Inc. Other product and company names mentioned herein are trademarks or trade names of their respective companies. For patents covering National Instruments products/technology, refer to the appropriate location: Help»Patents in your software, the patents.txt file on your media, or the National Instruments Patent Notice at /patents.© 2007–2008 National Instruments Corp. All rights reserved.374686B-01Oct08。
how to install CSVN
How to install CSVN server in LinuxFirst download CSVN server from Untar the file you downloaded from CollabNet and you will see as below:At last following README file.Highlight README file :CollabNet Subversion Edge - Linux 32/64-bitVersion 1.3.0Release Date: October 27, 2010Contents1. Overview2. Platform and configuration3. Requirements4. Installation notes5. Updates6. Documentation7. Known issues8. Support for CollabNet Subversion Edge9. About Subversion and CollabNet1. OverviewCollabNet Subversion Edge includes everything you need to install, manage and operate a Subversion server. It includes all of the Subversion andApache binaries needed to run a Subversion server. It also integrates the popular ViewVC repository browsing tool so that users can view repository history from a web browser.CollabNet Subversion Edge also includes a powerful web-based managementconsole that makes it easy to configure and manage your Apache server andSubversion repositories. You can easily setup the server to use SSLconnections and even connect the server to a corporate LDAP repository,including Microsoft Active Directory.CollabNet Subversion Edge only supports serving Subversion repositories via Apache httpd and it only supports the Subversion fsfs repository format.2. Platform and configurationProduct: CollabNet Subversion EdgeLicense: GNU Affero General Public License 3.0 (AGPLv3)Certified platforms: Red Hat Enterprise Linux 5.xCentOS 5.xSuSE Linux Enterprise 11.xNOTE: These are the platforms we formally certify when testing. CollabNet Subversion Edge is known to work on virtually all Linux distributions and is informally tested on others such as Ubuntu and Fedora.There are separate downloads for 32-bit and 64-bit Linux. Download theappropriate version for your distribution and kernel.3. Requirements* Java 1.6 JRE/JDK must be installed. We recommend the JRE provided bySun/Oracle. When testing on 64-bit Linux we have used the 64-bit JVM.* Python 2.4 to 2.6 must be installed.If you skip this step, the command line will stop you.4. Installation NotesIMPORTANT: Do not untar CollabNet Subversion Edge using root or sudo. This will cause the UID/GID on the files to carry the values from our buildsystem instead of being reset.1. Set the JAVA_HOME environment variable, and point it to your Java 6 JRE home. For example:export JAVA_HOME=/usr/java/defaultTest the variable:$ $JAVA_HOME/bin/java -versionjava version "1.6.0_20"Java(TM) SE Runtime Environment (build 1.6.0_20-b02)Java HotSpot(TM) Client VM (build 16.3-b01, mixed mode, sharing)2. Switch to the folder where you want to install CollabNet SubversionEdge. You must have write permissions to this folder.$ cd /opt3. Untar the file you downloaded from CollabNet.$ tar zxf CollabNetSubversionEdge-x.y.z_linux-x86.tar.gzThis will create a folder named "csvn" in the current directory. You canrename this folder if desired.I download CSVN in windows OS and untar it in windaows OS, then copy it to Linux. You can put it in any folder you like. However, you must have write permissions to this folder.You can skip following two optional steps.4. Optional. Install the application so that it will start automaticallywhen the server restarts. This command generally requires root/sudo toexecute.$ cd csvn$ sudo -E bin/csvn installIn addition to configuring your system so that the server is startedwith the system, it will also write the current JAVA_HOME and thecurrent username in to the file data/conf/csvn.conf. You can edit thisfile if needed as it controls the startup settings for the application.By setting the JAVA_HOME and RUN_AS_USER variables in this file, itensures they are set correctly when the application is run.5. Optional. Configure proxy settings. CollabNet Subversion Edge needaccess to the internet to check for and install updates. If you need togo through a proxy to access the internet, then you can configure theproxy by editing the data/conf/csvn.conf file which was created by theprevious step. Uncomment and edit the HTTP_PROXY variable to configureyour proxy server.Very Import !!!6. Start the server. Be sure that you are logged in as your own userid and not running as root.$ bin/csvn startThis will take a few minutes and the script will loop until it sees that the server is running. If the server does not start, then try starting the server with this command:$ bin/csvn consoleThis will start the server but output the initial startup messages tothe console.You must login to the CollabNet Subversion Edge browser-based managementconsole and configure the Apache server before it can be run for the first time. The UI of the management console writes the needed Apacheconfiguration files based on the information you provide.The default administrator login is:Address: http://localhost:3343/csvnUsername: adminPassword: adminThen you can open FireFox and input above URL to login the UI console.You should configure your server and then start it as following. Especially focus on Port. Do not set it with 80.Now with the server you can create repositories, users and do some access rights management. Also can monitor your server's utility rate and changes from repository.Subversion Edge also starts an SSL-protected version using a self-signed SSLcertificate. You can access the SSL version on this URL:Address: https://localhost:4434/csvnYou can force users to use SSL from the Server configuration. This will cause attempts to access the site via plain HTTP on port 3343 to be redirected to the secure port on 4434.5. UpdatesCollabNet Subversion Edge includes a built-in mechanism for discovering and installing updates. You must use this facility to install updates. Do not download and run a new version of the application installer.The update mechanism will require you to restart the servers at the end ofthe process, but it will do it for you.6. DocumentationDocumentation for CollabNet Subversion Edge is available here:/Context-sensitive help is also linked to this location from within theapplication.7. Known issues- For the latest FAQ, visit the project home page here:https:///sf/projects/svnedge- If you try to access an existing BDB (Berkeley DB) based repositorythrough CollabNet Subversion Edge, then you will receive an alert "Failed to load module for FS type 'bdb'." This is because CollabNet SubversionEdge does not support BDB. CollabNet recommends FSFS over BDB for easeof maintenance and supportability.- You can access the application from localhost, but not other computerson your LAN. This usually means that you need to configure Firewall rules for you server to open the firewall for port 3343:edit /etc/sysconfig/iptablesedit /etc/sysconfig/ip6tablesAdd the following line to the above files, it line be will the line before the last 2 lines.-A RH-Firewall-1-INPUT -m state --state NEW -m tcp -p tcp --dport 3343 -j ACCEPT/etc/init.d/iptables restart/etc/init.d/ip6tables restart8. Support for CollabNet Subversion EdgeAsk questions and get assistance with using CollabNet Subversion Edge via the community forums on openCollabNet. The forum for CollabNet Subversion Edge questions is available here:/ds/viewForumSummary.do?dsForumId=3Find out about CollabNet Technical Support at/support/Information about CollabNet Training, Consulting, and Migrationservices is at /training/Join openCollabNet for community support: 9. About Subversion and CollabNetCollabNet launched the Subversion project in 2000 in response to the demand for an open standard for Web-based software configuration management that could support distributed development. CollabNet continues to be strongly involved with the Subversion project and offers CollabNet SubversionSupport, Training, and Consulting services.CollabNet also provides the most widely used collaborative developmentenvironment in the world. More than 1,400,000 developers and IT projectsmanagers collaborate online through CollabNet. The company is transforming the way software is developed by enabling organizations to leverage global development talents to deliver better products and innovate faster.Visit CollabNet at for more information.Subversion is a registered trademark of the Apache Software Foundation./。
Lab Manager 说明书

VMware, Inc.
3
Lab Manager 用户指南
使用RPM安装程序在X中的Linux客户机上安装VMwareTools 35 使用Tar安装程序或RPM安装程序在Linux客户机上安装VMwareTools 35 在Solaris客户机上安装VMwareTools 36 自定义客户机操作系统 37 从ESX主机访问machine.id 37 从客户机操作系统访问machine.id 37 客户机自定义的必备条件 38 构建MicrosoftSysprep软件包 38 完成WindowsNT和Solaris虚拟机模板的客户机自定义 39 完成Solaris虚拟机模板的客户机自定义 40 使用客户机自定义SID生成工具 40 选择用于Lab Manage的SID生成工具 40 更改虚拟机模板的SID生成工具 40 选择虚拟机的SID生成工具 41 禁用客户机自定义 41 禁用虚拟机模板的客户机自定义 41 禁用虚拟机的客户机自定义 41 自定义客户机自定义 42 使用VMware Tools和LM Tools从LabManager2.x导入虚拟机模板 42 取消部署虚拟机模板 42 共享虚拟机模板 42 发布虚拟机模板 43 在发布虚拟机模板前检查VMwareTools状态 43 在发布虚拟机模板前禁用VMware Tools检查 43 发布虚拟机模板 44
13 管理网络模板 109
修改网络模板属性 109 更改网络模板的所有权 109 删除网络模板 110 监控虚拟网络的IP池使用情况 110 将IP地址添加到虚拟网络的IP池 110 从虚拟网络的IP池中移除IP地址 111
14 管理虚拟机模板 113
取消发布虚拟机模板 113 将虚拟机模板导出到SMB共享 114 将虚拟机模板导出到vCenter 114 整合虚拟机模板 115 放弃虚拟机模板的状态 115 修改虚拟机模板属性 115 修改虚拟机模板硬盘 117 向模板添加硬盘 117 编辑虚拟机模板硬盘 117 删除虚拟机模板硬盘 117 修改虚拟机模板网络接口 118 向虚拟机模板添加网络接口 118 编辑虚拟机网络接口 118 删除虚拟机模板的网络接口 119 重置虚拟机模板网络接口的MAC地址 升级虚拟硬件 119 更改虚拟机模板的所有权 119 删除虚拟机模板 120 强制删除虚拟机模板 120
LMS Virtual.Lab 9 10安装方法
LMS b R9 R10安装方法LMS b第9版和第10版发布之后,很多朋友在网上到处搜寻安装方法,很多只能找到原来8B甚至以前的安装方法。
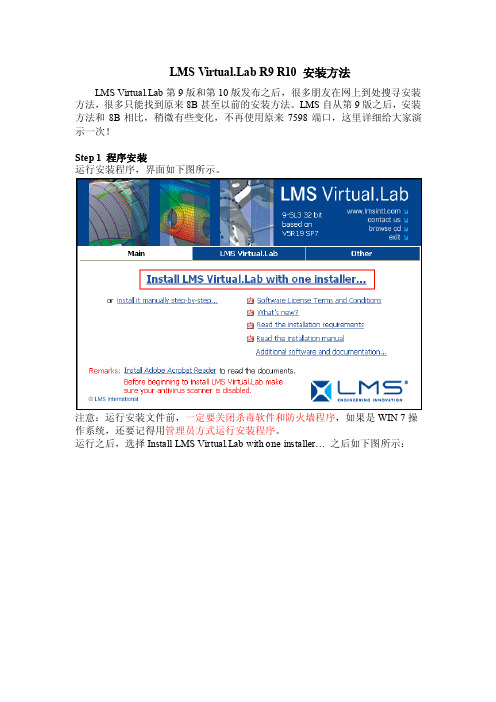
LMS自从第9版之后,安装方法和8B相比,稍微有些变化,不再使用原来7598端口,这里详细给大家演示一次!Step 1 程序安装运行安装程序,界面如下图所示。
注意:运行安装文件前,一定要关闭杀毒软件和防火墙程序,如果是WIN 7操作系统,还要记得用管理员方式运行安装程序。
运行之后,选择Install LMS b with one installer…之后如下图所示:点击Next之后弹出安装路径选择框,如图所示:这里注意:可以更改VL的安装盘符,但是千万不要更改安装路径,否则可能造成程序无法运行。
我这里选择安装在D盘。
然后点Next,如下图所示。
安装程序自动填写了本机的计算机名,此处不要更改!!!这个计算机名在后面证书中也要用到,可以在“我的电脑”中查看,如果有朋友不会查看,请记住此处的计算机名。
直接点击Next,如下图所示:这里询问是否安装LMS On-line help,这里面有很多帮助文档,还有部分计算算例,建议安装,选择Y es,然后点击Next,如下图所示:这里点击Install,然后就进入了程序的拷贝阶段,如下图所示:这个过程稍微有点长,安装成功后,弹出下对话框:点击Finish完成安装。
Step 2 证书配置首先,我声明一点,我这里演示的证书来源于网络,可以在很多地方下载到,我这里仅仅是作为一个演示,如果作为商业用途,请联系LMS公司购买正版软件,谢谢大家合作!找到license.dat文件,用记事本方式打开它,如下图所示:找到图中红线框中标注的位置,修改其中的localhost为你的计算机名,VENDOR 后面指定LMS_INTL.exe文件的位置,例如按照我上述安装方法,修改之后如图所示:注意:计算机名一定要正确,并且不要改计算机名后面的any。
Mellanox -ib驱动安装手册linux
Mellanox OFED for Linux Installation GuideRev 1.5.1Mellanox Technologies350 Oakmead Parkway, Suite 100Sunnyvale, CA 94085U.S.A.Tel: (408) 970-3400Fax: (408) 970-3403Mellanox Technologies, Ltd.PO Box 586 Hermon Building Yokneam 20692Israel Tel: +972-4-909-7200Fax: +972-4-959-3245© Copyright 2010. Mellanox Technologies, Inc. All Rights Reserved.Mellanox®, BridgeX®, ConnectX®, InfiniBlast®, InfiniBridge®, InfiniHost®, InfiniPCI®, InfiniRISC®, InfiniScale®, andVirtual Protocol Interconnect are registered trademarks of Mellanox Technologies, Ltd.CORE-Direct , FabricIT, and PhyX are trademarks of Mellanox Technologies, Ltd.All other marks and names mentioned herein may be trademarks of their respective companies.Document Number: 2914Rev 1.5.1Mellanox Technologies 2NOTE:THIS HARDWARE, SOFTWARE OR TEST SUITE PRODUCT (“PRODUCT(S)”) AND ITS RELATED DOCUMENTATION ARE PRO-VIDED BY MELLANOX TECHNOLOGIES “AS-IS” WITH ALL FAULTS OF ANY KIND AND SOLELY FOR THE PURPOSE OF AIDING THE CUSTOMER IN TESTING APPLICATIONS THAT USE THE PRODUCTS IN DESIGNATED SOLUTIONS. THE CUS-TOMER'S MANUFACTURING TEST ENVIRONMENT HAS NOT MET THE STANDARDS SET BY MELLANOX TECHNOLOGIES TO FULLY QUALIFY THE PRODUCTO(S) AND/OR THE SYSTEM USING IT. THEREFORE, MELLANOX TECHNOLOGIES CAN-NOT AND DOES NOT GUARANTEE OR WARRANT THAT THE PRODUCTS WILL OPERATE WITH THE HIGHEST QUALITY . ANY EXPRESS OR IMPLIED WARRANTIES, INCLUDING , BUT NOT LIMITED TO, THE IMPLIED WARRANTIES OF MER-CHANTABILITY , FITNESS FOR A PARTICULAR PURPOSE AND NONINFRINGEMENT ARE DISCLAIMED. IN NO EVENT SHALL MELLANOX BE LIABLE TO CUSTOMER OR ANY THIRD PARTIES FOR ANY DIRECT, INDIRECT, SPECIAL, EXEM-PLARY , OR CONSEQUENTIAL DAMAGES OF ANY KIND (INCLUDING , BUT NOT LIMITED TO, PAYMENT FOR PROCURE-MENT OF SUBSTITUTE GOODS OR SERVICES; LOSS OF USE, DATA, OR PROFITS; OR BUSINESS INTERRUPTION) HOWEVER CAUSED AND ON ANY THEORY OF LIABILITY , WHETHER IN CONTRACT, STRICT LIABILITY , OR TORT(INCLUDING NEGLIGENCE OR OTHERWISE) ARISING IN ANY WAY FROM THE USE OF THE PRODUCT(S) AND RELATED DOCUMENTATION EVEN IF ADVISED OF THE POSSIBILITY OF SUCH DAMAGE.Mellanox OFED for Linux User’s Manual Rev 1.5.1 InstallationThis chapter describes how to install and test the Mellanox OFED for Linux package on a singlehost machine with Mellanox InfiniBand and/or Ethernet adapter hardware installed. The chapterincludes the following sections:•“Hardware and Software Requirements” (page 3)•“Downloading Mellanox OFED” (page 4)•“Installing Mellanox OFED” (page 4)•“Uninstalling Mellanox OFED” (page 15)Hardware and Software RequirementsHardware RequirementsPlatforms• A server platform with an adapter card based on one of the following Mellanox Technologies’InfiniBand HCA devices:-MT25408 ConnectX®-2 (VPI, IB, EN, FCoE) (firmware: fw-ConnectX2)-MT25408 ConnectX® (VPI, IB, EN, FCoE) (firmware: fw-25408)-MT25208 InfiniHost® III Ex (firmware: fw-25218 for Mem-Free cards, and fw-25208 for cards withmemory)-MT25204 InfiniHost® III Lx (firmware: fw-25204)-MT23108 InfiniHost® (firmware: fw-23108)Note For the list of supported architecture platforms, please refer to the Mellanox OFEDRelease Notes file.Required Disk Space for Installation•400MBSoftware RequirementsOperating System•Linux operating systemNote For the list of supported operating system distributions and kernels, please refer to the Mellanox OFED Release Notes file.Installer Privileges•The installation requires administrator privileges on the target machineMellanox Technologies3Rev 1.5.1Mellanox Technologies 4Downloading Mellanox OFEDStep 1.Verify that the system has a Mellanox network adapter (HCA/NIC) installed by ensuringthat you can see ConnectX or InfiniHost entries in the display.The following example shows a system with an installed Mellanox HCA:host1# lspci -v | grep Mellanox02:00.0 InfiniBand: Mellanox Technologies MT25418 [ConnectX IB DDR, PCIe 2.0 2.5GT/s] (reva0)Step 2.Download the ISO image to your host.The image’s name has the format MLNX_OFED_LINUX-<ver>-<OS label>.iso. You candownload it from > Products > IB SW/Drivers.Step e the md5sum utility to confirm the file integrity of your ISO image. Run the followingcommand and compare the result to the value provided on the download page.host1$ md5sum MLNX_OFED_LINUX-<ver>-<OS label>.isoInstalling Mellanox OFEDThe installation script, mlnxofedinstall , performs the following:•Discovers the currently installed kernel•Uninstalls any software stacks that are part of the standard operating system distribution oranother vendor's commercial stack•Installs the MLNX_OFED_LINUX binary RPMs (if they are available for the current kernel)•Identifies the currently installed InfiniBand and Ethernet network adapters and automatically 1upgrades the firmwarePre-installation Notes•The installation script removes all previously installed Mellanox OFED packages and re-installsfrom scratch. You will be prompted to acknowledge the deletion of the old packages.Note Pre-existing configuration files will be saved with the extension “.conf.saverpm”.•If you need to install Mellanox OFED on an entire (homogeneous) cluster, a common strategy isto mount the ISO image on one of the cluster nodes and then copy it to a shared file system suchas NFS. To install on all the cluster nodes, use cluster-aware tools (such as pdsh).•If your kernel version does not match with any of the offered pre-built RPMs, you can add yourkernel version by using the “mlnx_add_kernel_support.sh ” script located under the docs/directory.Usage:mlnx_add_kernel_support.sh -i|--iso <mlnx iso>[-t|--tmpdir <local work dir>][-v|--verbose]1.The firmware will not be updated if you run the install script with the ‘--without-fw-update’ option.Mellanox OFED for Linux User’s Manual Rev 1.5.1 ExampleThe following command will create a MLNX_OFED_LINUX ISO image for RedHat 5.4 underthe/tmp directory.MLNX_OFED_LINUX-1.5.1-rhel5.4/docs/mlnx_add_kernel_support.sh -i/mnt/MLNX_OFED_LINUX-1.5.1-rhel5.4.isoAll Mellanox, OEM, OFED, or Distribution IB packages will be removed.Do you want to continue?[y/N]:yRemoving OFED RPMs...Running mkisofs...Created /tmp/MLNX_OFED_LINUX-1.5.1-rhel5.4.isoInstallation ScriptMellanox OFED includes an installation script called mlnxofedinstall. Its usage is describedbelow. You will use it during the installation procedure described in Section , “Installation Proce-dure,” on page 6.Usage./mlnxofedinstall [OPTIONS]Note If no options are provided to the script, then all available RPMs are installed.Options-c|--config <packages config_file>Example of the configuration file can be found under docs -n|--net <network config file>Example of the network configuration file can be foundunder docs-p|--print-available Print available packages for the current platform and cre-ate a corresponding ofed.conf file. The installation scriptexits after creating ofed.conf.--with-fc Install FCoE support — Available on RHEL5.2 ONLY--with-32bit Install 32-bit libraries (default). This is relevant forx86_64 and ppc64 platforms.--without-32bit Skip 32-bit libraries installation--without-ib-bonding Skip ib-bonding RPM installation--without-depcheck Skip Distro's libraries check--without-fw-update Skip firmware update--force-fw-update Force firmware update--force Force installation (without querying the user)--all Install all kernel modules, libibverbs, libibumad, librd-macm, mft, mstflint, diagnostic tools, OpenSM, ib-bonding,MVAPICH, Open MPI, MPI tests, MPI selector, perftest, sdp-netstat and libsdp srptools, rds-tools, static and dynamiclibrariesMellanox Technologies5Rev 1.5.1Mellanox Technologies6--hpc Install all kernel modules, libibverbs, libibumad, librd-macm, mft, mstflint, diagnostic tools, OpenSM , ib-bonding,MVAPICH, Open MPI, MPI tests, MPI selector, dynamic librar-ies--basic Install all kernel modules, libibverbs, libibumad, mft,mstflint, dynamic libraries--msmInstall all kernel modules, libibverbs, libibumad, mft,mstflint, diagnostic tools, OpenSM , ib-bonding, dynamiclibrariesNOTE: With --msm flag, the OpenSM daemon is configured torun upon boot.-v|-vv|-vvvSet verbosity level -q Set quiet - no messages will be printed mlnxofedinstall Return CodesTable 1 lists the mlnxofedinstall script return codes and their meanings.Installation ProcedureStep 1.Login to the installation machine as root.Step 2.Mount the ISO image on your machine host1# mount -o ro,loop MLNX_OFED_LINUX-<ver>-<OS label>.iso /mntNote After mounting the ISO image, /mnt will be a Read Only folder.Step 3.Run the installation scripthost1# /mnt/mlnxofedinstallThis program will install the MLNX_OFED_LINUX package on your machine.Note that all other Mellanox, OEM, OFED, or Distribution IB packages will be removed.Do you want to continue?[y/N]:yUninstalling the previous version of OFEDTable 1 - mlnxofedinstall Return CodesReturn CodeMeaning 0The Installation ended successfully 1The installation failed 2No firmware was found for the adapter device 3Failed to start the mst driverMellanox OFED for Linux User’s Manual Rev 1.5.1 Starting MLNX_OFED_LINUX-1.5.1-rc6 installation ...Installing kernel-ib RPMPreparing... ########################################### [100%]1:kernel-ib ########################################### [100%]Installing kernel-ib-devel RPMPreparing... ########################################### [100%]1:kernel-ib-devel ########################################### [100%]Installing mft RPMPreparing... ########################################### [100%]1:mft ########################################### [100%]Installing mpi-selector RPMPreparing... ########################################### [100%]1:mpi-selector ########################################### [100%]Install user level RPMs:Preparing... ########################################### [100%]1:libibumad ########################################### [100%]Preparing... ########################################### [100%]1:libibumad ########################################### [100%]Preparing... ########################################### [100%]1:libibmad ########################################### [100%]Preparing... ########################################### [100%]1:libibmad ########################################### [100%]Preparing... ########################################### [100%]1:libibumad-devel ########################################### [100%]Preparing... ########################################### [100%]1:libibumad-devel ########################################### [100%]Preparing... ########################################### [100%]1:libibmad-devel ########################################### [100%]Preparing... ########################################### [100%]1:libibmad-devel ########################################### [100%]Preparing... ########################################### [100%]1:ofed-scripts ########################################### [100%]Preparing... ########################################### [100%]1:libibverbs ########################################### [100%]Preparing... ########################################### [100%]1:libibverbs ########################################### [100%]Preparing... ########################################### [100%]1:libibverbs-devel ########################################### [100%]Preparing... ########################################### [100%]1:libibverbs-devel ########################################### [100%]Preparing... ########################################### [100%]1:libibverbs-devel-static########################################### [100%]Preparing... ########################################### [100%]1:libibverbs-devel-static########################################### [100%]Preparing... ########################################### [100%]1:libibverbs-utils ########################################### [100%]Preparing... ########################################### [100%]1:libmthca ########################################### [100%]Mellanox Technologies7Rev 1.5.1Mellanox Technologies8Preparing... ########################################### [100%]1:libmthca ########################################### [100%]Preparing... ########################################### [100%]1:libmthca-devel-static ########################################### [100%]Preparing... ########################################### [100%]1:libmthca-devel-static ########################################### [100%]Preparing... ########################################### [100%]1:libmlx4 ########################################### [100%]Preparing... ########################################### [100%]1:libmlx4 ########################################### [100%]Preparing... ########################################### [100%]1:libmlx4-devel ########################################### [100%]Preparing... ########################################### [100%]1:libmlx4-devel ########################################### [100%]Preparing... ########################################### [100%]1:libibcm ########################################### [100%]Preparing... ########################################### [100%]1:libibcm ########################################### [100%]Preparing... ########################################### [100%]1:libibcm-devel ########################################### [100%]Preparing... ########################################### [100%]1:libibcm-devel ########################################### [100%]Preparing... ########################################### [100%]1:libibumad-static ########################################### [100%]Preparing... ########################################### [100%]1:libibumad-static ########################################### [100%]Preparing... ########################################### [100%]1:libibmad-static ########################################### [100%]Preparing... ########################################### [100%]1:libibmad-static ########################################### [100%]Preparing... ########################################### [100%]1:ibsim ########################################### [100%]Preparing... ########################################### [100%]1:librdmacm ########################################### [100%]Preparing... ########################################### [100%]1:librdmacm ########################################### [100%]Preparing... ########################################### [100%]1:librdmacm-utils ########################################### [100%]Preparing... ########################################### [100%]1:librdmacm-devel ########################################### [100%]Preparing... ########################################### [100%]1:librdmacm-devel ########################################### [100%]Preparing... ########################################### [100%]1:libsdp ########################################### [100%]Preparing... ########################################### [100%]1:libsdp ########################################### [100%]Preparing... ########################################### [100%]1:libsdp-devel ########################################### [100%]Preparing... ########################################### [100%]1:libsdp-devel ########################################### [100%]Mellanox OFED for Linux User’s Manual Rev 1.5.1Preparing... ########################################### [100%]1:opensm-libs ########################################### [100%]Preparing... ########################################### [100%]1:opensm-libs ########################################### [100%]Preparing... ########################################### [100%]1:opensm ########################################### [100%]opensmd 0:off 1:off 2:off 3:off 4:off 5:off 6:offPreparing... ########################################### [100%]1:opensm-devel ########################################### [100%]Preparing... ########################################### [100%]1:opensm-devel ########################################### [100%]Preparing... ########################################### [100%]1:opensm-static ########################################### [100%]Preparing... ########################################### [100%]1:opensm-static ########################################### [100%]Preparing... ########################################### [100%]1:compat-dapl ########################################### [100%]Preparing... ########################################### [100%]1:compat-dapl ########################################### [100%]Preparing... ########################################### [100%]1:compat-dapl-devel ########################################### [100%]Preparing... ########################################### [100%]1:compat-dapl-devel ########################################### [100%]Preparing... ########################################### [100%]1:dapl ########################################### [100%]Preparing... ########################################### [100%]1:dapl ########################################### [100%]Preparing... ########################################### [100%]1:dapl-devel ########################################### [100%]Preparing... ########################################### [100%]1:dapl-devel ########################################### [100%]Preparing... ########################################### [100%]1:dapl-devel-static ########################################### [100%]Preparing... ########################################### [100%]1:dapl-devel-static ########################################### [100%]Preparing... ########################################### [100%]1:dapl-utils ########################################### [100%]Preparing... ########################################### [100%]1:perftest ########################################### [100%]Preparing... ########################################### [100%]1:mstflint ########################################### [100%]Preparing... ########################################### [100%]1:sdpnetstat ########################################### [100%]Preparing... ########################################### [100%]1:srptools ########################################### [100%]Preparing... ########################################### [100%]1:rds-tools ########################################### [100%]Preparing... ########################################### [100%]1:rnfs-utils ########################################### [100%]Preparing... ########################################### [100%]Mellanox Technologies9Rev 1.5.1Mellanox Technologies 10 1:ibutils ########################################### [100%]Preparing... ########################################### [100%]1:ibutils2 ########################################### [100%]Preparing... ########################################### [100%]1:ibdump ########################################### [100%]Preparing... ########################################### [100%]1:infiniband-diags ########################################### [100%]Preparing... ########################################### [100%]1:qperf ########################################### [100%]Preparing... ########################################### [100%]1:mlnxofed-docs ########################################### [100%]Preparing... ########################################### [100%]1:mvapich_gcc ########################################### [100%]Preparing... ########################################### [100%]1:mvapich_pgi ########################################### [100%]Preparing... ########################################### [100%]1:mvapich_intel ########################################### [100%]Preparing... ########################################### [100%]1:openmpi_gcc ########################################### [100%]Preparing... ########################################### [100%]1:openmpi_pgi ########################################### [100%]Preparing... ########################################### [100%]1:openmpi_intel ########################################### [100%]Preparing... ########################################### [100%]1:mpitests_mvapich_gcc ########################################### [100%]Preparing... ########################################### [100%]1:mpitests_mvapich_pgi ########################################### [100%]Preparing... ########################################### [100%]1:mpitests_mvapich_intel ########################################### [100%]Preparing... ########################################### [100%]1:mpitests_openmpi_gcc ########################################### [100%]Preparing... ########################################### [100%]1:mpitests_openmpi_pgi ########################################### [100%]Preparing... ########################################### [100%]1:mpitests_openmpi_intel ########################################### [100%]Device (15b3:634a):02:00.0 InfiniBand: Mellanox Technologies MT25418 [ConnectX IB DDR, PCIe 2.0 2.5GT/s] (rev a0)Link Width: 8xLink Speed: 2.5Gb/sInstallation finished successfully.Programming HCA firmware for /dev/mst/mt25418_pci_cr0 deviceRunning: mlxburn -d /dev/mst/mt25418_pci_cr0 -fw /tmp/MLNX_OFED_LINUX-1.5.1/MLNX_OFED_LINUX-1.5.1-sles11/firmware/fw-25408/2_7_000/fw-25408-rel.mlx -dev_type 25408 -no-I- Querying device ...-I- Using auto detected configuration file: /tmp/MLNX_OFED_LINUX-1.5.1/MLNX_OFED_LINUX-1.5.1-sles11/firmware/fw-25408/2_7_000/MHGH28-XTC_A4-A7.ini (PSID = MT_04A0140005)-I- Generating image ...Current FW version on flash: 2.6.0New FW version: 2.7.0Burning FW image without signatures - OKRestoring signature - OK-I- Image burn completed successfully.Please reboot your system for the changes to take effect.warning: /etc/infiniband/openib.conf saved as /etc/infiniband/openib.conf.rpmsaveNote In case your machine has the latest firmware, no firmware update will occur and the installation script will print at the end of installation a message similar to the following:...Installation finished successfully.The firmware version 2.7.000 is up to date.Note: To force firmware update use '--force-fw-update' flag.Note In case your machine has an unsupported network adapter device, no firmware update will occur and the error message below will be printed. Please contact your hardwarevendor for help on firmware updates.Error message:-I- Querying device ...-E- Can't auto detect fw configuration file: ...Step 4.In case the installation script performed firmware updates to your network adapter hard-ware, it will ask you to reboot your machine.Step 5.The script adds the following lines to /etc/security/limits.conf for the userspace components such as MPI:* soft memlock unlimited* hard memlock unlimitedThese settings unlimit the amount of memory that can be pinned by a user space application.If desired, tune the value unlimited to a specific amount of RAM.Step 6.For your machine to be part of the InfiniBand/VPI fabric, a Subnet Manager must be run-ning on one of the fabric nodes. At this point, Mellanox OFED for Linux has alreadyinstalled the OpenSM Subnet Manager on your machine. For details on starting OpenSM,see Chapter 12, “OpenSM – Subnet Manager”.Step 7.(InfiniBand only) Run the hca_self_test.ofed utility to verify whether or not the InfiniBand link is up. The utility also checks for and displays additional information suchas•HCA firmware version•Kernel architecture•Driver version•Number of active HCA ports along with their states•Node GUIDNote For more details on hca_self_test.ofed, see the file hca_self_test.readme under docs/.host1# /usr/bin/hca_self_test.ofed---- Performing InfiniBand HCA Self Test ----Number of HCAs Detected (1)PCI Device Check ....................... PASSKernel Arch ............................ x86_64Host Driver Version .................... MLNX_OFED_LINUX-1.5.1 (OFED-1.5.1-mlnx9) 1.5.1-2.6.9_89.ELlargesmpHost Driver RPM Check .................. PASSHCA Firmware on HCA #0 ................. 2.7.000HCA Firmware Check on HCA #0 ........... PASSHost Driver Initialization ............. PASSNumber of HCA Ports Active 0Port State of Port #0 on HCA #0 ........ INITPort State of Port #0 on HCA #0 ........ DOWNError Counter Check on HCA #0 .......... PASSKernel Syslog Check .................... PASSNode GUID on HCA #0 .................... 00:02:c9:03:00:00:10:e0------------------ DONE ---------------------Note After the installer completes, information about the Mellanox OFED installation such as prefix, kernel version, and installation parameters can be retrieved by running the com-mand /etc/infiniband/info.Installation ResultsSoftware•The OFED and MFT packages are installed under the /usr directory.•The kernel modules are installed under:-InfiniBand subsystem:/lib/modules/`uname -r`/updates/kernel/drivers/infiniband/-mlx4 driver:Under /lib/modules/`uname -r`/updates/kernel/drivers/net/mlx4you will find mlx4_core.ko, mlx4_en.ko, mlx4_ib.ko (and mlx4_fc ifyou ran the installation script with --with-fc)-RDS:/lib/modules/`uname -r`/updates/kernel/net/rds/rds.ko-Bonding module:/lib/modules/`uname -r`/updates/kernel/drivers/net/bonding/bonding.ko •The package kernel-ib-devel include files are placed under /usr/src/ofa_kernel/include/. These include files should be used when building kernel modules that use the stack. (Note that the include files, if needed, are “backported” to your kernel.)•The raw package (un-backported) source files are placed under/usr/src/ofa_kernel-<ver>•The script openibd is installed under /etc/init.d/. This script can be used to load and unload the software stack.•The script connectx_port_config is installed under /sbin. This script can be used to con-figure the ports of ConnectX network adapter cards to Ethernet and/or InfiniBand. For details on this script, please see Section 3.1, “Port Type Management”.•The directory /etc/infiniband is created with the files info and openib.conf and con-nectx.conf. The info script can be used to retrieve Mellanox OFED installation information. The openib.conf file contains the list of modules that are loaded when the openibd script is used. The connectx.conf file saves the ConnectX adapter card’s ports configuration to Ether-net and/or InfiniBand. This file is used at driver start/restart (/etc/init.d/openibd start) .•The file 90-ib.rules is installed under /etc/udev/rules.d/•If OpenSM is installed, the daemon opensmd is installed under /etc/init.d/ and opensm.conf is installed under /etc.•If IPoIB configuration files are included, ifcfg-ib<n> files will be installed under:-/etc/sysconfig/network-scripts/ on a RedHat machine-/etc/sysconfig/network/ on a SuSE machine•The installation process unlimits the amount of memory that can be pinned by a user space application. See Step 5.•Man pages will be installed under /usr/share/man/Firmware•The firmware of existing network adapter devices will be updated if the following two condi-tions are fullfilled:1. You run the installation script in default mode; that is, without the option‘--without-fw-update’.2. The firmware version of the adapter device is older than the firmware version includedwiththe Mellanox OFED ISO imageNote If an adapter’s Flash was originially programmed with an Expansion ROM image, the automatic firmware update will also burn an Expansion ROM image.•In case your machine has an unsupported network adapter device, no firmware update will occur and the error message below will be printed. Please contact your hardware vendor for help on firmware updates.Error message:。
OracleBIEE高可用性配置指南
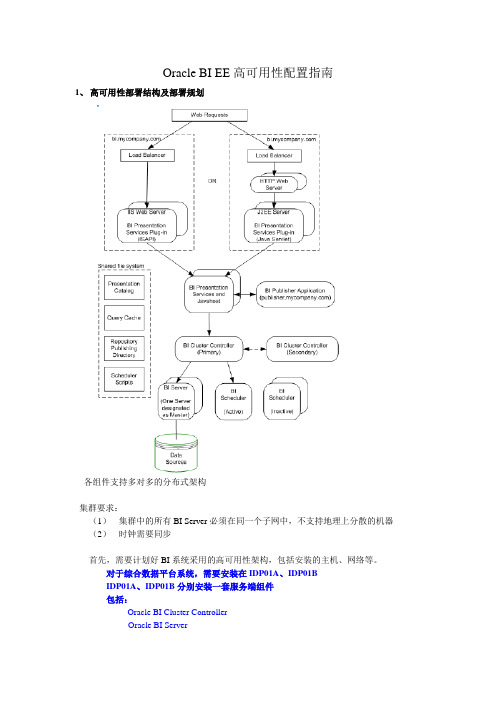
Oracle BI EE高可用性配置指南1、高可用性部署结构及部署规划各组件支持多对多的分布式架构集群要求:(1)集群中的所有BI Server必须在同一个子网中,不支持地理上分散的机器(2)时钟需要同步首先,需要计划好BI系统采用的高可用性架构,包括安装的主机、网络等。
对于综合数据平台系统,需要安装在IDP01A、IDP01BIDP01A、IDP01B分别安装一套服务端组件包括:Oracle BI Cluster ControllerOracle BI ServerOracle BI SchedulerOracle BI Presentation Services and Oracle BI JavahostOracle BI Presentation Services Plug-in客户端工具安装在维护工作站YD03A上2、安装BI组件(1)BI Client T ools安装,只能安装在Windows上用安装程序,选择基本安装类型,选择安装Oracle Business IntelligenceClient Tools.基本安装包括:Oracle Business Intelligence ODBC DriverOracle Business Intelligence JDBC DriverOracle Business Intelligence Administration ToolOracle Business Intelligence ClientOracle Business Intelligence Catalog ManagerOracle Business Intelligence Job Manager(2)安装Oracle BI Cluster Controller在两台机器上各安装一个Oracle BI Cluster Controller的实例,一个作为主控制器,一个作为辅控制器选择高级安装类型选择自定义类型选择Oracle BI Cluster Controller(对于同机安装的情况,也可以同时选择Oracle BI Server、Oracle BIScheduler等组件)对于Windows 安装,需要用域账号(3)安装Oracle BI Server在需要运行Oracle BI Server的机器上安装Oracle BI Server实例,最多允许16个实例参与到集群中。
- 1、下载文档前请自行甄别文档内容的完整性,平台不提供额外的编辑、内容补充、找答案等附加服务。
- 2、"仅部分预览"的文档,不可在线预览部分如存在完整性等问题,可反馈申请退款(可完整预览的文档不适用该条件!)。
- 3、如文档侵犯您的权益,请联系客服反馈,我们会尽快为您处理(人工客服工作时间:9:00-18:30)。
Wd^͗ K / ϭϭŐ &ŽƵŶĚĂƚŝŽŶ tŽƌŬƐŚŽƉ WĂŐĞ ͮ ϱ/DE 376 2%,(( J )RXQGDWLRQ :RUNVKRS 6HWXS5HFRPPHQGHG 3HUIRUPDQFH 6HWWLQJ IRU +RVW 6\VWHP0LQLPXP 6\VWHP 5HTXLUHPHQWV*% +DUG GLVN VSDFH \RX FDQ OHYHUDJH \RXU H[WHUQDO GULYH LI \RX ZLVK0LQLPXP *% 5$0 90 QHHGV DERXW *% 5$0$GPLQLVWUDWLYH SULYLOHJHV WR \RXU ZLQGRZV HQYLURQPHQW8VH WKLV JXLGH WR RSWLPL]H \RXU HQYLURQPHQW IRU SHUIRUPDQFH ZLWK 90(QDEOH &38 9LUWXDOL]DWLRQ 0RGH9HULI\ 8SGDWH 9LUWXDO PHPRU\ IRU WKH V\VWHP,QVWDOO 2UDFOH 9LUWXDO %R[ 90 7RRO,PSRUW 376 %, J :RUNVKRS LPDJH LQWR 9LUWXDO %R[,QVWDOO 2UDFOH %, J &OLHQW 7RRO RQ ZLQGRZV3ODFH DOO WKH ]LS ILOHV IRU WKH WR D VDPH IROGHU IRU H[DPSOH & ?376%,?/HW XV ILUVW WXQH WKH V\VWHP IRU SHUIRUPDQFH 5LJKW FOLFN RQ &RPSXWHU RU 0\&RPSXWHU IURP GHVNWRS RU IURP 3URJUDP )LOHV PHQX DQG VHOHFW SURSHUWLHV %DVHG RQ\RXU ZLQGRZV YHUVLRQ SURSHUWLHV ZLQGRZ PD\ ORRN GLIIHUHQW 6HOHFW $GYDQFHG VHWWLQJ RSWLRQ RU WDEWd^͗ K / ϭϭŐ &ŽƵŶĚĂƚŝŽŶ tŽƌŬƐŚŽƉ WĂŐĞ ͮ ϲ6HOHFW 6HWWLQJV IRU 3HUIRUPDQFH6HOHFW $GMXVW IRU EHVW SHUIRUPDQFH 7KHQ 6HOHFW $GYDQFHG 7DE2Q $GYDQFHG 7DE PDNH VXUH SURJUDPV UDGLR EXWWRQ LV VHOHFWHG IRU EHVW SHUIRUPDQFH &OLFN &KDQJH EXWWRQ IRU 9LUWXDO 0HPRU\Wd^͗ K / ϭϭŐ &ŽƵŶĚĂƚŝŽŶ tŽƌŬƐŚŽƉ WĂŐĞ ͮ ϳ6HOHFW &XVWRP VL]H RSWLRQ DQG PDNH LQLWLDO VL]H DW OHDVW 0% DQG 0D[ VL]H DW OHDVW 0% 0DNH VXUH \RX KDYH VSDFH DYDLODEOH WR GHGLFDWH WR YLUWXDO PHPRU\&OLFN 2N DOO WKH ZD\ WR VDYH WKH FKDQJHV DQG FORVH 6\VWHP 6HWWLQJV ZLQGRZ )RU WKH PRVW SDUW DQ\ QHZHU SURFHVVRU ZLWK PRUH WKDQ RQH FRUH VKRXOG EH FDSDEOH RI UXQQLQJ YLUWXDOL]DWLRQ VRIWZDUH 6RPH H[DPSOHV RI SURFHVVRUV WKDW VKRXOG VXSSRUW YLUWXDOL]DWLRQ DUH &RUH 'XR &RUH 4XDG ,QWHO &RUH L L L $0' $WKORQ ; $0' $WKORQ ; DQG $0' 3KHQRP ; 6HWXS 5HI +HOSGHVNJHHN7R YHULI\ LI &38 9LUWXDOL]DWLRQ LV HQDEOHG RU QRW UHVWDUW \RXU PDFKLQH DQG SUHVV ) RU ) GHSHQGV RQ ZKDW NH\ LV VHW XS IRU V\VWHP FRQILJXUDWLRQ GXULQJ ERRW XS WLPH 0DNH VXUH WR SUHVV WKDW UHOHYDQW NH\ ZKLOH UHVWDUWLQJ XS WR JR WR %,26 VHW XS ([DPSOH EHORZ VKRZV 'HOO V\VWHPWd^͗ K / ϭϭŐ &ŽƵŶĚĂƚŝŽŶ tŽƌŬƐŚŽƉWĂŐĞ ͮ ϴ2QFH \RX FOLFN ) RU ) \RX ZLOO EH SUHVHQWHG ZLWK %,26 VHW XS 6HOHFW VWDQGDUG&026 RU $GYDQFHG %,26 IHDWXUH ZKLFK HYHQ VKRZV \RX YLUWXDOL]DWLRQ RSWLRQWd^͗ K / ϭϭŐ &ŽƵŶĚĂƚŝŽŶ tŽƌŬƐŚŽƉ WĂŐĞ ͮ ϵ0DNH VXUH WR HQDEOH 9LUWXDOL]DWLRQ 7HFKQRORJ\ DQG WKHQ SUHVV ) WR 6DYH ([LW IURP%,26 VHW XS:RUNVKRS (QYLURQPHQW 6HWXS ZLWK 9LUWXDO %R[5LJKW FOLFN RQ ILUVW ]LSILOH DQG VHOHFW ([WUDFW $OO 7KH ]LS ILOHV DUH VHW XS WR H[WUDFW WKH HQWLUH ]LS ILOH VHW E\ MXVW H[WUDFWLQJ WKH ILUVW RQH 2QFH \RX H[WUDFW WKH ]LSILOH GLUHFWRU\VWUXFWXUH ZRXOG KDYH 376%, IROGHU ZLWK WKUHH VXEIROGHUV/DE IROGHU FRQWDLQV ODE ERRN IRU WKH ZRUNVKRS 6RIWZDUH IROGHU FRQWDLQV YLUWXDO ER[ DQG 2%,(( J FOLHQW WRRO LQVWDOOHU DQG 90 IROGHU FRQWDLQV YLUWXDO LPDJH ILOH /HW XV ILUVW VWDUW ZLWK ,QVWDOOLQJ 9LUWXDO %R[,I \RX KDYH QRW GRZQORDGHG DQG LQVWDOO 9LUWXDO %R[ DOUHDG\ \RX FDQ XVH LQVWDOOHU IURP VRIWZDUH GLUHFWRU\ 9LUWXDO %R[ ŚƚƚƉ͗ͬͬǁǁǁ͘ǀŝƌƚƵĂůďŽdž͘ŽƌŐͬǁŝŬŝͬ ŽǁŶůŽĂĚƐWd^͗ K / ϭϭŐ &ŽƵŶĚĂƚŝŽŶ tŽƌŬƐŚŽƉWĂŐĞ ͮ ϭϬ'RXEOH FOLFN RQ 9LUWXDO%R[ :LQ H[H WR VWDUW LQVWDOODWLRQ&OLFN 1H[W WR FRQWLQXHWd^͗ K / ϭϭŐ &ŽƵŶĚĂƚŝŽŶ tŽƌŬƐŚŽƉWĂŐĞ ͮ ϭϭ/HDYH WKH GHIDXOW RQ 6HWXS VFUHHQ DQG &OLFN 1H[W<RX PD\ FKRRVH WR FUHDWH VKRUWFXWV DQG &OLFN 1H[W WR &RQWLQXHWd^͗ K / ϭϭŐ &ŽƵŶĚĂƚŝŽŶ tŽƌŬƐŚŽƉWĂŐĞ ͮ ϭϮ&OLFN <HV DQG FRQWLQXH DQG WKHQ &OLFN RQ ,QVWDOO WR VWDUW LQVWDOODWLRQ SURFHVV ,I \RX DUH SURPSWHG IRU :LQGRZV /RJR WHVWLQJ ZDUQLQJ LJQRUH LW DQG FOLFN &RQWLQXH2QFH LQVWDOODWLRQ SURFHVV FRPSOHWHV VHOHFW RSWLRQ WR VWDUW 90 DQG FOLFN )LQLVKWd^͗ K / ϭϭŐ &ŽƵŶĚĂƚŝŽŶ tŽƌŬƐŚŽƉ WĂŐĞ ͮ ϭϯ)URP ILOH PHQX RI 90 9LUWXDO%R[ 0DQDJHU VHOHFW ,PSRUW $SSOLDQFH RSWLRQ6HOHFW 376B:RUNVKRSB%, J RYD ILOH IURP \RXU 90 IROGHU RI XQ]LSSHG GLUHFWRU\ &OLFN2SHQWd^͗ K / ϭϭŐ &ŽƵŶĚĂƚŝŽŶ tŽƌŬƐŚŽƉ WĂŐĞ ͮ ϭϰ&OLFN 1H[W WR &RQWLQXH ,I \RX DUH SURPSWHG WR DJUHH RQ 90 SROLF\ UHDG WKH LQIRUPDWLRQ DQG FOLFN $JUHH WR FRQWLQXH2Q $SSOLDQFH ,PSRUW 6HWWLQJ PDNH VXUH WR KDYH DW OHDVW 0% 5$0 LV VHW ,I \RX KDYH PRUH WKDQ *% 5$0 RQ \RXU KRVW V\VWHP \RX PD\ DOVR FKRRVH WR DOORFDWH0% 5$0$OVR VFUROO GRZQ DQG PDNH VXUH WKDW 9LUWXDO 'LVN ,PDJH ORFDWLRQ KDYH DW OHDVW *% GLVN VSDFH DYDLODEOH <RX PD\ FKRRVH WR FKDQJH WKLV ORFDWLRQ WR RWKHU WKDQ GHIDXOW GLUHFWRU\ RU WR DQ H[WHUQDO GULYH IRU HQRXJK VSDFH IRU 90 ILOH &OLFN )LQLVKWd^͗ K / ϭϭŐ &ŽƵŶĚĂƚŝŽŶ tŽƌŬƐŚŽƉ WĂŐĞ ͮ ϭϱ9LUWXDO PDFKLQH DOVR KDYH VKDUHG GLUHFWRU\ VHW XS ZLWK F ?WPS \RX PD\ FKRRVH WRFUHDWH WPS GLU LI QRW DYDLODEOH 7KLV LV RSWLRQDO DV ZH ZLOO QRW QHHG WKH VKDUHG IROGHU IRUODE SXUSRVH2QFH LPSRUW ILQLVKHV 90 0DQDJHU ZLOO VKRZ LPSRUWHG DSSOLDQFH DQG LWV SURSHUWLHVWd^͗ K / ϭϭŐ &ŽƵŶĚĂƚŝŽŶ tŽƌŬƐŚŽƉ WĂŐĞ ͮ ϭϲ9HULI\ 9LUWXDO %R[ $SSOLDQFH ,PDJH DQG ,QVWDOO 2%,(( &OLHQW 7RRO&OLFN RQ JUHHQ DUURZ ± 6WDUW EXWWRQ WR ODXQFK YLUWXDO PDFKLQH HQYLURQPHQW 2XU 9LUWXDO 0DFKLQH LV EDVHG RQ 2UDFOH (QWHUSULVH /LQX[ HQYLURQPHQW :H ZLOO H[SODLQ PRUH DERXW HQYLURQPHQW VRRQWd^͗ K / ϭϭŐ &ŽƵŶĚĂƚŝŽŶ tŽƌŬƐŚŽƉ WĂŐĞ ͮ ϭϳ(QWHU µRUDFOH¶ DV XVHUQDPH DQG µRUDFOH¶ DV D SDVVZRUG WR ORJ LQWR /LQX[ HQYLURQPHQW9LUWXDO %R[ LPDJH IRU 2%,(( J ZRUNVKRS LV IXOO\ FRQILJXUHG DQG HDV\ WR XVH LPDJH )ROORZLQJ LV JHQHUDO LQIRUPDWLRQ RQ WKH GHVNWRS VFUHHQ RQ WKH /LQX[ HQYLURQPHQW *HW IDPLOLDU ZLWK 7RRO EDU DQG LFRQV IRU HDV\ DFFHVV WR WHUPLQDOWd^͗ K / ϭϭŐ &ŽƵŶĚĂƚŝŽŶ tŽƌŬƐŚŽƉ WĂŐĞ ͮ ϭϴ7KHUH LV DOVR VKXWGRZQ WRRO LFRQWd^͗ K / ϭϭŐ &ŽƵŶĚĂƚŝŽŶ tŽƌŬƐŚŽƉWĂŐĞ ͮ ϭϵ,Q VTO SURPSW W\SH VWDUWXS RQFH GDWDEDVH VWDUWHG W\SH H[LW,Q D VDPH WHUPLQDO ZLQGRZ QRZ ZH ZLOO VWDUW ZHEORJLF QRGH PDQDJHU ZKLFK LV D GDHPRQ SURFHVV WR PDQDJH VWDUW VWRS RI ZHEORJLF GRPDLQVWd^͗ K / ϭϭŐ &ŽƵŶĚĂƚŝŽŶ tŽƌŬƐŚŽƉ WĂŐĞ ͮ ϮϬ9HULI\ WKDW QRGH PDQDJHU VWDUWHG ILQH$Q\ :/6 SURFHVVHV ZH VWDUW GR QRW FORVH WKDW WHUPLQDO ZLQGRZ DQG RSHQ QHZ RQH LI \RX QHHG WR QHHG WHUPLQDO ZLQGRZ 0LQLPL]H QRGH PDQDJHU SURFHVV ZLQGRZ DQG RSHQ QHZ RQH WR VWDUW ZHEORJLF VHUYHU7\SH LQ FRPPDQG LQ QHZ WHUPLQDO VWDUW:/6:KHQ DVNHG IRU XVHU QDPH W\SH ZHEORJLF DQG SDVVZRUG $GPLQ:HEORJLF LV DGPLQLVWUDWLYH XVHU ZKLFK WKH XVHU ZH ZLOO XVH IRU PRVW RI WKH DFWLYLWLHV IRU RXU ZRUNVKRS $OO WKH SDVVZRUGV ZLWKLQ %, HQYLURQPHQW LV $GPLQWd^͗ K / ϭϭŐ &ŽƵŶĚĂƚŝŽŶ tŽƌŬƐŚŽƉ WĂŐĞ ͮ Ϯϭ:DLW IRU VHUYHU VWDWXV WR EH VWDUWHG LQ UXQQLQJ PRGH0LQLPL]H ZHEORJLF VHUYHU WHUPLQDO ZLQGRZ DQG RSHQ QHZ WHUPLQDO ZLQGRZ WR VWDUW %, GRPDLQ VHUYHU,Q QHZ WHUPLQDO ZLQGRZ W\SH VWDUW%,6HUYHU:KHQ SURPSWHG W\SH XVHUQDPH ZHEORJLF DQG SDVVZRUG $GPLQWd^͗ K / ϭϭŐ &ŽƵŶĚĂƚŝŽŶ tŽƌŬƐŚŽƉWĂŐĞ ͮ ϮϮ:DLW WLOO \RX VHH %, VHUYHU VWDUWHG LQ UXQQLQJ PRGH2QFH ERWK GRPDLQV DUH UXQQLQJ ZHEORJLF DGPLQ GRPDLQ DQG %, VHUYHU GRPDLQ ZH FDQ VWDUW FRUH %, V\VWHP VHUYLFHV OLNH SUHVHQWDWLRQ VHUYHU :H ZLOO GLVFXVV PRUH DERXW DOO WKH VHUYHUV DQG VHUYLFHV ODWHU LQ WKH VHVVLRQ0LQLPL]H %, VHUYHU WHUPLQDO DQG RSHQ QHZ WHUPLQDO ZLQGRZ WR VWDUW %, V\VWHPVHUYLFHV 7\SH RSPQ6WDUWDOOWd^͗ K / ϭϭŐ &ŽƵŶĚĂƚŝŽŶ tŽƌŬƐŚŽƉ WĂŐĞ ͮ Ϯϯ2QFH RSPQ6WDUWDOO FRPPDQG FRPSOHWHV \RX FDQ XVH FRPPDQG RSPQ6WDWXV WR YHULI\LI DOO WKH %, V\VWHP VHUYLFHV DUH VWDUWHG0LQLPL]H WKH WHUPLQDO ZLQGRZ1RZ OHW XV YHULI\ %, LQVWDQFH UXQQLQJ ZLWKLQ 90 LPDJH DQG LQVWDOO 2%,(( J FOLHQW WRRO RQ ZLQGRZV KRVW PDFKLQH 2SHQ XS D EURZVHU LQ 90 LPDJH RU RQ \RXUZLQGRZV PDFKLQH )URP 90 LPDJH \RX FDQ XVH %RRNPDUN WR JR WR %, $QDO\WLFV XUOWd^͗ K / ϭϭŐ &ŽƵŶĚĂƚŝŽŶ tŽƌŬƐŚŽƉWĂŐĞ ͮ Ϯϰ<RX FDQ DOVR XVH EURZVHU IURP \RXU KRVW ZLQGRZV PDFKLQH DQG W\SH LQ WKH IROORZLQJ XUO KWWS ORFDOKRVW DQDO\WLFV<RXU 90 LV DXWR FRQILJXUHG WR ZRUN ZLWK KRVW ZLQGRZV V\VWHP MXVW OLNH \RX ZRXOG KDYH LQVWDOOHG DOO WKH FRPSRQHQWV OLNH GDWDEDVH DQG %, HQYLURQPHQW RQ ORFDOKRVW/DXQFKLQJ EURZVHU DQG YLVLWLQJ DQDO\WLFV XUO ZLOO EULQJ %, $QDO\WLFV ORJLQ SDJH 7\SH LQ 8VHUQDPH ZHEORJLF 3DVVZRUG $GPLQ2QFH ORJLQ GHIDXOW LQGH[ GDVKERDUG SDJH LV VKRZQ 7KLV LV 6DPSOH $SSOLFDWLRQ ZLWK SUH EXLOG H[DPSOH WR KHOS \RX OHDUQ PRUH DERXW 2%,(( J IHDWXUHV<RX PD\ FKRRVH WR FOLFN RQ YDULRXV OLQNV RQ WKH LQGH[ SDJH WR TXLFNO\ UHYLHZ 2%,(( SUHVHQWDWLRQ HQYLURQPHQW/RJRXW IURP WKH GDVKERDUG DQG FORVH WKH EURZVHU :H ZLOO QRZ LQVWDOO 2%,(( J FOLHQW WRRO RQ ZLQGRZV KRVW PDFKLQH &OLHQW WRRO LV D %, $GPLQ 7RRO ZKLFK DOORZ XV WR EXLOG DQG PRGLI\ LQIRUPDWLRQ PRGHO DQG SUHVHQWDWLRQ REMHFWV :H ZLOO JR WKURXJK $GPLQ 7RRO LQ JUHDW GHWDLO ZLWK KDQGV RQ ODEV ODWHU LQ WKH VHVVLRQ1RWH 90 ,PDJH FRQWDLQV VROXWLRQ WR DOO WKH ODEV XQGHU FDWDORJ IROGHU FDOOHG µ6ROXWLRQ IRU 376 )RXQGDWLRQ :RUNVKRS¶ DQG DOVR ZLWKLQ USG IRU PRGHOLQJ VROXWLRQWd^͗ K / ϭϭŐ &ŽƵŶĚĂƚŝŽŶ tŽƌŬƐŚŽƉWĂŐĞ ͮ ϮϱWd^͗ K / ϭϭŐ &ŽƵŶĚĂƚŝŽŶ tŽƌŬƐŚŽƉ WĂŐĞ ͮ Ϯϲ<RX VKRXOG GRZQORDG 2%,(( J FOLHQW LQVWDOOHU IURP 271 XVLQJ IROORZLQJ XUOŚƚƚƉ͗ͬͬǁǁǁ͘ŽƌĂĐůĞ͘ĐŽŵͬƚĞĐŚŶĞƚǁŽƌŬͬŵŝĚĚůĞǁĂƌĞͬďŝͲĞŶƚĞƌƉƌŝƐĞͲĞĚŝƚŝŽŶͬĚŽǁŶůŽĂĚƐͬďƵƐͲŝŶƚĞůůŝŐĞŶĐĞͲϭϭŐͲϭϲϱϰϯϲ͘Śƚŵů<RX FDQ XVH %, FOLHQW LQVWDOOHU IURP VRIWZDUH GLUHFWRU\ IURP 376%, XQ]LSSHG IROGHU 8Q]LS ELHHB BFOLHQWBLQVWDOO H[H ]LS DQG WKHQ GRXEOH FOLFN RQ RELHHBFOLHQWBLQVWDOO H[HFXWDEOHWd^͗ K / ϭϭŐ &ŽƵŶĚĂƚŝŽŶ tŽƌŬƐŚŽƉ WĂŐĞ ͮ Ϯϳ&OLFN 1H[W WR FRQWLQXH.HHS WKH GHIDXOW LQVWDOODWLRQ IROGHU DQG FOLFN 1H[W.HHS WKH GHIDXOW IRU WKH LFRQ SURJUDP JURXS FOLFN 1H[WWd^͗ K / ϭϭŐ &ŽƵŶĚĂƚŝŽŶ tŽƌŬƐŚŽƉ WĂŐĞ ͮ Ϯϴ&OLFN ,QVWDOO WR VWDUW WKH SURFHVVWd^͗ K / ϭϭŐ &ŽƵŶĚĂƚŝŽŶ tŽƌŬƐŚŽƉWĂŐĞ ͮ Ϯϵ<RX PLJKW JHW SRSXS WR $FFHSW LQVWDOODWLRQ RI 9LVXDO & UXQWLPH LI VR FOLFN 2N DQGFRQWLQXH1RWH :KHQ LQVWDOODWLRQ ILQLVKHV FOLFN GRQH %, &OLHQW LQVWDOOHU ZLOO DXWRPDWLFDOO\ ODXQFK 2'%& 'DWD 6RXUFH $GPLQLVWUDWRU ZLQGRZ :H QHHG WR FUHDWH 6\VWHP '61 IRU $GPLQ 7RRO WR FRQQHFW WR RXU %, VHUYHU RQ 90 ,QVWDQFH IRU UXQWLPH DFFHVV WR UHSRVLWRU\Wd^͗ K / ϭϭŐ &ŽƵŶĚĂƚŝŽŶ tŽƌŬƐŚŽƉWĂŐĞ ͮ ϯϬ2Q 6\VWHP '61 WDE FOLFN $GG0DNH VXUH WR VHOHFW 2UDFOH %, 6HUYHU GULYHU IURP WKH OLVWWd^͗ K / ϭϭŐ &ŽƵŶĚĂƚŝŽŶ tŽƌŬƐŚŽƉWĂŐĞ ͮ ϯϭ7\SH 376B:RUNVKRSB90 DV D QDPH DQG W\SH ORFDOKRVW IRU VHUYHU QDPH &OLFN 1H[W7\SH ZHEORJLF DV D /RJLQ ,G DQG $GPLQ DV D 3DVVZRUG .HHS SRUW WR DV LW LVGHIDXOW SRUW DQG FOLFN 1H[WWd^͗ K / ϭϭŐ &ŽƵŶĚĂƚŝŽŶ tŽƌŬƐŚŽƉWĂŐĞ ͮ ϯϮ/HDYH GHIDXOW VHWXS IRU &RQILJXUDWLRQ DQG &OLFN )LQLVK1HZ 6\VWHP '61 LV GLVSOD\HG LQ 2'%& 'DWD 6RXUFH $GPLQLVWUDWRU &OLFN 2N7KLV FRPSOHWHV RXU ZRUNVKRS HQYLURQPHQW VHWXSWd^͗ K / ϭϭŐ &ŽƵŶĚĂƚŝŽŶ tŽƌŬƐŚŽƉWĂŐĞ ͮ ϯϯ:KDW LV RQ WKH :RUNVKRS (QYLURQPHQW 90 ,PDJH1RWH 90 ,PDJH FRQWDLQV VROXWLRQ WR DOO WKH ODEV XQGHU FDWDORJ IROGHU FDOOHG µ6ROXWLRQ IRU 376 )RXQGDWLRQ :RUNVKRS¶ DQG DOVR ZLWKLQ USG IRU PRGHOLQJ VROXWLRQ2UDFOH %XVLQHVV ,QWHOOLJHQFH J FRPHV ZLWK DGYDQFHPHQW LQ ULFK XVHU LQWHUIDFH DV ZHOO DV LQIUDVWUXFWXUH FRPSRQHQWV WR IXUWKHU HQKDQFH V\VWHP SHUIRUPDQFH DQG GHSOR\PHQW RSWLRQV )ROORZLQJ LV KLJK OHYHO DUFKLWHFWXUH WKDW LV GHSOR\HG LQ RXUZRUNVKRS 90 LPDJH2UDFOH %, J +LJK /HYHO $UFKLWHFWXUH2UDFOH %, 'RPDLQ:HE/RJLF 'RPDLQ 2UDFOH %, 6\VWHP &RPSRQHQWV6XSSRUWLQJ 'DWDEDVH 6FKHPDV &UHDWHG E\ 5&8$GPLQ 6HUYHU0DQDJHG 6HUYHU1RGH 0DQDJHU$GPLQ &RQVROH (QWHUSULVH 0JU$FWLRQ 6HUYLFH:HE 6HUYLFH 62$%, 2IILFH %, 3XEOLVKHU %, 3OXJLQ6HFXULW\%, 6HUYHU%, 6FKHGXOHU%, 3UHVHQWDWLRQ 6HUYHU%, -DYD +RVW&OXVWHU &RQWUROOHU23012UDFOH (QWHUSULVH 'DWDEDVH J 5 LV LQVWDOOHG LQ 90 LPDJH DV PHWDGDWD UHSRVLWRU\ VWRUH IRU WKH 2%,(( J 'DWDEDVH LV DOVR FRQILJXUHG ZLWK VSDWLDO RSWLRQ WR ZRUN ZLWK 2%,(( J ZLWK VDPSOH GDWD VHW'DWDEDVH LV QRW VWDUWHG DV D VHUYLFH ZKHQ \RX VWDUW 90 LPDJH 7R EHVW XWLOL]H 90 LPDJH ZLWK FRPSRQHQWV QHHGHG ZH ZLOO VWDUW DOO WKH VHUYLFHV DQG SURFHVVHV DVQHHGHG EDVHV 7R VWDUW DQG DFFHVV GDWDEDVH \RX ZLOO QHHG WR VWDUW GDWDEDVH OLVWHQHU DQG GDWDEDVH VHUYHUWd^͗ K / ϭϭŐ &ŽƵŶĚĂƚŝŽŶ tŽƌŬƐŚŽƉWĂŐĞ ͮ ϯϰ'DWDEDVH $FFHVV)ROORZLQJ DUH VKRUWFXWV IRU GDWDEDVH VWDUW VWRS RSHUDWLRQV ! VWDUW/615 WR VWDUW GDWDEDVH OLVWHQHU VHUYLFH ! VTO WR ORJ LQWR WKH GDWDEDVH ZLWK V\VGED SULYLOHJHV VTO! VWDUWXS VWDUW GDWDEDVH VHUYHU IURP VTO SURPSW'DWDEDVH LV SUH SUHFRQILJXUHG ZLWK 2%,(( J PHWDGDWD VFKHPDV DQG %,6$03/( VFKHPDV IRU WKH ZRUNVKRS! VTOGHY 7R ODXQFK 2UDFOH 64/ 'HYHORSHU ZLWK SUH FRQILJXUHG FRQQHFWLRQV ! RUDFOHKRPH WR JR WR 25$&/(B+20( GDWDEDVH LQVWDOO GLUHFWRU\$OWKRXJK ZH GR QRW QHHG WR DFFHVV GDWDEDVH HQWHUSULVH PDQDJHU IROORZLQJ DUHVKRUWFXW WR VWDUW DQG VWRS (0 VHUYLFHV 3OHDVH DYRLG UXQQLQJ (0 RQ 90 XQOHVV WKHUH LV D QHHG WR XVH LW IRU DGPLQLVWUDWLYH DFWLRQ (0 ZLOO WDNH XS D ELW PRUH 5$0 DW UXQ WLPH DQG LV QRW QHHGHG IRU ZRUNVKRS SXUSRVH ! VWDUW(0 VWDUW GDWDEDVH HQWHUSULVH PDQDJHU DSSOLFDWLRQ ! VWRS(0VWRS GDWDEDVH HQWHUSULVH PDQDJHU DSSOLFDWLRQ'DWDEDVH (0 SDJH LV ERRNPDUNHG RQ 90 EURZVHG GDWDEDVH OLQN6FKHPD SDVVZRUGV6\V ZHOFRPH 6\VWHP 6FKHPD'(9B%,3/$7)250 $GPLQ 2%,(( J PHWDGDWD VWRUH %,6$03/( %,6$03/( %, 6DPSOH VFKHPD RELHHBQDYWHT RELHHBQDYWHT 6SDWLDO GDWD VDPSOH VFKHPDWd^͗ K / ϭϭŐ &ŽƵŶĚĂƚŝŽŶ tŽƌŬƐŚŽƉWĂŐĞ ͮ ϯϱ :HEORJLF DQG 2%,(( $FFHVV90 HQYLURQPHQW KDV :HEORJLF VHUYHU J LQVWDOOHG DV - (( DSSOLFDWLRQ VHUYHU :HEORJLF HQYLURQPHQW KDV WZR GRPDLQV RQH LV ZHEORJLF DGPLQLVWUDWLRQGRPDLQ VHUYLFH DQG DQRWKHU RQH LV %, GRPDLQ ZKHUH 2%,(( LV GHSOR\HG <RX ZLOO QHHG WR VWDUW ZHEORJLF QRGH PDQDJHU ILUVW DQG WKHQ VWDUW GRPDLQ VHUYHUV 6WLFN\ QRWHV RQ GHVNWRS GLVSOD\V VHTXHQFH RI VWHSV QHHGHG WR VWDUW IXOO IXQFWLRQDO %, HQYLURQPHQW )ROORZLQJ DUH VKRUWFXW FRPPDQGV UHODWHG WR ZHEORJLF VHUYLFHV! VWDUW1RGH0DQDJHUVWDUW :HEORJLF QRGH PDQDJHU VHUYLFH ! VWDUW:/6VWDUW ZHEORJLF DGPLQLVWUDWLRQ VHUYHU ! VWDUW%,6HUYHUVWDUW ZHEORJLF %, GRPDLQ ! RSPQ6WDUWDOOWR VWDUW DOO %, V\VWHP VHUYLFHV ! RSPQ6WDWXVWR FKHFN VWDWXV RI %, V\VWHP VHUYLFHV ! RSPQ6WRSDOOWR VWRS DOO %, V\VWHP VHUYLFHV ! VWRS%,6HUYHUVWRS ZHEORJLF %, GRPDLQ ! VWRS:/6 VWRS ZHEORJLF DGPLQLVWUDWLRQ VHUYHU! ZOVKRPH MXPS WR GLUHFWRU\ IRU PLGGOHZDUH KRPH DSS 2UDFOH 0LGGOHZDUH ! ELGRPDLQ EL GRPDLQ GLUHFWRU\DSS 2UDFOH 0LGGOHZDUH XVHUBSURMHFWV GRPDLQV ELIRXQGDWLRQBGRPDLQ ! 0DS%XLOGHU /DXQFK 0DS %XLOGHU FOLHQW WRRO3DVVZRUGV :HEORJLF DGPLQLVWUDWLYH XVHUQDPH DQG SDVVZRUG ZHEORJLF $GPLQ $OO WKH SUH VHHGHG XVHUV IRU %, HQYLURQPHQW KDYH VDPH SDVVZRUG $GPLQ :HEORJLF FRQVROH XUO KWWS ORFDOKRVW FRQVROH2%,(( HQWHUSULVH PDQDJHU KWWS ORFDOKRVW HP2%,(( $QDO\LWFV KWWS ORFDOKRVW DQDO\WLFV0DSYLZHU KWWS ORFDOKRVW PDSYLHZHU$OO WKH 85/V DUH DXWR FRQILJXUHG WR ZRUN IURP KRVW EURZVHU DV ZHOO DV DUHERRNPDUNHG LQ WKH 90 LPDJH 8VHUQDPH 3DVVZRUG ZHEORJLF $GPLQ。