浙江联通哈皮英语产品使用手册.
Holman产品安装和操作手册说明书

These symbols are intended to alert theuser to the presence of important operatingand maintenance instructions in the manualaccompanying the appliance.NOTICEUsing any part other than genuine Holman factory supplied parts relieves the manufacturer of all liability.Holman reserves the right to change specifications and product design without notice. Such revisions do not entitle the buyer to corresponding changes, improvements, additions or replacements for previously purchased equipment.Due to periodic changes in designs, methods, procedures, policies and regulations, the specifications contained in this sheet are subject to change without notice. While Holman Manufacturing exercises good faith efforts to provide information that is accurate, we are not responsible for errors or omissions in information provided or conclusions reached as a result of using the specifications. By using the information provided, the user assumes all risks in connection with such use.GENERAL SAFETY INFORMATIONThis equipment is designed and sold for commercial use only by personnel trained and experienced in its operation and is not sold for consumer use in and around the home nor for use directly by the general public in food service locations.Before using your new equipment, read and understand all the instructions & labels associated with the unit prior to putting it into operation. Make sure all people associated with its use understand the units operation & safety before they use the unit.All shipping containers should be checked for freight damage both visible and concealed. This unit has been tested and carefully packaged to insure delivery of your unit in perfect condition. If equipment is received in damaged condition, either apparent or concealed, a claim must be made with the delivering carrier. Concealed damage or loss - if damage or loss is not apparent until after equipment is unpacked, a request for inspection of concealed damage must be made with carrier within 15 days. Be certain to retain all contents plus external and internal packaging materials for inspection. The carrier will make an inspection and will supply necessary claim forms.GENERAL INSTALLATION INFORMATIONThe unit was shipped fully assembled and ready to plug into a standard outlet specified for its voltage and amp draw. If improper electrical supply is determined, contact a qualified electrician prior to using the unit. Removal and replacement of the power cord and plug will void the warranty. For assistance, contact your local authorized service agent for service or required maintenance. Level unit using the adjustable feet under the unit (approximately 1/2" adjustment).Before using the unit for the first time, wipe down the exterior with a damp cloth.Allow enough space around the toaster for adequate ventilation. Do not operate the unit without the crumb tray properly positioned. Overheating and poor toasting may occur. Read all labels on the unit and follow their instructions.MAINTENANCE AND REPAIRSContact the factory, a service representative or a local service company for service or required maintenance. Go to /scripts/manuals.aspx to find a service agent near you. Replacement cord sets must be purchased from Star Manufacturing International, Inc. or our authorized agents. Should you need any assistance regarding the operation or maintenance of any Holman equipment; write, phone, fax or e-mail our service department. In all correspondence mention the model number and the serial number of your unit, along with the voltage.Business Hours: 8 am to 4:30 p.m. Central Standard Time Telephone:(877) 242-0270Fax:(314) 781-2714E-mail:***********************************************************Website: Mailing Address: Star International Holdings Inc., Company10 Sunnen DriveSt. Louis, MO 63143U.S.A.MODELIRCS2-SBKConveyor ToastersElectronic ControlsIL27072M-Z17824, Rev. A 12/19/2013 CAUTIONELECTRICAL CONNECTIONBefore making any electrical connection to this unit, check that the power supply is adequate for the voltage, amperage and requirements stated on the rating plate. A wiring diagram is included in the Installation & Operations manual, which can be downloaded at /scripts/manuals.aspx .Disconnect the unit from the power source before installing or removing any parts.Be absolutely sure that the ground connection for the receptacle is properly wired. Do not connect equipment to power without proper ground connections. Improper grounding may result in personal injury or fatality.DO NOT CUT OR REMOVE THIS PLUG OR GROUNDING PRONG FROM THE PLUG.CONNECT/PLUG UNIT INTO DEDICATED A.C. LINE ONLY SPECIFIED ON THE DATAPLATE OF THE UNIT.CERTAIN SURFACES ARE EXTREMELY HOT DURING OPERATION AND CARE SHOULDBE TAKEN WHILE USING THIS UNIT.DO NOT IMMERSE OR LET THE UNIT STANDIN WATER.DO NOT HOSE DOWN THE UNIT OR THE TABLE/COUNTER IF THE UNIT IS ON THETABLE/COUNTER.KEEP AWAY FROM RUNNING WATER.INSTALLATION REQUIREMENTS1. Space: 16”x24”x18” (width x depth x height) inSpecialty Board of Breakfast Toaster Cart2. Electricity: 208/240 Volts, 30 Amps, NEMA L6-30RRecepticaleNOTE: Ensure to clean the toaster properly before using it for the first time. Refer to the Cleaning Procedure document for cleaning instructions.CAUTION WARNINGThe Holman IRCS conveyor toaster comes with pre-programmed factory default settings for CROISSANT, MUFFIN .Factory default settings are as follow:POWER SAVER SWITCHThere are three Power Saver modes:ON: Unit is in pre-programmed power saving setting.OFF: Power Saver mode is turned off.AUTO ON: Power Saver turns on when there has been no activityfor a programmed length of time.The operator may adjust the level of power reduction for the saver mode. (Note: conveyor may move slowly when in saver mode.)Two buttons (+) and (-) are used when increasing or decreasing the value of each programmable setting.A red LED light located at the lower portion of the control panel label will indicate if the value for top heat, bottom heat or conveyor speed is being adjusted.NEMA L6-30RWARNING WARNING WARNINGWARNINGCERTAIN SURFACES ARE EXTREMELY HOTDURING OPERATION AND CARE SHOULD BE TAKEN WHILE USING THIS UNIT.START UPWhen the toaster has been plugged into a suitable outlet and power supply, the word OFF will be displayed on the L.E.D. read out.A. Press the ON/OFF button once to turn on the toaster. The toaster will now enter into pre-heat and “PREHT” will be displayed (the elements will begin to glow but the conveyor and fan motor will not turn on).B. After one minute, the fan motor will turn on and the conveyor will begin turning at the previously saved setting (for initial start up, the drive motor will operate at the factory default setting).C. After 24 minutes, the display will show the last used programselection i.e. (for initial startup, CROIS, MUFFIN, will be the last program selected).DAILY OPERATIONCheck the power cord to insure that it is plugged into a proper outlet.Press the ON/OFF button once to turn the toaster on. Press the button a second time to turn the toaster off.NOTE: When the toaster is turned off, the fan and conveyor motors will continue to run for five minutes. The words COOL and DOWN will be alternately displayed during that time. After five minutes, the word OFF will be displayed until the ON/OFF button is pressed again.Once the toaster has been pre-heated, the menu buttons can be pressed to change to CROIS, MUFFIN, T3, T4.Menu buttons T5 & T6 are cheese melting features, when these buttons are pressed, the conveyor will stop and the display will count down. When finished, the conveyor will reverse for 10 seconds.OPERATING HINTS AND SAFETYIMPORTANT: If “HIGH TEMP” shows on the display1. Turn off the toaster and allow it to fully cool down.2. Inspect the fan inlet on the bottom of the toasterand remove anyting blocking the cooling fan inlet.3. Press the red high temperaure limit reset button onthe back of the toaster. (Note: There is one reset on each side). (Note: the toaster must be fully cool in order for the limit switch to reset).4. Turn on the toaster and check for proper operation.5. If cleaning the cooling fan inlet does not correctthe problem, contact the factory or an authorized service agency for required maintenance.Disconnect power to the unit with the ON/OFF button at the end of each day of operation.Do not leave the unit in operation without an attendant.Do not leave the unit at high temperature when not in use or during idle periods. This will cause food particles and grease film to carbonize.The cooling fan will continue to run until the toaster has completely cooled. If the toaster MUST be moved after using, allow the cooling fan to turn OFF before unplugging.CAUTION PROGRAMMING A. CONVEYOR SPEED (temporary setting)The conveyor speed is programmable with a range from 1 to 99 with1 being the slowest and 99 being the fastest. Each menu item can have independent conveyor speed settings.B. PROGRAMMING VALUES FOR MENU ITEMSTo make a program change to the top & bottom elements, or conveyor speed, you must first be in the menu item you want changed. Example: to change the programmed conveyor speed for croissants, the display must read CROIS . To change the programmed conveyorspeed for MUFFIN, the display must read MUFFIN and so on foreach menu item.1) Select the menu item you want to change i.e. CROIS, MUFFIN, T3, T4. 2) Press and hold both ( + ) AND ( - ) buttons for 3 seconds untilthe display goes blank, release the buttons and the display will show three characters for the menu item elected and the last two characters for the current value setting, i.e. CROIS, MUFFIN, T3, T4. The red L.E.D. light for upper front element at the bottom of the label will flash.3) Press the ( + ) or ( - ) buttons to increase or decrease thesetting for the upper element.4) Press the button for the menu button again and the red L.E.D.for the up lower element will flash.5) Press the ( + ) or ( - ) buttons to increase or decrease thesetting for the lower element. 6) Press the button for the menu button again and the red L.E.D.for the conveyor speed will flash.7) Press the ( + ) or ( - ) buttons to increase or decrease thesetting for the conveyor speed.8) Button T5 & T6 are cheese melting functions program. Theseare the same as above, but set a cheese melting time in seconds instead of conveyor speed.9) To skip one feature setting with out making any changes,press the menu item button one time and the red L.E.D. light for the next item will now flash.10) To change the POWER SAVER values press the SAVERbutton or to save your new setting(s), and exit the program mode press the menu button.11) The last two characters in the display will show MN forminutes.12) The first three characters will be numerical to represent thetime setting.13) When set to “OFF” the Saver button will be disabled duringoperation. The PowerSaver can be set to “OFF” or using the ( + ) or ( - ) set the time from 15 to 480 minutes.14) Press the SAVER button to change the power reduction usingthe ( + ) or ( - ) buttons to increase or decrease the setting.15) Press the POWER SAVER button to save changes and toexit.CLEANINGPreventive maintenance for your Holman toaster consists of the following recommended cleaning procedures. To keep your toaster in its top operating condition, these steps should be performed on a daily or weekly basis as required.SuppliesKAY® QSR Oven CleanerKAY® QSR Heavy Duty Multi-Purpose Sink Detergent (dispensed use solution)KAY® Sink Sanitizer (use solution prepared at the sink)No Scratch Pad Red ClothDaily Procedure:1. Turn toaster off, conveyor will continue to run until cooleddown (approx. 5-10 minutes)2. Immediately spray the oven cleaner onto the No ScratchPad and scrub the conveyor chain while it is still warm and moving.NOTE: DO NOT SPRAY directly onto the conveyor belt or into the cooking chamber. Overspray onto the heating elements can damage or shorten the life of the elements.3. Wash the No Scratch pad at the 3 compartment sink and thensoak with Multi-Purpose Sink Detergent. Ring the pad out so that it is only damp and continue to scrub the conveyor belt while it’s still moving. 4.Rinse the No Scratch pad at the 3 compartment sink to remove all detergent and then soak with clean warm water. Ring the pad out so that it is only damp and continue to scrub the conveyor belt while it still moving.5. Wipe the conveyor belt with a clean red cloth dampened withsanitizer solution while it is still moving. Allow to air dry.6. Rinse the No Scratch pad at the 3 compartment sink and thensoak with clean warm water. Ring the pad out so that it is only damp and wipe exterior areas of the toaster.7. Remove interior crumb tray and bottom catch tray and taketo the three compartment sink. Spray the pieces with oven cleaner and allow to sit on the drain board for a minimum of five minutes.8. Wash, Rinse and Sanitize removable pieces and allow to airdry before sliding the trays back into the unit.9. Unit is now ready to turn ON for warm up and use.DO NOT IMMERSE THE UNIT IN WATER OR LETTHE UNIT STAND IN WATER.DO NOT USE A NON-STICK SPRAY ON THE CONVEYOR BELT, IT WILL CAUSE A STICKYBUILD-UP AND INCREASE STICKING.DO NOT HOSE DOWN THE UNIT OR THETABLE/COUNTER IF THE UNIT IS ON THETABLE/COUNTER.KEEP AWAY FROM RUNNING WATER.WARNING WARNINGWARNING CAUTION STAR INTERNATIONAL HOLDINGS INC. COMPANY Star - Holman - Lang - Wells - Bloomfield - Toastmaster10 Sunnen Drive, St. Louis, MO 63143 U.S.A.(314) OPERATION PROCEDURESUsed to toast croissants and english muffinsTo Turn unit ON1. Ensure toaster is plugged in2. Press ON/OFF burron on each control panel.Screen will display “PREHT” for 25 minutes. DO NOT toast any product while the screen displays “PREHT”3. Select ‘CROIS” on the control panel and“MUFIN” on the other.4. Toast product in corresponding belt. Eg.croissants must only be toasted on the “CROIS” belt.To Turn unit OFF1. Ensure there is no product in the toastingchamber2. Press ON/OFF button on each control panel.Screen will shuffle “COOL” and “DOWN” for 10 minutes.NOTE: belts will continue to move for the duration of the cool-down time. Use this time to clean the toaster.ROUTINELY CHECKEntering Programming ModeNOTE: Ensure the toaster is ONNOTE: Changes to the same product must be repeated for each belt.1. Select product2. Press and hold up and down arrows at the sametime. You will enter programming mode.3. Use the up and down arrows to select thedesired top heat.4. Press product button on control5. Use the up and down arrows to select desiredbottom heat.6. Press product button on control7. Usse the top and down arrows to select desiredconveyor speed8. Press product button on control 2-3 times untilyou exit programming mode.NOTE: Changes in belt speed will be madeimmediately. Changes in top/bottom heat will take time to adjust depending on the specifics of the changeIRCS-2-SB2M-Z17508120V 240V 240V 120VO T 2 L 2 M 2 F 2 O T 1 H B 2 H T 2HB1 HT1L1 F1 M1120V 240V 240V 120VOT2 L2 M2 F2 OT1 HB2 HT2H B 1 H T 1L 1 F 1 M 1CFIFWHTBLKGND 15A15A10108914151611WHTRED BLK11814912133512121312344588991114141516OTOTFSRRCMRRCMMCMCFS FAN SWITCH (TSTAT)OT OVER TEMP (TSTAT)IF IMPINGEMENT FAN CF COOLING FANM MOTOR CAPACITOR CM CONVEYOR MOTOR RR REVERSING RELAYBLK REDWHT2M -Z 17824: S p l i t C o n v e y o r T o a s t e r , I R C S 2-S B KSK2709Rev. a 12/19/13MODEL: IRCS2-SBK:Split Electronic Conveyor ToasterDecember 19, 2013, Rev ASTAR INTERNATIONAL HOLDINGS INC. COMPANY Star - Holman - Lang - Wells - Bloomfield - Toastmaster10 Sunnen Drive, St. Louis, MO 63143 U.S.A.(314) 678-6303。
HEIDENHAIN EIB 700 Series 外部接口盒商品介绍说明书

June 2013Product Information EIB 700 Series External Interface BoxEIB 700 SeriesThe EIB 700 units are external interface boxes for precise position measurement. They are ideal for inspection stations and multipoint inspection apparatuses as well as for mobile data acquisition, such as in machine inspection and calibration. The EIB 700 series is ideal for applications requiring high-resolution encoder signals and fast measured-value acquisition.Ethernet transmission also enables you to use switches or hubs for connecting more than one EIB. It is also possible to use WLAN transmission, for example.The EIBs are suited for the following voltage supplies:EIB 741: 100 V AC to 240 V EIB 742: 24 V DCA maximum of four HEIDENHAINencoders, either with sinusoidal incremental signals ( 1 V PP ; 11 µA PP on request) or with EnDat interfaces (EnDat 2.1 and EnDat 2.2) can be connected to the EIB 700 series.The EIB 700 series subdivides the periods of the incremental signals up to 4 096-fold for measured-value generation. The deviations within one signal period areautomatically reduced by adjustment of the sinusoidal incremental signals.The integrated measured-value memory enables the EIB 700 series to save typically 250 000 measured values per axis. Internal or external triggers can be used for axis-specific storage of the measured values.A standard Ethernet interface using TCP/IP or UDP communication is available for data output. This permits direct connection to a PC, laptop or industrial PC. The type of measured-value transfer can be selected through the operating mode (transfer of individual values, block transfer, or transfer upon software request).Driver software for Windows, Linux and LabVIEW as well as example programs and the EIB application software are included in the items supplied, in order to process the measured values on the PC. The driver software enables customers to easilyprogramming their own applications. It also contains program examples demonstrating the capabilities of the EIB 700 series. The EIB application software serves for commissioning and demonstrating the capabilities of the EIB 700 series. This software is made available in the source code and can serve as a platform for the development of one’s own applications.Thanks to the compact dimensions , two EIB 700 series interface boxes fit next to each other in a 19-inch housing. They occupy one height unit.AccessoriesMounting bracketFor installation of two EIB 74x in a 19-inch housing ID 671144-012) Different trigger sources can be assigned to the individual axes3) Can also be used as logical input or output4) The quality of the data cable between the EIB and the PC must be suitable for the requested transfer rate and the cable length.Note:The features can be extended by updating the firmware.Basic circuit diagramOperating modes�����������������������������������������������������������������������������������������������������������������������������������������������������������655780 · 04 · A · 02 · 6/2013 · PDFSoftwareEIB application softwareThe EIB application software covers two applications:Commissioning and demonstration of the EIB 74xThe settings required for easy• configuration of the EIB 74x (e.g. input interface, data packets, operating mode, trigger settings).Management of one or more EIB 74x • units.Simple representation of the positions • transmitted by the EIB 74x.Settings can be saved so that different • application projects can be managed.The User's Guide provides more information.Platform for customer applications The EIB application software is madeavailable in the source code. Based on this application, customers can quickly realize their own applications. The application software was programmed with C++/CLI and Windows Forms in Visual Studio 2008. This programming environment is widely used in technical application programming, but does not necessarily provide state-of-the-art operating systems like Windows 7, for example. However, the customer can adapt the program to other graphic user interfaces.This Product Information supersedes all previous editions, which thereby become invalid. The basis for ordering from HEIDENHAIN is always the Product Information valid when the contract is made.For more informationProduct overview: • Interface Electronics。
原创猫狗喝水ountain产品说明书

Quick Start GuidePWW00-13704FCB-RERA, FWB-REOriginal ArrayPlease read this entire guide before beginning.WelcomeYou and your pet were made for each other. Our aim is to help you have the best companionship and the most memorable moments together. Your new Original Pet Fountain is designed to entice your pet to stay hydrated and healthy.We know that safe pets make happy owners. Before getting started, please take a moment to read through the important safety information. If you have any questions, please don't hesitate to contact us. Hereinafter Radio Systems Corporation and any other affiliate or Brand of Radio Systems Corporation may be referred to collectively as “We” or “Us”.This is the safety alert symbol. It is used to alert you to potential personal injury hazards. Obey allsafety messages that follow this symbol to avoid possible injury or death.WARNING indicates a hazardous situation which, if not avoided, could result indeath or serious injury.CAUTION, used without the safety alert symbol, indicates a hazardous situationwhich, if not avoided, could result in harm to your pet.NOTICE is used to address safe use practices not related to personal injury.When using electrical appliances, basic safety precautions should always be followed to reduce the risk of fire, electric shock and/or injury to persons, including the following:• Read all instructions before using this product.• To reduce the risk of injury, close supervision is necessary when an appliance is used by or near children.• To protect against electric shock, do not place electrical power cord or plug in water or other liquids.• Do not operate any appliance if it has a damaged electrical power cord or plug, or if it is malfunctioning or has been damaged. Call the Customer Care Center immediately for furtherinstructions.• To reduce the risk of electric shock, do not place or store an appliance where it can fall or be pulled into a bathtub or sink.• Always unplug any appliance when not in use, before putting on or taking off parts and before cleaning.• Do not use an appliance for anything other than its intended use.• If the plug of this device gets wet, turn off the electricity to that electrical outlet. Do not attempt to unplug.• Examine this appliance after installation. Do not plug into electrical outlet if there is water on the electrical power cord or plug.Customer Care Center +1 (800) 732-26772• Do not allow pets to chew on or swallow any parts. If you are concerned your pet may chew the power cord, purchase a cord conduit (a hard plastic protector) at any hardware store.• The plastic fountain parts are BPA-FREE. However, some animals have been known to be sensitive to plastic food and water containers. If your animal shows signs of an allergic reaction to the plastic, please discontinue use until you have consulted with your veterinarian.• The fountain is intended to run continuously (always plugged into an electrical outlet), as long as the water level is maintained and the fountain is cleaned regularly. Be sure to check the water level regularly to help prevent damage to the pump, as your pet will drink the water, and some may evaporate.• Do not attempt repairs on the pump.• Do not pull on the electrical power cord to remove the plug from the electrical outlet.• To unplug, grasp the plug, not the electrical power cord.• To avoid the possibility of the plug or electrical outlet getting wet, the electrical outlet should always be above the level of the fountain.• If an extension cord is necessary, an extension cord with a proper rating should be used.• The electrical use of this appliance is 2.5 watts.• The use of attachments not recommended or sold by the manufacturer may cause an unsafe condition. Do not modify the appliance.• Do not install or store appliance where it will be exposed to weather or temperatures below 40° F.• Read and observe all important notices listed on the appliance and in the packaging.• Never wash the filter with soapy water as the soap residue will seep into the filter and cannot be removed. Only rinse the filter with water.• Use only PetSafe® Brand authorized replacement filters. If unauthorized filters are used, the warranty may be voided.• Do not use outdoors. Do not run dry. For indoor household use only.SAVE THESE INSTRUCTIONS3Customer Care Center +1 (800) 732-267745Start HereCustomer Care Center +1 (800) 732-2677 675. Remove the teardrop shaped stator by pulling upon the small lip.6. Use a fingernail to pull out the impeller (white3-bladed propeller), which is held in place magnetically.7. Rinse all fountain components (except for theadapter) with warm water before using the pet fountain. This will remove any residue from the manufacturing process.8. Reassemble the fountain.Make sure the electrical power cord, the adapterand your hands are completely dry. Connect thein-line plug and make sure no silver is showing.Then plug the adapter into a standard electricalwall outlet.Pet Fountain CleaningNOTE: Replace the carbon filter every two to four weeks.1. Unplug the fountain, and disconnect the in-line plug.2. Pick up the pet fountain by the bowl, and take it to the sink.3. Disassemble the pet fountain, and discard the carbon filter.4. Reference page 6 for instructions on cleaning your pump. You can use the motor brush from theDrinkwell® Cleaning Kit to clean inside the pump. Use a solution of 80% water and 20% whitevinegar to remove hard water buildup.5. Wash all other parts with warm water and soap, or place in the top rack of the dishwasher.NOTE: Do not place the adapter or pump in the dishwasher.6. Reassemble the pet fountain.Attaching Additional Capacity Reservoir1. Hook the two tabs of the base over the rearwall at the back of the fountain. The base mustbe properly attached to avoid spills when thereservoir is added.2. Remove the lid from the reservoir and fill itwith water.3. Replace the lid.Customer Care Center +1 (800) 732-267784. Hold the reservoir over the base, and quickly turn Array it upside down onto the base. Make sure thespout is inserted into the opening on the back ofthe fountain.NOTE: The reservoir is not dishwasher safe. Hand wash only.Replacement Parts and AccessoriesReplacement parts or accessories for your fountain can be purchased by visiting or by contacting our Customer Care Center at +1 (800) 732-2677.Filter subscriptions now available! Get fountain filters automatically and conveniently delivered right to your door when you need them. Free shipping and5% discount included. Visit to sign up or call our Customer CareUSA & Canada - Tel: +1 (800) 732-2677Monday - Friday 8 AM - 8 PM / Saturday 9 AM – 5 PM (EST)9Terms of Use and Limitation of Liability1. Terms of UseThe use of this product is subject to your acceptance without modification of the terms, conditions and notices contained with this product. Use of this product implies acceptance of all such terms, conditions, and notices. If you do not wish to accept these terms, conditions, and notices, please return the product, unused, in its original packaging and at your own cost and risk to the relevant Customer Care location together with proof of purchase for a full refund.2. Proper UseProper Use includes, without limitation, reviewing the entire Product Manual and any specific safety information statements. The specific temperament or size/weight of your pet may not be suitable for this product. If you are unsure whether this product is appropriate for your pet, please consult your veterinarian or certified trainer prior to use. For products used with pets where training is desired, Radio Systems Corporation recommends that these training products are not used if your pet isaggressive and accepts no liability for determining suitability in individual cases.3. No Unlawful or Prohibited UseThis product is designed for use with pets only. This product is not intended to harm, injure or provoke.Using this product in a way that is not intended could result in violation of Federal, State or local laws.4. Limitation of LiabilityIn no event shall Radio Systems Corporation or any of its associated companies be liable for (i) any direct, indirect, punitive, incidental, special or consequential damage and/or (ii) any loss or damages whatsoever arising out of or connected with the use or misuse of this product. The Purchaser assumes all risks and liability from the use of this product to the fullest extent permissible by law.5. Modification of Terms and ConditionsRadio Systems Corporation reserves the right to change the terms, conditions and notices governing this product from time to time. If such changes have been notified to you prior to your use of thisproduct, they shall be binding on you as if incorporated herein.WarrantyOne Year Non-Transferrable Limited WarrantyThis product has the benefit of a limited manufacturer’s warranty. Complete details of the warranty applicable to this product and its terms can be found at .Customer Care Center +1 (800) 732-26771011Radio Systems Corporation 10427 PetSafe WayKnoxville, TN 37932+1 (800) 732-2677©2019 Radio Systems CorporationRE400-2131/1。
HAZGE说明书

3.3 监视显示...........................................................................................................................34
3
目录
3.4 系统参数初始化.............................................................................................................. 35
2
目录
目录ห้องสมุดไป่ตู้
前 言.....................................................................................................................................................2
为正确使用本产品及确保使用者安全,在你使用之前,请详细阅读本说明书,阅读完 后请妥善保存,以备后用。如在使用过程中遇到解决不了的疑难问题,请联系本公司的各 地经销商,或者直接与本公司联系。
Liebherr 冰箱产品说明书

4
存放........................................................................ 16
4.1 存放提示......................................................................... 16
3.15 连接设备......................................................................... 15
3.16 开启冰箱(首次调试)................................................. 15
5.2.1
用按键导航.................................................................. 17
5.2.2
设置菜单...................................................................... 17
5.3.11 Alarm Sound.............................................................. 22
5.3.12 Key Sound.................................................................. 22
3.1 安装条件......................................................................... 5
3.2 冰箱尺寸......................................................................... 6
I O Cards 产品说明书
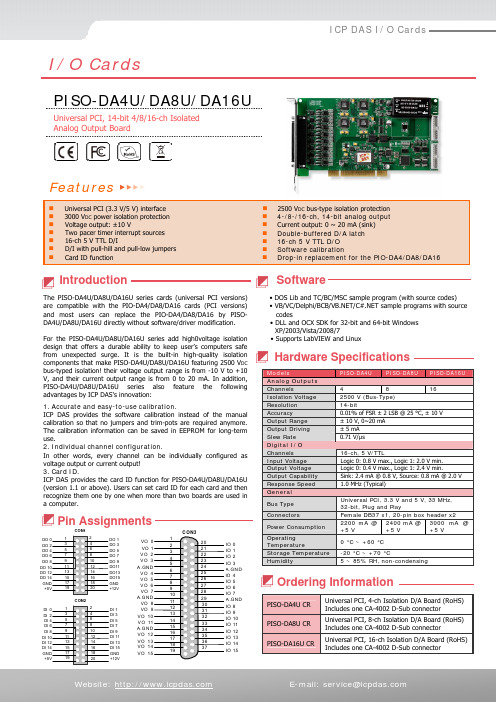
CON1CON2IO 14IO 13IO 15IO 10IO 9IO 11IO 12A.GA.GIO 8A.GND4IO 5DIO 0IO 3IO 7IO 2VOIO 1IO 6VOVOICP DAS I/O CardsI/O CardsPISO-DA4U/DA8U/DA16UUniversal PCI, 14-bit 4/8/16-ch IsolatedAnalog Output BoardFeatures►►►►Introduction SoftwareThe PISO-DA4U/DA8U/DA16U series cards (universal PCI versions)are compatible with the PIO-DA4/DA8/DA16 cards (PCI versions)and most users can replace the PIO-DA4/DA8/DA16 by PISO-DA4U/DA8U/DA16U directly without software/driver modification.For the PISO-DA4U/DA8U/DA16U series add high0voltage isolationdesign that offers a durable ability to keep user’s computers safefrom unexpected surge. It is the built-in high-quality isolationcomponents that make PISO-DA4U/DA8U/DA16U featuring 2500 V DCbus-typed isolation! their voltage output range is from -10 V to +10V, and their current output range is from 0 to 20 mA. In addition,PISO-DA4U/DA8U/DA16U series also feature the followingadvantages by ICP DAS's innovation:1. Accurate and easy-to-use calibration.ICP DAS provides the software calibration instead of the manualcalibration so that no jumpers and trim-pots are required anymore.The calibration information can be saved in EEPROM for long-termuse.2. Individual channel configuration.In other words, every channel can be individually configured asvoltage output or current output!3. Card ID.ICP DAS provides the card ID function for PISO-DA4U/DA8U/DA16U(version 1.1 or above). Users can set card ID for each card and thenrecognize them one by one when more than two boards are used ina computer.• DOS Lib and TC/BC/MSC sample program (with source codes)• VB/VC/Delphi/BCB//C#.NET sample programs with sourcecodes• DLL and OCX SDK for 32-bit and 64-bit WindowsXP/2003/Vista/2008/7• Supports LabVIEW and LinuxHardware SpecificationsModels PISO-DA4U PISO-DA8U PISO-DA16UAnalog OutputsChannels 4 8 16Isolation Voltage 2500 V (Bus-Type)Resolution 14-bit0.01% of FSR ± 2 LSB @ 25 °C, ± 10 VAccuracy± 10 V, 0~20 mAOutput Range± 5 mAOutput Driving0.71 V/μsSlew RateDigital I/OChannels 16-ch, 5 V/TTLLogic 0: 0.8 V max., Logic 1: 2.0 V min.Input VoltageLogic 0: 0.4 V max., Logic 1: 2.4 V min.Output VoltageSink:**********,Source:**********Output Capability1.0 MHz (Typical)Response SpeedGeneralBus Type Universal PCI, 3.3 V and 5 V, 33 MHz,32-bit, Plug and PlayConnectors Female DB37 x1, 20-pin box header x2Pin AssignmentsOrdering InformationPower Consumption 2200 mA @+5 V2400 mA @+5 V3000 mA @+5 VOperatingTemperature0 °C ~ +60 °CStorage Temperature -20 °C ~ +70 °CHumidity 5 ~ 85% RH, non-condensing Website:E-mail:******************PISO-DA4U CRUniversal PCI, 4-ch Isolation D/A Board (RoHS)Includes one CA-4002 D-Sub connectorPISO-DA8U CRUniversal PCI, 8-ch Isolation D/A Board (RoHS)Includes one CA-4002 D-Sub connectorPISO-DA16U CRUniversal PCI, 16-ch Isolation D/A Board (RoHS)Includes one CA-4002 D-Sub connector。
M6说明书(终版)

前言尊敬的用户:首先感谢您选用本公司的产品。
为了您能方便及充分地了解和使用本机的功能,敬请仔细阅读本机使用手册。
阅读之后请将本手册存放在方便位置,以供日后参考之用。
所有重要资料请用纸笔另作记录,用于备份。
对因操作不当、维修、靠近磁场周围或其他情况下造成机内资料的损失或删改,本公司概不负责。
因机内资料泄漏给第三者所造成的损失,如机内资料被盗用、更改等,本公司概不负责。
本公司将不断改善产品功能与质量,版本时有更新,而说明书不能及时修正并知会。
经过严格审核的说明书和经过严格检测的产品,若有错漏之处,敬请原谅及赐教指正。
12产品基本规格产品名称:M6外形尺寸:193mm×118mm×12.5mmLCD尺寸:480mm×800mm重量:350g电源:锂电子电池3.7V 2500mAh(毫安/时)本机设有定时关机功能,在开机状态下,连续一段时间不对本机进行任何操作,即自动关机。
定时关机时间预分钟,可至【系统设置】的【定时关机】功能中触摸屏耳机接口T-flash 卡槽USB 接口麦克风喇叭关机状态下,按机身右侧开机键 ,电源指示灯点亮,状态为绿灯,可开机;关机方法与开机相同。
● 主界面操作说明1 标题栏图标说明、切换小学界面功能键换肤功能键锁屏功能键2 快捷图标、1 将电源适配器一端插入电源插座,另一端插入本机 插口,即可为本机电池充电。
2 、 充电。
3 4 、请使用为本机提供的电源适配器或USB 连线充电。
、● 电池充电界面操作界面共 7 大类功能:词典、课文、考试、英语、百科、娱乐、工具。
可笔点直接进入对应功能项,也可横屏滑动切换相邻功能项。
● 词典篇笔点要查询的单词,进入单词释义界面。
笔点图标 ,进入牛津系列词典界面。
默认牛津现代为首选词典,软键盘输入要查询的单词,搜索框下自动匹配相同或相近单词,单词预览区显示反显词条信息。
笔点图标 ,可收起软键盘,查看预览区内容。
1 、2、笔点划过屏幕取词,被取词汇反显,可在气泡中预览该词大意,笔点该单词,可进行跳查。
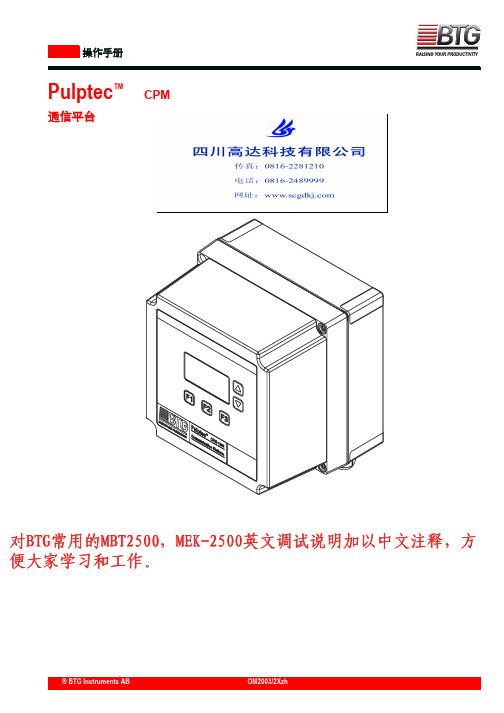
BTG2500中英文使用说明书
- 1、下载文档前请自行甄别文档内容的完整性,平台不提供额外的编辑、内容补充、找答案等附加服务。
- 2、"仅部分预览"的文档,不可在线预览部分如存在完整性等问题,可反馈申请退款(可完整预览的文档不适用该条件!)。
- 3、如文档侵犯您的权益,请联系客服反馈,我们会尽快为您处理(人工客服工作时间:9:00-18:30)。
浙江联通“哈皮英语”业务产品使用手册 V1.0
一、产品描述:哈皮英语是一款英语学习的客户端应用,以幽默、风趣的方式来练习听力、学习口语。
内容轻松、幽默。
产品以实用英语为主,突出语言的实践性和交际性。
贴近日常生活,由浅入深。
用户界面友好,易操作。
用户通过该软件可以不受时间、空间限制,随时随地在线收听各类音频节目。
音频内容能满足娱乐、学习、商务、休闲等各类不同年龄和层次的用户需求。
二、用户范围:浙江省联通移动后付费用户。
三、产品资费模式:资费组成:使用“哈皮英语”业务,用户需支付业务功能费,功能费分包月和点播两种计费形式。
用户使用GPRS 上网按联通公司的标准收取流量费。
(一)资费标准
1、业务功能费:6元/月;1元/条
2、手机上网流量费:用户使用GPRS 上网按联通公司的标准收取流量费。
(二)业务规则
1、用户订购产品后,立即生效,同时收取整月功能费;
2、用户退订产品后,立即失效,无法继续使用。
如用户希望本月继续使用,建议用户于月底退订。
3、包月产品当月多次订购、退订,只收取一次月功能费(不重复扣费)。
(三)业务受理方式
(1)业务申请:发送HP 到10625989进行包月业务定制,发送YY 到10625989按次点播使用。
(2)业务取消:发送ZXHP 到10625989退订,点播业务无需取消。
(3)10010退订:可通过10010平台退订业务。
四、产品功能简介
1、后台播放:执行该操作后,用户可以边听音频同时边进行其他页面的浏览。
2、音频收藏:用户可以将任意音频收藏在收藏阁内,任意时刻用户都可以在收藏阁内收听自己先前收藏的音频时段。
3、节点收藏:用户可以在任意音频时段节点退出,下次启动软件时在收藏阁内直接接续上次停顿的位置继续收听
4、推荐的好友:将客户端软件通过短信形式推荐给好友
5、搜索:输入关键字方便用户查找内容源
6、收藏:查看用户收藏的列表栏目、音频内容
五、产品使用指南
1、哈皮英语业务订购流程演示:
2、产品演示图
3、产品机型适配情况
哈皮英语客户端产品支持JAVA 操作系统,支持机型有诺基亚屏幕分辨率240*320以上、三星屏幕分辨率240*320以上、索爱屏幕分辨率240*320以上、摩托罗拉分辨率240*320以上。
其他JAVA 机型可安装通用版。
目前的适配操作系统较少,其他系统正在开发中。
六、FAQ
1. 在使用客户端业务之前要准备哪些?
①确定你的手机是否开通GPRS ,如果没有开通可以请10010帮忙
②确定你的手机是否支持Symbian/Kjava/WM/android等操作系统的任意一种,如果都不支持,抱歉您的手机不能使用此业务。
2. 哪些手机支持哈皮英语系列客户端软件?
目前支持这一功能的操作系统为JAVA 系统的大部分机型,其他机型正在研发中,稍后推出。
3. 什么是手机客户端?
手机客户端是指能在手机上运行的软件。
需要下载到手机本地才能使用。
4. 客户端和WAP 站的区别?
WAP 站:基于互联网页面技术而实现的,遵循WAP 技术规范而构建的WAP 页面的集合。
其最大的优势就在于可以使用手机随时随地访问,是真正贴身的移动互联网应用。
客户端:是将类似Outlook(邮件客户端、IM(即时通讯、流媒体播放器等传统PC 上的客户端安装在手机上,通过这些操作简便界面友好的软件,手机用户可以通过启动该软件访问网络、聊QQ 、收看视频等。
5. 如何使用推荐给好友?推荐给好友如何收费?
在客户端软件的菜单内有推荐给好友项,选择推荐给好友即可与好友共享千万好书。
收费会在用户下载客户端后,使用过程中提示用户。
6. 在一个月内反复定制、取消包月业务,会不会对我进行多次的重复计费?
我们的系统设置了逻辑判断程序,对用户因故在一个月内反复定制、取消包月业务,是不会重复计费的,而是只计一次包月费用。
7. 如果用户被运营商扣费后,发现客户端无法正常安装,或者无法正常播放怎么办?
请先与我们客服中心联系,确认问题所在。
咨询电话为4006809114。
如果查明确实由于本公司适配或者技术方面的原因,导致上述现象的。
本公司客服人员将在24小时之内原价返还给用户。
8、在使用哈皮英语过程中,偶尔会出现500或505错误提示是怎么回事?
因为您当时的网络环境较差,在请求数据时出现间歇性断开,造成数据访问失败,此时请退出程序换一个较好的网络环境重试。
9、软件下载之后,程序安装在手机什么地方?
软件成功下载后,不同的手机型号在手机中的位置不一样:
1 诺基亚:对于S40系列软件安装在百宝箱或者收藏夹或者应用程序中,对于S60则安装在手机主菜单或者应用程序、我的助手等菜单里
2 摩托罗拉:对于按键式的手机在百宝箱或者游戏菜单,对于触摸屏则在手机主菜单
3 三星:在百宝箱或者Java 世界、游戏或应用程序菜单
4 索尼爱立信:在收藏夹的应用程序或者游戏菜单中
5 其他品牌:一般是在游戏菜单或者Java 程序菜单
10、软件下载时提示文件已损坏, 下载不下来等
1、先询问用户手机的机型(看是否支持,若不支持则可以直接告诉用户是由于不支持的原因导致的)
2、询问用户手机中的文件是否已满,建议用户最好删除手机中的部分文件试(需要注意:有些用户的手机是有内存卡和手机存储两种存储区别。
若用户两种存储方式都已满,第一次下载是在
内存卡中,后将内存卡中的文件删除部分后,重新下载却放在手机内存中,还是会有此提示的,所以要存储在叫空的地方)
3、保证有足够内存后建议用户重新下载
11、下载软件时,如诺基亚s60系列手机, 可以正常下载,安装时提示“证书错误,请与软件供应商联系”
请用户到手机功能表中的“工具”-》“程序管理”选择菜单中的“设置”,打开第一项安装软件设置成允许所有软件。
原因是因为nokia 新版的部分手机默认只能安装nokia 厂方签名的程序,所以要重新设置一下。
终端支持列表:
【按机型下载】
支持诺基亚屏幕分辨率240*320以上支持三星屏幕分辨率240*320以上支持索爱屏幕分辨率240*320以上支持摩托罗拉分辨率240*320以上【按操作系统下载】
支持JAVA 通用版。