ch10ClusBasic
COLBOR CL100X视频灯用户手册说明书

Thank you for choosing COLBOR product. Please read this manualcarefully before use and follow all instructions mentioned herein.CL100X Video Light User ManualSafety InstructionsPlease read and fully understand this manual before using the product.Please remove the COB protective film to avoid damage by overheat beforefirst use.Please remove the COB protective cover to avoid damage by overheatbefore every use.Do not use the product under moist environment or with wet hands. Do notallow the product to be splashed or soaked in water.Keep the product away from corrosive chemicals and liquid to avoiddamage.Keep the product out of children’s reach during use. Do not leave theproduct unattended.When the product is working, the COB and heat sink will produce hightemperature. Do not block, turn upside down and touch with hands.To ensure the service life, the cooling system still runs for a while aftershutdown until the COB is below 45℃.Please disconnect the power supply and put away the power cord when it isnot in use.During use, arrange the power cord in order to avoid tripping and cutting offthe power or damaging the product.Let the product cool completely before storage. Remove the power cablefrom the product and put it in the corresponding position of carrying bagafter cooling down.Do not disassemble the product by yourself, otherwise the warranty will beinvalid. If any fault occurs, please refer it to an authorized technician forinspection or maintenance.Recommend to use the original parts of COLBOR. If the product is damageddue to the use of the non-original parts, it is not included in the warranty ofour products.Drop or external impact may cause product failure. Artificial damage is notcovered by warranty.COLBOR reserves the right of final interpretation of the products. Theproduct design and specifications are subject to change without notice.Product Instructions① COB Bead② Bead Radiator (Air Outlet)③ Bowen Mount Adaptor (BAR1)④ Ejector Pin⑤ Rail⑥ Air Vent (Air Intake)⑦ Quick-mount Holder (EC Stand)⑧ LCD Display Screen⑨ Brightness Control Wheel⑩ Color Temperature Control Wheel⑪ Setting (SET) Button⑫ Light Effect Frequency (RATE) Button⑬ Light Effect Mode (EFF) Button⑭ Color Temperature Mode (CCT) Button⑮ Type-C Power Input⑯ Switch ButtonInstallation & DisassemblyHold the COB protective cover and pull it out as thearrow shows.Note: Make sure remove the cover before every useto avoid heat damage.Power adapter (PA120) and V-port battery power cable (VC50) are onlyfor powering CL100X and CL100XM, not for other electronic devices. If anydamage caused by the wrong use, it is not within our warranty.①Align the inner frame of adapter ring with the outer frame of light, andpush the adapter ring into the light from the head. Fasten two marbles on theadapter ring to the chute.When disassembling, push the adapter ring towards the head of the light.①Slide the quick-mount holder into the chute under the light and rotate theknob a tightly.②Install tripod into the quick-mount holder and rotate the knob b tightly.③Slide the rail of one light into the chute of the other until the pins inlay.Slide VM2 into the chute of light, determine the fixed position and adjust thelever to lock.(1) Fixing power cablesScrew the power cable fixing clip, put thecable into the groove, and then align thebracket with the tightening screw.(2)DC power supplyConnect power adapter with Type-C powerinput and turn on.(3) Battery power supplyTurn on power after installing V-mount and battery.Operation Instructions1. Remove COB protective cover2. Install adapter and reflector3. Fixing of the video light4. Multi-light connection & disassembly5. Install VM26. Power supply1. Before using the product for the first time, please be sure to tear off theprotective film in front of the COB bead.2. Power On: connect the power cord with the power adapter, plug theconnector of adapter into the fixture’s power input, then attach to anelectricity supply.3. Function: long press the power button, then the power button lights up. Theproduct enters operation interface.(Factory default mode: CCT)4. Power Off: press the power button.Status Icon DescriptionCCT Mode (Short press CCT Mode Button to enter)operation②Align the reflector with the adapter ring and insert it. The ejector pin ispinched by reflector. Rotate the reflector tightly clockwise and the ejector pinsprings back.anticlockwise.Settings1. Short press Settings Button to enter settings menu.2. Roll the Brightness Control Wheel to choose setting.3. Roll the Color Temperature Control Wheel to adjust corresponding setting (Wireless connection adjust need short press).When Group function is on, if the product is operated after a period of time, it takes time to connect between products, so there will be millisecond delay.The effective distance of transmitter(TX), receiver (RX), transmitter & receiver (TXRX) is 10 meters.Repeater (RP) function is the auxiliary function to enhance the signal of light control and the effective distance of light control. However, too many uses of RP function can affect product response time due to environmental factors.If the distance between lights in a group is more than 10 meter, it isrecommended to set a light in the middle as a signal RP point to increase the control distance. In addition, in the state of multi-light connection, the response of the product can be effectively improved when the RP function of one light is turned on if connected lights are more than five, the RP function of two lights are turned on if there are more than ten, and so on.Restore factory settings: long press two wheels together for 5 secondsand the product reboots to restore the factory default mode.SpecificationsColor Rendering Index Beam AngleColor Temperature Range Illumination COB Output Power Rated PowerLight Working Voltage Cooling Mode Connector Body Material Light Dimension (mm)WeightOperating Environment Temperature97+≈∠120° Reflector ≈∠15°2700K~6500K(±200)See the Attachment 1. ≥100W120W(Max Power)DC 24V 5A SMART/QUIET Type-CAluminum Alloy+ABS152*80*90 (Light Base Not Included)Light: 800g Light Base: 160g -10~50℃Packaging ListLight x1Bowens Mount Standard Adapter(BAR1) x1Quick-mount Holder (EC Stand) x1Bowen Mouth Reflector (BSHR10) x1COB Protective Cover x1(PA120) x1x1x1WARRANTYWarranty PeriodThank you for purchasing COLBOR products.1. Customers are entitled to free replacement or repair service in case of quality defect(s) found in the product under normal use within 30 days upon receipt of the product.2. Original COLBOR products are entitled to 12-month limited warranty service. The warranty period begins on the date of purchase of brand new, unused products by the first end-user.Within the warranty period, if product defect or failure is attributable to material defection or technological problem, the defective product or defective part will be repaired or replaced without charge (service and materials fee).Warranty Exclusions and Limitations1. Faults resulted from inappropriate use of a product without following its operation specification2. Artificial damage, e.g. crash, squeeze, scratch, soaking, exposing to rain or damp3. Modifications to a product by its user or a third party without prior written consent of COLBOR, e.g. replacement of element or circuit, label alteration4. The code on product is inconsistent with that of warranty certificate, or the code on the product or warranty certificate is altered or torn off5. All consumable accessory attached to a product, like cable, cover6. Faults as a result of force majeure, such as fire, flood, lightning, etc.Warranty Claim Procedure1. If failure or any problem occurs to your product after purchase, please contact a local agent for assistance, or you can always contact COLBOR’s customer service through email.2. Please retain your sales receipt and warranty certificate as proof ofpurchase. If any of these documents is missing, only sales return or chargeable service will be provided.3. If the COLBOR product is out of the warranty coverage, the service and the parts cost will be charged.About Product1. After the test, the product with assembly structure has bearing capacity of 4kg. Customers need to use according to actual conditions.2. It is recommended to use the original power adapter for power supply. The malfuction will not be included in the warranty if use other equipment to power the product.3. When more than five lights are assembled into a light matrix, turning on the RP function in one of them to provide better control stability. If the number of lights reaches 10, enable the RP function for two of them,and so on.Attachment 1The data is given from testing in a laboratory.More functions of COLBORhttps:///pages/colbor-apps-downloadScan the above QR code to the webpage and download the relevant apps, so that you can be benefit with more functions such as remote light control and firmware upgrade.RESULT Solved Unsolved Returned(Replaced)Room 2401, 24 / F, South Tower, Lisheng Plaza, No. 68 Huadi Avenue, Liwan District, Guangzhou, China, 510000***********************Guangzhou Zhiying Technology Co., LtdIlluminationLight BaseLight BaseLight BaseLight BaseLight BaseReflector Reflector Reflector Reflector Reflector1mLUX FC LUX FC LUX FC LUX FC LUX FC LUX FC LUX FC LUX FC LUX FC LUX FC2910269192051783 346232223460 218536803422507023233749348256452381217217226723722787742622487682278269328628426957894634318291705014720011865555222432085905523922226075624502285m 3m CCT2700K3200K4300K5600K6500K3140292 210451955。
有机化学综合复习题及解答

有机化学综合复习题及解答1.写出下列反应的主要产物:OH OH+(1).H SO (CH 43)23CCH 2OH(2).(CH 3)2CC(CH 3)H 2(3).H 2SO 4(4).OHNaBr,H 2SO 4OH(5).OHHBr(6).OHPCC CH 2Cl 2CH 3CH 3(7).PBr HOH 3(8).O ()C MgBr C acetone12H 52H 5CH 3(2)H 3O +CH 3OCHCH CH 2OH(9).(10).CH H 5IO 6CH 33OHCH 3(11).H SO 4(A1)O 3H CH 23B(2)Zn,H 2OOH解答:O(1).(CH 3)2CCHCH 3(2).CH 3CC(CH 3)3(3).Br(4).CH 3(CH 2)3CH 2Br(5).(6).CH 3(CH 2)5CHOCH 3CH 3(7).HBr (8).OH +antiomer C 2H 5C 2H 5CH 3OHH 3C CH 3OO(9).(10).CH 3C(CH 2)4CCH(11).ACH 33CH 3CHCH CH 2CH 3CH 3BO CH 3O 2.解释下列现象:(1)为什么乙二醇及其甲醚的沸点随分子量的增加而降低?b.p.CH 2OH CH 2OH197CCH 2OCH 3CH 2OH125CCH 2OCH 3CH 2OCH 384C(2)下列醇的氧化(A)比(B)快?(A)OHMnO 2O(B)MnO 2OHO(3)在化合物(A )和(B )的椅式构象中,化合物(A )中的-OH 在e 键上,而化合物(B )中的-OH 却处在a 键上,为什么?(A)OH(B)OOOH解答:2.(1)醇分子中的羟基是高度极化的,能在分子间形成氢键,这样的羟基越多,形成的氢键越多,分子间的作用力越强,沸点越高。
甲醚的形成导致形成氢键的能力减弱,从而沸点降低。
(2)从产物看,反应(A )得到的是共轭体系的脂芳酮,而(B )没有这样的共轭体系。
Futaba10C-10CH中文说明书(1)

项设置或者功能的时候,都包含了大量的解释、描述文字,突出进行该项设置的“目的”、 该功能的“用途”,不像 14 通道或 12 通道设备配备的说明书,大量的篇幅用来说明菜单系 统、屏幕格局。此外,10C 说明书还注重功能设置、数据与和实际动作、设备的紧密联系, 对设置产生的实际效果描述十分清晰。 2. 英文说明书中对屏幕按键的使用方法写得“极为”详细,例如滚轮、导航键的组台使用方法 在几乎存在于每一页的设置举例中,这些表格看起来很复杂,但其实很简单,对于已经使用 过 Futaba9 通道遥控设备的用户,不必每 1 页的操作动作指引都看,按键使用方法与其它的 设备近似。之所以写得如此详细,是为了便于未接触过遥控器的初学者使用。 3. 对于各种类犁飞机、各重要功能项的基本设置原则介绍,是 10C 英文说明书中最“精华”的 内容,引导使用者进行正确的、快速的设置,请初次接触航空模型的用户多多注意,通过阅 读、揣摩,可以学到很多有用知识,本来译者有翻译 14z 说明书的成功先例,以为 10c 的说 明书会相对容易翻译一些,但仔细看过 10c 英文说明书后,即觉得它几乎是一本遥控模型设 置的基本手册,其间不乏模犁技术、原理、应用举倒,有些内容译者自己能理解,但用文字 正确表述出来,让爱好者在实际使用时能明白含义并且设定正确,确实让我们颇费番脑筋。 其中广泛涉及到各种倾斜盘操纵方式的直升机;各种空气动力布局的固定翼(3A 和滑翔机) 各种尾翼的操纵形式,让我们在翻译说明书的同时,对相对应的空气动力知识进行补充学习, 这个过程对我们自身的专业知识也是一个促进和提高。 4. 不同功能之间的关联性描述得十分清楚。例如在解释一项舵面混控功能之后,会列出与之相 关的多个混控项,并给出页码。 5. 不仅说明书正文通俗易懂,而且说明书的最后附有名词解释(专业词汇表),这也是其“贴 心”设计的重要表现。对文字理解有困难的用户可以用作参考。
Series 8 内置全自动咖啡机 CTL636ES6 产品说明书

Series 8, Built-in fully automatic coffee machine, Stainless steelCTL636ES6Included accessories1 x assembly screws, 1 x scoop, 1 x test strip, 1 x milk container (insulated), 1 x connection hose for milk frother, 1 x milk pipe Optional accessoriesTCZ7003 : Accessories small appliancesThe built-in coffee center with HomeConnect: offers unparalleled variety with highest comfort.Intelligent Heater inside: The sensoFlow System guarantees maximum espresso indulgence every time, thanks to its ideal,constant brewing temperatureOneTouch DoubleCup: Any coffee or milk speciality at the touch of a button - even two cups at the same timeAromaDouble Shot: Extra-strong coffee with less bitterness thanks to two grinding and brewing processesCeramDrive: High-quality grinder made of wear-resistant ceramicIntelligent Heater inside: Perfect brewing temperature and full aroma with the SensoFlow SystemTechnical DataBuilt-in / Free-standing : Built-in Frothing nozzle : No Display : NoWater protection system : noDimensions : 455 x 594 x 375 mmDimensions of the packed product (HxWxD) : 540 x 478 x 670mmHot water spout : No Standby function : YesSimultaneous preparation of 2 cups : YesIncluded accessories : 1 x assembly screws, 1 x scoop, 1 x test strip, 1 x milk container (insulated), 1 x connection hose for milk frother, 1 x milk pipeOptional accessories : TCZ7003, TCZ8001A, TCZ8002A,TCZ8004A, TCZ8009N, Y988081012, Y988081300Fuse protection : 10 A Voltage : 220-240 V Frequency : 50/60 HzPlug type : Gardy plug w/ earthingProduct group : Built-in coffee machine Brand : BoschProduct name/family : Built-in coffee machine Product name / Commercial code : CTL636ES6Main colour of product : Stainless steel Typology : Fully automaticLength electrical supply cord : 170.0 cm Maximum height for installation : 449 mm Dimensions : 455 x 594 x 375 mmDimensions of the packed product (HxWxD) : 540 x 478 x 670mmNet weight : 43.000 lbs Net weight : 19.7 kgGross weight : 49.000 lbs Gross weight : 22.3 kgCapacity water container : 2.4 lIncluded accessories : 1 x assembly screws, 1 x scoop, 1 x test strip, 1 x milk container (insulated), 1 x connection hose for milk frother, 1 x milk pipe'!2E 20A C -i f i b g !1/4Series 8, Built-in fully automatic coffee machine, Stainless steel CTL636ES6The built-in coffee center with HomeConnect: offers unparalleled variety with highest comfort.Flavour-Innovative heating system "senso flow system"-One-touch function for milk drinks-AromaDouble Shot - Extra strong coffee without compromisein aroma-Beverage temperature adjustable individually: 3 coffeetemperature levels., Hot water: 4 grades -optional Brita water filter: Improves the coffee's taste andprolongs the appliance's lifeConvenience-TFT display with interactive menu -20-250 ml-Coffee outlet is height-adjustable: Even 15cm high LatteMacchiato glasses fit underneath -Cappuccino: Prepare two cups simultaneously for all coffee and milk specialities-Removable 2.4 litre water tank-early warning when bean container or water tank are close toempty-Flexible milk solution: Decide for yourself if you preferconnecting the yes milk container or using any other container, e.g. a milk carton-Short user manual always at hand inside appliancePerformance-High-value ceramic grinding unit "silent ceram drive"-yes: The grinding unit automatically adjusts to bean variety -One-touch coffee milk specialities that specially creates fine-pored milk froth thanks to an innovative milk frother-Yes Yes separately available-Reduced heating-up time: fastest first cup!-Water pump with 19 bar pressure-Separate container for pre-grounded coffee-15.000 cup warranty: Consistently high appliance quality fromthe first cup to the 15,000th (valid for non-commercial use within 24 months)-Discover the new way of controlling home appliances: by app.The Home Connect app allows you to access the appliancefrom anywhere - at home using WiFi, when away from home using the mobile phone network.-Remote start: Select and configure beverages in the app, thenremotely start the beverage preparation-CoffeePlaylist: Enter multiple beverage wishes in the app atonce, e.g. for visitors; the appliance will then prepare them one after another-CoffeeWorld: 17 additional international coffee specialtiesare available in the app - from Australian Flat White to Vienna Melange to Colombian Cortado-Coffee recipes: The app offers a variety of recipes involvingcoffee, which can be transferred to the appliance or a Home Connect capable oven - from Espresso Crème brûlée to saddle of venison with coffee crunches-Coffee know-how: The app includes interesting knowledge around the topic coffee, e.g. bean varieties, harvesting methods or roasting techniques -User manual: A digital user manual is ready to hand at all times in the app-Customer service: In case of technical problems, the A01customer service is able to access the appliance virtually - if you want so-Security: Security is of top priority at Home Connect. TheHome Connect app has been tested and certified by TÜV IT.And the encrypted data transfer via Home Connect protocol protects against unauthorised access.-The availability of the Home Connect functionality dependson the availability of Home Connect services in your country.Home Connect services are not available in every country –for further information please check Hygiene-Removable brewing unit: Easy and hygienic cleaning underrunning water-steam blast: Fully-automatic steam cleaning of the milk systemis done after every beverage -All milk nozzle parts are easily removable, separable , easy to clean & dishwasher-proof -yes: Complete emptying of all pipes after each brewing process-Automatic quick rinse programme when switched on or off-Removable drip dish including container for coffee grounds -Fully automatic descaling & cleaning programme-Display of remaining cups before Decalcification, Cleaning,Change of water filter Miscellaneous-Containers for water, milk and coffee beans are easilyaccessible yet hidden behind a door, so the kitchen always looks clean-Bean container with aroma preserving lid for up to 500grams -Adjustable grind settings (multilevel)-Different display languages available-child-proof lock: key lock preventing unintended brewing cycle -Wattage: 1600 W2/4Accessories-isolated milk container with aluminium housing (0.7 l volume)-Included accessories: scoop, test strip, connection hose formilk frother, milk container (insulated), assembly screws-Separately available accessories: cleaning tablets (TZ60001),descaling tablets (TCZ8002), BRITA Intenza water filter(TCZ7003), care set for fully-automatic espresso makers(TCZ8004), insulated milk container (TCZ8009N)3/4Series 8, Built-in fully automatic coffeemachine, Stainless steelCTL636ES64/4。
金士顿SDHC SDXC类10UHS-I卡产品说明说明书

/FLASH> Class 10 UHS-I speeds > Multiple capacities up to 128GB > Built and tested to withstand harsh environmentsKingston’s SDHC/SDXC Class 10 UHS-I card is designed to be fast, with reduced buffer time between shots, making it ideal for cinema-quality full HD video and 3D video.1 It’s available in multiple capacities up to 128GB, toprovide plenty of space for HD videos and hi-res photos, and it’s tested to be durable, so you can take it anywhere with confidence that your photos, videos and other data will be protected, even in harsh or unstable conditions.SDHC/SDXC Class 10 UHS-I CardFast speeds to capture HD video.Features/specs on reverse >>Shock and vibration proof4Waterproof2Protected from airport X-rays 5Temperature proof 3THIS DOCUMENT SUBJECT TO CHANGE WITHOUT NOTICE.©2015 Kingston Technology Corporation, 17600 Newhope Street, Fountain Valley, CA 92708 USA.All rights reserved. All trademarks and registered trademarks are the property of their respective owners. USMKD-320SDHC/SDXC Class 10 UHS-I CardKINGSTON PART NUMBERSSD10VG2/16GB SD10VG2/32GB SD10VG2/64GB SD10VG2/128GBFEATURES/ BENEFITS>UHS-I interface — The advanced UHS-I interface makes the card ideal for cinema-quality full HD (1080p), 3D video and photos of subjects in motion, such as kids and pets>Versatile — When used in a non-UHS-I capable device, the card delivers Class 10 performance. It’s great for capturing still images, such as vacation photos, and for capturing full HD videos >Durable — For your peace of mind, the card has been extensively tested and proven to be waterproof, 2 temperature proof,3 shock and vibration proof 4 and X-ray proof 5>Guaranteed — Rest assured your card is covered by a lifetime warranty, free technical support and the legendary reliability that makes Kingston the world’s independent memory leaderSPECIFICATIONS>Capacities 6 16GB, 32GB, 64GB, 128GB>Performance 7 45MB/s read, ultra high-speed bus I (UHS-I) >Dimensions 0.94” x 1.25” x 0.08” (24mm x 32mm x 2.1mm) >File Format FAT32 (SDHC 16GB-32GB);exFAT (SDXC 64GB-128GB)>Operating Temperature -13°F to 185°F (-25°C to 85°C) >Storage Temperature -40°F to 185°F (-40°C to 85°C) >Voltage 3.3v >Warranty 8 Lifetime1 These Class 10 cards are meant for HD video recording but do not support some simultaneous video and still capture features.2 IEC/EN 60529 IPX7 certified for protection against continual water submersion up to 30 min. and depth up to 1m.3 Withstands temperature range from -25 °C to 85 °C4 Based on MIL-STD-883H, METHOD 2002.5 military standard test method.5 ISO 7816-1 certified for protection against 0.1 Gy of X-ray radiation to both sides of card.6 Some of the listed capacity on a Flash storage device is used for formatting and thus is not available for data storage. As such, the actual available capacity for data storage is less than what is listed on the products. For more information, go to Kingston’s Flash Memory Guide at /flashguide.7 Speed may vary due to host and device configuration.8 Kingston Flash Cards are designed and tested for compatibility with consumer-grade market products. It is recommended that you contact Kingston directly for any OEM opportunities or special useapplications that are beyond standard daily consumer usage. For more information on intended use, please refer to the Flash Memory Guide at /flashguideOPTIONAL ACCESSORIESFCR-MLG4 – MobileLite G4, USB 3.0 Card Reader FCR-HS 4 – USB 3.0 All-in-One Media Reader。
卡萨帝洗衣机 C1 HD10L6ELU1说明书
C1 HD10L6ELU1C1 HD10L6ELU11APP使用说明23456X 1X 4 套X 6X 1X 1X 2X 1袋内。
降噪毛毡放置于包装顶盖上。
说明书放置于台面上。
洗涤剂参考用量表X 12.78共有11种程序可选;洗干模式中,共有11种程序可选;护理模式中,共有7种程序可选;具体程序的操作说明,请参照照第21-22页的程序数据参考。
如下图所示,若不对洗涤参数进行设置,可直接使用默认参数,触按触按图标开机后,显示屏会显示默认的程序和参数。
用户可以根据洗衣物的种类和数量选择洗衣模式和程序。
触按键开始洗涤。
如下图所示,若不对洗干参数进行设置,可直接使用默认参数,触按键开始洗涤。
单烘程序下,可通过“+”和“-”详细设定AU(智能)、30、60、90、120、150分等参数。
右用户可根据需要对详细参数和功能进行调节、选择,某些程序只有部分参数功能可调节。
用户进入洗涤/洗干模式后,可根据需要详细设定智慧配给、紫外、预约、温度、漂洗、转速等参数。
洗涤/洗干参数调节后,洗涤/洗干时间也会自动调整。
若不对洗涤/洗干参数进行调节,则可直接使用默认参数。
用户进入护理模式后,可根据需要详细设定标准、除菌、祛味、除皱、蓬松、除潮 等参数。
在待机状态下,触按“智慧配给”按键,可打开或关闭精萃洗衣液、净白助洗剂、柔顺亮色剂功能,显示高亮表示功能打开,显示半亮表示功能关闭,显示熄灭表示功能不可选。
连续触按智慧配给按键,可循环显示多种投放功能组合。
精萃洗衣液/净白助洗剂/柔顺亮色剂/洗干/护理如下图所示,若不对护理参数进行设置,可直接使用默认参数,触按键开始护理。
“精萃洗衣液、净白助洗剂、柔顺亮色剂”为各自显示高亮时,分别触按上述按键选择专 下触按无效。
表示专属, 表示浓缩, 表示普通。
洗剂”、“柔顺亮色剂”按键可调节投放量,触按的按键高亮,其他半亮,精萃洗衣液循环显示d-1、d-2、d-3、d-4,净白助洗剂循环显示Z-1、Z-2、Z-3、Z-4,柔顺亮色剂循环显示S-1、S-2、S-3、S-4;5秒无操作或触按智慧配给按键退出该模式。
摩托罗拉CL10xC系列子母机说明书

3. 使用座机............................................................................17
机与一个外线之间的三方会议。 • 座机和无绳子机上有18种不同的和弦铃声,可用于外线呼叫。
需要帮助? 如果您在设置和使用CL1C方面存在任何问题,请联系我们客户服务部 门:4008-838-698。 或者,您可以查阅本说明书最后的“帮助”章节。 注释: 1仅有有限的功能。 2您必须向您的网络供应商申请开通来电显示服务,才能支持此功能的 服务。这可能需要支付订购费。
4
6. 座机设置............................................................................23
6.1 设置铃声................................................................................... 23 6.2 设置铃声音量.......................................................................... 23 6.3 设置日期和时间..................................................................... 23 6.4 设置闹钟................................................................................... 23 6.5 对比度........................................................................................ 24 6.6 拨号模式................................................................................... 24 6.7 闪断时间................................................................................... 24 6.8 PABX接入代码.......................................................................... 24 6.9 地区代码................................................................................... 25 6.10 恢复默认设置.......................................................................... 25 6.11 默认设置................................................................................... 25
NI 9220 16 AI, ±10 V, 16 Bit, 100 kS s ch Simultan
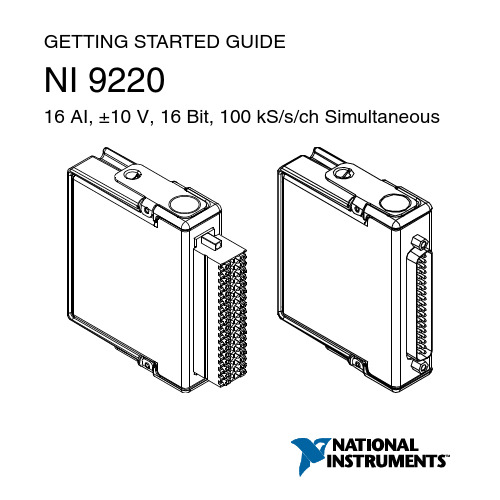
GETTING STARTED GUIDENI 922016 AI, ±10 V, 16 Bit, 100 kS/s/ch SimultaneousThis document explains how to connect to the NI 9220. In this document, the NI 9220 with spring terminal and the NI 9220 with DSUB are referred to inclusively as the NI 9220.Note Before you begin, complete the software andhardware installation procedures in your chassisdocumentation.Note The guidelines in this document are specific tothe NI 9220. The other components in the system mightnot meet the same safety ratings. Refer to thedocumentation for each component in the system todetermine the safety and EMC ratings for the entiresystem.Caution Electrostatic Discharge (ESD) can damagethe NI 9220 with spring terminal. To prevent damage,use industry-standard ESD prevention measures duringinstallation, maintenance, and operation.Safety GuidelinesOperate the NI 9220 only as described in this document.2| | NI 9220 Getting Started GuideCaution Do not operate the NI 9220 in a manner notspecified in this document. Product misuse can result ina hazard. You can compromise the safety protectionbuilt into the product if the product is damaged in anyway. If the product is damaged, return it to NI forrepair.Hazardous Voltage This icon denotes a warningadvising you to take precautions to avoid electricalshock with the NI 9220 with spring terminal. Safety VoltagesConnect only voltages that are within the following limits:NI 9220 with Spring Terminal Isolation Voltages Channel-to-channel NoneChannel-to-earth groundContinuous250 Vrms,Measurement Category IIWithstand up to 4,000 m 3,000 Vrms, verified by a 5 s dielectric withstand testNI 9220 Getting Started Guide| © National Instruments| 3Measurement Category II is for measurements performed on circuits directly connected to the electrical distribution system. This category refers to local-level electrical distribution, such as that provided by a standard wall outlet, for example, 115 V for U.S. or 230 V for Europe.Caution Do not connect the NI 9220 with springterminal to signals or use for measurements withinMeasurement Categories III or IV.NI 9220 with DSUB Safety VoltagesChannel-to-COM±30 V maximumIsolationChannel-to-COM NoneChannel-to-earth groundContinuous60 VDC, MeasurementCategory IWithstand up to 2,000 m 1,000 Vrms, verified by a 5 s dielectric withstand testMeasurement Category I is for measurements performed on circuits not directly connected to the electrical distribution system 4| | NI 9220 Getting Started Guidereferred to as MAINS voltage. MAINS is a hazardous live electrical supply system that powers equipment. This category is for measurements of voltages from specially protected secondary circuits. Such voltage measurements include signal levels, special equipment, limited-energy parts of equipment, circuits powered by regulated low-voltage sources, and electronics.Caution Do not connect the NI 9220 with DSUB tosignals or use for measurements within MeasurementCategories II, III, or IV.Safety Guidelines for Hazardous VoltagesYou can connect hazardous voltages only to theNI 9220 with spring terminal. Do not connect hazardous voltages to the NI 9220 with DSUB.If hazardous voltages are connected to the device, take the following precautions. A hazardous voltage is a voltage greater than 42.4 Vpk voltage or 60 VDC to earth ground.Caution Ensure that hazardous voltage wiring isperformed only by qualified personnel adhering to localelectrical standards.NI 9220 Getting Started Guide| © National Instruments| 5Caution Do not mix hazardous voltage circuits andhuman-accessible circuits on the same module.Caution Ensure that devices and circuits connected tothe module are properly insulated from human contact.Caution When module terminals are hazardousvoltage LIVE (>42.4 Vpk/60 VDC), you must ensurethat devices and circuits connected to the module areproperly insulated from human contact. You must usethe NI 9940 connector backshell kit to ensure that theterminals are not accessible.Safety Guidelines for Hazardous LocationsThe NI 9220 is suitable for use in Class I, Division 2, Groups A, B, C, D, T4 hazardous locations; Class I, Zone 2, AEx nA IIC T4 and Ex nA IIC T4 hazardous locations; and nonhazardous locations only. Follow these guidelines if you are installing the NI 9220 in a potentially explosive environment. Not following these guidelines may result in serious injury or death.Caution Do not disconnect I/O-side wires orconnectors unless power has been switched off or thearea is known to be nonhazardous.6| | NI 9220 Getting Started GuideCaution Do not remove modules unless power hasbeen switched off or the area is known to benonhazardous.Caution Substitution of components may impairsuitability for Class I, Division 2.Caution For Division 2 and Zone 2 applications,install the system in an enclosure rated to at least IP54as defined by IEC/EN 60079-15.Caution For Division 2 and Zone 2 applications,connected signals must be within the following limits. Capacitance0.2 µF maximumSpecial Conditions for Hazardous Locations Use in Europe and InternationallyThe NI 9220 has been evaluated as Ex nA IIC T4 Gc equipment under DEMKO 12 ATEX 1202658X and is IECEx UL 14.0089X certified. Each NI 9220 is marked II 3G and is suitable for use in Zone 2 hazardous locations, in ambient temperatures of -40 °C ≤ Ta ≤ 70 °C. If you are using the NI 9220 in Gas Group IIC hazardous locations, you must use the device in an NI chassis thatNI 9220 Getting Started Guide| © National Instruments| 7has been evaluated as Ex nC IIC T4, Ex IIC T4, Ex nA IIC T4, or Ex nL IIC T4 equipment.Caution You must make sure that transientdisturbances do not exceed 140% of the rated voltage.Caution The system shall only be used in an area ofnot more than Pollution Degree 2, as defined inIEC/EN 60664-1.Caution The system shall be mounted in anATEX/IECEx-certified enclosure with a minimumingress protection rating of at least IP54 as defined inIEC/EN 60079-15.Caution The enclosure must have a door or coveraccessible only by the use of a tool.Electromagnetic Compatibility Guidelines This product was tested and complies with the regulatory requirements and limits for electromagnetic compatibility (EMC) stated in the product specifications. These requirements and limits provide reasonable protection against harmful interference 8| | NI 9220 Getting Started Guidewhen the product is operated in the intended operational electromagnetic environment.This product is intended for use in industrial locations. However, harmful interference may occur in some installations, when the product is connected to a peripheral device or test object, or if the product is used in residential or commercial areas. To minimize interference with radio and television reception and prevent unacceptable performance degradation, install and use this product in strict accordance with the instructions in the product documentation.Furthermore, any changes or modifications to the product not expressly approved by National Instruments could void your authority to operate it under your local regulatory rules.Caution To ensure the specified EMC performance ofthe NI 9220 with DSUB, the length of all I/O cablesmust be no longer than 30 m (100 ft).Caution To ensure the specified EMC performance,operate this product only with shielded cables andaccessories. Do not use unshielded cables oraccessories unless they are installed in a shieldedenclosure with properly designed and shielded input/NI 9220 Getting Started Guide| © National Instruments| 9output ports and connected to the product using ashielded cable. If unshielded cables or accessories arenot properly installed and shielded, the EMCspecifications for the product are no longer guaranteed. Special Conditions for Marine ApplicationsSome products are Lloyd’s Register (LR) Type Approved for marine (shipboard) applications. To verify Lloyd’s Register certification for a product, visit /certification and search for the LR certificate, or look for the Lloyd’s Register mark on the product.Caution In order to meet the EMC requirements formarine applications, install the product in a shieldedenclosure with shielded and/or filtered power andinput/output ports. In addition, take precautions whendesigning, selecting, and installing measurement probesand cables to ensure that the desired EMC performanceis attained.10| | NI 9220 Getting Started GuidePreparing the EnvironmentEnsure that the environment in which you are using the NI 9220 meets the following specifications.Operating temperature(IEC 60068-2-1, IEC 60068-2-2)-40 °C to 70 °COperating humidity (IEC 60068-2-78)10% RH to 90% RH, noncondensingPollution Degree2Maximum altitudeFor NI 9220 withspring terminal4,000 mFor NI 9220 withDSUB2,000 mIndoor use only.Note Refer to the device datasheet on /manualsfor complete specifications.NI 9220 Getting Started Guide| © National Instruments| 11NI 9220 Pinout12| | NI 9220 Getting Started GuideGrounded Differential ConnectionsNI 9220 Getting Started Guide| © National Instruments| 13Floating Differential ConnectionsConnect the negative lead to COM through a 1 MΩ resistor to keep the signal source within the common-mode voltage range. The NI 9220 does not read data accurately if the signal source is outside of the common-mode voltage range.14| | NI 9220 Getting Started GuideSingle-Ended ConnectionsConnect the ground signal to COM to keep the signal source within the common-mode voltage range.NI 9220 Connection Guidelines•Make sure that devices you connect to the NI 9220 are compatible with the module specifications.•You must use 2-wire ferrules to create a secure connection when connecting more than one wire to a single terminal on the NI 9220 with spring terminal.NI 9220 Getting Started Guide| © National Instruments| 15•For the NI 9220 with spring terminal, push the wire into the terminal when using a solid wire or a stranded wire with aferrule.•For the NI 9220 with spring terminal, open the terminal by pressing the push button when using stranded wire without a ferrule.High-Vibration Application ConnectionsIf your application is subject to high vibration, NI recommends that you use the NI 9940 backshell kit to protect connections to the NI 9220 with spring terminal.Overvoltage ProtectionThe NI 9220 provides overvoltage protection for each channel.Note Refer to the device datasheet on /manualsfor more information about overvoltage protection.16| | NI 9220 Getting Started GuideWhere to Go NextLocated at /manuals NI 9220 Getting Started Guide | © National Instruments | 17Worldwide Support and ServicesThe NI website is your complete resource for technical support. At /support, you have access to everything from troubleshooting and application development self-help resources to email and phone assistance from NI Application Engineers. Visit /services for NI Factory Installation Services, repairs, extended warranty, and other services.Visit /register to register your NI product. Product registration facilitates technical support and ensures that you receive important information updates from NI.A Declaration of Conformity (DoC) is our claim of compliance with the Council of the European Communities using the manufacturer’s declaration of conformity. This system affords the user protection for electromagnetic compatibility (EMC) and product safety. You can obtain the DoC for your product by visiting /certification. If your product supports calibration, you can obtain the calibration certificate for your product at /calibration.18| | NI 9220 Getting Started GuideNI corporate headquarters is located at11500 North Mopac Expressway, Austin, Texas, 78759-3504. NI also has offices located around the world. For telephone support in the United States, create your service request at /support or dial 1 866 ASK MYNI (275 6964). For telephone support outside the United States, visit the Worldwide Offices section of /niglobal to access the branch office websites, which provide up-to-date contact information, support phone numbers, email addresses, and current events.NI 9220 Getting Started Guide| © National Instruments| 19Refer to the NI Trademarks and Logo Guidelines at /trademarks for information on NI trademarks. Other product and company names mentioned herein are trademarks or trade names of their respective companies. For patents covering NI products/technology, refer to the appropriate location: Help»Patents in your software, the patents.txt file on your media, or the National Instruments Patent Notice at /patents. Y ou can find information about end-user license agreements (EULAs) and third-party legal notices in the readme file for your NI product. Refer to the Export Compliance Information at /legal/export-compliance for the NI global trade compliance policy and how to obtain relevant HTS codes, ECCNs, and other import/ export data. NI MAKES NO EXPRESS OR IMPLIED WARRANTIES AS TO THE ACCURACY OF THE INFORMATION CONTAINED HEREIN AND SHALL NOT BE LIABLE FOR ANY ERRORS. U.S. Government Customers: The data contained in this manual was developed at private expense and is subject to the applicable limited rights and restricted data rights as set forth in FAR 52.227-14, DFAR 252.227-7014, and DFAR 252.227-7015.© 2017 National Instruments. All rights reserved.378023A-01Jan17。
- 1、下载文档前请自行甄别文档内容的完整性,平台不提供额外的编辑、内容补充、找答案等附加服务。
- 2、"仅部分预览"的文档,不可在线预览部分如存在完整性等问题,可反馈申请退款(可完整预览的文档不适用该条件!)。
- 3、如文档侵犯您的权益,请联系客服反馈,我们会尽快为您处理(人工客服工作时间:9:00-18:30)。
Considerations for Cluster Analysis
Partitioning criteria
Single level vs. hierarchical partitioning (often, multi-level hierarchical partitioning is desirable)
Clustering precipitation in Australia
6
Clustering: Rich Applications and Multidisciplinary Efforts
Pattern Recognition
Spatial Data Analysis
Create thematic maps in GIS by clustering feature spaces
Localizing search to one or a small number of clusters Outliers are often viewed as those ―far away‖ from any cluster
5
Compression:
Finding K-nearest Neighbors
9
Measure the Quality of Clustering
Dissimilarity/Similarity metric Similarity is expressed in terms of a distance function, typically metric: d(i, j) The definitions of distance functions are usually rather different for interval-scaled, boolean, categorical, ordinal ratio, and vector variables Weights should be associated with different variables based on applications and data semantics Quality of clustering: There is usually a separate ―quality‖ function that measures the ―goodness‖ of a cluster. It is hard to define ―similar enough‖ or ―good enough‖ The answer is typically highly subjective
7
Quality: What Is Good Clustering?
A good clustering method will produce high quality clusters
high intra-class similarity: cohesive within clusters low inter-class similarity: distinctive between clusters
Chapter 10. Cluster Analysis: Basic Concepts and Methods
Cluster Analysis: Basic Concepts Partitioning Methods Hierarchical Methods Density-Based Methods Grid-Based Methods Evaluation of Clustering
The quality of a clustering method depends on
the similarity measure used by the method its implementation, and Its ability to discover some or all of the hidden patterns
Summary
1
What is Cluster Analysis?
Finding groups of objects such that the objects in a group will be similar (or related) to one another and different from (or unrelated to) the objects in other groups
4
Clustering as a Preprocessing Tool (Utility)
Summarization:
Preprocessing for regression, PCA, classification, and association analysis Image processing: vector quantization
Outlier detection
Applications of Cluster Analysis
Understanding Group related documents for browsing, group genes and proteins that have similar functionality, or group stocks with similar price fluctuations Summarization Reduce the size of large data sets
Intra-cluster distances are minimized Inter-cluster distances are maximized
2
What is Cluster Analysis?
Cluster: A collection of data objects similar (or related) to one another within the same group dissimilar (or unrelated) to the objects in other groups Cluster analysis (or clustering, data segmentation, …) Finding similarities between data according to the characteristics found in the data and grouping similar data objects into clusters Unsupervised learning: no predefined classes (i.e., learning by observations vs. learning by examples: supervised) Typical applications As a stand-alone tool to get insight into data distribution As a preprocessing step for other algorithms
Similarity measure
Distance-based (e.g., Euclidian, road network, vector) vs. connectivity-based (e.g., density or contiguity)
Clustering space
Full space (often when low dimensional) vs. subspaces (often in high-dimensional clustering)
Separation of clusters
Exclusive (e.g., one customer belongs to only one region) vs. nonexclusive (e.g., one document may belong to more than one class)
3
Clustering for Data Understanding and Applications
Biology: taxonomy of living things: kingdom, phylum, class, order, family, genus and species Information retrieval: document clustering Land use: Identification of areas of similar land use in an earth observation database Marketing: Help marketers discover distinct groups in their customer bases, and then use this knowledge to develop targeted marketing programs City-planning: Identifying groups of houses according to their house type, value, and geographical location Earth-quake studies: Observed earth quake epicenters should be clustered along continent faults Climate: understanding earth climate, find patterns of atmospheric and ocean Economic Science: market resarch