w3af tutorial
SVG基础教程(Tutorials Point)说明书

About the T utorialScalable Vector Graphics commonly known as SVG is a XML based format to draw vector images. It is used to draw twodimentional vector images.This tutorial will teach you basics of SVG. Also, this training material contains chapters discussing all the basic components of SVG with suitable examples.AudienceThis tutorial has been prepared for beginners to help them understand the basic concepts related to SVG. Also, it will give you enough understanding on SVG from where you can take yourself to a higher level of expertise.PrerequisitesBefore proceeding with this tutorial, it is advisable to have some basic knowledge of XML, HTML, and JavaScript.Disclaimer & CopyrightCopyright 2015 by Tutorials Point (I) Pvt. Ltd.All the content and graphics published in this e-book are the property of Tutorials Point (I) Pvt. Ltd. The user of this e-book is prohibited to reuse, retain, copy, distribute, or republish any contents or a part of contents of this e-book in any manner without written consent of the publisher. We strive to update the contents of our website and tutorials as timely and as precisely as possible, however, the contents may contain inaccuracies or errors. Tutorials Point (I) Pvt. Ltd. provides no guarantee regarding the accuracy, timeliness, or completeness of our website or its contents including this tutorial. If you discover any errors on our website or in this tutorial, please notify us at **************************iT able of ContentsAbout the Tutorial (i)Audience (i)Prerequisites (i)Disclaimer & Copyright (i)Table of Contents ...................................................................................................................................... i i SVG – OVERVIEW (1)What is SVG? (1)Advantages (1)Disadvantages (1)Example (1)How SVG Integrates with HTML (2)SVG – SHAPES (4)SVG Rect (4)SVG Circle (7)SVG Ellipse (9)SVG Line (12)SVG Polygon (14)SVG Polyline (17)SVG Path (19)SVG – TEXT (24)Declaration (24)Attributes (24)Example (25)SVG – STROKE (27)iiExample (27)SVG – FILTERS (30)Declaration (30)Attributes (31)Example (31)SVG – PATTERNS (34)Declaration (34)Attributes (34)Example (35)SVG – GRADIENTS (37)Linear Gradients Declaration (37)Attributes (37)Example (38)Radial Gradients Declaration (39)Attributes (40)Example (41)SVG – INTERACTIVITY (43)Example (43)Explanation (44)SVG – LINKING (46)Declaration (46)Attributes (46)Example (46)iiiSVG 1What is SVG?∙SVG, Scalable Vector Graphics is an XML based language to define vector based graphics. ∙SVG is expected to display images over the web. ∙As these are vector images, SVG images never drops on quality no matter how they are zoomed out or resized. ∙SVG images supports interactivity and animation. ∙SVG is a W3C standard. ∙Other image formats like raster images can also be clubbed with SVG images. ∙ SVG integrates well with XSLT and DOM of HTML.Advantages∙Use any text editor to create and edit SVG images. ∙Being XML based, SVG images are searchable, indexable and can be scripted and compressed. ∙SVG images are highly scalable as they never loses quality no matter how they are zoomed out or resized ∙Good printing quality at any resolution ∙ SVG is an Open StandardDisadvantages∙Since text format size is larger, it is generally compared to binary formatted raster images. ∙ Size can be big even for a smaller image.ExampleFollowing XML snippet can be used to draw a circle in web browser. <svg width="100" height="100"><circle cx="50" cy="50" r="40" stroke="red" stroke-width="2" fill="green" /> </svg>Embed the SVG XML directly in an HTML page.testSVG.htm<html><title>SVG Image</title>SVG – OVERVIEWSVG<body><h1>Sample SVG Image</h1><svg width="100" height="100"><circle cx="50" cy="50" r="40" stroke="red" stroke-width="2" fill="green" /></svg></body></html>OutputOpen textSVG.htm in Chrome web browser. You can use Chrome/Firefox/Opera to view SVG image directly without any plugin. In Internet Explorer, activeX controls are required to view SVG images.How SVG Integrates with HTML∙<svg> element indicates the start of SVG image.∙<svg> element's width and height attributes defines the height and width of the SVG image.∙In the above example, we've used a <circle> element to draw a circle.∙cx and cy attribute represents center of the circle. Default value is (0,0).∙“r”attribute represents radius of circle.∙Other attribues stroke and stroke-width controls the outlining of the circle.2SVG ∙fill attributes defines the fill color of the circle.∙Closing</svg> tag indicates the end of SVG image.3SVGEnd of ebook previewIf you liked what you saw…Buy it from our store @ https://4。
ER3A-C60系列机器人编程手册20150701v1.1
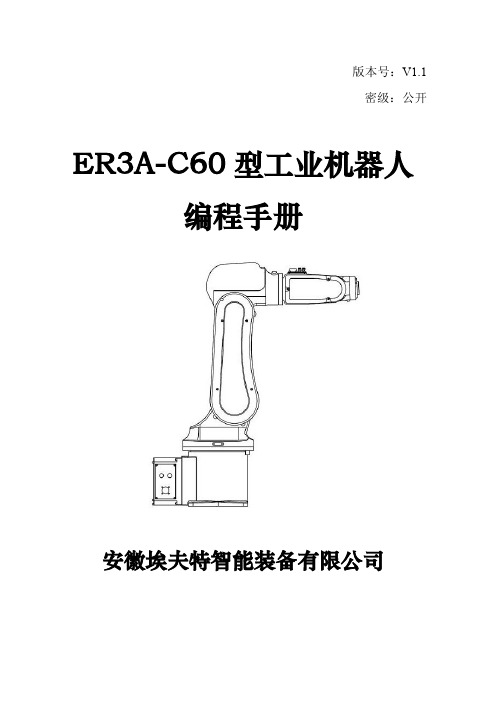
埃夫特
修订记录 V1.0 v1.1
C60控制系统
2014.09.08 2015.06.08
- 编程手册 - 电气手册 - 机械手册
安徽埃夫特智能装备有限公司
目录
第一章 基本安全预防措施................................................................................................1 1.1 安全责任................................................................................................................1 1.2 安全预防措施........................................................................................................1 1.2.1 目的..........................................................................................................1 1.2.2 定义..........................................................................................................1 1.2.3 适用范围..................................................................................................2
W3D教程_1

3D基础Macromedia Director MX能让你建立强大的高性能的web3D图形。
Director MX能让你更大程度的开发一个3D产品——从简单的字处理到交互式产品演示再到完成虚拟游戏场景。
使用Macromedia免费的Shockwave播放器8.5,用户可以通过Netscape、IE或其它支持Shockwave的浏览器看到你的web作品。
Director MX可以让你检测使用者的系统能力,同时根据使用者的系统能力进行调整。
一台带3D图形加速卡的计算机可以获得最佳的效果,使用者可以成功的在装有Macintosh 或者Windows系统的硬件平台使用Director MX 3D电影。
速度快的计算机的图形处理效果好。
经过调整的客户端处理能力使得web传送Director MX理想。
需要了解的内容Director MX是Director的一步大的推进。
如果你不熟悉Director,在使用Director MX 3D 前,你将在Director MX文档和帮助的开始部分中很少的基础质始中获益。
你可以使用Director内置的3D行为库完成一些基础的3D操作。
获得更多关于这些行为的信息,请参考使用3D行为库。
更多复杂的3D操作,可以使用Director内置的scripting 语言。
这里的3D文档是帮助不懂得Lingo的人所编。
如果你没有学习过Lingo,你可以从使用Lingo写Scripts开始。
你应熟练使用Lingo字典——一本通过字母排序包括所有的Lingo 命令和可以获得的属性。
Lingo字典定义了每一个Lingo表达式,并说明它们的语法,同时提供相应的例子。
因为3D主要是通过Lingo来实现控制的,所以在详细资料中说明了新的3D命令和属性。
你将在第18到20章中通过分类找到它们。
在Lingo字典中同样给出了这些命令和属性,同时提供相应的说明和代码例子。
从2D到3D因为Director MX处于不断发展,很多关于Director你所知的功能仍然具备。
W3D教程_3

模型和模型源的处理本章覆盖了处理模型和模型源的Lingo命令和属性的使用,以及灯光和摄像机来增强Macromedia Director MX三维(3D)影片。
你也能通过在字母表中找到这些命令和属性,在Lingo字典中(帮助>Lingo字典)有相应的语法、定义和举例。
因为一个模型的大量行为依赖于调节器(模型的调节器),这一章同样也讨论了调节器。
通过阴影和材质,显示一个模型的外观,也在这被讨论。
其中还有3D域和模型的灯光照射。
没有灯,域依然存在和操作也能发生,但使用者看不到任何东西。
你可以在你的3D建模程序或者使用Macromedia Director MX属性检查工具,在3D域中添加灯光。
摄像机行为作为一个3D域的窗口。
在一个3D演员中的每一个摄像机提供一个不同的视角,同时使用一个3D演员的每一个sprite应用其中的一个摄像机。
一个摄像机的位置可以被属性检查工具或者Shockwave 3D窗口移动。
你也可以用Director 3D行为或者Lingo来操作摄像机的位置。
关于模型和模型源模型是你在3D域中看到的对象。
你可以在Macromedia Director MX中建立模型,立方体、平面、圆柱体和粒子系统都能用Lingo或Dirctor MX behaviors其中一种来建立。
这些简单的形状被称为图元(primitives)。
它们是建立更多复杂模型的基础形状。
(粒子系统与其他的图元不同;是形状的取代,它们建立移动粒子的串联。
)更多的部件,只能在Director之外来建立一些复杂的模型,使用一种3D建模软件,并以W3D格式引入Director。
存取模型或其它节点类型的属性和命令需要这个节点在舞台上或者用preload()或loadFile()命令明确的载入。
下面的段落更详细地描述了模型、模型源和图元,直到你会使用Lingo来处理它们。
模型源模型源是在3D建模软件或者在Director 8.5 Shockwave Studio中Lingo建立的3D几何结构定义。
Electrolux Type W3 Manual

Electrolux Type W3 ManualBeaver Dhc2 Instrument ManualBeaver Dhc2 Instrument Manual DHC 2 Homemade beaver cockpit to scale Download Electrolux type w3 manual.pdf Download Respironics everflo user manual.pdf/beaver-dhc2-instrument-manual-ghreeoo.pdfAeon Cobra 110 ManualAeon Cobra 110 Manual Preloved | cobra quads for sale UK and Ireland Download Electrolux type w3 manual.pdf Download 1998 vz800 repair manual.pdf/aeon-cobra-110-manual-rvbwzbx.pdfFRT18L4JW3 Frigidaire Top Freezer RefrigeratorFRT18L4JW3 Frigidaire Manual hold control and F, and type Normal Operating Sounds & Sights . 10 Order Genuine Electrolux Parts/Manuals/Frigidaire/Description/FRT18L4JW3/Frigidaire%20Top% 20Freezer%20Refrigerator%20Owners%20Manual/241857201en/Briggs And Stratton Model 28c707 ManualElectrolux operating manual type w3.pdf Vw sharan electric manual.pdf Personality assessment inventory manual.pdf Ultimate wealth guide.pdf/hwa/briggs-and-stratton-model-28c707-manual-9729463.pdfWashing machine - Wikipedia, the free encyclopediaA washing machine (laundry machine, clothes washer, or washer) is a machine used to wash laundry, such as clothing and sheets. The term is mostly applied to machines/wiki/Washing_machineFRT17B3AW3 Frigidaire Top Freezer RefrigeratorManuals For Same Model Number. If you want to search this text, hold control and F, and type the word # 240379010 TOP MOUNT REFRIGERATOR Model No . ELECTROLUX/Manuals/Frigidaire/Description/FRT17B3AW3/Frigidaire%20Top %20Freezer%20Refrigerator%20Parts%20And%20Diagrams/5995379806/Electrolux Operating Manual Type W3Electrolux Operating Manual Type W3 User Manuals | Support | Electrolux Download a user manual for you Electrolux product. Store Locator; Products./a91d5ed5783f11fc0667563a4247f00c.pdfHomelite Bandit St155 Strimmer ManualDownload Nordyne furnace manual b5bm x30k.pdf Download 2001 cavalier repair manual.pdf Download 9th class maths guide mcq.pdf Download Electrolux type w3 manual.pdf/homelite-bandit-st155-strimmer-manual-vtoyfkd.pdfELECTROLUX AUF 27391W3 Manuals - Owner's manual, instructions book, user's guide, service manual, schematics, illustrated parts lists Service Manual ELECTROLUX AUF 27391W3 Installation Software/results.php?lang=en&search=ELECTROLUX%20AUF%202739 1W3Electrolux W645H-W4300H PDF User's ManualElectrolux W645H-W4300H PDF User's Manual Download & Online Preview. ElectroluxW645H-W4300H PDF Manual Download for Free./electrolux/w645h-w4300h/users-manualAire Flo Manual For 10 SeerElectrolux operating manual type w3.pdf Vw sharan electric manual.pdf Personality assessment inventory manual.pdf Ultimate wealth guide.pdf 3 / 4./hwa/aire-flo-manual-for-10-seer-7922532.pdfElectrolux Airospeed Aow101e InstallationElectrolux airospeed aow101e installation operation and Jun 7, 2011 w475n w4330n, w475s w4330s. w4280x, w4350x. type w3, exsm.x. compass/electrolux-airospeed-aow101e-installation-operation-and/Electrolux | Support | User ManualsLooking for support? Search and download a user manual for your Electrolux product..au/Support/Manuals/electrolux operating manual type n2 - free pdfelectrolux operating manual type n2 at - Download free pdf files,ebooks and documents of electrolux operating manual type n2/electrolux-operating-manual-type-n2/: 5303918441 Electrolux EVAPORATOR KIT:: 5303918441 Electrolux EVAPORATOR KIT: Home Improvement. Amazon Try Prime Tools & Home Improvement. Go. Shop by Department. Hello. Sign in Your/Electrolux-5303918441-EVAPORATOR-KIT/dp/B003BW3UZG Related PDF manuals Download:Download 1950 willys jeep service manual.pdfDownload Caterpillar d5m manual.pdfDownload Statesman service manual.pdfDownload Genetics 2 unit study guide.pdfDownload Catalyst che 121 laboratory manual answers.pdfDownload Ford focus st 2002 manual uk.pdfDownload Ground vehicle lighting standards manual torrent.pdfDownload Accounting technician exam study guide.pdfDownload Warren wiersbe nehemiah study guide.pdfDownload Americas study guide mcdougal isbn.pdfMore manual PDF Files:Download Caterpillar 3406e service repair manual downloadable.pdfDownload Cyclon 215 manual.pdfDownload Mercedes e230 repair manual.pdfDownload Mazdaspeed3 factory manual.pdfDownload 1mercedes benz actros manual transmission.pdfDownload 1997 seadoo gsi service manual.pdfDownload Musso service manual.pdfDownload 1983 50 hp mercury outboard manual.pdfDownload Manual mercedes ml 320.pdfDownload Electrokon user manual.pdfMore PDF files:, sitemap, pdf manuals 8, pdf manuals 97, pdf manuals 99, pdf manuals 123, pdf manuals 172。
DotSpatial_Tutorial_3

Raster Data Operations in DotSpatial Tutorial (2)Purpose of this tutorial: Become familiar with the following raster operations in DotSpatial:1. Loading different formats of raster data in DotSpatial.2. Implementing the hill shade.3. Change the color of the raster data.4. Multiply the raster data.5. Reclassify the raster data.6. Get the mouse clicked point values on the raster data layer.This tutorial has 5 important steps.Step 1: Download the DotSpatial class libraryStep 2: Add the DotSpatial reference and change the compile option.Step 3: Add the DotSpatial Controls into the Visual Studio Toolbox.Step 4: Copy the Data Extensions folder to the debugs folder of the current projectStep 5: Design the GUI. (GUI - Graphical User Interface)Step 6: Write the code for implementing the map operations.Step 1: Download the DotSpatial class libraryThis step is the same as Tutorial #1 step 1.Step 2: Add the DotSpatial reference and change the compile option.1.1) Adding the references.DotSpatial.Data.Forms.dll, DotSpatial.Symbology.dll, DotSpatial.Controls.dll, DotSpatial.Projections.dll, DotSpatial.Data.dll, DotSpatial.Topology.dllFig. 1 Required references.2.2) Change the compile option.Change the compile option from .Net Framework 4 Client Profile to .Net Framework4.This step is the same as the Tutorial # 1 step 2.2.Step 3: Add the DotSpatial Controls into the Visual Studio Toolbox.This step is the same as the Tutorial # 1 step 3.Step 4: Copy the Data Extension folder from your downloaded folder to your current project bin/debug folder. The .dlls from this folder is necessary for GDAL data provider access.Fig. 2 Data Extensions folder from DotSpatial downloaded unzip folderStep 5: Design the GUIDesign the GUI as follows:Fig. 3 Final GUIInterface design considerations.1. Add three panel controls. Panel control's properties should be as follows:Properties Panel1 Panel2 Panel3Name pnlOperations pnlLegend pnlMapDock Top Left Fill2. Add five buttons. Button properties should be as follows:Properties Button1 Button2 Button3 Button4 Button5 Name btnLoadRaster btnHillshade btnChangeColor btnMultiplyRaster btnReclassify Text &Load Raster &Hillshade Change &Color &Multiply Raster &ReclassifyRaster3. Add two label controls. Labels' properties should be as follows:Properties Label1 Label2Name lblElevation lblRasterValueText Elevation Row: Column: Value:4. Add a checkbox and it should have the following properties.Name: chbRasterValue Text : Raster value at clicked point5. Add a textbox and it should have the following features.Name: txtElevation Text: 30006. Drag a “Legend” control from the DotSpatial tab under toolbox and drop it on pnlLegend. Legend properties should be as follows:Name: Legend1 Dock: Fill7. Drag a “Map” control from the DotSpatial tab under toolbox and drop it on pnlMap. Map properties should be as follows:Name: Map1 Dock: Fill Legend: Legend18. Drag an "AppManager" control from DotSpatial tab under toolbox and drop it on the form. Note: This control is necessary for loading different formats of raster data.Fig. 4 AppManager9. Set the properties of AppManager1 as follows:Map: Map1 Legend: Legend1Step: 6 Loading the different formats of raster data.6.1) Import the following namespaces in the coding window.//Required namespacesusing DotSpatial.Symbology;using DotSpatial.Controls;using DotSpatial.Data;using DotSpatial.Topology;6.2 ) btnLoadRaster click event should be as follows:private void btnLoadRaster_Click(object sender, EventArgs e){//AddRasterLayer() method is used to load the raster layers on the mapmap1.AddRasterLayer();map1.ZoomToMaxExtent();}Implementing the hill shade.btnHillshade_Click event should have the following code.private void btnHillshade_Click(object sender, EventArgs e){if (yers.Count > 0){//IMapRasterLayer layer = (IMapRasterLayer)yers[0];IMapRasterLayer layer =yers[0] as IMapRasterLayer;if (layer == null){MessageBox.Show("Please select a raster layer");return;}layer.Symbolizer.ShadedRelief.ElevationFactor = 1;layer.Symbolizer.ShadedRelief.IsUsed = true;layer.WriteBitmap();}else{MessageBox.Show("Please add a layer to the map.");}}Change the color.btnChangeColor click event should has the following event.private void btnChangeColor_Click(object sender, EventArgs e){if (yers.Count > 0){//change the color of raster//typecast the first layer to MapRasterLayerIMapRasterLayer layer = yers[0] as IMapRasterLayer;if (layer == null){MessageBox.Show("Please add a raster layer.");return;}//set the color scheme//create an instance for a colorschemeColorScheme scheme = new ColorScheme();//create a new categoryColorCategory category1 = new ColorCategory(2500, 3000, Color.Red, Color.Yellow);category1.LegendText = "Elevation 2500 - 3000";//add the category to the color schemescheme.AddCategory(category1);//create another categoryColorCategory category2 = new ColorCategory(1000, 2500, Color.Blue, Color.Green);category2.LegendText = "Elevation 1000 - 2500";scheme.AddCategory(category2);//assign new color schemelayer.Symbolizer.Scheme = scheme;//refresh the layer display in the maplayer.WriteBitmap();}else{MessageBox.Show("Please add a layer to the map.");}}Multiply the raster.btnMultiplyRaster should has the following event.private void btnMultiplyRaster_Click(object sender, EventArgs e){if (yers.Count > 0){IMapRasterLayer layer = yers[0] as IMapRasterLayer ;if (layer == null){MessageBox.Show("Please select a raster layer");}IRaster demRaster = layer.DataSet;string[] rasterOptions = new string[1];IRaster newRaster = Raster.CreateRaster("multiply.bgd", null, demRaster.NumColumns, demRaster.NumRows, 1, demRaster.DataType, rasterOptions);//Bounds specify the cellsize and the coordinates of raster corner newRaster.Bounds = demRaster.Bounds.Copy();newRaster.NoDataValue = demRaster.NoDataValue;newRaster.Projection = demRaster.Projection;for (int i = 0; i <= demRaster.NumRows - 1; i++){for (int j = 0; j <= demRaster.NumColumns - 1; j++) {if (demRaster.Value[i, j] != demRaster.NoDataValue) {newRaster.Value[i, j] = demRaster.Value[i, j] * 2; }}}//save the new raster to the filenewRaster.Save();//add the new raster to the mapyers.Add(newRaster);}else{MessageBox.Show("Please add a layer to the map.");}}Reclassify the raster.btnReclassify should has the following event.private void btnReclassify_Click(object sender, EventArgs e){//typecast the selected layer to IMapRasterLayerIMapRasterLayer layer = yers.SelectedLayer as IMapRasterLayer ;if (layer == null){MessageBox.Show("Please select a raster layer.");else{//get the raster datasetIRaster demRaster = layer.DataSet;//create a new empty raster with same dimension as original rasterstring[] rasterOptions = new string[1];IRaster newRaster = Raster.CreateRaster("reclassify.bgd", null, demRaster.NumColumns, demRaster.NumRows, 1, demRaster.DataType, rasterOptions);newRaster.Bounds = demRaster.Bounds.Copy();newRaster.NoDataValue = demRaster.NoDataValue;newRaster.Projection = demRaster.Projection;//reclassify raster.// values >= specified value will have new value 1// values < specified value will have new value 0double oldValue = 0;//get the specified value from the textboxdouble specifiedValue = Convert.ToDouble(txtElevation.Text);for (int i = 0; i <= demRaster.NumRows - 1; i++){for (int j = 0; j <= demRaster.NumColumns - 1; j++){//get the value of original rasteroldValue = demRaster.Value[i, j];if (oldValue >= specifiedValue){newRaster.Value[i, j] = 1;}else{newRaster.Value[i, j] = 0;}}}newRaster.Save();yers.Add(newRaster);}}Get the mouse clicked point values on the raster data layer.Select the chbRasterValue's "CheckedChanged" event.fig.5 ChbRasterValue checkbox's checked changed event.chbRasterValue_CheckedChanged event should has the following events.private void chbRasterValue_CheckedChanged(object sender, EventArgs e) {if (chbRasterValue.Checked){IMapRasterLayer rasterLayer = yers.SelectedLayer as IMapRasterLayer ;if ((rasterLayer != null)){//set the map cursor to crossmap1.Cursor = Cursors.Cross;}else{//if no raster layer is selected, uncheck the checkboxMessageBox.Show("Please select a raster layer.");chbRasterValue.Checked = false;}}else{//change map cursor back to arrowmap1.Cursor = Cursors.Arrow;}}Select the Map1's mouse up event.fig.6 Map1_MouseUp eventmap1_MouseUp event should have the following code.private void map1_MouseUp(object sender, MouseEventArgs e){if (chbRasterValue.Checked){//get the layer selected in the legendIMapRasterLayer rasterLayer = yers.SelectedLayer as IMapRasterLayer;if ((rasterLayer != null)){//get the raster data objectIRaster raster = rasterLayer.DataSet;//convert mouse position to map coordinateCoordinate coord = map1.PixelToProj(e.Location);//convert map coordinate to raster row and columnRcIndex rc = raster.Bounds.ProjToCell(coord);int row = rc.Row;int column = rc.Column;//check if clicked point is inside of rasterif ((column > 0 & column < raster.NumColumns & row > 0 & row < raster.NumRows)){//get the raster value at row and columndouble value = raster.Value[row, column];//show the row, column and value in the labellblRasterValue.Text = string.Format("row: {0} column: {1} value: {2}", row, column, value);}else{lblRasterValue.Text = "outside of raster";}}}}Output screen shot for different operations.Fig.7 Load a raster dataFig.8 After the hill shade operationFig.9 After the color change operationFig.10 After the raster multiplicationFig.11 After the reclassify operationFig.12 Getting the mouse click point value on the raster data file.。
WT技术交流提纲

CFD风能资源评估软件Meteo dyn WT技术交流(提纲)时间:2012年11月27日地点:国电联合动力技术有限公司·北京Dong Zhi Men Wai Da Jie, n°48, Oriental Kenzo Building, Office D-27C, Dong Cheng District目录1. 技术基础 (3)1.1 CFD技术在风能资源评估领域的应用 (3)1.2 Meteodyn WT软件原理 (3)2. 入口数据的准备 (4)2.1 地形数据 (4)2.2 粗糙度数据 (4)2.3 定义结果点 (4)2.4 定义绘图区域 (4)3. 定向计算 (5)3.1 定向计算参数选择 (5)3.2 计算发散情况的处理 (5)4. 综合与多塔综合 (6)4.1 气象数据 (6)4.2 湍流校正 (6)4.3 应用空气密度校正 (6)4.4 多测风塔综合设置 (7)5. 综合结果的使用 (8)5.1 可视化 (8)5.2 Excel输出 (8)5.3 微观选址 (8)5.4 输出对应IEC标准的结果 (9)5.5 输出WRG / WRB文件 (9)5.6 其他输出 (10)5.7 折减和不确定性评估 (10)Dong Zhi Men Wai Da Jie, n°48, Oriental Kenzo Building, Office D-27C, Dong Cheng District1. 技术基础1.1 CFD技术在风能资源评估领域的应用1.2 Meteodyn WT软件原理✓网格生成与网格加密✓边界条件✓热稳定度✓粗糙度与森林模型✓求解器(对硬件资源的需求)✓综合与多塔综合Dong Zhi Men Wai Da Jie, n°48, Oriental Kenzo Building, Office D-27C, Dong Cheng District2. 入口数据的准备2.1 地形数据2.2 粗糙度数据2.3 定义结果点2.4 定义绘图区域Dong Zhi Men Wai Da Jie, n°48, Oriental Kenzo Building, Office D-27C, Dong Cheng District3. 定向计算3.1 定向计算参数选择✓网格分辨率与扩展系数✓迭代次数✓角度步长3.2 计算发散情况的处理Dong Zhi Men Wai Da Jie, n°48, Oriental Kenzo Building, Office D-27C, Dong Cheng District4. 综合与多塔综合4.1 气象数据✓支持的格式✓使用时间序列格式的注意事项4.2 湍流校正4.3 应用空气密度校正✓不进行空气密度校正Dong Zhi Men Wai Da Jie, n°48, Oriental Kenzo Building, Office D-27C, Dong Cheng District✓使用TXT格式的功率曲线并进行空气密度校正✓使用WTG格式的功率曲线并进行空气密度校正4.4 多测风塔综合设置✓默认设置/ 使用最近的测风点✓信任系数设置Dong Zhi Men Wai Da Jie, n°48, Oriental Kenzo Building, Office D-27C, Dong Cheng District5. 综合结果的使用5.1 可视化5.2 Excel输出✓平均结果✓分风向的结果5.3 微观选址Dong Zhi Men Wai Da Jie, n°48, Oriental Kenzo Building, Office D-27C, Dong Cheng District5.4 输出对应IEC标准的结果5.5 输出WRG / WRB文件Dong Zhi Men Wai Da Jie, n°48, Oriental Kenzo Building, Office D-27C, Dong Cheng District5.6 其他输出✓Google Earth✓风速矩阵/ 发电量矩阵✓尾流效应✓湍流矩阵5.7 折减和不确定性评估Dong Zhi Men Wai Da Jie, n°48, Oriental Kenzo Building, Office D-27C, Dong Cheng District。
Fillling_Anallysis_Setup_Tutorial

This tutorial will go through a simple “Flow Analysis” example.I. Loading the Mold Flow macros:Currently in HM5.1, the user has to follow a set of steps to load the macros.1.Go to “options”2.Go to “menu config” radio selection;In the macro = field, go to...\Altair51\hm\5.1\scripts\moldflow\moldflow.mac Clicking retrieve will load the mold flow.mac file.Click “return”3. Now on the permanent menu , click on “MoldFlow” button.This will display the mold flow macros on the macro menu.Note: Depending on the analysis, click on “Flow” or “Cool” Buttons to have the corresponding menu changes.II. Importing a CAD model into HM:Note: In this tutorial we are importing a hmascii file.1.Click on “CAD” under Model.2.This will take you to the import panel and the options “import” and “geom” are pre-3.Browse to the location of the file “demo_lid_cad1.hma” ; Select the option HM ASCIIfrom the menu available using the toggle and click on “import”4.Hit “return”.III. Model Setup:The user can use the tools available in “Create model” section if Geometry cleanup is necessary for any CAD model.Note: The user might switch between options to set up the mold flow deck.The model in this example does not need any geometry cleanup.The geometry will have two components with different thicknesses.A.Creating Collectors to store the element data:1.Click on the macro button, “Midplane/Fusion” under “Attributes” section. This willtake the user to the “collectors” panel with option “create” checked and the “MPI-2.Enter the name for e.g. “Dome” ; pick a color a nd click “create/edit”. This will loadthe card image with the necessary attributes as shown below.Note: An effort has been made to make things intuitive to the user. The user can choose from the options available for “Model Type” and “Region Type”. By clicking on the current option available under the corresponding Type, the user can pick among the different options available as shown below.Region Type Options3.After choosing the Model Type as “Cavity” and RegionT ype as “Moldcavity”, enterthe thickness of the component. Here the dome will be assigned a thickness of 8mm.4.Click “return”.The same process is repeated to create another collector called “Lid”, with ModelType “Cavity” and RegionType “Moldcavity” and a thickness of 5mm.anizing the surfaces to aid in one step meshing:2.Click on the toggle and select “surfs” from the ex tended entity selectionTo select the surface(s) to organize, the user can(a)With the left mouse click pick the surface (highlighted in white above)OR(b)Click on “surfs “ and pick the “by collector” o ption from the extended selection asshown below(c) Select the collector by checking the box ; Click on “select” as shown below.3.Click on “destination =” and select “Dome” collector4.Click on “move”5.Click “return”The same proce dure is repeated for organizing the surfaces from collector “lid_geom” to “Lid”.C.One Step Auto-meshing for 2D Components:1. Click on the “Automesh” option under “Create model” section on the macro menu. This will take the user to the automesh panel:2. Click on “surfs” and select displayed from the extended selection.3. Click on the toggle switch to select option elements to surface’s comp (default is elements to current comp)Note: This implies that the elements meshed will belong to the collectors that the surfaces belong to.4. Type in an element size5. Click on “mesh”Note: Please refer to the online help for details on the mesh panel.This should give the user the meshed partD.Modeling the Feed System:In this example, the arrangement will include a “gate” and a “runner”.As in 2D component meshing, the user will have to create collectors to store these 1d elements and then assign the attributes.1.Click on “Feed system” under the Attributes section. This will put the user in the collec torspanel with the option “create” checked and “MPI 1d” card image loaded.Enter a name and click on “create/edit”Pick a color for the component.2. The user can now assign attributes. The various options available can be accessed by clicking on the icons under each Attribute type.For the example, the following selections are made,Model Type = CavityShape = CircleRegion Type = GateFeed System = Cold Feed SystemA tapered Gate will be assigned for this set up. For this, the user will have to check the “Tapered_C/section” option.Taper Definition: Major Diameter = 8mmMinor Diameter = 5mm3. Click on “return” to accept.4. Repeat the same procedure to create another 1d c ollector for “Runner”Click “create/edit”In this case, a runner with uniform diameter of 5.0 mm is modeled.Click “return “Click “return”E.Creating nodes/1d elements to define the position of Gate and Runner:For this example here, a simple ar rangement of “Gate” and “Runner” is modeled. The user can follow the same instructions to have gate, runner and sprue arrangement.The location of nodes to define Gate and Runner can also be picked according to user requirement.In the example, approximately at the center of the Dome part, a Gate will be attached and a runner will be attached on top of it.1. Nodes for Gate and Runner:(a)Go to “Geom” page; “create nodes” panel.(b)Use “type in” option(c)Click on “as node” (it will be highlighted by Cya n color) ; Now click once (leftmouse click) on the node that you want your Gate to be placed at ; then click on“create node”A temp node will be placed at that location as shown above.(d) In the same panel, type in the z co-ordinates to create two more temp nodes at z = 8mm and z = 20 mm.Click “create node”Click “create node” Click “return”(e) Now there are three temp nodes to define the locations of the gate and runner asshown below.2. Creating 1d elements for Runner and Gate.Node 1Node 2Node 3(a)Click on “global” panel on the permanent menu.Click on “component = “and select Gate to be the current collector.Note: The Gate collector is made current so that when you create the 1d element for Gate, it is stored in this collector.(b)Click on “Beam Elements” under “Create model” sectionThis will take the user to the “rods” panel.Note: In HM 6.0, plan is to have some kind of representation for the major and minor diameters in the case of tapered gate and runner. In HM5.1, the user has to keep in mind that the first node the user picks will be the major diameter and the second node picked will be the minor diameter. There is no visual representation to indicate these diameters currently.Hence the order of picking nodes is important.Gate 1d element definition. Node 1 Node 2(c)Similarly for Runner, follow the steps in (a), Since the runner is of uniform in diameter inthis example, the order of node picking does not matter.Note: Once completed, the 1d elements will have the color of their respective comps “Runner” and “Gate’.(d)This completes the modeling of the Gate and Runner.F.Setting up Boundary Conditions:1. Click on “BC Entity set” option under “Attributes & BC” section.This will take you to the “entity sets” panelNode AIn this example there will be only one injection location.Type in a name, pick on the node (node A- highlighted as shown a bove) and click on “create”. Click “return”2. Click on “Flow BC” under “Attributes & BC” section.This will take the user to the collectors panel with the “create” and “loadcols” options pre-selected.Enter a name and click on “create/edit”Click twice on “Injection Nodes Set” to highlight it in Cyan; and then the entity sets available are listed as shown below;Pick the “Injection” by clicking on it.Note that before picking the injection node set, the id is “0” and after selecting the “Injection” set, it changes to “1”Click “return”G.Summary Panel and Exporting the Moldflow Deck:Click on “Summary” option under “Export data” section of the macro menu.H.Exporting the Moldflow Deck:Click on “MPI Deck” optionThis will bring a pop up tk window to write out MPI project files.Enter a name; Select MPI release and click on “Export”。
- 1、下载文档前请自行甄别文档内容的完整性,平台不提供额外的编辑、内容补充、找答案等附加服务。
- 2、"仅部分预览"的文档,不可在线预览部分如存在完整性等问题,可反馈申请退款(可完整预览的文档不适用该条件!)。
- 3、如文档侵犯您的权益,请联系客服反馈,我们会尽快为您处理(人工客服工作时间:9:00-18:30)。
w3af (Web Application audit and attack framework) is a framework for auditing and exploitation of web applications. In this series of articles we will be looking at almost all the features that w3af has to offer and discuss how to use them for Web application Penetration testing. In the first part of this series we will be working with w3af console and getting ourselves familiar with the commands. We will also be looking at the different types of plugins that w3af has to offer and discuss how to use them for optimal performance.Some of the major features of w3af are:1.It has plugins that communicate with each other. For eg. the discovery pluginin w3af looks for different url’s to test for vulnerabilities and passes it on tothe audit plugin which th en uses these URL’s to search for vulnerabilities.2.It removes some of the headaches involved in Manual web application testingthrough its Fuzzy and Manual request generator feature. It can also beconfigured to run as a MITM proxy. The requests intercepted can be sent tothe request generator and then manual web application testing can beperformed using variable parameters.3.It also has features to exploit the vulnerabilities that it finds.It is important to understand that no automated web application scanner is perfect and false positives will always occur. With w3af the first and the foremost step is to make sure that we have the latest version. This is very important because w3af developers (Andres Riancho and the w3af team) are constantly fixing bugs and hence it is very important to make sure that we have the most bug free version. To open up w3af console, type in the command as shown in the figure below.w3af may ask you to update the version. It is advisable to keep updated with the latest version. Ok, so now that we are in the console, type in help to look at the list of available commands.We can see the list of available options available to us. Type the keys command to look at the various shortcuts keys available to us. I recommend you get familiar with them.Let’s have a look at the plugins which are available in w3af. Type plugins. You can see the console output change to w3af/plugins. Type back to go back or type help to display the list of available plugins.To know information about a specific plugins, just type help pluginName. For e.g if i want to know about the discovery plugin, i would type help discovery.We can see that there are about 9 types of different plugins.1)Discovery- The discovery plugin helps in finding more Url’s, forms etc to be used for vulnerability scanning. This information is then passed over to the audit plugin. There are a number of different discovery plugins like webSpider, spiderMan, hmap etc. All these plugins have a different function. A user can enable one or more plugins at the same time.To see the discovery plugins, just type discovery.To find specific information about a particular plugin, justtype pluginTypedescpluginname. For e.g if i want to know more information about the spiderMan index plugini would write the command discovery descspiderMan.One of the important things to note here is that the spiderMan plugin has 2 configurable parameters. To set the configurable parameters, type in the following commands as shown in the figure below. As you can see from the figure below, i have set the listenPort to 55555.Here are some other commands that could be used.1) discovery pluginType1, pluginType2 – Selects two plugins.2) discovery all- Enables all the plugins (not advisable as it may take a long time to finish).3) discovery !all – Removes all the enabled plugins.4) list discovery enabled – Lists all the plugins currently enabled.Here is a screenshot below showing some of these commands in action.Let’s now run one of the discovery plugins. I will be using the hmap plugin in discovery to know the version of the server running on a remote host. As you can see from the figure below, i have enabled the hmap plugin.Once this is done, it is now time to give the location of the target server. Type back to navigate back. Then type the following commands as shown in the figure below to set the target. As we can see, the target is set by the set target target-address command.Once this is done, type back to navigate back and the type start to start the plugin. As we can see, w3af has figured out the version of Apache and php running on my server. We will discuss more features of the discovery plugin later.2)Audit-Audit plugins are used to detect vulnerabilities in the URL’s or forms provided by the discovery plugins. This is where the interaction between plugins inw3af comes to use. The audit plugin has options for testing different types of vulnerabilities like xss, sqli, csrf etc. It does this by injecting different strings in its request and then looking for a specific value (corresponding to the input string) in the response. False positives may occur during this process. If i want to know how the sqli plugin works, i could type in the commands as shown in the figure below.Again, i can set the different configuration parameters while selecting a particular plugin. For e.g in the figure below i am increasing the number of checks while performing a XSS audit.3)Grep– The grep plugin is used to find interesting information in the requests and responses going through like email accounts, forms with file upload capabilities, hashes, credit card numbers, email addresses etc. You can set the type of information you want to look for by setting the appropriate plugin. Since the grep plugin only analyzes the request and response, it is important to have some kind of discovery plugin enabled for it to work. Otherwise grep plugins are of no use. As you can see in the figure below i have set grep to use the getMails plugin.4)Brute force– Brute force plugins can be used to brute force login forms as well as http-auth logins. Once the discovery plugin finds any form with form based input or an http-auth input it will automatically launch the brute force attack against it if the corresponding brute force plugin is enabled. Some of the important things to know about the brute force are the configuration parameters.It is advisable that you use your own configuration file for the list of usernames and passwords. Also be sure to take a look at some other options. As you can see in the figure below, i have set the option passEqUser to false simply because i d on’t think users wouldn’t have their passwords as the same as their username.One of the other good configurable parameter is the useMails option. This options uses the email addresses that w3af finds (maybe through the grep plugin) to be one of the inputs for the username field. For e.g if one of the usernames isexample@, then the username tried would be example. This is another example of how the interaction between the different plugins could make the job much more effective.5)Output– The output plugin helps us decide the format in which we want the output. w3af supports many formats like console, emailReport, html, xml, text etc. Again you can set various parameters here like the filename, verbosity etc. In the figure below, i have set verbose to True as i want a very detailed report about the application that i am testing.6)Mangle– The mangle plugin is used to mangle with request and responses on the fly. It has only one plugin named sed (Stream editor) which is used to modify requests and responses using different regular expressions. The expressions should have a specific format. The usage is quite evident from the description.As you can see from the figure below, i have set the plugin to look for the string Yahoo and replace it with Google in the request header.7)Evasion- The evasion plugins uses various techniques to bypass WAF (Web application firewalls). For e.g one of the options rndHexEncode randomly encodes the url in hex format to avoid detection while the plugin fullWidthEncode does a full width encode of the Url to bypass Http content scanning systems using the vulnerability described here.8)Auth– Last but not the least, auth plugin is one of the most important plugins in w3af. It has only one type called generic. This is because while crawling on a target web application, if w3af hits a login form, then it needs to submit the credentials automatically in order to continue looking for information. By using this plugin, we can specify a predefined username/password that w3af should enter when it hits a login form. We need to specify all the parameters for generic in order for it to work successfully.In the figure below i am setting options for w3af to successfully log in to DVWA (Damn vulnerable web application) which is located on the addresshttp://10.0.1.24/dvwaConclusionIn this article we discussed about the plugins available in w3af and learnt how to work with the w3af console. In the upcoming articles in this series, we are going to discuss the following topics.ing different profiles2.Exploiting a vulnerability found by the audit plugining the Manual Request and Fuzzy request featureing the Mitm proxy and the encoder/decoder features5.w3af scripting6.Optimizing w3af scansPlease drop a comment if you liked the article or if there is something about w3af that you want to see in the upcoming articles.References:w3af UserGuide /documentation/user/w3afUsersGuide.pdf Incoming search terms:。