Windows-Server2016分层存储技术详细拆解手册
Windows Server 2016 软件定义存储系统说明书
SR over SMB3
NODE3 in FSCLUS NODE4 in FSCLUS
NODE4 in DRCLUS NODE4 in DRCLUS
• Two separate servers • Manual failover • Synchronous or asynchronous
Manhattan DC Jersey City DC
Node (SR)
t
2
t1
5
Data
Log
Log Data
#Create new stretched cluster syhcnronous replica
• • • • • •
Storage Spaces 3-way mirror with ReFS
• •
•
•
• Checksums verified on reads
Benefits
Block-level, host-based, volume replication End-to-end software stack from Microsoft Works with any Windows volume Hardware agnostic; existing SANs work Uses SMB3 as transport
IO Scheduler
•
•
Policy
Manager
• •
• •
https:///en-us/library/dn891438.aspx
• • •
• • •
• • • • •
•
• Storage Spaces Direct • Storage Replica • ReFs • Storage QoS • Deduplication • SCVMM Consistency
WindowsServer2016基础操作

Windows Server 2008是微软下一个服务器操作系统的名称,它将会继承Windows2003。
WindowsServer2008在进行开发及测试时的代号为"Windows Server Longhorn"。
Windows Server 2008将会是一套相等于Windows Vista(代号为Longhorn)的服务器系统,两者很可能将会拥有很多相同功能;Vista及Server2008与XP及Server2003间存在相似的关系。
(XP和Server 2003的代号分别为Whistler及Whistler Server)Microsoft Windows Server 2008代表了下一代Windows Server。
使用Windows Server 2008,IT专业人员对其服务器和网络基础结构的控制能力更强,从而可重点关注关键业务需求。
Windows Server 2008通过加强操作系统和保护网络环境提高了安全性。
通过加快IT 系统的部署与维护、使服务器和应用程序的合并与虚拟化更加简单、提供直观管理工具,Windows Server2008还为IT专业人员提供了灵活性。
Windows Server 2008为任何组织的服务器和网络基础结构奠定了最好的基础。
Microsoft Windows Server2008用于在虚拟化工作负载、支持应用程序和保护网络方面向组织提供最高效的平台。
它为开发和可靠地承载Web应用程序和服务提供了一个安全、易于管理的平台。
从工作组到数据中心,Windows Server2008都提供了令人兴奋且很有价值的新功能,对基本操作系统做出了重大改进。
更强的控制能力[编辑本段]使用Windows Server 2008,IT专业人员能够更好地控制服务器和网络基础结构,从而可以将精力集中在处理关键业务需求上。
增强的脚本编写功能和任务自动化功能(例如,WindowsPowerShell)可帮助IT专业人员自动执行常见IT任务。
WindowsServer 2016超融合解决方案介绍
Windows Server 2016 Hyper-Converged Solution - Virtual Machines and Software Defined Storage on the Same ClusterWindows Server 2016 Technical Preview introduces Storage Spaces Direct, which enables building highly available (HA) storage systems with local storage. This is a significant step forward in Microsoft Windows Server software-defined storage (SDS) as it simplifies the deployment and management of SDS systems and also unlocks use of new classes of disk devices, such as SATA and NVMe disk devices, that were previously not possible with clustered Storage Spaces with shared disks.Windows Server 2016 provides a hyper-converged solution by allowing the same set of servers to provide SDS, through Storage Spaces Direct (S2D), and serve as the hosts for virtual machines using Hyper-V. The sameHow to Use this Guide:This document provides both an introductory overview and specific standalone examples of how to deploy a Hyper Converged Solution with Storage Spaces Direct.Before taking any action, it is recommended that you do a quick read through of this document to familiarize yourself with the overall approach, to get a sense for the important Notes associated with some steps, and to acquaint yourself with the additional supporting resources and documentation. Hyper-converged Solution with Software Defined Storage OverviewIn the Hyper-Converged configuration described in this guide, Storage Spaces Direct seamlessly integrates with the features you know today that make up the Windows Server software defined storage stack, including Clustered Shared Volume File System (CSVFS), Storage Spaces and Failover Clustering.The hyper-converged deployment scenario has the Hyper-V (compute) and Storage Spaces Direct (storage) components on the same cluster. Virtual machine's files are stored on local CSVs. This allows for scaling Hyper-V compute clusters together with the storage it’s using. Once Storage Spaces Direct is configured and the CSV volumes are available, configuring and provisioning Hyper-V is the same process and uses the same tools that you would use with any other Hyper-V deployment on a failover cluster. Figure 5 illustrates the hyper-converged deployment scenario.1FIGURE 5: Hyperconverged – same cluster configured for Storage Spaces Direct and the hosting of virtual machinesHardware requirementsWe are working with our hardware partners to define and validate specific hardware configurations, including SAS HBA, SATA SSD and HDD, RDMA enabled network adapters etc. to ensure a good user experience. You should contact your hardware vendors for the solutions that they have verified are compatible for use with Storage Spaces Direct.If you would like to evaluate Storage Spaces Direct in Windows Server 2016 Technical Preview without investing in hardware, you can use Hyper-V virtual machines, see Testing Storage Spaces Direct using Windows Server 2016 virtual machines.For more information about hardware options, see Hardware options for evaluating Storage Spaces Direct in Technical Preview 4NoteStorage Spaces Direct does not support disks connected via multiple paths, and the Microsoft Multipath MPIO software stack.2Example Hardware for this GuideFor simplicity, this guide references a specific set of hardware that we were able to test. This is for example purposes only and most of the steps are not specific to hardware. Where something is specific to hardware, it will be noted. There are many hardware vendors with solutions that are compatible with the hyper-converged system described in this guide and this hardware example does not indicate a preference over other systems or hardware vendors. Due to limited resources and time constraints imposed by TP5, we are in a position to offer detailed guidance only for a specific subset of tested hardware configurations at this time.Server: Dell 730XD- Bios: 1.5.54HBA: Dell HBA330- Firmware:9.17.20.07 A00Network Interfaces:Mellanox ConnectX-3 Pro (dual port 10Gb, SFP+) for RoCEv2 networks- Firmware: 2.34.50.60 or newerTop of Rack Switch (TOR) Cisco Nexus 3132- BIOS version: 1.7.0Information GatheringThe following information will be needed as inputs to configure provision and manage the hyper-converged system, and therefore it will speed up the process and make it easier for you if you have it on hand when you start:- Server Names–you should be familiar with your organization’s nami ng policies for computers, files, paths, and other resources as you will be provisioning several servers with Nanoinstallations and each will need to have a unique server name.- Domain name – you will be joining computers to your domain, and you will need to specify the domain name. It would be good to familiarize with your internal domain naming and domainjoining policies.3- Administrator Password for the new servers: When the Nano images are created, the command to create the images will prompt you to input the password for the local administrator account.- For RDMA configurationso Top of Rack switch make/modelo Network Adapter make/modelThere are 2 types of RDMA protocols, note which type your RDMA adapter is(RoCEv2 or iWarp)o Vlan IDs to be used for the 2 network interfaces used by the management OS on the hyper-converged hosts. You should be able to obtain this from your networkadministrator.Nano or Full/Core Install OptionsHyper-converged deployments can be done using either Nano or Full installations of Windows Server 2016 Preview.Nano is a new install type for Windows Server 2016, see this link for more information on the advantages of using Nano and deploying and managing Nano server.This guide will focus on deploying hyper-converged systems using Nano server and the “Deploy the operating system” section is a step-by-step method of deploying Nano server.However, the steps in t he “Configure the Network” and “Configure Storage Spaces Direct” sections are identical whether you are using Nano or full or core installations.For full and core installations, instead of following the “Deploy the operating system” in this guide, you can deploy Windows Server 2012 Datacenter like you would any other Failover Cluster deployment. This would include joining them to an Active Directory domain and installing the Hyper-V role and Failover Cluster feature and if using RoCE RDMA devices including the “Data Center Bridging” feature. Nano server installations require all management to be done remotely, except what can be done through the Nano Recovery Console. On Full and core installations you can use the remote management steps in this guide, or in some cases you can log into the servers and do the commands and management locally.Nano: Installing and configuring Hyper-Converged SystemThis section includes instructions to install and configure the components of a Hyper-Converged system using the Windows Server 2016 Technical Preview with a Nano Server configuration of the operating system. The act of deploying a Hyper-Converged system can be divided into three high level phases:1. Deploy the operating system2. Configure the Network3. Configure Storage Spaces Direct45Figure 6 illustrates the process for building a hyper-converged solution using Windows Server 2016 Technical Preview.Figure 6: Process for building a hyper-converged solution using Windows Server 2016 Technical Preview.You can tackle these steps a few at a time or all at once, but they do need to be completed in the order shown in Figure 6. After describing some prerequisites and terminology, we will describe each of the three phases in more detail and provides examples.ImportantThis preview release should not be used in production environments.Prerequisites and TerminologyThe provisioning and deployment process for a Windows Server Nano server involves specific steps that include:Creating a bootable .VHDx file for each Nano server∙Copying the bootable .VHDx files to a physical host and configuring the host to boot from the .VHDx files∙Remotely managing the newly deployed host machines running Nano ServersNote: The Image creation machine and the Management machine (defined below) can be the same machine. The critical factor is that the machine from which you are managing must be of the same version (or higher) as the Nano server that are being managed. For Windows Server 2016 Technical Preview 5 evaluation we recommend that your Management machine be runningWS2016 TP5 so you will be able to efficiently manage the Nano Servers (which are also running TP5).1. Image creation machine. The instructions in this guide includes creating bootableNano .VHDx files for each server. It’s a simple process, but you will need a system (Windows10 or Windows Server 2012 R2 or later) where you can use PowerShell to create andtemporarily store the .VHDX files that will be copied to the servers. The cmdlet modules used to create the image are imported from the Windows Server 2016 preview ISO, the instructionsbelow will have details on this process.2. Management machine. For the purposes of this document, the machine that has themanagement tools to remotely manage the Nano servers will be referred to as theManagement system. The management system machine has the following requirements:a. Running Windows Server 2016 Technical Preview 5, domain joined to the samedomain or fully trusted domain as the Nano systems.b. Remote Server Administration Tools (RSAT) and PowerShell modules for Hyper-V andFailover Clustering. RSAT tools and PowerShell modules are available on WindowsServer 2016 and can be installed without installing other features. They are alsoavailable by installing the RSAT package for Windows clients.c. Management system can be run inside of a Virtual Machine or on a physical machine.d. Requires network connectivity to the Nano servers3. Host machines. In the example below, the expectation is that you start with physicalmachines that are booted to a Windows Server operating system (full or core). We’ll becopying the VHDs files to the Host machines and then re-booting into Nano operation systemthat was created in the VHDx files. Booting from a VHDx file is the method of deploymentbeing outlined in this guide. Other methods of deploying VHDx boot files can also be used.Deploy the operating systemDeploying the operating system is composed of the following tasks:1. Acquire an ISO image of Windows Server 2016 TP52. Use the ISO and PowerShell to create the new Nano Server Images3. Copy the new Nano Server images to the Host machines4. Reboot into the new Nano Server image5. Connecting to and managing the Nano Servers from the Management system machine678Complete the steps below to create and deploy the Nano Server as the operating system on your Host machines in a Hyper-Converged system. Note: The “Getting Started with Nano Server” guide has many more examples and detailed explanations of how to deploy and manage a Nano server. The instructions below are solely intended to illustrate one of many possible deployments; you need to find an approach that fits your organization’s needs and situation.Acquire an ISO image of Windows Server 2016 TP5 DatacenterDownload a copy Datacenter ISO from <link to Technet> to your Image creation machine and note the path.Use the ISO and PowerShell to Create the new Nano Server ImagesThere are other methods do deploy Nano, but in the case of this exam ple we’ll provide a set of steps below. If you want to learn more about creating and managing different kinds of Nano deployments or images, see the “Getting Started with Nano Server” guid e, starting in the section “To quickly deploy Nano Server on a physical server”.NoteIf your deployment isn’t using a RoCEv2 RDMA adapter, then you can remove the“-Packages Microsoft-NanoServer-DCB-Package” parameter in the PowerShellcommandlet string below. Our example hardware for this guide does use RoCEv2RDMA adapters and Data Center Bridging, so the DCB package is included in theexample.NoteIf you are going to manage the servers with System Center, add the following itemsin the “-Packages” section of the “New-NanoServerImage” commandMicrosoft-NanoServer-SCVMM-PackageMicrosoft-NanoServer-SCVMM-Compute-PackageNoteIf you have drivers that are recommended by your hardware vendor, It is simplestto inject the network drivers into the image during the “New-NanoServerImage”step below. If you don’t, you may be able to use the in-box drivers using the –OEMDrivers parameter in the “New-NanoServerImage” command, and then updatethe drivers using Windows Update after deployment. It is important to have thedrivers that your hardware vender recommends, so that the networks provide thebest reliability and performance possible.91. On the Image creation machine, mount the Windows Server Technical Preview .ISO. Tomount the ISO, in File Explorer select and right click on the ISO, then choose Mount. Once the mounted drive is opened, navigate to the \NanoServer\NanoServerImageGenerator directory and copy the contents to a directory to your desired working folder on your Image creation machine where you want to create and store your new Nano Server Images.In this example, the NanoServerImageGenerator directory will be copied to:C:\NanoBuild\NanoBuildScripts2. Start Windows PowerShell as an administrator, change directory your desired workingfolder where you copied the “NanoServerImageGenerator” contents to, and run the following command to import the Nano Server Image Generator PowerShell module. This module will enable you to create the new Nano Server images.Import-Module.\NanoServerImageGenerator–VerboseYou should see something like this:3. Copynetwork drivers to a directory and note the path. The example in the next step will use c:\WS2016TP5_Drivers4. Before using the following PowerShell commands to create the new Nano Server imagesplease read the following section to get an overview of the entire task. Some features, need specific packages to be specified to be included in the “New-NanoServerImage”command below.In this step, you will create a unique image for each Host machine. We need 4 images;one for each physical host in the HyperConverged setup.10Creating each Nano Server image can take several minutes depending on the size ofthe drivers and other packages being included. It is not unusual for a large image to take30 minutes to complete the creation process.∙Create the images one at a time. Because of possible file collision, werecommend creating the images one at a time.∙You will be prompted to input a password for the Administrator accounts of your new Nano Servers. Type carefully and note your password for later use.You will use these passwords later to log into the new Nano Servers∙You will need the following information (at a minimum)o MediaPath: Specifies the path to the mounted Windows Server PreviewISO. It will usually be something like D:\o TargetPath: Specifies the path where the resulting .VHDx file will belocated. NOTE: this path needs to pre-exist before running the new-NanaServerImage cmdlet.o ComputerName: Specifies the name that the Nano server will use and beaccessed by.o Domain name: Specifies the fully qualified name to the domain that yourserver will join.o DriversPath– folder location where the expanded drivers that you want toinject to the image are maintainedo Other options: If you want a richer understanding of the all the inputparameters associated with New-NanoServerImage you can learn morefrom the “Getting Started with Nano Server” guide.New-NanoServerImage -MediaPath <MediaPath> -TargetPath <TargetPath> -ComputerName <ComputerName> -Compute -Storage -Clustering -DomainName <DomainName -OEMDrivers -DeploymentType Host -Edition Datacenter -EnableRemoteManagementPort -ReuseDomainNode -DriversPath <DriversPath> -Packages Microsoft-NanoServer-DCB-PackageThe following is an example of how you can execute the same thing in a script://Example definition of variable names and values$myNanoServerName="myComputer-1"$myNanoImagePath=".\Nano\NanoServerPhysical"$myNanoServerVHDXname="myComputer=1.VHDX"$myDomainFQDN=""$MediaPath="d:\"$myDriversPath="C:\WS2016TP5_Drivers"New-NanoServerImage-MediaPath d:\-TargetPath"$myNanoImagePath\$myNanoServerVHDXname"-ComputerName$myNanoServerName-Compute-Storage-Clustering-DomainName$myDomainFQDN-OEMDrivers-DeploymentType Host-Edition Datacenter-EnableRemoteManagementPort-ReuseDomainNode-DriversPath$myDriversPath-Packages Microsoft-NanoServer-DCB-Package11When you complete this task, you should have 1 VHDx file for each of the four hyper-converged systems that you are provisioningOther Packages that you may want to include:Desired State Configuration. An example feature that requires this is the Software Defined Network feature. The packages to include are:Microsoft-NanoServer-DSC-PackageShielded VMMicrosoft-NanoServer-SecureStartup-PackageMicrosoft-NanoServer-ShieldedVM-PackageManaging Nano with System Center Virtual Machine Manager or Operations ManagerMicrosoft-NanoServer-SCVMM-PackageMicrosoft-NanoServer-SCVMM-Compute-PackageCopy the new Nano Server images to the Host machinesThe tasks in this section assume that the servers that will be used for the hyper-converged system (Host Machines) are booted into a Windows Server operating system and accessible to the network. 1. Log in as an Administrator on the Host machines that will be the nodes of the hyper-convergedsystem.2. Copy the VHDX files that you created earlier to each respective Host machine and configureeach Host machine to boot from the new VHDX using the following steps:∙Mount the VHDx. If you are using Windows Explorer, the mount is accomplished by right clicking on the VHDX file and “mount”.Note: In this example, it is mounted under D:\ ∙Open a PowerShell console with Administrator privilages.∙Change the prompt to the “Windows” directory of the mounted VHD: In this example the command would be:cd d:\windows∙Enable booting to the VHDx:Bcdboot.exe d:\windows12Unmount the VHD. If you are using Windows Explorer, the unmount is accomplished by right clicking on the drive letter in the left hand navigation pane, and selecting “eject”. THIS STEPIS IMPORTANT, THE SYSTEM MAY HAVE ISSUES BOOTING IF YOU DON’T UNMOUNTTHE VHDX.Reboot into the new Nano Server image1. Reboot the Host machines. They will automatically boot into the new Nano Server VHDx images.2. Log into the Nano Recovery Console: After the Host machines are booted, they will show alogon screen for the Nano Server Recovery Console (see the "Nano Server Recovery Console"section in this Nano guide). You will need to enter “Administrator” for the User Name and enter the password you specified earlier when creating the new Nano Server images. For the Domain field, you can leave this blank or enter the computer name of your Nano server.3. Acquire the IP address of the Nano Server: You will use these IP addresses to connect to theNano Server in the next section, so it’s suggested to write it down or note it somewhere.a. Steps to aquire the IP address in the Nano Recovery Console:i. Select Networking then press Enterii. Identify from the network adapter list the one that is being used to connect to the system to manage it. If you aren’t sure which one, look at each of them andidentify the addresses.iii. Select your Ethernet adapter then press Enteriv. Note your IPv4 address for later useNote: While you are in the Nano Recovery Console, you may also specify static IP addresses at this time for networks if DHCP is not available.Connecting to and managing the Nano Servers from the Management system machineYou will need a Management system machine that has the same build of Windows Server 2016 to manage and configure your Nano deployment. Remote Server Administration Tools (RSAT) for Windows Serve 2016 is not suggested for this scenario since some of the Windows 10 storage APIs may not be updated to be fully compatible at the time of this preview release.1. On the Management system install the Failover Cluster and Hyper-V management tools. Thiscan be done through Server Man ager using the “Add Roles and Features” wizard. In the“Features” page, select “Remote Server Administration Tools” and then select the tools toinstall.2. On the Management system machine configure TrustedHosts; this is a onetimeconfiguration on the management system machine:Open a PowerShell console with Administrator privilages and execute the following. This willconfigure the trusted hosts to all hosts.enter13After the onetime configuration above, you will not need to repeat Set-Item. However, each time you close and reopen the PowerShell console you should establish a new remote PS Session to the Nano Server by running the commands below:3. Enter the PS session and use either the Nano Server name or the IP address that you acquiredfrom the Recovery Console earlier in this doc. You will be prompted for a password after youexecute this command, enter the administrator password you specified when creating the Nano VHDx.Enter-PSSession-ComputerName<myComputerName>-CredentialLocalHost\AdministratorExamples of doing the same thing in a way that is more useful in scripts, in case you need todo this more than once:Example 1: using an IP address:$ip="10.100.0.1"$user="$ip\Administrator"Enter-PSSession-ComputerName$ip-Credential$userExample 2: OR you can do something similar with computer name instead of IP address.$myNanoServer1="myNanoServer-1"$user="$myNanoServer1\Administrator"Enter-PSSession-ComputerName$myNanoServer1-Credential$userAdding domain accounts.So far this guide has had you deploying and configuring individual nodes with the local administrator account<ComputerName>\Administrator.Managing a hyper-converged system, including the cluster and storage and virtualization components, often requires using a domain account that is in the Administrators group on each node.The following steps are done from the Management System.For each server of the hyper-converged system:e a PowerShell console that was opened with Administrator privileges and in a PSSession issue thefollowing command to add your domain account(s) in the Administrators local security group. See the section above for information about how to connect to the Nano systems using PSSession.Net localgroup Administrators<Domain\Account>/add14Network ConfigurationThe following assumes 2 RDMA NIC Ports (1 dual port, or 2 single port). In order to deploy Storage Spaces Direct, the Hyper-V switch must be deployed with RDMA-enabled host virtual NICs. Complete the following steps to configure the network on each server:NoteSkip this Network Configuration section, if you are testing Storage Spaces Direct inside of virtual machines. RDMA is not available for networking inside a virtual machine.Configure the Top of Rack (TOR) SwitchOur example configuration is using a network adapter that implements RDMA using RoCEv2. Network QoS for this type of RDMA requires that the TOR have specific capabilities set for the network ports that the NICs are connected to.15Enable Network Quality of Service (Network QoS)Network QoS is used to in this hyper-converged configuration to ensure that the Software Defined Storage system has enough bandwidth to communicate between the nodes to ensure resiliency and performance. Do the following steps from a management system using Enter-PSSession to connect and do the following to each of the servers.NoteFor Windows Server 2016 Technical Preview, there are multiple vendors supporting these RDMA network capabilities. Check with your network interface card vendor to verify which of their products support hyper-converged RDMA networking in in technical preview 5.1. Set a network QoS policy for SMB-Direct, which is the protocol that the software definedstorage system uses.New-NetQosPolicy “SMB” –NetDirectPortMatchCondition 445 –PriorityValue8021Action 3The output should look something like this:Name : SMBOwner : Group Policy (Machine)NetworkProfile : AllPrecedence : 127JobObject :NetDirectPort : 445PriorityValue : 32. Turn on Flow Control for SMBEnable-NetQosFlowControl –Priority 33. Disable flow control for other trafficDisable-NetQosFlowControl –Priority 0,1,2,4,5,6,74. Get a list of the network adapters to identify the target adapters (RDMA adapters)Get-NetAdapter | FT Name,InterfaceDescription,Status,LinkSpeedThe output should look something like the following. The Mellanox ConnectX03 Pro adapters are the RDMA network adapters and are the only ones connected to a switch, in this example configuration.[MachineName]: PS C:\Users\User\Documents> Get-NetAdapter | FT Name,InterfaceDescription,Status,LinkSpeedName InterfaceDescription Status LinkSpeed---- -------------------- ------ ---------NIC3 QLogic BCM57800 Gigabit Ethernet (NDIS VBD Client) #46 Disconnected 0 bpsEthernet 2 Mellanox ConnectX-3 Pro Ethernet Adapter #2 Up 10 Gbps16SLOT # Mellanox ConnectX-3 Pro Ethernet Adapter Up 10 GbpsNIC4 QLogic BCM57800 Gigabit Ethernet (NDIS VBD Client) #47 Disconnected 0 bpsNIC1 QLogic BCM57800 10 Gigabit Ethernet (NDIS VBD Client) #44 Disconnected 0 bpsNIC2 QLogic BCM57800 10 Gigabit Ethernet (NDIS VBD Client) #45 Disconnected 0 bps5. Apply network QoS policy to the target adapters. The target adapters are the RDMA adapters.Use the “Name” of the target adapters for the –InterfaceAlias in the following exampleEnable-NetAdapterQos –InterfaceAlias “<adapter1>”,”<adapter2>”Using the example above, the command would look like this:Enable-NetAdapterQoS –InterfaceAlias “Ethernet 2”,”SLOT #”6. Create a Traffic class and give SMB Direct 30% of the bandwidth minimum. The name of theclass will be “SMB”New-NetQosTrafficClass “SMB” –Priority 3 –BandwidthPercentage 30 –Algorithm ETSCreate a Hyper-V Virtual Switch with SET and RDMA vNICThe Hyper-V virtual switch allows the physical NIC ports to be used for both the host and virtual machines and enables RDMA from the host which allows for more throughput, lower latency, and less system (CPU) impact. The physical network interfaces are teamed using the Switch Embedded Teaming (SET) feature that is new in Windows Server 2016.Do the following steps from a management system using Enter-PSSession to connect to each of the servers.1. Identify the network adapters (you will use this info in step #2)Get-NetAdapter | FT Name,InterfaceDescription,Status,LinkSpeed [MachineName]: PS C:\Users\User\Documents> Get-NetAdapter | FT Name,InterfaceDescription,Status,LinkSpeedName InterfaceDescription Status LinkSpeed---- -------------------- ------ ---------NIC3 QLogic BCM57800 Gigabit Ethernet (NDIS VBD Client) #46 Disconnected 0 bpsEthernet 2 Mellanox ConnectX-3 Pro Ethernet Adapter #2 Up 10 GbpsSLOT # Mellanox ConnectX-3 Pro Ethernet Adapter Up 10 GbpsNIC4 QLogic BCM57800 Gigabit Ethernet (NDIS VBD Client) #47 Disconnected 0 bpsNIC1 QLogic BCM57800 10 Gigabit Ethernet (NDIS VBD Client) #44 Disconnected 0 bpsNIC2 QLogic BCM57800 10 Gigabit Ethernet (NDIS VBD Client) #45 Disconnected 0 bps2. Create the virtual switch connected to both of the physical network adapters, and enable theSwitch Embedded Teaming (SET). You may notice a message that your PSSession lostconnection. This is expected and your session will reconnect.New-VMSwitch –Name SETswitch –NetAdapterName “<adapter1>”,”<adapter2>”–EnableEmbeddedTeaming $trueUsing the Get-NetAdapter example above, the command would look like this:17。
Windows Server 2016 系列用户指南说明书
Windows Server 2016 –Le système d’exploitation adapté au nuageGrâce à la technologie infonuagique, le rythme des changements est plus rapide que jamais, ce qui met de la pression sur les TI. Les organisations cherchent à accroître la sécurité, l’e fficacité et l’innovation, et c’e st ce que Windows Server 2016 leur permet. Windows Server 2016 est le systèmed’e xploitation adapté au nuage qui prend en charge vos charges de travail actuelles tout en ajoutant de nouvelles technologies qui faciliteront la transition vers l’infonuagique lorsque vous serez prêt.Comment utiliser ce guide de comparaison Utilisez ce guide pour comparer les fonctionnalités propres à chaque version de Windows Server, afin de comprendre les différences entre la version que vous utilisez aujourd’hui et la plus récente version offerte par Microsoft.La sécurité est une priorité des équipes de TI. De nouvelles menaces rendent plus que jamais difficile la tâche de sécuriser les données et les applications. Windows Server 2016 vous donne de nouvelles capacités de prévention des attaques et de détection des activités suspectes, grâce à des fonctionnalités de contrôle des accès privilégiés, de protection des machines virtuelles et de prémunition des plateformes contre les menaces émergentes.Aujourd’hui, les opérations des centres de données semblent faire l’o bjet de plus d’e xamens que de financement. De nouvelles applications rallongent les opérations et créent des arriérés en matièred’infrastructure qui peuvent ralentir les activités. Pour répondre aux attentes, les organisations de TI doivent faire plus avec moins, mais une infrastructure vieillissante qui manque d’automatisation peut devenir un obstacle. Alors que les organisations cherchent au-delà de la virtualisation de serveurs afin de devenir plus efficaces, elles peuvent se tourner vers les capacités de Windows Server 2016 pour répondre aux défis opérationnels et de sécurité, libérant ainsi des ressources de TI qui peuvent alors se concentrer sur la planification et l’innovation en matière de solutions futures qui favorisent le succès.Utilisez Windows Server 2016 pour compter sur de nouvelles façons de déployer etd’e xécuter les applications qui vous permettront de gagner des clients et de susciter leur participation, que cesoit localement ou dans Microsoft Azure. Le nuage facilite plus que jamais l’innovation avec les applications.Vous pouvez maintenant créer de nouvelles applications au moyen de conteneurs, de Nano Server et de microservices. Windows Server 2016 demeure également une excellente option pour les organisations quiexécutent toujours des applications client sur serveur.Entièrement pris en chargePassez à l’étape suivante. Pour en savoir plus, visitez le /WindowsServer2016。
windowsserver2016下域环境的搭建(完整版)

windowsserver2016下域环境的搭建(完整版)展开全文在搭建之前简单介绍一下基础知识:1.工作组:默认模式,人人平等,不方便管理2.域:人人不平等,集中管理,统一管理•域中计算机的分类:域控制器、成员服务器、客户机、独立服务器•域的部署:1.安装域控制器-就生成了域环境安装了活动目录-就生成了域控制器2.活动目录:Active Directory =AD是指域环境中提供目录服务的组件。
目录用于存储有关网络对象的信息。
活动目录存储的是网络中所有资源的快捷方式,用户可以通过寻找快捷方式来定位资源。
•活动目录:1.AD2.特点:集中管理/统一管理本次搭建过程需要在虚拟机下进行,需要虚拟机软件(例如VMware),windows 2016 Server(作为域控制器),windows 7 ,windows server 2008 R2.这里需要注意以下所有环境都是属于链接克隆的,所以可能会遇到SID相同的错误,可参考/tech/201908163.html来进行解决。
一、环境介绍二、搭建主域1.创建主域2.创建域普通用户三、搭建子域1.创建子域2.创建子域用户四、搭建辅域五、搭建独立域1.创建财务部电脑系统2.创建财务部电脑核心资料系统六、总结一、环境介绍:1.这里用拓扑图进行展示:2.所有环境配置如下(1)主域:计算机全名:AD01域:ip:10.10.88.6 255.255.255.0默认网关:10.10.88.1首选dns服务器:10.10.88.6DNS2:10.10.88.8计算机名:AD01域:用户名:ICE\Administrator(2)辅域:计算机全名:域:ip:10.10.88.8 255.255.255.0默认网关:10.10.88.1首选dns服务器:10.10.88.8DNS2:10.10.88.6(3)域用户:计算机名:域:ip:10.10.88.104 255.255.255.0默认网关:10.10.88.1首选dns服务器:10.10.88.6用户名:USER0\ice计算机全名:(4)子域:计算机全名:域:ip:10.10.88.12 255.255.255.0默认网关:10.10.88.1首选dns服务器:10.10.88.6DNS2:10.10.88.6财务部共享:IP 10.10.99.5 255.255.255.0 默认网关:10.10.99.1首选DNS服务器:10.10.99.5用户名:ZIYU0\administrator(5)子域用户:计算机名:ip:10.10.88.22 255.255.255.0默认网关:10.10.88.1首选dns服务器:10.10.88.6外网ip:(6)财务部电脑:ip:10.10.99.22 255.255.255.0默认网关:10.10.99.1DNS:10.10.99.5ip:172.16.5.2 255.255.255.0默认网关:172.16.5.1DNS:172.16.5.2(7)财务部存放核心资料:IP:172.16.5.5子网掩码:255.255.255.0网关:172.16.5.1DNS1:172.16.5.2二、搭建主域:1.设置ip2.点击服务器管理器–>添加角色和功能–>下一步–>选择基于角色或基于功能的安装之后点击下一步–>下一步3.勾选Active Directory 域服务–>点击添加功能–>下一步4.直到确认这步点击安装等待5.成功安装之后点击将此服务器提升为域控制器6.选择添加新林–>并定义根域名–>下一步7.直接点击下一步8.检查此计算机是否满足安装AD 域服务器的条件,满足可点击安装最后重启计算机即可!创建域普通用户:1.配置IP:2.点击计算机–>右键属性更改–>加入主域–>点击确定,输入主域的账户名与密码为:administrator bing (123)三、搭建子域1.配置IP:2.点击添加角色功能和向导选择ad域服务(与上一步相似)3.开始配置选择将域添加到现有林4.点默认下一步…直到安装界面点击安装5.安装成功之后自动重启计算机创建子域用户:1.配置IP:2.点击我的电脑右键属性–>选择域3.加入成功:四、搭建辅域1.安装完子域之后,为避免出现单点故障,需要再部署一台辅域控制器为备用配置ip:2.先与主域用户配置同样的方法(加入域):3.点击服务器管理器–>添加角色和功能–>与搭建子域操作类似,添加域服务4.点击下一步直到等待安装5.点击提升为域控制器:6.这里将域控制器添加到现有的域,凭证为主域的用户名和密码7.这里都为默认,填写完密码进行下一步8.路径都为默认,直接下一步9.先决条件成功之后直接安装即可10.最后辅域控服务器重启后检查DNS服务器是否已获取到主域控制器传输过来的DNS服务器配置,检查正常后需要把辅域控制器的DNS服务器_和的起始授权机构(S○A)区域传送设置成允许。
8Windows Server 2016磁盘管理
7/33
基本磁盘与动态磁盘
基本磁盘
包含主磁盘分区、扩展磁盘分区或逻辑分区的物理磁盘
动态磁盘特点
可扩展性 高读写性能 高可靠性
8/33
小结
请思考
计算机文件在存储介质上的组织是由什么管理的? 计算机分区方式有哪些? Windows动态磁盘有什么特点?
9/33
初始化磁盘
联机
只有磁盘处于联机状态时才能对其初始化
Windows磁盘管理
磁盘管理概述 Windows磁盘管理
分区方式
基本磁盘与Windows动 态磁盘
联机和初始化磁盘
新建卷
管理卷 使用卷
22/33
课堂练习
课堂练习提问与讲解
23/33
课后作业
必做
教员填写
选做
教员填写
作业
教员备课时根据班级情况在此添加内容,应区分必做、选做内容,以 满足不同层次学员的需求
包含引导程序和分区表 分区表中存储着硬盘的每个分区的信息 每块硬盘至多可以划分4个分区 划分更多分区时可对某一分区进行扩展
分区示意图
分区示意图
6/33
分区方式2-2
GPT (GUID Patrition Table,GUID分区表)
支持每个磁盘上多于四个分区 Windows Server 2016最多可以划分128个分区
磁盘管理概述 Windows磁盘管理
分区方式
基本磁盘与Windows动 态磁盘
联机和初始化磁盘
新建卷
管理卷 使用卷
4/33
磁盘管理概述
文件在存储介质上的组织由文系统负责管理
FAT
NTFS
FAT文件系统
NTFS文件系统
系统中心2016版本数据中心和标准版本简介说明书
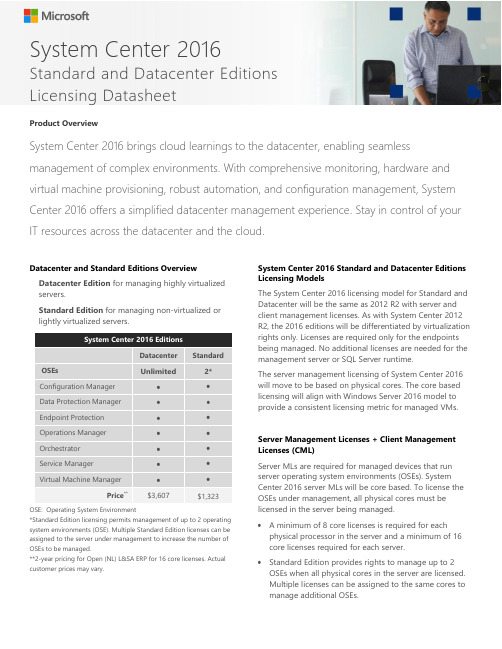
Datacenter and Standard Editions Overview Datacenter Edition for managing highly virtualized servers.Standard Edition for managing non-virtualized or lightly virtualized servers.System Center 2016 EditionsDatacenter Standard OSEs Unlimited 2*Configuration ManagerData Protection ManagerEndpoint ProtectionOperations ManagerOrchestratorService ManagerVirtual Machine ManagerPrice**$3,607 $1,323*Standard Edition licensing permits management of up to 2 operating system environments (OSE). Multiple Standard Edition licenses can be assigned to the server under management to increase the number of OSEs to be managed.**2-year pricing for Open (NL) L&SA ERP for 16 core licenses. Actual customer prices may vary. System Center 2016 Standard and Datacenter Editions Licensing ModelsThe System Center 2016 licensing model for Standard and Datacenter will be the same as 2012 R2 with server and client management licenses. As with System Center 2012 R2, the 2016 editions will be differentiated by virtualization rights only. Licenses are required only for the endpoints being managed. No additional licenses are needed for the management server or SQL Server runtime.The server management licensing of System Center 2016 will move to be based on physical cores. The core based licensing will align with Windows Server 2016 model to provide a consistent licensing metric for managed VMs.Server Management Licenses + Client Management Licenses (CML)Server MLs are required for managed devices that run server operating system environments (OSEs). System Center 2016 server MLs will be core based. To license the OSEs under management, all physical cores must be licensed in the server being managed.∙ A minimum of 8 core licenses is required for each physical processor in the server and a minimum of 16 core licenses required for each server.∙Standard Edition provides rights to manage up to 2 OSEs when all physical cores in the server are licensed.Multiple licenses can be assigned to the same cores to manage additional OSEs.System Center 2016Standard and Datacenter EditionsLicensing DatasheetProduct OverviewSystem Center 2016 brings cloud learnings to the datacenter, enabling seamless management of complex environments. With comprehensive monitoring, hardware and virtual machine provisioning, robust automation, and configuration management, System Center 2016 offers a simplified datacenter management experience. Stay in control of your IT resources across the datacenter and the cloud.System Center 2016Standard and Datacenter Editions Licensing Datasheet∙The price of 16 core licenses of System Center 2016 will be same price as the 2 proc license for the corresponding editions of System Center 2012 R2. CMLS: Client Management Licenses (CML) are required for managed devices that run non server OSEs. CMLs are available on a per OSE or per user basis. Configuration Manager, Endpoint Protection, and the Client Management Suite are sold as CMLs and server MLs.How to license System Center 2016 server management licenses by physical cores∙License all the physical cores in the server beingmanaged∙Minimum of 8 core licenses required for each procMinimum of 16 core licenses required for each server ∙Core licenses will be sold in packs of two**8 two-core packs will be the minimum required to license each physical server under management. The two-core pack for each edition is 1/8th the price of 16 cores for the 2016 editions.Move to Core-based Licensing∙Customers with processor licenses with SoftwareAssurance (SA) can upgrade to System Center 2016 at no additional cost. At end of the SA term, processor licenses will be exchanged for core licenses andcustomers can renew their SA on core licenses.∙System Center 2-proc licenses with SA will beexchanged for a minimum of 8 two-core pack licenses(16 core licenses) or the actual number of physicalcores in use on the server under management.∙At the end of agreement term, customers should do a self-inventory to document the number of physicalcores in each processor in use that are licensed withSystem Center processor licenses with SA. This willenable customers to receive the appropriate number of core licenses to continue deployments.∙Standard Edition licenses with SA assigned to fourproc servers managing more than 2 OSEs will receive license grants to cover the additional OSEs. If noinventory is done, grants of 16 core licenses (8 two-core packs) will be provided for each 2-proc licensewith SA.∙Customers in existing Microsoft license agreements,such as an Enterprise Agreement, will be able tocontinue to purchase processor licenses through the end of the term of the agreement.∙Customers can do self-inventory using the Microsoft Assessment Planning Toolkit, the Microsoft Software Inventory Logging Aggregator (new tool) or otherinventory tools and processes to achieve a time/date stamped inventory of hardware.Hybrid management with Software AssuranceAll System Center 2016 server management licenseswith active Software Assurance qualify for LicenseMobility through the Software Assurance benefits.Server MLs can be assigned to manage OSEs running in public cloud infrastructure. SA on a StandardEdition license permits management of 2 OSEs andSA on a Datacenter Edition licenses permitsmanagement of 10 OSEs in the cloud. Licenses for 16 physical cores will be required for the license mobility SA benefit.©2015 Microsoft Corporation. All rights reserved. This document is for informational purposes only. Microsoft makes no warranties, express or implied, in this summary. For more information on System Center 2016, please visit -Cloud Platform-System Center 2016.。
win server 2016操作手册

win server 2016操作手册Windows Server 2016是微软推出的一款服务器操作系统,具有强大的功能和高度可靠性。
本操作手册将详细介绍Windows Server 2016的安装、配置和管理等各方面内容,以帮助用户更好地理解和使用该操作系统。
一、安装1.准备工作:在安装Windows Server 2016之前,需要准备一台满足最低硬件要求的服务器,并确保已备份重要数据。
此外,还需准备安装介质或ISO镜像文件,以及有效的产品密钥。
2.安装步骤:(1)将安装介质或挂载ISO镜像文件到服务器上。
(2)启动服务器,并从引导菜单中选择安装选项。
(3)选择安装语言、货币和键盘布局等设置。
(4)阅读并接受许可协议。
(5)选择安装类型(如标准安装或核心安装)。
(6)选择磁盘分区和目标位置。
(7)等待安装过程完成。
二、配置1.域名系统(DNS)配置:(1)选择“开始”菜单中的“管理工具”。
(2)找到“服务器管理器”并打开。
(3)在左侧导航栏中选择“角色”或“功能”,然后点击“添加角色”或“添加功能”。
(4)在“选择安装类型”中选择“基于角色或基于功能的安装”。
(5)在“选择服务器”中选择当前服务器,并点击“下一步”。
(6)在“选择角色”或“选择功能”中选择“DNS服务器”。
(7)根据需求配置DNS服务器的选项。
(8)完成配置,并等待安装过程完成。
2.网络适配器配置:(1)选择“开始”菜单中的“控制面板”。
(2)找到并打开“网络和共享中心”。
(3)点击“更改适配器设置”。
(4)找到当前使用的网络适配器,并右键点击选择“属性”。
(5)选中“Internet协议版本4 (TCP/IPv4)”或“Internet协议版本6 (TCP/IPv6)”。
(6)点击“属性”并根据需求进行配置。
(7)点击“确定”并保存设置。
三、管理1.服务器管理器:(1)打开“服务器管理器”。
(2)在左侧导航栏中选择相应功能,如“文件和存储服务”或“远程桌面服务”等。
- 1、下载文档前请自行甄别文档内容的完整性,平台不提供额外的编辑、内容补充、找答案等附加服务。
- 2、"仅部分预览"的文档,不可在线预览部分如存在完整性等问题,可反馈申请退款(可完整预览的文档不适用该条件!)。
- 3、如文档侵犯您的权益,请联系客服反馈,我们会尽快为您处理(人工客服工作时间:9:00-18:30)。
Windows-Server2016分层存储技术详细拆解手册
目录
1.概述 (3)
1.1本次部署测试的目的 (3)
1.2本次测试内容 (3)
1.3前期环境的准备 (3)
1.4分层存储技术拓扑 (3)
2.创建存储池 (4)
3.创建虚拟磁盘 (9)
4.创建卷 (15)
5.存储层优化及报表查看 (19)
6.实验目的的验证及最佳实践 (23)
6.1分层存储技术对数据读写速率的提升 (23)
6.2Windows Server分层存储技术到底是不是缓存技术 (23)
6.3Windows Server分层存储技术可否脱离硬RAID (24)
6.4Windows Server分层存储技术的最佳实践 (24)
7.测试总结 (25)
1.概述
本次测试目的是为测试Windwos Server 中存储池及分层存储技术的实现方法。
实现基于本地存储及SSD高性能磁盘完成对冷热数据的分层存储,以提高业务系统I/O效率。
通过Windwos Server存储池及文件服务器角色,配置存储分层管理。
物理服务器及数量操作系统及配置用途
服务器 *1安装Server 2016,配置文件服务器角色用于创建分层存储
本次实验的Disk均为硬RAID之后的磁盘,若不采用硬RAID,选择使用Mirror模式可用性与硬RAID一致。
Mirror的前提条件后面的实验结果会有详细描述。
2.创建存储池
1)服务器需要安装“文件服务器角色”,“文件服务器资源管理器”角色为可选:
2)本次实验通过为虚拟机添加额外硬盘来模拟实际使用中的SSD与HDD,其中
50GB分区模拟已通过硬件做了Raid1的SSD;100GB分区模拟已通过硬件做了
Raid的HDD分区。
操作系统分区需要使用独立的一块磁盘(建议仍然使用硬
Raid1):
3)浏览当前磁盘状态:
4)新建存储池:
5)填写存储池的名称并下一步:
6)选择存储池的物理磁盘:
7)确认信息并点击创建:
8)等待存储池创建完成:
9)通过PowerShell将硬盘的类型强制修改为SSD或HDD,否则将无法启用分层
存储技术:
3.创建虚拟磁盘
1)首先通过“重新扫描存储”刷新当前存储池下的磁盘信息:
2)在物理磁盘选项卡页面,查看当前存储池中的磁盘类型,由于本实验的SSD为
硬RAID1,HDD为硬RAID5;所以在这里看到只有一个SSD和1个HDD,(若
完全抛开硬件Raid,这里的磁盘需要至少2块SSD及3块HDD):
3)右键单击创建好的存储池“Storage”,选择“新建虚拟磁盘”:
4)确认存储池信息:
5)指定虚拟磁盘的名称,并勾选“在此虚拟磁盘上创建存储层”:
6)由于本次实验均使用本地存储,所以无法使用机箱感知:
7)选择”Simple”布局,因为本实验中的所有分区均已完成硬件Raid,无需采用
Mirror模式,避免空间的浪费:
8)类型默认”固定”:
9)这里我们手动指定更快层与标准层的大小,因为虚拟磁盘需要额外的空间完成回
写缓存,否则将创建失败,本次实验预留4GB左右的空间:
10)确认信息,点击”创建”:
11)完成虚拟磁盘的创建,并启用了”分层存储技术”:
4.创建卷
1)在启用了”分层存储技术”的虚拟磁盘上,创建卷:
2)选择刚刚已创建的虚拟磁盘,容量为SSD(45GB)+HDD(95GB):
3)确认卷大小,并点击”下一步”
4)为新创建的卷分配驱动器号:
5)设置卷标:
6)确定信息并单击”创建”:
7)完成卷的创建:
8)本次实验的快速层为45GB,所以拷贝了60GB的数据到新建卷E:\ ,为的是测
试出当数据量超出快速存储层以后,是否会将冷热数据区分开存放:
5.存储层优化及报表查看
1)在启用了分层存储技术后,会自动创建存储分层管理的计划任务,默认凌晨
1点开始执行,每4小时执行一次,目的是自动计算数据热度并完成迁移:
2)同样,使用PowerShell同样可以对此任务完成管理:
3)手动执行一次,并观察运行情况:
4)设置存储层优化计划任务运行时报表的输出路径:
区,查看当前状态的报表信息:
6)查询当前存储层的信息:
7)手动设置将某一个目录或文件固定在快速存储层中:
Set-FileStorageTier -FilePath <filepath>-DesiredStorageTierFriendlyName <tierfriendlyname>
8)验证已固定的文件是否在快速存储层:
9)手动将某一个目录或文件取消在快速存储层中的固定:
Clear-FileStorageTier -FilePath <filepath>
6.实验目的的验证及最佳实践
以下是国外技术达人对速度进行的测试,File1~3均为同一个文件的3个副本:
File1为100%存储在SSD上的文件;
File2为100%存储在HDD上的文件;
File3为部分存储在SSD(快速存储层)上的文件;
以上速率测试结果仅供参考,使用了分层存储技术的File3整体的读写速度较纯HDD存储的File2有着显著的提高。
“Windows Server分层存储技术”并非一种单纯缓存技术,因为分层存储区无论是快速层还是标准层均是数据的存储载体。
“Sim p le”模式的最终使用容量=快速存储区容量+标准存储区容量;快速存储分区也是数据存储的载体,并非纯缓存;即快速存储区若为1块非物理RAID后的SSD,损坏后即丢失所有此分区上的数据。
所以本实验中对SSD分区的描述,均是硬RAID1以后的SSD分区。
“Mirror”模式要求在“磁盘管理”中能识别的SSD分区(快速存储区)至少2个,在“磁盘管理”中能识别的HDD分区(标准存储区)至少2个,否则无法启用“分层存储技术”。
“Parity”模式无法应用于启用了“分层存储技术”的虚拟磁盘上。
综上, Windows Server分层存储技术是对数据块进行分析,将热数据迁移到读写更快的SSD快速存储分区之上,是一种数据存储技术,而非缓存。
区别就是缓存可以损坏,但存储损坏即数据丢失。
可以,Windows Server分层存储技术是完全可以脱离物理RAID而单独使用的技术,生产环境中建议3块以上SSD+3块以上HDD,采用“Mirror”模式并启用“分层存储技术”。
不过软RAID必然会占用系统资源,稳定性未知。
建议将此技术建立在应RAID基础之上,采用Simple模式;
操作系统分区务必安装在物理RAID分区之上,且建议不要与存放数据的分区共享物理磁盘。
否则当操作系统故障无法修复时,恢复存储池及虚拟磁盘较为困难。
7.测试总结
本次实验只是针对此项存储技术完成实验并论证,未对实际使用速率测试。
Windows Server分层存储技术是对数据块进行分析,将热数据迁移到读写更快的SSD快速存储分区之上,是一种数据存储技术,而非缓存技术。
区别就是缓存可以接收损坏,但存储损坏即数据丢失。
以下内容摘录自官方文档:
If you're using tiered storage spaces in Windows Server, Windows is automatically optimizing your storage performance by transparently moving the data that's accessed most frequently to your faster solid-state drives (the SSD tier) and switching out less active data to your less expensive hard disk drives (the HDD tier).。